
📝 21 Apr 2021
UPDATE: Rust on BL602 is now simpler with Rust Wrapper for BL602 IoT SDK. Check out the new article
In the past 14 articles we’ve done so much with BL602 IoT SDK: LoRa wireless transceivers, SPI LCD displays, UART e-ink displays, I2C sensors, …
Can we do this in Rust? (Instead of C)
And flash our Rust firmware to BL602 over UART? (Instead of JTAG)
Let’s run some Rust code on top of BL602 IoT SDK, and understand how that’s possible.
Today we won’t be talking about the merits (and demerits) of Embedded Rust, we’ll save that for the future.
But if you have the tiniest interest in coding Rust firmware for BL602… Please read on!
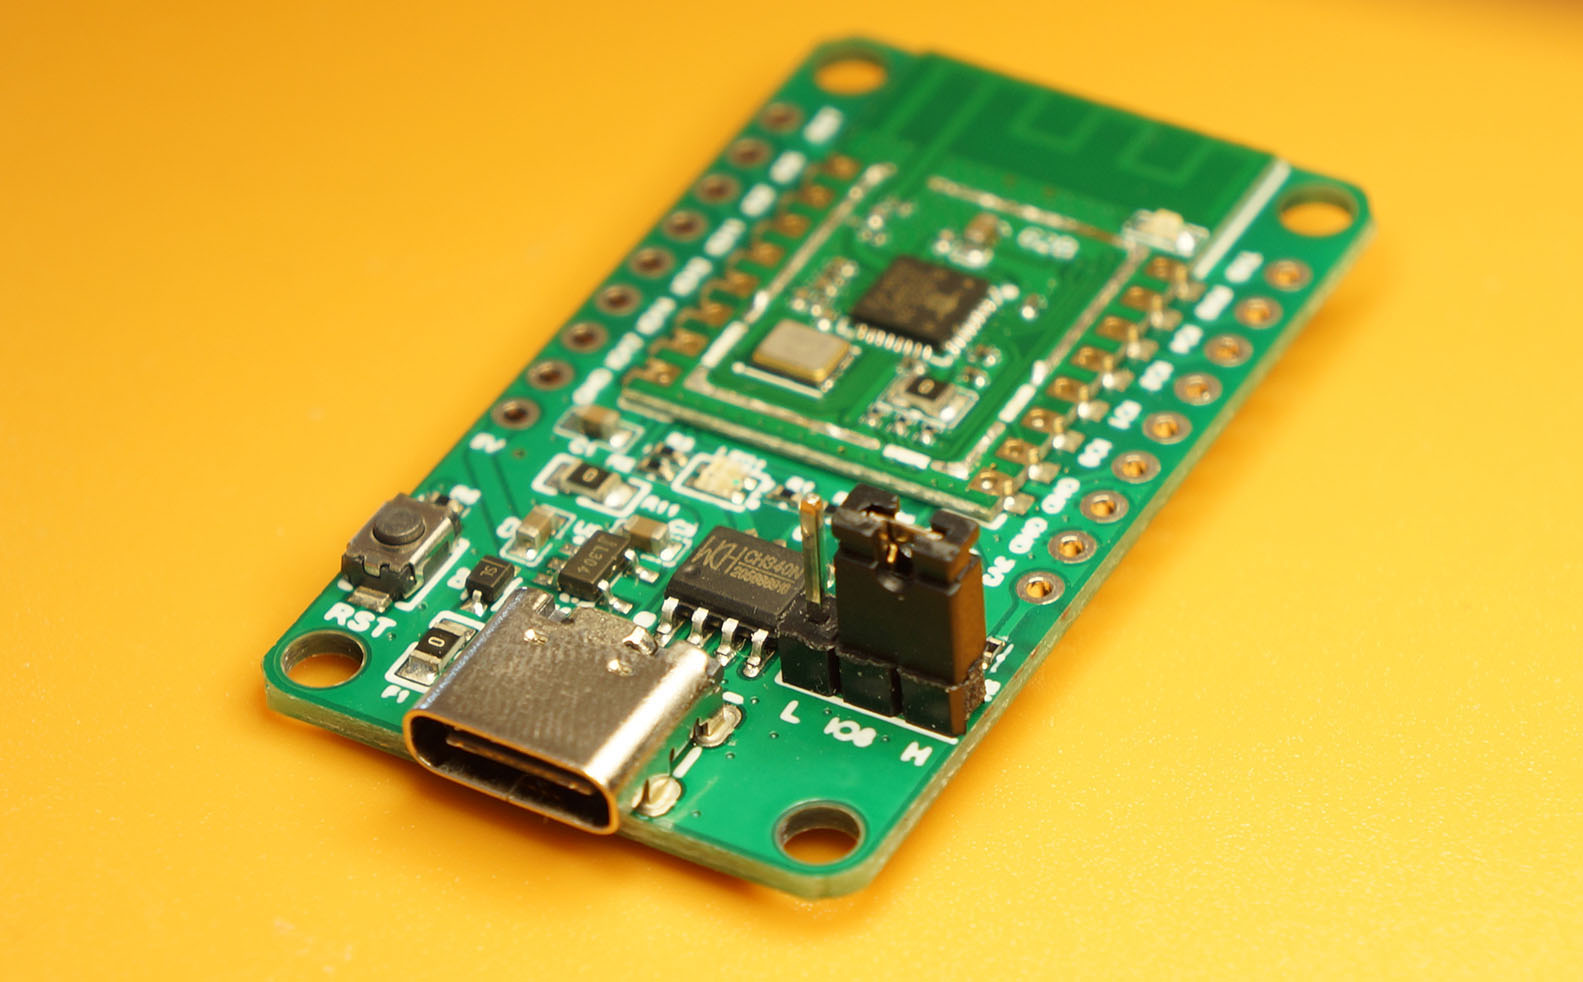
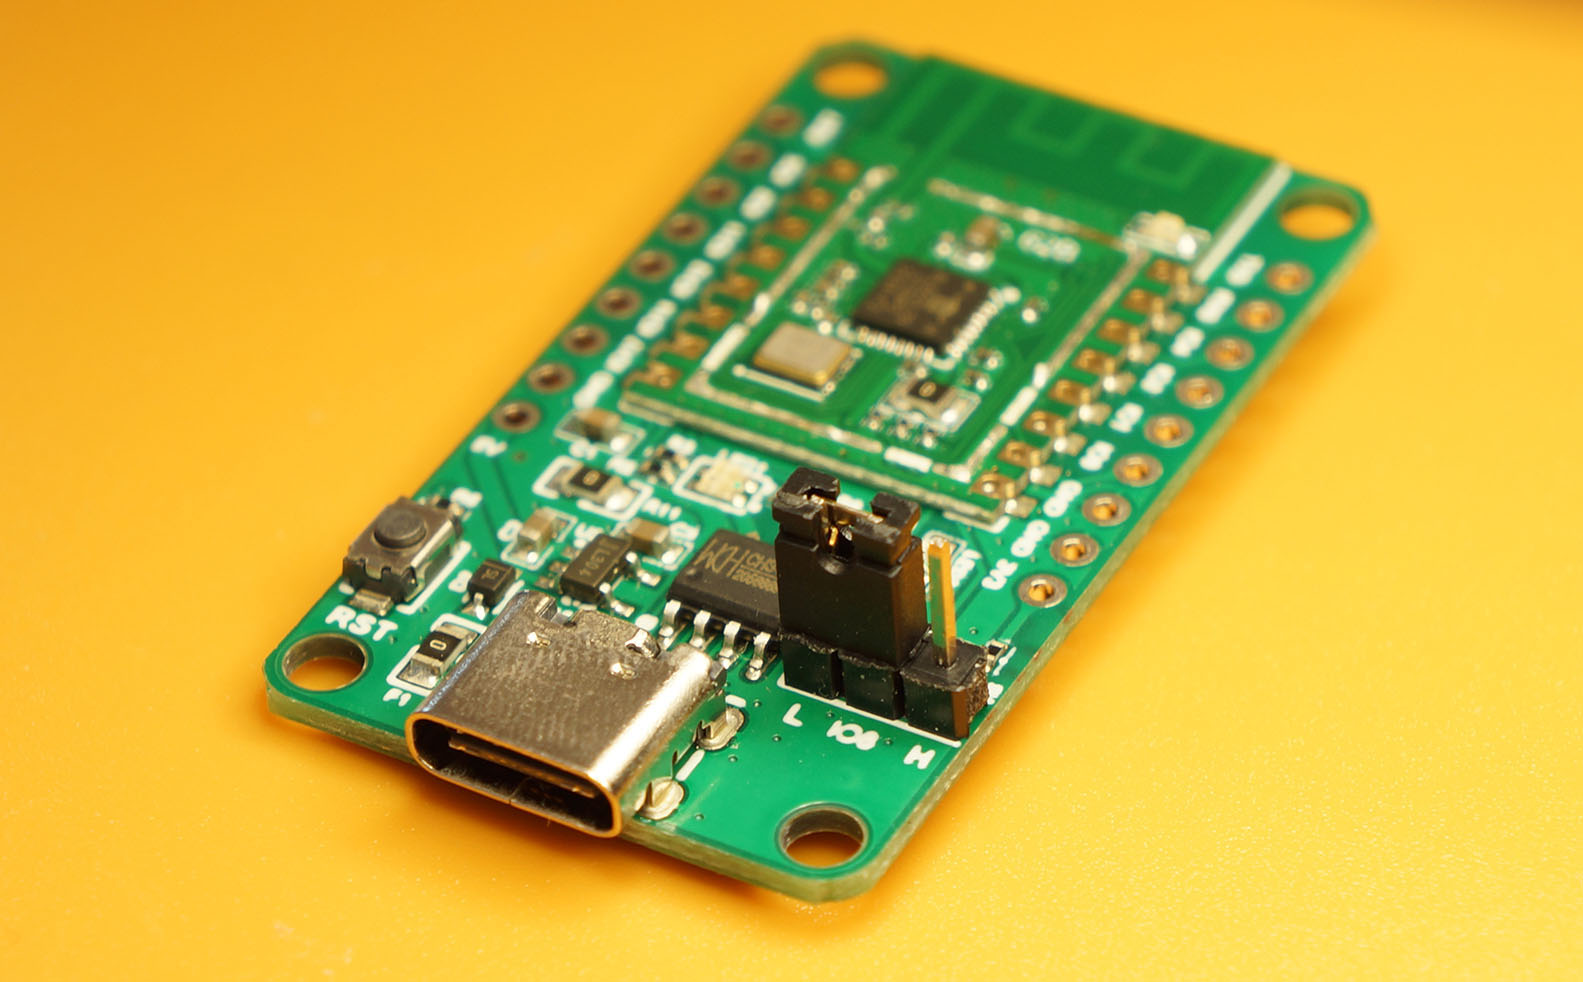
PineCone BL602 RISC-V Board
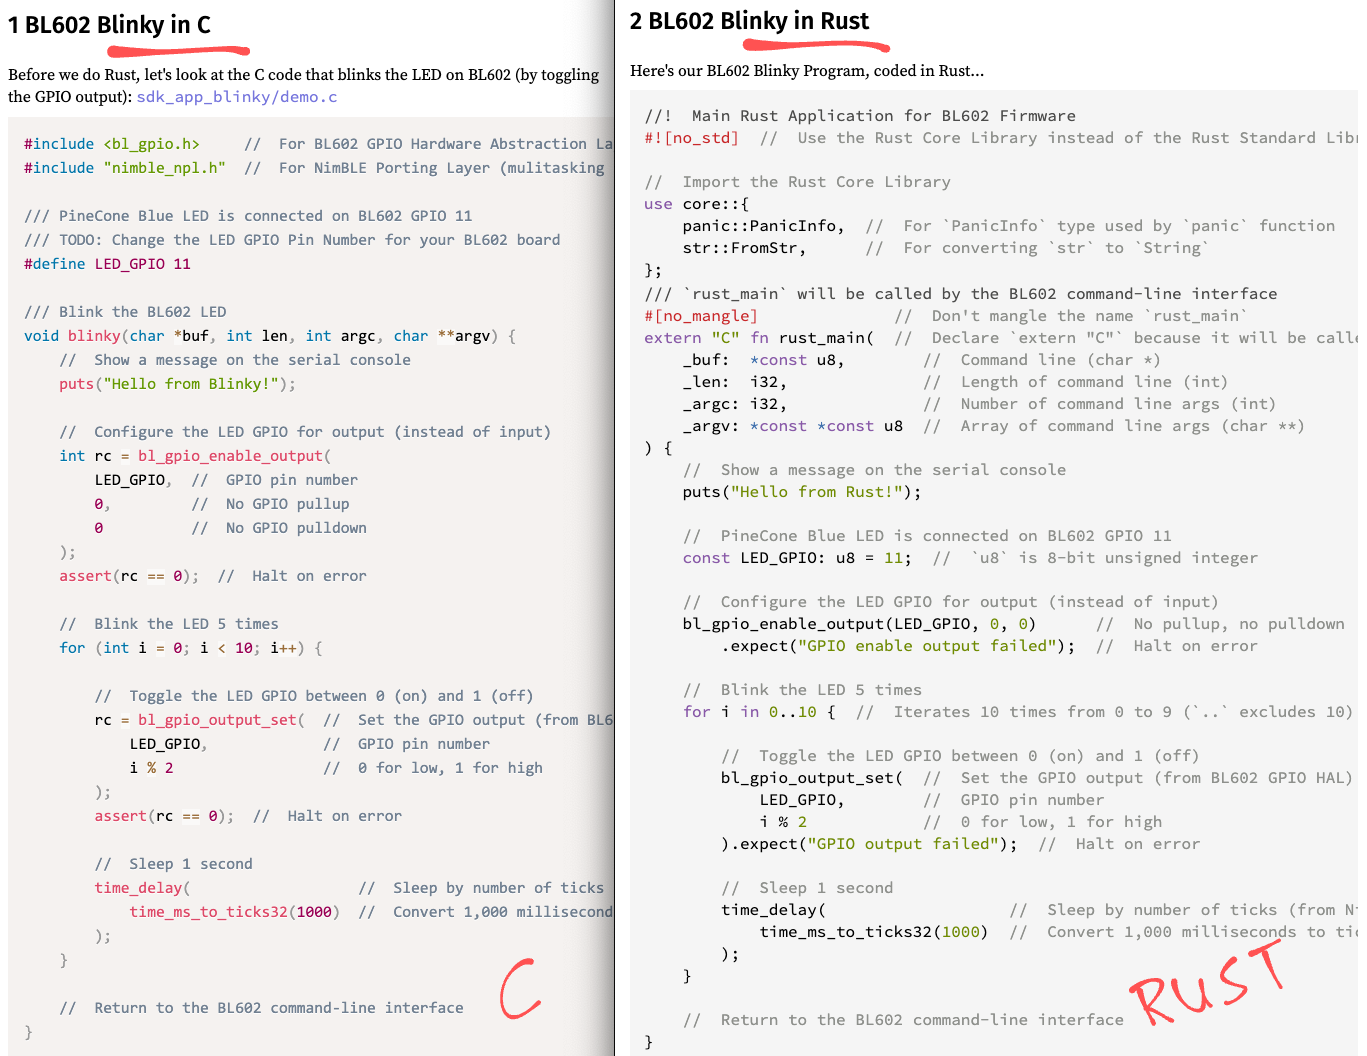
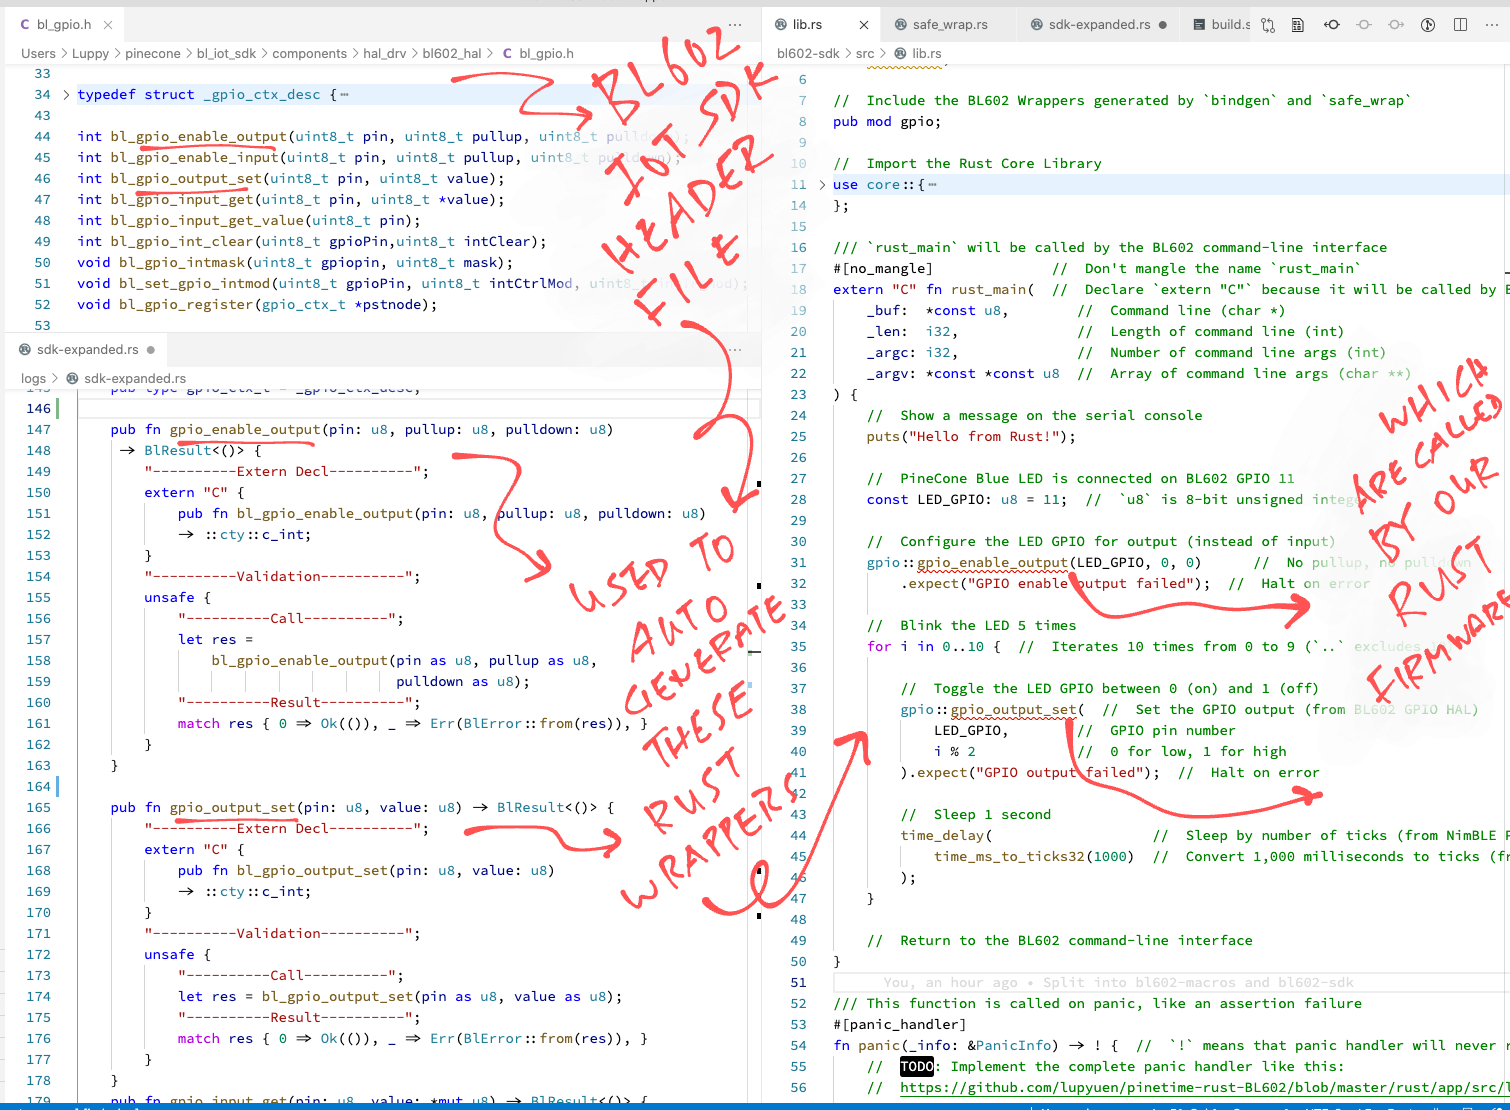
Before we do Rust, let’s look at the C code that blinks the LED on BL602 (by toggling the GPIO output): sdk_app_blinky/demo.c
#include <bl_gpio.h>     //  For BL602 GPIO Hardware Abstraction Layer
#include "nimble_npl.h"  //  For NimBLE Porting Layer (mulitasking functions)

/// PineCone Blue LED is connected on BL602 GPIO 11
/// TODO: Change the LED GPIO Pin Number for your BL602 board
#define LED_GPIO 11

/// Blink the BL602 LED
void blinky(char *buf, int len, int argc, char **argv) {
    //  Show a message on the serial console
    puts("Hello from Blinky!");

    //  Configure the LED GPIO for output (instead of input)
    int rc = bl_gpio_enable_output(
        LED_GPIO,  //  GPIO pin number
        0,         //  No GPIO pullup
        0          //  No GPIO pulldown
    );
    assert(rc == 0);  //  Halt on error

    //  Blink the LED 5 times
    for (int i = 0; i < 10; i++) {

        //  Toggle the LED GPIO between 0 (on) and 1 (off)
        rc = bl_gpio_output_set(  //  Set the GPIO output (from BL602 GPIO HAL)
            LED_GPIO,             //  GPIO pin number
            i % 2                 //  0 for low, 1 for high
        );
        assert(rc == 0);  //  Halt on error

        //  Sleep 1 second
        time_delay(                   //  Sleep by number of ticks (from NimBLE Porting Layer)
            time_ms_to_ticks32(1000)  //  Convert 1,000 milliseconds to ticks (from NimBLE Porting Layer)
        );
    }

    //  Return to the BL602 command-line interface
}
Here we call two GPIO Functions from the BL602 IoT SDK (specifically, the BL602 GPIO Hardware Abstraction Layer)…
bl_gpio_enable_output: Configure a GPIO Pin for output (instead of input)
bl_gpio_output_set: Set the GPIO Pin output to high or low
Instead of calling the Multitasking Functions in FreeRTOS, we call the NimBLE Porting Layer (which wraps FreeRTOS into a simpler API)…
time_delay: Put the current FreeRTOS task to sleep (for a number of system ticks)
time_ms_to_ticks32: Convert milliseconds to FreeRTOS system ticks
Now let’s code-switch to Rust.
More about NimBLE Porting Layer
Here’s our BL602 Blinky Firmware, coded in Rust: rust/src/lib.rs
//!  Main Rust Application for BL602 Firmware
#![no_std]  //  Use the Rust Core Library instead of the Rust Standard Library, which is not compatible with embedded systems

//  Import the Rust Core Library
use core::{
    panic::PanicInfo,  //  For `PanicInfo` type used by `panic` function
    str::FromStr,      //  For converting `str` to `String`
};
First we tell the Rust Compiler to use the Rust Core Library.
(Instead of the Rust Standard Library, which is too heavy for microcontrollers)
We import PanicInfo and FromStr to handle Errors and String Conversion. (We’ll see later)
Our Rust Blinky Function looks similar to the C version: lib.rs
/// `rust_main` will be called by the BL602 command-line interface
#[no_mangle]              //  Don't mangle the name `rust_main`
extern "C" fn rust_main(  //  Declare `extern "C"` because it will be called by BL602 firmware
    _buf:  *const u8,        //  Command line (char *)
    _len:  i32,              //  Length of command line (int)
    _argc: i32,              //  Number of command line args (int)
    _argv: *const *const u8  //  Array of command line args (char **)
) {
    //  Show a message on the serial console
    puts("Hello from Rust!");

    //  PineCone Blue LED is connected on BL602 GPIO 11
    const LED_GPIO: u8 = 11;  //  `u8` is 8-bit unsigned integer

    //  Configure the LED GPIO for output (instead of input)
    bl_gpio_enable_output(LED_GPIO, 0, 0)      //  No pullup, no pulldown
        .expect("GPIO enable output failed");  //  Halt on error
When code-switching from C to Rust we consciously…
Rename the Types: “int” in C becomes “i32” in Rust (32-bit signed integer)
Flip the Declarations: “typename varname” in C becomes “varname: typename” in Rust
Change Assertions to Expect: “assert” in C becomes “expect” in Rust. (More about this later)
The rest of the Rust function looks similar to C…
    //  Blink the LED 5 times
    for i in 0..10 {  //  Iterates 10 times from 0 to 9 (`..` excludes 10)

        //  Toggle the LED GPIO between 0 (on) and 1 (off)
        bl_gpio_output_set(  //  Set the GPIO output (from BL602 GPIO HAL)
            LED_GPIO,        //  GPIO pin number
            i % 2            //  0 for low, 1 for high
        ).expect("GPIO output failed");  //  Halt on error

        //  Sleep 1 second
        time_delay(                   //  Sleep by number of ticks (from NimBLE Porting Layer)
            time_ms_to_ticks32(1000)  //  Convert 1,000 milliseconds to ticks (from NimBLE Porting Layer)
        );
    }

    //  Return to the BL602 command-line interface
}
(Yep the for loop looks a little different in Rust)
For Embedded Rust we need to include a Panic Handler that will handle errors (like Expect / Assertion Failures): lib.rs
/// This function is called on panic, like an assertion failure
#[panic_handler]
fn panic(_info: &PanicInfo) -> ! {  //  `!` means that panic handler will never return
    //  TODO: Implement the complete panic handler like this:
    //  https://github.com/lupyuen/pinetime-rust-mynewt/blob/master/rust/app/src/lib.rs#L115-L146

    //  For now we display a message
    puts("TODO: Rust panic");

	//  Loop forever, do not pass go, do not collect $200
    loop {}
}
We’re not done with Rust yet! Let’s find out how we import the BL602 IoT SDK (and NimBLE Porting Library) into Rust.
Here’s our code switching from C to Rust so far…
UPDATE: Rust on BL602 is now simpler with Rust Wrapper for BL602 IoT SDK. Check out the new article
As we import the functions from BL602 IoT SDK into Rust, let’s create Wrapper Functions that will expose a cleaner, neater interface to our Rust callers.
We start with bl_gpio_output_set, the function from BL602 GPIO HAL (Hardware Abstraction Layer) that sets the GPIO Pin output: lib.rs
/// Set the GPIO pin output to high or low.
fn bl_gpio_output_set(
    pin:   u8,  //  GPIO pin number (uint8_t)
    value: u8   //  0 for low, 1 to high
) -> Result<(), i32> {  //  Returns an error code (int)
The C version of bl_gpio_output_set returns an int result code (0 for success, non-zero for error)…
Why does the Rust version return Result<(),i32>?
Because Result<...> lets us return a meaningful result to our Rust caller…
Ok: For success
Err: For error code
This makes the error handling easier (with expect). We’ll see the returned result in a while.
Inside the wrapper, we import the C function like so…
    extern "C" {  //  Import C Function
        /// Set the GPIO pin output to high or low (from BL602 GPIO HAL)
        fn bl_gpio_output_set(pin: u8, value: u8) -> i32;
    }
Next our wrapper calls the imported C function…
    //  Call the C function
    let res = unsafe {  //  Flag this code as unsafe because we're calling a C function
        bl_gpio_output_set(pin, value)
    };
Rust requires us to flag this code as unsafe because we’re calling a C function.
Finally we match the result returned by the C function: 0 for success, non-zero for error…
    //  Check the result code
    match res {
        0 => Ok(()),   //  If no error, return OK
        _ => Err(res)  //  Else return the result code as an error
    }
}“match” works like “switch...case” in C. (“_” matches anything, similar to “default” in C)
Here we return Ok for success, or Err with an error code inside.
When our Rust caller receives Err, the expect error checking will fail with a panic.
Strings are terminated by null in C, but not in Rust.
(Rust strings have an internal field that remembers the string length)
To pass strings from C to Rust, our wrapper needs to copy the string and pad it with null. Here’s how: lib.rs
/// Print a message to the serial console.
/// `&str` is a reference to a string slice, similar to `const char *` in C
fn puts(s: &str) -> i32 {
Our wrapper for puts accepts a string and returns an int.
“&str” is a Reference to a String Slice. It’s similar to “const char *” in C.
We import the puts function from BL602 IoT SDK (stdio library)…
    extern "C" {  //  Import C Function
        /// Print a message to the serial console (from C stdio library)
        fn puts(s: *const u8) -> i32;
    }
When importing “const char *” from C, we rewrite it as “*const u8” (const pointer to unsigned byte).
Next we make a copy of the input string…
    //  Convert `str` to `String`, which similar to `char [64]` in C
    let mut s_with_null = String::from_str(s)  //  `mut` because we will modify it
.expect("puts conversion failed"); // If it exceeds 64 chars, halt with an error“String” is similar to “char[64]” in C.
Here we create a “String” (instead of “&str”) because “String” will allocate storage (on the stack) to hold the copied string.
If our input string exceeds 64 characters, the copying fails with an error.
(More about “String” in a while)
    //  Terminate the string with null, since we will be passing to C
    s_with_null.push('\0')
        .expect("puts overflow");  //  If we exceed 64 chars, halt with an error
Here we pad the copied string with null.
This also fails with an error if the padded string exceeds 64 characters.
Finally we fetch the pointer to our null-terminated string, and pass it to the C function…
    //  Convert the null-terminated string to a pointer
    let p = s_with_null.as_str().as_ptr();

    //  Call the C function
    unsafe {  //  Flag this code as unsafe because we're calling a C function
        puts(p)
    }

    //  No semicolon `;` here, so the value returned by the C function will be passed to our caller
}
String is a custom heapless string type that’s allocated on the stack or static memory. (Instead of heap memory)
We define String in lib.rs…
/// Limit Strings to 64 chars, similar to `char[64]` in C
type String = heapless::String::<heapless::consts::U64>;
For safety, we limit our strings to 64 characters.
String uses the heapless library, as specified in rust/Cargo.toml…
## External Rust libraries used by this module.  See crates.io.
[dependencies]
## `static` friendly data structures that don't require dynamic memory allocation: https://crates.io/crates/heapless
heapless = "0.6.1"
We’re copying the string just to pad it with null. Not so efficient no?
In future we might switch to cstr and eliminate the copying of strings. (See this)
UPDATE: Rust on BL602 is now simpler with Rust Wrapper for BL602 IoT SDK. Check out the new article
Sure looks like a lot of repetitive work to create the Wrapper Functions… When we import the entire BL602 IoT SDK?
Someday we shall automatically generate the Wrapper Functions for the entire BL602 IoT SDK.
We’ll do that with the bindgen tool, helped by a Rust Procedural Macro.
We’ve previously done this to import the LVGL graphics library and Apache Mynewt OS functions into Rust…
In short: We shall run a script that will scan the *.h header files from the BL602 IoT SDK and create the wrapper functions we’ve seen earlier. Yes it’s possible!
(Here’s a sneak peek of bl602-rust-wrapper)
Our Rust Firmware accesses the BL602 serial port, GPIO pin and system timer by calling the BL602 IoT SDK. (Imported from C into Rust)
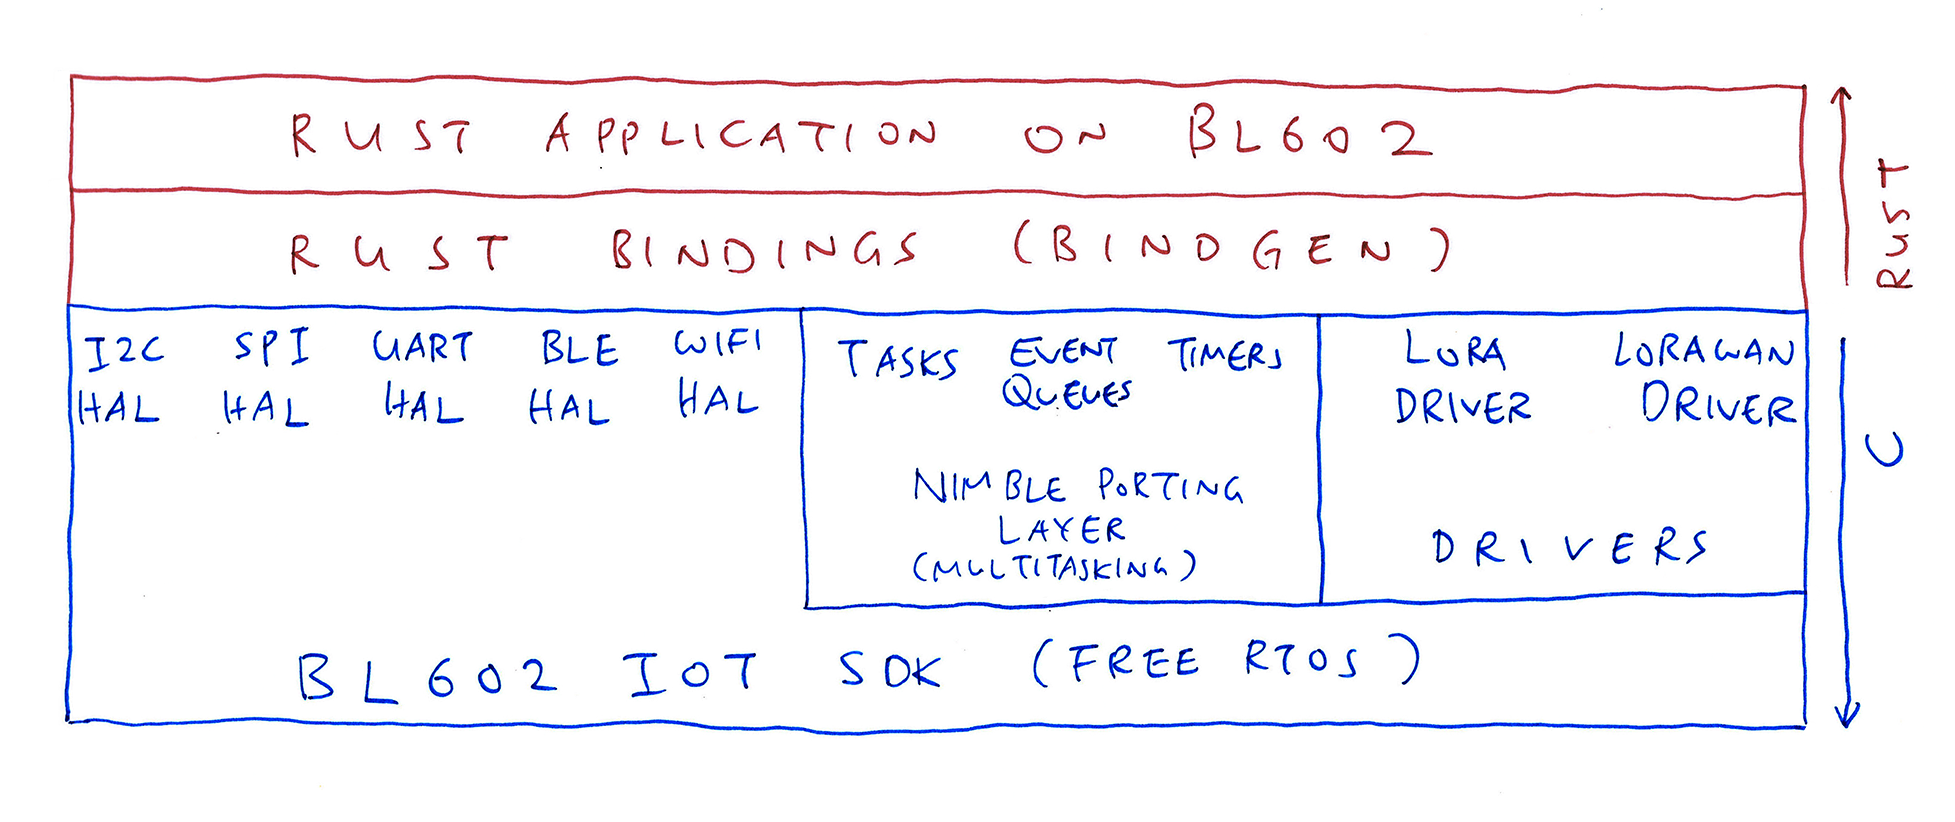
Strictly speaking this isn’t Embedded Rust, because we’re not running Rust directly on Bare Metal (BL602 Hardware).
Instead we’re running Rust on top of an Embedded Operating System (BL602 IoT SDK + FreeRTOS). It’s similar to running Rust on Linux / macOS / Windows.
That’s why we compile our Rust code into a static library that will be linked into the BL602 Firmware. See rust/Cargo.toml…
## Build this module as a Rust library,
## not a Rust application.  We will link
## this library with the BL602 firmware.
[lib]
## Output will be named `libapp.a`
name       = "app"
crate-type = ["staticlib"]
This produces a BL602 Rust Firmware file that we may flash to BL602 the conventional way: Over the BL602 Serial / UART Port.
(We’ll talk later about Embedded Rust on Bare Metal BL602)
UPDATE: Rust on BL602 is now simpler with Rust Wrapper for BL602 IoT SDK. Check out the new article
Here are the steps to build the BL602 Rust Firmware sdk_app_rust.bin…
Install rustup, blflash and xpack-riscv-none-embed-gcc…
Download the source code for the BL602 Rust Firmware…
## Download the master branch of lupyuen's bl_iot_sdk
git clone --recursive --branch master https://github.com/lupyuen/bl_iot_sdk
cd bl_iot_sdk/customer_app/sdk_app_rust
Edit the script run.sh in the sdk_app_rust folder.
This build script was created for macOS, but can be modified to run on Linux and Windows (with WSL).
In run.sh, set the following variables to the downloaded folders for blflash and xpack-riscv-none-embed-gcc…
##  Where blflash is located
export BLFLASH_PATH=$PWD/../../../blflash

##  Where GCC is located
export GCC_PATH=$PWD/../../../xpack-riscv-none-embed-gcc
Save the changes into run.sh
Build the firmware…
./run.shWe should see…
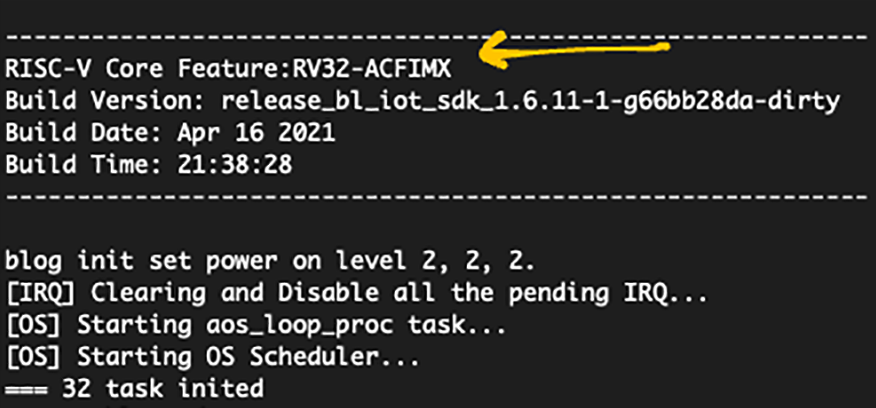
----- Building Rust app and BL602 firmware for riscv32imacf-unknown-none-elf / sdk_app_rust...

----- Build BL602 Firmware
+ make
...
LD build_out/sdk_app_rust.elf
Generating BIN File to build_out/sdk_app_rust.bin
...
Building Finish. To flash build output.
The script has built our firmware… C only, no Rust yet.
Next the script compiles our Rust code into a static library: libapp.a
----- Build Rust Library
+ rustup default nightly

+ cargo build \
    --target ../riscv32imacf-unknown-none-elf.json \
    -Z build-std=core

Updating crates.io index
Compiling compiler_builtins v0.1.39
Compiling core v0.0.0
...
Compiling app v0.0.1
Finished dev [unoptimized + debuginfo] target(s) in 29.47s
Yep this command looks odd… It’s compiling our Rust code with a JSON target file! (riscv32imacf-unknown-none-elf.json)
We’ll learn why in a while.
The script overwrites the Stub Library in our firmware build (librust-app.a) by the Rust static library (libapp.a)
+ cp rust/target/riscv32imacf-unknown-none-elf/debug/libapp.a \
    build_out/rust-app/librust-app.a
Finally the script links the Rust static library into our BL602 firmware…
----- Link BL602 Firmware with Rust Library
+ make
use existing version.txt file
LD build_out/sdk_app_rust.elf
Generating BIN File to build_out/sdk_app_rust.bin
...
Building Finish. To flash build output.
Ignore the error from blflash, we’ll fix this in a while.
Our BL602 Rust Firmware file has been generated at…
build_out/sdk_app_rust.binLet’s flash this to BL602 and run it!
Check out the complete build log here…
(See the Appendix for more about run.sh)
Here’s how we flash the Rust Firmware file sdk_app_rust.bin to BL602…
Set BL602 to Flashing Mode and restart the board…
For PineCone:
Set the PineCone Jumper (IO 8) to the H Position (Like this)
Press the Reset Button
For BL10:
Connect BL10 to the USB port
Press and hold the D8 Button (GPIO 8)
Press and release the EN Button (Reset)
Release the D8 Button
For Ai-Thinker Ai-WB2, Pinenut and MagicHome BL602:
Disconnect the board from the USB Port
Connect GPIO 8 to 3.3V
Reconnect the board to the USB port
For macOS:
Enter this at the command prompt…
./run.shThe script should automatically flash the firmware after building…
----- Flash BL602 Firmware

+ blflash flash build_out/sdk_app_rust.bin \
    --port /dev/tty.usbserial-1410 \
    --initial-baud-rate 230400 \
    --baud-rate 230400

Finished dev [unoptimized + debuginfo] target(s) in 0.97s
Running `target/debug/blflash flash sdk_app_rust.bin --port /dev/tty.usbserial-1410 --initial-baud-rate 230400 --baud-rate 230400`
Start connection...
5ms send count 115
handshake sent elapsed 145.949µs
Connection Succeed
Bootrom version: 1
Boot info: BootInfo { len: 14, bootrom_version: 1, otp_info: [0, 0, 0, 0, 3, 0, 0, 0, 61, 9d, c0, 5, b9, 18, 1d, 0] }
Sending eflash_loader...
Finished 1.6282326s 17.55KB/s
5ms send count 115
handshake sent elapsed 54.259µs
Entered eflash_loader
Skip segment addr: 0 size: 47504 sha256 matches
Skip segment addr: e000 size: 272 sha256 matches
Skip segment addr: f000 size: 272 sha256 matches
Erase flash addr: 10000 size: 118224
Program flash... bac8824299e4d6bb0cceb1f93323f43ae6f56500f39c827590eb011b057ec282
Program done 6.54650345s 17.64KB/s
Skip segment addr: 1f8000 size: 5671 sha256 matches
Success
(We might need to edit the script to use the right serial port)
For Linux and Windows:
Copy build_out/sdk_app_rust.bin to the blflash folder.
Then enter this at the command prompt…
## TODO: Change this to the downloaded blflash folder
cd blflash

## For Linux:
blflash flash build_out/sdk_app_lora.bin \
    --port /dev/ttyUSB0

## For Windows: Change COM5 to the BL602 Serial Port
blflash flash c:\blflash\sdk_app_lora.bin --port COM5Finally we run the BL602 Rust Firmware…
Set BL602 to Normal Mode (Non-Flashing) and restart the board…
For PineCone:
Set the PineCone Jumper (IO 8) to the L Position (Like this)
Press the Reset Button
For BL10:
For Ai-Thinker Ai-WB2, Pinenut and MagicHome BL602:
Disconnect the board from the USB Port
Connect GPIO 8 to GND
Reconnect the board to the USB port
For macOS:
The run.sh script should automatically launch CoolTerm after flashing…
----- Run BL602 Firmware
+ open -a CoolTermFor Linux:
Connect to BL602’s UART Port at 2 Mbps like so…
screen /dev/ttyUSB0 2000000For Windows:
Use putty (See this)
Alternatively:
Use the Web Serial Terminal (See this)
In the serial console, press Enter to reveal the command prompt.
Enter help to show the commands…
help
====Build-in Commands====
====Support 4 cmds once, seperate by ; ====
help                     : print this
p                        : print memory
m                        : modify memory
echo                     : echo for command
exit                     : close CLI
devname                  : print device name
sysver                   : system version
reboot                   : reboot system
poweroff                 : poweroff system
reset                    : system reset
time                     : system time
ota                      : system ota
ps                       : thread dump
ls                       : file list
hexdump                  : dump file
cat                      : cat file

====User Commands====
rust_main                : Run Rust code
blogset                  : blog pri set level
blogdump                 : blog info dump
bl_sys_time_now          : sys time now
Enter rust_main to run our Rust code…
rust_mainWe should see…
Hello from Rust!And the LED on our BL602 board blinks 5 times.
That’s how we build, flash and run Rust Firmware with BL602 IoT SDK!
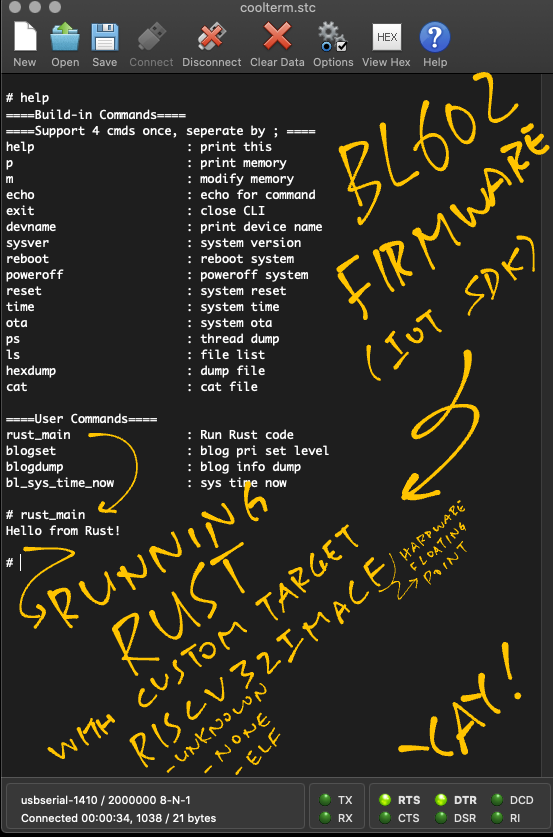
Our BL602 Rust Firmware running with CoolTerm
Why did we compile our Rust Firmware with this unusual JSON target?
cargo build \
    --target ../riscv32imacf-unknown-none-elf.json \
    -Z build-std=core
Watch what happens when we compile our Rust Firmware the conventional way for 32-bit RISC-V microcontrollers (like GD32VF103)…
cargo build \
    --target riscv32imac-unknown-none-elf
(We’ve previously used this for BL602)
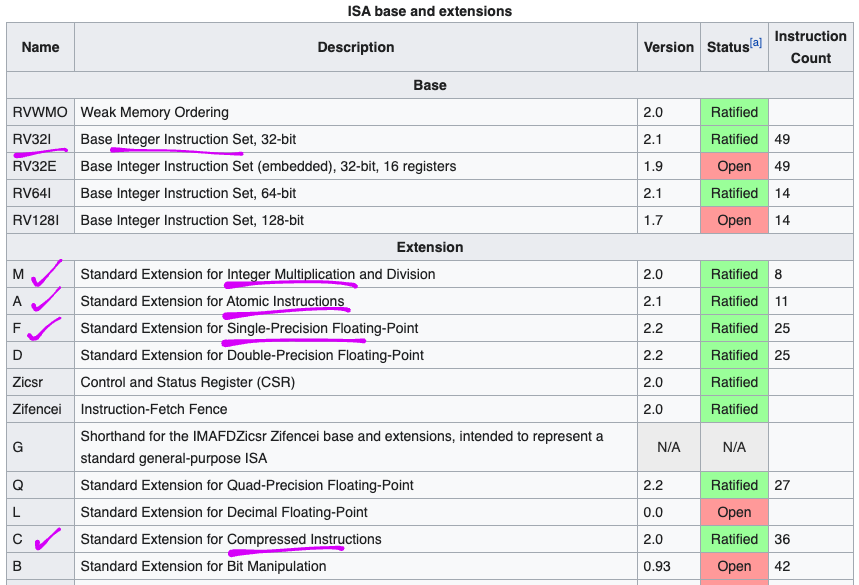
riscv32imac describes the capabilities of our RISC-V CPU…
| Designation | Meaning |
|---|---|
rv32i | 32-bit RISC-V with Base Integer Instructions |
m | Integer Multiplication + Division |
a | Atomic Instructions |
c | Compressed Instructions |
When we link the compiled Rust code with BL602 IoT SDK, the GCC Linker fails with this error…
Can't link soft-float modules with single-float modulesWhy?
That’s because the full designation of BL602 is actually riscv32-imacfx…
Which means that BL602 supports Hardware Floating-Point (Single Precision)…
BL602 IoT SDK was compiled with this GCC command…
gcc -march=rv32imfc -mabi=ilp32f ...UPDATE: NuttX BL602 was compiled with…
gcc -march=rv32imafc -mabi=ilp32f ...(Note that it’s “imfc” vs “imafc”)
This produces binaries that contain RISC-V Floating-Point Instructions.
Which are not compatible with our Rust binaries, which use Software Floating-Point.
Hence we have a Software vs Hardware Floating-Point conflict between the compiled Rust code and the compiled BL602 IoT SDK.
Is there another Rust Target that we can use for BL602?
Let’s hunt for a Rust Target for 32-bit RISC-V that supports Hardware Floating Point…
rustc --print target-listHere are the Rust Targets for RISC-V…
riscv32gc-unknown-linux-gnu
riscv32gc-unknown-linux-musl
riscv32i-unknown-none-elf
riscv32imac-unknown-none-elf
riscv32imc-unknown-none-elf
riscv64gc-unknown-linux-gnu
riscv64gc-unknown-linux-musl
riscv64gc-unknown-none-elf
riscv64imac-unknown-none-elf
Strike off the 64-bit RISC-V targets, and we get…
riscv32gc-unknown-linux-gnu
riscv32gc-unknown-linux-musl
riscv32i-unknown-none-elf
riscv32imac-unknown-none-elf
riscv32imc-unknown-none-elf
For embedded platforms we pick the targets that support ELF…
riscv32i-unknown-none-elf
riscv32imac-unknown-none-elf
riscv32imc-unknown-none-elf
Bummer… None of these Built-In Rust Targets support Hardware Floating-Point!
(They’re missing the “f” designator for Hardware Floating-Point)
Fortunately Rust lets us create Custom Rust Targets. Let’s create one for BL602!
More about Built-In Rust Targets
We’re creating a Custom Rust Target for BL602 because…
We can’t link Rust code (compiled for Software Floating-Point) with BL602 IoT SDK (compiled for Hardware Floating-Point)
Existing 32-bit RISC-V Rust Targets don’t support Hardware Floating-Point
Here’s how we create the Custom Rust Target for BL602: riscv32imacf-unknown-none-elf.json
We export an existing Rust Target riscv32imac-unknown-none-elf…
rustc +nightly \
    -Z unstable-options \
    --print target-spec-json \
    --target riscv32imac-unknown-none-elf \
    >riscv32imac-unknown-none-elf.json
Here’s the JSON Target File for riscv32imac-unknown-none-elf…
We modify the JSON Target File to support Hardware Floating-Point.
First we add “+f” to “features”…
"features": "+m,+a,+c,+f",We set the Application Binary Interface so that the Rust Compiler will produce binaries for Hardware Floating-Point…
"llvm-abiname": "ilp32f",We discovered this from the GCC command that compiles the BL602 IoT SDK…
gcc -march=rv32imfc -mabi=ilp32f ...We set “is-builtin” to false since this is a Custom Rust Target…
"is-builtin": false,Save the modified JSON Target File as…
riscv32imacf-unknown-none-elf.json(Which has the “f” designator for Hardware Floating-Point)
Now we may compile our Rust code with the Custom Rust Target…
cargo build \
    --target riscv32imacf-unknown-none-elf.json \
    -Z build-std=core
We specify “-Z build-std=core” so that the Rust Compiler will rebuild the Rust Core Library for our Custom Rust Target.
Here’s our Custom Rust Target for Hardware Floating-Point: riscv32imacf-unknown-none-elf.json
{
  "arch": "riscv32",
  "cpu": "generic-rv32",
  "data-layout": "e-m:e-p:32:32-i64:64-n32-S128",
  "eh-frame-header": false,
  "emit-debug-gdb-scripts": false,
  "executables": true,
  "features": "+m,+a,+c,+f",
  "is-builtin": false,
  "linker": "rust-lld",
  "linker-flavor": "ld.lld",
  "llvm-abiname": "ilp32f",
  "llvm-target": "riscv32",
  "max-atomic-width": 32,
  "panic-strategy": "abort",
  "relocation-model": "static",
  "target-pointer-width": "32"
}
How did we figure out the changes for “features” and “llvm-abiname”?
By exporting and comparing the Rust Targets for riscv32imac (32-bit Software Floating-Point) and riscv64gc-unknown-none-elf (64-bit Hardware Floating-Point).
More about Custom Rust Targets
Since Oct 2020 the Sipeed BL602 Community has started porting Embedded Rust to Bare Metal BL602 (without BL602 IoT SDK)…
Embedded Rust on BL602 has its own Hardware Abstraction Layer, which is in active development…
This version of Embedded Rust doesn’t run in XIP Flash Memory, instead it runs in Cache Memory (ITCM / DTCM, similar to RAM). (See this)
Here’s how we use a JTAG Adapter (instead of flashing over UART) to run Embedded Rust on BL602 (from Dec 2020)…
In Feb 2021 9names created a new project that runs the Embedded Rust HAL in XIP Flash Memory and works with UART flashing…
9names has also created an interesting Rust library that wraps the BL602 ROM functions…
Apache NuttX OS has been ported recently to BL602 (Jan 2021)…
NuttX runs on Bare Metal BL602 in XIP Flash Memory (flashed over UART), without BL602 IoT SDK.
We might be seeing Rust on NuttX…
If you’re keen to contribute, please sign up above!
What about Rust on Apache Mynewt for BL602?
We talked about Rust on Mynewt back in Jan 2021…
We planned to port Mynewt to BL602 by reusing a subset of the BL602 IoT SDK. (Specifically, the BL602 HALs.) We have integrated the BL602 GPIO HAL with Mynewt. (See this)
Sadly there’s little interest in supporting Mynewt on BL602. (And we might have problems running Mynewt in XIP Flash)
That’s why today we’re running Rust on BL602 IoT SDK (with FreeRTOS inside).
When we have a stable implementation of Rust on BL602, perhaps we can do Graphical Flow Programming on BL602…
But seriously… Why are we still coding BL602 Firmware in C? Why not code everything in Rust?
Because some BL602 features work better in C than in Rust.
Like SPI with DMA, which is useful for SPI displays that require high-bandwidth data transfer.
In our next BL602 article we shall head back to LoRaWAN, the low-power, long range IoT network. (See this)
Check out the new article on Rust Wrapper for BL602 IoT SDK…
Please drop me a note if you would like to see more Rust on BL602 IoT SDK!
Got a question, comment or suggestion? Create an Issue or submit a Pull Request here…
Auto-generating Rust Wrappers for BL602 IoT SDK with bl602-rust-wrapper
This article is the expanded version of this Twitter Thread
We’re using the demo-friendly command-line interface for our BL602 firmware, and rust_main looks like some kind of script… But rust_main is actually compiled Rust code!
Our Rust firmware runs exactly the same way as C firmware, compiled into efficient RISC-V machine code. (More about this)
Let’s look inside the script that builds, flashes and runs our Rust Firmware for BL602: run.sh
The script begins with the build and flash settings…
##  Name of app
export APP_NAME=sdk_app_rust

##  Build for BL602
export CONFIG_CHIP_NAME=BL602

##  Where BL602 IoT SDK is located
export BL60X_SDK_PATH=$PWD/../..

##  Where blflash is located
export BLFLASH_PATH=$PWD/../../../blflash

##  Where GCC is located
export GCC_PATH=$PWD/../../../xpack-riscv-none-embed-gcc
(Change BLFLASH_PATH and GCC_PATH for your machine)
The script was created for macOS, but should run on Linux and Windows (WSL) with minor tweaks.
Next we define the Custom Rust Target that supports Hardware Floating-Point…
From run.sh
##  Rust target: Custom target for llvm-abiname=ilp32f
##  https://docs.rust-embedded.org/embedonomicon/compiler-support.html#built-in-target
##  https://docs.rust-embedded.org/embedonomicon/custom-target.html
rust_build_target=$PWD/riscv32imacf-unknown-none-elf.json
rust_build_target_folder=riscv32imacf-unknown-none-elf
We remove the Stub Library and the Rust Library is they exist…
From run.sh
##  Remove the Stub Library if it exists:
##  build_out/rust-app/librust-app.a
if [ -e $rust_app_dest ]; then
    rm $rust_app_dest
fi

##  Remove the Rust Library if it exists:
##  rust/target/riscv32imacf-unknown-none-elf/debug/libapp.a
if [ -e $rust_app_build ]; then
    rm $rust_app_build
fi
(More about Stub Library in the next section)
We build the BL602 firmware with the Stub Library…
From run.sh
##  Build the firmware with the Stub Library
make
This build contains only C code, no Rust code.
We compile the Rust Library with our Custom Rust Target that supports Hardware Floating-Point…
From run.sh
##  Build the Rust Library
pushd rust
rustup default nightly
cargo build $rust_build_options
popd
The Rust Compiler command looks like this…
cargo build \
    --target ../riscv32imacf-unknown-none-elf.json \
    -Z build-std=core
We overwrite the Stub Library by the compiled Rust Library…
From run.sh
##  Replace the Stub Library by the compiled Rust Library
##  Stub Library: build_out/rust-app/librust-app.a
##  Rust Library: rust/target/riscv32imacf-unknown-none-elf/debug/libapp.a
cp $rust_app_build $rust_app_dest
We link the compiled Rust Library into the BL602 Firmware…
From run.sh
##  Link the Rust Library to the firmware
make
This creates the BL602 Rust Firmware file…
build_out/sdk_app_rust.binWe copy the BL602 Rust Firmware file to the blflash folder and flash to BL602…
From run.sh
##  Copy firmware to blflash
cp build_out/$APP_NAME.bin $BLFLASH_PATH

##  Flash the firmware
pushd $BLFLASH_PATH
blflash flash build_out/$APP_NAME.bin \
    --port /dev/tty.usbserial-14* \
    --initial-baud-rate 230400 \
    --baud-rate 230400
sleep 5
popd
The cargo run flash command needs to be modified for Linux and WSL.
Finally we launch CoolTerm to run the BL602 Rust Firmware…
From run.sh
##  Run the firmware
open -a CoolTerm
This needs to be modified for Linux and WSL.
Check out the complete build log here…
The build script run.sh links the compiled Rust code into the BL602 firmware by overwriting the compiled rust_app Stub Library…
This library contains a stub function for rust_main…
From rust-app.c
/// Main function in Rust.
/// TODO: Sync with customer_app/sdk_app_rust/sdk_app_rust/demo.c
void rust_main(char *buf, int len, int argc, char **argv) {
    printf("Build Error: components/3rdparty/rust-app not replaced by Rust compiled code\r\n");
}
Why do we need the stub function rust_main?
Because rust_main is referenced by our C code when defining the commands for our Command-Line Interface…
From sdk_app_rust/demo.c
//  TODO: Sync with components/3rdparty/rust-app/src/rust-app.c
void rust_main(char *buf, int len, int argc, char **argv);

/// List of commands
const static struct cli_command cmds_user[] STATIC_CLI_CMD_ATTRIBUTE = {
    {
        "rust_main",
        "Run Rust code",
        rust_main
    }
};
If we omit rust_main from our Stub Library, our GitHub Actions build will fail. (See this)
Many functions from the NimBLE Porting Layer are declared as “static inline”…
From nimble_npl_os.h
//  static inline function
static inline void ble_npl_time_delay(ble_npl_time_t ticks) { ... }
This becomes a problem when we import ble_npl_time_delay into Rust… ble_npl_time_delay isn’t really a C function, it has been inlined into the calling C function!
To work around this we disable the static and inline keyworks…
//  Disable static inline
#define static
#define inline
So the GCC Compiler compiles our static inline function as regular non-inline function…
void ble_npl_time_delay(ble_npl_time_t ticks) { ... }(Yeah it’s sneaky)
Here’s how we implement this for our BL602 Rust Firmware…
//  Export the inline functions for NimBLE Porting Layer to Rust
//  TODO: Move this to nimble-porting-layer library

//  Include FreeRTOS before NPL, so that FreeRTOS will be inlined
#include "FreeRTOS.h"

//  Disable static inline so:
//    static inline void ble_npl_time_delay(ble_npl_time_t ticks) { ... }
//  Becomes:
//    void ble_npl_time_delay(ble_npl_time_t ticks) { ... }
#define static
#define inline

//  Define the functions like:
//    void ble_npl_time_delay(ble_npl_time_t ticks) { ... }
#include "nimble_npl.h"