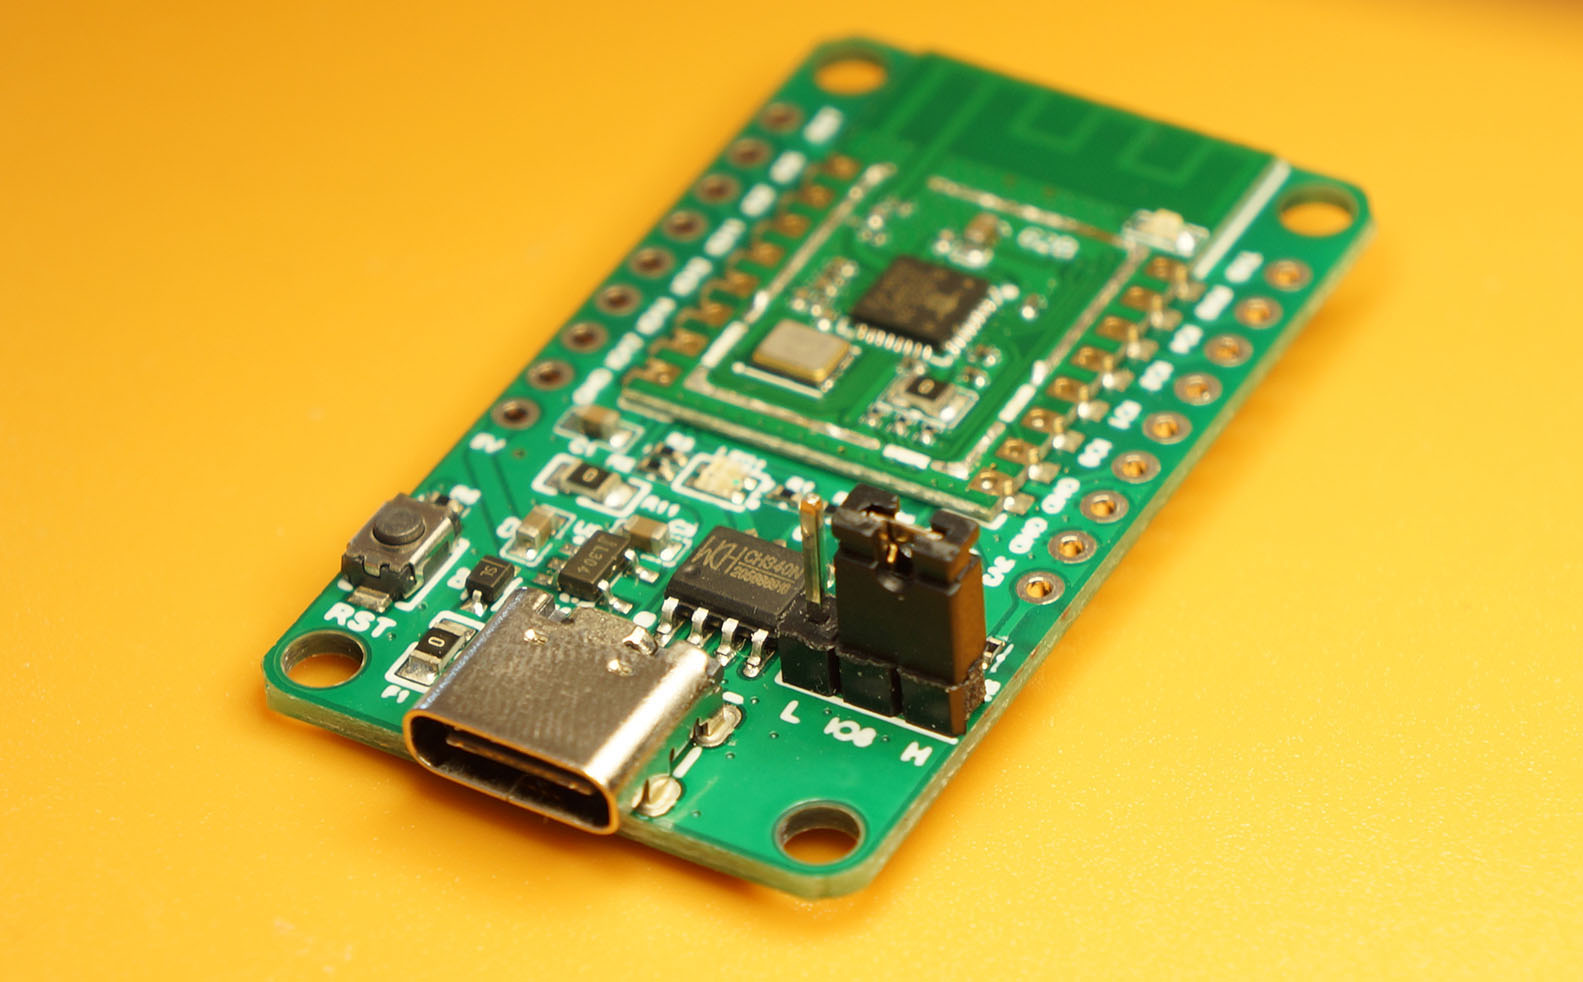
PineCone BL602 RISC-V Evaluation Board
📝 1 Jan 2021
2020 has been an awesome year for PineCone BL602!
We took a quick peek at PineCone BL602 RISC-V Evaluation Board…
Then we connected PineCone to OpenOCD with a JTAG Debugger…
And we debugged Rust on PineCone with VSCode and GDB…
Today we shall learn to…
Flash BL602 Firmware to the PineCone Board with open-source tools on any computer: Linux x64, Linux Arm64, macOS and Windows
Appreciate all the things that we can flash to BL602…
And we’ll better understand the (undocumented) internals of the BL602 RISC-V + WiFi + Bluetooth SoC!
Follow these steps to flash a Firmware Binary File (like nuttx.bin or sdk_app_helloworld.bin) to BL602 from Linux x64, Linux Arm64, macOS and Windows.
(On Windows: Use plain old Windows CMD Command Prompt to run the commands, not WSL)
Install rustup from rustup.rs
Select the default options.
For Windows: Install rustup under plain old Windows CMD, not WSL
For Linux and macOS: Add Rust to the PATH…
source $HOME/.cargo/envWe’ll use blflash, the flashing tool created in Rust by spacemeowx2.
(For WSL: Do this under plain old Windows CMD, not WSL, because blflash needs to access the COM port)
Install the blflash tool…
cargo install blflashWe should see…
Compiling blflash v0.3.3
Finished release [optimized] target(s) in 4m 37s
Installing ~/.cargo/bin/blflash
Installed package `blflash v0.3.3` (executable `blflash`)
For Linux: Grant access to the USB UART port. (Here’s how)
Flashing PineCone BL602 with Manjaro Linux Arm64 on Pinebook Pro
(For WSL: Do this under plain old Windows CMD, not WSL, because blflash needs to access the COM port)
To flash the firmware, we set BL602 to Flashing Mode and restart the board…
For PineDio Stack BL604:
Set the GPIO 8 Jumper to High (Like this)
Disconnect the USB cable and reconnect
Or use the Improvised Reset Button (Here’s how)
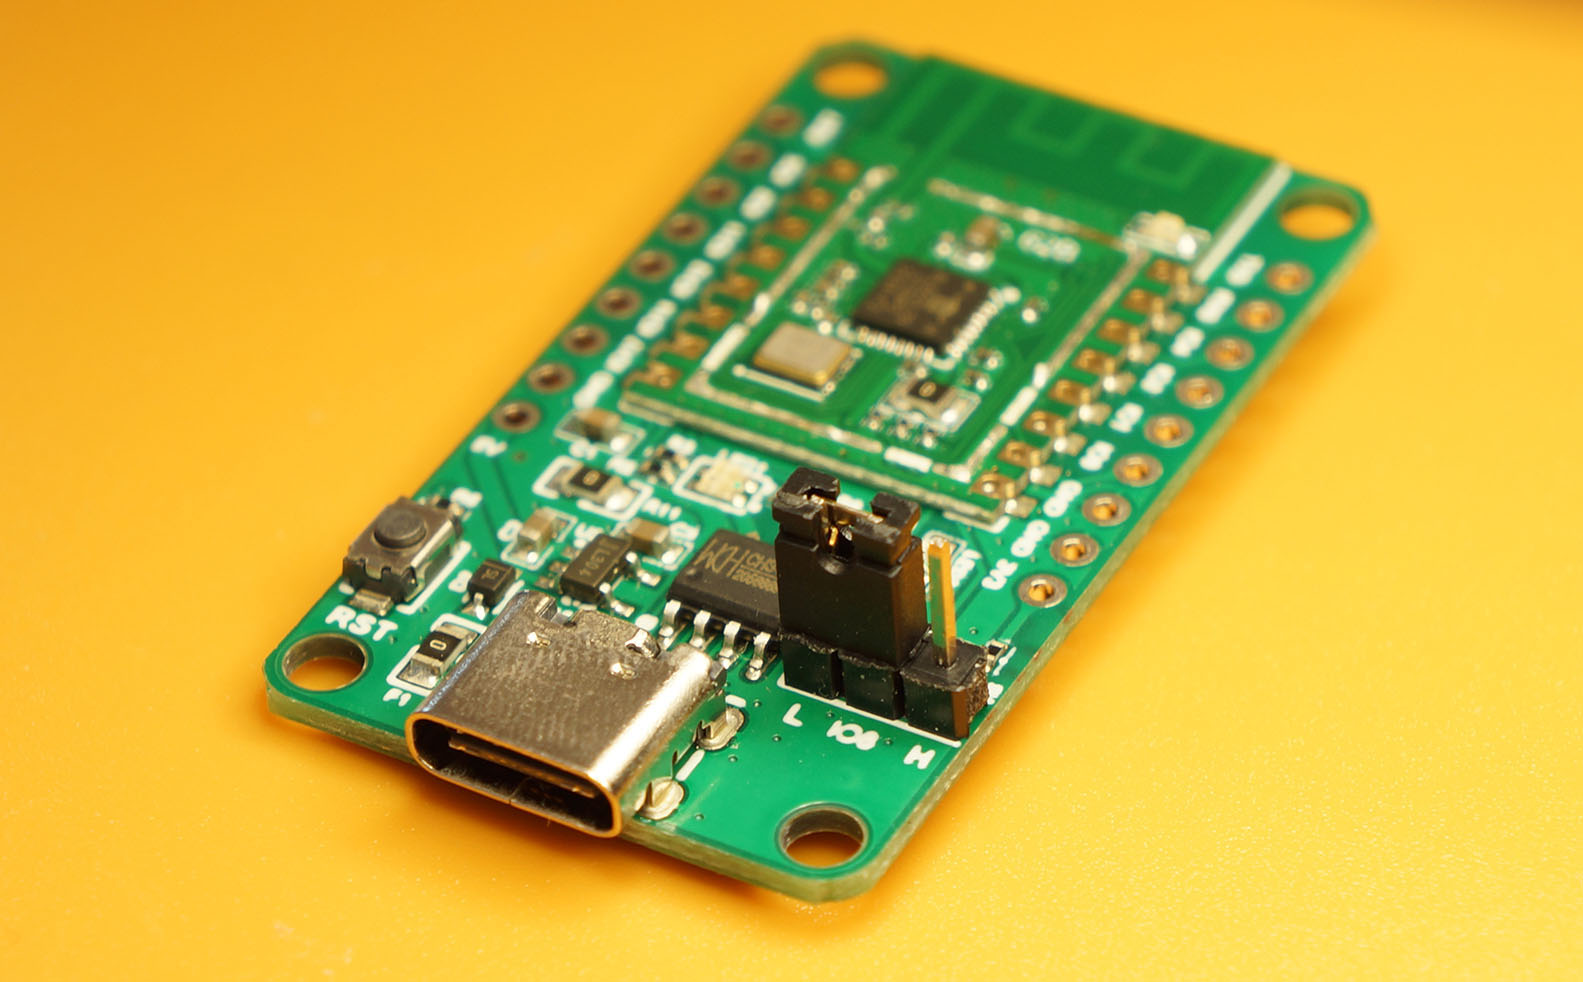
For PineCone BL602:
Connect PineCone to the USB port
Set the PineCone Jumper (IO 8) to the H Position (Like this)
Press the Reset Button
For BL10:
Connect BL10 to the USB port
Press and hold the D8 Button (GPIO 8)
Press and release the EN Button (Reset)
Release the D8 Button
For Ai-Thinker Ai-WB2, Pinenut and MagicHome BL602:
Disconnect the board from the USB Port
Connect GPIO 8 to 3.3V
Reconnect the board to the USB port
Enter this to flash our firmware…
For Linux:
blflash flash sdk_app_helloworld.bin \
  --port /dev/ttyUSB0
(Change sdk_app_helloworld.bin to the full path of the firmware binary to be flashed. Change the USB serial port /dev/ttyUSB0 if necessary.)
For macOS:
blflash flash sdk_app_helloworld.bin \
  --port /dev/tty.usbserial-1410 \
  --initial-baud-rate 230400 \
  --baud-rate 230400
(Change sdk_app_helloworld.bin to the full path of the firmware binary to be flashed. Change /dev/tty.usbserial-1420 to the USB Serial Device assigned to BL602)
Note that we’re throttling the USB Serial Port from the default 1 Mbps to 230.4 kbps. blflash won’t work on macOS at 1 Mbps (because it’s not a standard POSIX baud rate).
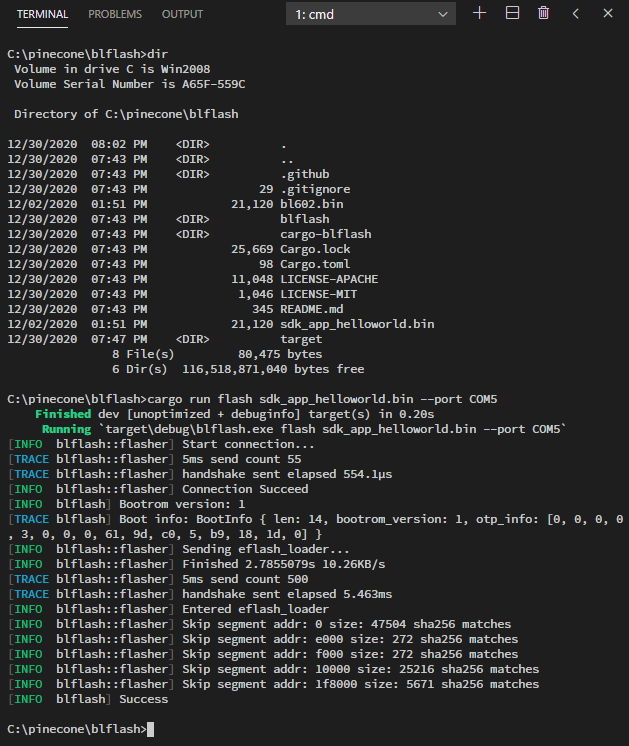
For Windows:
blflash flash sdk_app_helloworld.bin --port COM5(Change sdk_app_helloworld.bin to the full path of the firmware binary to be flashed. Change COM5 to the serial port assigned to BL602)
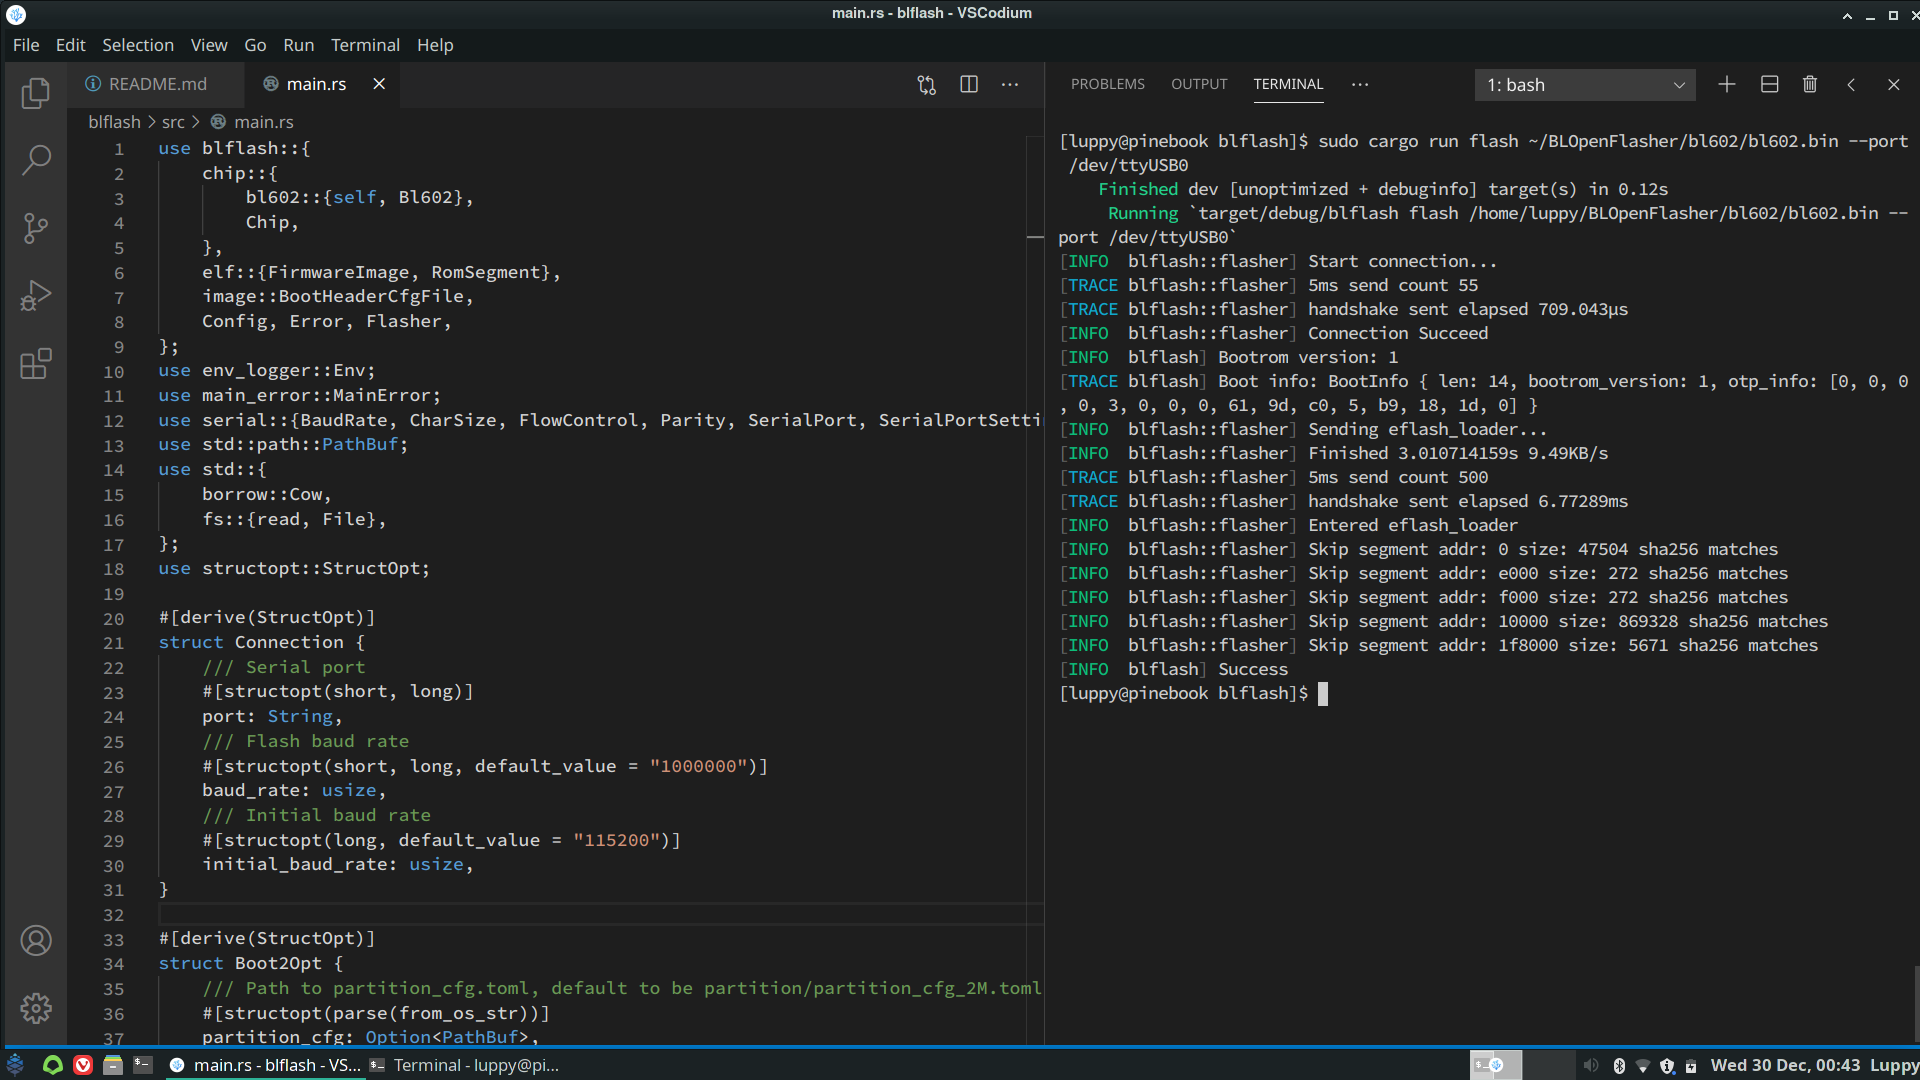
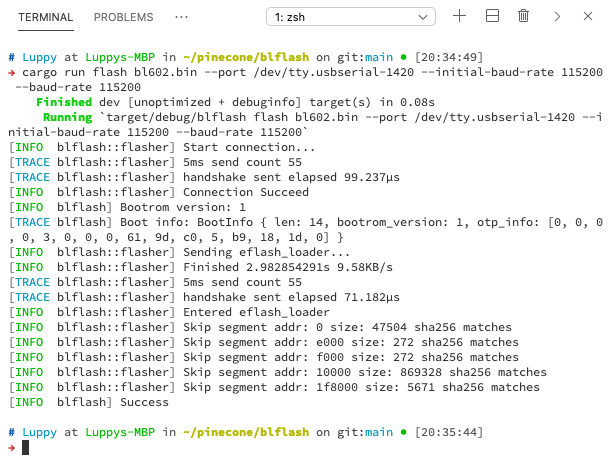
We should see…
Start connection...
5ms send count 55
handshake sent elapsed 1.059862ms
Connection Succeed
blflash has connected successfully to BL602 over the USB Serial port.
Bootrom version: 1
Boot info: BootInfo { len: 14, bootrom_version: 1, otp_info: [0, 0, 0, 0, 3, 0, 0, 0, 61, 9d, c0, 5, b9, 18, 1d, 0] }
Sending eflash_loader...
Finished 3.375522563s 8.47KB/s
5ms send count 500
handshake sent elapsed 6.51343ms
Entered eflash_loader
blflash starts by sending the EFlash Loader program to BL602. Then EFlash Loader starts running on BL602.
EFlash Loader receives our Flash Image from blflash and flashes our firmware to ROM…
Erase flash addr: 0 size: 47504
Program flash... c85e11a0083a27f72f6e1bab9b67cac98d5d31ed90b64b78e6e89e070d782c58
Program done 836.9393ms 55.49KB/s
Skip segment addr: e000 size: 272 sha256 matches
Skip segment addr: f000 size: 272 sha256 matches
Erase flash addr: 10000 size: 25216
Program flash... 86e0abb8907b99dfc8e7771f58aa9c5473fc2439b3aa38613d0ad895681d656e
Program done 489.5002ms 50.36KB/s
Skip segment addr: 1f8000 size: 5671 sha256 matches
Success
blflash (and EFlash Loader) has successfully erased and flashed 5 sections in BL602 ROM.
The ROM sections were extracted from our Flash Image at offsets 0x0, 0xe000, 0xf000, 0x10000 (that’s our firmware) and 0x1f8000
We’ll learn more about this.
If we see this…
Start connection...
5ms send count 115
handshake sent elapsed 72.001µs
Retry 1
Or this…
Start connection...
5ms send count 55
handshake sent elapsed 850.287µs
Connection Succeed
Error: IO error: Operation timed out
caused by: Operation timed out
Disconnect PineCone from the USB port. Check that the PineCone Jumper (IO 8) is set to H. Retry the flash command.
If we see this error…
Sending eflash_loader...
Finished 2.988880532s 9.56KB/s
Error: IO error while using serial port: Invalid argument
caused by: Invalid argument
It probably means that the baud rate is too high. Try a lower baud rate like 115.2 kbps…
blflash flash sdk_app_helloworld.bin \
  --port /dev/tty.usbserial-1410 \
  --initial-baud-rate 115200 \
  --baud-rate 115200
If we see this error…
Error: IO error while using serial port:
Permission denied
Check whether access has been granted for the USB UART port. (Here’s how)
(Flashing WiFi Firmware for NuttX? See this)
(See the flashing screenshots)
Firmware running on PineCone
To run our firmware, we set BL602 to Normal Mode (Non-Flashing) and restart the board…
For PineDio Stack BL604:
Set the GPIO 8 Jumper to Low (Like this)
Disconnect the USB cable and reconnect
Or use the Improvised Reset Button (Here’s how)
For PineCone BL602:
Set the PineCone Jumper (IO 8) to the L Position (Like this)
Press the Reset Button
For BL10:
For Ai-Thinker Ai-WB2, Pinenut and MagicHome BL602:
Disconnect the board from the USB Port
Connect GPIO 8 to GND
Reconnect the board to the USB port
To watch our firmware run, connect to the PineCone Serial Console (at 2 Mbps)…
For Linux:
screen /dev/ttyUSB0 2000000(Change the USB serial port /dev/ttyUSB0 if necessary)
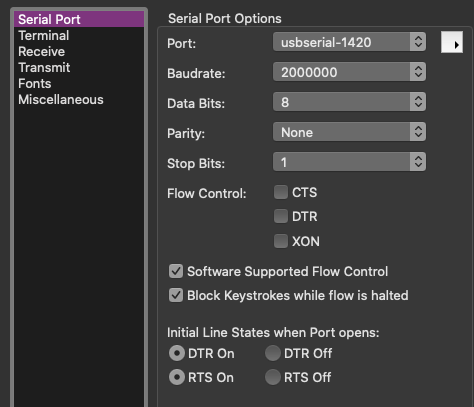
For macOS:
Click Options
Set Port to usbserial-1420
Set Baudrate to 2000000 (2 Mbps)
Click Connect
(Some macOS apps like screen won’t work at 2 Mbps because it’s not a standard POSIX baud rate. See “Fix BL602 Demo Firmware for macOS”)
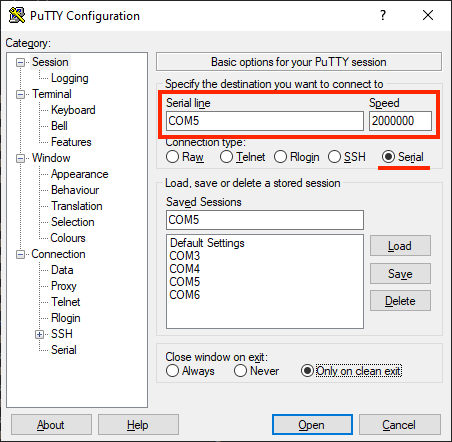
For Windows: Use putty to connect to PineCone’s COM Port (like COM5) at speed 2000000 (2 Mbps)
Web Serial Terminal: Newer versions of the Chrome Web Browser support the Web Serial API, which also works with BL602…
Under Baud Rate, select Custom and enter 2000000 (2 Mbps)
Press the RST Button on PineCone to restart the board. As PineCone boots, we shall see the console output from our firmware…
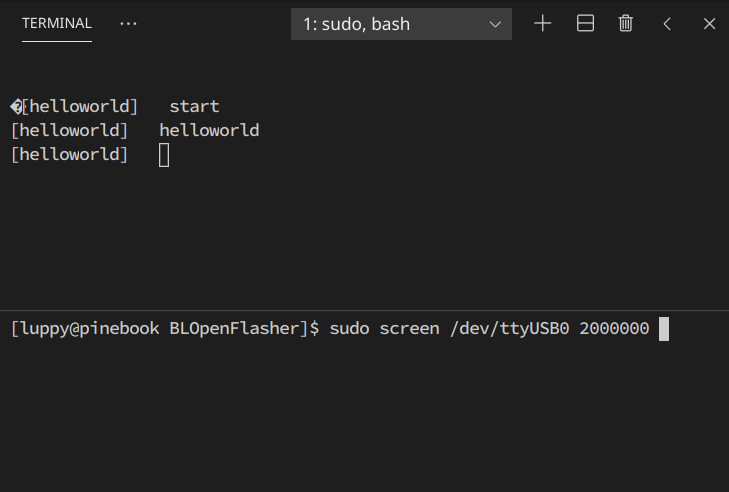
For nuttx.bin:
NuttShell (NSH) NuttX-10.2.0
nsh> [helloworld] start
[helloworld] helloworld
[helloworld] endFor Linux: To exit the screen console, press Ctrl-A then k then y
For macOS: Close the CoolTerm window
For Windows: Close the putty window
Here’s the console output for BL602 Firmware that supports WiFi and interactive commands: bl602.bin
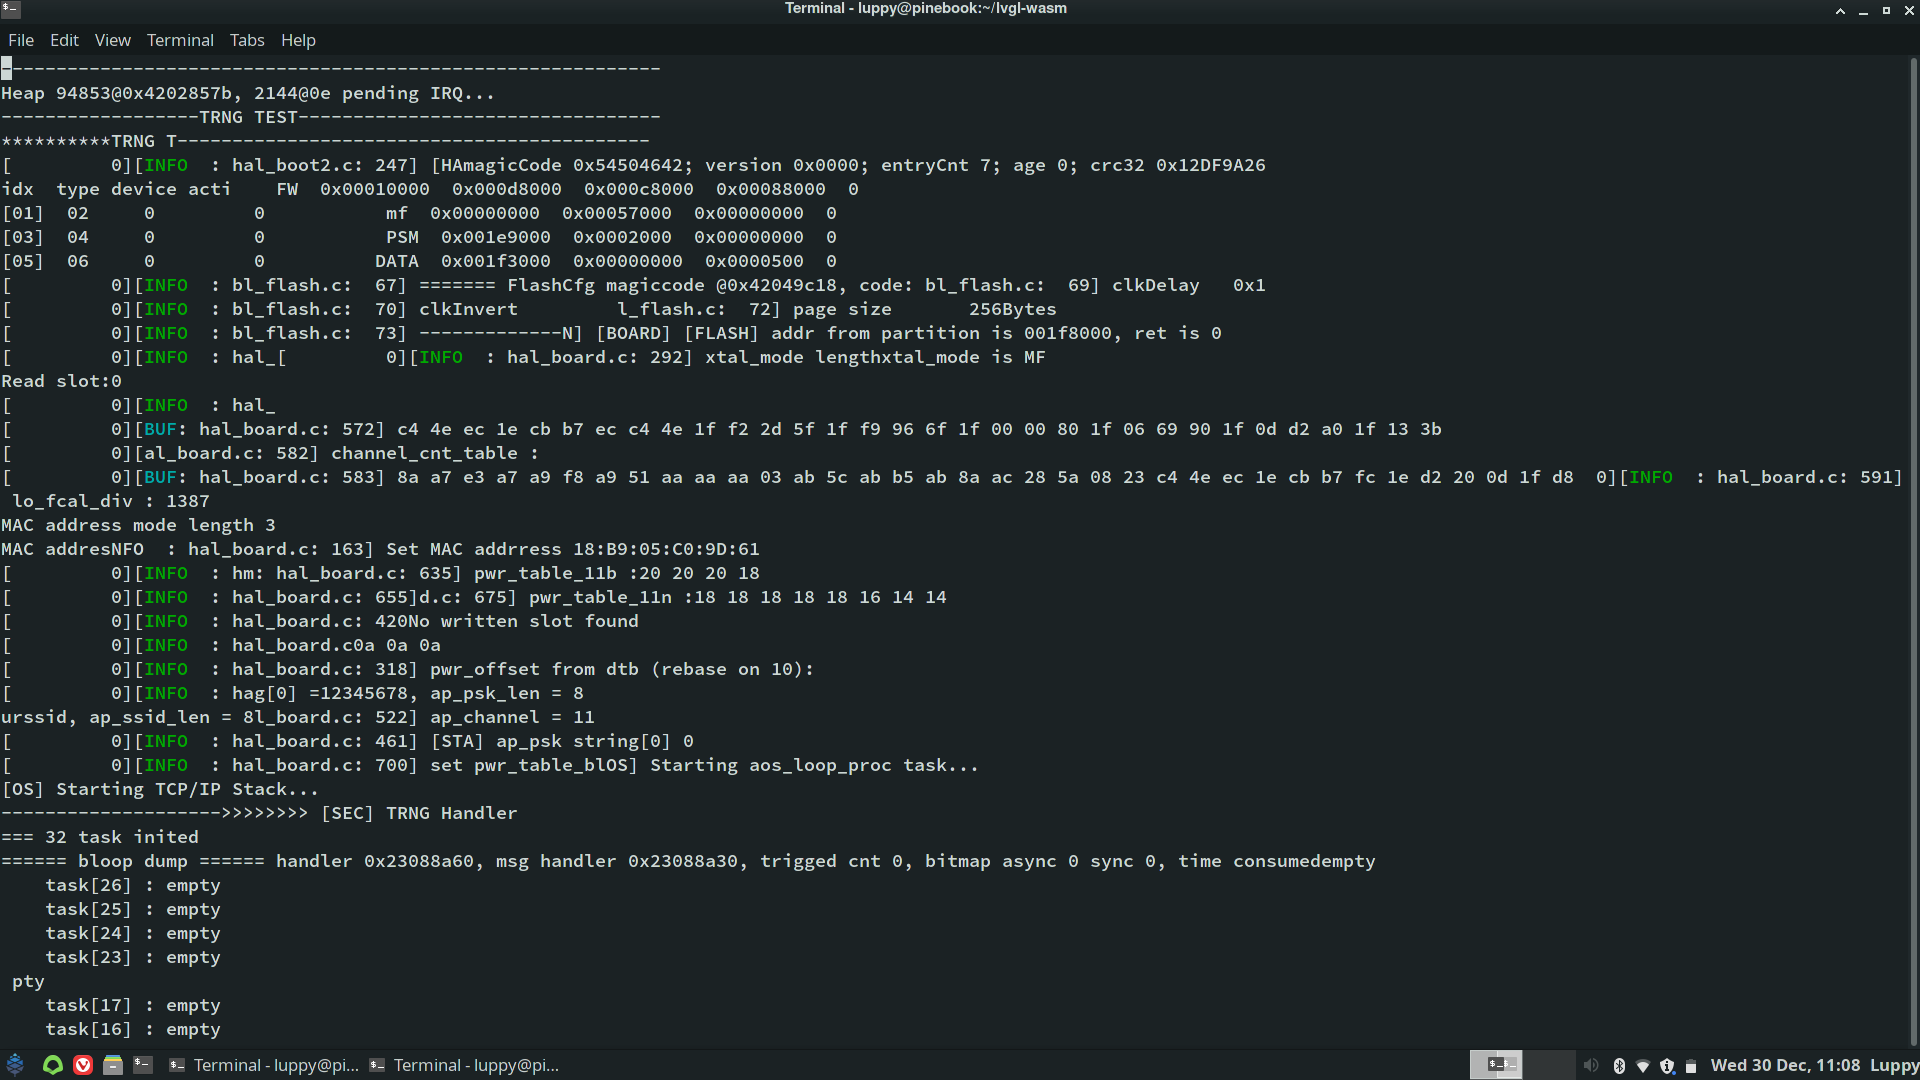
Console output for BL602 WiFi Firmware
What happens when we leave the PineCone Jumper (IO 8) in the H Position.. And connect with screen or putty?
We’ll see that PineCone is stuck in a Holding Pattern, waiting to be flashed…
PineCone waiting to be flashed
These steps were tested on Arm64 Linux (Pinebook Pro with Manjaro), macOS Catalina and Windows 10.
For MagicHome BL602 WiFi LED Controller: This gadget doesn’t have a Reset Button, so it will be hard to see the helloworld message. Use the NuttX firmware nuttx.bin instead…
Or sdk_app_gpio.bin GPIO Demo Firmware…
Connect at 2 Mbps. When we enter help, it will respond with a list of commands. This is useful for validating that our firmware is running on MagicHome BL602.
If BL602 isn’t responding, check that the USB Serial Adapter supports 2 Mbps. Some adapters don’t support 2 Mbps (like CP2102), changing it to FT232R might help.
Can we configure BL602 to run at a lower Baud Rate? It’s not easy because the Baud Rate is defined inside the Device Tree, which needs to be recompiled with the firmware.
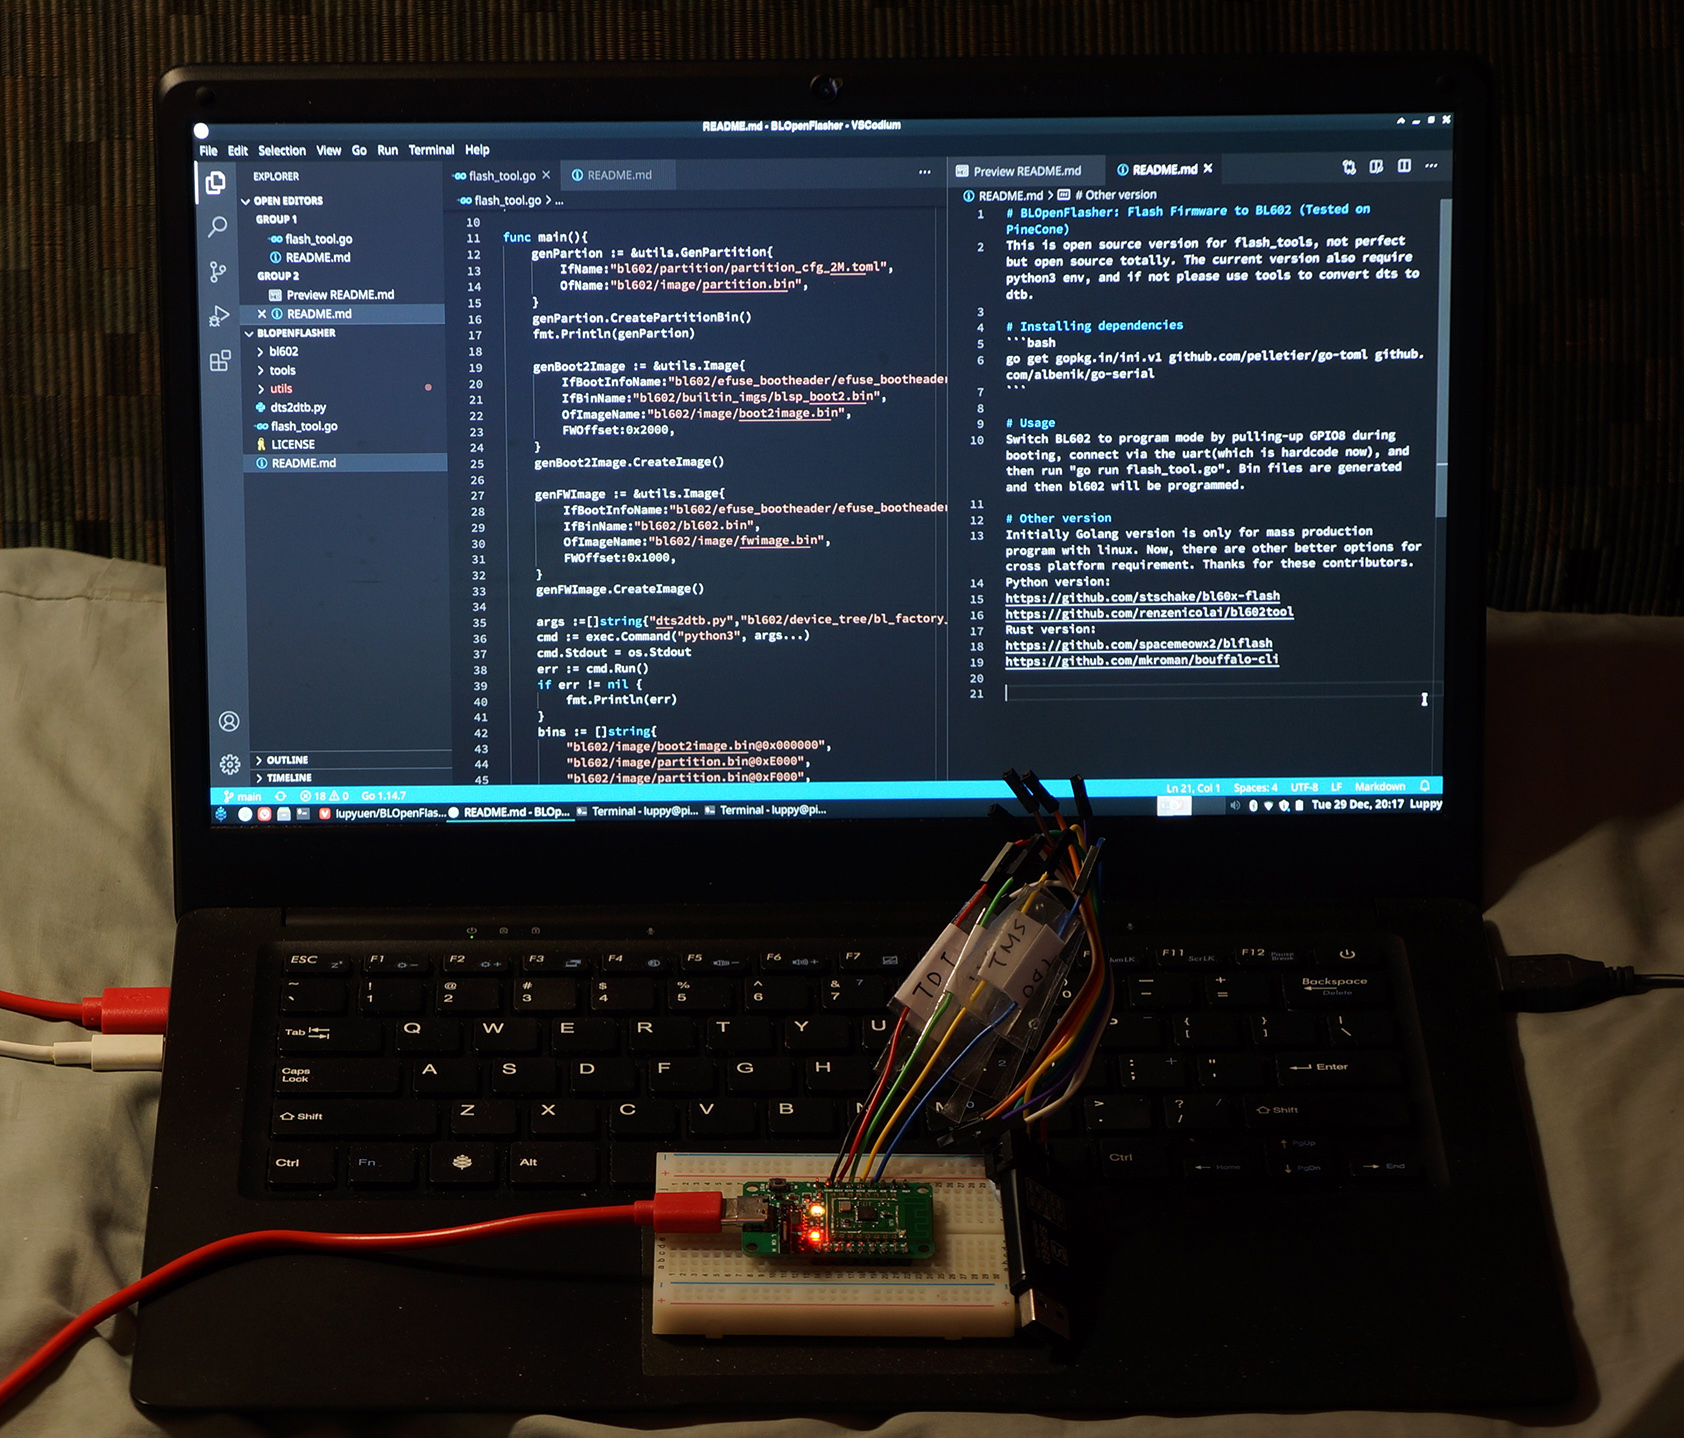
BL602 Flashing Process reverse engineered from BLOpenFlasher
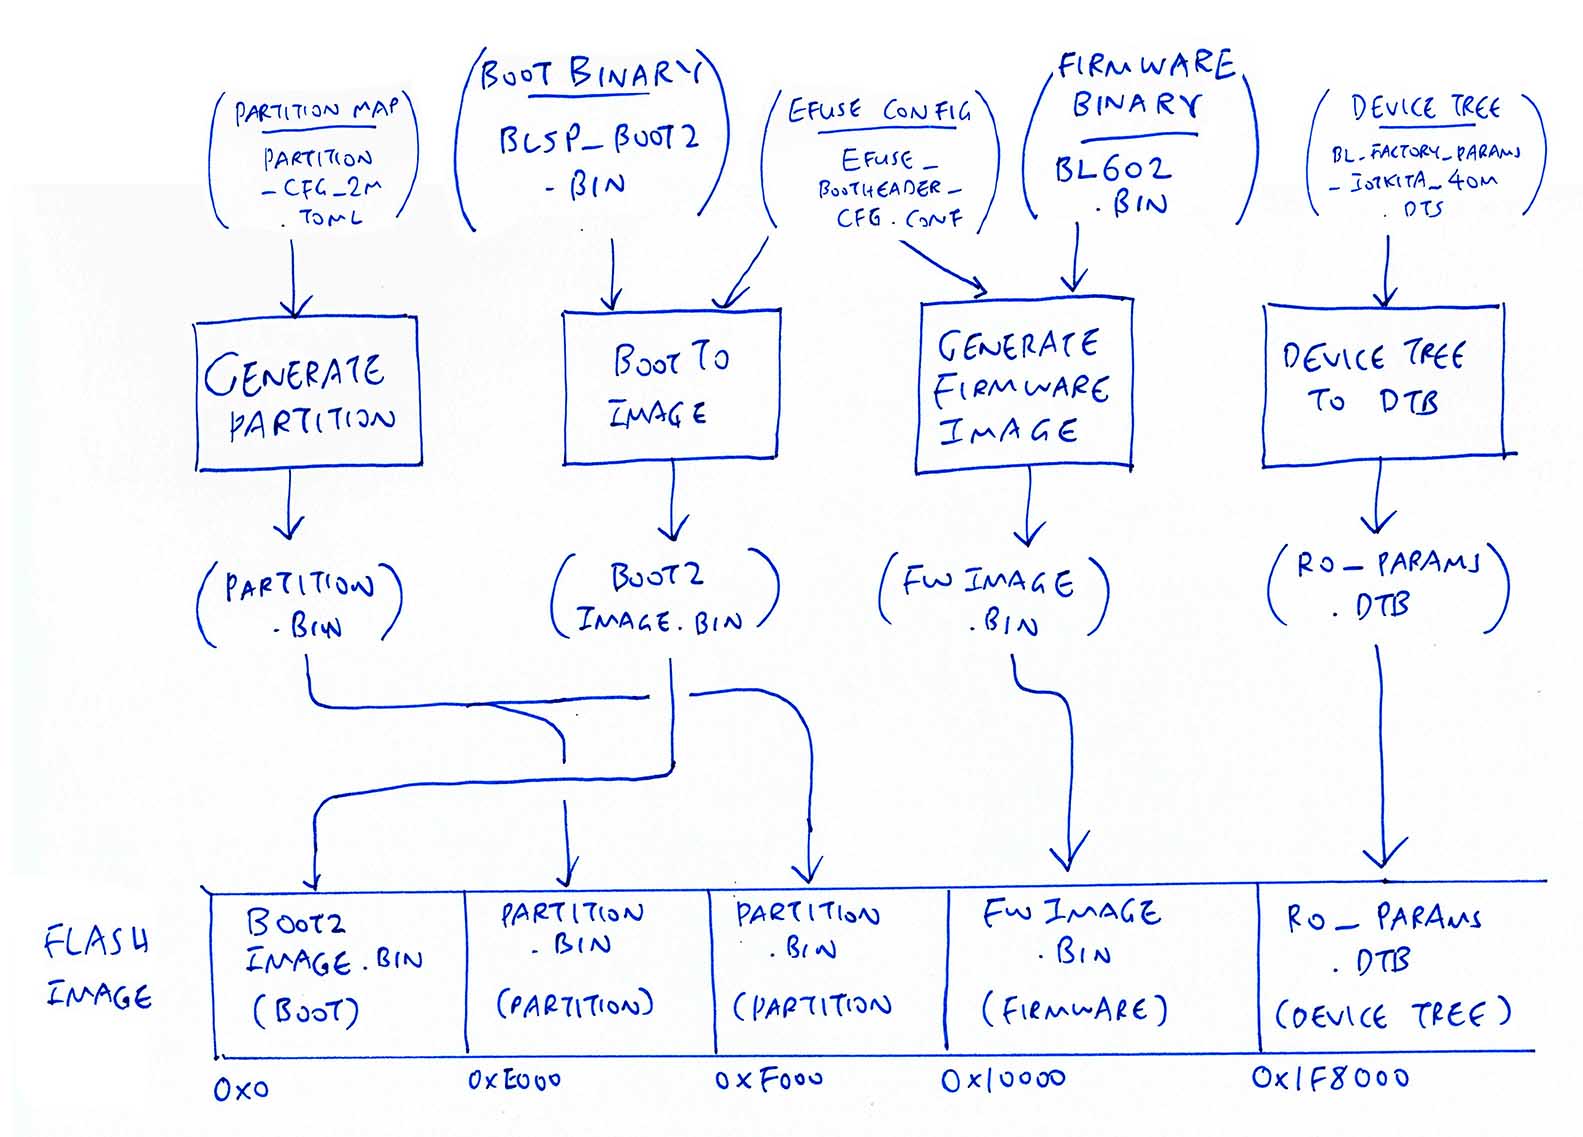
Whenever we flash the firmware of BL602, blflash transmits to BL602 a Flash Image that contains 5 sections of data…
| Offset | Contents |
|---|---|
Boot2 Bootloader 0x0000 0000 | Code and data for Boot2 Bootloader |
Partition Table 0x0000 E000 | Partition Table for Flash Image |
Partition Table 0x0000 F000 | Partition Table for Flash Image (For second core?) |
Firmware Image 0x0001 0000 | Code and data for Application Firmware |
Device Tree 0x001F 8000 | Default settings for peripherals and ports: UART, GPIO, SPI, WiFi, … |
The addresses above are Offsets into the Flash Image that is transmitted by blflash to BL602 for flashing.
This info was deciphered from the official open-source Go flashing tool for BL602: BLOpenFlasher…
Refer to flash_tool.go
See BL602 ISP Flash Programming Doc for the UART Flashing Protocol
See “Documenting the BouffaloLab BL602 firmware image format”
Let’s look at each section of the Flash Image.
In this article we’ll use “ROM” to refer to BL602’s XIP Flash Memory (at address 0x2300 0000 with size 16 MB).
(XIP means Execute In Place… BL602 lets us run firmware code from External Flash Memory without transferring to RAM first. See this)
The BL602 Reference Manual uses “ROM” to refer to BL602’s Boot ROM (at address 0x2100 0000 with size 128 KB).
BL602’s Boot ROM is explained here…

Compiling the BL602 Partition Table
The Partition Table specifies the structure of the Flash Image that will be flashed to ROM. It’s like the ROM Table above… But converted to binary format and transmitted to BL602 (twice).
Here’s a snippet from BL602’s Partition Table: partition_cfg_2M.toml
[pt_table]
# Partition table is 4K in size (0x1000 bytes)
address0 = 0xE000
address1 = 0xF000
This says that the Partition Table (4,096 bytes in binary form) is stored at two offsets: 0xE000 and 0xF000
The second Partition Table might possibly be used in future to support a second CPU. See this
Here’s the first Partition Entry in the Partition Table…
[[pt_entry]]
type     = 0
name     = "FW"
device   = 0
address0 = 0x10000
size0    = 0xC8000
address1 = 0xD8000
size1    = 0x88000
len      = 0
It says that our Firmware Image is located at offset 0x10000.
(But why two contiguous sections: 0x10000 and 0xD8000?)
[[pt_entry]]
type     = 7
name     = "factory"
device   = 0
address0 = 0x1F8000
size0    = 0x7000
address1 = 0
size1    = 0
len      = 0
This is the Partition Entry for the Device Tree at offset 0x1F8000. We’ll cover the Device Tree in a while.
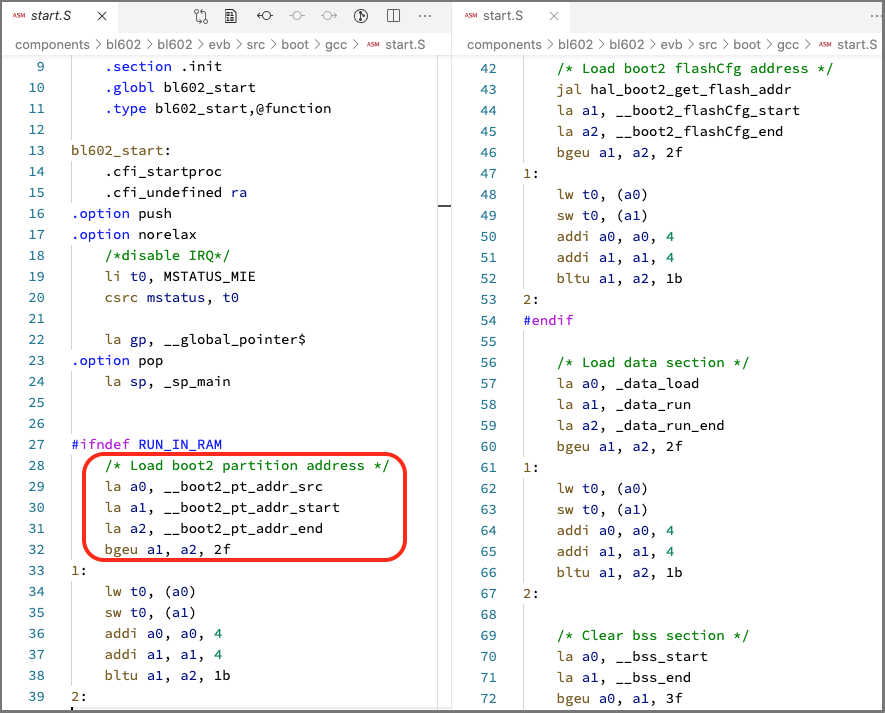
BL602 Start Code refers to the Partition Table
The Partition Table is referenced by the Start Code for BL602 Firmware…
Browse the BL602 Start Code
See “Porting Mynewt to PineCone BL602”, Section 10: “Implement Start Code”
More about BL602 Partition Table
Transforming firmware images with BL602 EFuse Configuration
What’s an EFuse in BL602?
An EFuse stores one bit of data (0 or 1) in a special way… Once an EFuse is set to 1, it can never be reset to 0.
BL602 has 1,024 EFuses (1,024 bits).
How are EFuses used in BL602?
Since the EFuses are one-time write-only bits, they are useful for storing Encryption Keys securely.
Once the Encryption Keys have been injected into BL602’s EFuses, they can never be changed.
Why would we need Encryption Keys in BL602?
To make it harder for unauthorised folks to dump out the BL602 Firmware or tamper with it.
BL602 disallows the reading of Encryption Keys once they have been set.
Do we really need to encrypt our firmware?
For development we will leave the EFuse Configuration empty, so that our firmware won’t be encrypted.
EFuse Configuration is used when we’re ready to release a commercial product with BL602 inside.
How EFuses are used for encrypting and verifying BL602 firmware updates
How EFuses are used in ESP32… And how Encryption Keys were compromised
Snippet from BL602’s EFuse Configuration: efuse_bootheader_cfg.conf
[EFUSE_CFG]
ef_sf_aes_mode     = 0
ef_sboot_sign_mode = 0
ef_sboot_en        = 0
ef_dbg_jtag_dis    = 0
ef_dbg_mode        = 0
ef_dbg_pwd_low     = 0
ef_dbg_pwd_high = 0The EFuse Configuration also includes a Boot Header Configuration that specifies how the Boot2 Bootloader and Firmware Image should be flashed to ROM.
Here’s a snippet from efuse_bootheader_cfg.conf…
[BOOTHEADER_CFG]
magic_code          = 0x504e4642
revision            = 0x01
flashcfg_magic_code = 0x47464346
io_mode             = 4
cont_read_support   = 1
sfctrl_clk_delay    = 1
sfctrl_clk_invert   = 0x01

reset_en_cmd        = 0x66
reset_cmd           = 0x99
exit_contread_cmd   = 0xff
exit_contread_cmd_size = 3

jedecid_cmd         = 0x9f
jedecid_cmd_dmy_clk = 0
qpi_jedecid_cmd     = 0x9f
qpi_jedecid_dmy_clk = 0

sector_size = 4
mfg_id      = 0xef
page_size   = 256

chip_erase_cmd   = 0xc7
sector_erase_cmd = 0x20
blk32k_erase_cmd = 0x52
blk64k_erase_cmd = 0xd8
...
JEDEC refers to the Common Flash Memory Interface that’s used to access Flash Memory.
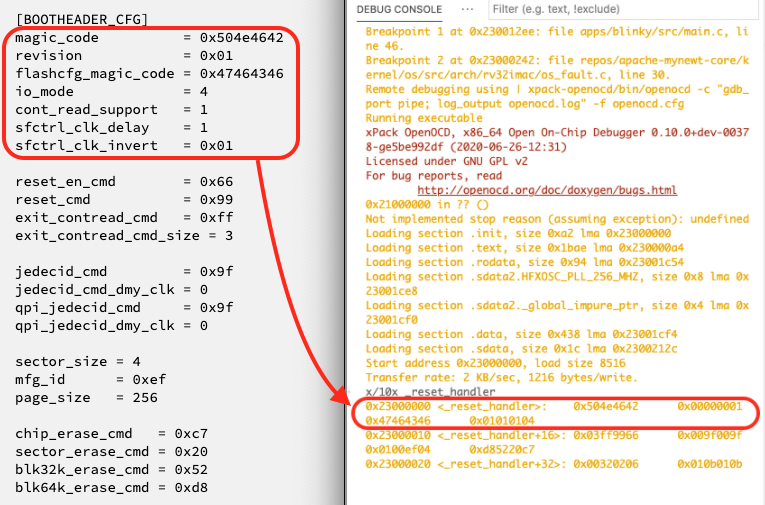
Here we see that the Boot Header (in binary form) is located at the base of XIP Flash Memory (0x2300 0000).
More about BL602 EFuse Configuration
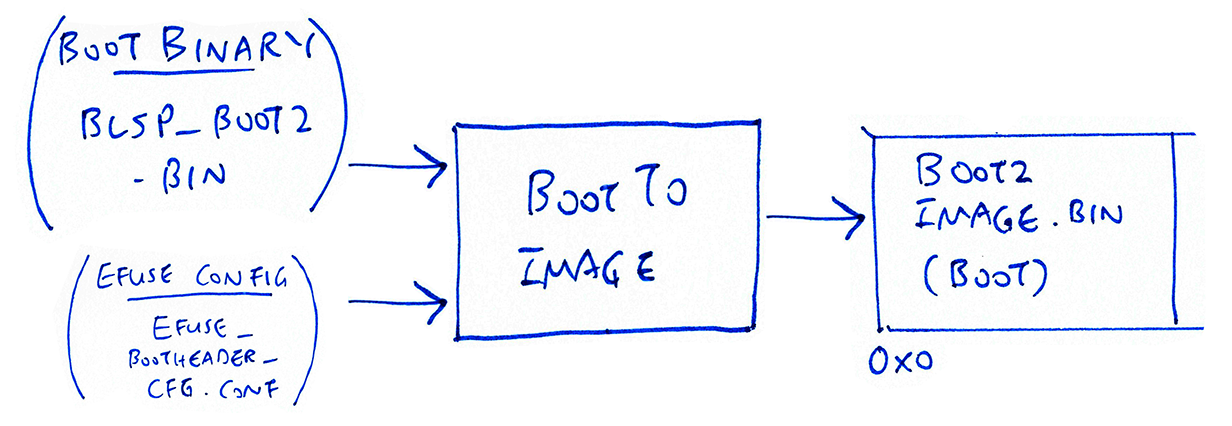
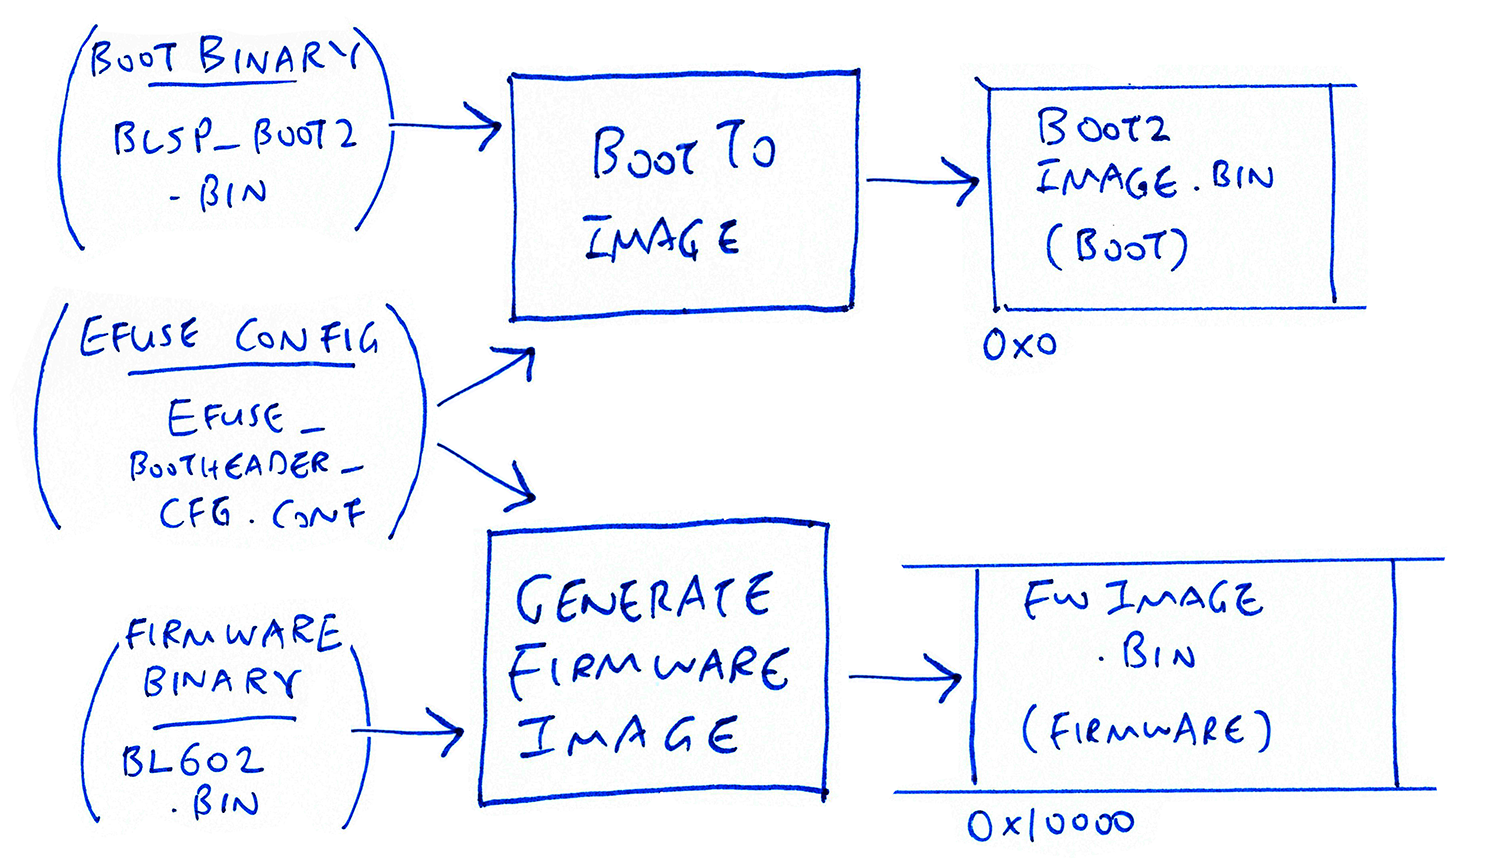
Transforming the BL602 Boot2 Bootloader
Located at offset 0x0, the Boot2 Bootloader contains the firmware code that is run first upon booting BL602….
Boot2 Bootloader Binary is at…
Which gets transformed with the EFuse Configuration (and Boot Header Configuration) to create (with firmware offset 0x2000)…
(For development, we have disabled encryption in the EFuse Configuration)
Which is flashed to BL602 Flash ROM whenever we update the firmware
The BL602 Boot2 Bootloader Source Code is located here…
The BL602 Boot2 Bootloader is explained in the article…
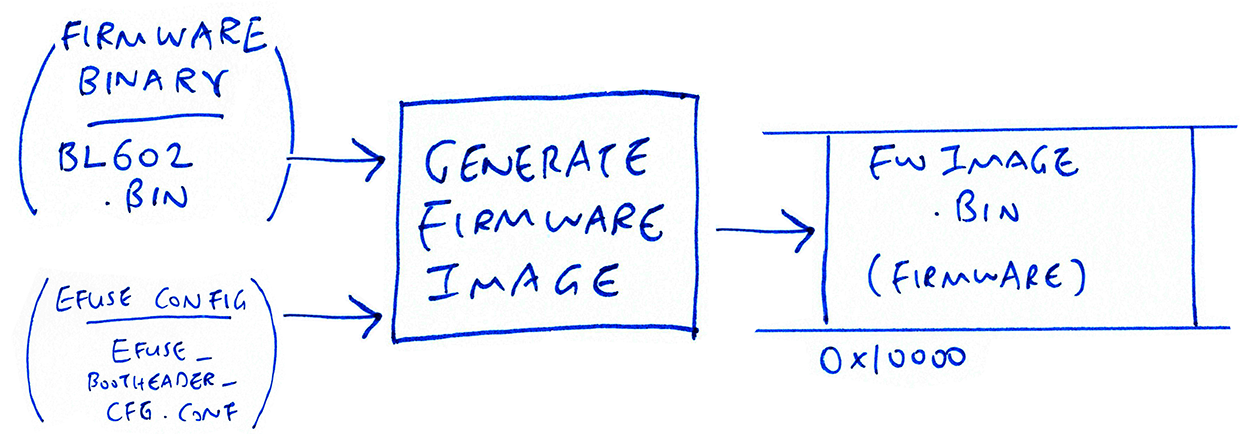
Transforming the BL602 Firmware Image
Located at offset 0x10000, the Firmware Image contains our application firmware code that is run after the boot2 bootloader.
Our firmware binary (sdk_app_helloworld.bin) gets transformed with the EFuse Configuration (and Boot Header Configuration) to create (with firmware offset 0x1000)…
bl602/image/fwimage.bin(For development, we have disabled encryption in the EFuse Configuration)
The transformed binary is then flashed to BL602 Flash ROM.
Both the Boot2 Bootloader and Firmware Image are compiled to execute at XIP Flash Address 0x2300 0000… How can two programs coexist at the same address?
Does Boot2 Bootloader contain the code to move Firmware Image to address 0x2300 0000, overwriting the Boot2 Bootloader?
Yes indeed! This is explained in the article…
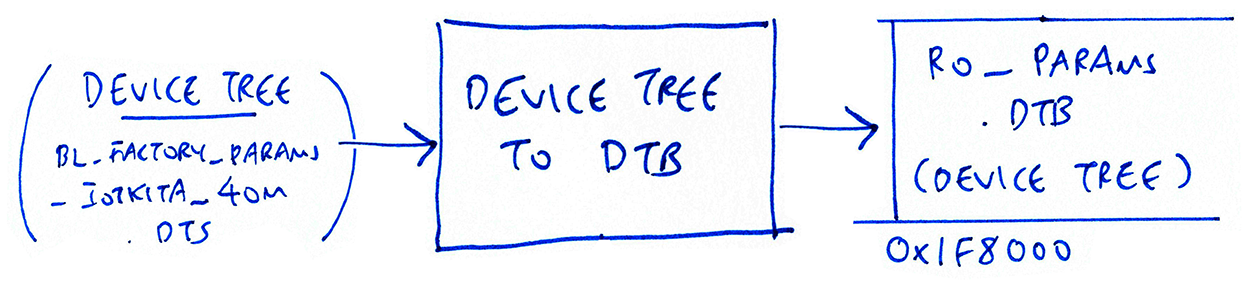
Compiling the BL602 Device Tree
What’s a Device Tree?
In Linux, a Device Tree describes the computer hardware and its settings: Board, Memory, SoC, USB Devices, … (In Windows, the hardware settings are stored in the Windows Registry)
BL602 doesn’t run Linux (yet). But it uses a similar Device Tree to load the settings for the BL602 peripherals and ports: GPIO, UART, PWM, SPI, WiFi, …
Whenever we update the firmware on BL602, the Device Tree is converted to binary format and flashed to BL602 ROM.
Arm Microcontrollers don’t use Device Trees… Is this overkill for BL602?
We may configure BL602’s peripherals and ports through the firmware code by calling the BL602 Hardware Abstraction Layer (HAL). So it’s not mandatory to use the Device Tree.
Configuring the WiFi stack for BL602 can get cumbersome if we code it in the firmware. Thus it makes sense to embed the WiFi configuration inside the Device Tree. (We’ll see this in a while)
UPDATE: Device Trees are used on BL602 because the BL602 IoT SDK is partly based on AliOS Things embedded operating system. This enables AliOS to access BL602 peripherals and ports via the Linux-style /dev name. For example, /dev/ttyS0 refers to the UART console.
Which functions in the BL602 HAL will use the Device Tree to configure the BL602 peripherals and ports?
Look for BL602 HAL Functions named dts like…
This function initialises the GPIO port by loading the Device Tree from ROM.
Here are some interesting snippets from the BL602 Device Tree: bl_factory_params_IoTKitA_40M.dts
(“40M” refers to the BL602 Clock Speed: 40 MHz)
(FYI: Some RISC-V microcontrollers don’t use Device Trees, like GD32 VF103. Device Trees seem to be common among microcontrollers based on SiFive RISC-V Cores, including BL602.)
This setting configures GPIO 5 for LED output…
gpio0 {
    status  = "okay";
    pin     = <5>;
    feature = "led";
    active  = "Hi";     //  Hi or Lo
    mode    = "blink";  //  blink or hearbeat
time = <100>; // Duration for this modeHere we configure GPIO 2 as a Button Input (note the debounce logic)…
gpio2 {
    status  = "okay";
    pin     = <2>;
    feature = "button";
    active  = "Hi";
    mode    = "multipress";
    button {
        debounce   = <10>;
        short_press_ms {
            start  = <100>;
            end    = <3000>;
            kevent = <2>;
        };
        long_press_ms {
            start  = <6000>;
            end    = <10000>;
            kevent = <3>;
        };
        longlong_press_ms {
            start  = <15000>;
            kevent = <4>;
        };
trig_level = "Hi";This is the default UART setting for /dev/ttyS0, on GPIO 7 and 16 at 2 Mbps…
uart@4000A000 {
    status     = "okay";
    id         = <0>;
    compatible = "bl602_uart";
    path       = "/dev/ttyS0";
    baudrate   = <2000000>;
    pin {
        rx = <7>;
        tx = <16>;
    };
    buf_size {
        rx_size = <512>;
        tx_size = <512>;
    };
    feature {
        tx  = "okay";
        rx  = "okay";
        cts = "disable";
        rts = "disable";
    };
};There is a second UART Port at /dev/ttyS1, on GPIO 3 and 4 at 115.2 kbps…
uart@4000A100 {
    status = "okay";
    id = <1>;
    compatible = "bl602_uart";
    path = "/dev/ttyS1";
    baudrate = <115200>;
    pin {
        rx = <3>;
        tx = <4>;
    };
    buf_size {
        rx_size = <512>;
        tx_size = <512>;
    };
    feature {
        tx = "okay";
        rx = "okay";
        cts = "disable";
        rts = "disable";
    };
};This PWM setting could be useful for turning PineCone’s onboard RGB LED into a Disco Light…
pwm {
    #address-cells = <1>;
    #size-cells    = <1>;
    pwm@4000A420 {
        status     = "okay";
        compatible = "bl602_pwm";
        reg        = <0x4000A420 0x20>;
        path       = "/dev/pwm0";
        id         = <0>;
        pin        = <0>;
        freq       = <800000>;
        duty       = <50>;
};This complicated setting configures the WiFi stack (including SSID)…
wifi {
    #address-cells = <1>;
    #size-cells    = <1>;
    region {
        country_code = <86>;
    };
    mac {
        mode         = "MBF";
        sta_mac_addr = [C8 43 57 82 73 40];
        ap_mac_addr  = [C8 43 57 82 73 02];
    };
    sta {
        ssid = "yourssid";
        pwd  = "yourapssword";
        auto_connect_enable = <0>;
    };
    ap {
        ssid = "bl_test_005";
        pwd  = "12345678";
        ap_channel       = <11>;
        auto_chan_detect = "disable";
};Bluetooth is configured in the Device Tree too…
bluetooth {
    #address-cells = <1>;
    #size-cells = <1>;
    brd_rf {
        pwr_table_ble = <13>;  //range:-3~15dbm; if set -3, please set 253 here
};(TODO: Where is the Device Tree stored in XIP Flash ROM? Is this Device Tree used by EFlash Loader or Boot2 Bootloader?)
Earlier we saw that our firmware is flashed to BL602 in two stages… (Just like the Falcon Rocket)
Stage 1: Transmit the EFlash Loader to BL602
Stage 2: Transmit our Flash Image to the EFlash Loader and write to ROM
Let’s zoom into each stage of the flashing process.
The BL602 UART Flashing Protocol is explained here…
First we transmit the firmware code for the EFlash Loader to BL602 at 512 kbps… (Slower = More Reliable)
eflash_loader_40m.bin(“40m” refers to the BL602 Clock Speed: 40 MHz)
Then we start running the EFlash Loader on BL602 in RAM at address 0x2201 0000
Next we compose the Flash Image that contains 5 sections of data…
| Offset | Contents |
|---|---|
0x0000 0000 | Boot2 Bootloader (transformed) |
0x0000 E000 | Partition Table (binary format) |
0x0000 F000 | Partition Table (binary format) |
0x0001 0000 | Firmware Image (transformed) |
0x001F 8000 | Device Tree (binary format) |
Then we transmit the Flash Image to EFlash Loader, which updates the BL602 Flash ROM.
The data is transmitted at 2 Mbps. (Instead of 512 kbps earlier)
EFlash Loader must acknowledge the data transfer within 5 seconds. Or the flashing shall be considered failed.
EFlash Loader is explained here…
We started this article with blflash (in Rust) … And pivoted to BLOpenFlasher (in Go). Why the switcheroo?
BLOpenFlasher is the official open-source flashing tool for BL602… But we couldn’t run make it work on Linux and Windows CMD (See this)
blflash (created by spacemeowx2) was derived from BLOpenFlasher and it works great on Linux, macOS and Windows CMD
Hence we’ll use blflash for flashing BL602… But to understand the flashing internals we shall refer to the official reference implementation: BLOpenFlasher.
UPDATE: blflash might need to be updated due to changes in the BL602 Embedded Flash. (See this)
How different is blflash from BLOpenFlasher?
blflash transmits the EFlash Loader at 115.2 kbps (vs 512 kbps in BLOpenFlasher)
blflash transmits the ROM data to be flashed at 1 Mbps (vs 2 Mbps in BLOpenFlasher)
The transmission speeds may be specified through the command-line options --initial-baud-rate (for EFlash Loader) and --baud-rate (for ROM data)…
blflash flash sdk_app_helloworld.bin \
  --port /dev/tty.usbserial-1410 \
  --initial-baud-rate 230400 \
  --baud-rate 230400
Note: blflash won’t work on macOS at 1 Mbps because it’s not a standard POSIX baud rate. That’s why we use a lower baud rate like 230.4 kbps.
blflash doesn’t support compiling Device Trees into binary format.
It uses a hard-coded binary Device Tree located here…
ro_params.dtbBLOpenFlasher uses a Python script to compile the Device Tree into binary…
dts2dtb.py
Compiling the BL602 Device Tree
What if we need to modify the Device Tree (like the WiFi SSID settings)?
We could compile the Device Tree with BLOpenFlasher. Then transfer the compiled Device Tree binary…
…from BLOpenFlasher to blflash for flashing.
Configuration files and firmware binaries for blflash…
Partition Table: partition_cfg_2M.toml
EFuse Configuration: efuse_bootheader_cfg.conf
Boot2 Bootloader: blsp_boot2.bin
EFlash Loader: eflash_loader_40m.bin
This information was derived from main.rs in blflash
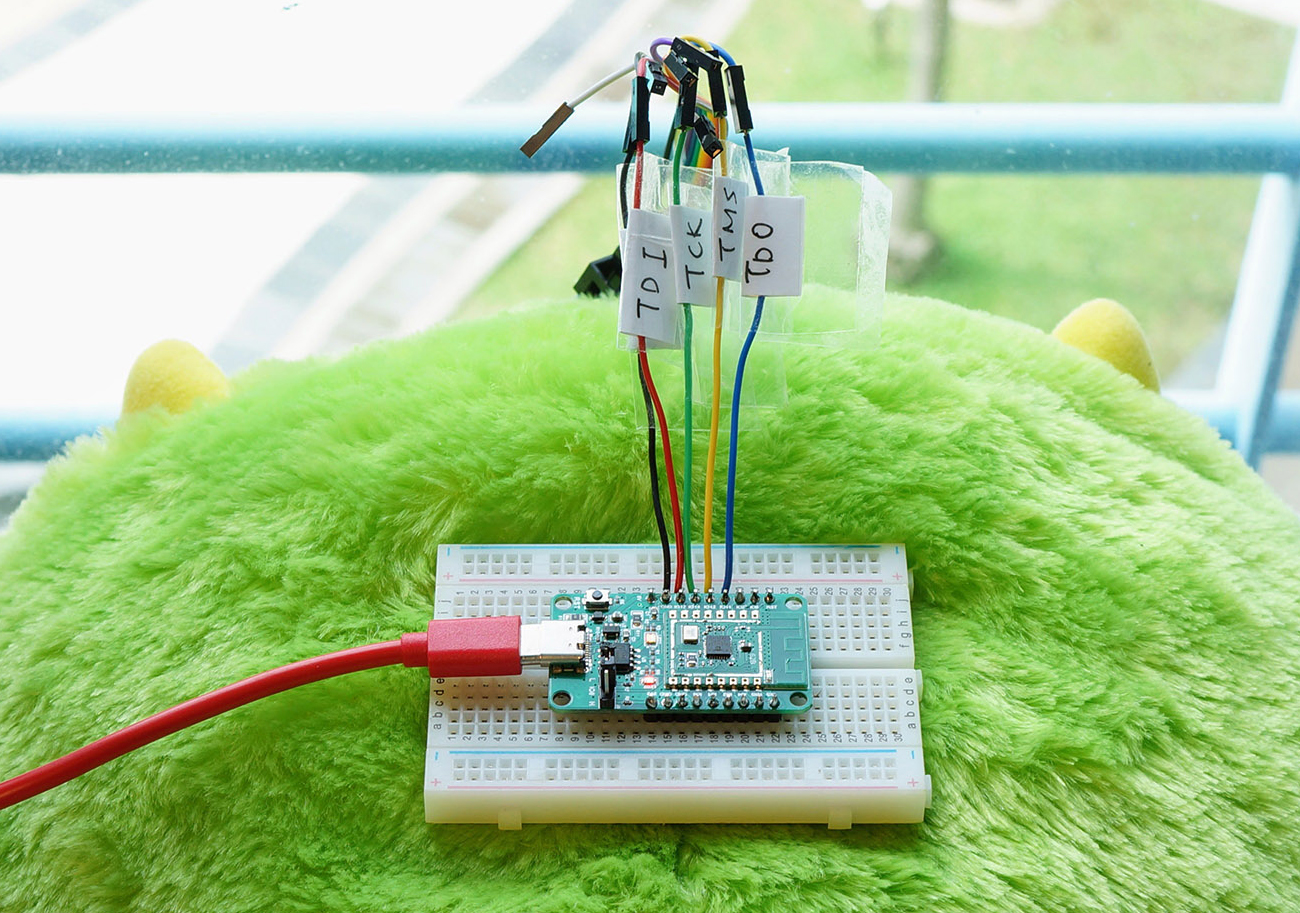
PineCone BL602 connected to Pinebook Pro
I had fun reverse-engineering the BL602 source code… And I’m delighted that the BL602 Community is creating really awesome tools like blflash!
I hope to uncover more BL602 goodies in 2021. Stay tuned!
Got a question, comment or suggestion? Create an Issue or submit a Pull Request here…
lupyuen.github.io/src/flash.md
Do all BL602 boards use a jumper or switch for flashing the firmware?
Yep because all BL602 boards run on the same Boot ROM… Which uses GPIO 8 to decide whether it should go into Flashing Mode.
Hopefully somebody will create a smarter way to flash BL602 boards and reduce the build-flash-test cycle time.
UPDATE: Check out this article…
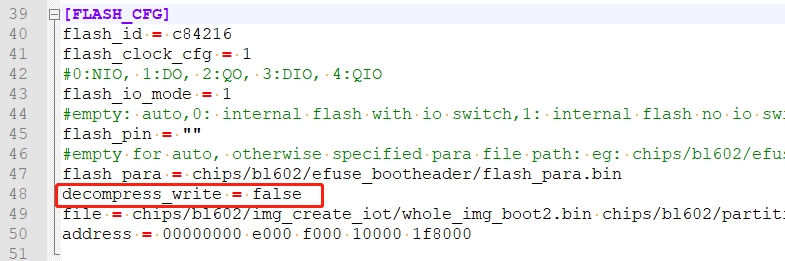
JF reported an interesting problem with his prototype PineDio Stack BL604 V2 board: It fails to flash any firmware.
(My PineDio Stack V2 flashes OK)
BLDevCube shows this error…
{"ErrorCode": "0036","ErrorMsg":"BFLB FLASH WRITE FAIL"}The engineers at Bouffalo Lab told us…
“We judge that a hardware error caused XZ work fail, maybe the ram of the chip is faulty.”
“We have a second way to bypass XZ. There is a configuration file in the /chips/bl602/eflash_loader/ eflash_loader_cfg.ini directory of the Bouffalo Lab DevCube tool.”
“The configuration file has a config item for decompress_write, Set it from true to false and save configuration file. After the configuration file is modified, you can try program flash again.”
JF disabled the XZ Decompression and the flashing worked OK.
(For Linux Only)
The USB UART Port /dev/ttyUSB0 is not accessible by normal Linux Users. (sudo is needed)
Thus we may see this error when flashing (blflash) or running (screen) BL602 firmware…
$ blflash flash sdk_app_helloworld.bin --port /dev/ttyUSB0

Error: IO error while using serial port:
Permission denied
To fix this, we need to add our user to the Linux Group that has access to the USB UART Port.
Enter this command to show the group…
ls -g /dev/ttyUSB0For Debian and Ubuntu: The group is dialout…
crw-rw---- 1 dialout 188, 0 Feb 16 19:50 /dev/ttyUSB0For Arch Linux and Manjaro: The group is uucp…
crw-rw---- 1 uucp 188, 0 Feb 16 19:50 /dev/ttyUSB0Enter this command to add our user to the group…
##  For Debian and Ubuntu:
sudo usermod -a -G dialout $USER

##  For Arch Linux and Manjaro:
sudo usermod -a -G uucp $USER
Logout and login for the changes to take effect…
logoutVerify that our user is in the group…
groupsWe should see dialout or uucp
We may now flash (blflash) or run (screen) BL602 firmware. (Without sudo)
Manjaro Linux Arm64 on Pinebook Pro
macOS Catalina
Windows 10
Will be compiled to binary format bl602/image/partition.bin and flashed to 0xE000 and 0xF000
Compiling the BL602 Partition Table
[pt_table]
#partition table is 4K in size
address0 = 0xE000
address1 = 0xF000

[[pt_entry]]
type = 0
name = "FW"
device = 0
address0 = 0x10000
size0 = 0xC8000
address1 = 0xD8000
size1 = 0x88000
## compressed image must set len,normal image can left it to 0
len = 0

[[pt_entry]]
type = 2
name = "mfg"
device = 0
address0 = 0x160000
size0 = 0x32000
address1 = 0
size1 = 0
## compressed image must set len,normal image can left it to 0
len = 0

[[pt_entry]]
type = 3
name = "media"
device = 0
address0 = 0x192000
size0 = 0x57000
address1 = 0
size1 = 0
## compressed image must set len,normal image can left it to 0
len = 0

[[pt_entry]]
type = 4
name = "PSM"
device = 0
address0 = 0x1E9000
size0 = 0x8000
address1 = 0
size1 = 0
## compressed image must set len,normal image can left it to 0
len = 0

[[pt_entry]]
type = 5
name = "KEY"
device = 0
address0 = 0x1F1000
size0 = 0x2000
address1 = 0
size1 = 0
## compressed image must set len,normal image can left it to 0
len = 0

[[pt_entry]]
type = 6
name = "DATA"
device = 0
address0 = 0x1F3000
size0 = 0x5000
address1 = 0
size1 = 0
## compressed image must set len,normal image can left it to 0
len = 0


[[pt_entry]]
type = 7
name = "factory"
device = 0
address0 = 0x1F8000
size0 = 0x7000
address1 = 0
size1 = 0
## compressed image must set len,normal image can left it to 0
len = 0

##if user want to put RF calibration data on flash, uncomment following pt entry
##[[pt_entry]]
##type = 8
##name = "rf_para"
##device = 0
##address0 = 0x1FF000
##size0 = 0x1000
##address1 = 0
##size1 = 0
## compressed image must set len,normal image can left it to 0
##len = 0From BLOpenFlasher/bl602/device_tree/ bl_factory_params_IoTKitA_40M.dts
Will be compiled by Python script dts2dtb.py to binary format bl602/image/ro_params.dtb and flashed to 0x1F8000
Compiling the BL602 Device Tree
/dts-v1/;
/include/ "bl602_base.dtsi";
// version: 17
// last_comp_version: 16
// boot_cpuid_phys: 0x0

/ {
    model = "bl bl602 AVB board";
    compatible = "bl,bl602-sample", "bl,bl602-common";
    #address-cells = <0x1>;
    #size-cells = <0x1>;
    gpio {
        #address-cells = <1>;
        #size-cells = <1>;
        max_num = <40>;
        gpio0 {
            status = "okay";
            pin  = <5>;
            feature = "led";
            active = "Hi"; //Hi or Lo
            mode = "blink"; //blink or hearbeat
            time = <100>; //duration for this mode
        };
        gpio1 {
            status = "disable";
            pin  = <6>;
            feature = "led";
            active = "Hi"; //Hi or Lo
            mode = "blink"; //blink or hearbeat
            time = <100>; //duration for this mode
        };
        gpio2 {
            status = "okay";
            pin = <2>;
            feature = "button";
            active = "Hi";
            mode = "multipress";
            button {
                debounce = <10>;
                short_press_ms {
                    start = <100>;
                    end = <3000>;
                    kevent = <2>;
                };
                long_press_ms {
                    start = <6000>;
                    end = <10000>;
                    kevent = <3>;
                };
                longlong_press_ms {
                    start = <15000>;
                    kevent = <4>;
                };
                trig_level = "Hi";
            };
            hbn_use = "disable";
        };
    };
    i2s {
        #address-cells = <1>;
        #size-cells = <1>;
        i2s@40017000 {
            status = "okay";
            compatible = "bl602_i2s";
            reg = <0x40017000 0x100>;
            mclk_only = "okay";
            pin {
                mclk = <11>;
            };
        };
        i2s@40017100 {
            status = "okay";
            compatible = "bl602_i2s";
            reg = <0x40017100 0x100>;
            mclk_only = "disable";
            pin {
                bclk = <12>;
                fs = <29>;
                do = <30>;
                di = <31>;
            };
        };
    };
    i2c {
        #address-cells = <1>;
        #size-cells = <1>;
        i2c@40011000 {
            status = "okay";
            compatible = "bl602_i2c";
            reg = <0x40011000 0x100>;
            pin {
                scl = <32>;
                sda = <13>;
            };
            devices {
                list_addr = <0x18 0x21>;
                list_driver = "i2c_es8311", "i2c_gc0308>";
            };
        };
        i2c@40011100 {
            status = "disable";
            compatible = "bl602_i2c";
            reg = <0x40011100 0x100>;
            pin {
                /*empty here*/
            };
        };
    };
    timer {
        #address-cells = <1>;
        #size-cells = <1>;
        timer@40014000 {
            status = "disable";
            compatible = "bl602_timer";
            reg = <0x40014000 0x100>;
        };
        timer@40014100 {
            status = "disable";
            compatible = "bl602_timer";
            reg = <0x40014100 0x100>;
        };
    };
    pwm {
        #address-cells = <1>;
        #size-cells = <1>;
        pwm@4000A420 {
            status = "okay";
            compatible = "bl602_pwm";
            reg = <0x4000A420 0x20>;
            path = "/dev/pwm0";
            id = <0>;
            pin = <0>;
            freq = <800000>;
            duty = <50>;
        };
        pwm@4000A440 {
            status = "disable";
            reg = <0x4000A440 0x20>;
            path = "/dev/pwm1";
            id = <1>;
            pin = <1>;
            freq = <5000>;
            duty = <50>;
        };
        pwm@4000A460 {
            status = "disable";
            reg = <0x4000A460 0x20>;
            path = "/dev/pwm2";
            id = <2>;
            pin = <2>;
            freq = <5000>;
            duty = <50>;
        };
        pwm@4000A480 {
            status = "disable";
            reg = <0x4000A480 0x20>;
            path = "/dev/pwm3";
            id = <3>;
            pin = <3>;
            freq = <5000>;
            duty = <50>;
        };
        pwm@4000A4A0 {
            status = "disable";
            reg = <0x4000A4A0 0x20>;
            path = "/dev/pwm4";
            id = <4>;
            pin = <4>;
            freq = <5000>;
            duty = <50>;
        };
    };
    ir {
        #address-cells = <1>;
        #size-cells = <1>;
        ctrltype = <0>;
        tx {
            status = "disable";
            pin = <11>;         // only support 11
            mode = "NEC";       // NEC、ExtenedNEC、RC5、SWM
            interval = <100>;   // ms
            active_mode = "Hi"; //Hi、Lo
        };
        rx {
            status = "okay";
            pin = <12>;         // only support 12 13
            mode = "NEC";       // NEC、ExtenedNEC、RC5、SWM
            active_mode = "Hi"; //Hi、Lo
        };
    };
    uart {
        #address-cells = <1>;
        #size-cells = <1>;
        uart@4000A000 {
            status = "okay";
            id = <0>;
            compatible = "bl602_uart";
            path = "/dev/ttyS0";
            baudrate = <2000000>;
            pin {
                rx = <7>;
                tx = <16>;
            };
            buf_size {
                rx_size = <512>;
                tx_size = <512>;
            };
            feature {
                tx = "okay";
                rx = "okay";
                cts = "disable";
                rts = "disable";
            };
        };
        uart@4000A100 {
            status = "okay";
            id = <1>;
            compatible = "bl602_uart";
            path = "/dev/ttyS1";
            baudrate = <115200>;
            pin {
                rx = <3>;
                tx = <4>;
            };
            buf_size {
                rx_size = <512>;
                tx_size = <512>;
            };
            feature {
                tx = "okay";
                rx = "okay";
                cts = "disable";
                rts = "disable";
            };
        };
    };
    spi {
        #address-cells = <1>;
        #size-cells = <1>;
        spi@4000F000 {
            status = "okay";         /* okay disable */
            mode = "master";
            reg = <0x4000F000 0x100>;   /* 4KB */
            path = "/dev/spi0";
            port = <0>;
            polar_phase = <1>;                 /* 0,1,2,3 */
            freq = <6000000>;
            pin {
                clk = <3>;
                cs = <2>;
                mosi = <1>;
                miso = <0>;
            };
            dma_cfg {
                tx_dma_ch = <2>;
                rx_dma_ch = <3>;
            };
        };
    };
    gpip {
        #address-cells = <1>;
        #size-cells = <1>;
        adc_key {
            status = "disable";
            pin = <9>;
            interrupt  = <3>;
            key_vol = <0 100 400 300 500>;
            key_pcb = "SW1", "SW2", "SW3", "SW4","SW5";
            key_event = "Usr1", "Usr2", "Start", "Up", "Down";
            key_raw = <1 2 3 4 5>;
        };
    };
    qspi {
        #address-cells = <1>;
        #size-cells = <1>;
        qspi@4000A000 {
            status = "disable";
            reg = <0x4000A000 0x1000>;/* 4KB */
        };
    };
    wifi {
        #address-cells = <1>;
        #size-cells = <1>;
        region {
            country_code = <86>;
        };
        mac {
            mode = "MBF";
            sta_mac_addr = [C8 43 57 82 73 40];
            ap_mac_addr = [C8 43 57 82 73 02];
        };
        sta {
            ssid = "yourssid";
            pwd = "yourapssword";
            auto_connect_enable = <0>;
        };
        ap {
            ssid = "bl_test_005";
            pwd = "12345678";
            ap_channel = <11>;
            auto_chan_detect = "disable";
        };
        brd_rf {
            xtal_mode = "MF";
            xtal = <36 36 0 60 60>;
            /*
            pwr_table = <   4 3 3 186
                            4 3 4 176
                            4 3 5 167
                            3 3 0 159
                            3 3 1 149
                            3 3 2 140
                            3 3 3 129
                            3 3 4 119
                            3 3 5 110
                            2 3 0 101
                            2 3 1 91
                            2 3 2 82
                            2 3 3 72
                            2 3 4 62
                            2 3 5 52
                            1 3 3 10>;
            */
            pwr_mode = "bf";//B: only use power offset in EFUSE; b: use power offset in EFUSE with incremental mode; F: only use power offset in Flash; f: use power offset in Flash with incremental mode
            pwr_table_11b = <20 20 20 18>;//1Mbps 2Mbps 5.5Mbps 11Mbps
            pwr_table_11g = <18 18 18 18 18 18 14 14>; //6Mbps 9Mbps 12Mbps 18MBps 24Mbps 36Mbps 48Mbps 54Mbps
            pwr_table_11n = <18 18 18 18 18 16 14 14>; //MCS0 MCS1 MCS2 MCS3 MCS4 MCS5 MCS6 MCS7
            pwr_offset = <10 10 10 10 10 10 10 10 10 10 10 10 10 10>;//due to the limit of current DTC, negative value is used. So we work around by adding all the poweroffset with 10. so 8 represents -2; 10 represents 0; 13 represents 3
            channel_div_table = <0x1EEC4EC4 0x1EFCB7CB 0x1F0D20D2 0x1F1D89D8 0x1F2DF2DF 0x1F3E5BE5 0x1F4EC4EC 0x1F5F2DF2 0x1F6F96F9 0x1F800000 0x1F906906 0x1FA0D20D 0x1FB13B13 0x1FD89D89 0x201F81F8>;
            channel_cnt_table = <0xA78A 0xA7E3 0xA83C 0xA895 0xA8ED 0xA946 0xA99F 0xA9F8 0xAA51 0xAAAA 0xAB03 0xAB5C 0xABB5 0xAC8A>;
            lo_fcal_div = <0x56B>;
        };
    };
    bluetooth {
        #address-cells = <1>;
        #size-cells = <1>;
        brd_rf {
            pwr_table_ble = <13>;  //range:-3~15dbm; if set -3, please set 253 here
        };
    };
};From BLOpenFlasher/bl602/ efuse_bootheader/ efuse_bootheader_cfg.conf
Will be used for transforming Boot2 Bootloader and Firmware Image
Also includes the Boot Header Configuration
Transforming firmware images with BL602 EFuse Configuration
[EFUSE_CFG]
########################################################################
#2bits
ef_sf_aes_mode = 0
#2bits
ef_sboot_sign_mode = 0
#2bits
ef_sboot_en = 0
#2bits
ef_dbg_jtag_dis = 0
#4bits
ef_dbg_mode = 0
#32bits
ef_dbg_pwd_low = 0
#32bits
ef_dbg_pwd_high = 0
###################################################################
ef_key_slot_2_w0 = 0
ef_key_slot_2_w1 = 0
ef_key_slot_2_w2 = 0
ef_key_slot_2_w3 = 0
ef_key_slot_3_w0 = 0
ef_key_slot_3_w1 = 0
ef_key_slot_3_w2 = 0
ef_key_slot_3_w3 = 0
ef_key_slot_4_w0 = 0
ef_key_slot_4_w1 = 0
ef_key_slot_4_w2 = 0
ef_key_slot_4_w3 = 0

wr_lock_key_slot_4_l = 0
wr_lock_dbg_pwd = 0
wr_lock_key_slot_2 = 0
wr_lock_key_slot_3 = 0
wr_lock_key_slot_4_h = 0
rd_lock_dbg_pwd = 0
rd_lock_key_slot_2 = 0
rd_lock_key_slot_3 = 0
rd_lock_key_slot_4 = 0

[BOOTHEADER_CFG]
magic_code = 0x504e4642
revision = 0x01
#########################flash cfg#############################
flashcfg_magic_code = 0x47464346
#flashcfg_magic_code=0
io_mode = 4
cont_read_support = 1
#0.5T sfctrl_clk_delay=0 sfctrl_clk_invert=3
#1 T sfctrl_clk_delay=1 sfctrl_clk_invert=1
#1.5T sfctrl_clk_delay=1 sfctrl_clk_invert=3
sfctrl_clk_delay = 1
sfctrl_clk_invert = 0x01

reset_en_cmd = 0x66
reset_cmd = 0x99
exit_contread_cmd = 0xff
exit_contread_cmd_size = 3

jedecid_cmd = 0x9f
jedecid_cmd_dmy_clk = 0
qpi_jedecid_cmd = 0x9f
qpi_jedecid_dmy_clk = 0

sector_size = 4
mfg_id = 0xef
page_size = 256

chip_erase_cmd = 0xc7
sector_erase_cmd = 0x20
blk32k_erase_cmd = 0x52
blk64k_erase_cmd = 0xd8

write_enable_cmd = 0x06
page_prog_cmd = 0x02
qpage_prog_cmd = 0x32
qual_page_prog_addr_mode = 0

fast_read_cmd = 0x0b
fast_read_dmy_clk = 1
qpi_fast_read_cmd = 0x0b
qpi_fast_read_dmy_clk = 1

fast_read_do_cmd = 0x3b
fast_read_do_dmy_clk = 1
fast_read_dio_cmd = 0xbb
fast_read_dio_dmy_clk = 0

fast_read_qo_cmd = 0x6b
fast_read_qo_dmy_clk = 1
fast_read_qio_cmd = 0xeb
fast_read_qio_dmy_clk = 2

qpi_fast_read_qio_cmd = 0xeb
qpi_fast_read_qio_dmy_clk = 2
qpi_page_prog_cmd = 0x02
write_vreg_enable_cmd = 0x50

wel_reg_index = 0
qe_reg_index = 1
busy_reg_index = 0
wel_bit_pos = 1

qe_bit_pos = 1
busy_bit_pos = 0
wel_reg_write_len = 2
wel_reg_read_len = 1

qe_reg_write_len = 1
qe_reg_read_len = 1
release_power_down = 0xab
busy_reg_read_len = 1

reg_read_cmd0 = 0x05
reg_read_cmd1 = 0x35

reg_write_cmd0 = 0x01
reg_write_cmd1 = 0x31

enter_qpi_cmd = 0x38
exit_qpi_cmd = 0xff
cont_read_code = 0x20
cont_read_exit_code = 0xff

burst_wrap_cmd = 0x77
burst_wrap_dmy_clk = 0x03
burst_wrap_data_mode = 2
burst_wrap_code = 0x40

de_burst_wrap_cmd = 0x77
de_burst_wrap_cmd_dmy_clk = 0x03
de_burst_wrap_code_mode = 2
de_burst_wrap_code = 0xF0

sector_erase_time = 300
blk32k_erase_time = 1200

blk64k_erase_time = 1200
page_prog_time = 5

chip_erase_time = 200000
power_down_delay = 3
qe_data = 0

flashcfg_crc32 = 0

#########################clk cfg####################################
clkcfg_magic_code = 0x47464350
#clkcfg_magic_code=0

#0:Not use XTAL to set PLL,1:XTAL is 24M ,2:XTAL is 32M ,3:XTAL is 38.4M
#4:XTAL is 40M,5:XTAL is 26M,6:XTAL is RC32M
xtal_type = 4
#0:RC32M,1:XTAL,2:PLL 48M,3:PLL 120M,4:PLL 160M,5:PLL 192M
pll_clk = 4
hclk_div = 0
bclk_div = 1
#0:120M,1:XCLK(RC32M or XTAL),2:48M,3:80M,4:BCLK,5:96M
flash_clk_type = 3
flash_clk_div = 1
clkcfg_crc32 = 0

########################boot cfg####################################
#1:ECC
sign = 0
#1:AES128,2:AES256,3:AES192
encrypt_type = 0
key_sel = 0
no_segment = 1
cache_enable = 1
notload_in_bootrom = 0
aes_region_lock = 0
cache_way_disable = 0x03
crc_ignore = 0
hash_ignore = 0

########################image cfg####################################
#total image len or segment count
img_len = 0x100
bootentry = 0
#img RAM address or flash offset
img_start = 0x2000

#img hash
hash_0 = 0xdeadbeef
hash_1 = 0
hash_2 = 0
hash_3 = 0
hash_4 = 0
hash_5 = 0
hash_6 = 0
hash_7 = 0

crc32 = 0xdeadbeefSample flashing log emitted by bl_iot_sdk/tools/ flash_tool/BLDevCube.exe on Windows…
[23:01:59.398] - [param]
interface_type = "Uart"
comport_uart = "COM5"
speed_uart = "2000000"
speed_jlink = "1000"
bl60x_brd = "IoTKitA"
bl60x_xtal = "40M"
aes_key = ""
aes_iv = ""
addr = "0x0"

[check_box]
partition_download = true
boot2_download = true
bin_download = true
media_download = false
use_romfs = false
mfg_download = false
ro_params_download = true
ckb_erase_all = "False"
encrypt = false
download_single = false

[input_path]
pt_bin_input = "C:\\pinecone\\bl_iot_sdk\\tools\\flash_tool\\bl602\\partition\\partition_cfg_2M.toml"
boot2_bin_input = "C:\\pinecone\\bl_iot_sdk\\image_conf\\bl602\\blsp_boot2_release.bin"
cfg2_bin_input = "C:\\Users\\user\\Downloads\\customer_app.zip\\sdk_app_helloworld\\build_out\\sdk_app_helloworld.bin"
meida_bin_input = ""
romfs_dir_input = ""
mfg_bin_input = ""
img_bin_input = ""
[23:01:59.406] - ========= Interface is Uart =========
[23:01:59.420] - eflash loader bin is eflash_loader_40m.bin
[23:01:59.421] - ========= chip flash id: ef4015 =========
[23:01:59.468] - Update flash cfg finished
[23:01:59.492] - create partition.bin, pt_new == True
[23:01:59.504] - bl60x_fw_boot_head_gen xtal: 40M
[23:01:59.509] - Create bootheader using C:\pinecone\bl_iot_sdk\tools\flash_tool\bl602\efuse_bootheader/efuse_bootheader_cfg.ini
[23:01:59.510] - Updating data according to <C:\pinecone\bl_iot_sdk\tools\flash_tool\bl602\efuse_bootheader/efuse_bootheader_cfg.ini[BOOTHEADER_CFG]>
[23:01:59.513] - Created file len:176
[23:01:59.532] - Create efuse using C:\pinecone\bl_iot_sdk\tools\flash_tool\bl602\efuse_bootheader/efuse_bootheader_cfg.ini
[23:01:59.532] - Updating data according to <C:\pinecone\bl_iot_sdk\tools\flash_tool\bl602\efuse_bootheader/efuse_bootheader_cfg.ini[EFUSE_CFG]>
[23:01:59.535] - Created file len:128
[23:01:59.570] - ========= sp image create =========
[23:01:59.642] - Image hash is b'1b80574f36095a60475887c38abcbd10735eb6b2c07f7b119b79fe6755445dfa'
[23:01:59.643] - Header crc: b'6309dbed'
[23:01:59.643] - Write flash img
[23:01:59.677] - bl60x_fw_boot_head_gen xtal: 40M
[23:01:59.682] - Create bootheader using C:\pinecone\bl_iot_sdk\tools\flash_tool\bl602\efuse_bootheader/efuse_bootheader_cfg.ini
[23:01:59.683] - Updating data according to <C:\pinecone\bl_iot_sdk\tools\flash_tool\bl602\efuse_bootheader/efuse_bootheader_cfg.ini[BOOTHEADER_CFG]>
[23:01:59.685] - Created file len:176
[23:01:59.693] - Create efuse using C:\pinecone\bl_iot_sdk\tools\flash_tool\bl602\efuse_bootheader/efuse_bootheader_cfg.ini
[23:01:59.694] - Updating data according to <C:\pinecone\bl_iot_sdk\tools\flash_tool\bl602\efuse_bootheader/efuse_bootheader_cfg.ini[EFUSE_CFG]>
[23:01:59.697] - Created file len:128
[23:01:59.732] - ========= sp image create =========
[23:01:59.773] - Image hash is b'26d56114b6c744112d88dccf5de778fb40a7feffdd9cb9e0b9c0c299461bf48d'
[23:01:59.773] - Header crc: b'2a98df4f'
[23:01:59.774] - Write flash img
[23:01:59.804] - FW Header is 176, 3920 still needed
[23:01:59.806] - FW OTA bin header is Done. Len is 4096
[23:01:59.854] - FW OTA bin is Done. Len is 25216
[23:01:59.931] - FW OTA xz is Done
[23:01:59.932] - ========= eflash loader config =========
[23:01:59.956] - =========C:\pinecone\bl_iot_sdk\tools\flash_tool\bl602\device_tree/bl_factory_params_IoTKitA_40M.dtsbl602/device_tree/ro_params.dtb=========
[23:02:00.260] - Version: bflb_eflash_loader_v1.7.2
[23:02:00.261] - Program Start
[23:02:00.261] - option is ['-p', '-t', 'flash', '-d', 'COM5']
[23:02:00.262] - Config file: C:\pinecone\bl_iot_sdk\tools\flash_tool\bl602\eflash_loader/eflash_loader_cfg.ini
[23:02:00.263] - com device: COM5
[23:02:00.264] - chiptype: bl602
[23:02:00.264] - ========= Interface is Uart =========
[23:02:00.265] - Eflash load helper file: C:\pinecone\bl_iot_sdk\tools\flash_tool\bl602\eflash_loader/eflash_loader_40m.bin
[23:02:00.265] - ========= load eflash_loader.bin =========
[23:02:00.265] - Load eflash_loader.bin via uart
[23:02:00.266] - ========= image load =========
[23:02:00.541] - tx rx and power off, press the machine!
[23:02:00.542] - cutoff time is 0.1
[23:02:00.651] - power on tx and rx
[23:02:01.463] - reset cnt: 0, reset hold: 0.005, shake hand delay: 0.1
[23:02:01.464] - clean buf
[23:02:01.571] - send sync
[23:02:01.805] - ack is b'4f4b'
[23:02:01.852] - shake hand success
[23:02:02.420] - get_boot_info
[23:02:02.423] - data read is b'010000000000000003000000619dc005b9181d00'
[23:02:02.424] - sign is 0 encrypt is 0
[23:02:02.424] - segcnt is 1
[23:02:02.433] - segdata_len is 21872
[23:02:02.518] - 4080/21872
[23:02:02.603] - 8160/21872
[23:02:02.689] - 12240/21872
[23:02:02.774] - 16320/21872
[23:02:02.859] - 20400/21872
[23:02:02.891] - 21872/21872
[23:02:02.894] - Run img
[23:02:03.007] - Load helper bin time cost(ms): 2741.156982421875
[23:02:03.115] - Program operation
[23:02:03.116] - ========= flash read jedec ID =========
[23:02:03.116] - Flash load shake hand
[23:02:03.117] - clean buf
[23:02:03.226] - send sync
[23:02:03.463] - ack is b'4f4b'
[23:02:03.512] - Read flash jedec ID
[23:02:03.513] - readdata:
[23:02:03.514] - b'ef401500'
[23:02:03.514] - Finished
[23:02:03.515] - Dealing Index 0
[23:02:03.516] - ========= programming bl602/img_create/whole_img_boot2.bin to 0x00000000
[23:02:03.517] - ========= flash load =========
[23:02:03.518] - ========= flash erase =========
[23:02:03.519] - Erase flash  from 0x0 to 0xb6cf
[23:02:03.813] - Erase time cost(ms): 292.946044921875
[23:02:03.855] - Load 2048/46800 {"progress":4}
Load 4096/46800 {"progress":8}
[23:02:03.893] - Load 6144/46800 {"progress":13}
Load 8192/46800 {"progress":17}
[23:02:03.929] - Load 10240/46800 {"progress":21}
Load 12288/46800 {"progress":26}
[23:02:03.966] - Load 14336/46800 {"progress":30}
Load 16384/46800 {"progress":35}
[23:02:04.004] - Load 18432/46800 {"progress":39}
Load 20480/46800 {"progress":43}
[23:02:04.041] - Load 22528/46800 {"progress":48}
Load 24576/46800 {"progress":52}
[23:02:04.079] - Load 26624/46800 {"progress":56}
Load 28672/46800 {"progress":61}
[23:02:04.115] - Load 30720/46800 {"progress":65}
Load 32768/46800 {"progress":70}
[23:02:04.151] - Load 34816/46800 {"progress":74}
Load 36864/46800 {"progress":78}
[23:02:04.187] - Load 38912/46800 {"progress":83}
Load 40960/46800 {"progress":87}
[23:02:04.224] - Load 43008/46800 {"progress":91}
Load 45056/46800 {"progress":96}
[23:02:04.240] - Load 46800/46800 {"progress":100}
[23:02:04.241] - Write check
[23:02:04.243] - Flash load time cost(ms): 428.165283203125
[23:02:04.243] - Finished
[23:02:04.245] - Sha caled by host: cc1ce53503cdf01b3ec47225589046bf6e99b3ddba900f8ed9a6201ebb9f323f
[23:02:04.245] - xip mode Verify
[23:02:04.259] - Read Sha256/46800
[23:02:04.260] - Flash xip readsha time cost(ms): 13.030517578125
[23:02:04.260] - Finished
[23:02:04.262] - Sha caled by dev: cc1ce53503cdf01b3ec47225589046bf6e99b3ddba900f8ed9a6201ebb9f323f
[23:02:04.263] - Verify success
[23:02:04.263] - Dealing Index 1
[23:02:04.264] - ========= programming bl602/partition/partition.bin to 0xe000
[23:02:04.264] - ========= flash load =========
[23:02:04.265] - ========= flash erase =========
[23:02:04.265] - Erase flash  from 0xe000 to 0xe10f
[23:02:04.301] - Erase time cost(ms): 36.224609375
[23:02:04.306] - Load 272/272 {"progress":100}
[23:02:04.306] - Write check
[23:02:04.309] - Flash load time cost(ms): 7.0009765625
[23:02:04.309] - Finished
[23:02:04.310] - Sha caled by host: da4d2fe7d42a71246b0e84d64665b70ad701435f89716c48e6f23ef55340eaa0
[23:02:04.310] - xip mode Verify
[23:02:04.320] - Read Sha256/272
[23:02:04.320] - Flash xip readsha time cost(ms): 8.000732421875
[23:02:04.320] - Finished
[23:02:04.322] - Sha caled by dev: da4d2fe7d42a71246b0e84d64665b70ad701435f89716c48e6f23ef55340eaa0
[23:02:04.323] - Verify success
[23:02:04.323] - Dealing Index 2
[23:02:04.324] - ========= programming bl602/partition/partition.bin to 0xf000
[23:02:04.324] - ========= flash load =========
[23:02:04.325] - ========= flash erase =========
[23:02:04.325] - Erase flash  from 0xf000 to 0xf10f
[23:02:04.362] - Erase time cost(ms): 36.013427734375
[23:02:04.367] - Load 272/272 {"progress":100}
[23:02:04.368] - Write check
[23:02:04.370] - Flash load time cost(ms): 6.999755859375
[23:02:04.370] - Finished
[23:02:04.371] - Sha caled by host: da4d2fe7d42a71246b0e84d64665b70ad701435f89716c48e6f23ef55340eaa0
[23:02:04.372] - xip mode Verify
[23:02:04.382] - Read Sha256/272
[23:02:04.382] - Flash xip readsha time cost(ms): 8.004150390625
[23:02:04.382] - Finished
[23:02:04.384] - Sha caled by dev: da4d2fe7d42a71246b0e84d64665b70ad701435f89716c48e6f23ef55340eaa0
[23:02:04.385] - Verify success
[23:02:04.385] - Dealing Index 3
[23:02:04.386] - ========= programming bl602/img_create/whole_img.bin to 0x10000
[23:02:04.386] - ========= flash load =========
[23:02:04.387] - ========= flash erase =========
[23:02:04.387] - Erase flash  from 0x10000 to 0x1627f
[23:02:04.612] - Erase time cost(ms): 223.555419921875
[23:02:04.656] - Load 2048/25216 {"progress":8}
Load 4096/25216 {"progress":16}
[23:02:04.700] - Load 6144/25216 {"progress":24}
Load 8192/25216 {"progress":32}
[23:02:04.743] - Load 10240/25216 {"progress":40}
Load 12288/25216 {"progress":48}
[23:02:04.781] - Load 14336/25216 {"progress":56}
Load 16384/25216 {"progress":64}
[23:02:04.818] - Load 18432/25216 {"progress":73}
Load 20480/25216 {"progress":81}
[23:02:04.856] - Load 22528/25216 {"progress":89}
Load 24576/25216 {"progress":97}
[23:02:04.862] - Load 25216/25216 {"progress":100}
[23:02:04.863] - Write check
[23:02:04.865] - Flash load time cost(ms): 251.464599609375
[23:02:04.866] - Finished
[23:02:04.867] - Sha caled by host: 3507cc26ec24cff845d18eafeb5b50e57e94b443fc539994e79e1f5e8e83a18d
[23:02:04.867] - xip mode Verify
[23:02:04.880] - Read Sha256/25216
[23:02:04.880] - Flash xip readsha time cost(ms): 10.96826171875
[23:02:04.881] - Finished
[23:02:04.883] - Sha caled by dev: 3507cc26ec24cff845d18eafeb5b50e57e94b443fc539994e79e1f5e8e83a18d
[23:02:04.883] - Verify success
[23:02:04.883] - Dealing Index 4
[23:02:04.884] - ========= programming bl602/device_tree/ro_params.dtb to 0x1f8000
[23:02:04.884] - ========= flash load =========
[23:02:04.885] - ========= flash erase =========
[23:02:04.885] - Erase flash  from 0x1f8000 to 0x1f9626
[23:02:04.957] - Erase time cost(ms): 71.47705078125
[23:02:04.993] - Load 2048/5671 {"progress":36}
Load 4096/5671 {"progress":72}
[23:02:05.009] - Load 5671/5671 {"progress":100}
[23:02:05.009] - Write check
[23:02:05.011] - Flash load time cost(ms): 52.88330078125
[23:02:05.012] - Finished
[23:02:05.012] - Sha caled by host: ae42d69b09c2eb134b202b412c00ff175e10b625e2d3c0a2820378bd341926b8
[23:02:05.013] - xip mode Verify
[23:02:05.023] - Read Sha256/5671
[23:02:05.023] - Flash xip readsha time cost(ms): 8.00732421875
[23:02:05.024] - Finished
[23:02:05.026] - Sha caled by dev: ae42d69b09c2eb134b202b412c00ff175e10b625e2d3c0a2820378bd341926b8
[23:02:05.026] - Verify success
[23:02:05.027] - Program Finished
[23:02:05.028] - All time cost(ms): 4766.982421875
[23:02:05.136] - [All Success]