📝 17 Oct 2020
We can build Watch Faces for PineTime Smart Watch in C... Right?
Sure we can create Watch Faces in C. But as our Watch Face code in C grows in complexity... It becomes harder to test, deploy, maintain and extend.
Today we'll look at a more sustainable way to build Watch Faces... With a Watch Face Framework in Rust!
Rust Watch Faces may also be catalogued at crates.io... So that PineTime Owners may easily discover, extend and remix the Watch Faces.
Let's learn how...
Watch Faces are built in Rust with the Watch Face Framework pinetime-watchface.
Our Rust Watch Face needs to implement the WatchFace Trait that's defined in pinetime-watchface/blob/master/src/lib.rs
/// Watch Faces shall implement this trait
pub trait WatchFace {
    /// Create the widgets for the Watch Face
    fn new() -> MynewtResult<Self>
        where Self: core::marker::Sized;  //  Result type must have known size

    /// Update the widgets in the Watch Face with the current state
    fn update(&self, state: &WatchFaceState) -> MynewtResult<()>;
}
(If you're new to Rust... A Trait in Rust works like an Interface in Java and TypeScript)
The WatchFace Trait says we need to define two functions...
new: To create the Watch Face. This is called by the PineTime Firmware when PineTime starts.
update: To update the Watch Face with the current date and time. This is called every minute by the PineTime Firmware to refresh our Watch Face.
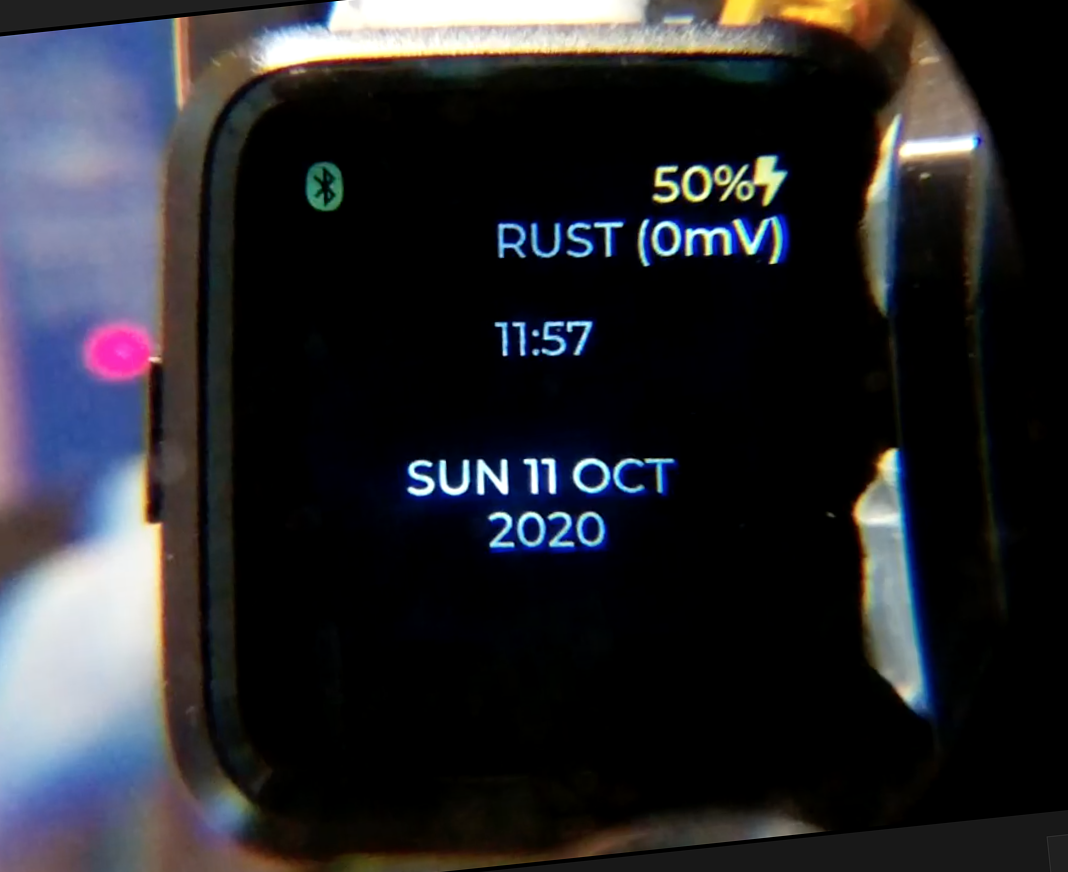
Let's create a very simple Watch Face: BarebonesWatchFace
Preview this Watch Face in your web browser
Here's how we implement the new function to create our Watch Face: barebones-watchface/src/lib.rs
impl WatchFace for BarebonesWatchFace {

    /// Create the widgets for the Watch Face
    fn new() -> MynewtResult<Self> {
        //  Get the active screen
        let screen = watchface::get_active_screen();

        //  Create the widgets
        let watch_face = Self {
            //  Create a Label for Time: "00:00"
            time_label: {
                let lbl = label::create(screen, ptr::null()) ? ;  //  `?` will terminate the function in case of error
                label::set_long_mode(lbl, label::LV_LABEL_LONG_BREAK) ? ;
                label::set_text(     lbl, strn!("00:00")) ? ;     //  strn creates a null-terminated string
                obj::set_width(      lbl, 240) ? ;
                obj::set_height(     lbl, 200) ? ;
                label::set_align(    lbl, label::LV_LABEL_ALIGN_CENTER) ? ;
                obj::align(          lbl, screen, obj::LV_ALIGN_CENTER, 0, -30) ? ;
                lbl  //  Return the label as time_label
            },
We're rendering the UI with LVGL Library Version 7.
The code above creates a Time Label for the time and positions the Label at the centre of PineTime's display.
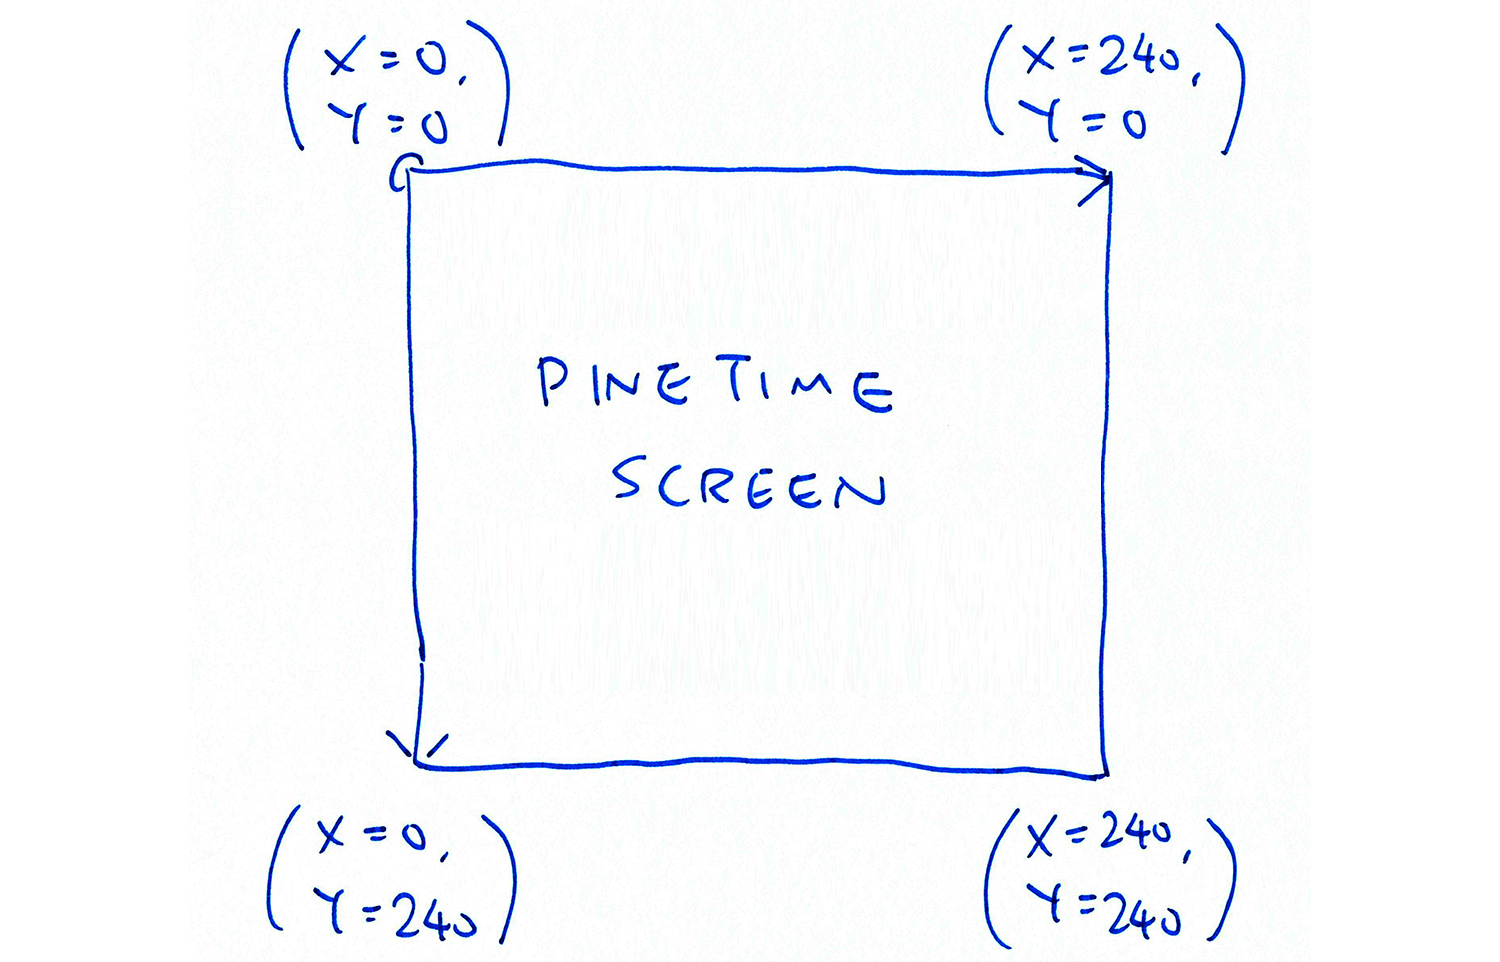
LVGL uses screen coordinates (x, y) in this layout...
LVGL is a C Library, so calling the LVGL Library in Rust looks... Different.
Here are the LVGL Functions we call above and their original names in C...
| LVGL Rust Function | LVGL C Function | What it does |
|---|---|---|
label::set_long_mode | lv_label_set_long_mode | Set the text wrapping for the label |
label::set_text | lv_label_set_text | Set the text in the label |
obj::set_width | lv_obj_set_width | Set the label width (in pixels) |
obj::set_height | lv_obj_set_height | Set the label height (in pixels) |
label::set_align | lv_label_set_align | Set the label text alignment |
obj::align | lv_obj_align | Align the label to the screen |
LVGL Label Widgets are documented here: Label Widget
LVGL Base Objects are documented here: Base Object
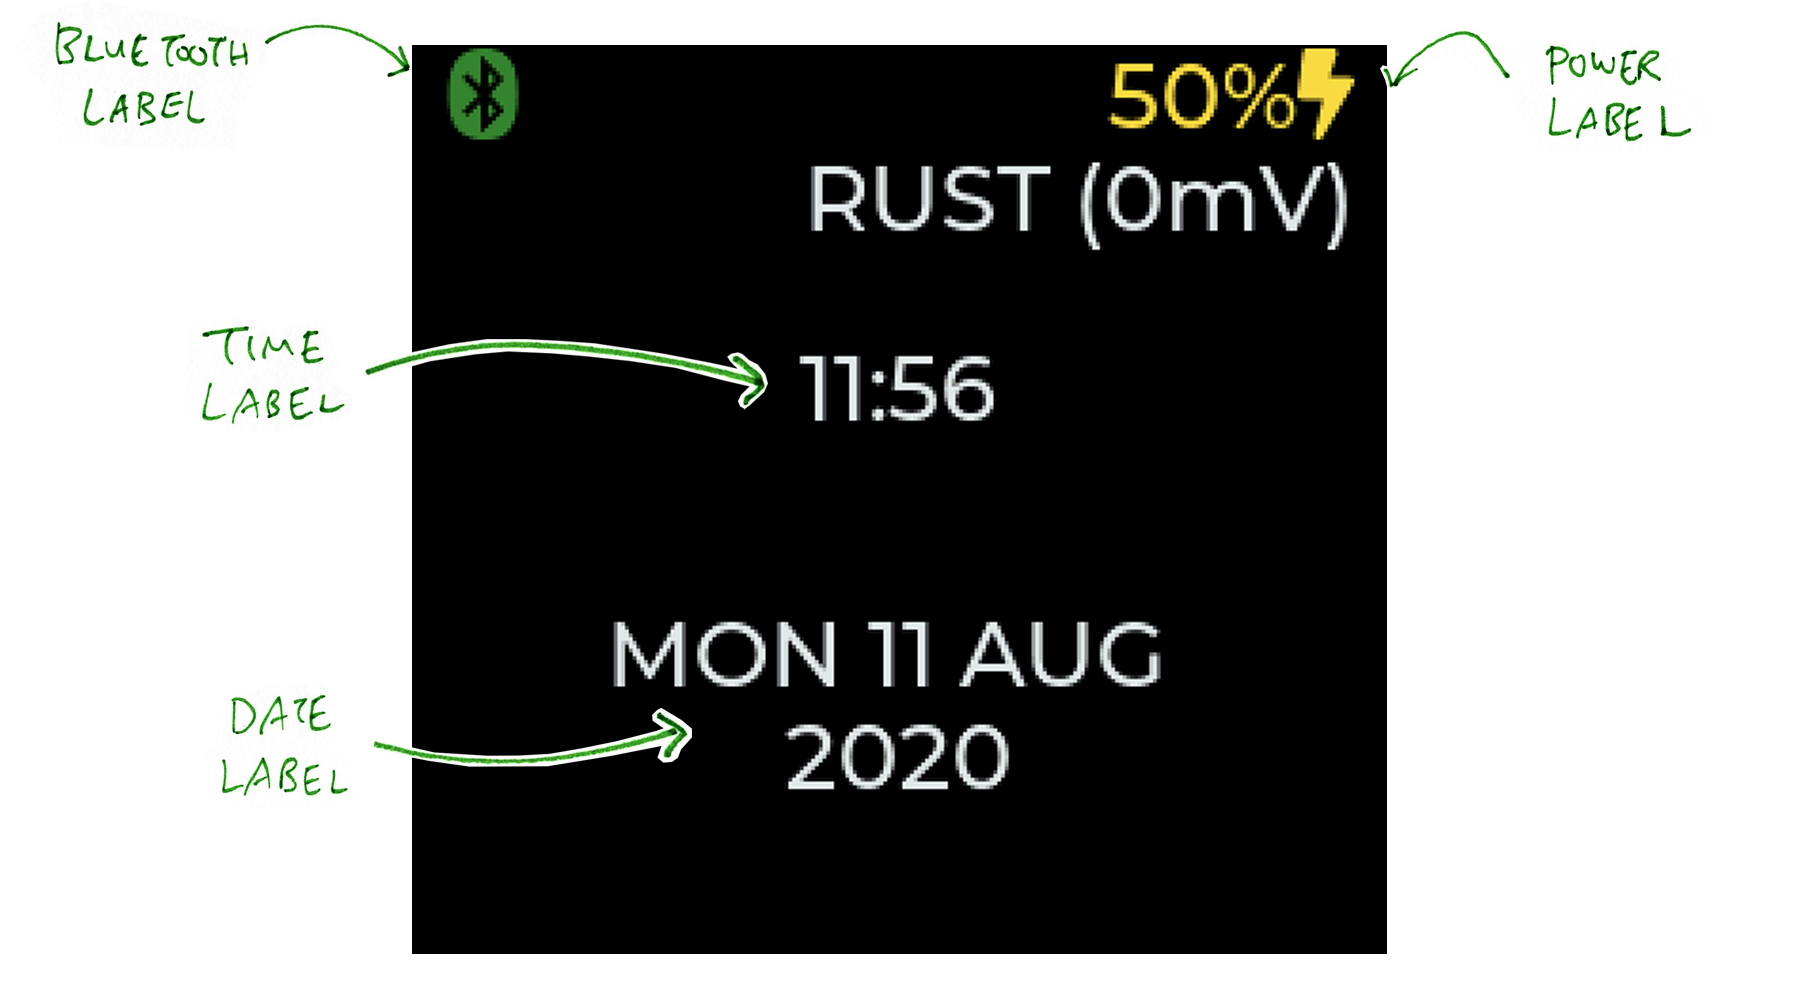
Below the Time Label, we create a Date Label for the date...
            //  Create a Label for Date: "MON 22 MAY 2020"
            date_label: {
                let lbl = label::create(screen, ptr::null()) ? ;
                label::set_long_mode(lbl, label::LV_LABEL_LONG_BREAK) ? ;
                obj::set_width(      lbl, 200) ? ;
                obj::set_height(     lbl, 200) ? ;
                label::set_text(     lbl, strn!("")) ? ;  //  strn creates a null-terminated string
                label::set_align(    lbl, label::LV_LABEL_ALIGN_CENTER) ? ;
                obj::align(          lbl, screen, obj::LV_ALIGN_CENTER, 0, 40) ? ;
                lbl  //  Return the label as date_label
            },
At top left we create a Bluetooth Label to indicate whether PineTime is connected on Bluetooth LE...
            //  Create a Label for Bluetooth State
            bluetooth_label: {
                let lbl = label::create(screen, ptr::null()) ? ;
                obj::set_width(     lbl, 50) ? ;
                obj::set_height(    lbl, 80) ? ;
                label::set_text(    lbl, strn!("")) ? ;  //  strn creates a null-terminated string
                label::set_recolor( lbl, true) ? ;
                label::set_align(   lbl, label::LV_LABEL_ALIGN_LEFT) ? ;
                obj::align(         lbl, screen, obj::LV_ALIGN_IN_TOP_LEFT, 0, 0) ? ;
                lbl  //  Return the label as bluetooth_label
            },
At top right we create a Power Label to indicate the battery status and whether PineTime is charging...
            //  Create a Label for Power Indicator
            power_label: {
                let lbl = label::create(screen, ptr::null()) ? ;
                obj::set_width(    lbl, 80) ? ;
                obj::set_height(   lbl, 20) ? ;
                label::set_text(   lbl, strn!("")) ? ;  //  strn creates a null-terminated string
                label::set_recolor(lbl, true) ? ;
                label::set_align(  lbl, label::LV_LABEL_ALIGN_RIGHT) ? ;
                obj::align(        lbl, screen, obj::LV_ALIGN_IN_TOP_RIGHT, 0, 0) ? ;
                lbl  //  Return the label as power_label
            },
        };
        //  Return the watch face
        Ok(watch_face)
    }
For more details about calling LVGL from Rust, check out this article...
"Porting PineTime Watch Face from C to Rust On RIOT with LVGL"
Why did we call set_recolor for the Bluetooth and Power labels?
Instead of the default white colour, we'll be showing the Bluetooth and Power Labels in various colour (to indicate the current status).
By calling set_recolor on the Bluetooth and Power Labels, we may specify #RGB Colour Codes inside the labels. For example, this label...
#00ff00 OK#
Will show the text OK in Green. We'll see the #RGB Colour Codes in a while.
Where are the Labels defined?
The Labels are defined in the BarebonesWatchFace Struct in lib.rs...
/// Barebones Watch Face with no frills
pub struct BarebonesWatchFace {
    /// Label for Time: "12:34"
    pub time_label:      lvgl::Ptr,
    /// Label for Date: "MON 22 MAY 2020"
    pub date_label:      lvgl::Ptr,
    /// Label for Bluetooth State (Bluetooth Icon)
    pub bluetooth_label: lvgl::Ptr,
    /// Label for Power Indicator (Charging & Battery)
    pub power_label:     lvgl::Ptr,
}
Recall that to roll our Watch Face we need to provide two functions: new (to create the Watch Face) and update (to update our Watch Face).
In the previous section we have done new, now let's do update in lib.rs...
impl WatchFace for BarebonesWatchFace {

    /// Update the widgets in the Watch Face with the current state
    fn update(&self, state: &WatchFaceState) -> MynewtResult<()> {
        //  Populate the Time and Date Labels
        self.update_date_time(state) ? ;

        //  Populate the Bluetooth Label
        self.update_bluetooth(state) ? ;

        //  Populate the Power Label
        self.update_power(state) ? ;
        Ok(())
    }
Every minute the Watch Face Framework calls update, passing a WatchFaceState with the current date, time, Bluetooth status and charging status: pinetime-watchface/src/lib.rs
/// State for the Watch Face
#[repr(C)]  //  Allow this struct to be passed to C (for WebAssembly integration)
pub struct WatchFaceState {
    /// Current date and time
    pub time:       WatchFaceTime,
    /// Bluetooth state
    pub bluetooth:  BluetoothState,
    /// Current power
    pub millivolts: u32,
    /// True if watch is charging
    pub charging:   bool,
    /// True if watch is powered
    pub powered:    bool,
}
Let's study how the update_date_time, update_bluetooth and update_power functions refresh the Date, Time, Bluetooth and Power Labels based on the WatchFaceState...
Preview this Watch Face in your web browser
Every minute the update function calls update_date_time, passing a WatchFaceState struct.
Inside the WatchFaceState struct is a WatchFaceTime struct that contains the current date and time...
/// Watch Face Time
#[repr(C)]  //  Allow this struct to be passed to C (for WebAssembly integration)
pub struct WatchFaceTime {
    ///  Year (4 digit year)
    pub year:       u16,
    ///  Month (1 - 12)
    pub month:       u8,
    ///  Day (1 - 31)
    pub day:         u8,
    ///  Hour (0 - 23)
    pub hour:        u8,
    ///  Minute (0 - 59)
    pub minute:      u8,
    ///  Second (0 - 59)
    pub second:      u8,
    /// Day of week (0 - 6; 0 = Sunday)
    pub day_of_week: u8,
}
Our function update_date_time refreshes the Time Label like so: barebones-watchface/src/lib.rs
impl BarebonesWatchFace {

    /// Populate the Time and Date Labels with the time and date
    fn update_date_time(&self, state: &WatchFaceState) -> MynewtResult<()> {
        //  Format the time as "12:34"
        let mut buf = new_string();
        write!(
            &mut buf,         //  Write the formatted text here
            "{:02}:{:02}\0",  //  Must terminate Rust strings with null
            state.time.hour,
            state.time.minute
        ).expect("time fail");

        //  Set the label
        label::set_text(
            self.time_label,
            &to_strn(&buf)
        ) ? ;
What's write!?
write! is a Rust Macro that writes formatted text strings. It works like a safer version of sprintf as explained here: "Heapless Strings in Rust"
What's new_string?
new_string creates a new Heapless String on the stack. Unlike normal the Rust String, our Heapless String doesn't require any Heap Memory and works well on embedded platforms.
Our Watch Face Framework exposes a Heapless String Type that limits strings to 64 characters. Which is sufficient for most Watch Faces (and prevents buffer overflows). This is defined in pinetime-watchface/src/lib.rs
/// Limit Strings to 64 chars (which may include multiple color codes like "#ffffff")
pub type String = heapless::String::<heapless::consts::U64>;

/// Create a new String
pub const fn new_string() -> String {
    heapless::String(heapless::i::String::new())
}

/// Convert a static String to null-terminated Strn
pub fn to_strn(str: &String) -> Strn {
    Strn::new(str.as_bytes())
}
Our function update_date_time also refreshes the Date Label: barebones-watchface/src/lib.rs
impl BarebonesWatchFace {

    /// Populate the Time and Date Labels with the time and date
    fn update_date_time(&self, state: &WatchFaceState) -> MynewtResult<()> {
        //  Omitted: Format and set the time label
        ...

        //  Get the short day name ("MON") and short month name ("MAY")
        let day   = get_day_name(&state.time);
        let month = get_month_name(&state.time);

        //  Format the date as "MON 22 MAY 2020"
        let mut buf = new_string();
        write!(
            &mut buf,           //  Write the formatted text here
            "{} {} {} {}\n\0",  //  Must terminate Rust strings with null
            day,
            state.time.day,
            month,
            state.time.year
        ).expect("date fail");

        //  Set the label
        label::set_text(
            self.date_label,
            &to_strn(&buf)
        ) ? ;
        Ok(())
    }
get_month_name converts a numeric month (1 to 12) to text (like JAN): lib.rs
/// Get month short name
fn get_month_name(time: &WatchFaceTime) -> String {
    String::from(
        match time.month {
            1  => "JAN",
            2  => "FEB",
            3  => "MAR",
            ...
get_day_name converts a numeric day-of-week (0 to 6) to text (like SUN): lib.rs
/// Get day short name
fn get_day_name(time: & WatchFaceTime) -> String {
    String::from(
        match time.day_of_week {
            0  => "SUN",
            1  => "MON",
            2  => "TUE",
            ...
Our function update_bluetooth refreshes the Bluetooth Label like so: barebones-watchface/src/lib.rs
impl BarebonesWatchFace {

    /// Populate the Bluetooth Label with the Bluetooth State (Bluetooth Icon)
    fn update_bluetooth(&self, state: &WatchFaceState) -> MynewtResult<()> {
        if state.bluetooth == BluetoothState::BLUETOOTH_STATE_DISCONNECTED {
            //  If Bluetooth is disconnected, leave the label empty
            label::set_text(
                self.bluetooth_label,
                strn!("")
            ) ? ;
        } else {
            //  Compute the color of the Bluetooth icon
            let color =
                match &state.bluetooth {
                    BluetoothState::BLUETOOTH_STATE_INACTIVE     => "#000000",  //  Black
                    BluetoothState::BLUETOOTH_STATE_ADVERTISING  => "#0000ff",  //  Blue
                    BluetoothState::BLUETOOTH_STATE_DISCONNECTED => "#ff0000",  //  Red
                    BluetoothState::BLUETOOTH_STATE_CONNECTED    => "#00ff00",  //  Green
                };

            //  Format the Bluetooth status
            let mut buf = new_string();
            write!(
                &mut buf,              //  Write the formatted text here
                "{} \u{F293}#\0",      //  LV_SYMBOL_BLUETOOTH. Must terminate Rust strings with null.
                color
            ).expect("bt fail");

            //  Set the label
            label::set_text(
                self.bluetooth_label,
                &to_strn(&buf)
            ) ? ;
        }
        Ok(())
    }
What does this do?
//  Compute the color of the Bluetooth icon
let color =
    match &state.bluetooth {
        BluetoothState::BLUETOOTH_STATE_INACTIVE     => "#000000",  //  Black
        BluetoothState::BLUETOOTH_STATE_ADVERTISING  => "#0000ff",  //  Blue
        BluetoothState::BLUETOOTH_STATE_DISCONNECTED => "#ff0000",  //  Red
        BluetoothState::BLUETOOTH_STATE_CONNECTED    => "#00ff00",  //  Green
    };
This code converts the current Bluetooth State into an #RGB Colour Code color.
The Bluetooth Label is coloured by the #RGB Colour Code. For example, this label...
#00ff00 OK#
Will show the text OK in Green.
What's \u{F293}?
\u{F293} is the Unicode Symbol for the Bluetooth Icon. So when we set a label to...
#00ff00 \u{F293}#
This means we're displaying the Bluetooth Icon in Green.
Lastly our function update_power refreshes the Power Label like so: barebones-watchface/src/lib.rs
impl BarebonesWatchFace {

    /// Populate the Power Label with the Power Indicator (Charging & Battery)
    fn update_power(&self, state: &WatchFaceState) -> MynewtResult<()> {
        //  Get the active screen
        let screen = watchface::get_active_screen();

        //  Compute the percentage power
        let percentage = convert_battery_voltage(state.millivolts);

        //  Compute the colour for the charging symbol
        let color =                                                     //  Charging color
            if percentage <= 20                        { "#f2495c" }    //  Low Battery
            else if state.powered && !(state.charging) { "#73bf69" }    //  Full Battery
            else                                       { "#fade2a" };   //  Mid Battery

        let symbol =                         //  Charging symbol
            if state.powered { "\u{F0E7}" }  //  LV_SYMBOL_CHARGE
            else             { " " };

        //  Format the Power Indicator
        let mut buf = new_string();
        write!(
            &mut buf,                    //  Write the formatted text here
            "{} {}%{}#\nRUST ({}mV)\0",  //  Must terminate Rust strings with null
            color,
            percentage,
            symbol,
            state.millivolts
        ).expect("batt fail");

        //  Set the label
        label::set_text(
            self.power_label,
            &to_strn(&buf)
        ) ? ;

        //  Align the label to the top right of the screen
        obj::align(
            self.power_label, screen,
            obj::LV_ALIGN_IN_TOP_RIGHT, 0, 0
        ) ? ;
        Ok(())
    }
Here we compute color, the #RGB Colour Code for the Charging Icon that's stored in symbol.
\u{F0E7} is the Unicode Symbol for the Charging Icon.
See the RUST text above?
//  Format the Power Indicator
write!(
    &mut buf,                    //  Write the formatted text here
    "{} {}%{}#\nRUST ({}mV)\0",  //  Must terminate Rust strings with null
In a while we'll change RUST to create our Custom Watch Face.
To learn more about the Watch Face Framework and the Rust Wrappers for LVGL and Mynewt (and the helper macros)...
Now that we understand Watch Faces, let's publish our own Watch Face on crates.io...
How can we discover PineTime Watch Faces that others have created?
So that we may load them into our watches... Even modify them?
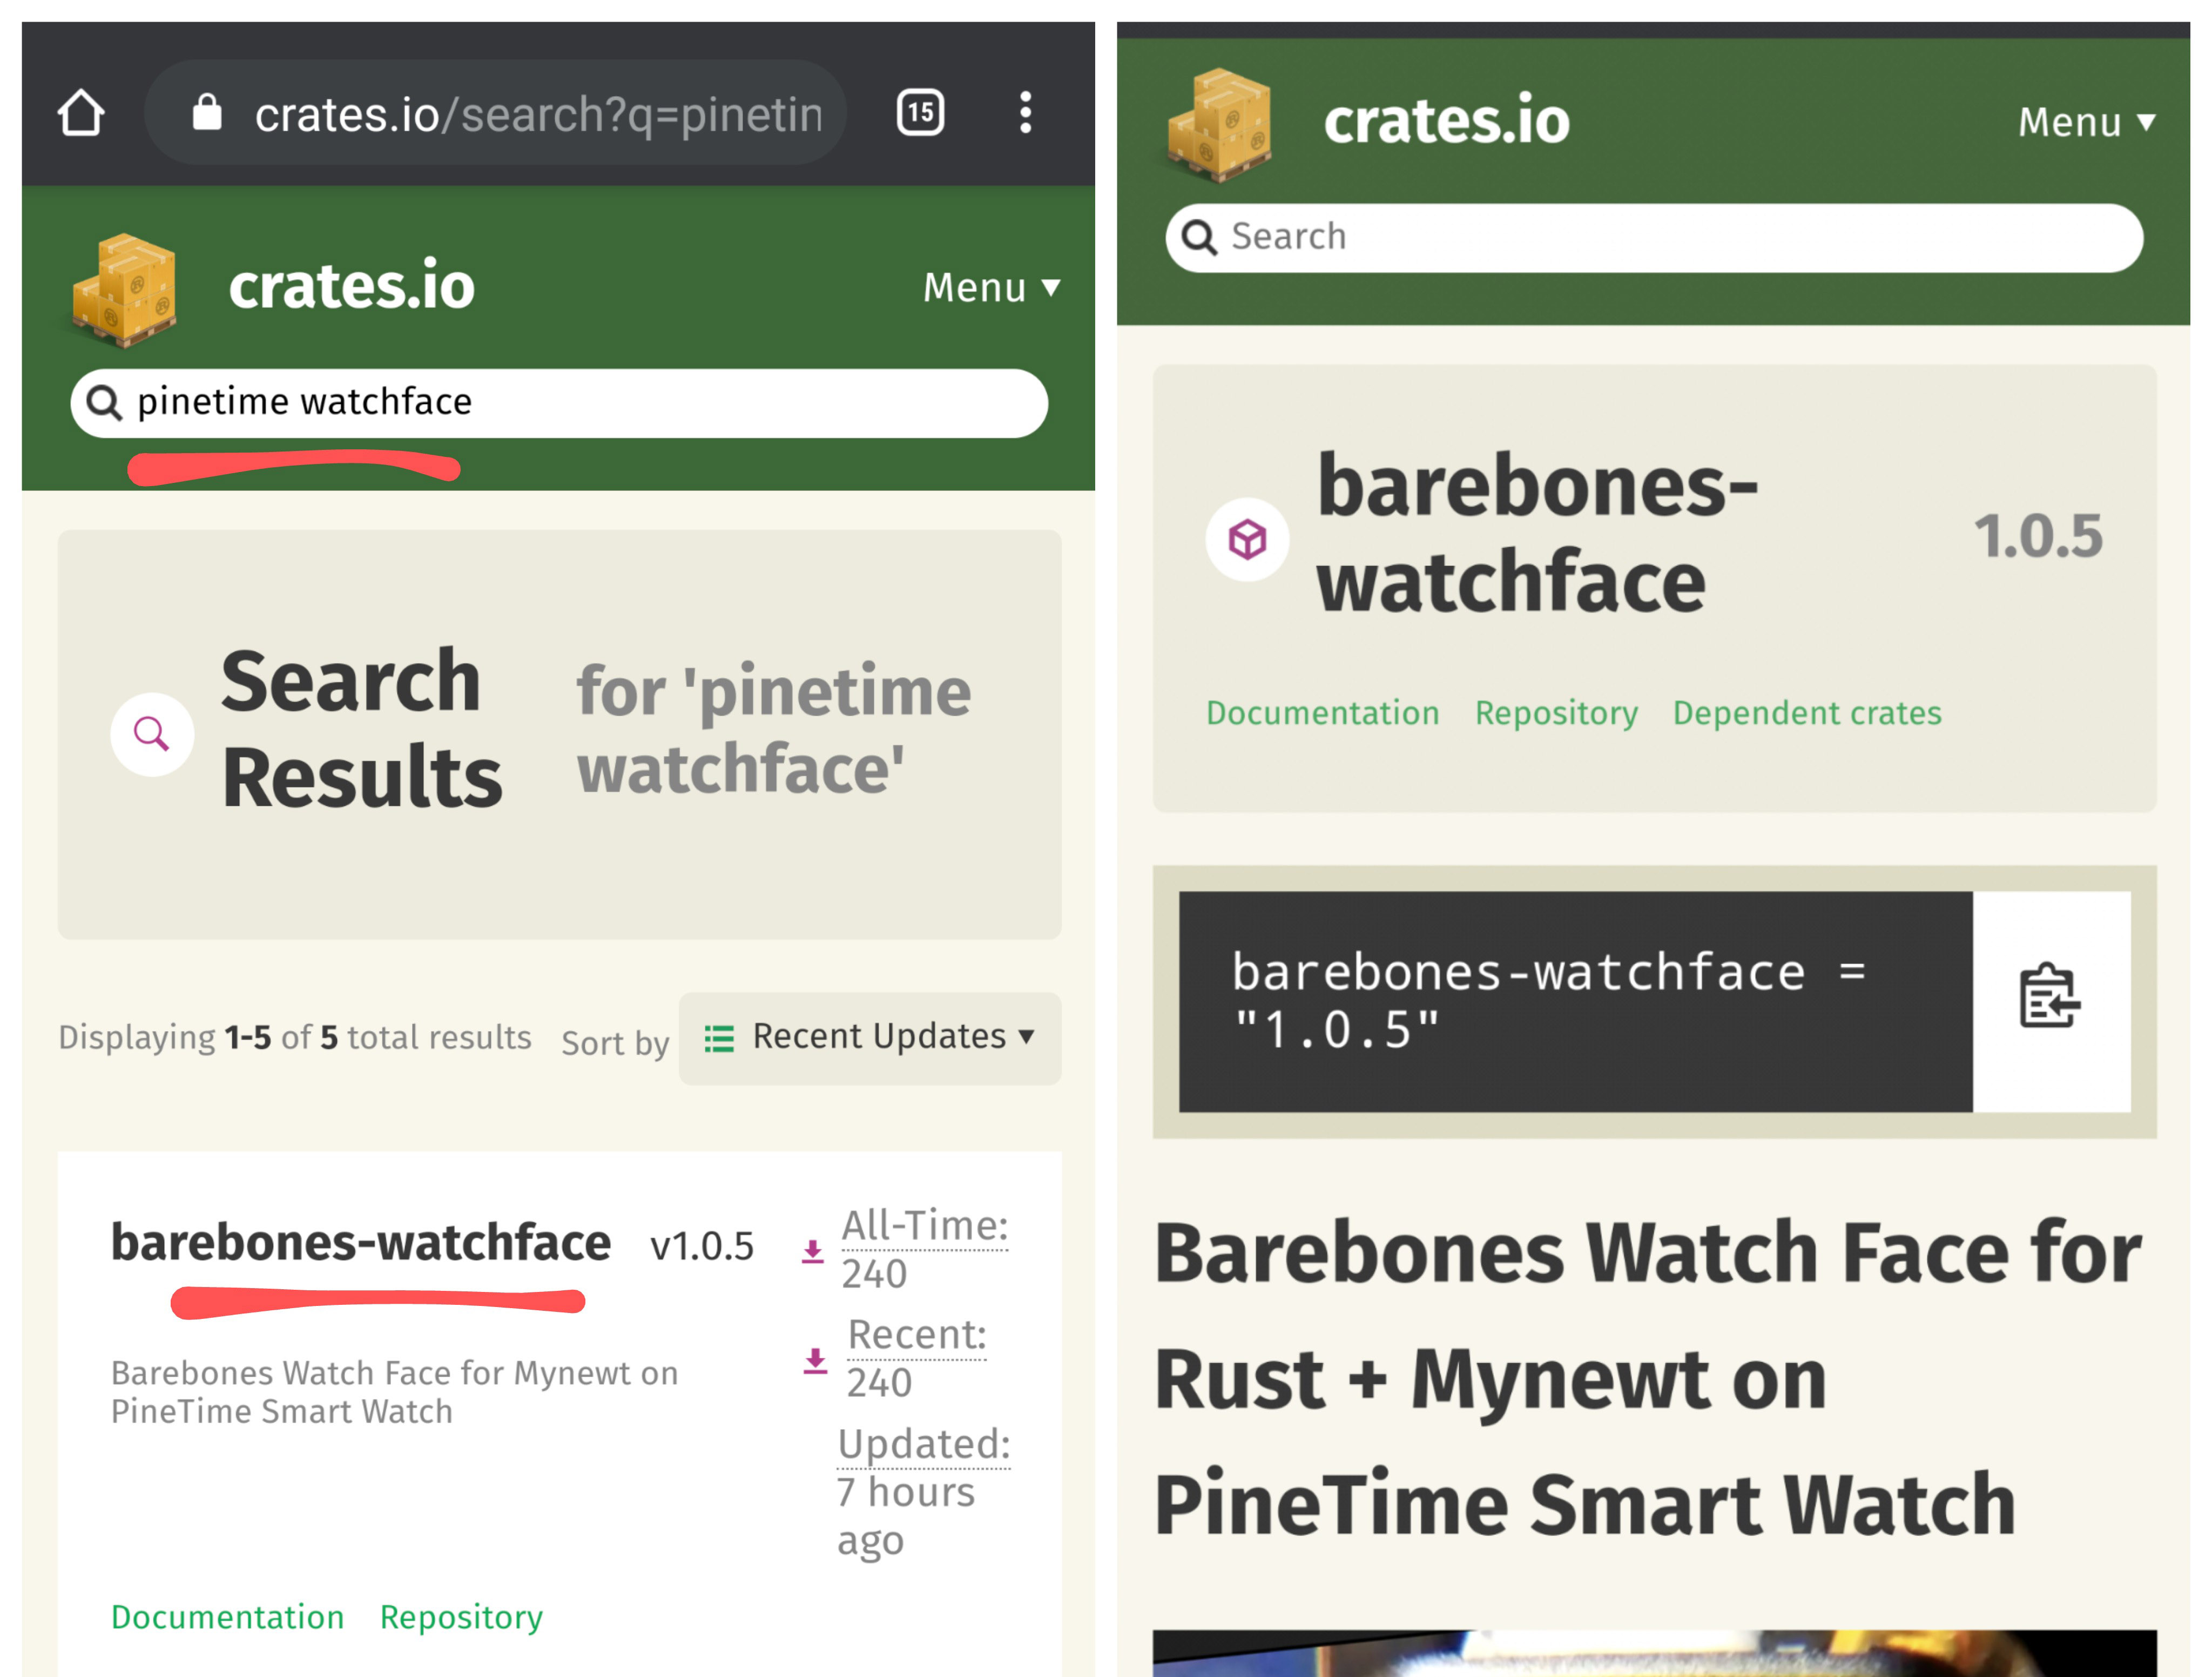
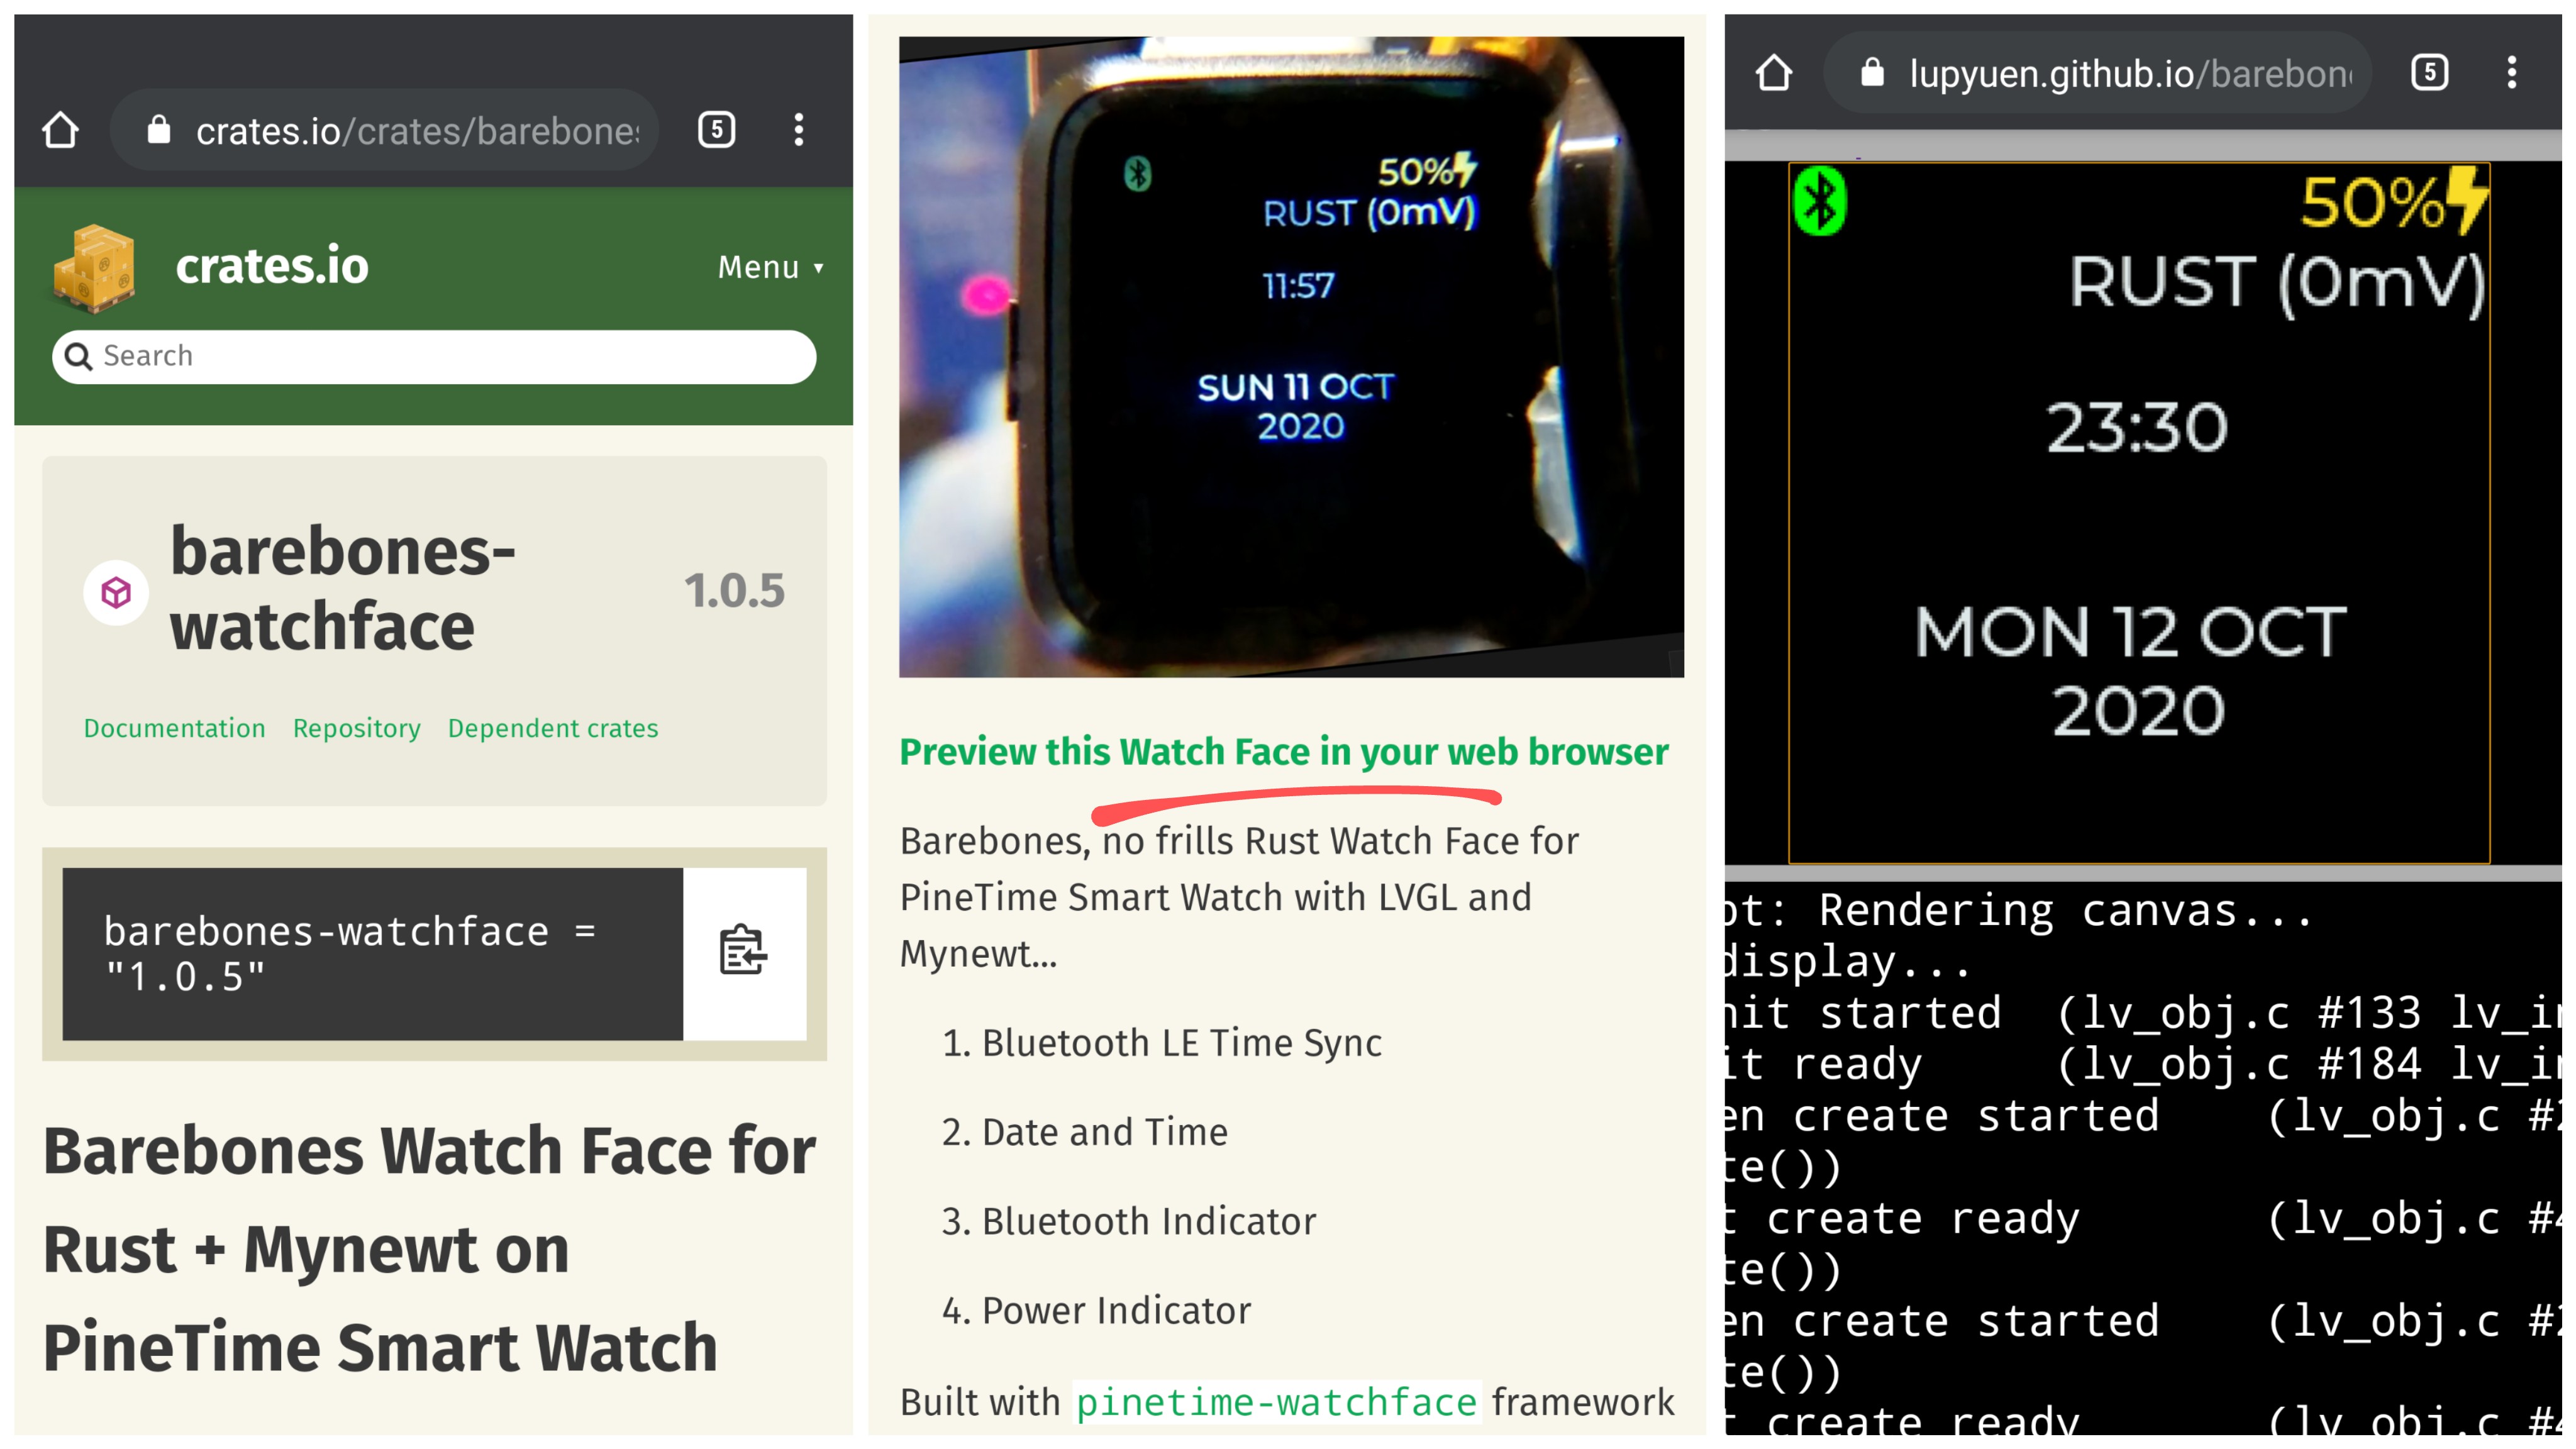
It's easy to discover Rust Watch Faces for PineTime! Just head over to crates.io and search for...
pinetime watchface
Search crates.io for pinetime watchface
Each Watch Face comes with its own link to let us preview the Watch Face in our web browser (thanks to WebAssembly)...
Click here to preview Barebones Watch Face
How do we publish our own Watch Face?
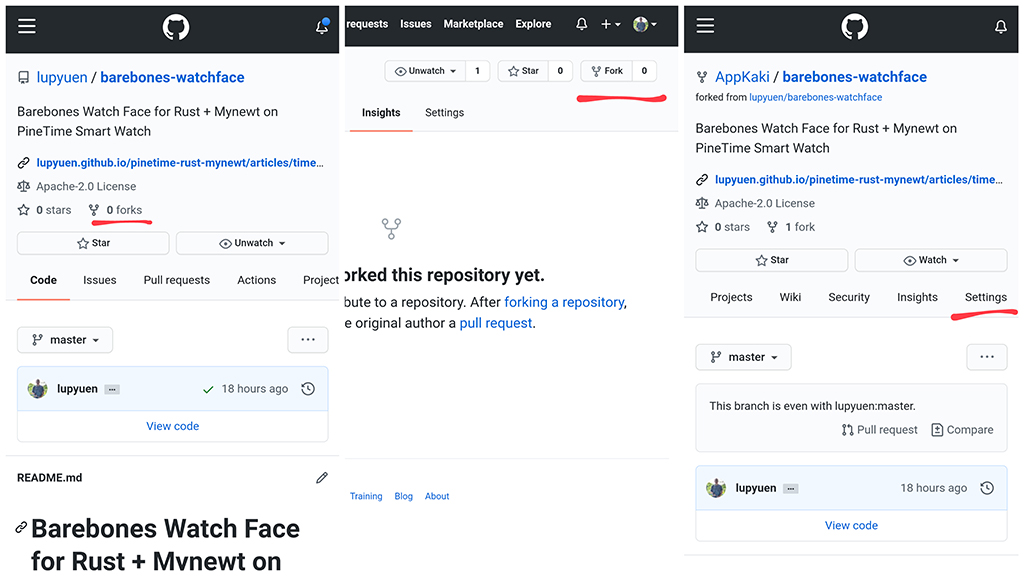
Browse to the Barebones Watch Face repo: github.com/lupyuen/barebones-watchface
Click Forks → Fork to create your own Fork of Barebones Watch Face.
Click Settings
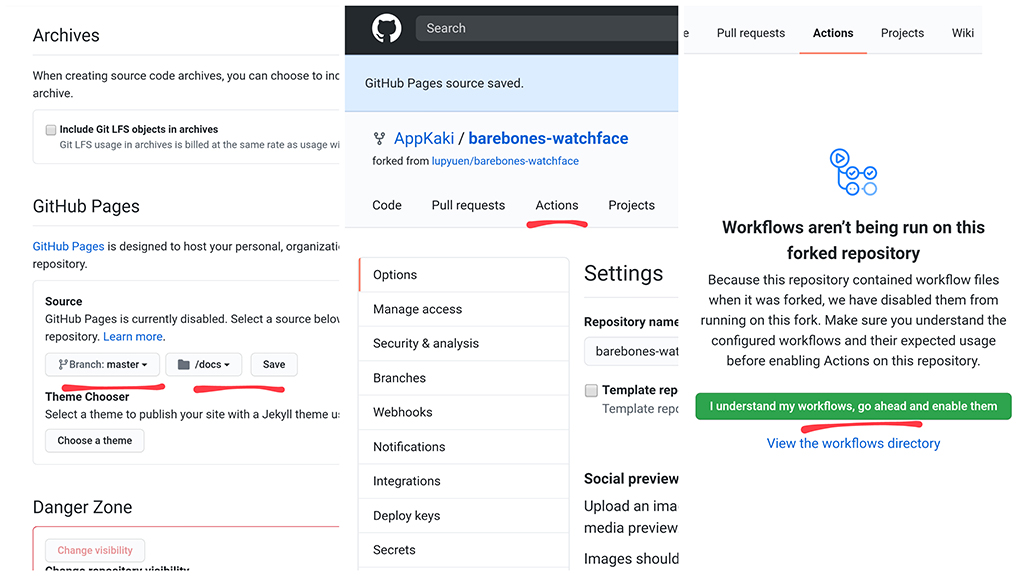
Scroll down the Settings page and look for GitHub Pages
Select Master and /docs. Click Save
Click Actions → I Understand My Workflows Enable Them
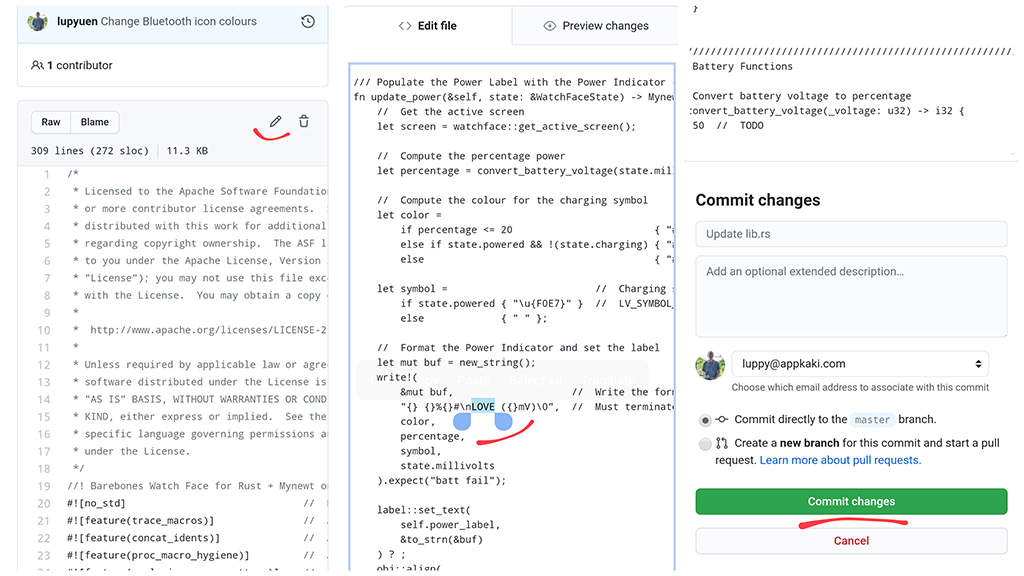
Click Code → View Code → src → lib.rs
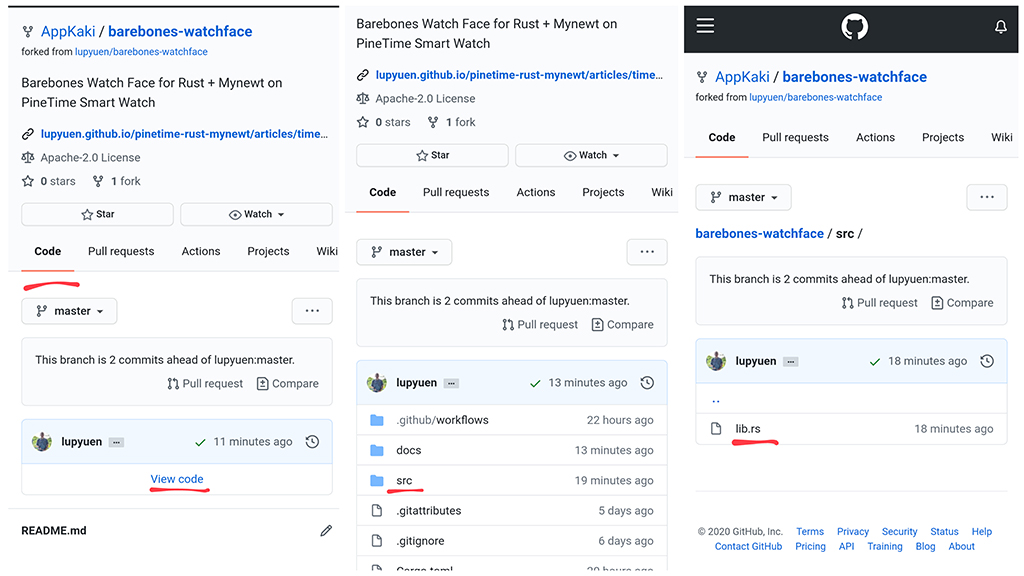
Click the Edit icon. Look for the function update_power
Change the RUST text to your own message, like LOVE
Click Commit Changes
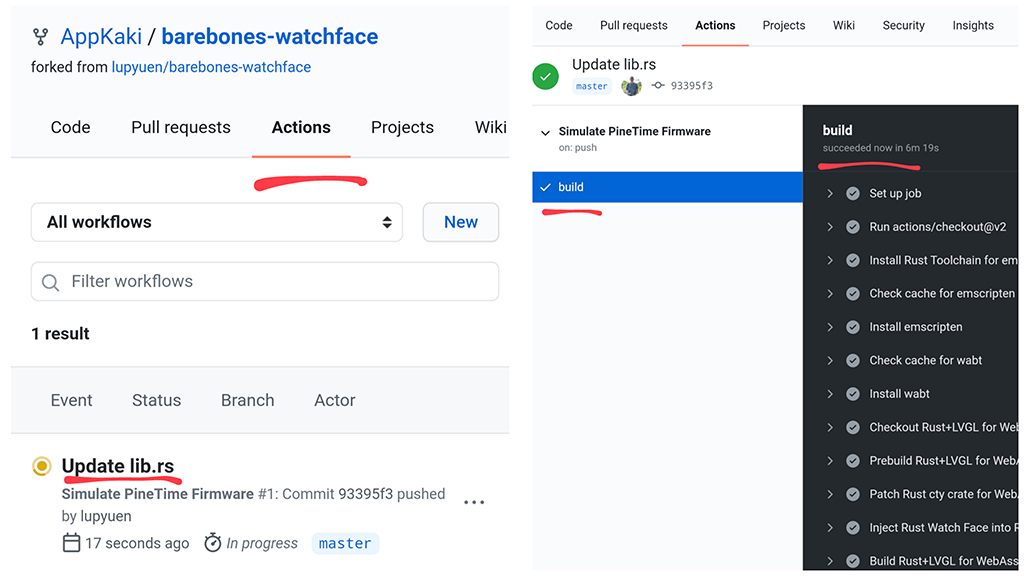
Click Actions → Update lib.rs → build
Wait about 2 minutes for GitHub Actions to build your Watch Face.
Subsequent builds will complete faster, because of the cached dependencies.
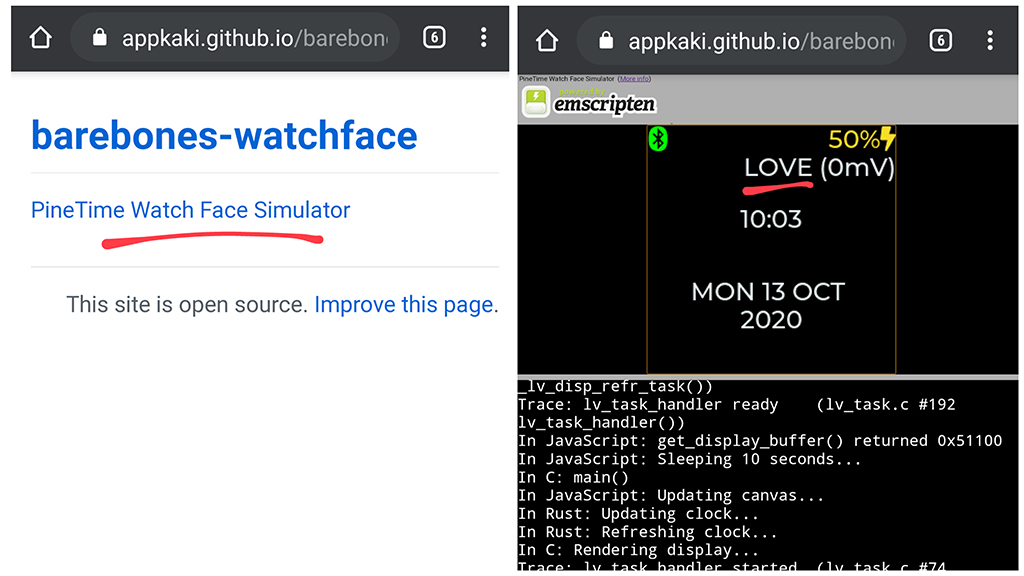
Browse to your Watch Face at...
https://YOUR_GITHUB_ACCOUNT.github.io/barebones-watchface
Change YOUR_GITHUB_ACCOUNT to your GitHub Account Name.
Click PineTime Watch Face Simulator and your Custom Watch Face appears (rendered with WebAssembly)...
Your Custom Watch Face can now be built and installed by other PineTime Owners! Just share with them your Watch Face repo URL...
https://github.com/YOUR_GITHUB_ACCOUNT/barebones-watchface
Change YOUR_GITHUB_ACCOUNT to your GitHub Account Name.
You should probably rename barebone-watchface... Just click Settings to rename your repo.
Remember to edit README.md and change the preview URL...
[__Preview this Watch Face in your web browser__](https://lupyuen.github.io/barebones-watchface/lvgl.html)
(If you prefer to build the Watch Face Simulator locally on your computer, check the instructions here)
But most PineTime Owners won't know that your Watch Face exists... That's why we upload our Watch Faces to crates.io as a Central Registry of all Rust Watch Faces.
How do we upload our Custom Watch Face to crates.io?
Follow the instructions here: "Publishing on crates.io"
Update the fields in Cargo.toml to describe your Watch Face...
[package]
name          = "barebones-watchface"
version       = "1.0.5"
authors       = ["Lee Lup Yuen <luppy@appkaki.com>"]
edition       = "2018"
description   = "Barebones Watch Face for Mynewt on PineTime Smart Watch"
repository    = "https://github.com/lupyuen/barebones-watchface"
documentation = "https://docs.rs/barebones-watchface"
categories    = ["embedded", "no-std"]
keywords      = ["pinetime", "watchface", "mynewt", "lvgl", "barebones"]
readme        = "./README.md"
license       = "Apache-2.0"
Always keep pinetime and watchface in the keywords so that your Watch Face will appear when PineTime Owners search for pinetime watchface on crates.io.
The Documentation URL docs.rs/YOUR_WATCH_FACE will be automatically generated when we have published our Watch Face to crates.io.
Check out the docs.rs documentation for Barebones Watchface
As noted on Reddit, Watch Faces published on crates.io should be useful ones (instead of random Watch Faces). Please think carefully when publishing your Watch Face... The Rust Community really appreciates this 🙏
How do we install our Custom Watch Face on a real PineTime watch?
We need to build the pinetime-rust-mynewt firmware... Then flash the firmware to PineTime.
If you don't have a PineTime, try flashing and testing on Remote PineTime instead. Remote PineTime is a real PineTime watch that's connected 24x7 to the internet... For anyone to flash and test firmware from anywhere in the world.
Choose one of the following ways to build the firmware...
GitHub Actions (in the GitHub Cloud, no software installation needed)
GitLab CI (in the GitLab Cloud, no software installation needed)
Linux (including PineBook Pro and Raspberry Pi)
macOS
Windows (plain old CMD, without MinGW, WSL or Docker)
Here are the instructions for building the firmware...
Fork the GitHub Repo: github.com/lupyuen/pinetime-rust-mynewt
Click Actions → I Understand My Workflows Enable Them
Edit rust/app/Cargo.toml and rust/app/src/lib.rs to select the Watch Face (see below)
This will trigger the firmware build. Click Actions to download the built firmware Artifact my_sensor_app.img
GitHub Actions Workflow is at .github/workflows/main.yml
Fork the GitLab Repo: gitlab.com/lupyuen/pinetime-rust-mynewt
Enable GitLab CI for the forked repo
Edit rust/app/Cargo.toml and rust/app/src/lib.rs to select the Watch Face (see below)
This will trigger the firmware build. Click CI / CD to download the built firmware Artifact my_sensor_app.img
GitLab CI Workflow is at .gitlab-ci.yml
Follow the steps under "Build Instructions"...
We'll flash this built firmware file in the next step...
bin/targets/nrf52_my_sensor/app/apps/my_sensor_app/my_sensor_app.img
We'll flash the firmware the wired way using an ST-Link v2 or Raspberry Pi. (We don't recommend flashing by Bluetooth... The firmware is not fully tested and may brick our watch)
For macOS and Linux...
Download and run PineTime Updater. Connect ST-Link v2 or Raspberry Pi according to the instructions provided.
Select Latest Bootloader. The bootloader only needs to be flashed once.
PineTime Updater exits after flashing the bootloader. Start PineTime Updater again.
Select Downloaded File
Enter the downloaded path of my_sensor_app.img
Enter 0x8000 as the address
After flashing, PineTime starts running our firmware
For Windows...
Follow the steps under "Build Instructions"...
"Flash MCUBoot Bootloader". The bootloader only needs to be built and flashed once.
For Remote PineTime...
Upload the built firmware file my_sensor_app.img as a GitHub Release and flash to Remote PineTime...
In your GitHub repo, click Releases
Click Draft A New Release
Fill in the Tag Version and Release Title
Attach the firmware file my_sensor_app.img
Click Publish Release
Under Assets of your new GitHub Release, copy the URL of the firmware file my_sensor_app.img
Follow the steps here to flash the MCUBoot Bootloader and your firmware URL to Remote PineTime...
To specify the Watch Face for the firmware...
Edit rust/app/Cargo.toml
Look for the barebones-watchface dependency..
# External Rust libraries used by this module
[dependencies]
...
barebones-watchface = "1.0.5"
Replace the entire line with the Watch Face name and version found on crates.io...
my-watchface = "1.0.5"
If the Watch Face isn't published on crates.io, specify the Git URL like so...
my-watchface = { git = "https://github.com/lupyuen/my-watchface" }
Edit rust/app/src/lib.rs
Look for WatchFaceType...
/// Declare the Watch Face Type
type WatchFaceType = barebones_watchface::BarebonesWatchFace;
Change barebones_watchface to the Watch Face Crate Name (replace all - by _).
Change BarebonesWatchFace to the Watch Face Type Name (from README.md or docs.rs documentation).
The line should look like this...
type WatchFaceType = my_watchface::MyWatchFace;
Rebuild the firmware and flash to PineTime
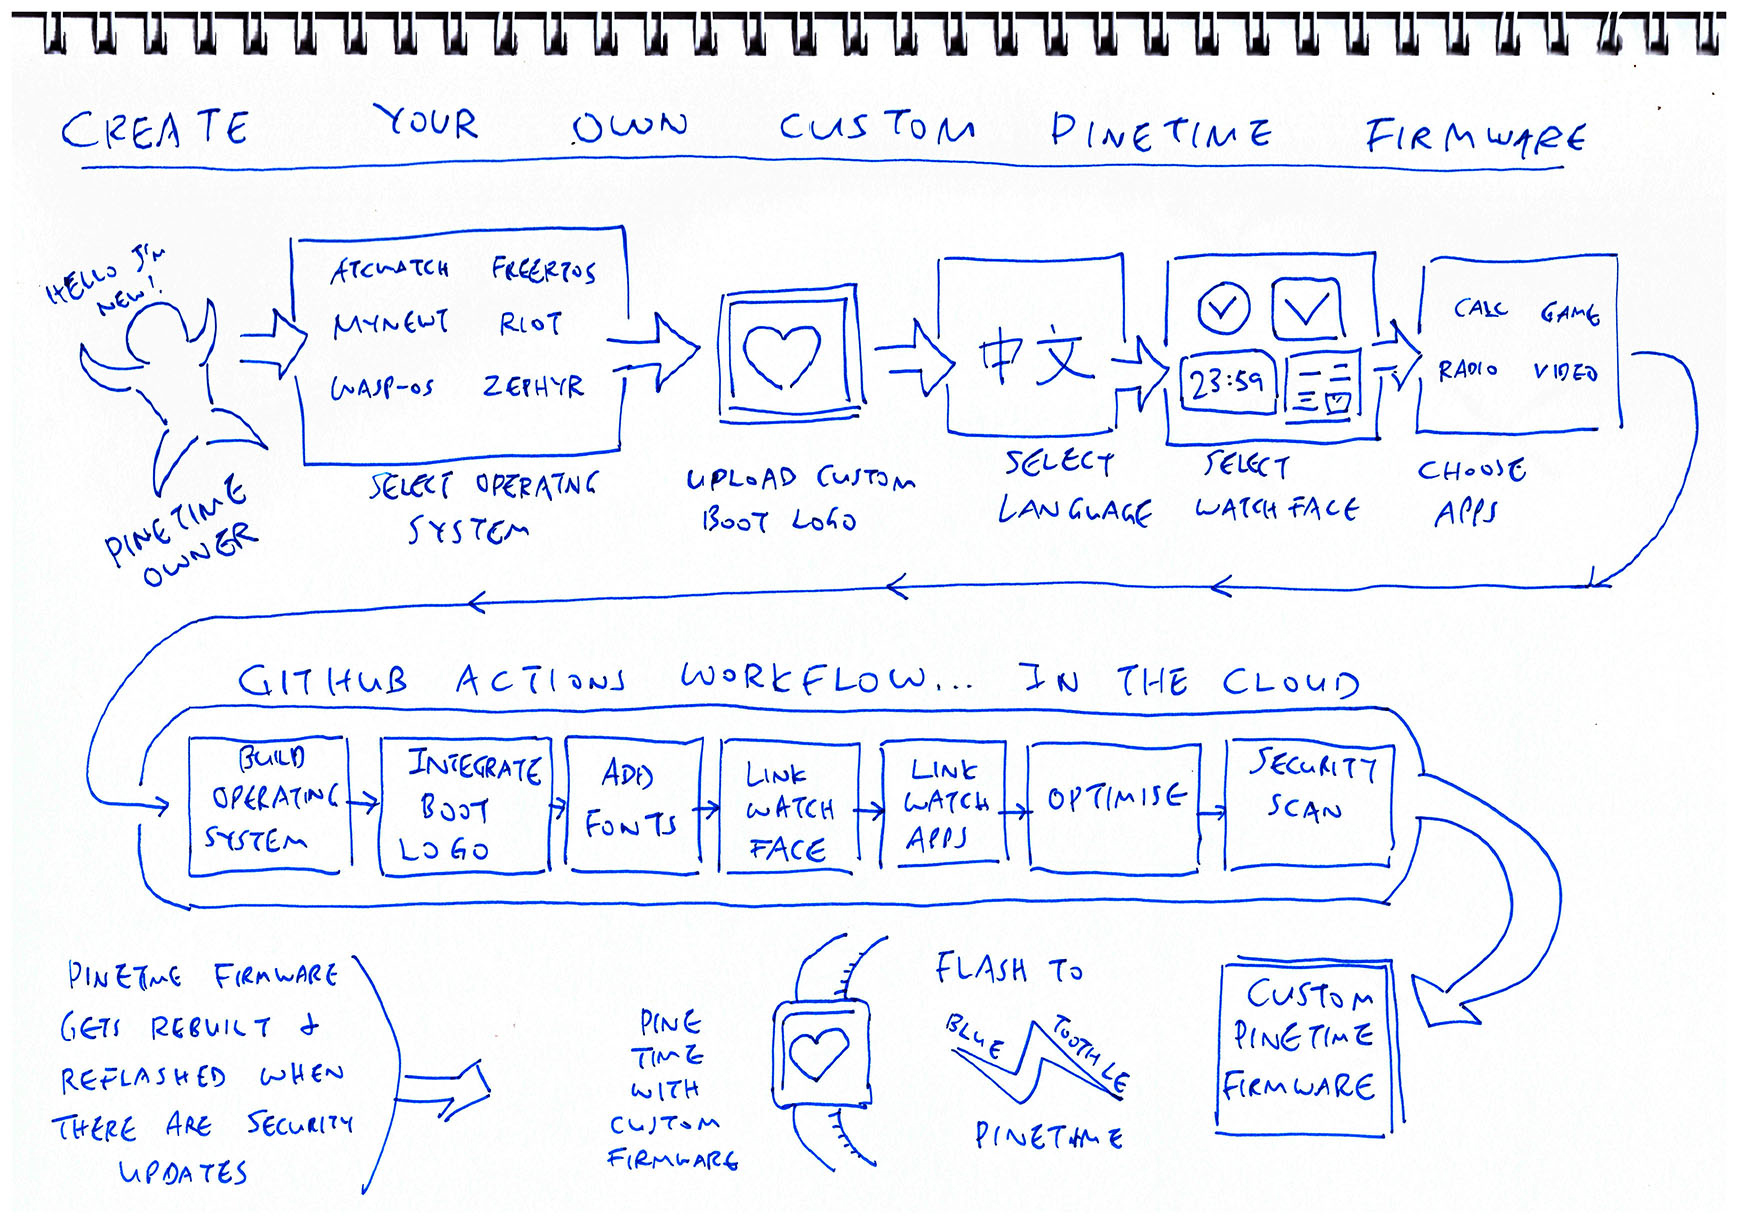
pinetime-rust-mynewt was created as a Learning Tool to help us understand what happens inside the firmware of a smartwatch like PineTime.
Today pinetime-rust-mynewt has evolved to make smartwatch programming even easier to learn...
Safe and sensible embedded programming with Rust, without the traps
Easier to share, learn and validate small, meaningful chunks of PineTime code... By publishing Watch Faces on crates.io.
(No more digging into a HUGE repository of firmware code!)
Lets us code PineTime firmware on any computer: Linux, macOS and Windows. Even code on a mobile phone... And build in the Cloud with GitHub Actions and GitLab CI.
(No more toolchain worries!)
Standardised on LVGL, the UI toolkit adopted by most PineTime firmware. So any skills we learn on pinetime-rust-mynewt may be easily transferred to other PineTime platforms.
(Which means druid, piet and kurbo have been purged from the firmware... But druid may be revived someday as druid-lvgl)
The PineTime Community has been super enthusiastic about turning PineTime into a "Daily Driver"... But shouldn't we also understand what's inside our "Daily Driver"?
Maybe make some firmware tweaks and practise some "Driving" ourselves? And understand the firmware code before copying it and letting it "Drive" our lives?
That might be the better way to sustain Open Source development on PineTime. Because if we don't have any PineTime Learners... The "Driving" shall one day come to a halt. :-(
pinetime-rust-mynewt is the school for "Driver's Ed". The firmware has been deconstructed into manageable chunks that are simpler to learn. And we use Rust wherever posssible... Because C Pointer Problems can disrupt our learning.
Perhaps one day pinetime-rust-mynewt will become a Daily Driver. But let's take time to enrich our firmware the Educational Way, so that everyone can learn...
Integrate the Touch Controller Driver in Rust with LVGL (to support touch input)
Add Rust Drivers for Step Counting and Heart Rate Sensing
Improve the Power Efficiency of the firmware (like switching off the backlight when idle)
Allow Watch Apps to published on crates.io, for building Custom PineTime Firmware in the Cloud (see the sketch below)
Fill in the missing Rust Bindings for Watch Faces, LVGL and Mynewt: pinetime-watchface, pinetime-lvgl, pinetime-mynewt
Lemme know if you're keen to help! :-)
In the meantime, please go right ahead to create your own Watch Faces and publish them on crates.io... So that all PineTime Owners can share, learn and enjoy :-)
Got a question, comment or suggestion? Create an Issue or submit a Pull Request here...
pinetime-rust-mynewt/rust/ app/src/watchface.md
The WebAssembly Simulator for Watch Faces is auto-generated by a GitHub Actions Workflow: simulator.yml
Source code for the WebAssembly Simulator is at the mynewt branch of github.com/AppKaki/lvgl-wasm
If you prefer to build the WebAssembly Simulator locally on your machine instead of GitHub Actions, check this link for the build instructions...
More about the WebAssembly Simulator
Check out the previous article to learn how PineTime synchronises its time over Bluetooth LE...
"Bluetooth Time Sync and LVGL on PineTime Mynewt"
Here's how we fetch the Mynewt system time in Rust: pinetime-watchface/src/lib.rs
/// Get the system time
fn get_system_time() -> MynewtResult<WatchFaceTime> {
    //  Get the system time
    static mut TV: os::os_timeval  = fill_zero!(os::os_timeval);
    static mut TZ: os::os_timezone = fill_zero!(os::os_timezone);
    let rc = unsafe { os::os_gettimeofday(&mut TV, &mut TZ) };
    assert!(rc == 0, "Can't get time");

    //  Convert the time
    static mut CT: clocktime = fill_zero!(clocktime);
    let rc = unsafe { timeval_to_clocktime(&TV, &TZ, &mut CT) };
    assert!(rc == 0, "Can't convert time");

    //  Return the time
    let result = unsafe {  //  Unsafe because CT is a mutable static
        WatchFaceTime {
            year:        CT.year as u16,  //  Year (4 digit year)
            month:       CT.mon  as  u8,  //  Month (1 - 12)
            day:         CT.day  as  u8,  //  Day (1 - 31)
            hour:        CT.hour as  u8,  //  Hour (0 - 23)
            minute:      CT.min  as  u8,  //  Minute (0 - 59)
            second:      CT.sec  as  u8,  //  Second (0 - 59)
            day_of_week: CT.dow  as  u8,  //  Day of week (0 - 6; 0 = Sunday)
        }
    };
    Ok(result)
}
This produces a WatchFaceTime struct that's defined in our pinetime-watchface Watch Face Framework.
The Watch Face Framework is derived from the Watch Face in C described in this article...
Here's how the Watch Face Framework starts our Watch Face: pinetime-watchface/blob/master/src/lib.rs
/// Start rendering the watch face every minute
pub fn start_watch_face(update_watch_face: UpdateWatchFace) -> MynewtResult<()> {
    console::print("Init Rust watch face...\n"); console::flush();

    //  Save the callback for updating the watch face
    unsafe { UPDATE_WATCH_FACE = Some(update_watch_face); }

    //  Get active screen from LVGL
    let screen = get_active_screen();

    //  Allow touch events
    obj::set_click(screen, true) ? ;

    //  Render the watch face
    let rc = unsafe { pinetime_lvgl_mynewt_render() };
    assert!(rc == 0, "LVGL render fail");

    //  Set a timer to update the watch face every minute
    unsafe {  //  Unsafe because os_callout_init is a Mynewt C function
        os::os_callout_init(
            &mut WATCH_FACE_CALLOUT,         //  Timer for the watch face
            os::eventq_dflt_get().unwrap(),  //  Use default event queue
            Some(watch_face_callback),       //  Callback function for the timer
            ptr::null_mut()                  //  No argument
        );
    }

    //  Trigger the watch face timer in 60 seconds
    let rc = unsafe {  //  Unsafe because os_callout_reset is a Mynewt C function
        os::os_callout_reset(
            &mut WATCH_FACE_CALLOUT,   //  Timer for the watch face
            os::OS_TICKS_PER_SEC * 60  //  Trigger timer in 60 seconds
        )
    };
    assert!(rc == 0, "Timer fail");
    Ok(())
}

/// Timer that is triggered every minute to update the watch face
static mut WATCH_FACE_CALLOUT: os::os_callout = fill_zero!(os::os_callout);

/// Called every minute to update the Watch Face
static mut UPDATE_WATCH_FACE: Option<UpdateWatchFace> = None;

/// Type of callback to update the Watch Face
type UpdateWatchFace = fn (state: &WatchFaceState) -> MynewtResult<()>;
start_watch_face is called by the main function when PineTime starts up, as we shall see in a while.
start_watch_face calls these functions...
pinetime_lvgl_mynewt_render comes from the LVGL Mynewt Library and renders the LVGL display
os::os_callout_init and os::os_callout_reset are Mynewt Functions for creating and setting the Callout Timer WATCH_FACE_CALLOUT
Every minute, the Callout Timer WATCH_FACE_CALLOUT triggers this Callback Function to update the Watch Face...
/// Timer callback that is called every minute
extern fn watch_face_callback(_ev: *mut os::os_event) {
    console::print("Update Rust watch face...\n"); console::flush();

    //  If there is no callback, fail.
    assert!(unsafe { UPDATE_WATCH_FACE.is_some() }, "Update watch face missing");

    //  Get the system time
    let time = get_system_time()
        .expect("Can't get system time");

    //  Compose the watch face state
    let state = WatchFaceState {
        time,
        millivolts: 0,     //  TODO: Get current voltage
        charging:   true,  //  TODO: Get charging status
        powered:    true,  //  TODO: Get powered status
        bluetooth:  BluetoothState::BLUETOOTH_STATE_CONNECTED,  //  TODO: Get BLE state
    };

    //  Update the watch face
    unsafe {  //  Unsafe because WATCH_FACE is a mutable static
        UPDATE_WATCH_FACE.unwrap()(&state)
            .expect("Update Watch Face fail");
    }

    //  Render the watch face
    let rc = unsafe { pinetime_lvgl_mynewt_render() };
    assert!(rc == 0, "LVGL render fail");

    //  Trigger the watch face timer in 60 seconds
    let rc = unsafe {  //  Unsafe because os_callout_reset is a Mynewt C function
        os::os_callout_reset(
            &mut WATCH_FACE_CALLOUT,   //  Timer for the watch face
            os::OS_TICKS_PER_SEC * 60  //  Trigger timer in 60 seconds
        )
    };
    assert!(rc == 0, "Timer fail");
}
get_system_time fetches the current date and time from Mynewt. We have covered this in the previous section.
start_watch_face is called by the main function when PineTime starts up: pinetime-rust-mynewt/rust/app/src/lib.rs
/// Declare the Watch Face Type
type WatchFaceType = barebones_watchface::BarebonesWatchFace;

/// Watch Face for the app
static mut WATCH_FACE: WatchFaceType = fill_zero!(WatchFaceType);

///  main() will be called at Mynewt startup. It replaces the C version of the main() function.
#[no_mangle]                 //  Don't mangle the name "main"
extern "C" fn main() -> ! {  //  Declare extern "C" because it will be called by Mynewt
    //  Initialise the Mynewt packages and internal temperature sensor driver. Any startup
    //  functions defined in pkg.yml of our custom drivers and libraries will be called by
    //  sysinit().  Here are the startup functions consolidated by Mynewt:
    //  bin/targets/nrf52_my_sensor/generated/src/nrf52_my_sensor-sysinit-app.c
    mynewt::sysinit();  //  LVGL is also initialised here

    //  Start Bluetooth LE, including over-the-air firmware upgrade.  TODO: Create a safe wrapper for starting Bluetooth LE.
    extern { fn start_ble() -> i32; }
    let rc = unsafe { start_ble() };
    assert!(rc == 0, "BLE fail");

    //  Create the watch face
    unsafe {  //  Unsafe because WATCH_FACE is a mutable static
        WATCH_FACE = WatchFaceType::new()
            .expect("Create watch face fail");
    }

    //  Start rendering the watch face every minute
    watchface::start_watch_face(update_watch_face)
        .expect("Watch Face fail");
The main function creates the Watch Face (like BarebonesWatchFace) and calls start_watch_face, passing this Callback Function...
/// Called every minute to update the Watch Face
fn update_watch_face(state: &WatchFaceState) -> MynewtResult<()> {
    //  Update the watch face
    unsafe {  //  Unsafe because WATCH_FACE is a mutable static
        WATCH_FACE.update(state)
    }
}
update_watch_face is called by watch_face_callback every minute to refresh the Watch Face.
The Rust Bindings (and Safe Wrappers) for LVGL are defined in the pinetime-lvgl crate.
The Rust Bindings were created with the bindgen tool, applied to the LVGL C source files in the pinetime_lvgl_mynewt
More about the LVGL C Library pinetime_lvgl_mynewt
We run the script gen-bindings.sh to create the bindings with bindgen, also to process the output with sed.
For example, this LVGL function in pinetime_lvgl_mynewt/src/lv_widgets/lv_label.h
//  In C: Declare LVGL function
void lv_label_set_text(lv_obj_t * label, const char * text);
Will be transformed by gen-bindings.sh into this Rust declaration in pinetime-lvgl/src/widgets/label.rs
// In Rust: Rust Binding for LVGL function generated by bindgen
#[lvgl_macros::safe_wrap(attr)]
extern "C" {
    pub fn lv_label_set_text(label: *mut lv_obj_t, text: *const ::cty::c_char);
}
The line #[lvgl_macros::safe_wrap(attr)] is inserted by the sed script in gen-bindings.sh.
This triggers a Rust Procedural Macro safe_wrap that will rewrite the above code like this: pinetime-lvgl/logs/expanded.rs
// In Rust: Safe Wrapper for LVGL function generated by safe_wrap macro
pub fn set_text(label: *mut lv_obj_t, text: &Strn)
    -> MynewtResult<()> {
    //  Import the external C function from LVGL
    extern "C" {
        pub fn lv_label_set_text(label: *mut lv_obj_t,
                                    text: *const ::cty::c_char);
    }
    //  Check to make sure that `text` is null terminated
    text.validate();
    //  Call the external C function in LVGL
    unsafe {
        lv_label_set_text(label as *mut lv_obj_t,
                            text.as_ptr() as *const ::cty::c_char);
        Ok(())
    }
}
This creates a Safe Wrapper for the LVGL C Function, so that we may call it without flagging as unsafe.
Also it checks that the strings are null-terminated (because LVGL expects all strings to be null-terminated).
The safe_wrap macro is defined in pinetime-macros/src/safe_wrap.rs