
📝 15 Jan 2021
A month ago we started porting Apache Mynewt, a modern embedded operating system, to PineCone BL602…
Then last week we learnt about the Hardware Abstraction Layer provided by the BL602 IoT SDK for controlling GPIO…
Today we shall…
Embed BL602’s Hardware Abstraction Layer inside Mynewt
Map Mynewt’s GPIO Functions to BL602’s Hardware Abstraction Layer
Build Mynewt BL602 automatically with GitHub Actions
If you’re new to PineCone BL602, check out my article…
PineCone BL602 RISC-V Evaluation Board with LED controlled by Apache Mynewt
Here’s the Mynewt Program that actually runs on our PineCone BL602 Board and switches on the Blue LED: main.c
#include <sysinit/sysinit.h>  //  Init Functions
#include <os/os.h>            //  Mynewt Functions
#include <bsp/bsp.h>          //  Board Support Package
#include <hal/hal_gpio.h>     //  Mynewt HAL for GPIO

int main(int argc, char **argv) {
    //  Initialise Mynewt drivers
    sysinit();

    //  Set the LED GPIOs to output mode.
    //  Switch off the LEDs (1 = Off)
    hal_gpio_init_out(LED_BLUE_PIN,  1);
    hal_gpio_init_out(LED_GREEN_PIN, 1);
    hal_gpio_init_out(LED_RED_PIN,   1);

    //  Switch on Blue LED (0 = On)
    hal_gpio_write(LED_BLUE_PIN,  0);

    //  Loop forever
    for(;;) {}
}
We’re looking at the beauty of Mynewt… Minimal fuss, easy to read, perfect for learning embedded programming!
Mynewt Programs are Portable too… hal_gpio_init_out and hal_gpio_write will work on many microcontrollers: STM32 Blue Pill (Arm), Nordic Semi nRF52 (Arm too), SiFive HiFive1 (RISC-V)… And now PineCone BL602 (RISC-V yay!)
The GPIO Pin Numbers will differ. But on PineCone, this Mynewt Program lights up the Blue LED, exactly like the pic above.
The LED GPIOs are defined in bsp/bsp.h…
//  Define the LED GPIOs: 11 (Blue), 14 (Green), 17 (Red)
#define LED_BLUE_PIN  11
#define LED_GREEN_PIN 14
#define LED_RED_PIN   17
Let’s find out how we made this work.
We have many options for learning Embedded Programming on PineCone BL602… Why Mynewt?
BL602’s native IoT SDK looks easy for coding BL602 in C… Supports Multitasking through FreeRTOS (like reading sensor data and sending to network concurrently)
But with BL602 IoT SDK we’ll be locked in to BL602. Our programs won’t run on other microcontrollers.
And we can’t easily port programs from other devices to BL602 either.
What if we wrap up the BL602 IoT SDK with Arduino Libraries?
Arduino is kinda ancient for embedded coding. (And the Bit Banging looks disturbing)
Could there be a modern alternative that works better with today’s multitasking microcontrollers?
Like Mbed OS? The newer Arduino SAMD boards support mbed OS
Mbed OS looks complex for learners. (Based on C++)
And Mbed OS was created by Arm so…
Zephyr? It’s well supported by Linux Foundation and many microcontroller manufacturers
Maybe something simpler than Zephyr? As simple as the program above?
Something that compiles easily on Linux, macOS and Windows… Without WSL and Docker?
(We’ll save Zephyr for the bravest embedded professionals)
Alrighty Nitpicky… We’re left with Mynewt. But it’s not as popular as Zephyr
Mynewt was designed as a simple tiny OS… And that’s OK!
(Mynewt is named after “minute” i.e. “small”, not the lizard)
Mynewt is easy to port to BL602. And our porting work will benefit Zephyr later.
What about Embedded Rust? We have many fans.
Embedded Rust looks very promising… Clean and safe embedded coding.
There’s ongoing work on Embedded Rust for BL602 so let’s wait for it. More details
Meanwhile I’ll do Rust the shortcut way… Run it on top of Mynewt. (Instead of Bare Metal)
So we’ll have Rust on Mynewt?
UPDATE: Check out Apache NuttX operating system for BL602
How does Mynewt create programs that are portable to other microcontrollers?
By using layers of code that isolate the differences between microcontrollers (like BL602) and boards (like PineCone).
(Dressing in layers is a very good thing… Especially in Winter!)
Here’s how we layer the code in Mynewt…
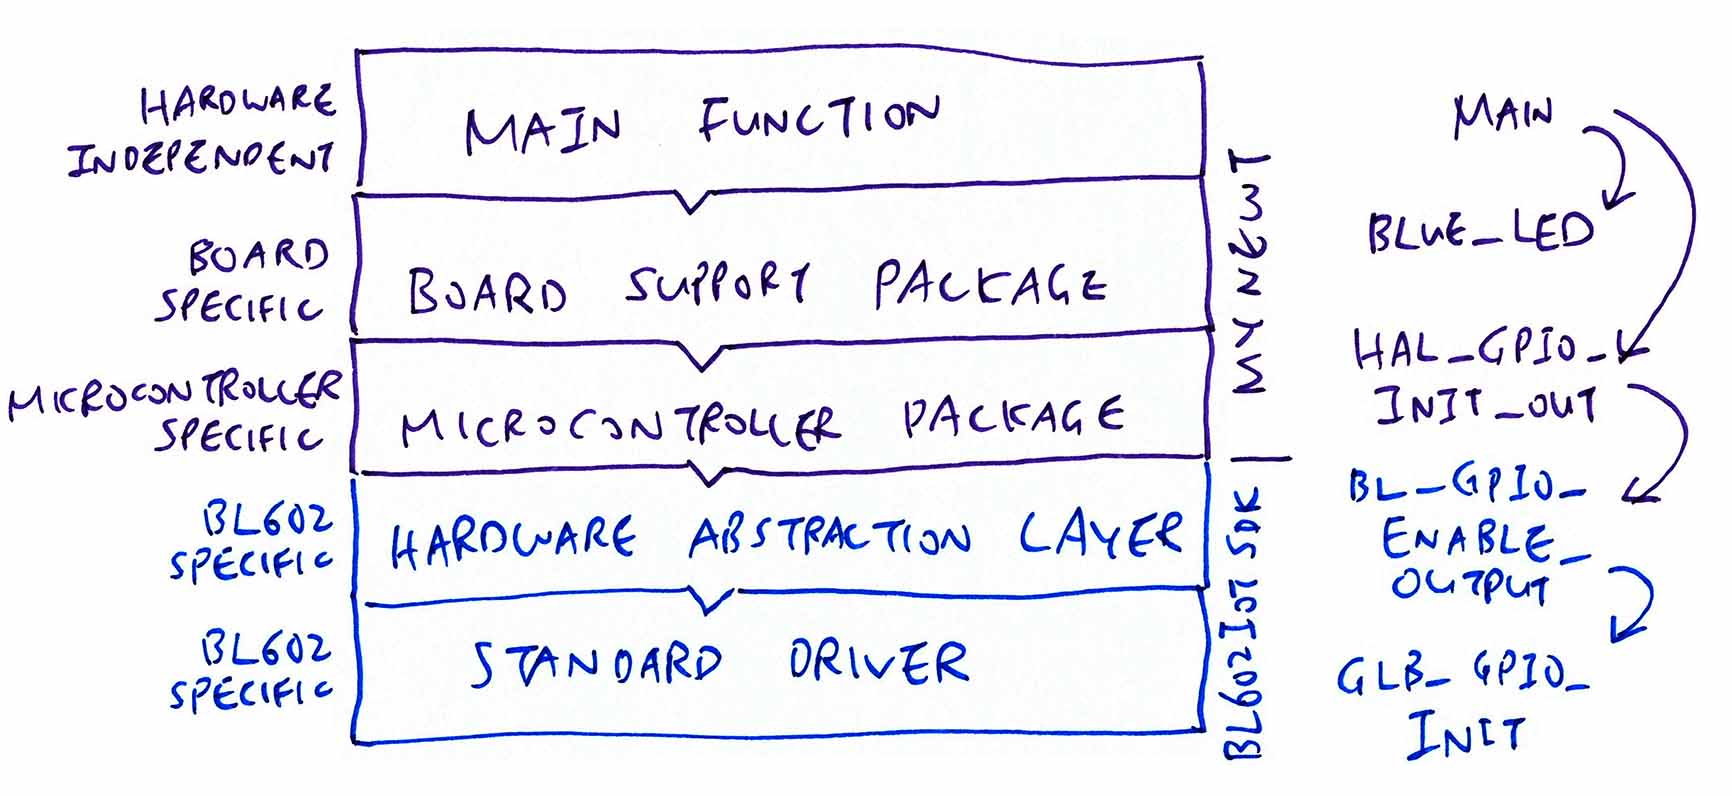
Main Function: We’ve seen the Main Function at the top of the article… It lights up the Blue LED.
Assuming that the GPIO Pin Number is defined correctly, the same Main Function will light up the LED on any microcontroller.
That’s why this is portable, Hardware Independent code. A key feature of modern embedded operating systems.
Board Support Package: This layer contains code that’s specific to the Hardware Board, like PineCone.
The Blue LED is connected at GPIO 11 on PineCone… And these details will vary depending on the BL602 Board that we use (say PineCone vs Pinenut).
So it makes sense to capture such Board Specific details inside the Board Support Package layer.
Microcontroller Package: This layer is specific to the Microcontroller (like BL602). The Microcontroller Package is reused by all Boards that are based on the same Microcontroller (like PineCone and Pinenut).
Hardware Abstraction Layer: This layer is lifted directly from the BL602 IoT SDK (with minimal changes).
Here we find the functions that control the BL602 hardware: GPIO, PWM, UART, I2C, SPI, …
Standard Driver: This layer is unique to BL602. The Hardware Abstraction Layer in BL602 calls this layer to access the Hardware Registers to perform hardware functions.
What about the rest of the BL602 IoT SDK?
We have integrated the smallest subset of functions from the BL602 SDK that are needed for Mynewt. The rest are not needed (yet).
In particular, we don’t compile under Mynewt the FreeRTOS driver code from the BL602 SDK. Because running two operating systems side by side would be a disaster!
To better understand the Mynewt and BL602 Layers, let’s walk through the chain of function calls for a GPIO operation…
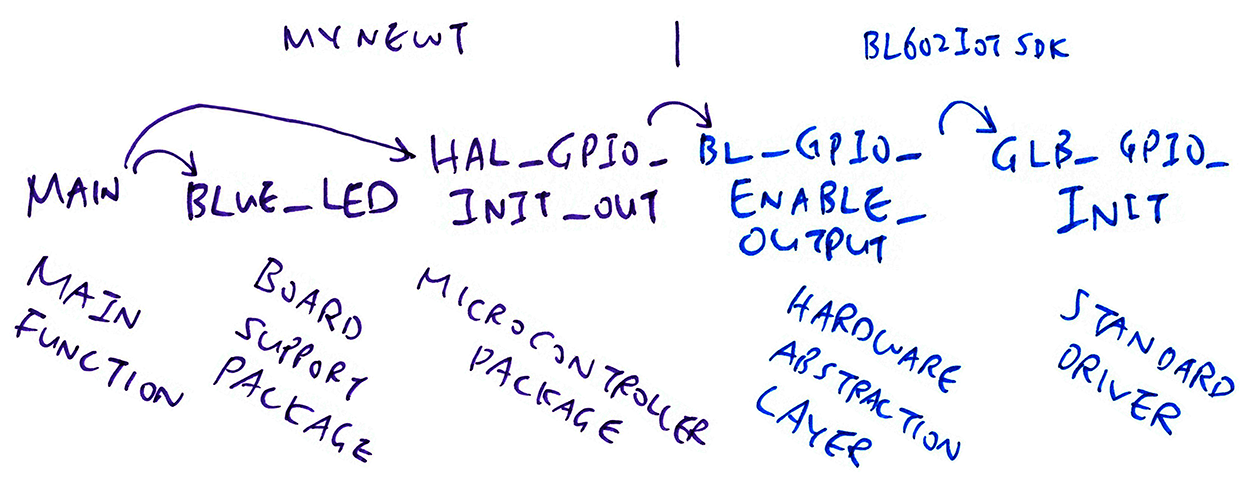
In the Hardware-Agnostic Main Function, we set the LED GPIO to output mode like so: main.c
int main(int argc, char **argv) {
    //  Set the Blue LED GPIO to output mode
    hal_gpio_init_out(LED_BLUE_PIN,  1);
The Mynewt GPIO Function hal_gpio_init_out works on any microcontroller.
LED_BLUE_PIN is the GPIO Pin Number for the Blue LED.
The LED GPIO Pin Number will differ across Boards, so LED_BLUE_PIN is defined in the Board Support Package for PineCone: bsp/bsp.h
//  Define the Blue LED GPIO
#define LED_BLUE_PIN  11
hal_gpio_init_out is a standard Mynewt GPIO Function that works on any microcontroller. But its implementation is specific to the microcontroller.
Here’s the implementation of hal_gpio_init_out in our Microcontroller Package for BL602: bl602/hal_gpio.c
int hal_gpio_init_out(int pin, int val) {
    int rc = bl_gpio_enable_output(pin, 0, 0);
The above implementation calls bl_gpio_enable_output, which is defined in the Hardware Abstraction Layer from BL602 IoT SDK: bl602_hal/bl_gpio.c
int bl_gpio_enable_output(uint8_t pin, uint8_t pullup, uint8_t pulldown) {
    ...
    GLB_GPIO_Init(&cfg);
And finally we call GLB_GPIO_Init, which is defined in the Standard Driver from BL602 IoT SDK: StdDriver/bl602_glb.c
GLB refers to BL602’s Global Register.
GLB_GPIO_Init manipulates the GLB Hardware Register to control the GPIO Hardware and switch GPIO 11 to output mode.
How do we specify which folders of BL602 IoT SDK to compile under Mynewt?
Remember that we’re compiling the smallest subset of functions from the BL602 IoT SDK that are needed for Mynewt…
BL602 Hardware Abstraction Layer: hal_drv/bl602_hal
BL602 Standard Driver: bl602/bl602_std/ bl602_std/StdDriver
We specify these folders in Mynewt’s Microcontroller Package for BL602: hw/mcu/bl/ bl602/pkg.yml
pkg.src_dirs:
    - src
    # Select the BL602 IoT SDK folders to be included for the build
    - ext/bl_iot_sdk/components/hal_drv/bl602_hal
    - ext/bl_iot_sdk/components/bl602/bl602_std/bl602_std/StdDriver/Src
The Microcontroller Package for BL602 also specifies the Include Folders and the GCC Compiler Options: pkg.yml
pkg.cflags:
    - -march=rv32imac
    - -mabi=ilp32
    # BL602 IoT SDK definitions
    - -DCONF_USER_ENABLE_PSRAM
    - -DconfigUSE_TICKLESS_IDLE=0
    - -DFEATURE_WIFI_DISABLE=1
    - -DCFG_FREERTOS
    - -DARCH_RISCV
    - -DBL602
    ...
    # Where the BL602 IoT SDK include files are located
    - -Ihw/mcu/bl/bl602/ext/bl_iot_sdk/components/bl602/bl602_std/bl602_std/Common/partition
    - -Ihw/mcu/bl/bl602/ext/bl_iot_sdk/components/bl602/bl602_std/bl602_std/Common/sim_print
    - -Ihw/mcu/bl/bl602/ext/bl_iot_sdk/components/bl602/bl602_std/bl602_std/Common/soft_crc
    ...
The above options were obtained by running make in Trace Mode when building the BL602 IoT SDK…
make --traceTo preserve the integrity of the BL602 IoT SDK, the entire SDK is mounted under the Mynewt Project as a Git Submodule at…
Does the BL602 IoT SDK depend on any External Library?
Unfortunately yes… The BL602 IoT SDK (Hardware Abstraction Layer) depends on FreeRTOS. And this complicates the porting to Mynewt.
Let’s look at this code from the BL602 Security (Crypto) HAL: bl602_hal/bl_sec.c
int bl_sec_init(void) {
    g_bl_sec_sha_mutex = xSemaphoreCreateMutexStatic(&sha_mutex_buf);
This code calls FreeRTOS to create a Mutex (Mutually Exclusive Lock) to prevent tasks from accessing some shared data concurrently.
Mynewt fails to compile this because xSemaphoreCreateMutexStatic isn’t defined. To work around this, we gave Mynewt a Mock Declaration for the undefined function: semphr.h
It compiles OK under Mynewt for now. But eventually we need to implement xSemaphoreCreateMutexStatic with a Mynewt Semaphore.
Here are the other Mock Declarations for FreeRTOS on Mynewt…
Should the BL602 Hardware Abstraction Layer call FreeRTOS?
This is highly unusual… The Hardware Abstraction Layer (HAL) is Low-Level Code that’s meant to called by various Operating Systems. So we don’t expect BL602 HAL to call FreeRTOS directly.
(STM32 Blue Pill HAL and nRF52 HAL don’t call any Operating Systems either)
This unusual structure seems similar to ESP32, where FreeRTOS is embedded into the ESP32 HAL.
We can still go ahead and port Mynewt (and other Operating Systems) to BL602. Just that we need to emulate the FreeRTOS functions in Mynewt (and other Operating Systems).
Mynewt is strict and uptight when compiling C code with GCC… Any warnings emitted by GCC will fail the Mynewt build.
We made the following fixes to the BL602 IoT SDK to resolve the warnings…
Here we’re passing adc_pin as a number: components/hal_drv/ bl602_hal/bl_adc.c
uint8_t adc_pin = gpio_num;
GLB_GPIO_Func_Init(GPIO_FUN_ANALOG, &adc_pin, 1);
//  Fails because GCC expects adc_pin to be an enum, not a number
Which displeases the GCC Compiler because the function GLB_GPIO_Func_Init expects an enum GLB_GPIO_Type, not a number.
The fix is simple…
//  Declare as enum instead of number
GLB_GPIO_Type adc_pin = gpio_num;This potential Buffer Overflow seems scary: components/hal_drv/ bl602_hal/hal_button.c
int i = ...;
char gpio_node[10] = "gpio";
sprintf(gpio_node, "gpio%d", i);
//  Fails because gpio_node may overflow
GCC thinks that i may exceed 5 digits (because it’s a 32-bit integer), causing gpio_node to overflow.
For our safety (and to placate GCC), we switch sprintf to snprintf, which limits the output size…
//  Limit formatting to size of gpio_node
snprintf(gpio_node, sizeof(gpio_node), "gpio%d", i);Here we use a pointer that’s defined in a GCC Linker Script: components/hal_drv/ bl602_hal/hal_sys.c
extern uint8_t __global_pointer_head$;
memset(&__global_pointer_head$, 0, 0x498);
//  Fails because the pointer references a single byte, not 0x498 bytes
GCC thinks that the pointer references a single byte… Copying 0x498 bytes to the pointer would surely cause an overflow!
Thus we do the right thing and tell GCC that it’s really a pointer to an array of 0x498 bytes…
//  Pointer to an array of 0x498 bytes
extern uint8_t __global_pointer_head$[0x498];The above fixes (plus a few minor ones) have been submitted upstream as a Pull Request…
4 fixes have not been pushed upstream yet, because they need more Impact Analysis…
Variable set but not used
Mismatched format strings
Misplaced main function
Missing include
When porting Mynewt to BL602, it’s good to make sure that we don’t break any existing code by accident. (Especially the BL602 IoT SDK, which we have tweaked slightly for Mynewt)
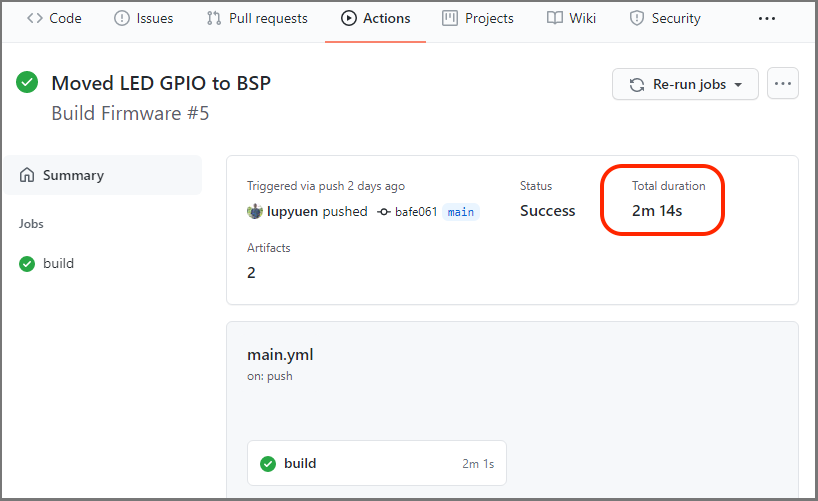
That’s why we use GitHub Actions to compile automatically the Mynewt code (plus the core parts of BL602 IoT SDK) whenever we commit any changes.
How long does GitHub take to compile our Mynewt + BL602 SDK Code?
TWO MINUTES. Thus if we ever commit some bad code (that can’t be compiled) into the repo, GitHub will alert us in TWO MINUTES (via email) that something has gone terribly wrong in our repo.
We’ll see the results of the Automated Build here (please log in to GitHub first)…
To complete the build in TWO MINUTES, we use some caching magic inside our GitHub Actions Workflow.
Let’s learn how it works: .github/workflows/main.yml
At the top of the GitHub Actions Workflow, we state the conditions that will trigger the Automated Build…
## Name of this Workflow
name: Build Firmware

## When to run this Workflow...
on:
  ## Run this Workflow when files are updated (Pushed) in this Branch
  push:
    branches: [ main ]
This says that the Automated Build will be triggered whenever we commit code to the main branch.
We’ll use an Ubuntu x64 virtual machine (hosted at GitHub) to compile our code…
## Steps to run for the Workflow
jobs:
  build:
    ## Run these steps on Ubuntu
runs-on: ubuntu-latestHere begins the steps for our Mynewt + BL602 SDK Automated Build with GitHub Actions.
First we check out the source files from the repo recursively, including the following submodules…
BL602 IoT SDK at hw/mcu/bl/bl602/ext
Mynewt Core, NimBLE, MCU Manager and MCUBoot at repos
    steps:
    - name: Checkout source files
      uses: actions/checkout@v2
      with:
submodules: 'recursive'Mynewt doesn’t use make to build… It uses its own build tool named newt.
Developed in Go, newt runs on Linux, macOS and Windows CMD.
We fetch the newt executable from our GitHub Actions Cache, if it exists…
    - name: Check cache for newt
      id:   cache-newt
      uses: actions/cache@v2
      env:
        cache-name: cache-newt
      with:
        path: ${{ runner.temp }}/mynewt-newt
        key:  ${{ runner.os }}-build-${{ env.cache-name }}
        restore-keys: ${{ runner.os }}-build-${{ env.cache-name }}
(If newt isn’t found in our cache, we build newt and cache it in the next step)
Each cache has a name, ours is cache-newt…
      env:
        cache-name: cache-newt
The Cache Action actions/cache requires 3 parameters: path, key and restore-keys…
      with:
        path: ${{ runner.temp }}/mynewt-newt
        key:  ${{ runner.os }}-build-${{ env.cache-name }}
        restore-keys: ${{ runner.os }}-build-${{ env.cache-name }}
Given that our GitHub Actions Environment is defined as…
runner.temp    = /home/runner/work/_temp
runner.os      = Linux
env.cache-name = cache-newt
Our parameters will get expanded to…
path:         /home/runner/work/_temp/mynewt-newt
key:          Linux-build-cache-newt
restore-keys: Linux-build-cache-newt
Thus the Cache Action will cache and restore the newt folder at this temporary folder…
path: /home/runner/work/_temp/mynewt-newtAnd to avoid confusion with other caches in the same workflow, we give it a unique key…
key: Linux-build-cache-newtHere’s how we download and build newt if it doesn’t exist in our cache…
    - name: Install newt
      ## Install newt if not found in cache
      if:   steps.cache-newt.outputs.cache-hit != 'true'
      run:  |
        source scripts/install-version.sh
        cd ${{ runner.temp }}
        git clone --branch $mynewt_version https://github.com/apache/mynewt-newt/
        cd mynewt-newt/
        ./build.sh
        newt/newt version
        export PATH=$PATH:${{ runner.temp }}/mynewt-newt/newt
        newt version
(We set mynewt_version to mynewt_1_8_0_tag in scripts/install-version.sh)
Note the condition: We execute this step only when newt doesn’t exist in our cache…
      ## Install newt if not found in cache
if: steps.cache-newt.outputs.cache-hit != 'true'(steps.cache-newt refers to the cache checking from the previous step)
After building newt, the Cache Action actions/cache (from the previous step) caches our newt folder…
path: /home/runner/work/_temp/mynewt-newtAnd restores the newt folder whenever we run the Automated Build.
This caching enables us to complete the Automated Build in two minutes. We’ll use caching again for the GCC Compiler.
For troubleshooting our Automated Build, we dump the GitHub Actions Environmment Variables and the File System like so…
    - name: Show files
      run:  set ; pwd ; ls -l
And here’s the output…
Mynewt Automated Build completed in 2 minutes
Remember how we cached the newt tool to cut down on the build time? We’ll do the same for our GCC Compiler…
    - name: Check cache for xPack RISC-V Toolchain xpack-riscv-none-embed-gcc
      id:   cache-toolchain
      uses: actions/cache@v2
      env:
        cache-name: cache-toolchain
      with:
        path: xpack-riscv-none-embed-gcc
        key:  ${{ runner.os }}-build-${{ env.cache-name }}
        restore-keys: ${{ runner.os }}-build-${{ env.cache-name }}
First we try to load the GCC Compiler from the cache with these settings…
path:         xpack-riscv-none-embed-gcc
key:          Linux-build-cache-toolchain
restore-keys: Linux-build-cache-toolchain
If the GCC Compiler exists in our cache, the Cache Action will restore the GCC folder xpack-riscv-none-embed-gcc into the current directory (which is the root of our repo).
If the GCC Compiler doesn’t exist in our cache, we download the xPack RISC-V Toolchain: xpack-riscv-none-embed-gcc
    - name: Install xPack RISC-V Toolchain xpack-riscv-none-embed-gcc
      ## Install toolchain if not found in cache
      if:   steps.cache-toolchain.outputs.cache-hit != 'true'
      run:  |
        wget -qO- https://github.com/xpack-dev-tools/riscv-none-embed-gcc-xpack/releases/download/v8.3.0-2.3/xpack-riscv-none-embed-gcc-8.3.0-2.3-linux-x64.tar.gz | tar -xz
        mv xpack-riscv-none-embed-gcc-* xpack-riscv-none-embed-gcc
(Remember: We check steps.cache-toolchain and skip this step if the GCC Compiler is already in our cache)
After downloading the GCC Compiler, the Cache Action actions/cache (from the previous step) caches our GCC folder…
path: xpack-riscv-none-embed-gccCaching the GCC Compiler is essential for reducing the Automated Build time to 2 minutes… Because each download of the xPack RISC-V Toolchain takes a whopping 400 MB! (Zipped!)
Now that we have the build tools ready (newt and GCC Compiler), let’s build Mynewt with GitHub Actions…
    - name: Build Application Firmware
      run:  |
        export PATH=$PATH:${{ runner.temp }}/mynewt-newt/newt
        ./scripts/build-app.sh
This sets the path of newt and calls the build script: scripts/build-app.sh
##  Add GCC to the PATH
export PATH="$PWD/xpack-riscv-none-embed-gcc/bin:$PATH"

##  Build the Mynewt Firmware
newt build pinecone_app

##  Display the firmware size
newt size -v pinecone_app
We can see the results of the Automated Build here (please log in to GitHub first)…
Here’s a peek at the Automated Build log at GitHub Actions…
Linking /home/runner/work/pinecone-rust-mynewt/pinecone-rust-mynewt/bin/targets/pinecone_app/app/apps/blinky/blinky.elf
Target successfully built: targets/pinecone_app
+ newt size -v pinecone_app
Size of Application Image: app
Mem flash: 0x22008000-0x22014000
Mem ram: 0x22014000-0x22020000
Note that the “Flash Memory” actually points to the Cache Memory at 0x2200 8000.
This means that our firmware is meant to be tested and debugged with OpenOCD and GDB (or VSCode). (Instead of being flashed to Flash Memory)
  flash     ram
      6     529 *fill*
    172       0 @apache-mynewt-core_hw_hal.a
   4442    8213 @apache-mynewt-core_kernel_os.a
     80       0 @apache-mynewt-core_libc_baselibc.a
    702     128 @apache-mynewt-core_sys_flash_map.a
      2       0 @apache-mynewt-core_sys_log_modlog.a
    782      29 @apache-mynewt-core_sys_mfg.a
     30       5 @apache-mynewt-core_sys_sysinit.a
     72       0 @apache-mynewt-core_util_mem.a
     36       0 apps_blinky.a
     44      12 hw_bsp_pinecone.a
   3486     228 hw_mcu_bl_bl602.a
     92       0 pinecone_app-sysinit-app.a
    292    1064 libg.a
Here are the components of our firmware. The BL602 IoT SDK (GPIO HAL and Standard Driver) occupies 3.4 KB of code and read-only data in hw_mcu_bl_bl602.a.
The Mynewt Kernel apache-mynewt-core_kernel_os.a occupies 4.3 KB of code and read-only data, plus another 8 KB of read-write data in RAM. (Mostly for the Kernel Stack)
Loading compiler /home/runner/work/pinecone-rust-mynewt/pinecone-rust-mynewt/compiler/riscv-none-embed, buildProfile debug
objsize
   text	   data	    bss	    dec	    hex	filename
  11318	     28	   9100	  20446	   4fde	/home/runner/work/pinecone-rust-mynewt/pinecone-rust-mynewt/bin/targets/pinecone_app/app/apps/blinky/blinky.elf
The build creates a Firmware ELF File blinky.elf that contains 11 KB of code and read-only data.
To save the firmware files generated by the Automated Build (and allow anyone to download), we call actions/upload-artifact…
    - name: Upload Application Firmware
      uses: actions/upload-artifact@v2
      with:
        name: blinky.elf
        path: bin/targets/pinecone_app/app/apps/blinky/blinky.elf
Here we save the Mynewt Firmware ELF File blinky.elf as an Artifact, to make it accessible for everyone to download. Download here
    - name: Upload Application Firmware Outputs
      uses: actions/upload-artifact@v2
      with:
        name: blinky.zip
        path: bin/targets/pinecone_app/app/apps/blinky/blinky.*
Next we upload another Artifact named blinky.zip that contains some useful files from the Mynewt Automated Build…
blinky.elf.bin: Mynewt Firmware Binary.
Contains only the firmware code and read-only data, without the debugging symbols.
blinky.elf.map: GCC Linker Map for our Mynewt Firmware.
Shows the addresses of every function and global variable in our firmware.
blinky.elf.lst: RISC-V Assembly Code for our Mynewt Firmware.
Disassembled from our firmware build.
It’s good to keep a record of the files created from the build: pathname, timestamp, file size, …
Here’s how we capture the build output info with GitHub Actions…
    - name: Find output
      run:  |
        find bin/targets/pinecone_app/app/apps/blinky -name "blinky.*" -ls
And here’s the captured info…
5439531     12 -rwxr-xr-x   1 runner   docker      11348 Jan 10 02:26 bin/targets/pinecone_app/app/apps/blinky/blinky.elf.bin
5439528    348 -rw-r--r--   1 runner   docker     354281 Jan 10 02:26 bin/targets/pinecone_app/app/apps/blinky/blinky.elf.map
5439529    392 -rwxr-xr-x   1 runner   docker     401104 Jan 10 02:26 bin/targets/pinecone_app/app/apps/blinky/blinky.elf
5439530      4 -rw-r--r--   1 runner   docker       3309 Jan 10 02:26 bin/targets/pinecone_app/app/apps/blinky/blinky.elf.cmd
5439532 300 -rw-r--r-- 1 runner docker 303790 Jan 10 02:26 bin/targets/pinecone_app/app/apps/blinky/blinky.elf.lstRemember how we cached newt and the GCC Compiler with GitHub Actions?
Note that the cache will be populated only when the build succeeds.
When creating a new GitHub Actions Workflow, we should first comment out the build steps (to let the build succeed), let the caching happen, then uncomment the build steps.
With caching in effect, we save a lot of time testing and troubleshooting our Automated Build.
To test and debug the updated Mynewt on PineCone with our Linux / macOS / Windows computer…
Download and install newt, GCC, OpenOCD, VSCode and pinecone-rust-mynewt…
Build the Mynewt firmware on our computer using the instructions above.
Alternatively, download blinky.elf from here and copy it to…
pinecone-rust-mynewt/bin/targets/pinecone_app/app/apps/blinkyConnect PineCone to our computer with a JTAG Debugger and start the VSCode Debugger…
In the GDB Debug Console we’ll see this…
Breakpoint 1 at 0x220092ba: file apps/blinky/src/main.c, line 30.
Breakpoint 2 at 0x22008242: file repos/apache-mynewt-core/kernel/os/src/arch/rv32imac/os_fault.c, line 30.
Remote debugging using | xpack-openocd/bin/openocd -c "gdb_port pipe; log_output openocd.log" -f openocd.cfg
Running executable
xPack OpenOCD, x86_64 Open On-Chip Debugger 0.10.0+dev-00378-ge5be992df (2020-06-26-12:31)
This says that we have set two breakpoints. And that OpenOCD has been started, talking to PineCone.
0x21000000 in ?? ()
Not implemented stop reason (assuming exception): undefined
OpenOCD has taken control of BL602 and has halted the execution at address 0x2100 0000
Which is really interesting because 0x2100 0000 is the address of BL602’s Boot ROM. Thus we have evidence that BL602 starts running the Boot ROM code at 0x2100 0000 whenever it reboots.
Loading section .init, size 0xa2 lma 0x22008000
Loading section .text, size 0x1c1c lma 0x220080a4
Loading section .tcm_code, size 0xaa0 lma 0x22009cc0
Loading section .rodata, size 0x94 lma 0x2200a760
Loading section .sdata2.HFXOSC_PLL_256_MHZ, size 0x8 lma 0x2200a7f4
Loading section .sdata2._global_impure_ptr, size 0x4 lma 0x2200a7fc
Loading section .data, size 0x438 lma 0x2200a800
Loading section .sdata, size 0x1c lma 0x2200ac38
Start address 0x22008000, load size 11346
Transfer rate: 2 KB/sec, 1418 bytes/write.
Our GDB Script (see this) has loaded our firmware to BL602 at address 0x2200 8000, which is in Cache Memory.
(BL602 doesn’t support flashing firmware to Flash Memory with OpenOCD. More details)
Breakpoint 1, main (argc=0, argv=0x0) at apps/blinky/src/main.c:30
30	int main(int argc, char **argv) {
When the debugger code hits the first breakpoint (in the main function), click the Continue button in the Debug Toolbar. (Or press F5)
Calamity strikes as our Mynewt GPIO Firmware runs.
Yes the Blue LED lights up, but we see this error in GDB…
Debugger is not authenticated to target Debug Module. (dmstatus=0x0).
Use `riscv authdata_read` and `riscv authdata_write` commands to authenticate.
That’s because PineCone’s RGB LED is connected to the same pins as the JTAG port!
| PineCone Pin | LED Pin | JTAG Pin |
|---|---|---|
GPIO 11 | Blue | TDO |
GPIO 14 | Green | TCK |
GPIO 17 | Red | TDI |
(See “If you love the LED… Set it free!”)
When we flip the LEDs on and off, the JTAG Debugger connection drops.
But our firmware is indeed flipping the LEDs correctly, so we’re done with GPIO testing on Mynewt!
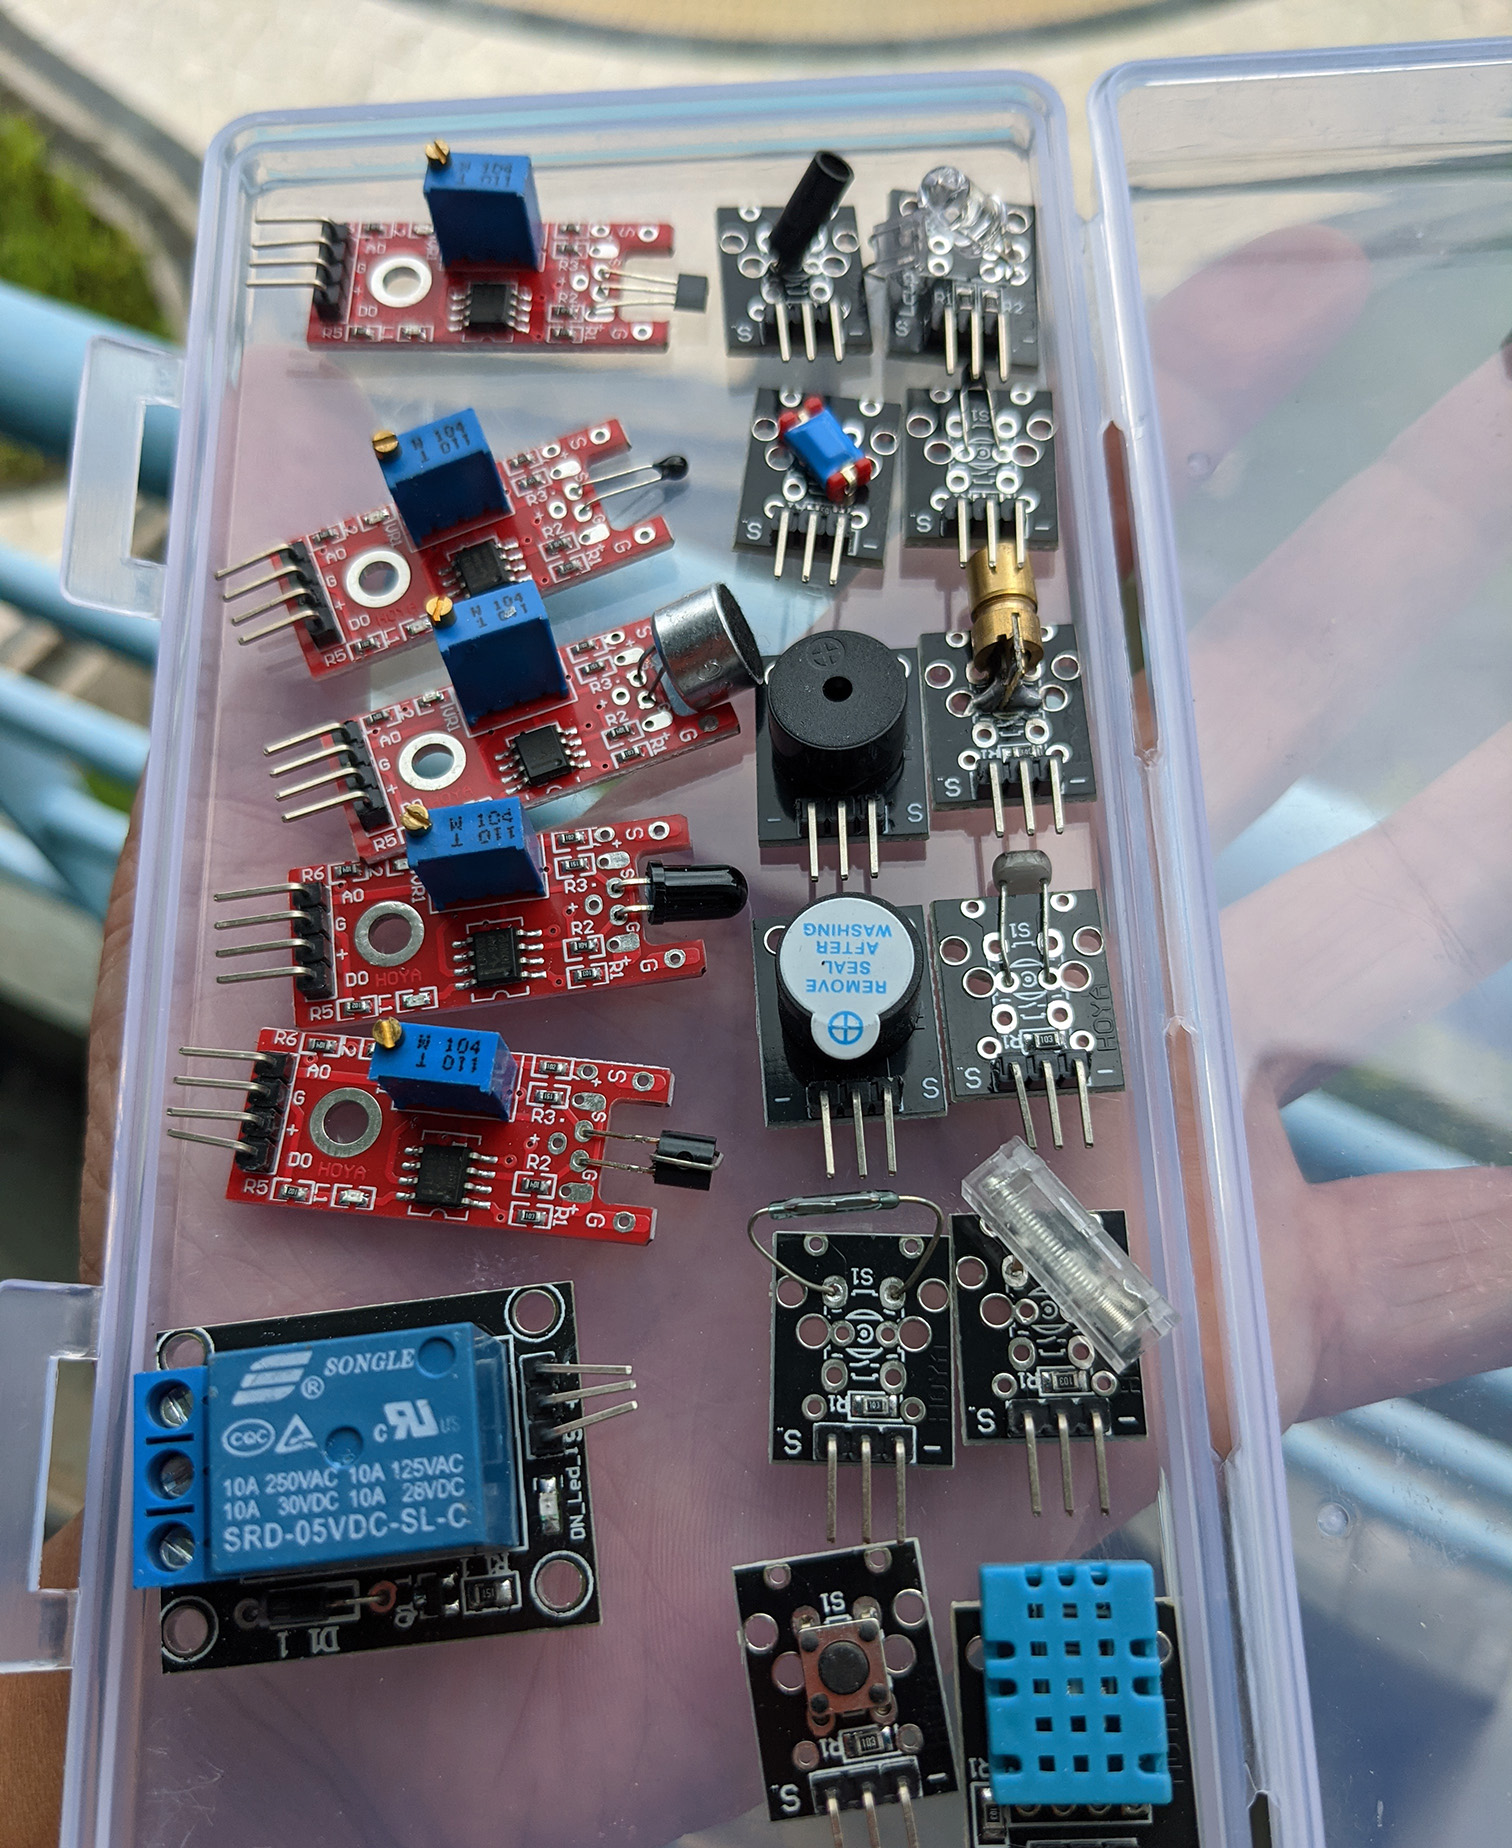
Sensors and actuators to be tested with PineCone BL602
We’ll be testing Mynewt on PineCone BL602 with an interesting mix of Sensors and Actuators shown above. Here’s the list
Most of the Sensors and Actuators will work fine with GPIO on Mynewt. But some require additional support from Mynewt: Pulse Width Modulation and Analog to Digital Converter.
We shall integrate with Mynewt the respective Hardware Abstraction Layers from the BL602 IoT SDK.
What about DHT11, the Temperature and Humidity Sensor? (Lower right corner)
DHT11 will be a problem because it transmits Serial Data in an unusual way (bidirectional single wire) that’s incompatible with UART, I2C and SPI. See DHT11 Datasheet
We would have to read the data from DHT11 via Bit Banging. Which is hard to do reliably on a multitasking operating system like Mynewt. More about the evils of Bit Banging
Is there a better Temperature and Humidity Sensor that connects with standard interfaces… And works well with mutitasking?
Yes BME280 senses Temperature, Humidity and Altitude (Air Pressure). BME280 supports both I2C and SPI interfaces. More about BME280
We shall we using BME280 for testing the implementation of I2C and SPI on Mynewt BL602.
How do we find Software Drivers for BME280 and other Sensors and Actuators?
This will be a problem for all operating systems running on BL602: Getting the Sensor / Actuator Drivers for Mynewt, FreeRTOS, Zephyr, RIOT, …
Each operating system has its own Hardware Abstraction Layer (HAL) for talking to hardware interfaces (like I2C, SPI and Timers). Thus we’ll never find drivers that will work across all operaing system.
What if we could standardise the HAL across all operating systems?
There’s one possibility: Adopt the Rust Embedded HAL. I have previously ported the Rust Embedded HAL to Mynewt (for PineTime). More details
Once we have the Rust Embedded HAL ported to Mynewt (and other operating systems), we’ll be able to use the Rust Embedded Drivers. List of Rust Embedded Drivers
(And we’ll code our firmware in Rust of course)
We shall experiment with the BME280 Rust Driver on Mynewt BL602.
Anything else we’ll be supporting in Mynewt BL602?
Yes we shall be adding support for UART on Mynewt BL602, so that we can view debugging messages.
And Timers so that we can poll for GPIO Inputs.
Stay Tuned!
Got a question, comment or suggestion? Create an Issue or submit a Pull Request here…
My thoughts on Teaching IoT and Embedded Programming with Sensors and Actuators?
Let’s move away from boring old GPIO-based Sensors and Actuators… And teach modern ones based on I2C and SPI!
To teach IoT with PineCone or Pinenut BL602, we need to add on…
SPI Display Controller with LED / OLED / EPaper display (like ST7789 on PineTime)
I2C Touch Controller or Keypad (like on PineTime)
Battery
Will newbies find it difficult to code firmware for an SPI Display?
Not if we adopt a Common Graphics Library like LVGL that will work on all BL602 operating systems. More about LVGL
On PineTime we have proven that LVGL (and the ST7789 driver) works perfectly fine on FreeRTOS, Mynewt, RIOT, Zephyr, …
We have even created Web Simulators for PineTime based on LVGL + WebAssembly. See this
LVGL is a great way for newbies to create Graphical Embedded Apps in C and Rust, our PineTime experience has shown. LVGL on Rust
(Especially when BL602 has more RAM and Flash Memory than PineTime)
There is a GPIO feature that hasn’t been implemented on Mynewt BL602: Trigger an interrupt when a GPIO Input changes. See this
This requires CLNT Interrupts to be supported on Mynewt BL602.
Sensors and actuators to be tested with PineCone BL602
| Sensor | Outputs |
|---|---|
| Linear Hall | Analog, Digital |
| Shock Switch | Digital |
| Knock Switch | Digital |
| Mini Reed Switch | Digital |
| Analog Temperature | Analog |
| Analog & Digital Temperature | Analog, Digital |
| Button Switch | Digital |
| Tilt Switch | Digital |
| Photoresistor | Analog |
| Digital Temperature & Humidity (DHT11) | Digital (Serial) |
| High Sensitivity Audio | Analog, Digital |
| Metal Touch | Analog, Digital |
| Flame | Analog, Digital |
| Actuator | Input |
|---|---|
| Laser Transmitter | Digital |
| Active Buzzer | Digital |
| Passive Buzzer | Digital |
| Relay | Digital |
| Sensor + Actuator | Input / Output |
|---|---|
| Infrared Transmitter & Receiver | Digital |
Here’s how we dump the GitHub Actions Environmment Variables and the File System…
    - name: Show files
      run:  set ; pwd ; ls -l
And here’s the output…
AGENT_TOOLSDIRECTORY=/opt/hostedtoolcache
ANDROID_HOME=/usr/local/lib/android/sdk
ANDROID_SDK_ROOT=/usr/local/lib/android/sdk
ANT_HOME=/usr/share/ant
AZURE_EXTENSION_DIR=/opt/az/azcliextensions
BASH=/usr/bin/bash
BASHOPTS=checkwinsize:cmdhist:complete_fullquote:extquote:force_fignore:globasciiranges:hostcomplete:interactive_comments:progcomp:promptvars:sourcepath
BASH_ALIASES=()
BASH_ARGC=()
BASH_ARGV=()
BASH_CMDS=()
BASH_LINENO=([0]="0")
BASH_SOURCE=([0]="/home/runner/work/_temp/e317ee99-ed5d-4e4d-bf6d-765dc458355d.sh")
BASH_VERSINFO=([0]="5" [1]="0" [2]="17" [3]="1" [4]="release" [5]="x86_64-pc-linux-gnu")
BASH_VERSION='5.0.17(1)-release'
CHROMEWEBDRIVER=/usr/local/share/chrome_driver
CHROME_BIN=/usr/bin/google-chrome
CI=true
CONDA=/usr/share/miniconda
DEBIAN_FRONTEND=noninteractive
DEPLOYMENT_BASEPATH=/opt/runner
DIRSTACK=()
DOTNET_MULTILEVEL_LOOKUP='"0"'
DOTNET_NOLOGO='"1"'
DOTNET_SKIP_FIRST_TIME_EXPERIENCE='"1"'
EUID=1001
GECKOWEBDRIVER=/usr/local/share/gecko_driver
GITHUB_ACTION=run2
GITHUB_ACTIONS=true
GITHUB_ACTION_REF=
GITHUB_ACTION_REPOSITORY=
GITHUB_ACTOR=lupyuen
GITHUB_API_URL=https://api.github.com
GITHUB_BASE_REF=
GITHUB_ENV=/home/runner/work/_temp/_runner_file_commands/set_env_64d8b762-fb69-4a06-8cda-f76ea66e06b5
GITHUB_EVENT_NAME=push
GITHUB_EVENT_PATH=/home/runner/work/_temp/_github_workflow/event.json
GITHUB_GRAPHQL_URL=https://api.github.com/graphql
GITHUB_HEAD_REF=
GITHUB_JOB=build
GITHUB_PATH=/home/runner/work/_temp/_runner_file_commands/add_path_64d8b762-fb69-4a06-8cda-f76ea66e06b5
GITHUB_REF=refs/heads/main
GITHUB_REPOSITORY=lupyuen/pinecone-rust-mynewt
GITHUB_REPOSITORY_OWNER=lupyuen
GITHUB_RETENTION_DAYS=90
GITHUB_RUN_ID=474939609
GITHUB_RUN_NUMBER=5
GITHUB_SERVER_URL=https://github.com
GITHUB_SHA=bafe061d1fa6e96cc014e4e9a3444a43a1c5144d
GITHUB_WORKFLOW='Build Firmware'
GITHUB_WORKSPACE=/home/runner/work/pinecone-rust-mynewt/pinecone-rust-mynewt
GOROOT=/opt/hostedtoolcache/go/1.14.13/x64
GOROOT_1_14_X64=/opt/hostedtoolcache/go/1.14.13/x64
GOROOT_1_15_X64=/opt/hostedtoolcache/go/1.15.6/x64
GRADLE_HOME=/usr/share/gradle
GROUPS=()
HOME=/home/runner
HOMEBREW_CELLAR='"/home/linuxbrew/.linuxbrew/Cellar"'
HOMEBREW_PREFIX='"/home/linuxbrew/.linuxbrew"'
HOMEBREW_REPOSITORY='"/home/linuxbrew/.linuxbrew/Homebrew"'
HOSTNAME=fv-az29-728
HOSTTYPE=x86_64
IFS=$' \t\n'
INVOCATION_ID=448992154cf94065a2a551779d186946
ImageOS=ubuntu20
ImageVersion=20201210.0
JAVA_HOME=/usr/lib/jvm/adoptopenjdk-11-hotspot-amd64
JAVA_HOME_11_X64=/usr/lib/jvm/adoptopenjdk-11-hotspot-amd64
JAVA_HOME_8_X64=/usr/lib/jvm/adoptopenjdk-8-hotspot-amd64
JOURNAL_STREAM=9:19739
LANG=C.UTF-8
LEIN_HOME=/usr/local/lib/lein
LEIN_JAR=/usr/local/lib/lein/self-installs/leiningen-2.9.5-standalone.jar
M2_HOME=/usr/share/apache-maven-3.6.3
MACHTYPE=x86_64-pc-linux-gnu
OPTERR=1
OPTIND=1
OSTYPE=linux-gnu
PATH=/home/linuxbrew/.linuxbrew/bin:/home/linuxbrew/.linuxbrew/sbin:/opt/pipx_bin:/usr/share/rust/.cargo/bin:/home/runner/.config/composer/vendor/bin:/home/runner/.dotnet/tools:/snap/bin:/usr/local/sbin:/usr/local/bin:/usr/sbin:/usr/bin:/sbin:/bin:/usr/games:/usr/local/games:/snap/bin
PERFLOG_LOCATION_SETTING=RUNNER_PERFLOG
PIPX_BIN_DIR='"/opt/pipx_bin"'
PIPX_HOME='"/opt/pipx"'
POWERSHELL_DISTRIBUTION_CHANNEL=GitHub-Actions-ubuntu20
PPID=1419
PS4='+ '
***
RUNNER_OS=Linux
RUNNER_PERFLOG=/home/runner/perflog
RUNNER_TEMP=/home/runner/work/_temp
RUNNER_TOOL_CACHE=/opt/hostedtoolcache
RUNNER_TRACKING_ID=github_bd1e8ac9-ce6e-4066-bc5e-9e1017d2a08c
RUNNER_USER=runner
RUNNER_WORKSPACE=/home/runner/work/pinecone-rust-mynewt
SELENIUM_JAR_PATH=/usr/share/java/selenium-server-standalone.jar
SHELL=/bin/bash
SHELLOPTS=braceexpand:errexit:hashall:interactive-comments
SHLVL=1
SWIFT_PATH=/usr/share/swift/usr/bin
TERM=dumb
UID=1001
USER=runner
VCPKG_INSTALLATION_ROOT=/usr/local/share/vcpkg
_=/usr/bin/bash/home/runner/work/pinecone-rust-mynewt/pinecone-rust-mynewt
total 52
-rw-r--r-- 1 runner docker 11357 Jan 10 02:24 LICENSE
-rw-r--r-- 1 runner docker 241 Jan 10 02:24 NOTICE
-rw-r--r-- 1 runner docker 583 Jan 10 02:24 README.md
drwxr-xr-x 3 runner docker 4096 Jan 10 02:24 apps
drwxr-xr-x 3 runner docker 4096 Jan 10 02:24 compiler
drwxr-xr-x 4 runner docker 4096 Jan 10 02:24 hw
-rw-r--r-- 1 runner docker 1807 Jan 10 02:24 openocd.cfg
-rw-r--r-- 1 runner docker 1081 Jan 10 02:24 project.yml
drwxr-xr-x 7 runner docker 4096 Jan 10 02:24 repos
drwxr-xr-x 2 runner docker 4096 Jan 10 02:24 scripts
drwxr-xr-x 4 runner docker 4096 Jan 10 02:24 targets