
Debugging Mynewt Firmware with VSCode
📝 21 Dec 2020
Our journey so far…
We took a quick peek at PineCone BL602 RISC-V Evaluation Board…
Then we connected PineCone to OpenOCD with a JTAG Debugger…
And we debugged Rust on PineCone with VSCode and GDB
Today we’ll learn about our port of Apache Mynewt embedded operating system to PineCone.
Watch the Sneak Peek on YouTube
Why port Mynewt to BL602?
Since FreeRTOS is already supported on BL602 (for multitasking Bluetooth LE and WiFi in the background), let’s port a modern embedded operating system like Mynewt.
It’s a great way to learn the internals of BL602. And this article will be a valuable resource for porting to BL602 other embedded operating systems, like Zephyr and RIOT.
UPDATE: Check out Apache NuttX operating system for BL602
UPDATE: Check out Zephyr for BL602
UPDATE: Zephyr is being ported to BL602 MCU SDK
What’s the quickest way to port Mynewt to PineCone BL602?
There’s one (and only one) RISC-V Board supported today on Mynewt: SiFive’s HiFive1 Board, based on the SiFive FE310 Microcontroller.
We shall copy and adapt the necessary files from the HiFive1 FE310 port to our PineCone BL602 port.
How different is BL602 from SiFive FE310?
The Memory Maps for BL602 and SiFive FE310 look totally different…
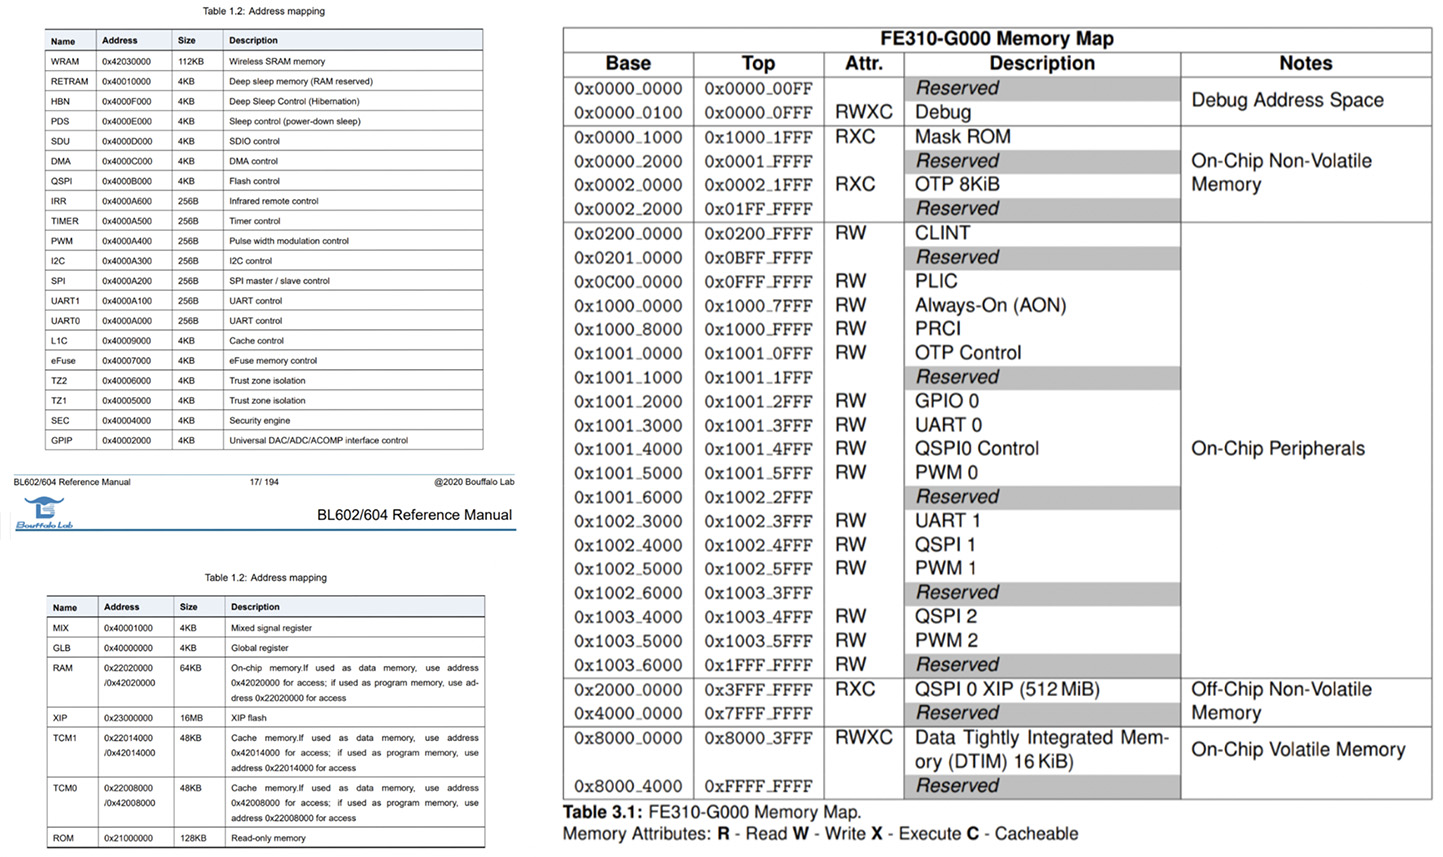
BL602 Memory Map (left) vs SiFive FE310 (right): Totally different
But BL602’s RISC-V Core is highly similar to SiFive FE310. Compare these two files…
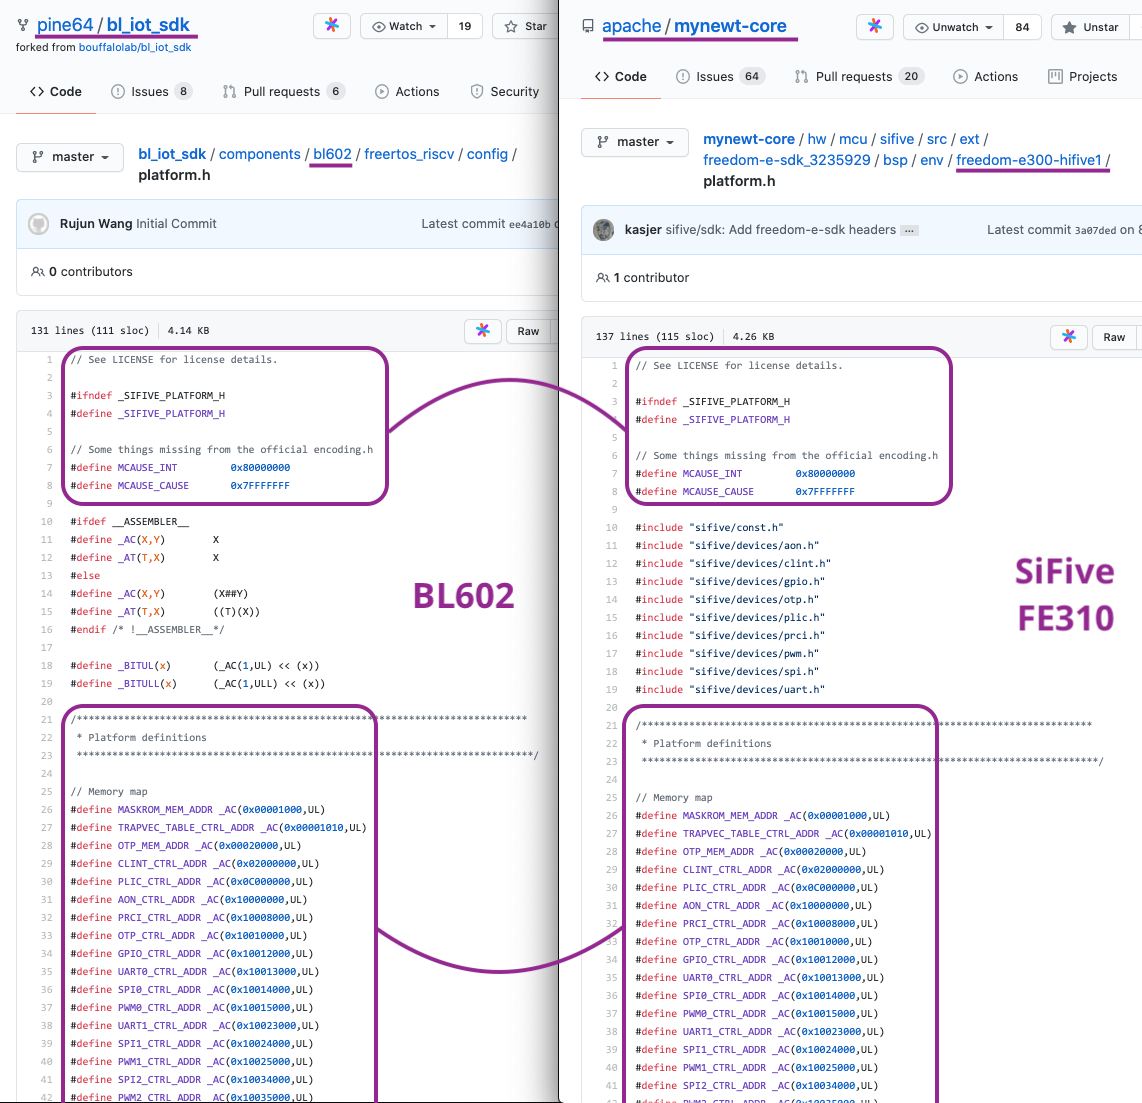
platform.h: BL602 (left) vs SiFive FE310 (right)
Since BL602’s RISC-V Core is so similar to FE310, it makes porting simpler.
BL602 is based on which SiFive RISC-V Core?
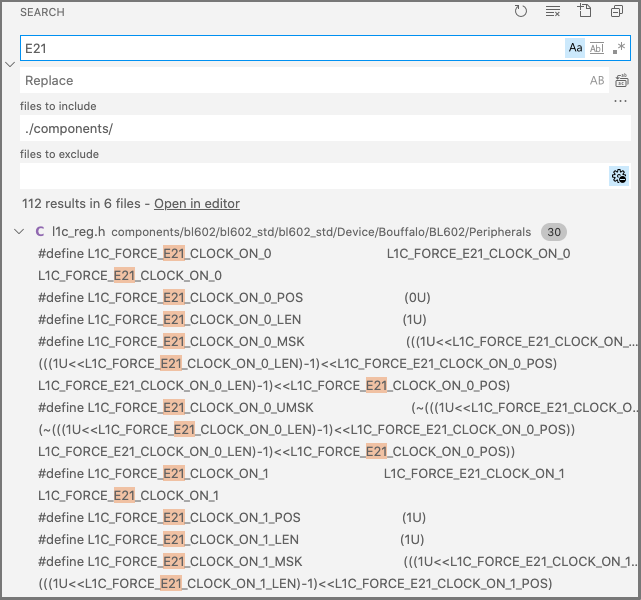
From the screenshot above, the name “E21” appears (over a hundred times) in the BL602 IoT SDK. (See this)
Thus we assume that BL602 is based on the SiFive E21 RISC-V Core (and not E24)…
While doing the porting, we shall compare the above E21 doc with the FE310 doc so that we can identify the differences (e.g. FE310 supports PLIC, E21 doesn’t)
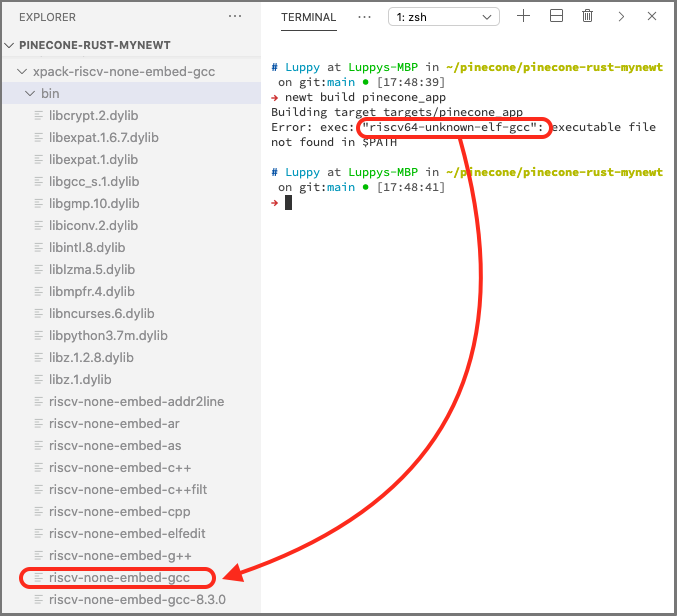
Mynewt’s default GCC Compiler is riscv64-unknown-elf-gcc
When building RISC-V Firmware, Mynewt uses the RISC-V GCC Compiler riscv64-unknown-elf-gcc (See this)
But that’s not the same as our compiler from xPack RISC-V GCC: riscv-none-embed-gcc
(See “Debug Rust on PineCone BL602 with VSCode and GDB”, Section 1.3, “Install GDB”)
Hence we copy and modify the GCC settings like so: compiler/riscv-none-embed/compiler.yml
compiler.path.cc:      "riscv-none-embed-gcc"
compiler.path.as:      "riscv-none-embed-gcc"
compiler.path.archive: "riscv-none-embed-ar"
compiler.path.objdump: "riscv-none-embed-objdump"
compiler.path.objsize: "riscv-none-embed-size"
compiler.path.objcopy: "riscv-none-embed-objcopy"
Mynewt will now compile our firmware with riscv-none-embed-gcc
In the screen above, how did we create the Mynewt Project pinecone-rust-mynewt and the Mynewt Firmware pinecone_app?
I created pinecone-rust-mynewt and pinecone_app using Mynewt’s newt tool.
We’ll download them in a while, so you don’t need to create them.
(FYI: I created pinecone-rust-mynewt and pinecone_app using the steps explained in the sections “Appendix: Install newt” and “Appendix: Create the Mynewt Firmware” below)
Mynewt Microcontroller Definition for BL602
We create a Microcontroller Definition to tell Mynewt all about BL602…
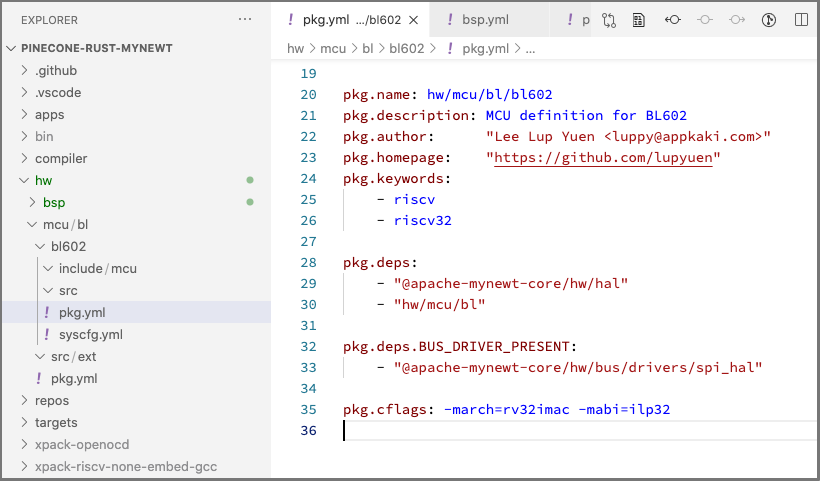
BL602 Microcontroller Definition: hw/mcu/bl/bl602
BL602 Package: pkg.yml
BL602 Configuration: syscfg.yml
This contains the code for the Hardware Adaptaion Layer that’s specific to BL602 and its built-in Periperal Functions (like Flash Memory, GPIO, I2C, SPI, …)
The code here was derived from SiFive FE310: hw/mcu/sifive/fe310
BL602 is present on various boards, PineCone is one of them. The BL602 boards have different features: LEDs, buttons, JTAG debugger, …
In Mynewt we handle the board differences by creating a Board Support Package for PineCone…
PineCone Board Support Package: hw/bsp/pinecone
PineCone Definition: bsp.yml
PineCone Package: pkg.yml
PineCone Configuration: syscfg.yml
The Board Support Package for PineCone contains code that’s specific to PineCone. More details
The code here was derived from SiFive HiFive1 Board: hw/bsp/hifive1
The Linker Script tells GCC Compiler about the Memory Layout for executing our firmware…
Flash Memory Area: For firmware code and read-only data
RAM Memory Area: For read/write data
Here’s our Linker Script for PineCone…
hw/bsp/pinecone/bsp_app.ldMEMORY
{
/* Use this memory layout when firmware is loaded into cache memory.
Based on https://github.com/lupyuen/pinecone-rust/blob/main/memory.x */
flash (rxai!w) : ORIGIN = 0x22008000, LENGTH = 48K /* Instruction Cache Memory */
ram (wxa!ri) : ORIGIN = 0x22014000, LENGTH = 48K /* Data Cache Memory */
}Note that we’re loading the firmware code and read-only data into BL602’s Instruction Cache Memory (similar to RAM), not into Flash Memory. (We’ll learn why in a while)
In future when we’re ready to load our firmware into Flash Memory, we’ll use this memory layout instead…
  /* TODO: Use this memory layout when firmware is loaded into Flash Memory
     Based on Based on https://github.com/lupyuen/bl_iot_sdk/blob/master/components/bl602/bl602/evb/ld/flash_rom.ld */
  flash (rxai!w) : ORIGIN = 0x23000000, LENGTH = 4M   /* Flash Memory */
  ram   (wxa!ri) : ORIGIN = 0x4200c000, LENGTH = 216K /* RAM          */
(This is commented out in bsp_app.ld)
We’re presently not using a Bootloader on PineCone…
/* Bootloader not in use. */
_imghdr_size = 0x0;
In future when we use the Mynewt Bootloader, we need to reserve some space for the Bootloader Image Header, which is located at the start of the firmware code…
/* This linker script is used for images and thus contains an image header */
/* TODO: Uncomment the next line when Bootloader is in use */
_imghdr_size = 0x20;Mynewt’s MCUBoot Bootloader will roll back the Active Firmware to the Standby Firmware in case the Active Firmware can’t be started.
We define the Flash Map to tell Mynewt where in Flash Memory the Bootloader, Active Firmware Image and Standby Firmware Image will be located…
hw/bsp/pinecone/bsp.yml## BL602 Instruction Cache Memory starts at 0x2200 8000, size 48 KB
## Based on https://github.com/lupyuen/pinecone-rust/blob/main/memory.x
bsp.flash_map:
areas:
## System areas.
## (Not Used) Bootloader
FLASH_AREA_BOOTLOADER:
device: 0
offset: 0x22013c00
size: 1kB # 0x400
## Active Firmware Image
FLASH_AREA_IMAGE_0:
device: 0
offset: 0x22008000
size: 43kB # 0xac00
## (Not Used) Standby Firmware Image, in case Active Firmware can't start
FLASH_AREA_IMAGE_1:
device: 0
offset: 0x22012c00
size: 1kB # 0x400
## (Not used) Scratch Area for swapping Active Firmware and Standby Firmware
FLASH_AREA_IMAGE_SCRATCH:
device: 0
offset: 0x22013000
size: 1kB # 0x400Remember that we’re loading our firmware into Cache Memory (instead of Flash Memory) and we’re not using the Bootloader.
That’s why we allocate most of the Cache Memory to the Active Firmware Image (located at the start of Cache Memory).
        ## User areas.
        ## (Not Used) Reboot Log
        FLASH_AREA_REBOOT_LOG:
            user_id: 0
            device:  0
            offset:  0x22013400
            size:    1kB    # 0x400
        ## (Not Used) User File System, like LittleFS
        FLASH_AREA_NFFS:
            user_id: 1
            device:  0
            offset:  0x22013800
            size:    1kB    # 0x400
Since we have very little Cache Memory, we’ll cut down on the Reboot Log and User File Systems.
The Flash Map looks more meaningful when we’re ready to load our firmware into Flash Memory and turn on the Bootloader.
Here is our Flash Map for the future…
## TODO: Use this memory layout when firmware is loaded into Flash Memory
## BL602 Flash starts at 0x2300 0000, size 4 MB
## Based on https://github.com/lupyuen/bl_iot_sdk/blob/master/components/bl602/bl602/evb/ld/flash_rom.ld
bsp.flash_map:
    areas:
        ## System areas.
        ## TODO: Bootloader not in use. When used, move Bootloader to 0x2300 0000 and shift the other areas accordingly
        FLASH_AREA_BOOTLOADER:
            device:  0
            offset:  0x2330d000
            size:    32kB      # 0x8000
        ## Active Firmware Image
        FLASH_AREA_IMAGE_0:
            device:  0
            offset:  0x23000000
            size:    1024kB    # 0x100 000
        ## Standby Firmware Image, in case Active Firmware can't start
        FLASH_AREA_IMAGE_1:
            device:  0
            offset:  0x23100000
            size:    1024kB    # 0x100 000
        ## Scratch Area for swapping Active Firmware and Standby Firmware
        FLASH_AREA_IMAGE_SCRATCH:
            device:  0
            offset:  0x23300000
            size:    4kB       # 0x1000
(This is commented out in bsp.yml)
In future we’ll have a proper Reboot Log and a User File System for saving files and data that will be retained across reboots…
        ## User areas.
        ## Reboot Log
        FLASH_AREA_REBOOT_LOG:
            user_id: 0
            device:  0
            offset:  0x23301000
            size:    48kB      #  0xc000
        ## User File System, like LittleFS
        FLASH_AREA_NFFS:
            user_id: 1
            device:  0
            offset:  0x23200000
size: 1024kB # 0x100 000We select the Mynewt Firmware to be built by creating a Firmware Target…
targets/pinecone_app/target.ymltarget.app: apps/blinky
target.bsp: "hw/bsp/pinecone"
target.build_profile: debugHere we specify that our firmware code comes from the Blinky Sample App. And our firmware will be compiled for the PineCone BL602 Board.
Also check out the Target Package and the Target Configuration.
We have created a minimal port of Mynewt to PineCone. Here’s how we build the firmware on Linux, macOS and Windows (plain old CMD, without WSL and MSYS2)…
Install Mynewt’s newt tool according to the instructions here…
To build newt from the source code, check the section “Appendix: Install newt” below
At the command prompt, enter…
##  Download source files
git clone --recursive https://github.com/lupyuen/pinecone-rust-mynewt
cd pinecone-rust-mynewt
Download GCC from the xPack GCC for RISC-V site…
Extract the downloaded archive.
Copy the extracted xPack GCC RISC-V folder to the pinecone-rust-mynewt folder.
Rename the copied folder as…
pinecone-rust-mynewt/xpack-riscv-none-embed-gccFor Windows: Add the full path of xpack-riscv-none-embed-gcc/bin to the PATH. For example…
c:\pinecone-rust-mynewt\xpack-riscv-none-embed-gcc\binDownload OpenOCD from the xPack OpenOCD site… (Other variants of OpenOCD may not work with PineCone)
Extract the downloaded archive.
Copy the extracted xPack OpenOCD folder to the pinecone-rust-mynewt folder.
Rename the copied folder as…
pinecone-rust-mynewt/xpack-openocdFor Windows: Add the full path of xpack-openocd/bin to the PATH. For example…
c:\pinecone-rust-mynewt\pinecone-rust-mynewt\xpack-openocd\binFor Linux and macOS: Enter at the command prompt…
##  Build the firmware
export PATH="$PWD/xpack-riscv-none-embed-gcc/bin:$PATH"
newt build pinecone_app

##  Display the firmware size
newt size -v pinecone_app
For Windows: Enter at the command prompt…
::  Build the firmware
newt\newt.exe build pinecone_app

::  Display the firmware size
newt\newt.exe size -v pinecone_app
We should see this…
Linking /Users/Luppy/pinecone/pinecone-rust-mynewt/bin/targets/pinecone_app/app/apps/blinky/blinky.elf
Target successfully built: targets/pinecone_app
Followed by the size of the firmware (8,488 bytes) and its library components…
+ newt size -v pinecone_app
Size of Application Image: app
Mem flash: 0x22008000-0x22014000
Mem ram: 0x22014000-0x22020000
  flash     ram
      6     525 *fill*
    172       0 @apache-mynewt-core_hw_hal.a
   4494    8213 @apache-mynewt-core_kernel_os.a
     80       0 @apache-mynewt-core_libc_baselibc.a
    702     128 @apache-mynewt-core_sys_flash_map.a
      2       0 @apache-mynewt-core_sys_log_modlog.a
    782      29 @apache-mynewt-core_sys_mfg.a
     30       5 @apache-mynewt-core_sys_sysinit.a
     72       0 @apache-mynewt-core_util_mem.a
     60       8 apps_blinky.a
     44      12 hw_bsp_pinecone.a
    580     228 hw_mcu_bl_bl602.a
     92       0 pinecone_app-sysinit-app.a
    292    1064 libg.a
Loading compiler pinecone-rust-mynewt/compiler/riscv-none-embed, buildProfile debug

objsize
   text    data     bss     dec     hex filename
   8488      28    9104   17620    44d4 pinecone-rust-mynewt/bin/targets/pinecone_app/app/apps/blinky/blinky.elf
The compiled ELF firmware is located at…
pinecone-rust-mynewt/bin/targets/pinecone_app/app/apps/blinky/blinky.elfThe above steps will build successfully a minimal port of Mynewt for PineCone.
That’s because I have fixed many missing functions in Mynewt’s Hardware Abstraction Layer (HAL), like these…
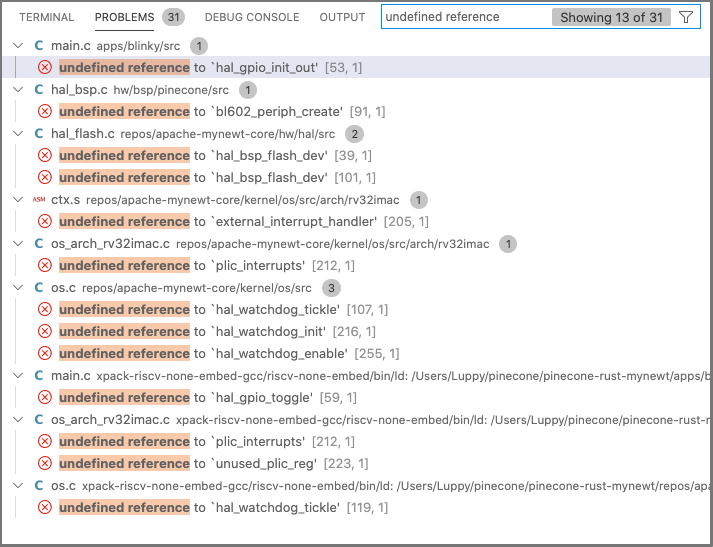
Missing Functions in Mynewt HAL
We can see that Mynewt’s HAL consists of low-level functions that control BL602’s hardware functions: Flash Memory, Interrupts, Watchdog, GPIO, …
We’ll be filling in these missing HAL functions someday… But for now I have inserted Stub Functions.
Which means that the firmware will build OK… Just that GPIO and other features won’t actually work when we run the firmware.
How shall we fill in the HAL Functions for PineCone?
The BL602 HAL functions (GPIO, I2C, SPI, …) are already implemented here…
We shall copy the source files from above and embed them here…
The BL602 SDK Functions look different from the Mynewt HAL API. Thus we’ll have to create some adapter code in C to make the BL602 Functions look like the Mynewt HAL.
The code that adapts the BL602 SDK to Mynewt HAL shall be placed here…
As we can see from the GPIO pic below, our job now is to adapt the BL602 SDK (left) to the Mynewt HAL (right).
(For reference: Here’s how the Mynewt HAL for SiFive FE310 is adapted from the FE310 SDK)
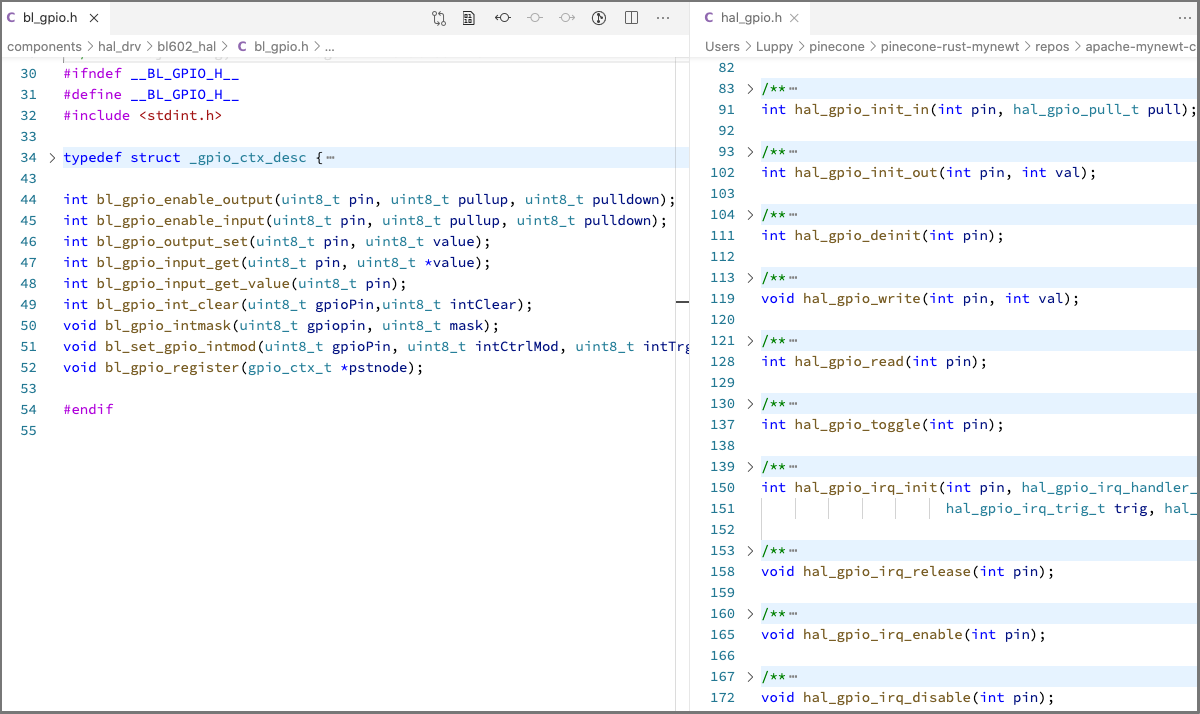
BL602 GPIO SDK (left) vs Mynewt GPIO HAL (right)
Most firmware will have some Start Code (written in Assembly Code) that will be executed when the firmware starts.
For the BL602 IoT SDK, this is the Start Code (in RISC-V Assembly)…
Start Code from BL602 IoT SDK: start.S
For Mynewt we’re using this Start Code instead…
(Adapted from FE310 Start Code)
Mynewt’s Start Code initialises the RAM before calling the main function.
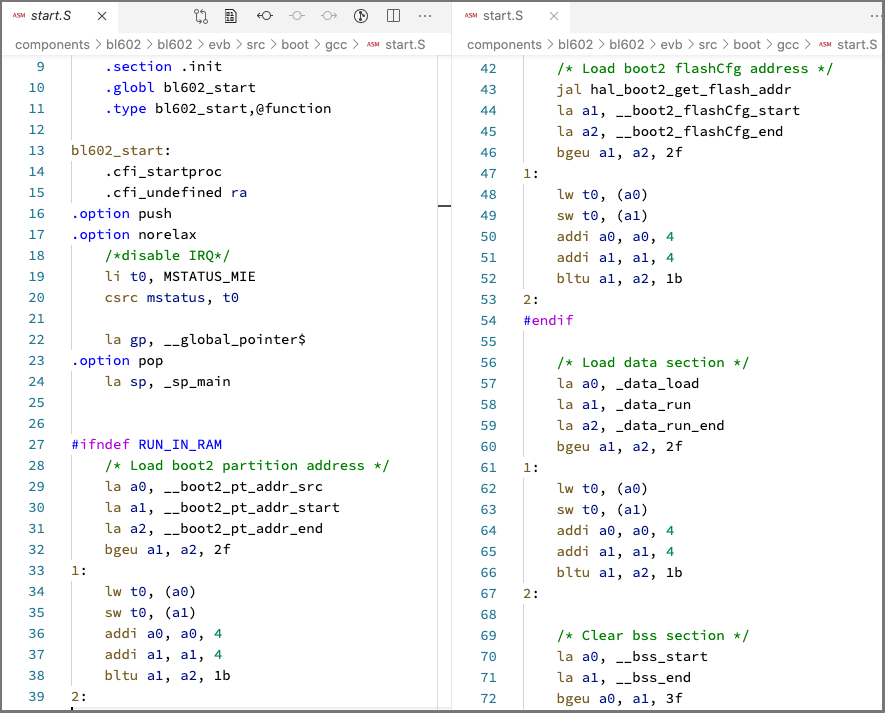
Is Mynewt’s Start Code any different from the BL602 SDK?
When we compare Mynewt’s Start Code with the BL602 SDK, we see that the BL602 SDK Start Code uses the Boot Partition and Flash Configuration. More details
This code will have to be inserted into Mynewt’s Start Code, when our firmware is ready to be loaded into Flash Memory.
According to the SDK, BL602 uses a RISC-V Core (SiFive E21) that’s designated rv32imfc based on its capabilities…
| Designation | Meaning |
|---|---|
rv32i | 32-bit RISC-V with Base Integer Instructions |
m | Integer Multiplication + Division |
f | Single-Precision Hardware Floating Point |
c | Compressed Instructions |
UPDATE: BL602 actually supports rv32acfimx (See this)
However Mynewt today supports only rv32imac…
| Designation | Meaning |
|---|---|
rv32i | 32-bit RISC-V with Base Integer Instructions |
m | Integer Multiplication + Division |
a | Atomic Instructions |
c | Compressed Instructions |
What’s the difference?
Mynewt doesn’t support RISC-V Hardware Floating Point yet… But it supports Atomic Instructions (for data synchronisation).
Thus for now we’ll compile our Mynewt Firmware for rv32imac (without Hardware Floating Point)…
In future we’ll have to implement rv32imfc (with Hardware Floating Point) in Mynewt.
SiFive FE310 Reference in Mynewt rv32imac
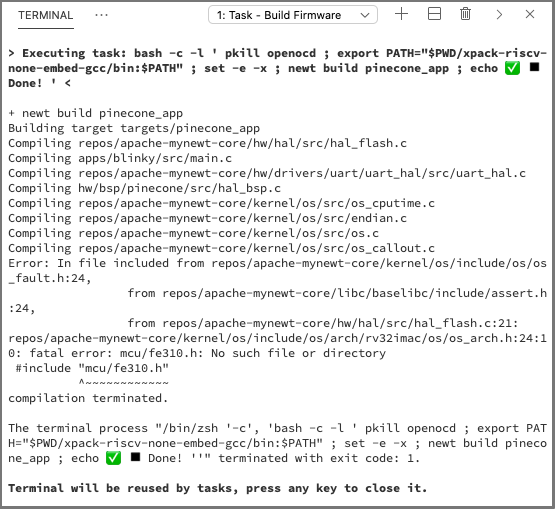
There’s a peculiar problem compiling RISC-V Firmware on Mynewt…
Error: In file included from ...
repos/apache-mynewt-core/kernel/os/include/os/arch/rv32imac/os/os_arch.h:24:10:
fatal error: mcu/fe310.h: No such file or directory
#include "mcu/fe310.h"
This error shows that rv32imac, the RISC-V support in Mynewt, is dependent on SiFive FE310. Which looks really odd.
(Probably done that way because FE310 is the only RISC-V Microcontroller supported by Mynewt)
We work around this problem by creating Stub Files like these…
These Stub Files point to the correct Header Files for BL602, so that our BL602 Firmware can be compiled successfully.
We’re almost ready to run Mynewt on PineCone! Let’s do one final check before running our firmware…
##  Build the firmware
export PATH="$PWD/xpack-riscv-none-embed-gcc/bin:$PATH"
newt build pinecone_app

##  Display the firmware size
newt size -v pinecone_app
We should see…
Linking pinecone-rust-mynewt/bin/targets/pinecone_app/app/apps/blinky/blinky.elf
Target successfully built: targets/pinecone_app
+ newt size -v pinecone_app
Size of Application Image: app
Mem flash: 0x22008000-0x22014000
Mem ram:   0x22014000-0x22020000
Yep this matches our Instruction Cache Memory (0x2200 8000) and Data Cache Memory (0x2201 4000).
  flash     ram
      6     525 *fill*
    172       0 @apache-mynewt-core_hw_hal.a
   4494    8213 @apache-mynewt-core_kernel_os.a
     80       0 @apache-mynewt-core_libc_baselibc.a
    702     128 @apache-mynewt-core_sys_flash_map.a
      2       0 @apache-mynewt-core_sys_log_modlog.a
    782      29 @apache-mynewt-core_sys_mfg.a
     30       5 @apache-mynewt-core_sys_sysinit.a
     72       0 @apache-mynewt-core_util_mem.a
     60       8 apps_blinky.a
     44      12 hw_bsp_pinecone.a
    580     228 hw_mcu_bl_bl602.a
     92       0 pinecone_app-sysinit-app.a
    292    1064 libg.a
Here are all the code modules linked into our Mynewt Firmware. Note that…
Mynewt Kernel takes the most memory
Our BL602 HAL hw_mcu_bl_bl602 is tiny because it’s mostly Stub Functions
Loading compiler pinecone-rust-mynewt/compiler/riscv-none-embed, buildProfile debug
objsize
   text    data     bss     dec     hex filename
   8488      28    9104   17620    44d4 pinecone-rust-mynewt/bin/targets/pinecone_app/app/apps/blinky/blinky.elf
Our Mynewt Firmware contains 8,488 bytes of code and data. It runs with 9,104 bytes of RAM (BSS).
The firmware build produces the following files in…
pinecone-rust-mynewt/bin/targets/pinecone_app/app/apps/blinkyblinky.elf: Our Mynewt Firmware in ELF Format (See this)
blinky.elf.map: Memory Map of our Mynewt Firmware (See this)
blinky.elf.lst: RISC-V Disassembly of our Mynewt Firmware (See this)
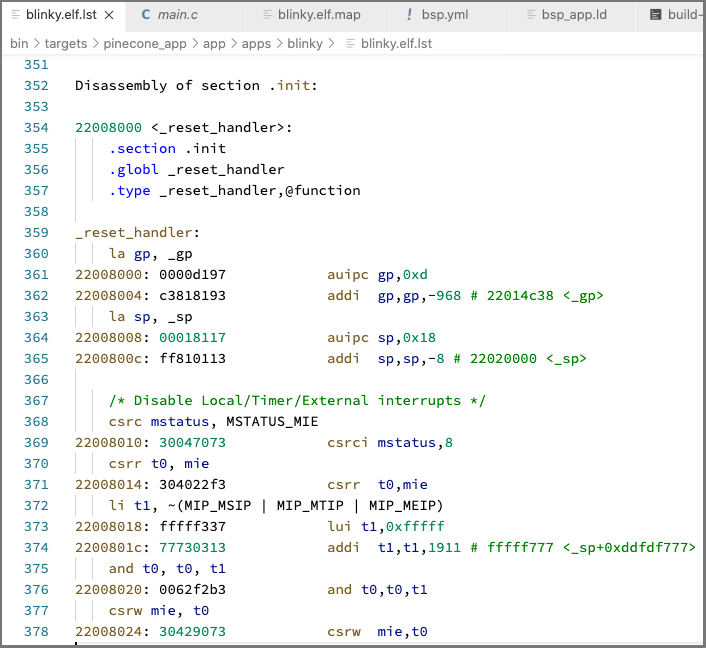
RISC-V Disassembly of Mynewt Firmware
Inspect the RISC-V Disassembly: blinky.elf.lst
It should look similar to our Start Code. And it should be located at the Start Address of our firmware: 0x2200 8000.
We’re ready to run our Mynewt Firmware on PineCone!
Now we run and debug our Mynewt Firmware with VSCode on Linux, macOS and Windows…
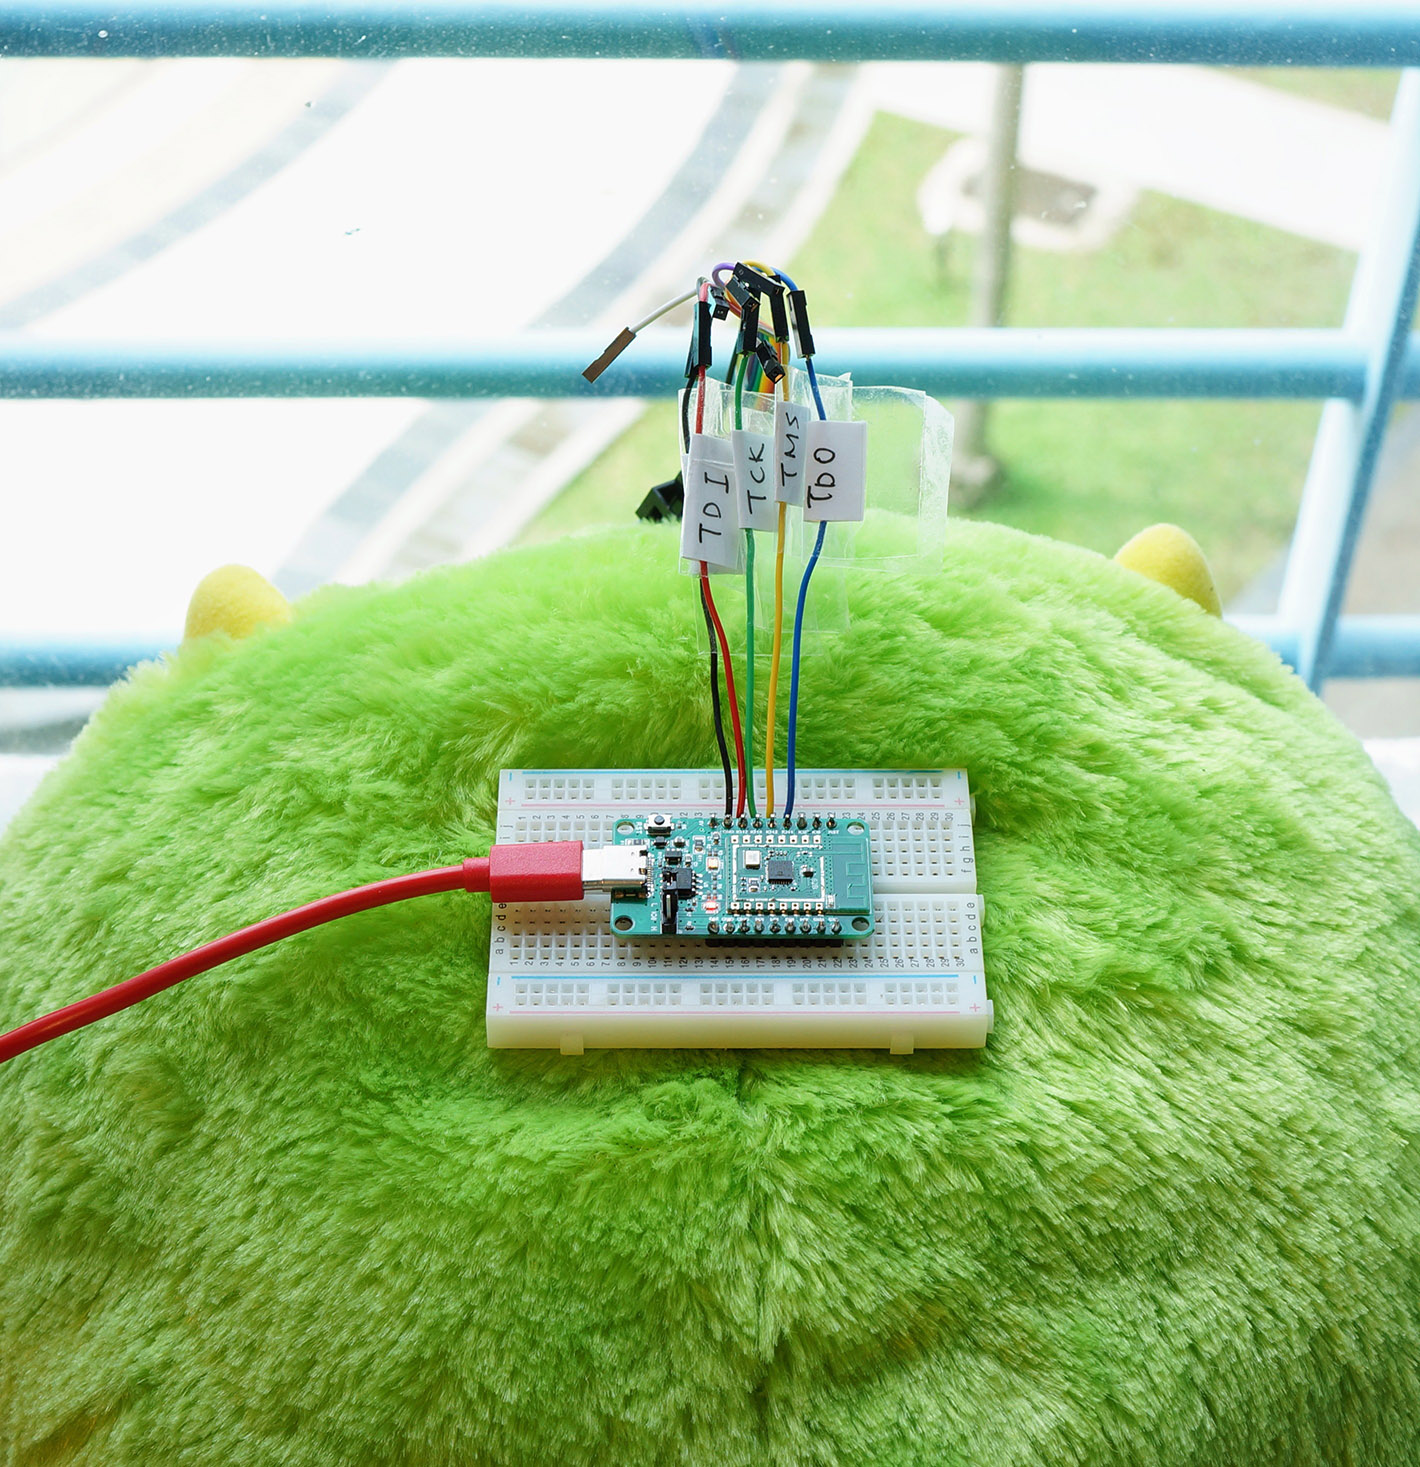
Connect PineCone and the JTAG Debugger to our computer. See the article…
“Connect PineCone BL602 to OpenOCD”, Section 4, “Connect JTAG Debugger to PineCone”
Launch VSCode
Click File → Open
Select the folder pinecone-rust-mynewt
Click Terminal → Run Build Task
This builds the Mynewt Firmware. The RISC-V ELF Firmware image is generated here…
pinecone-rust-mynewt/bin/targets/pinecone_app/app/apps/blinky/blinky.elfThis step also terminates any OpenOCD processes that are running. (Linux and macOS only)
Click Run → Start Debugging
The debugger loads our Mynewt Firmware to PineCone’s Cache Memory and begins execution.
Click View → Debug Console to view the Debug Console. GDB messages will be shown here.
The debugger pauses execution at the first line of the main function
We should see the screen below…
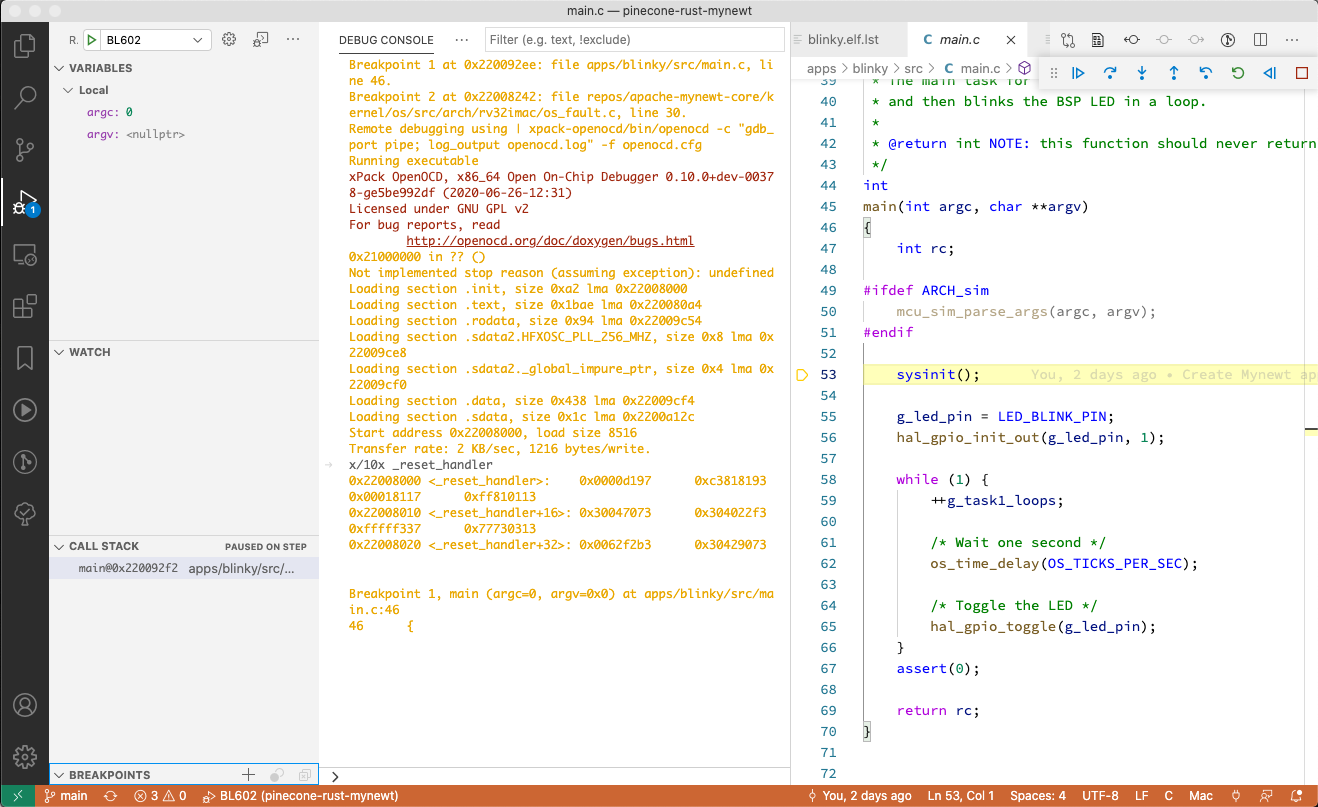
Debug Firmware with VSCode
We may use these features for debugging our Mynewt Firmware…
Variables (Left Top Pane): Inspect global and local variables
Watch (Left Centre): Show the value of expressions
Call Stack (Left Bottom): Navigate the stack trace and its variables
Debug Console (Centre): Enter GDB commands here
Debug Toolbar (Top Right): Continue / Pause, Step Over, Step Into, Step Out, Restart, Stop
To set a Breakpoint, click the Gutter Column at the left of the source code
When we’re done with debugging, click the Stop button in the Debug Toolbar at top right
Before we start a new debugging session with Run → Start Debugging…
We must always click Terminal → Run Build Task first!
That’s because stopping the debugger will leave OpenOCD running (and locking up the connection to PineCone).
Clicking Run Build Task will terminate the OpenOCD task, so that the next debugging session can restart OpenOCD successfully.
For Windows: Sorry we need to terminate the OpenOCD task manually with the Task Manager.
In case of OpenOCD problems, check the OpenOCD log file…
pinecone-rust-mynewt/openocd.logFor details on the VSCode settings, check the section “Appendix: VSCode Settings” below.
How shall we test Mynewt on PineCone? Or any other RTOS ported to PineCone?
We have an interesting problem here… PineCone is a barebones board that doesn’t have any sensors or actuators connected on interfaces like I2C and SPI.
It will be challenging to test the various interfaces ported to Mynewt. (I might test with the Bus Pirate Probe)
For now I’ll do “Opportunistic Porting and Testing”… I’ll port to Mynewt only those PineCone Interfaces that I can test.
Do you have ideas for testing an RTOS on PineCone? Let us know!
Testing PineCone’s onboard RGB LED over GPIO seems easy… Except that the LED is connected to the JTAG Port. So the debugger will fail.
In the earlier articles we learnt about remapping the JTAG port. This could be a (complicated) solution to test and debug the GPIO Port.
Meanwhile I’ll proceed to port the GPIO HAL from the BL602 IoT SDK to Mynewt, as discussed earlier.
We could test GPIO Input with PineCone’s onboard jumper.
This should be straightforward, right after we port over the GPIO HAL to Mynewt.
PineCone’s UART Port is wired to the USB Connector. We could test PineCone’s UART Port over USB.
We’ll need to port the UART HAL from the BL602 IoT SDK to Mynewt.
There’s more work to be done porting Mynewt to PineCone…
Port the Hardware Abstraction Layer from BL602 IoT SDK to Mynewt: GPIO, UART, PWM, I2C, SPI…
Bluetooth LE: We shall reverse engineer the Bluetooth LE Stack on PineCone. Then replace it by the open source NimBLE Stack.
WiFi: Also needs to be reverse engineered. We might be able to port this Mynewt WiFi Driver to PineCone…
Rust will be supported so that we may build complex firmware without falling into traps with C Pointers.
Then we shall have a fully Open Source Operating System for PineCone!
How confident are we of porting Mynewt to PineCone BL602?
One year ago I failed to port Mynewt to an earlier RISC-V Microcontroller (GD32 VF103)
But Second Time’s The Charm!
PineCone’s BL602 Microcontroller runs on a RISC-V Core that’s similar to SiFive FE310. And porting Mynewt from FE310 to BL602 seems quick and easy. (As seen on Twitter)
The port of Mynewt to PineCone BL602 continues here…
Got a question, comment or suggestion? Create an Issue or submit a Pull Request here…
lupyuen.github.io/src/mynewt.md
UPDATE: Check out this Rust Firmware that runs in Flash Memory instead of Cache Memory
Why did we load our Mynewt Firmware (and Rust Firmware) to Cache Memory instead of Flash Memory?
Because OpenOCD couldn’t load our Mynewt Firmware (and Rust Firmware) into Flash Memory.
(Probably because of Flash Protection. Or because writing to BL602 Flash Memory hasn’t been implemented in OpenOCD.)
What happens when we use blflash to load our firmware to Flash Memory?
We’re not sure if the Mynewt (or Rust) Firmware will run… But it’s worth trying!
Make sure that we update the Memory Map to load our code into the XIP Flash Memory at 0x2300 0000.
Note that the Start Code from BL602 IoT SDK start.S references the Boot2 Bootloader.
We’re not sure why. Our Start Code from Mynewt (and Rust) doesn’t use the Boot2 Bootloader.
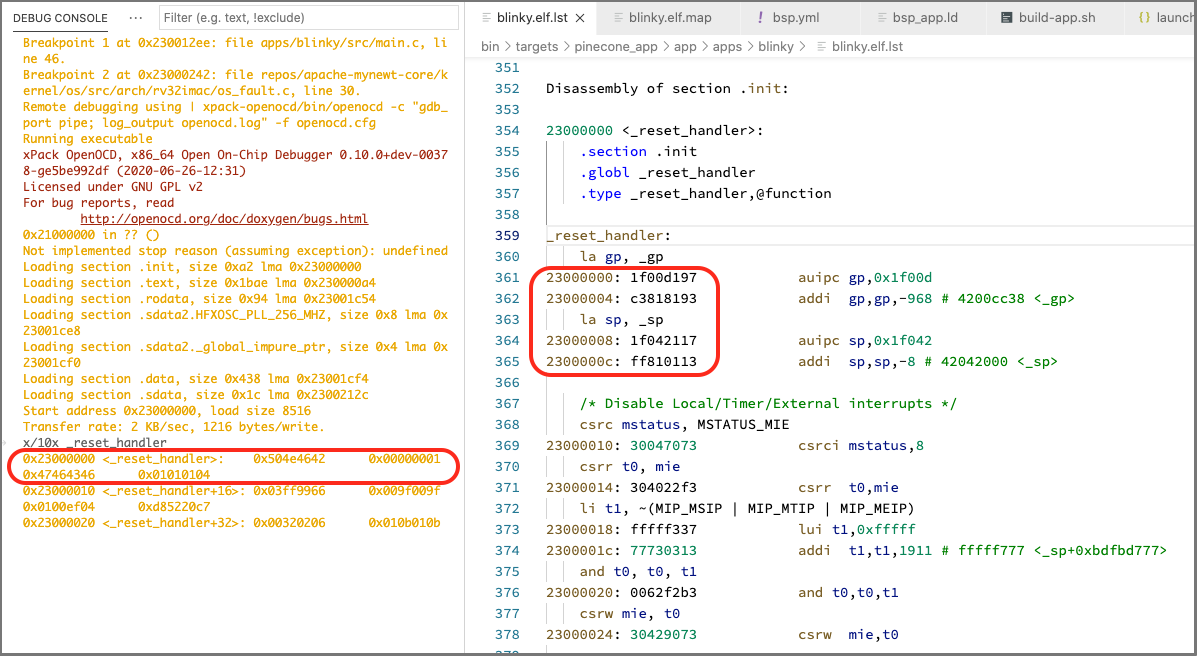
What happens when we use OpenOCD + JTAG to load our firmware to Flash Memory?
The screen above shows the first version of the Mynewt Firmware, that loads into Flash Memory.
We used this GDB command to dump out the first 10 words of PineCone’s Flash Memory…
x/10x _reset_handler(_reset_handler is the function name of Mynewt’s Start Code, located at the start of our firmware)
When we compare the dumped data with our Firmware Disassembly, we see that the bytes don’t match.
Hence we deduce that our Mynewt Firmware wasn’t loaded correctly into Flash Memory.
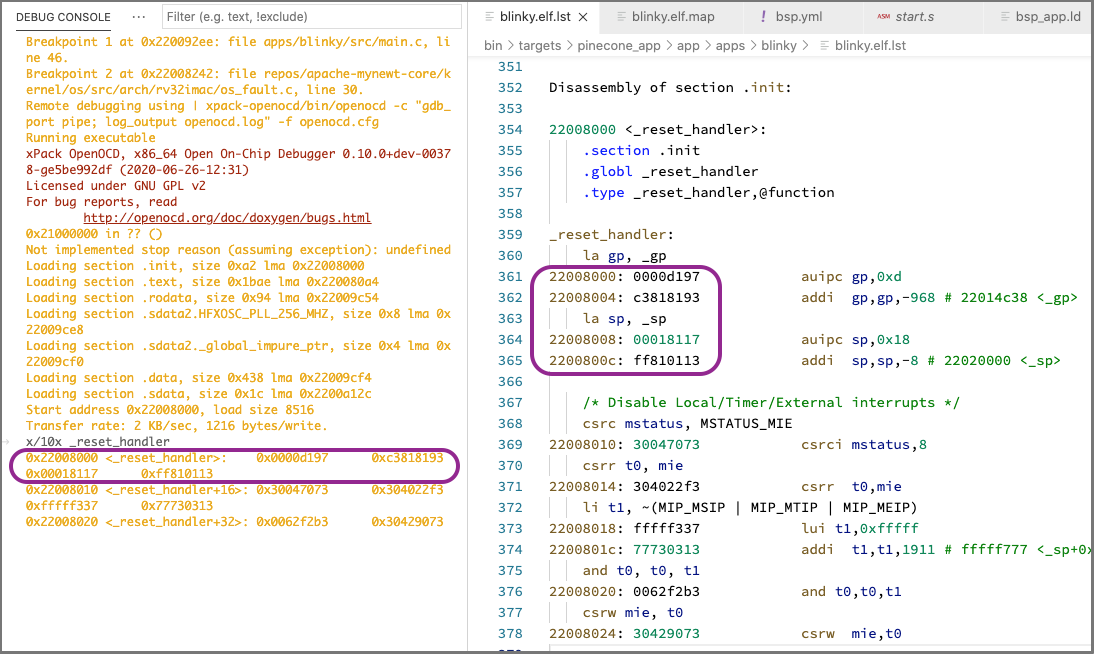
What happens when we use OpenOCD + JTAG to load our firmware to Cache Memory?
Here’s the second try, loading our Mynewt Firmware to Cache Memory. (The same way that we loaded Rust Firmware in our previous article)
Entering the same GDB Command…
x/10x _reset_handlerWe see that the data is identical. Our Mynewt Firmware is loaded correctly to Cache Memory indeed!
But we can’t run Mynewt Firmware in Cache Memory forever right?
The solution is to load our firmware to PineCone over USB (UART). (And flipping the jumper)
We may integrate with VSCode the command-line scripts for loading our firmware to PineCone.
Check out the article…
We may install Mynewt’s newt tool according to the instructions here…
Or we may build from the source code…
Install the latest version of Go
At a command prompt, enter…
cd /tmp
export mynewt_version=mynewt_1_8_0_tag
git clone --branch $mynewt_version https://github.com/apache/mynewt-newt/
cd mynewt-newt
./build.sh
sudo mv newt/newt /usr/local/bin
newt version
We should see…
Apache Newt 1.8.0The Windows version of newt is already bundled at…
pinecone-rust-mynewt\newt\newt.exeThe build script build-app.cmd uses the above newt executable.
However, the newt executable triggers a Windows Defender warning (because it wasn’t built as a certified executable). We need to update the Windows Security settings to allow the newt executable to run.
To build newt from the source code, follow these steps…
Install the latest version of Go
At a command prompt, enter…
git clone --branch mynewt_1_8_0_tag https://github.com/apache/mynewt-newt/
cd mynewt-newt\newt
go build
newt.exe version
We should see…
Apache Newt 1.8.0Copy the newt executable from…
mynewt-newt\newt\newt.exeTo…
pinecone-rust-mynewt\newt\newt.exe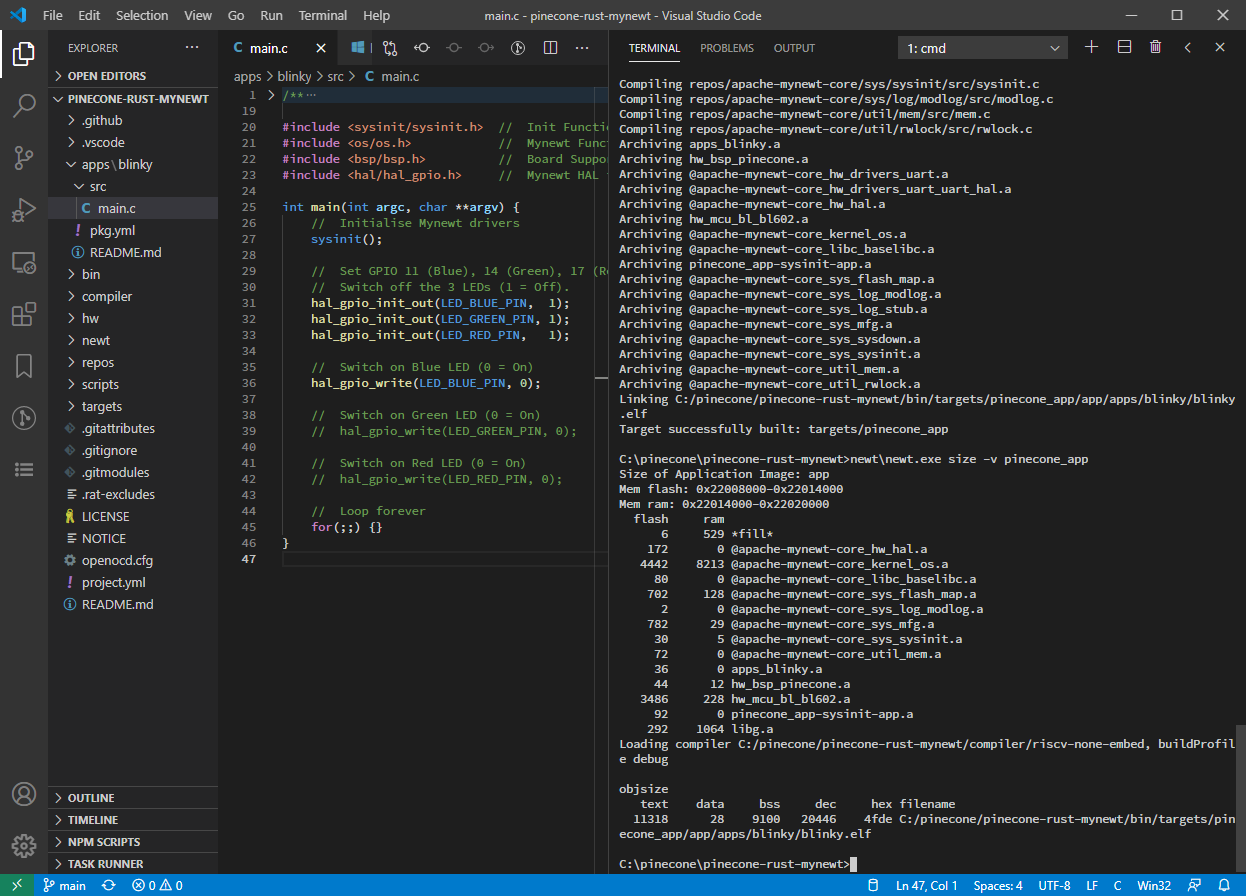
Mynewt BL602 built with Windows CMD
Mynewt Project pinecone-rust-mynewt and Mynewt Firmware pinecone_app were originally created using these steps…
newt new pinecone-rust-mynewt
cd pinecone-rust-mynewt
newt upgrade
newt target create pinecone_app
newt target set pinecone_app app=apps/blinky
## This will be changed to pinecone later
newt target set pinecone_app bsp=@apache-mynewt-core/hw/bsp/hifive1
newt target set pinecone_app build_profile=debug
We don’t need to create them again, just download from…
The steps above were based on the Blinky Tutorial for STM32F4-Discovery.
I added this Git Modules file so that the Mynewt source files will be downloaded together with the repo…
The VSCode Debugger Settings may be found in .vscode/launch.json
This file defines…
Firmware Path (target)
GDB Path (gdbpath)
OpenOCD Path (in autorun, after target remote)
GDB Commands to be executed upon starting the debugger (autorun)
{
    //  VSCode Debugger Config for PineCone BL602
    "version": "0.2.0",
    "configurations": [
        {
            "name": "BL602",
            "type": "gdb",
            "request": "launch",
            //  Application Executable to be flashed before debugging
            "target": "${workspaceRoot}/bin/targets/pinecone_app/app/apps/blinky/blinky.elf",
            "cwd": "${workspaceRoot}",
            "gdbpath": "${workspaceRoot}/xpack-riscv-none-embed-gcc/bin/riscv-none-embed-gdb",
            "valuesFormatting": "parseText",
            "autorun": [
                //  Before loading the Application, run these gdb commands.
                //  Set timeout for executing openocd commands.
                "set remotetimeout 600",

                //  This indicates that an unrecognized breakpoint location should automatically result in a pending breakpoint being created.
                "set breakpoint pending on",

                //  Set breakpoints
                "break main",                             //  Break at main()
                "break __assert_func",                    //  Break for any C assert failures
                //  "break os_default_irq",                   //  Break for any Mynewt unhandled interrupts
                //  "break core::panicking::panic",       //  Break for any Rust assert failures and panics
                //  "break core::result::unwrap_failed",  //  Break for any Rust unwrap and expect failures

                //  Launch OpenOCD. Based on https://www.justinmklam.com/posts/2017/10/vscode-debugger-setup/
                "target remote | xpack-openocd/bin/openocd -c \"gdb_port pipe; log_output openocd.log\" -f openocd.cfg ",

                //  Load the program into board memory
                "load",

                //  Execute one RISC-V instruction and stop
                //  "stepi",

                //  Run the program until we hit the main() breakpoint
                //  "continue",
            ]
        }
    ]
}The VSCode Task Settings may be found in .vscode/tasks.json
This file defines the VSCode Task for building the Mynewt Firmware…
{
    // See https://go.microsoft.com/fwlink/?LinkId=733558
    // for the documentation about the tasks.json format
    "version": "2.0.0",
    "tasks": [
        {
            //  Build firmware
            "label": "Build Firmware",
            "type": "shell",
            "windows": {
                "command": "cmd",
                "args": [
                    "/c",
                    " newt build pinecone_app && newt size -v pinecone_app && echo ✅ ◾ ️Done! "
                ]
            },
            "osx": {
                "command": "bash",
                "args": [
                    "-c", "-l",
                    " scripts/build-app.sh && echo ✅ ◾ ️Done! "
                ]
            },
            "linux": {
                "command": "bash",
                "args": [
                    "-c", "-l",
                    " scripts/build-app.sh && echo ✅ ◾ ️Done! "
                ]
            },
            "group": {
                "kind": "build",
                "isDefault": true
            },
            "problemMatcher": [
                {
                    //  Problem matcher for GNU Linker, e.g. /Users/Luppy/mynewt/stm32bluepill-mynewt-sensor/apps/my_sensor_app/src/ATParser.h:82: undefined reference to `operator delete[](void*)'
                    "fileLocation": [ "absolute" ],
                    "pattern": {
                        "regexp": "^(/.*):(\\d+):\\s+(.*)$",
                        "file": 1,
                        "line": 2,
                        "message": 3,
                        // "code": 3,
                        // "severity": 4,
                    }
                }
            ],
            "presentation": {
                "clear": true
            }
        },
        ...
scripts/build-app.sh does the following…
Terminate the OpenOCD process
Build the Mynewt Firmware
Display the firmware size
#!/usr/bin/env bash
##  macOS and Linux Bash script to build Mynewt Firmware

set -e  #  Exit when any command fails
set -x  #  Echo commands

##  Terminate any OpenOCD processes from the debug session
set +e  #  Ignore errors
pkill openocd
set -e  #  Stop on errors

##  Add GCC to the PATH
set +x  #  Stop echo
export PATH="$PWD/xpack-riscv-none-embed-gcc/bin:$PATH"
set -x  #  Echo commands

##  Build the Mynewt Firmware
newt build pinecone_app

##  Display the firmware size
newt size -v pinecone_app