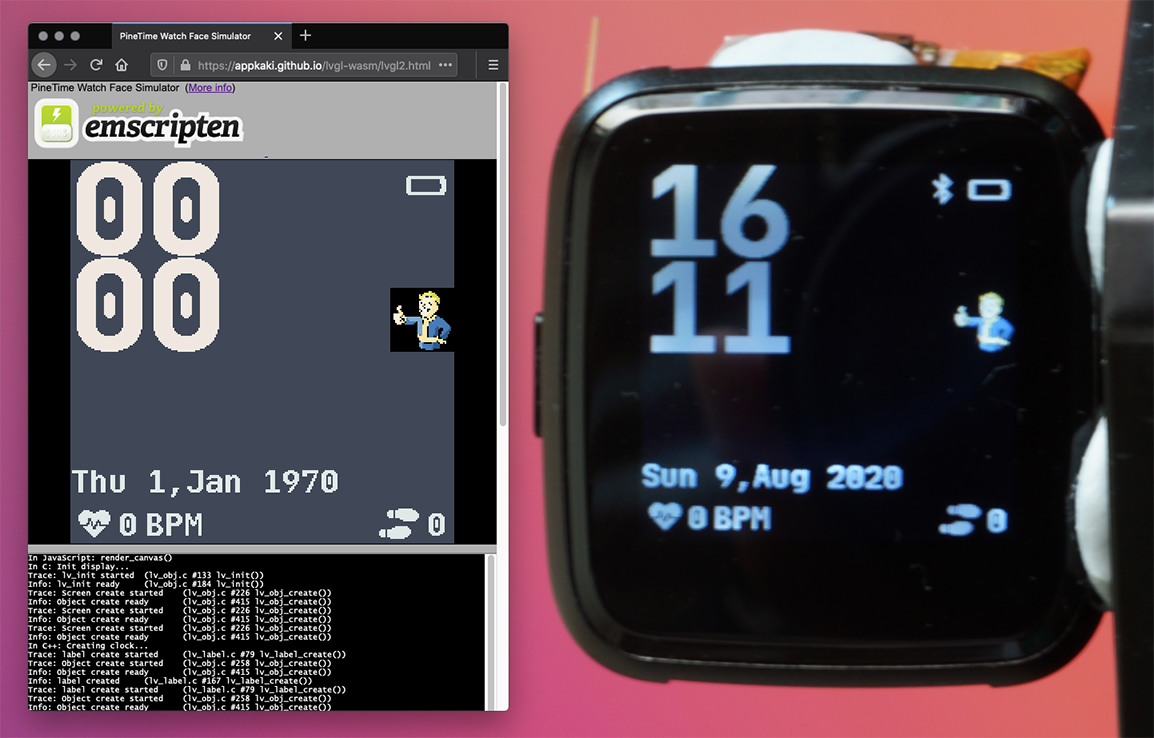
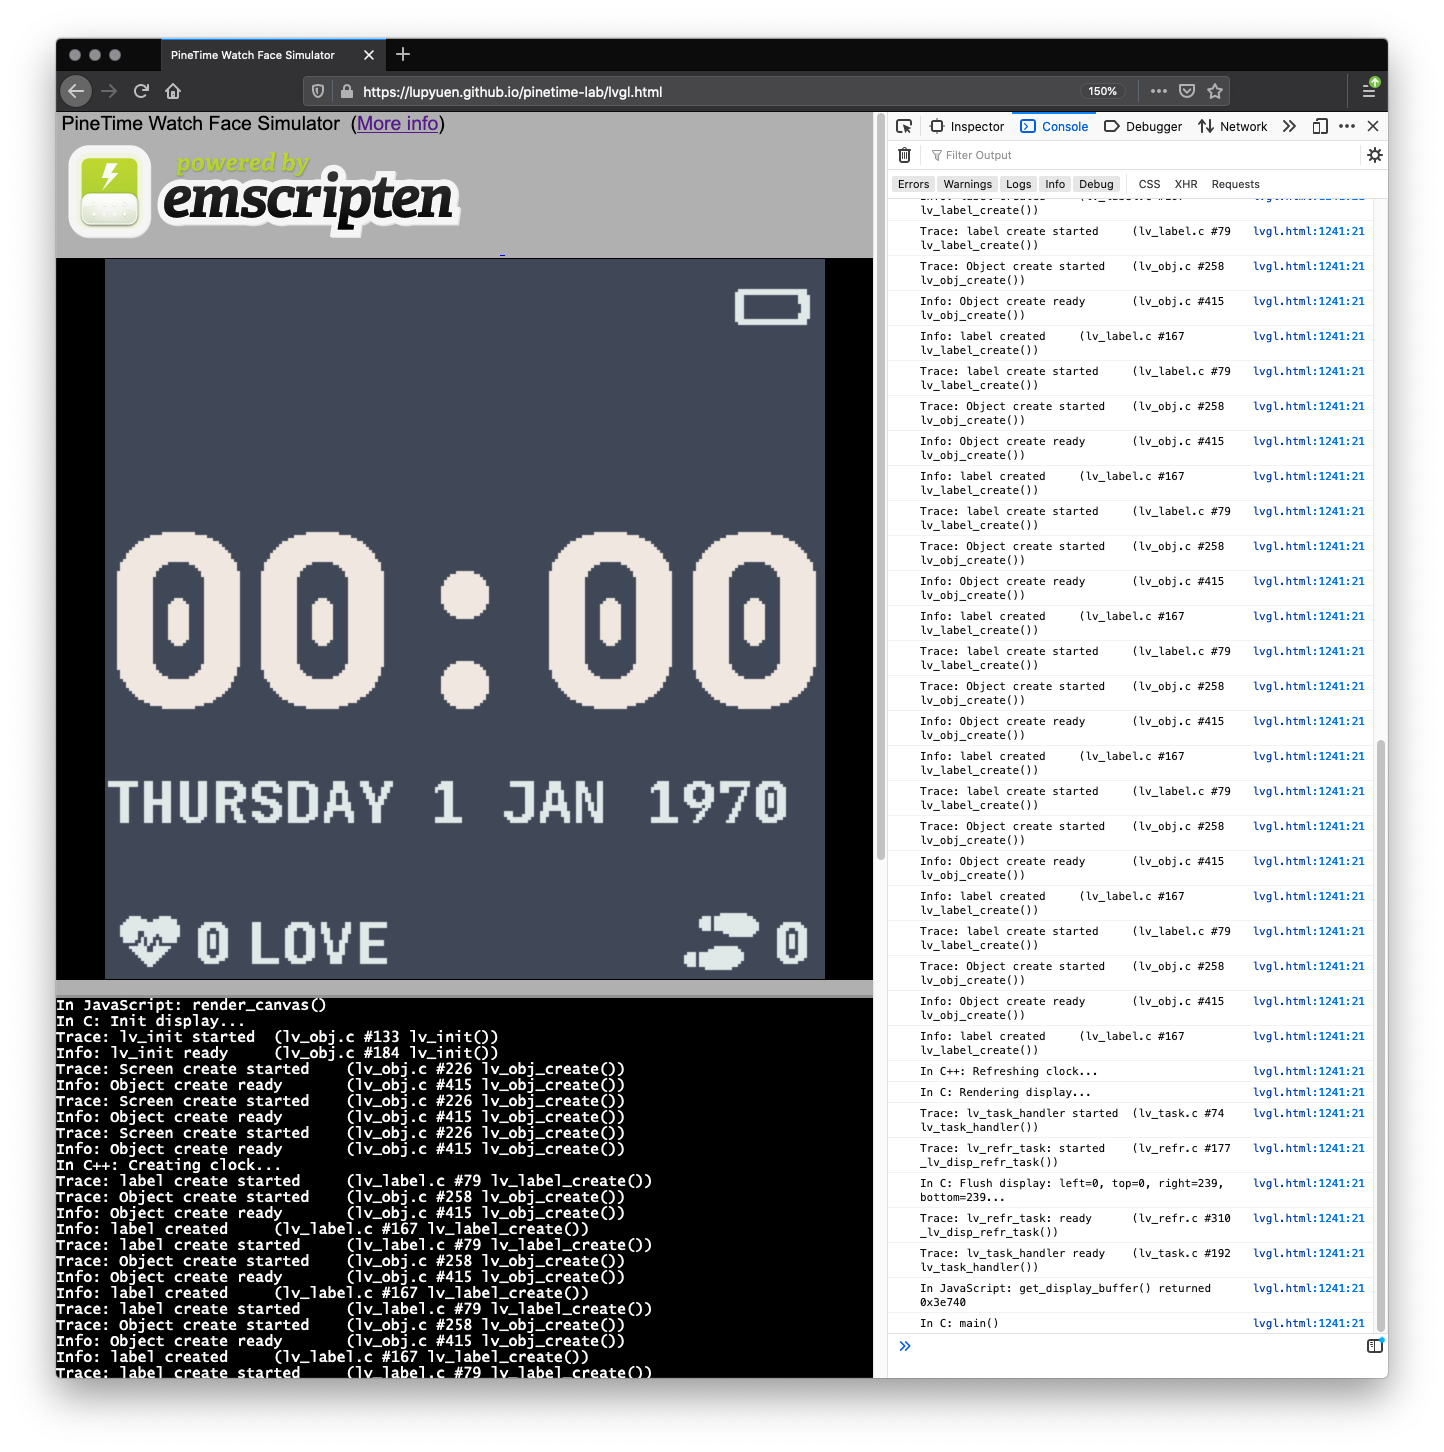
Custom PineTime Watch Face created in C++ by SravanSenthiln1: PineTime Watch Face Simulator vs Real PineTime
📝 19 Aug 2020
Now we can build and preview Watch Faces for PineTime Smart Watch in the Web Browser, thanks to WebAssembly...
All we need is a Web Browser... Even a Web Browser on mobile phones will do!
Let's learn how...
(Nope no knife!)
Create a free GitHub Account if we haven't got one...
▶️ github.com
Browse to the GitHub Repository for the PineTime Firmware...
Here's the complete Source Code for the InfiniTime Firmware (based on FreeRTOS).
Click the Fork button at top right...

This creates a Fork of the PineTime Repository under our GitHub Account...
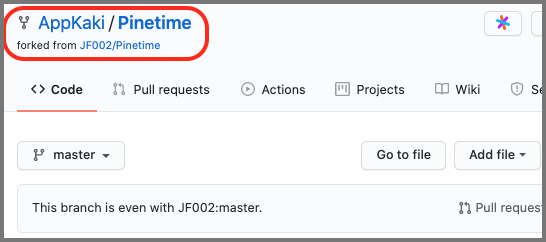
The URL looks like this...
https://github.com/ACCOUNT_NAME/Pinetime
The Fork contains our own copy of the entire Source Code for the PineTime Firmware... Ready for us to make any updates!
GitHub helpfully tracks updates to our Fork, so that one day we may submit a Pull Request to sync our updates (only the useful ones) back to the original PineTime Repository.
And we may also Pull Updates from the original PineTime Repository and apply them to our Fork.
That's how we maintain Open Source Projects!
Read on to learn how we add GitHub Actions to our Fork to preview our Custom Watch Face automagically...
In our Fork on GitHub, click ... and Settings at top right

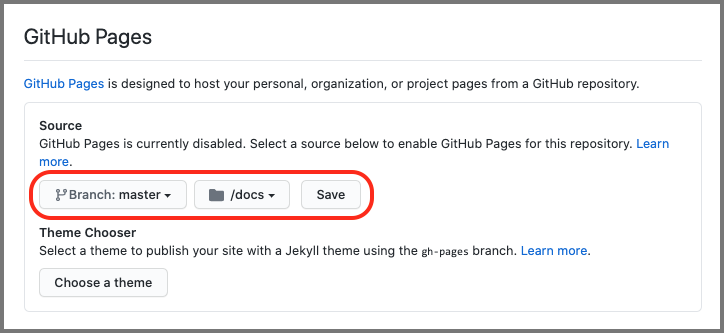
Scroll down the Settings page (Options tab) and look for GitHub Pages
Set Branch to master
Set the folder to docs
Click Save
In our Fork on GitHub, click Actions at the top bar
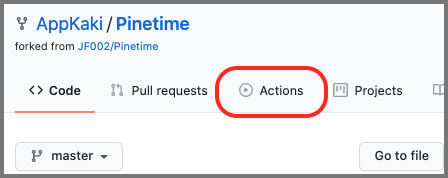
Click Skip this and set up a workflow yourself
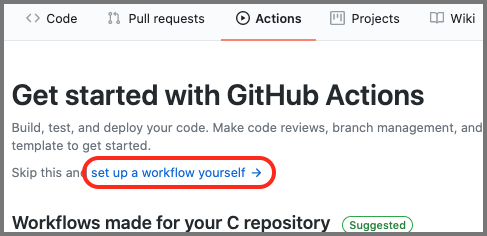
GitHub brings us to a page to edit .github/workflows/main.yml
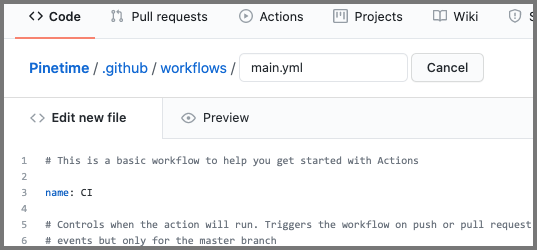
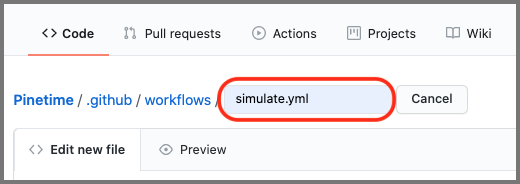
Change main.yml to simulate.yml
Open a new web browser tab.
Browse to this page...
github.com/lupyuen/pinetime-lab/.github/workflows/simulate.yml
Copy the contents of this page.
Switch back to the earlier page: .github/workflows/simulate.yml
Paste and overwrite the contents of the file...
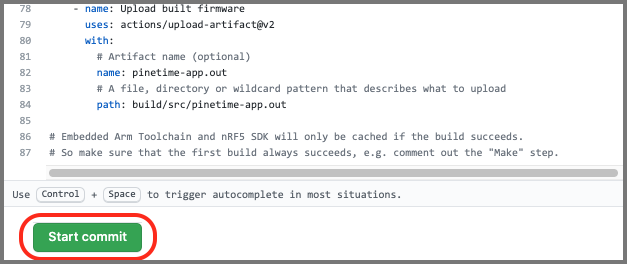
Click Start Commit at the right or bottom of the page...
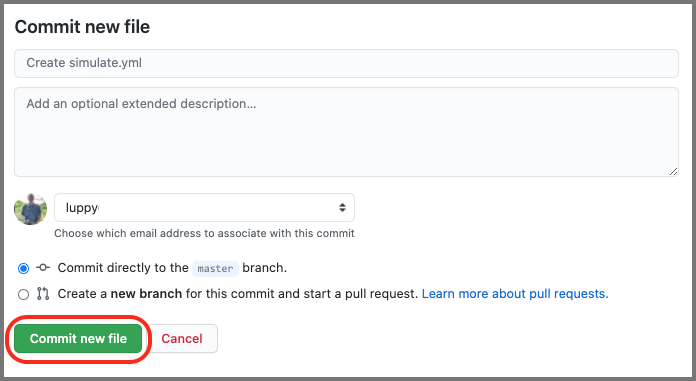
Click Commit New File
We have just created a Workflow... An automated job that will be run by GitHub whenever we update our source files.
If we ever need to edit the Workflow, just browse to this URL...
https://github.com/ACCOUNT_NAME/Pinetime/blob/master/.github/workflows/simulate.yml
(Change ACCOUNT_NAME to our GitHub Account Name)
Let's change a PineTime source file... And trigger our very first PineTime Simulator Build in the Cloud!
We shall modify the source code so that the PineTime Watch Face shows our own special message...
Browse to this URL...
https://github.com/ACCOUNT_NAME/Pinetime/blob/master/src/DisplayApp/Screens/Clock.cpp
(Change ACCOUNT_NAME to our GitHub Account Name)
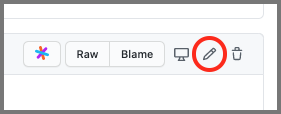
Click the Edit icon at the right...
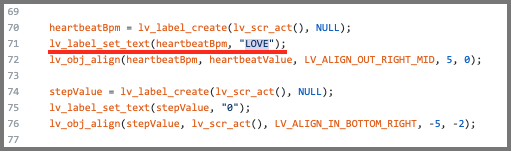
Look for the line with "BPM" (line 71)...
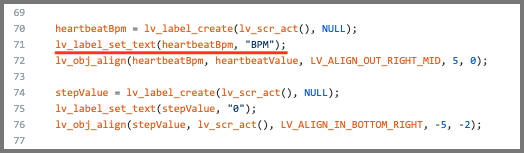
BPM is the text that's displayed on the PineTime Watch Face.
Change BPM to our own short message, like LOVE...
Scroll to the bottom of the page.
Click Commit Changes
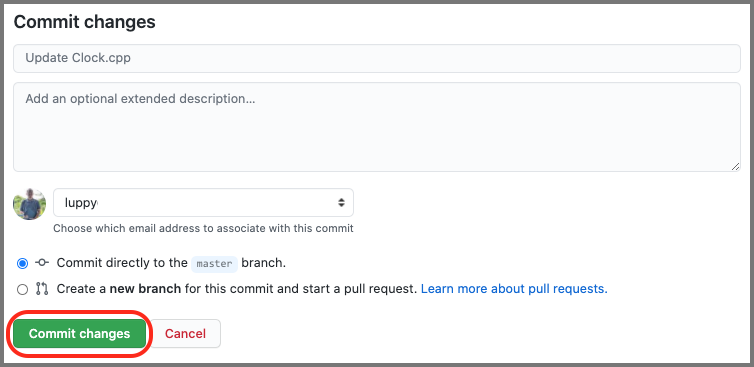
Guess what?
We have just triggered Our Very First PineTime Simulator Build In The Cloud!
(Because the Simulator Build is triggered by any file update)
Let's check the result of our Simulator Build...
Check out this article to learn more about Clock.cpp
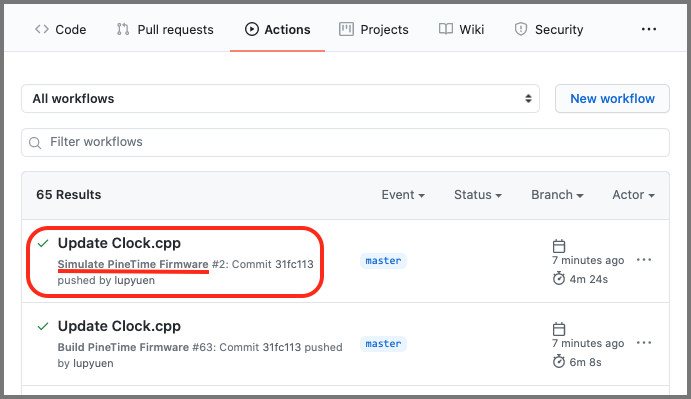
Click Actions at the top.
Click the first row that says: Update Clock.cpp - Simulate PineTime Firmware
(Make sure it's Simulate PineTime Firmware not Build PineTime Firmware)
Click build at left...
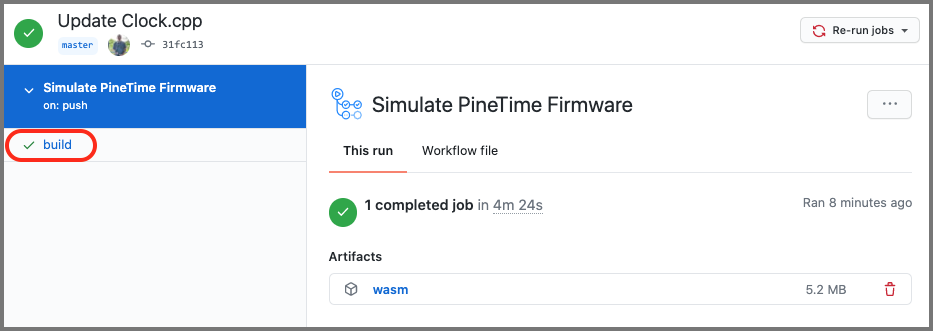
We'll see each step of the simulator building process...
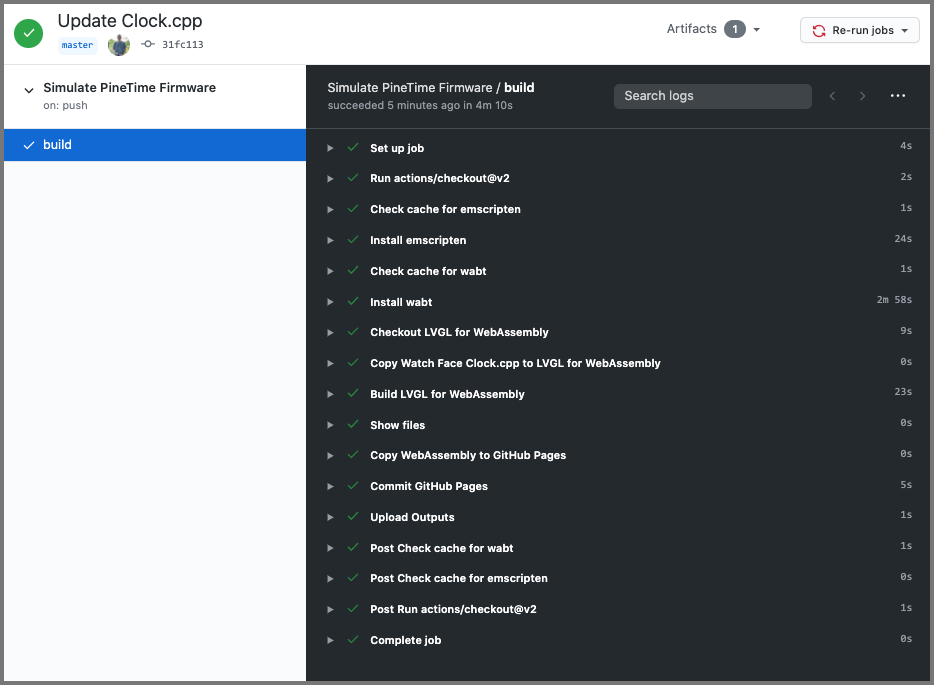
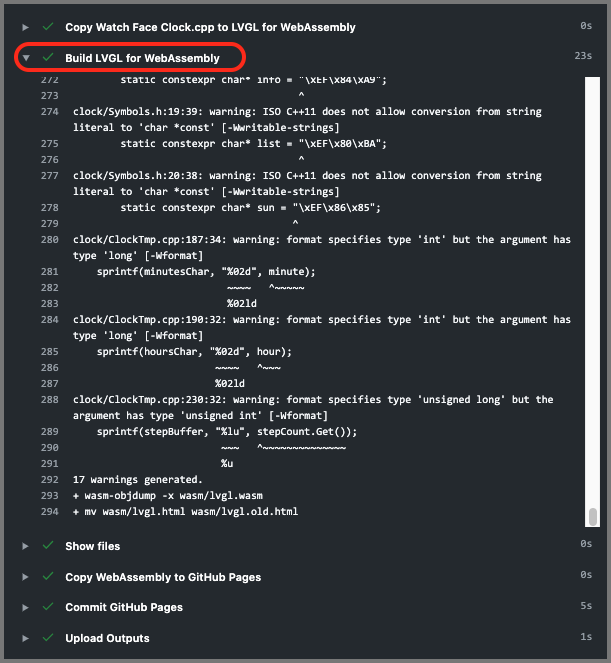
Click Build LVGL for WebAssembly
This shows the messages that were generated by the WebAssembly Compiler (emscripten)...
On our computer or mobile phone, launch the Web Browser.
Browse to this URL to see PineTime Simulator for our Fork...
https://ACCOUNT_NAME.github.io/Pinetime
(Change ACCOUNT_NAME to our GitHub Account Name)
If we are happy with the Watch Face, we may flash the built firmware to PineTime over Bluetooth. See "Test Our PineTime Fimware"
We will need to install the GitHub Actions Workflow for building the PineTime Firmware: .github/workflows/main.yml. See "Add GitHub Actions for PineTime Firmware"
Get Creative with Watch Faces! Find out how to add our own Bitmaps to Watch Faces
I have a request...
If you could... With your kind permission... Please post to Twitter and/or Mastodon a pic of your PineTime Simulator with the new Watch Face.
Tag the post with #PineTime so we know that simulating PineTime Firmware in the Cloud works OK for you. Thanks! :-)
If you're stuck, please chat with us in the PineTime Chatroom...
PineTime Chatroom on Discord / Matrix / Telegram / IRC
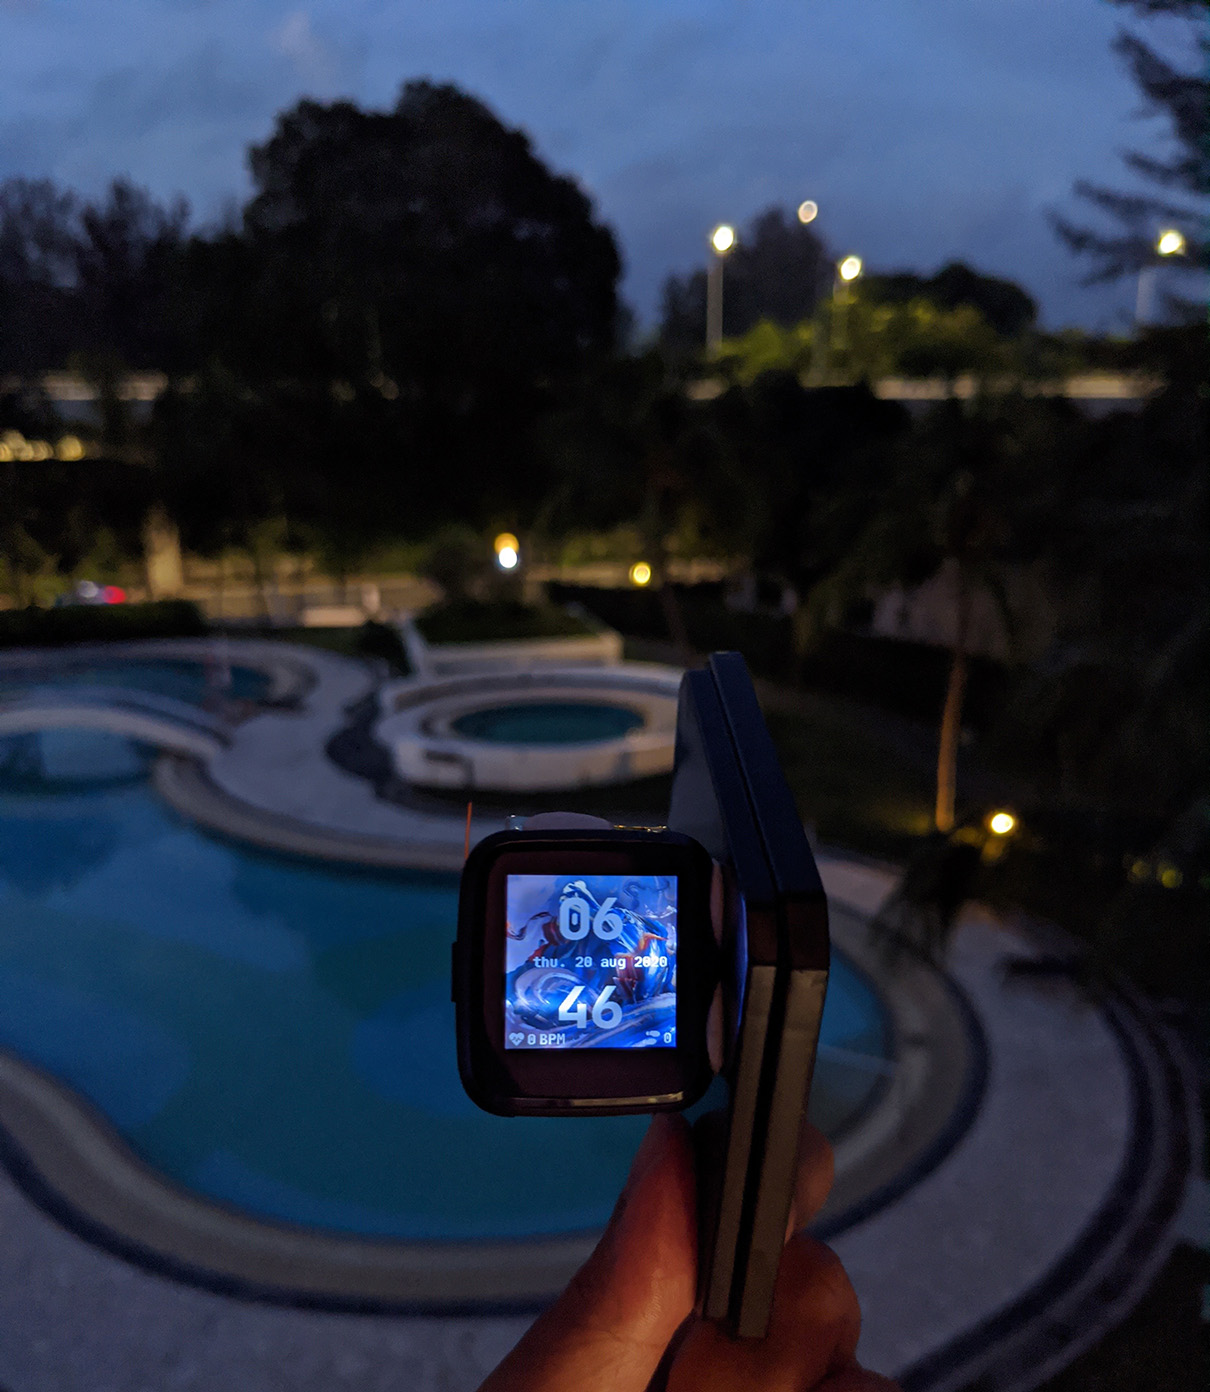
Custom PineTime Watch Face by SravanSenthiln1
Can we change other files besides Clock.cpp?
Sorry, the Simulator only renders the code in Clock.cpp
Any bitmaps and fonts will have to be embedded inside that file.
Can we add labels and other widgets to Clock.h?
Sorry, the Simulator runs in a "Sandbox" that only renders the code in Clock.cpp and not Clock.h
The workaround is to declare a static variable in Clock.cpp like this...
//  In Clock.cpp...
...
//  Extern Declarations
extern lv_font_t jetbrains_mono_extrabold_compressed;
extern lv_font_t jetbrains_mono_bold_20;
extern lv_style_t* LabelBigStyle;

//  Declare your Static Variable here. Must be in Global Scope so that all methods can access it.
static lv_obj_t* my_label;

//  Constructor for Clock Class
Clock::Clock(DisplayApp* app, ...) { ...
Then set the static variable in the Clock Constructor...
//  Constructor for Clock Class
Clock::Clock(DisplayApp* app, ...) {
    ...
    //  Create the label
    my_label = lv_label_create(lv_scr_act(), NULL);
And update it in the Refresh Method...
//  Refresh Method for Clock Class
bool Clock::Refresh() {
    ...
    //  Refresh the label
    lv_label_set_text(my_label, my_string);
Note that the variable must be declared in Global Scope so that the methods can access the variable.
Can we edit our files in GitHub without using the web browser?
We recommend VSCode or VSCodium for editing files with Git Version Control. (Which works with GitHub files)
Remember to Commit any updated files and Push the Commits to the master Branch to trigger the simulator build.
After building the simulator, we need to Pull from our Fork to fetch the updated WebAssembly files in the docs folder.
Can we build the simulator on our own computers?
Follow the instructions in LVGL WebAssembly doc.
To troubleshoot the build, compare with my build logs.
What if we don't wish to make our repos public?
Only public repos get GitHub Actions for free... But there's an alternative:
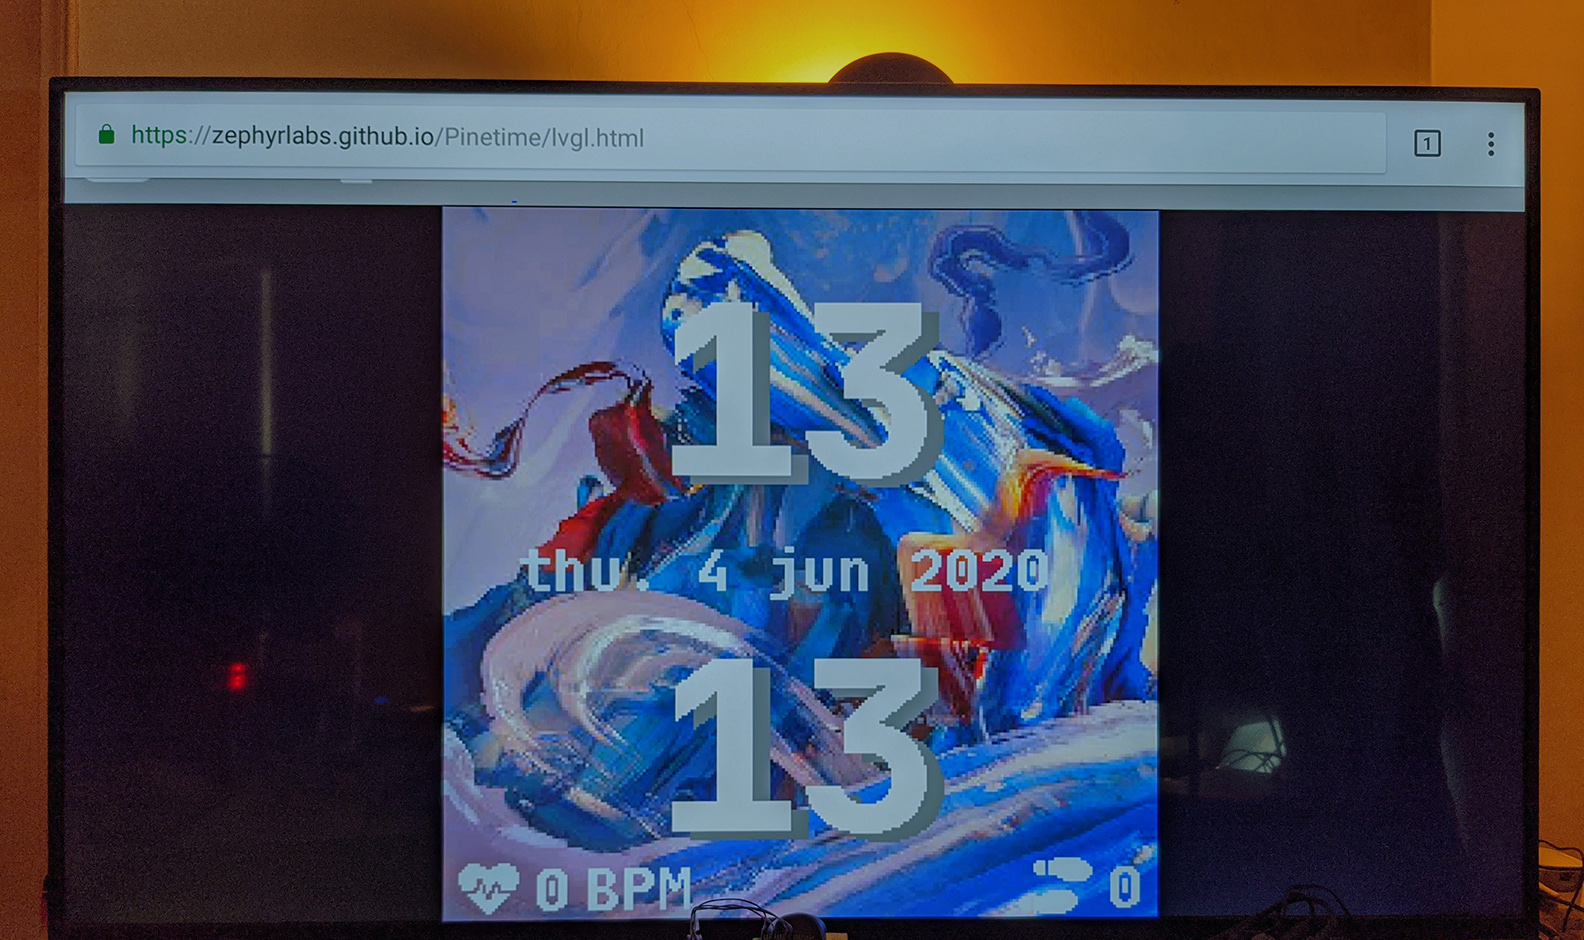
Custom PineTime Watch Face by SravanSenthiln1 rendered by a TV's built-in web browser
Here's what we'll be implementing next...
Accept Touch Input for LVGL
Convert Clock.cpp from C++ to Rust with lvgl-rs
Allow PineTime Watch Faces to be built online in Rust with online preview. Similar to WebAssembly Studio
We have a lot to do, please chat with us if you're keen to help...
PineTime Chatroom on Discord / Matrix / Telegram / IRC
And remember to enjoy your PineTime :-)
Got a question, comment or suggestion? Create an Issue or submit a Pull Request here...
pinetime-rust-mynewt/rust/ app/src/simulator.md
(Warning: The topics below are deeply technical... If you're keen please read on!)
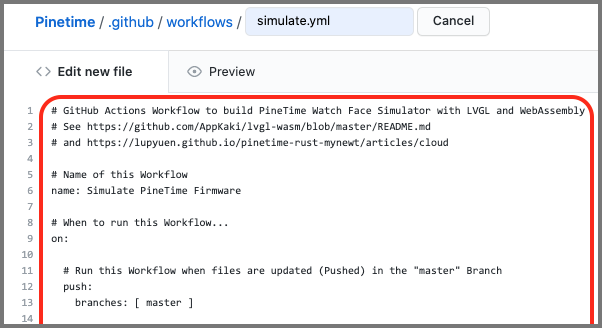
Let's look at the GitHub Actions Workflow we used for previewing PineTime Watch Faces: .github/workflows/simulate.yml
# GitHub Actions Workflow to build PineTime Watch Face Simulator with LVGL and WebAssembly
# See https://github.com/AppKaki/lvgl-wasm/blob/master/README.md
# and https://lupyuen.github.io/pinetime-rust-mynewt/articles/cloud

# Name of this Workflow
name: Simulate PineTime Firmware

# When to run this Workflow...
on:

  # Run this Workflow when files are updated (Pushed) in the "master" Branch
  push:
    branches: [ master ]

  # Also run this Workflow when a Pull Request is created or updated in the "master" Branch
  pull_request:
    branches: [ master ]
Here we see the conditions that will trigger our Workflow...
When files are updated (or Pushed) in the master Branch
When a Pull Request is created or updated in the master Branch
Next we specify which Operating System GitHub should use to execute the Workflow Steps...
# Steps to run for the Workflow
jobs:
  build:

    # Run these steps on Ubuntu
    runs-on: ubuntu-latest

    steps:
      ...
This asks GitHub to allocate a free Virtual Machine (Docker Container) to build our firmware, based on Ubuntu 18.04.
We're using Ubuntu, but GitHub supports Windows and macOS as well.
After that we specify the steps to be executed for our Workflow...
First we fetch a complete set of source files from our Fork...
    steps:
    - uses: actions/checkout@v2
The actions/checkout GitHub Action copies the source files into /home/runner/work/Pinetime/Pinetime
Our Ubuntu Virtual Machine in the GitHub Cloud is based on the Intel x64 platform... But we're compiling our C and C++ program to WebAssembly.
To do that, we need to install the emscripten WebAssembly Compiler
We'll install this in the next step, but first we check whether emscripten is in our cache...
    - name: Check cache for emscripten
      id:   cache-emsdk
      uses: actions/cache@v2
      env:
        cache-name: cache-emsdk
      with:
        path: /tmp/emsdk
        key:  ${{ runner.os }}-build-${{ env.cache-name }}
        restore-keys: ${{ runner.os }}-build-${{ env.cache-name }}
Why cache the Embedded Arm Toolchain?
emscripten is a huge 90 MB download (compressed).
Every time GitHub builds our firmware, it creates a fresh new empty Virtual Machine.
(So that our firmware builds may be reproduced consistently... And for security too)
GitHub will take roughly 30 seconds to download and unpack emscripten... Unless we cache it.
    - name: Check cache for emscripten
      id:   cache-emsdk
      uses: actions/cache@v2
The actions/cache GitHub Action lets us cache emscripten for future builds.
We can have multiple caches. Here's our cache for emscripten...
      env:
        cache-name: cache-emsdk
Next we tell GitHub what to cache...
      with:
        path: /tmp/emsdk
        key:  ${{ runner.os }}-build-${{ env.cache-name }}
        restore-keys: ${{ runner.os }}-build-${{ env.cache-name }}
Given these build settings...
runner.os      = Linux
env.cache-name = cache-emsdk
This means...
GitHub shall cache the temporary emscripten folder /tmp/emsdk
(We'll download emscripten to this folder in the next step)
The unique cache key for our toolchain cache shall be Linux-build-cache-emsdk
In future builds, GitHub shall attempt to restore the cache for Linux-build-cache-emsdk into our emscripten folder /tmp/emsdk
Now we download and unpack emscripten into the temporary folder /tmp/emsdk...
    - name: Install emscripten
      if:   steps.cache-emsdk.outputs.cache-hit != 'true'  # Install emscripten if not found in cache
      run:  |
        # Based on https://emscripten.org/docs/getting_started/downloads.html
        cd /tmp

        # Get the emsdk repo
        git clone https://github.com/emscripten-core/emsdk.git

        # Enter that directory
        cd emsdk

        # Download and install the latest SDK tools.
        ./emsdk install latest

        # Make the "latest" SDK "active" for the current user. (writes .emscripten file)
        ./emsdk activate latest

        # Activate PATH and other environment variables in the current terminal
        source ./emsdk_env.sh

        # Show version
        emcc --version
        emcc --version
Why is there a condition for the step?
      # Install emscripten if not found in cache
      if:   steps.cache-emsdk.outputs.cache-hit != 'true'
This says that GitHub shall download emscripten only if the previous step cache-emsdk couldn't find an existing cache for emscripten.
Huge downloads and reinstallation averted... So neat!
What software is preinstalled on the GitHub Virtual Machine?
Check out the preinstalled software on Ubuntu 18.04 for GitHub Actions
Now that we have installed and cached emscripten, let's do the same for wabt, the WebAssembly Binary Toolkit
First we check the cache for wabt...
    - name: Check cache for wabt
      id:   cache-wabt
      uses: actions/cache@v2
      env:
        cache-name: cache-wabt
      with:
        path: /tmp/wabt
        key:  ${{ runner.os }}-build-${{ env.cache-name }}
        restore-keys: ${{ runner.os }}-build-${{ env.cache-name }}
Then we install wabt in /tmp/wabt...
    - name: Install wabt
      if:   steps.cache-wabt.outputs.cache-hit != 'true'  # Install wabt if not found in cache
      run:  |
        cd /tmp
        git clone --recursive https://github.com/WebAssembly/wabt
        cd wabt
        mkdir build
        cd build
        cmake ..
        cmake --build .
Now it gets interesting. Here we fetch the source code from lvgl-wasm...
    - name: Checkout LVGL for WebAssembly
      run:  |
        cd /tmp
        git clone https://github.com/AppKaki/lvgl-wasm
And save it to /tmp/lvgl-wasm
What's lvgl-wasm?
PineTime Web Simulator runs in a Web Browser based on WebAssembly (somewhat similar to Java Applets). More about WebAssembly
Clock.cpp is our C++ class that contains the Watch Face code. Clock.cpp calls functions from two providers...
InfiniTime Operating System based on FreeRTOS
We have a version of LVGL compiled for WebAssembly... It's inside lvgl-wasm...
So we'll be compiling lvgl-wasm to WebAssembly together with our Watch Face code.
What about the InfiniTime Operating System?
Our PineTime Web Simulator doesn't support all functions provided by InfiniTime... lvgl-wasm simulates the minimal set of InfiniTime functions needed for rendering Watch Faces. (FreeRTOS is not supported by the Simulator)
Hence lvgl-wasm works like a Sandbox. We'll learn more details in the lvgl-wasm documentation
Remember that lvgl-wasm is just a Sandbox for simulating Watch Faces... It needs the actual Watch Face code.
Here's how we copy the Watch Face code in Clock.cpp to lvgl-wasm...
    - name: Copy Watch Face Clock.cpp to LVGL for WebAssembly
      run:  |
        cp src/DisplayApp/Screens/Clock.cpp /tmp/lvgl-wasm/clock
Now that the Watch Face code is inside lvgl-wasm, let's build the project with emscripten...
    - name: Build LVGL for WebAssembly
      run:  |
        # Add emscripten and wabt to the PATH
        source /tmp/emsdk/emsdk_env.sh
        export PATH=$PATH:/tmp/wabt/build

        # Build LVGL app: wasm/lvgl.html, lvgl.js, lvgl.wasm
        cd /tmp/lvgl-wasm
        wasm/lvgl.sh
lvgl.sh shall be explained in the lvgl-wasm documentation
The script calls emscripten to generate three files in /tmp/lvgl-wasm/wasm/...
lvgl.wasm: WebAssembly Executable Code, containing our Watch Face, LVGL and the InfiniTime Sandbox. Sample File
lvgl.js: Provides the JavaScript glue that's needed to load lvgl.wasm and run it in a Web Browser. Sample File
lvgl.html: The HTML file that calls lvgl.js to render the user interface.
We won't be using this file, because we have a custom version of lvgl.html
Next we copy the WebAssembly files to the docs folder, which will be hosted on GitHub Pages...
    - name: Copy WebAssembly to GitHub Pages
      run:  |
        if [ ! -d docs ]; then
          mkdir docs
        fi
        export src=/tmp/lvgl-wasm
        export docs=$src/docs
        export wasm=$src/wasm
        cp \
          $docs/index.md \
          $docs/lvgl.html \
          $wasm/*.html \
          $wasm/*.js \
          $wasm/*.wasm \
          $wasm/*.txt \
          docs
Finally we Commit the changed files in docs back to the Fork so that GitHub Pages will be updated...
    - name: Commit GitHub Pages
      uses: EndBug/add-and-commit@v4.4.0
      with:
        add: docs
For troubleshooting, we publish the generated WebAssembly files as an Artifact wasm...
    - name: Upload Outputs
      uses: actions/upload-artifact@v2
      with:
        name: wasm
        path: |
          /tmp/lvgl-wasm/wasm/*.html
          /tmp/lvgl-wasm/wasm/*.js
          /tmp/lvgl-wasm/wasm/*.wasm
          /tmp/lvgl-wasm/wasm/*.txt
Let's take a peek at the environment variables and the files that have been checked out...
    - name: Show files
      run:  set ; pwd ; ls -l /tmp/lvgl-wasm
The current directory pwd is shown as...
/home/runner/work/Pinetime/Pinetime
Check the section "Environment Variables" below for the complete list of environment variables.
Here's a tip about the caches we have created for emscripten and wabt...
The files get cached only if the build succeeds
If the first few builds fail (say due to coding errors), the files will never get cached. And restarting the build becomes painfully slow.
Therefore it's good to tweak the Workflow to make sure that the first build always succeeds... Like commenting out the actions from Build LVGL for WebAssembly onwards.
Subsequent builds will be a lot faster with the caching.
And that's how we build PineTime Simulator in the Cloud!
GitHub Actions Workflow Syntax
TODO
This step in our GitHub Actions Workflow...
    - name: Show files
      run:  set ; pwd ; ls -l /tmp/lvgl-wasm
Shows these environment variables...
AGENT_TOOLSDIRECTORY=/opt/hostedtoolcache
ANDROID_HOME=/usr/local/lib/android/sdk
ANDROID_SDK_ROOT=/usr/local/lib/android/sdk
ANT_HOME=/usr/share/ant
AZURE_EXTENSION_DIR=/opt/az/azcliextensions
BASH=/bin/bash
lquote:extquote:force_fignore:hostcomplete:interactive_comments:progcomp:p
BASH_ALIASES=()
BASH_ARGC=()
BASH_ARGV=()
BASH_CMDS=()
BASH_LINENO=([0]="0")
BASH_SOURCE=([0]="/home/runner/work/_temp/a3bba1d.sh")
BASH_VERSINFO=([0]="4" [1]="4" [2]="20" [3]="1" [4]="release" [5]
BASH_VERSION='4.4.20(1)-release'
BOOST_ROOT_1_69_0=/opt/hostedtoolcache/boost/1.69.0/x64
BOOST_ROOT_1_72_0=/opt/hostedtoolcache/boost/1.72.0/x64
CHROMEWEBDRIVER=/usr/local/share/chrome_driver
CHROME_BIN=/usr/bin/google-chrome
CI=true
CONDA=/usr/share/miniconda
DEBIAN_FRONTEND=noninteractive
DEPLOYMENT_BASEPATH=/opt/runner
DIRSTACK=()
DOTNET_NOLOGO='"1"'
DOTNET_SKIP_FIRST_TIME_EXPERIENCE='"1"'
EUID=1001
GECKOWEBDRIVER=/usr/local/share/gecko_driver
GITHUB_ACTION=run2
GITHUB_ACTIONS=true
GITHUB_ACTOR=lupyuen
GITHUB_API_URL=https://api.github.com
GITHUB_BASE_REF=
GITHUB_EVENT_NAME=push
GITHUB_EVENT_PATH=/home/runner/work/_temp/_github_workflow/event.json
GITHUB_GRAPHQL_URL=https://api.github.com/graphql
GITHUB_HEAD_REF=
GITHUB_JOB=build
GITHUB_REF=refs/heads/master
GITHUB_REPOSITORY=AppKaki/Pinetime
GITHUB_REPOSITORY_OWNER=AppKaki
GITHUB_RUN_ID=183212738
GITHUB_RUN_NUMBER=2
GITHUB_SERVER_URL=https://github.com
GITHUB_SHA=bce10a451e6cef08c30b1d6ac297e1f50cf57bf3
GITHUB_WORKFLOW='Build PineTime Firmware'
GITHUB_WORKSPACE=/home/runner/work/Pinetime/Pinetime
GOROOT=/opt/hostedtoolcache/go/1.14.4/x64
GOROOT_1_11_X64=/opt/hostedtoolcache/go/1.11.13/x64
GOROOT_1_12_X64=/opt/hostedtoolcache/go/1.12.17/x64
GOROOT_1_13_X64=/opt/hostedtoolcache/go/1.13.12/x64
GOROOT_1_14_X64=/opt/hostedtoolcache/go/1.14.4/x64
GRADLE_HOME=/usr/share/gradle
GROUPS=()
HOME=/home/runner
HOMEBREW_CELLAR='"/home/linuxbrew/.linuxbrew/Cellar"'
HOMEBREW_PREFIX='"/home/linuxbrew/.linuxbrew"'
HOMEBREW_REPOSITORY='"/home/linuxbrew/.linuxbrew/Homebrew"'
HOSTNAME=fv-az20
HOSTTYPE=x86_64
IFS=$' \t\n'
INVOCATION_ID=cc632305776e4c49848d4644a457d167
ImageOS=ubuntu18
ImageVersion=20200717.1
JAVA_HOME=/usr/lib/jvm/adoptopenjdk-8-hotspot-amd64
JAVA_HOME_11_X64=/usr/lib/jvm/adoptopenjdk-11-hotspot-amd64
JAVA_HOME_12_X64=/usr/lib/jvm/adoptopenjdk-12-hotspot-amd64
JAVA_HOME_7_X64=/usr/lib/jvm/zulu-7-azure-amd64
JAVA_HOME_8_X64=/usr/lib/jvm/adoptopenjdk-8-hotspot-amd64
JOURNAL_STREAM=9:31251
LANG=C.UTF-8
LEIN_HOME=/usr/local/lib/lein
LEIN_JAR=/usr/local/lib/lein/self-installs/leiningen-2.9.4-standalone.jar
M2_HOME=/usr/share/apache-maven-3.6.3
MACHTYPE=x86_64-pc-linux-gnu
OPTERR=1
OPTIND=1
OSTYPE=linux-gnu
PATH=/home/runner/work/_temp/arm-none-eabi/bin:/home/runner/work/_temp/-x86_64/bin/:/home/linuxbrew/.linuxbrew/bin:/home/linuxbrew/.linuxbrew/in:/home/runner/.config/composer/vendor/bin:/home/runner/.dotnet/tools://local/bin:/usr/sbin:/usr/bin:/sbin:/bin:/usr/games:/usr/local/games
PERFLOG_LOCATION_SETTING=RUNNER_PERFLOG
POWERSHELL_DISTRIBUTION_CHANNEL=GitHub-Actions-ubuntu18
PPID=2451
PS4='+ '
PWD=/home/runner/work/Pinetime/Pinetime
RUNNER_OS=Linux
RUNNER_PERFLOG=/home/runner/perflog
RUNNER_TEMP=/home/runner/work/_temp
RUNNER_TOOL_CACHE=/opt/hostedtoolcache
RUNNER_TRACKING_ID=github_3a45354c-437f-42c1-b8fb-cff7fa3cf2a0
RUNNER_USER=runner
RUNNER_WORKSPACE=/home/runner/work/Pinetime
SELENIUM_JAR_PATH=/usr/share/java/selenium-server-standalone.jar
SHELL=/bin/bash
SHELLOPTS=braceexpand:errexit:hashall:interactive-comments
SHLVL=1
SWIFT_PATH=/usr/share/swift/usr/bin
TERM=dumb
UID=1001
USER=runner
VCPKG_INSTALLATION_ROOT=/usr/local/share/vcpkg
_=/bin/bash