Optimising PineTime’s Display Driver with Rust and Mynewt
Simple tweaks like Batched Updates and Non-Blocking SPI can have a huge impact on rendering performance…
PineTime Smart Watch has been an awesome educational tool for teaching embedded coding with Rust and Mynewt OS… Check out PineTime articles #1, #2 and #3
But stare closely at the video demos in the articles… You’ll realise that the rendering of graphics on PineTime’s LCD display looks sluggish.
Can we expect speedy screen updates from a $20 smart watch… Powered by a Nordic nRF52832 Microcontroller that drives an ST7789 Display Controller over SPI?
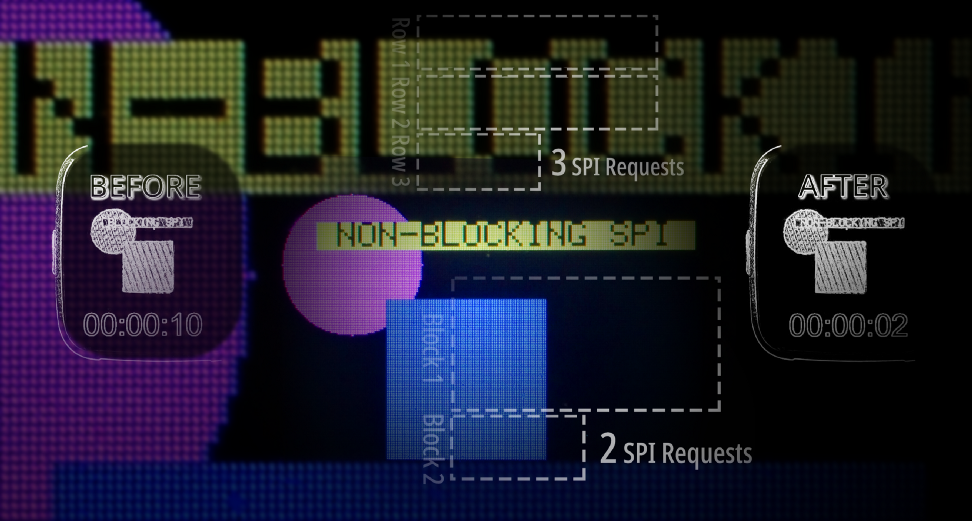
Yes we can! Check the rendering performance of Rust and Mynewt OS on PineTime, before and after optimisation…
Before and after optimising PineTime’s display driver
Today we’ll learn how we optimised the PineTime Display Driver to render text and graphics in sub-seconds…
- We group the pixels to be rendered into rows and blocks. This allows graphics and text to be rendered in fewer SPI operations.
- We changed Blocking SPI operations to Non-Blocking SPI operations. This enables the Rust rendering functions to be executed while SPI operations are running concurrently. (Think graphics rendering pipeline)
Rendering PineTime Graphics Pixel by Pixel
Let’s look at a simple example to understand how the [embedded-graphics] and [st7735-lcd] crates work together to render graphics on PineTime’s LCD display. This code creates a rectangle with [embedded-graphics] and renders the rectangle to the [st7735-lcd] display…
From https://github.com/lupyuen/piet-embedded/blob/master/piet-embedded-graphics/src/display.rs
When we trace the SPI requests generated by the [st7735-lcd] driver, we see lots of repetition…
From https://github.com/lupyuen/stm32bluepill-mynewt-sensor/blob/pinetime/logs/spi-blocking.log
(The SPI log was obtained by uncommenting this code)
For each pixel in the rectangle, the display driver is setting the X and Y coordinates of each pixel and setting the colour of each pixel… Pixel by pixel! (0, 0), (0, 1), (0, 2), …
That’s not efficient for rendering graphics, pixel by pixel… Why are [embedded-graphics] and [st7735-lcd] doing that?
That’s because [embedded-graphics] was designed to run on highly-constrained microcontrollers with very little RAM… Think STM32 Blue Pill, which has only 20 KB RAM! That’s too little RAM for rendering rectangles and other graphics into RAM and copying the rendered RAM bitmap to the display. How does [embedded-graphics] render graphics?
By using Rust Iterators! Every graphic object to be rendered (rectangles, circles, even text) is transformed by [embedded-graphics] into a Rust Iterator that returns the (X, Y) coordinates of each pixel and its colour. This requires very little RAM because the pixel information is computed on the fly, only when the Iterator needs to return the next pixel.
Rendering a Pixel Iterator to the display is really easy and doesn’t need much RAM, like this…
From https://github.com/lupyuen/st7735-lcd-batch-rs/blob/master/src/lib.rs
Upon inspecting
the set_pixel function that’s called for each pixel, we see
this…
From https://github.com/lupyuen/st7735-lcd-batch-rs/blob/master/src/lib.rs
A-ha! We have discovered the code that creates all the repeated SPI requests for setting the (X, Y) coordinates and colour of each pixel!
Instead of updating the LED display pixel by pixel, can we batch the pixels together and blast the entire batch of pixels in a single SPI request?
Digging into the [st7735-lcd] display driver code, we see this clue…
From https://github.com/lupyuen/st7735-lcd-batch-rs/blob/master/src/lib.rs
See the
difference? The function set_pixels sets the pixel window to the
region from (X Start, Y Start) to (X End, Y End)… Then it blasts a list of pixel
colours to populate that entire window region!
When we call
set_pixels the SPI requests generated by the display driver
would look like this… (Note the long lists of pixel colours)
From https://github.com/lupyuen/stm32bluepill-mynewt-sensor/blob/pinetime/logs/spi-non-blocking.log
But will this really improve rendering performance? Let’s test this hypothesis the Lean and Agile Way by batching the pixels (in the simplest way possible) without disturbing too much [embedded-graphics] and [st7735-lcd] code…
Batching PineTime Pixels into Rows and Blocks
Here’s our situation…
- [embedded-graphics] creates Rust Iterators for rendering graphic objects. Works with minimal RAM, but generates excessive SPI requests.
- PineTime’s Nordic nRF52832 microcontroller has 64 KB of RAM… Not quite sufficient to render the entire 240x240 screen into RAM. (2 bytes of colour per pixel ✖ ️240 rows ✖ 240 columns = 112.5 KB) RAM-based bitmap rendering is no go.
Is there a Middle Way… Keeping the RAM-efficient Rust Iterators... But get the Iterators to return small batches of pixels (instead of returning individual pixels)? Let’s experiment with two very simple Rust Iterators: Pixel Row Iterator and Pixel Block Iterator!
Suppose we ask [embedded-graphics] to render this trapezoid shape with 10 pixels…
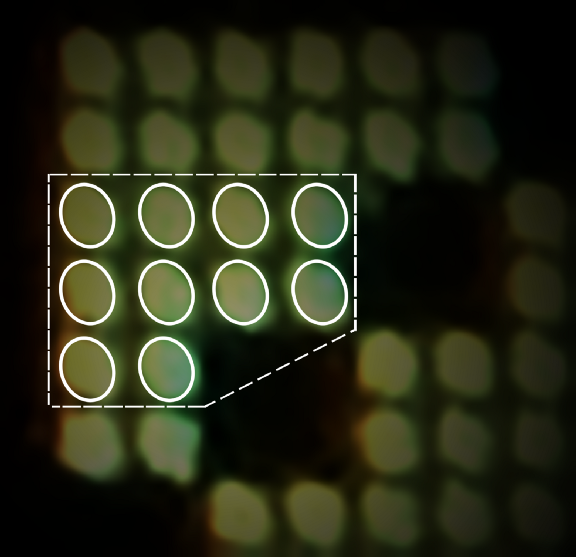
10 pixels from the rendered letter K
[embedded-graphics] returns a Pixel Iterator that generates the 10 pixels from left to right, top to bottom…
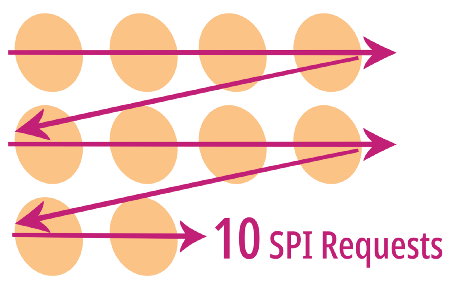
Zig-zag Pixel Iterator returned by [embedded-graphics]
Which needs 10 SPI requests to render, 1 pixel per SPI request. (Let’s count only the set colour requests)
Since the Pixel Iterator produces pixels row by row, let’s create a Pixel Row Iterator that returns pixels grouped by row…
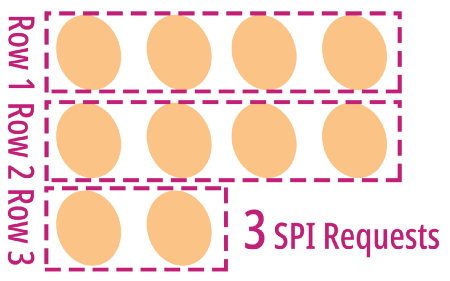
Our Pixel Row Iterator returns 3 rows
Awesome! When we group the pixels into rows, we only need to make 3 SPI requests to render all 10 pixels!
Can we do better? What if we group consecutive rows of the same width into rectangular blocks… Creating a Pixel Block Iterator…
Our Pixel Block Iterator returns 2 blocks
Yay! We have grouped 10 pixels into 2 blocks… Only 2 SPI requests to render all 10 pixels!
What’s the catch? How did we optimise 10 SPI requests into 2 SPI requests… Without sacrificing anything?
While grouping the pixels into rows and blocks, we actually use more RAM. Every time the Pixel Row Iterator returns the next row, it needs up to 8 bytes of temporary RAM storage (4 pixels with 2 colour bytes each).
And every time the Pixel Block Iterator returns the next block (max 8 pixels), it needs up to 16 bytes of temporary RAM storage. Which isn’t a lot of RAM, if we keep our block size small. Also the Iterator will reuse the storage for each block returned, so we won’t need to worry about storing 2 or more blocks returned by the Iterator.
This is the classical Space-Time Tradeoff in Computer Science… Sacrificing some storage space (RAM) to make things run faster.
Pixel Row and Pixel Block Iterators
Here’s the code for the Pixel Row Iterator that returns the next row of contiguous pixels…
Pixel Row Iterator. From https://github.com/lupyuen/piet-embedded/blob/master/piet-embedded-graphics/src/batch.rs
And here’s the code for the Pixel Block Iterator that returns the next block of contiguous rows of the same width. Turns out we only need to tweak the code above slightly to get what we need… Instead of iterating over pixels, we now iterate over rows…
Pixel Block Iterator. From https://github.com/lupyuen/piet-embedded/blob/master/piet-embedded-graphics/src/batch.rs
Combining the
Pixel Row Iterator and the Pixel Block Iterator, we get the draw_blocks function that renders any [embedded-graphics] graphic
object (including text) as pixel blocks…
Rendering a graphic object as Pixel Blocks. From https://github.com/lupyuen/piet-embedded/blob/master/piet-embedded-graphics/src/batch.rs
Thus we now render graphic objects as RAM-efficient chunks of pixels, instead of individual pixels. Middle Way found!
Test the Pixel Row and Pixel Block Iterators
“Space-Time Tradeoff called and wants to know how much space we’ll be allocating to make things run faster…”
The more RAM storage we allocate for batching pixels into rows and blocks, the fewer SPI requests we need to make. The code currently sets the limits at 100 pixels per row, 200 pixels per block…
Pixel Row and Pixel Block Sizes. From https://github.com/lupyuen/piet-embedded/blob/master/piet-embedded-graphics/src/batch.rs
Note that the rows and blocks are returned by the Iterators as [heapless] Vectors, which use fixed-size arrays to store Vectors. So that we don’t rely on Heap Memory, which is harder to manage on embedded devices like PineTime.
Any graphic object that’s 100 pixels wide (or smaller) will be batched efficiently into pixels rows and blocks. Like this square of width 90 pixels created with [embedded-graphics]…
From https://github.com/lupyuen/piet-embedded/blob/master/piet-embedded-graphics/src/display.rs
Square of width 90 pixels from the render demo
When we trace the rendering of the square, we see this log of pixel blocks…
From https://github.com/lupyuen/stm32bluepill-mynewt-sensor/blob/pinetime/logs/pixel-block.log
(The log was created by uncommenting this code)
Which means that we are indeed deconstructing the 90x90 square into 90x2 pixel blocks for efficient rendering.
💎 This deconstruction doesn’t work so well for a square that occupies the entire 240x240 PineTime screen. I’ll let you think… 1️⃣ Why this doesn’t work 2️⃣ A solution for rendering the huge square efficiently 😀
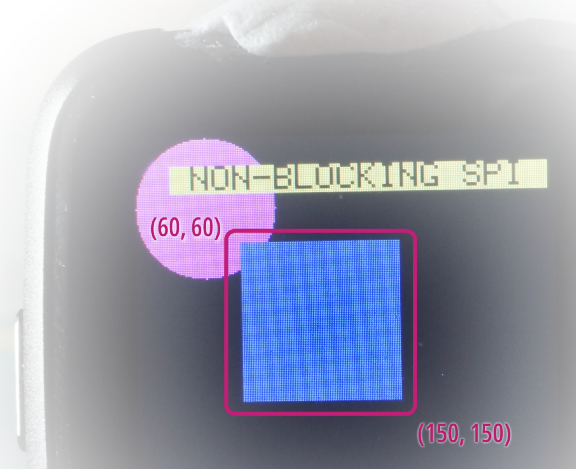
Non-Blocking SPI on PineTime with Mynewt OS
We could go ahead and run the Pixel Row and Pixel Block Iterators to measure the rendering time… But we won’t. We are now rendering the screen as chunks of pixels, transmitting a long string of pixel colours in a single SPI request…
However our SPI code in PineTime isn’t optimised to handle large SPI requests… Whenever it transmits an SPI request, it waits for the entire request to be transmitted before returning to the caller. This is known as Blocking SPI.
Here’s how we
call hal_spi_txrx
to transmit a Blocking SPI request in Rust with Mynewt OS…
From https://github.com/lupyuen/stm32bluepill-mynewt-sensor/blob/pinetime/rust/mynewt/src/spi.rs
Mynewt OS
provides an efficient way to transmit SPI requests: Non-Blocking SPI.
hal_spi_txrx_noblock
doesn’t hold up the caller while transmitting the request. Instead, Mynewt calls our Callback Function
when the request has been completed.
Here’s how we
set up Non-Blocking SPI and call hal_spi_txrx_noblock…
From https://github.com/lupyuen/stm32bluepill-mynewt-sensor/blob/pinetime/rust/mynewt/src/spi.rs
spi_noblock_handler is our Callback Function in Rust. Mynewt won’t
let us transmit a Non-Blocking SPI request while another is in progress, so our Callback Function
needs to ensure that never happens. More about spi_noblock_handler in a while.
💎 What’s
core::mem::transmute? We use this function from the Rust Core Library to cast pointer types when passing pointers and references from Rust to C. It’s similar to castingchar *tovoid *in C.Why don’t we need to specify the pointer type that we are casting to? Because the Rust Compiler performs Type Inference to deduce the pointer type.
Work Around an SPI Quirk
Bad News: Non-Blocking SPI doesn’t work 100% as advertised for Nordic nRF52832 Microcontroller, the heart of PineTime. According to this note in Mynewt OS, Non-Blocking SPI on nRF52832 fails if we’re sending a single byte over SPI.
But why would we send single-byte SPI requests anyway?
Remember this
SPI log that we captured earlier? We seem to be sending single bytes very often: 2a, 2b and 2c, which are Command Bytes…
From https://github.com/lupyuen/stm32bluepill-mynewt-sensor/blob/pinetime/logs/spi-non-blocking.log
PineTime’s ST7789 Display Controller has an unusual SPI interface with a special pin: the Data/Command (DC) Pin. The display controller expects our microcontroller to set the DC Pin to Low when sending the Command Byte, and set the DC Pin to High when sending Data Bytes…
From https://github.com/lupyuen/stm32bluepill-mynewt-sensor/blob/pinetime/rust/mynewt/src/spi.rs
Unfortunately our Command Bytes are single bytes, hence we see plenty of single-byte SPI requests. All because of the need to flip the DC Pin!
This complicates our SPI design but let’s overcome this microcontroller hardware defect with good firmware… All single-byte SPI requests are now sent the Blocking way, other requests are sent the Non-Blocking way…
From https://github.com/lupyuen/stm32bluepill-mynewt-sensor/blob/pinetime/rust/mynewt/src/spi.rs
The code uses a
Semaphore SPI_SEM to wait for the Non-Blocking SPI operation to
complete before proceeding. SPI_SEM is signalled by our Callback
Function spi_noblock_handler like this…
From https://github.com/lupyuen/stm32bluepill-mynewt-sensor/blob/pinetime/rust/mynewt/src/spi.rs
Something smells fishy… Why are we now waiting for a Non-Blocking SPI request to complete?
Well this happens when we do things the Lean and Agile Way… When we hit problems (like the single-byte SPI issue), we assess various simple solutions before we select and implement the right permanent fix. (And I don’t think we have found the right fix yet)
This Semaphore
workaround also makes the function internal_spi_noblock_write
easier to troubleshoot… Whether the SPI request consists of a single byte or multiple bytes, internal_spi_noblock_write will always wait for the SPI request to
complete, instead of having diverging paths.
This story also highlights the benefit of building our Rust firmware on top of an established Real Time Operating System like Mynewt OS… We quickly discover platform quirks that others have experienced, so that we can avoid the same trap.
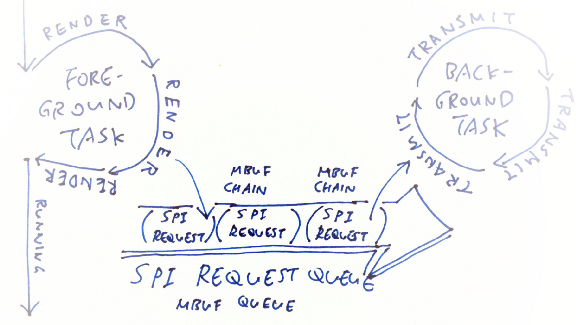
Render Graphics and Send SPI Requests Simultaneously on PineTime
Now we can send large SPI requests efficiently to PineTime’s LCD display. We are blocking on a Semaphore while waiting for the SPI request to be completed, which means that our CPU is actually free to do some other tasks while blocking.
Can we do some [embedded-graphics] rendering while waiting for the SPI requests to be completed?
Two problems with that…
- [embedded-graphics] creates Rust Iterators and SPI requests in temporary RAM storage. To let [embedded-graphics] continue working, we need to copy the generated SPI requests into RAM before sending the requests
- To perform [embedded-graphics] rendering independently from the SPI request transmission, we need a background task. The main task will render graphics with [embedded-graphics] (which is our current design), the background task will transmit SPI requests (this part is new).
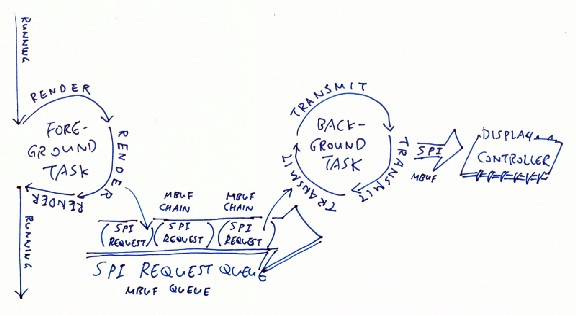
Rendering graphics and transmitting SPI requests at the same time on PineTime. Yes this is the Producer-Consumer Pattern found in many programs.
Fortunately Mynewt OS has everything we need to experiment with this multitasking…
- Mynewt’s Mbuf Chains may be used to copy SPI requests easily into a RAM space that’s specially managed by Mynewt OS
- Mynewt’s Mbuf Queues may be used to enqueue the SPI requests for transmission by the background task
- Mynewt lets us create a background task to send SPI requests from the Mbuf Queue
Let’s look at Mbuf Chains, Mbuf Queues and Multitasking in Mynewt OS.
Buffer SPI Requests with Mbuf Chains in Mynewt OS
In the Unix world of Network Drivers, Mbufs (short for Memory Buffers) are often used to store network packets. Mbufs were created to make common networking stack operations (like stripping and adding protocol headers) efficient and as copy-free as possible. (Mbufs are also used by the NimBLE Bluetooth Stack, which we have seen in the first PineTime article)
What makes Mbufs so versatile? How are they different from Heap Storage?
When handling Network Packets (and SPI Requests), we need a quick way to allocate and deallocate buffers of varying sizes. When we request memory from Heap Storage, we get a contiguous block of RAM that’s exactly what we need (or maybe more). But it causes our Heap Storage to become fragmented and poorly utilised.
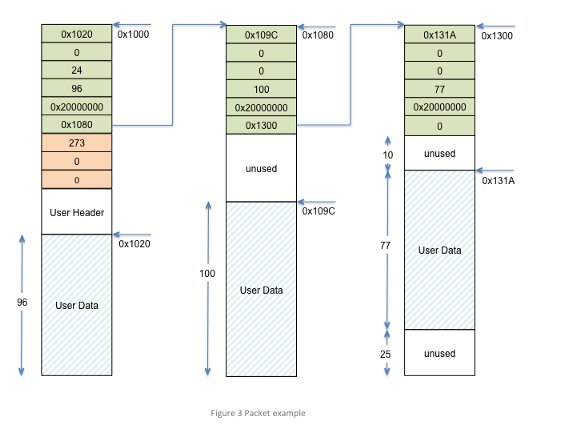
Chain of Mbufs. From https://mynewt.apache.org/latest/os/core_os/mbuf/mbuf.html
With Mbufs, we get a chain (linked list) of memory blocks instead. We can’t be sure how much RAM we’ll get in each block, but we can be sure that the total RAM in the entire chain meets what we need. (The diagram above shows how Mynewt OS allocates Mbuf Chains in a compact way using fixed-size Mbuf blocks)
Isn’t it harder to code with a chain of memory blocks? Yes, it makes coding more cumbersome, but Mbuf Chains will utilise our tiny pool of RAM on PineTime much better than a Heap Storage allocator.
With Rust and Mynewt OS, here’s how we allocate an Mbuf Chain and append our SPI request to the Mbuf Chain…
From https://github.com/lupyuen/stm32bluepill-mynewt-sensor/blob/pinetime/rust/mynewt/src/spi.rs
We may call
os_mbuf_append
as often as we like to append data to our Mbuf Chain, which keeps growing and growing… (Unlike Heap
Storage blocks which are fixed-size). So cool!
Here’s how we walk the Mbuf Chain to transmit each block of SPI data in the chain, and deallocate the chain when we’re done…
From https://github.com/lupyuen/stm32bluepill-mynewt-sensor/blob/pinetime/rust/mynewt/src/spi.rs
Note that we don’t transmit the entire Mbuf Chain of SPI data in a single SPI operation… We transmit the SPI data one Mbuf at a time. This works fine for PineTime’s ST7789 Display Controller. And with limited RAM, it’s best not to make an extra copy of the entire Mbuf Chain before transmitting.
Enqueue SPI Requests with Mbuf Queues in Mynewt OS
After [embedded-graphics] has completed its rendering, we get an Mbuf Chain that contains the SPI request that will be transmitted to the PineTime Display Controller by the background task. Now we need a way to enqueue the SPI requests (Mbuf Chains) produced by [embedded-graphics]…
Enqueuing SPI requests in an MBuf Queue before transmitting
When we use Mbuf Chains in Mynewt OS, we get Mbuf Queues for free!
Check the
function spi_event_callback from the last code snippet… It’s
actually calling os_mqueue_get
to read SPI requests (Mbuf Chains) from an Mbuf Queue named SPI_DATA_QUEUE.
Adding an SPI
request to an Mbuf Queue is done by calling os_mqueue_put in
Rust like this…
From https://github.com/lupyuen/stm32bluepill-mynewt-sensor/blob/pinetime/rust/mynewt/src/spi.rs
spi_noblock_write is the complete Rust function we use in our
PineTime firmware to 1️⃣ Allocate an Mbuf Chain 2️⃣ Append the SPI request to the Mbuf Chain 3️⃣ Add
the Mbuf Chain to the Mbuf Queue. Yep it’s that easy to use Mbuf Chains and Mbuf Queues
in Mynewt OS!
Transmit Enqueued SPI Requests with Mynewt Background Task
Here comes the final part of our quick experiment… Create a background task in Mynewt to read the Mbuf Queue and transmit each SPI request to PineTime’s Display Controller…
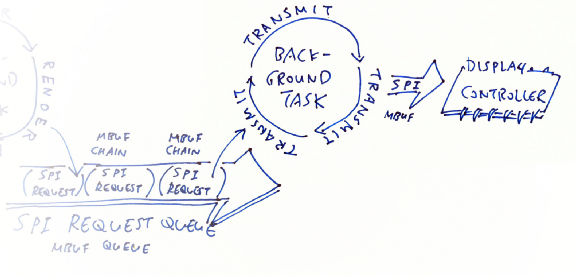
Transmitting SPI Requests enqueued in an Mbuf Queue
With Rust and
Mynewt OS, here’s how we create a background task SPI_TASK that
runs the neverending function spi_task_func…
From https://github.com/lupyuen/stm32bluepill-mynewt-sensor/blob/pinetime/rust/mynewt/src/spi.rs
(Note that we’re calling Mynewt to create background tasks instead of using Rust multitasking, because Mynewt controls all our tasks on PineTime)
spi_task_func runs forever, blocking until there’s a request in the
Mbuf Queue, and executes the request. The request is handled by the function spi_event_callback that we have seen earlier. (How
does Mynewt know that it should invoke spi_event_callback? It’s defined in the call to
os_mqueue_init above.)
hal_watchdog_tickle
appears oddly in the code… What is that?
Mynewt helpfully pings our background task every couple of milliseconds, to make sure that it’s not hung… That’s why it’s called a Watchdog.
To prevent
Mynewt from raising a Watchdog Exception, we need to tell the Watchdog every couple of milliseconds
that we are OK… By calling hal_watchdog_tickle
Optimised PineTime Display Driver… Assemble!
This has been a lengthy but quick (two-week) experiment in optimising the display rendering for PineTime. Here’s how we put everything together…
1️⃣ We have batched the rendering of pixels by rows and by blocks. This batching code has been added to the [piet-embedded] crate that calls [embedded-graphics] to render 2D graphics and text on our PineTime.
2️⃣ The code that demos the batching
of pixels is also in the [piet-embedded] crate. Batching is enabled when we enable the noblock_spi feature in [piet-embedded]’s Cargo.toml
like this…
From https://github.com/lupyuen/piet-embedded/blob/master/piet-embedded-graphics/Cargo.toml
3️⃣ noblock_spi is referenced in the demo code like this…
From https://github.com/lupyuen/piet-embedded/blob/master/piet-embedded-graphics/src/display.rs
4️⃣ We have implemented Non-Blocking SPI with Mbuf Chains and Mbuf Queues (plus a background task). The code is located in the [mynewt] crate.
5️⃣ We have
forked the original [st7735-lcd] display driver into [st7735-lcd-batch] to test
Non-Blocking SPI. Non-Blocking SPI is enabled when we enable the noblock_spi feature in [st7735-lcd-batch]’s Cargo.toml…
From https://github.com/lupyuen/st7735-lcd-batch-rs/blob/master/Cargo.toml
6️⃣ noblock_spi is referenced by [st7735-lcd-batch] like this…
From https://github.com/lupyuen/st7735-lcd-batch-rs/blob/master/src/lib.rs
(Plus a few other spots in that file)
We have attempted to optimise the display driver for PineTime… But it’s far from optimal!
There are a few parameters that we may tweak to make PineTime render faster… Just be mindful that some of these tweaks will take up precious RAM…
1️⃣ MaxRowSize:
Maximum number of pixels per batched row. Currently set to 100.
2️⃣ MaxBlockSize:
Maximum number of pixels per batched block. Currently set to 200.
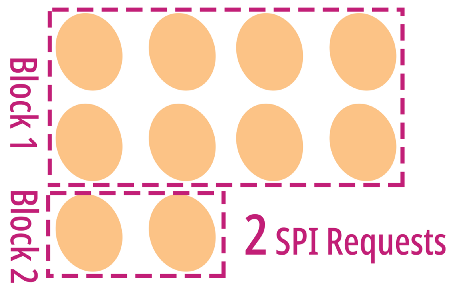
3️⃣ SPI_THROTTLE_SEM:
How many SPI requests are allowed to be enqueued before blocking the rendering task. Currently set to
2.
4️⃣ OS_MAIN_STACK_SIZE:
Stack Size for the main task. Currently set to 16 KB
5️⃣ MSYS_1_BLOCK_COUNT:
Number of Mbuf blocks available. Currently set to 64.
What’s Next?
PineTime is available for purchase by general public! Check this article for updated instructions to build and flash PineTime firmware…
In the next article we’ll have…
1️⃣ The prebuilt Rust + Mynewt OS firmware that we may download and install on PineTime
2️⃣ Instructions for flashing the firmware to PineTime with Raspberry Pi (or ST Link)
3️⃣ Instructions for developing our own Watch Apps with the druid Rust UI Framework
Stay tuned!
Here are the other articles in the PineTime series…