Create your IoT gadget with Apache Mynewt and STM32 Blue Pill
The year is 2029. Humans are populating the Moon, starting at Moon Base One. Two Moon Base Operators observe something highly unusual in the crop garden of beautiful red tomatoes…
Operator 1: The sprinklers are turning on and off erratically. We have just upgraded all our STM32-BLUEST-PILL Temperature Sensing Devices with a Soil Moisture Sensor. Are we sure that the Soil Moisture Sensor is reporting the correct values to the IoT System?
Operator 2: Yes the soil moisture values are correct. Just that we are multitasking two sensors (temperature and soil moisture) so I decided to poll the temperature every minute and the soil moisture every 100 minutes.
You see this clever temperature sensing loop in my code? Every time the counter reaches 100, the code polls the soil moisture sensor, waits for the data, then resumes the temperature sensing loop…
Operator 1: So we get the soil moisture every 100 minutes? That’s absurd! Let’s change the firmware to poll the temperature every 3 minutes and the soil moisture every 5 minutes!
Operator 2: Hmmm OK. I need to make this sensing loop a little more complicated… One counter for 3 minutes and another for 5 minutes…
Operator 1: Yesterday we plugged in the Light Sensor on all our STM32-BLUEST-PILL devices right? Can we get the light sensor data now?
Operator 2: OK but I can’t find a proper software driver for the Light Sensor. I’ll hack up a simple C function to read the sensor… Done! I have just flashed all 1,000 of our STM32-BLUEST-PILL devices with the latest code for Temperature Sensor, Soil Moisture Sensor AND Light Sensor.
Operator 1: WHAT’S HAPPENING !!! Our IoT Dashboards are now totally blank! Says here… “Memory Corruption Error: Invalid pointer in Light Sensor code, core dumped”… All 1,000 sensors are dead… Our tomatoes are all EXPLODING IN FLAMES !!! NOOOOOOO !!!
Creating an IoT Device is hard… Do we have the necessary software drivers to read data correctly from the connected sensors? If the device is connected to multiple sensors, can we read multiple sensors concurrently in a safe and reliable way? Fortunately, Apache Mynewt can help!
Apache Mynewt is a free, open-source realtime operating system for microcontrollers. It has been compared with FreeRTOS and Zephyr, though Mynewt is newer than FreeRTOS and Zephyr.
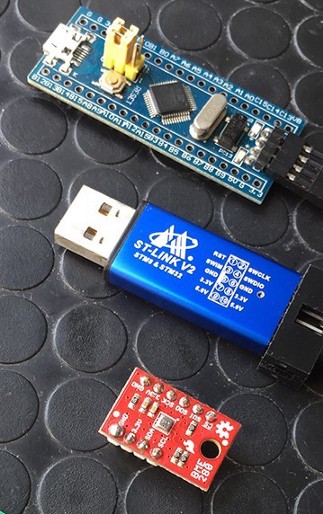
Hardware needed for this tutorial: (1) Blue Pill (2) ST-Link (3) SparkFun BME280 (optional)
Mynewt runs on various microcontrollers like MIPS32, Microchip PIC32, RISC-V. In this article we’ll learn about programming and running Mynewt on the STM32 Blue Pill, one of the cheapest 32-bit microcontroller dev boards available today (only $2!)
We’ll flash and debug the Blue Pill with the ST Link V2 USB adapter. Or a compatible USB adapter.
BME280 is a popular sensor for ambient temperature, relative humidity and air pressure. In this tutorial we’ll configure Mynewt to poll the BME280 temperature sensor every 10 seconds. So just imagine we’re building a temperature sensing device with Blue Pill. BME280 is not mandatory for this tutorial.

Roadmap of the tutorial
This tutorial is packed full of Mynewt goodies but Blue Pill newbies should have no problem following the steps since we’re using Visual Studio Code. We’ll learn to…
1️⃣ Install Mynewt and the Sensor Application
2️⃣ Build Mynewt Bootloader and Application
3️⃣ Flash Bootloader and Application to Blue Pill
4️⃣ Debug Mynewt on Blue Pill
5️⃣ Configure Mynewt for BME280 Sensor
6️⃣ View Mynewt debug messages
7️⃣ Customise Mynewt with a custom debug console
8️⃣ Manage Mynewt Package Dependencies
9️⃣ Target Mynewt for multiple microcontrollers
Install Visual Studio Code and the Mynewt Sensor Application
Follow these instructions if you’re using Windows or macOS
1️⃣ Install Visual Studio Code for Windows or macOS
from
► Visual
Studio Code Website
Launch Visual Studio Code

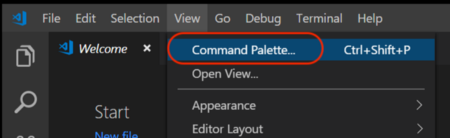
2️⃣ Click View → Command Palette
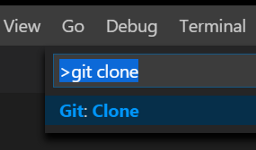
3️⃣ After >, type git clone
Press Enter
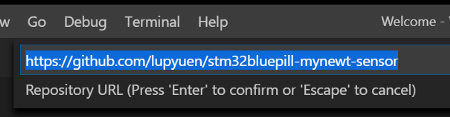
4️⃣ For Repository URL, enter
https://github.com/lupyuen/stm32bluepill-mynewt-sensor
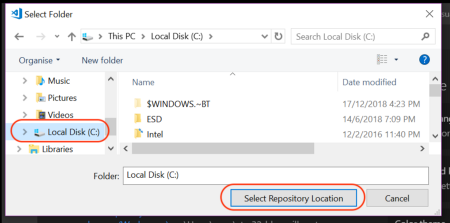
5️⃣ For
Windows: Select your Local Disk C: drive
For macOS: Select your Home folder
The Mynewt Sensor Application
source code will be downloaded to C:\stm32bluepill-mynewt-sensor
(Windows) or $HOME/stm32bluepill-mynewt-sensor
(macOS)
In the Windows Ubuntu
environment, this folder is accessed via the path /mnt/c/stm32bluepill-mynewt-sensor
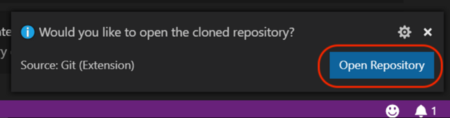
6️⃣ When prompted, click
Open Repository. If the prompt disappears before clicking, click the bell icon at lower
right
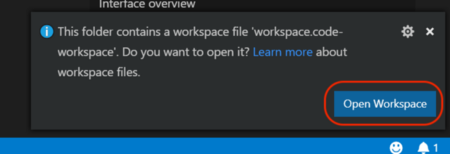
7️⃣ When prompted, click
Open Workspace
If the prompt disappears before clicking, click the bell icon at lower right
8️⃣ Edit the configuration file
targets/bluepill_my_sensor/syscfg.yml.
Update the settings so that TUTORIAL1 is uncommented and TUTORIAL2 is commented out, like this…
TUTORIAL1: 1 # Uncomment Tutorial 1 #TUTORIAL2: 1 # Comment out Tutorial 2
Install Apache Mynewt for Windows
Skip this section if you’re NOT using Windows. For Ubuntu Linux, refer to these instructions.
1️⃣ Follow the instructions in this article to install Windows Subsystem for Linux.
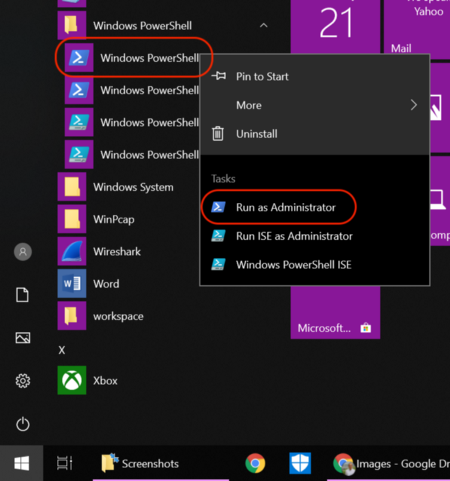
The PowerShell command in the article should be run as Administrator…
Right-click Windows PowerShell in the Windows
menu
Select Run As Administrator

For the Linux Distribution,select Ubuntu
Click Get
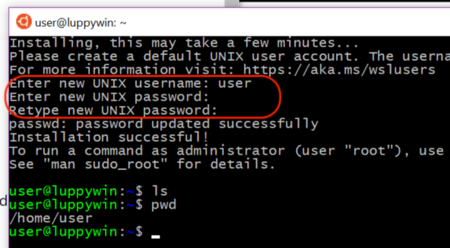
2️⃣ Click Windows → Ubuntu
When prompted, enter a simple
user ID (e.g. user) without any
spaces.
Enter a password of your choice.
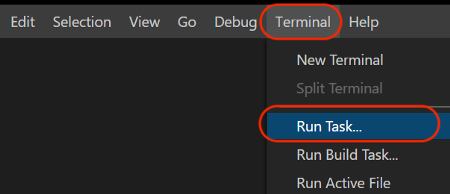
3️⃣ Switch over to Visual Studio Code.
Click Terminal → Run Task
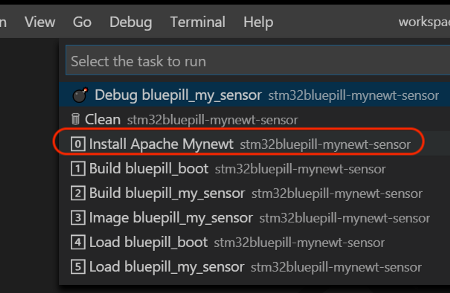
4️⃣ Select [0] Install Apache Mynewt
When prompted, click Continue Without Scanning The Task Output
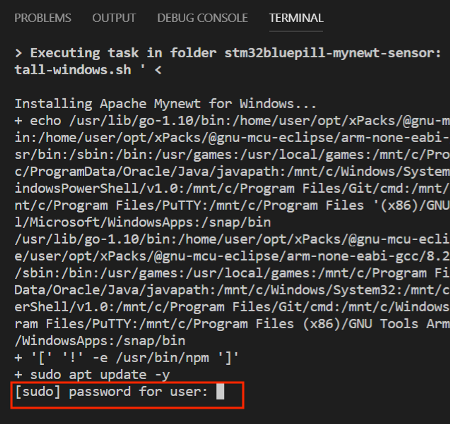
5️⃣ When prompted, click on the
Terminal pane and enter the
password from Step 2️⃣
The password only needs to be entered once.

6️⃣ The setup script will take a few minutes to download and install the build tools.
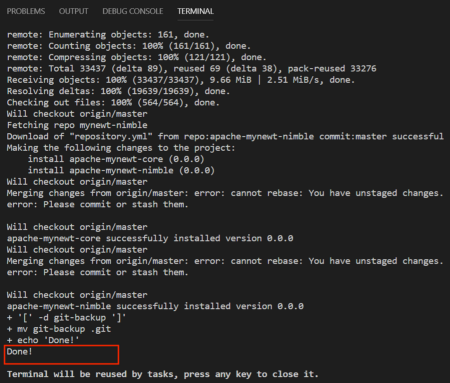
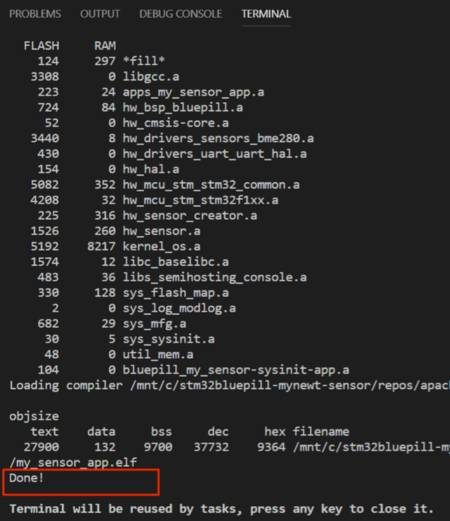
When it’s done, we should see
Done!
Exit and restart Visual Studio Code. This activates the installed extensions.
In case of problems, compare your log with this setup log.
7️⃣ Download the ST-Link USB driver from
► ST-Link
Driver Website (email registration required)
Click Get Software
Unzip the downloaded file.
Double-click the driver installer: dpinst_amd64.exe
8️⃣ Install Arm Cross-Compiler and Linker for Windows from
► Arm
Developer Website
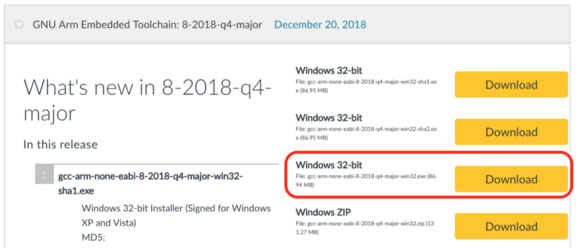
Look for the first Windows 32-bit Download without SHA, e.g.
gcc-arm-none-eabi-...-major-win32.exe
Click Download
Select this option at the last
install step: "Add path to environment variable"
Install Apache Mynewt for macOS
Skip this section if you’re NOT using macOS

1️⃣ Switch over to Visual Studio Code.
Click Terminal → Run Task

2️⃣ Select [0] Install Apache Mynewt
When prompted, click Continue Without Scanning The Task Output

3️⃣ When prompted, click on the
Terminal pane and enter your
macOS password
The password only needs to be entered once.
4️⃣ The setup script will take a few minutes to download and install the build tools.
When it’s done, we should see
Done!
Exit and restart Visual Studio Code. This activates the installed extensions.
Build Mynewt Bootloader and Application
We’ll now build the Mynewt Bootloader and Application that will be flashed to the Blue Pill ROM…
1️⃣ Click Terminal → Run Task →
[1] Build bluepill_boot
This builds the Mynewt Bootloader, which is run first whenever the Blue Pill is restarted.
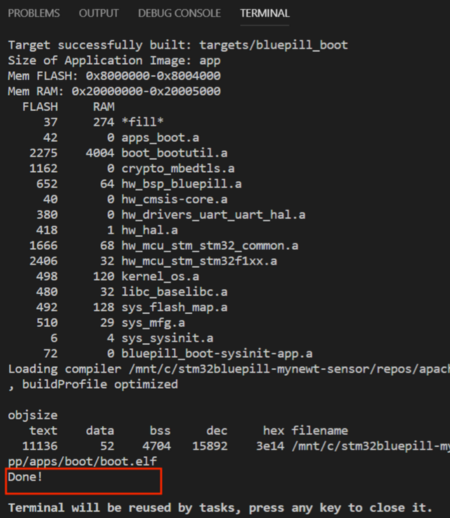
When the Bootloader Build has
completed successfully, we should see Done!
Note: If we’re building for the first time, it may fail with a missing file error. Click the build command again to complete the build.
2️⃣ Click Terminal → Run Task →
[2] Build bluepill_my_sensor
This builds the Mynewt Sensor Application, which is loaded by the Bootloader whenever the Blue Pill is restarted.
When the Application Build has
completed successfully, we should see Done!
Note: If we’re building for the first time, it may fail with a missing file error. Click the build command again to complete the build.
Create Application Image
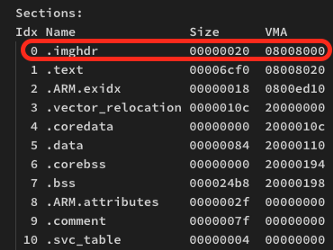
Memory Sections in the Application. From bin/targets/bluepill_my_sensor/app/apps/my_sensor_app/my_sensor_app.elf.lst
Remember that Mynewt requires two programs to be flashed into the Blue Pill ROM: the Bootloader and our Application. How does the Bootloader discover which Application has been flashed into the ROM? That’s done through the Image Header.
The Image Header is located at
the start of the Application and describes the Application (size, security options, …) to the
Bootloader. The Image Header is initially blank when we built it above with Build bluepill_my_sensor. To populate
the Image Header, we need to run…
Terminal → Run Task →
[3] Image bluepill_my_sensor
This creates an Application ROM
image file my_sensor_app.img that
we’ll flash to the Blue Pill in the next step.
Flash Bootloader and Application to Blue Pill
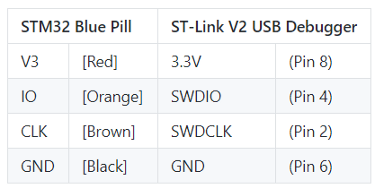
Connecting Blue Pill to ST-Link USB Debugger
1️⃣ Connect the Blue Pill and ST Link to the USB port of your computer.
Both jumpers should be set to the “0” positions
2️⃣ Set both yellow jumpers on
the Blue Pill (BOOT0 andBOOT1
near the Micro USB Port) to the “0”
positions (closer to the Micro USB Port).
3️⃣ The Bootloader is the first program that Blue Pill runs when powered up, so it needs to be flashed first. To flash the Bootloader into the Blue Pill ROM, click…
Terminal → Run Task →
[4] Load bluepill_boot
4️⃣ Next we flash the Application into the Blue Pill ROM, using the Application image we have created in the previous step…
Terminal → Run Task →
[5] Load bluepill_my_sensor
Debug Mynewt on Blue Pill
We’re all set to execute and debug our Application!
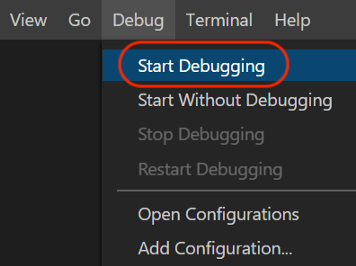
Click Debug → Start Debugging
This starts the debugger to let us inspect our Application as it runs on Blue Pill.
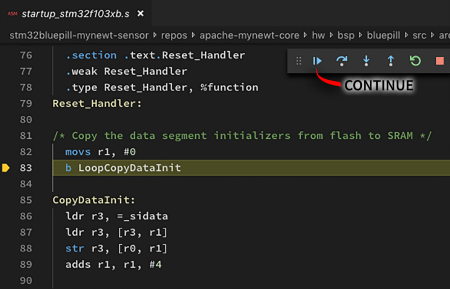
The debugger pauses at the line
with LoopCopyDataInit
Click Continue or press F5
The debugger pauses next at the
main() function in apps/my_sensor_app/src/main.c,
so that we may step through the execution…
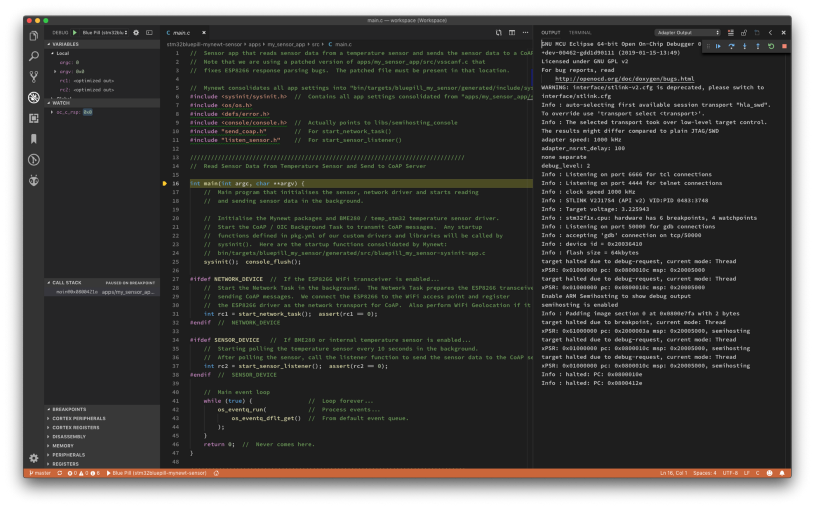
Debugging Mynewt Application on Blue Pill
What will this Application do?
1️⃣ sysinit(): The Application initialises the BME280 driver, which is part of the Mynewt OS. Mynewt has built-in drivers for many
sensors, and we may create our own drivers too.
start_network_task() will only be used in the
next tutorial, so let’s skip to start_sensor_listener()
in apps/my_sensor_app/src/listen_sensor.c...
2️⃣ sensor_set_poll_rate_ms():
We’ll instruct the Mynewt OS to poll the BME280 sensor every 10
seconds. Mynewt is a realtime OS so we can trust it to poll multiple sensors concurrently
without risk of data corruption. Which is highly critical for IoT devices!
3️⃣ sensor_mgr_find_next_bydevname():
We’ll call the Mynewt Sensor Manager to fetch the object that represents our
BME280 sensor. Each sensor is identified by a name assigned by Mynewt. The sensor name
looks like this: bme280_0.
4️⃣ sensor_register_listener():
What happens after Mynewt has polled our BME280 sensor? We instruct Mynewt to call our listener
function read_temperature().
In this demo we’ll just display the temperature on the console…
And back to apps/my_sensor_app/src/main.c...
5️⃣ os_eventq_run():
Finally we let Mynewt start multitasking. This is the standard Event
Queue loop that’s required for all Mynewt applications. It will start polling our BME280 sensor and
calling our listener function every 10 seconds.
With a few lines of code we have created a working IoT sensor device that can handle multiple sensors with multitasking! Let’s verify that it really works…
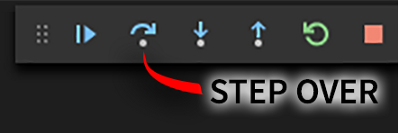
In the debugger toolbar, click the Step Over button (the second button).
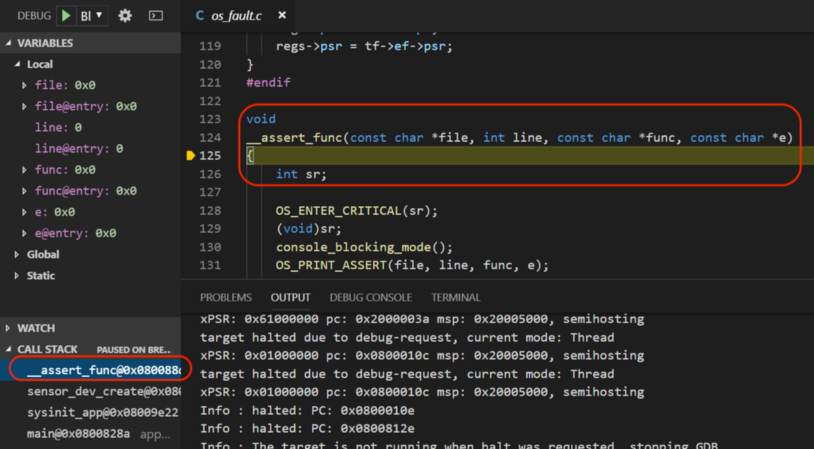
The debugger has paused at __assert_func(),
which means that Mynewt has encountered a fatal error (assertion failure). Let’s check what went
wrong.
In the Call Stack, click on sensor_dev_create(). This the culprit
function that triggered the failure…
Mynewt is attempting to initialise the BME280 driver but it failed. Which could happen if we didn’t connect a real BME280 sensor to our Blue Pill. But it could also happen if our BME280 sensor is misconfigured…
Configure Mynewt for BME280 Sensor
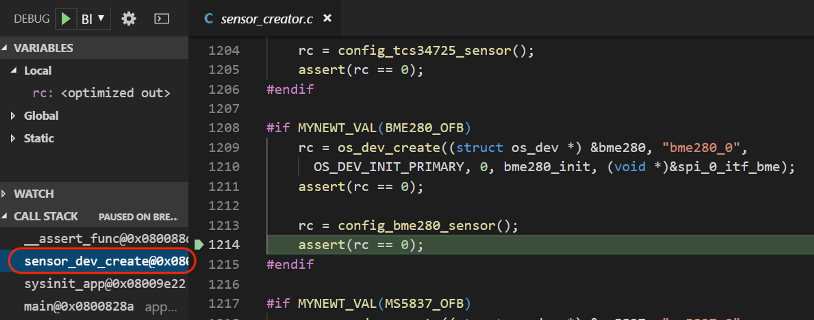
This code in the screen above is
from the Mynewt
Sensor Creator. One amazing feature of Mynewt is that we don’t need to
write any code to configure common sensors like BME280. How do we tell Mynewt that we have
connected a BME280 sensor? Though the syscfg.yml System
Configuration File!
Here’s the System Configuration
File for our Application, located at apps/my_sensor_app/syscfg.yml...
syscfg.vals.TUTORIAL1:
    BME280_OFB:   1  # Enable BME280 offboard sensor
    SPI_0_MASTER: 1  # Enable port SPI1 for BME280
BME280_OFB causes the Sensor Creator to include the BME280 driver in our Application. (OFB means it’s an off-board sensor, i.e. it’s not a sensor that’s
integrated with the Blue Pill microcontroller)
SPI_0_MASTER tells the Sensor Creator to use
the first SPI port (SPI1) on Blue Pill. Connecting the Application to the BME280 sensor via
SPI is really that easy!
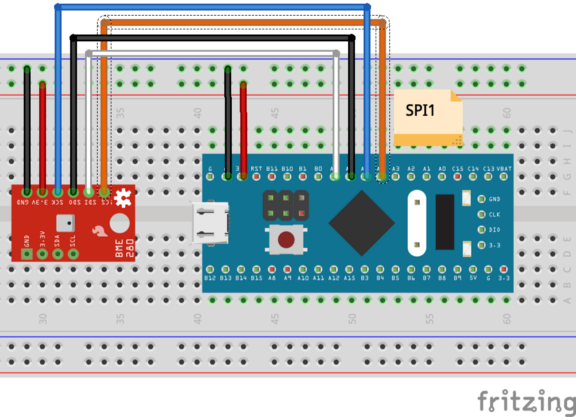
Connecting BME280 to Blue Pill. From https://github.com/lupyuen/stm32bluepill-mynewt-sensor/blob/master/bme280spi.fzz
Blue Pill Pin PA4  (SS1)   → BME280 Pin !CS
Blue Pill Pin PA5  (SCK1)  → BME280 Pin SCK
Blue Pill Pin PA6  (MISO1) → BME280 Pin SDO
Blue Pill Pin PA7  (MOSI1) → BME280 Pin SDI
Blue Pill Pin 3V3          → BME280 Pin 3.3V
Blue Pill Pin GND          → BME280 Pin GND
That’s how we normally wire up the BME280 sensor to Blue Pill on port SPI1. Note that the CS (Chip Select) Pin is connected to PA4 on Blue Pill. There’s a slight complication… If you look at the Sensor Creator code, it assumes that the CS Pin is connected to PA3…
#if MYNEWT_VAL(SPI_0_MASTER) && MYNEWT_VAL(BME280_OFB)
static struct sensor_itf spi_0_itf_bme = {
    .si_type = SENSOR_ITF_SPI,
    .si_num = 0,
    .si_cs_pin = 3  //  Assumes the CS Pin is connected to PA3.
};
#endif
The fix is easy: Just edit the
file repos/apache-mynewt-core/hw/sensor/creator/src/sensor_creator.c,
look for line 200, and change the CS Pin from 3 to 4…
#if MYNEWT_VAL(SPI_0_MASTER) && MYNEWT_VAL(BME280_OFB)
static struct sensor_itf spi_0_itf_bme = {
    .si_type = SENSOR_ITF_SPI,
    .si_num = 0,
    .si_cs_pin = 4 //  Changed to connect CS Pin to PA4.
};
#endif

BME280 connected to Blue Pill
Tip for Experienced Coders: You might think it’s not proper to modify the Mynewt OS files directly like this (even though it’s suggested in this article).
The cleaner way to
change the configuration is to copy the config_bme280_sensor()
function into our Application and make the changes there.
View Mynewt Debug Messages
To view debug messages generated by our Application, follow these steps…
1️⃣ After updating sensor_creator.c, stop the debugger by clicking the red square in the debugger toolbar.
2️⃣ Click Terminal → Run Task → [2] Build bluepill_my_sensor
3️⃣Start the debugger: Click
Debug → Start Debugging

4️⃣ Click View → Output
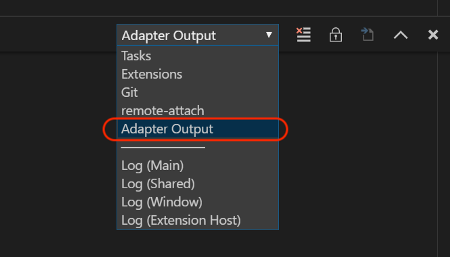
5️⃣ In the Output pane that
appears, select Adapter Output
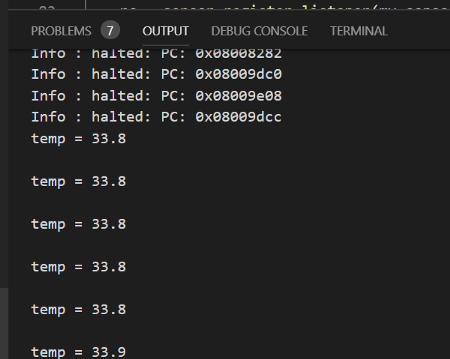
6️⃣ If we have connected a BME280 sensor to our Blue Pill according to the schematic above, we should see the temperature reading like this.
Our Application contains a listener function that
displays the temperature after polling the BME280 sensor. To display a debug message in our
Application, we just call console_printf() like this...
console_printf("TMP poll data: tmp ");
console_printfloat(tmp);
console_printf("\n");
But what is this “Adapter Output”? How did we redirect Mynewt’s console_printf() function to show messages in Adapter Output? We used some Arm magic called Arm
Semihosting.
Customise Mynewt with Semihosting Console
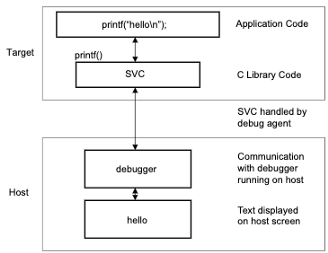
Arm Semihosting for displaying debug messages. SVC refers to the BKPT instruction. From https://developer.arm.com/docs/dui0471/k/what-is-semihosting/what-is-semihosting
Arm Semihosting is a simple
way to display debug messages via ST Link. When our Application
executes the special Arm instruction bkpt #0xAB
and passes a debug message, the message is transmitted over ST Link (SWD port) to our computer.
To view the messages, we need to
activate the OpenOCD Console. This is the Adapter Output log that we saw above. OpenOCD is the program running
in the background that connects to Blue Pill via ST Link to flash and debug Blue Pill programs. So it
makes sense that the Arm Semihosting debug messages are displayed in the OpenOCD Console.
However, Arm Semihosting is not supported natively in Mynewt. Mynewt’s Console Library routes debug messages to the UART port by default. This makes debugging more complicated: We need to connect Blue Pill’s UART port to our computer via a USB Serial Adapter to see the debug messages.
Fortunately Mynewt lets us
customise the OS by coding our own Console Library for Arm Semihosting.
The Semihosting Console Library
that’s included in our Application will override the default Console Library and show debug messages
in the OpenOCD Console (Adapter Output) instead.
Select Mynewt Libraries through Package Dependencies
How do we tell Mynewt to use the
Semihosting Console instead of the regular Console Library? Through the Application’s pkg.yml Package
Configuration File located at apps/my_sensor_app/pkg.yml…
pkg.deps:
    - "@apache-mynewt-core/kernel/os"
    - "@apache-mynewt-core/sys/log/stub"
    - "@apache-mynewt-core/sys/stats/stub"
    - "@apache-mynewt-core/hw/sensor"
    - "@apache-mynewt-core/hw/sensor/creator"
    - "@apache-mynewt-core/libc/baselibc"
    - "libs/semihosting_console"
In pkg.yml we list the library packages needed by
our Application. Here we declare the Sensor Library and Sensor Creator, which are needed to
support BME280. The last entry libs/semihosting_console is our
Semihosting Console Library.
The Semihosting Console Library
works only when the ST Link is connected to our Blue Pill. (The library
hangs when the ST Link is disconnected) When we roll out the Blue Pill in the real world, we should
disable the debug console by switching to the Stub Console
Library. Change the last line of pkg.yml to…
- "@apache-mynewt-core/sys/console/stub"
To switch back to the default UART Console
Library, change the last line of pkg.yml to…
- "@apache-mynewt-core/sys/console/full"
Target Mynewt for multiple microcontrollers
In the sections above, we
examined Application configuration files that were located in two source folders: my_sensor_app and bluepill_my_sensor. How are my_sensor_app and bluepill_my_sensor related?
Mynewt is a portable operating system that supports many microcontrollers: Blue Pill, STM32F4-Discovery, Arduino Zero, nRF52, … So most of the Mynewt OS, Bootloader and Application code was designed to be generic to support different microcontrollers.
In order to compile this generic
code to run on Blue Pill, we need to “Target” the generic code for Blue
Pill. So my_sensor_app is the generic
version of the Sensor Application, and bluepill_my_sensor is the same application targeted for Blue Pill.
How do we target bluepill_my_sensor for Blue Pill? Through the target.yml Target
Configuration File located at targets/bluepill_my_sensor/target.yml…
target.app: apps/my_sensor_app
target.bsp: "@apache-mynewt-core/hw/bsp/bluepill"
target.build_profile: debug
The bluepill_my_sensor Target Configuration File states that…
1️⃣ apps/my_sensor_app: Take the generic
my_sensor_app Application…
2️⃣ @apache-mynewt-core/hw/bsp/bluepill:
And target it for the Blue Pill microcontroller. BSP refers to the Mynewt Board
Support Package, which is a library that contains system functions that are specific
to a microcontroller, like Blue Pill.
3️⃣ debug: Generate debugger info during
compilation
Mynewt will let us generate Applications for multiple microcontrollers so easily… Just edit the Target Configuration File!
Here’s the folder structure for
our stm32bluepill-mynewt-sensor project. We can see the generic
and targeted Applications, as well as their configuration files. All Mynewt projects will follow this
structure when we create projects using the newt new command.

Mynewt project folder structure
Whats Next?
Now that we understand the fundamentals of Mynewt’s Sensor Framework, we’ll dive deep in the next tutorial and learn to send sensor data to an IoT cloud (like thethings.io) via ESP8266 WiFi and CoAP. We’ll be testing WiFi Geolocation — computing your location based on WiFi Access Points scanned by the ESP8266 module.
Check out the latest article on Visual Embedded Rust…
Here are the older Mynewt tutorials…
Here’s the code for this article…