📝 5 Oct 2021
Suppose we’re creating an IoT Gadget that transmits Sensor Data from a Temperature Sensor and a Light Sensor…
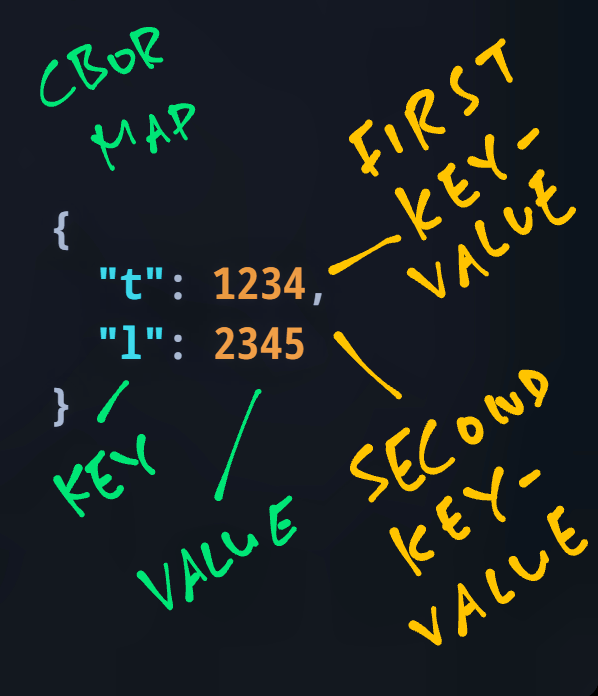
{
  "t": 1234,
  "l": 2345
}
(Located in a Greenhouse perhaps)
And we’re transmitting over a low-power wireless network like LoRa, Zigbee or Bluetooth LE.
We could transmit 19 bytes of JSON. But there’s a more compact way to do it….
Concise Binary Object Representation (CBOR), which works like a binary, compressed form of JSON.
And we need only 11 bytes of CBOR!
Today we’ll learn to encode Sensor Data with the TinyCBOR Library that we have ported to the BL602 and BL604 RISC-V SoCs…
The library has been tested on PineDio Stack BL604, but it should work on any BL602 or BL604 Board: Ai-Thinker Ai-WB2, PineCone BL602, Pinenut, DT-BL10, MagicHome BL602, …
Must we scrimp and save every single byte?
Yes, every single byte matters for low-power wireless networks!
Low-power wireless networks operate on Radio Frequency Bands that are shared with many other gadgets.
They are prone to collisions and interference.
The smaller the data packet, the higher the chance that it will be transmitted successfully!
When we transmit LoRa packets to The Things Network (the free public global LoRa network), we’re limited by their Fair Use Policy.
(Roughly 12 bytes per message, assuming 10 messages per hour)
JSON is too big for this. But CBOR works well!
In a while we’ll watch the TinyCBOR Library in action for encoding Sensor Data in The Things Network.
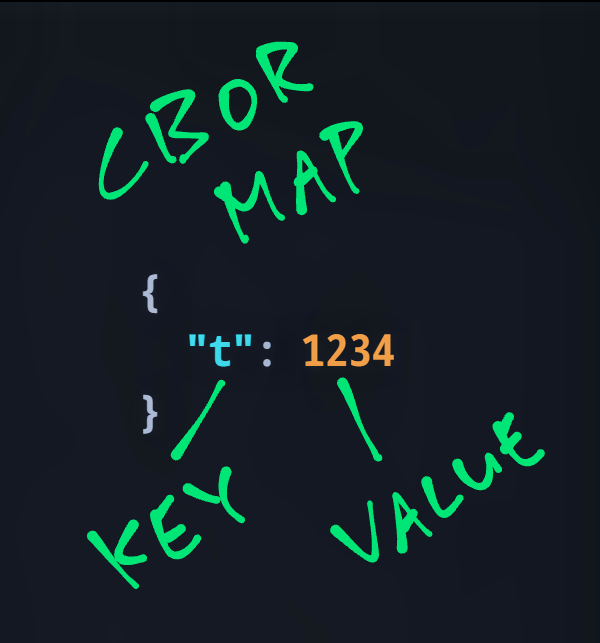
We begin by encoding one data field into CBOR…
{
  "t": 1234
}
We call this a CBOR Map that maps a Key (“t”) to a Value (1234)…
Let’s look at the code from our firmware that encodes the above into CBOR…
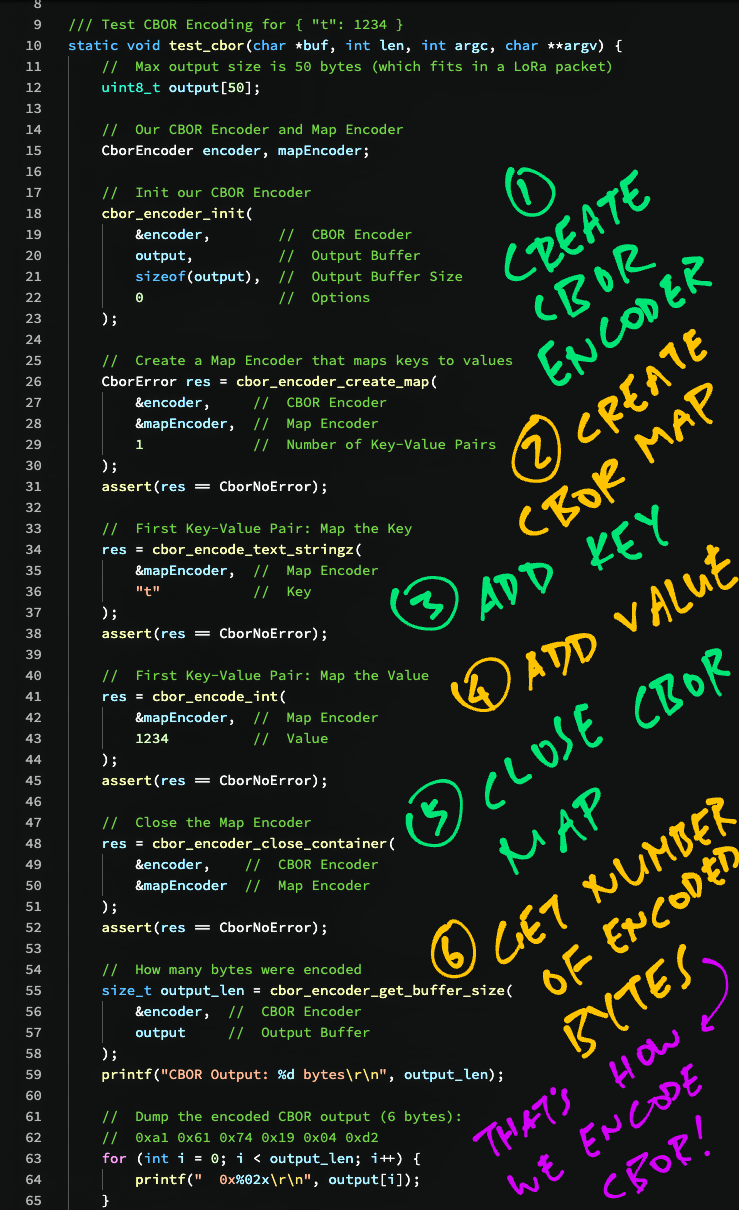
First we create an Output Buffer that will hold the encoded CBOR data: pinedio_cbor/demo.c
/// Test CBOR Encoding for { "t": 1234 }
static void test_cbor(char *buf, int len, int argc, char **argv) {

  //  Max output size is 50 bytes (which fits in a LoRa packet)
  uint8_t output[50];
(50 bytes is the max packet size for The Things Network AS923 DR2)
Output Buffer Size is important: Calls to the TinyCBOR library will fail if we run out of buffer space!
Next we define the CBOR Encoder (from TinyCBOR) that will encode our data…
  //  Our CBOR Encoder and Map Encoder
  CborEncoder encoder, mapEncoder;
As well as the Map Encoder that will encode our CBOR Map.
We initialise the CBOR Encoder like so…
  //  Init our CBOR Encoder
  cbor_encoder_init(
    &encoder,        //  CBOR Encoder
    output,          //  Output Buffer
    sizeof(output),  //  Output Buffer Size
    0                //  Options (always 0)
);Now we create the Map Encoder that will encode our CBOR Map…
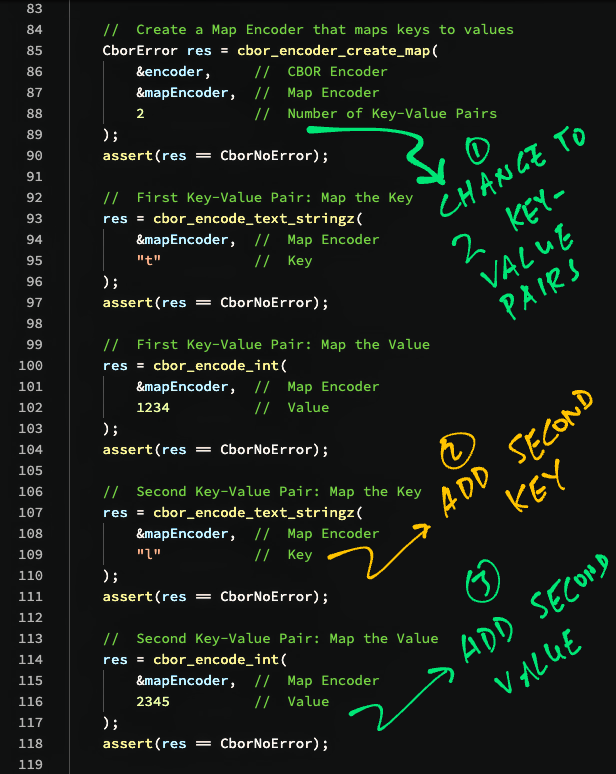
  //  Create a Map Encoder that maps keys to values
  CborError res = cbor_encoder_create_map(
    &encoder,     //  CBOR Encoder
    &mapEncoder,  //  Map Encoder
    1             //  Number of Key-Value Pairs
  );
  assert(res == CborNoError);
The last parameter (1) is important: It must match the Number of Key-Value Pairs (like "t": 1234) that we shall encode.
We encode the Key (“t”) into the CBOR Map…
  //  First Key-Value Pair: Map the Key
  res = cbor_encode_text_stringz(
    &mapEncoder,  //  Map Encoder
    "t"           //  Key
  );
  assert(res == CborNoError);
Followed by the Value (1234)…
  //  First Key-Value Pair: Map the Value
  res = cbor_encode_int(
    &mapEncoder,  //  Map Encoder
    1234          //  Value
  );
  assert(res == CborNoError);
cbor_encode_int encodes 64-bit Signed Integers.
(We’ll look at other data types in a while)
We’re done with our CBOR Map, so we close the Map Encoder…
  //  Close the Map Encoder
  res = cbor_encoder_close_container(
    &encoder,    //  CBOR Encoder
    &mapEncoder  //  Map Encoder
  );
  assert(res == CborNoError);
Our CBOR Encoding is complete!
To work with the Encoded CBOR Output, we need to know how many bytes have been encoded…
  //  How many bytes were encoded
  size_t output_len = cbor_encoder_get_buffer_size(
    &encoder,  //  CBOR Encoder
    output     //  Output Buffer
  );
  printf("CBOR Output: %d bytes\r\n", output_len);
For the demo we dump the encoded CBOR data to the console…
  //  Dump the encoded CBOR output (6 bytes):
  //  0xa1 0x61 0x74 0x19 0x04 0xd2
  for (int i = 0; i < output_len; i++) {
    printf("  0x%02x\r\n", output[i]);
  }
}
And that’s how we call the TinyCBOR Library to work with CBOR data!
Let’s watch what happens when we run the firmware…
Follow the steps in the Appendix to build, flash and run the CBOR Firmware…
At the BL602 / BL604 Command Prompt, enter…
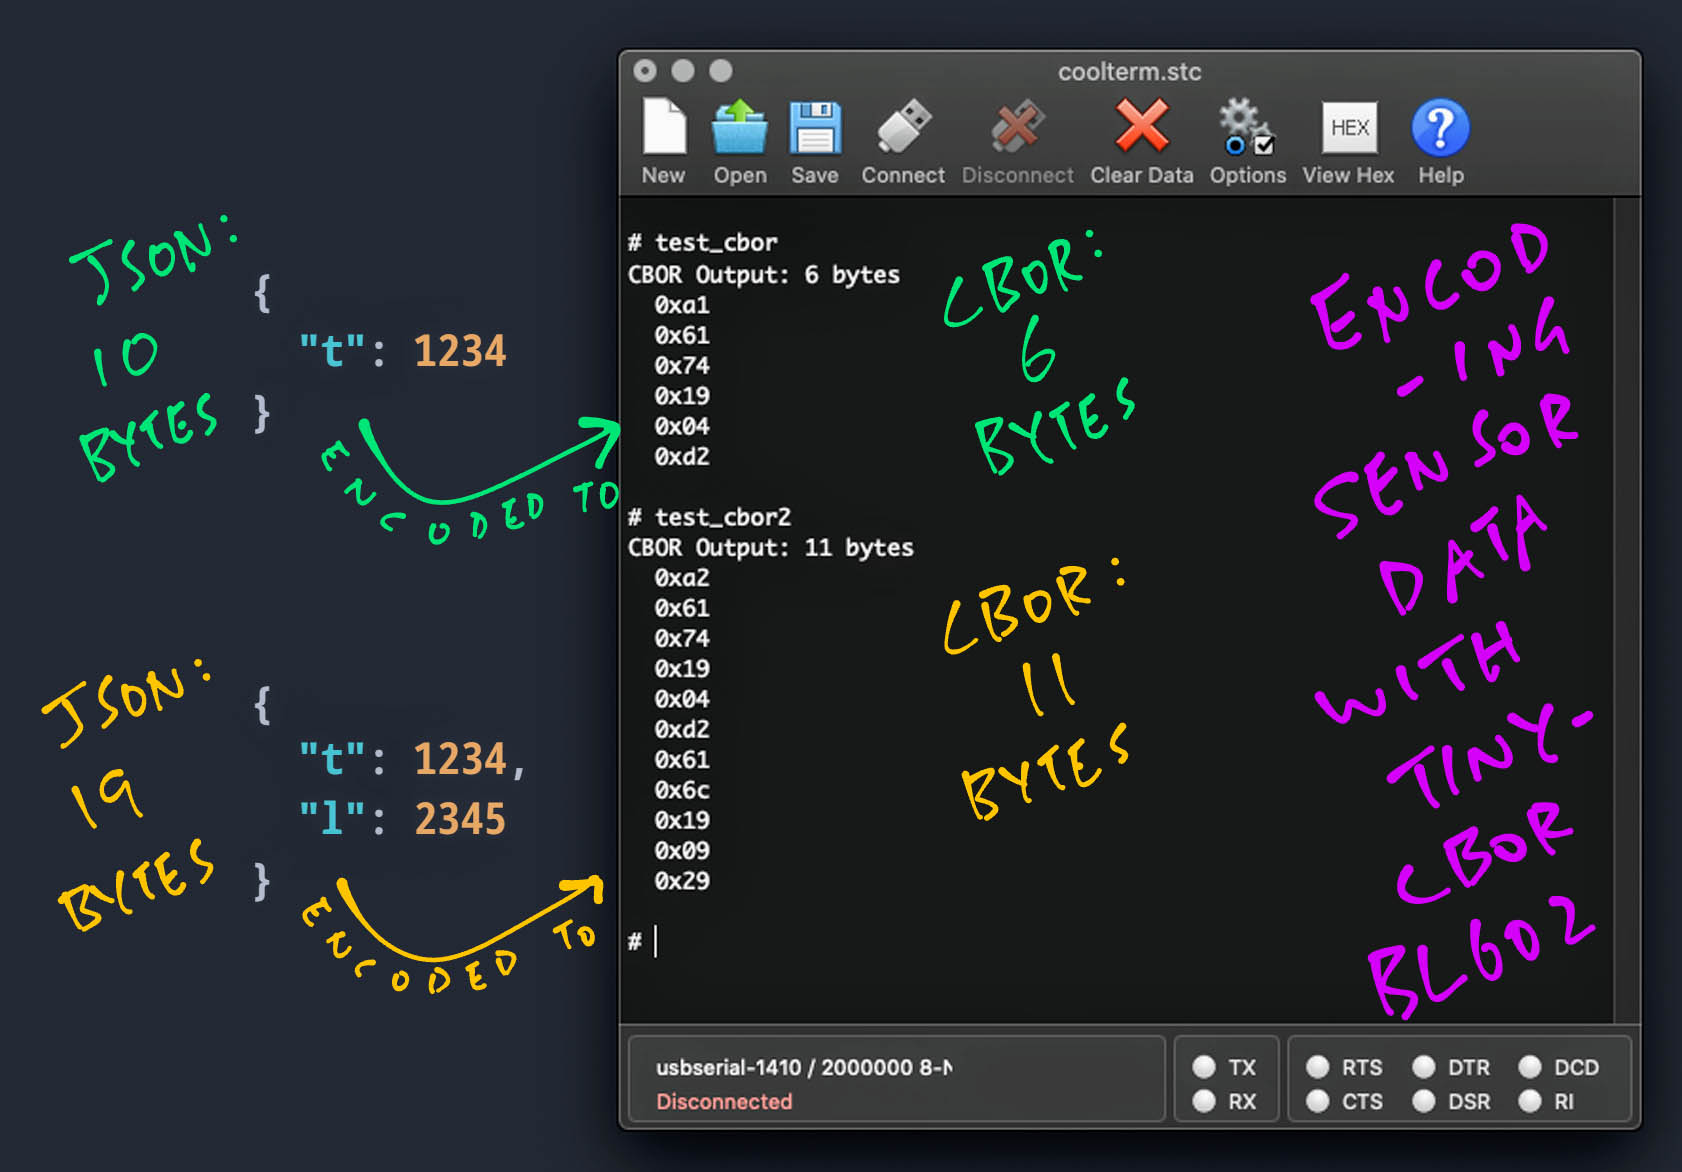
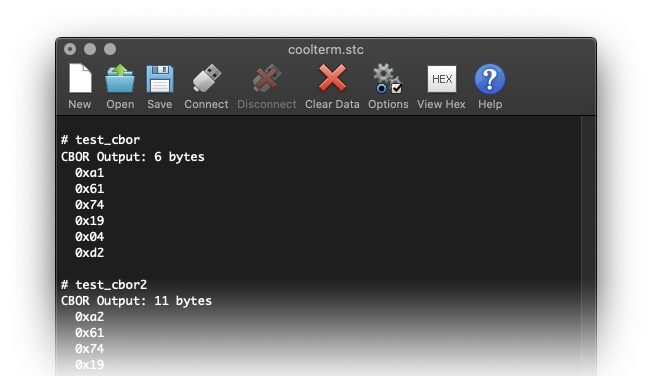
test_cborWe’ll see 6 bytes of Encoded CBOR Output…
CBOR Output: 6 bytes
  0xa1
  0x61
  0x74
  0x19
  0x04
  0xd2
We have just compressed 10 bytes of JSON…
{
  "t": 1234
}
Into 6 bytes of CBOR.
We have scrimped and saved 4 bytes!
Now we add another field to our CBOR Encoding…
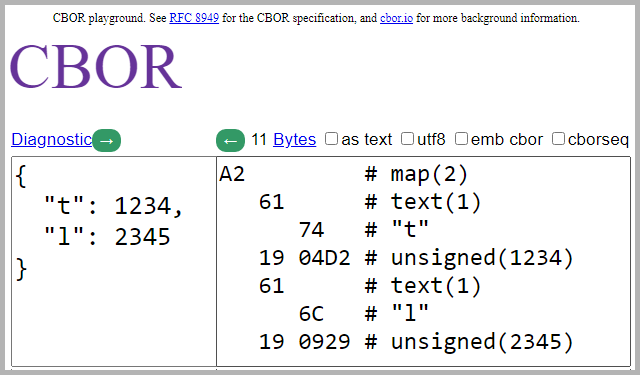
{
  "t": 1234,
  "l": 2345
}
And watch how our program changes to accommodate the second field.
We begin the same way as before: pinedio_cbor/demo.c
/// Test CBOR Encoding for { "t": 1234, "l": 2345 }
static void test_cbor2( ... ) {

  //  Max output size is 50 bytes (which fits in a LoRa packet)
  uint8_t output[50];

  //  Our CBOR Encoder and Map Encoder
  CborEncoder encoder, mapEncoder;

  //  Init our CBOR Encoder
  cbor_encoder_init( ... );
Now we create the Map Encoder with a tiny modification…
  //  Create a Map Encoder that maps keys to values
  CborError res = cbor_encoder_create_map(
    &encoder,     //  CBOR Encoder
    &mapEncoder,  //  Map Encoder
    2             //  Number of Key-Value Pairs
  );
  assert(res == CborNoError);
We changed the Number of Key-Value Pairs to 2.
(Previously it was 1)
We encode the First Key and Value the same way as before…
  //  First Key-Value Pair: Map the Key
  res = cbor_encode_text_stringz(
    &mapEncoder,  //  Map Encoder
    "t"           //  Key
  );
  assert(res == CborNoError);

  //  First Key-Value Pair: Map the Value
  res = cbor_encode_int(
    &mapEncoder,  //  Map Encoder
    1234          //  Value
  );
  assert(res == CborNoError);
(Yep no changes above)
This part is new: We encode the Second Key and Value (“l” and 2345)…
  //  Second Key-Value Pair: Map the Key
  res = cbor_encode_text_stringz(
    &mapEncoder,  //  Map Encoder
    "l"           //  Key
  );
  assert(res == CborNoError);

  //  Second Key-Value Pair: Map the Value
  res = cbor_encode_int(
    &mapEncoder,  //  Map Encoder
    2345          //  Value
  );
  assert(res == CborNoError);
And the rest of the code is the same…
  //  Close the Map Encoder
  res = cbor_encoder_close_container( ... );

  //  How many bytes were encoded
  size_t output_len = cbor_encoder_get_buffer_size( ... );

  //  Dump the encoded CBOR output (11 bytes):
  //  0xa2 0x61 0x74 0x19 0x04 0xd2 0x61 0x6c 0x19 0x09 0x29
  for (int i = 0; i < output_len; i++) {
    printf("  0x%02x\r\n", output[i]);
  }
}
Recap: To add a data field to our CBOR Encoding, we…
Modify the call to cbor_encoder_create_map and update the Number of Key-Value Pairs (2)
Add the new Key and Value (“l” and 2345) to the CBOR Map
Everything else stays the same.
Follow the steps in the Appendix to build, flash and run the CBOR Firmware…
At the BL602 / BL604 Command Prompt, enter…
test_cbor2This time we’ll see 11 bytes of Encoded CBOR Output…
CBOR Output: 11 bytes
  0xa2
  0x61
  0x74
  0x19
  0x04
  0xd2
  0x61
  0x6c
  0x19
  0x09
  0x29
We have just compressed 19 bytes of JSON into 11 bytes of CBOR.
8 bytes saved!
If we wish to call TinyCBOR from an existing BL602 / BL604 project, check the Appendix…
We’ve been encoding 64-bit Signed Integers. What other Data Types can we encode?
Below are the CBOR Data Types and their respective Encoder Functions from the TinyCBOR Library…
Signed Integer (64 bits): cbor_encode_int
(We called this earlier. Works for positive and negative integers)
Unsigned Integer (64 bits): cbor_encode_uint
(Positive integers only)
Negative Integer (64 bits): cbor_encode_negative_int
(Negative integers only)
Floating-Point Number (16, 32 or 64 bits):
(See the next chapter)
Null-Terminated String: cbor_encode_text_stringz
(We called this earlier to encode our Keys)
Text String: cbor_encode_text_string
(For strings that are not null-terminated)
Byte String: cbor_encode_byte_string
(For strings containing binary data)
Boolean: cbor_encode_boolean
Null: cbor_encode_null
Undefined: cbor_encode_undefined
For the complete list of CBOR Encoder Functions, refer to the TinyCBOR docs…
CBOR Data Types are explained in the CBOR Specification…
To experiment with CBOR Encoding and Decoding, try the CBOR Playground…
The CBOR spec says that there are 3 ways to encode floats…
Half-Precision Float (16 bits): cbor_encode_half_float
(3.3 significant decimal digits. See this)
Single-Precision Float (32 bits): cbor_encode_float
(6 to 9 significant decimal digits. See this)
Double-Precision Float (64 bits): cbor_encode_double
(15 to 17 significant decimal digits. See this)
How do we select the proper float encoding?
Suppose we’re encoding Temperature Data (like 12.34 ºC) that could range from 0.00 ºC to 99.99 ºC.
This means that we need 4 significant decimal digits.
Which is too many for a Half-Precision Float (16 bits), but OK for a Single-Precision Float (32 bits).
Thus we need 5 bytes to encode the Temperature Data. (Including the CBOR Initial Byte)
Huh? If we encode an integer like 1234, we need only 3 bytes!
That’s why in this article we scale up 100 times for the Temperature Data and encode as an integer instead.
(So 1234 actually means 12.34 ºC)
2 bytes saved!
(Our scaling of Sensor Data is similar to Fixed-Point Representation)
Is it meaningful to record temperatures that are accurate to 0.01 ºC?
How much accuracy do we need for Sensor Data anyway?
The accuracy for our Sensor Data depends on…
Our monitoring requirements, and
Accuracy of our sensors
Learn more about Accuracy and Precision of Sensor Data…
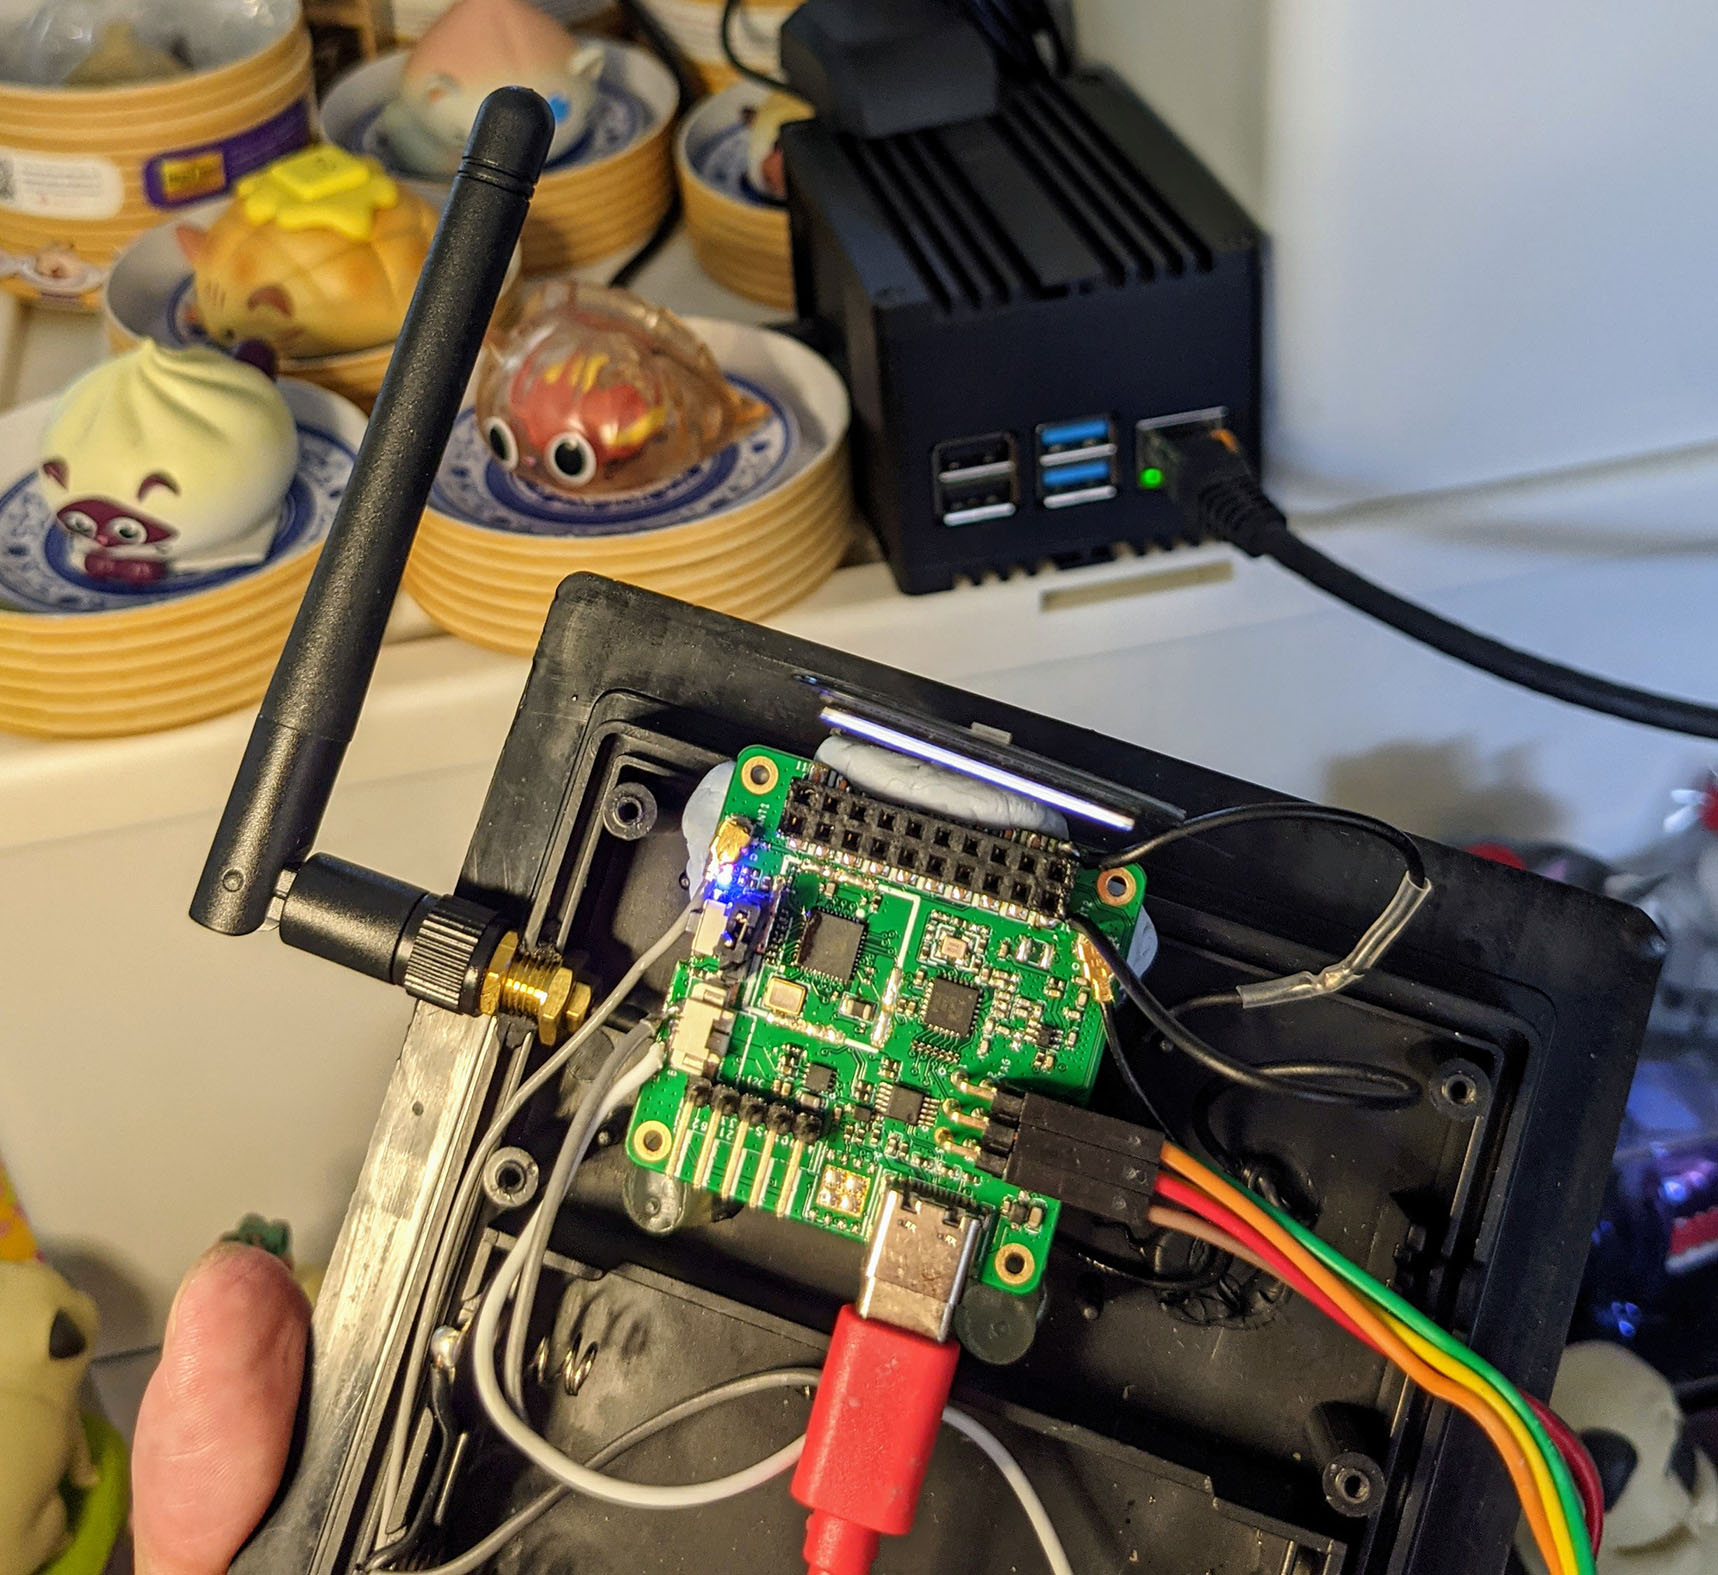
PineDio Stack BL604 RISC-V Board (foreground) talking to The Things Network via RAKWireless RAK7248 LoRaWAN Gateway (background)
Let’s watch CBOR in action on a real wireless network… As PineDio Stack BL604 talks to The Things Network over LoRaWAN!
In a while we shall run this LoRaWAN Command…
las_app_tx_cbor 2 0 1234 2345This means…
Transmit a LoRaWAN Packet to Port 2
That contains the values t=1234 (Temperature), l=2345 (Light Level)
0 means that this is an Unconfirmed Message
(Because we’re not expecting an acknowledgement)
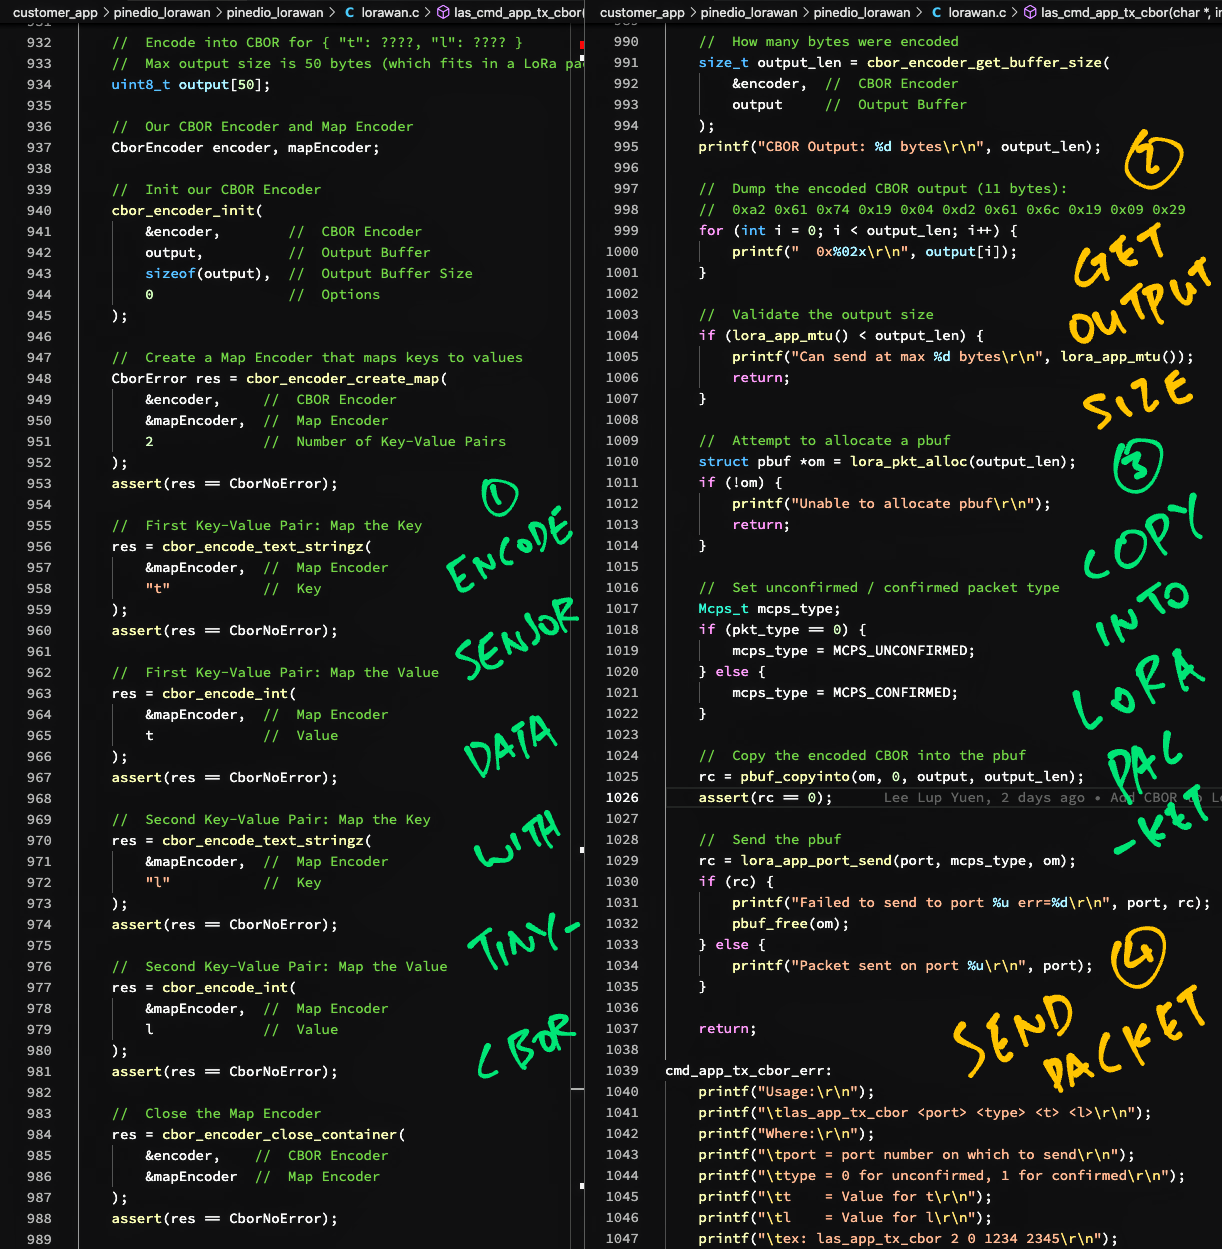
Our CBOR Encoding happens inside the las_app_tx_cbor function: pinedio_lorawan/lorawan.c
/// Transmit CBOR payload to LoRaWAN. The command
///   las_app_tx_cbor 2 0 1234 2345
/// Will transmit the CBOR payload
///   { "t": 1234, "l": 2345 }
/// To port 2, unconfirmed (0).
void las_cmd_app_tx_cbor( ... ) {
  ...
  //  Get the "t" value from command args
  uint16_t t = parse_ull_bounds(argv[3], 0, 65535, &rc);

  //  Get the "l" value from command args
  uint16_t l = parse_ull_bounds(argv[4], 0, 65535, &rc);
In the code above we get the values of “t” (Temperature Sensor) and “l” (Light Sensor) from the command line arguments.
(Our sensors are simulated for now)
Watch how we encode “t” and “l” and transmit them…
This part looks super familiar: We initialise our CBOR Encoder and Map Encoder…
  //  Encode into CBOR for { "t": ????, "l": ???? }
  //  Max output size is 50 bytes (which fits in a LoRa packet)
  uint8_t output[50];

  //  Our CBOR Encoder and Map Encoder
  CborEncoder encoder, mapEncoder;

  //  Init our CBOR Encoder
  cbor_encoder_init( ... );

  //  Create a Map Encoder that maps keys to values (2 pairs)
  CborError res = cbor_encoder_create_map( ... );
Next we encode the Key and Value for “t”…
  //  First Key-Value Pair: Map the Key ("t")
  res = cbor_encode_text_stringz(
    &mapEncoder,  //  Map Encoder
    "t"           //  Key
  );
  assert(res == CborNoError);

  //  First Key-Value Pair: Map the Value
  res = cbor_encode_int(
    &mapEncoder,  //  Map Encoder
    t             //  Value
  );
  assert(res == CborNoError);
Then we encode the Key and Value for “l”…
  //  Second Key-Value Pair: Map the Key ("l")
  res = cbor_encode_text_stringz(
    &mapEncoder,  //  Map Encoder
    "l"           //  Key
  );
  assert(res == CborNoError);

  //  Second Key-Value Pair: Map the Value
  res = cbor_encode_int(
    &mapEncoder,  //  Map Encoder
    l             //  Value
  );
  assert(res == CborNoError);
And we close the Map Encoder…
  //  Close the Map Encoder
  res = cbor_encoder_close_container( ... );

  //  How many bytes were encoded
size_t output_len = cbor_encoder_get_buffer_size( ... );We’re ready to transmit our encoded Sensor Data!
First we allocate a Packet Buffer for our LoRaWAN Packet…
  //  Validate the output size
  if (lora_app_mtu() < output_len) { return; }  //  Output too big

  //  Attempt to allocate a Packet Buffer
  struct pbuf *om = lora_pkt_alloc(output_len);
  if (!om) { return; }  //  Unable to allocate Packet Buffer
Next we copy our encoded Sensor Data into the Packet Buffer…
  //  Copy the encoded CBOR into the Packet Buffer
  rc = pbuf_copyinto(om, 0, output, output_len);
  assert(rc == 0);
Finally we transmit the Packet Buffer…
  //  Send the Packet Buffer
  rc = lora_app_port_send(port, mcps_type, om);

  //  Omitted: Check the return code
That’s how we encode Sensor Data and transmit over LoRaWAN!
Follow the instructions in the Appendix to build, flash and run the LoRaWAN Firmware…
At the BL602 / BL604 Command Prompt, enter this command…
las_app_tx_cbor 2 0 1234 2345This means…
Transmit a LoRaWAN Packet to Port 2
That contains the values t=1234 (Temperature), l=2345 (Light Level)
0 means that this is an Unconfirmed Message
(Because we’re not expecting an acknowledgement)
Our Sensor Data has been transmitted via LoRaWAN to The Things Network!
How do we see the Sensor Data in The Things Network?
We could use Grafana, the open source tool for data visualisation…
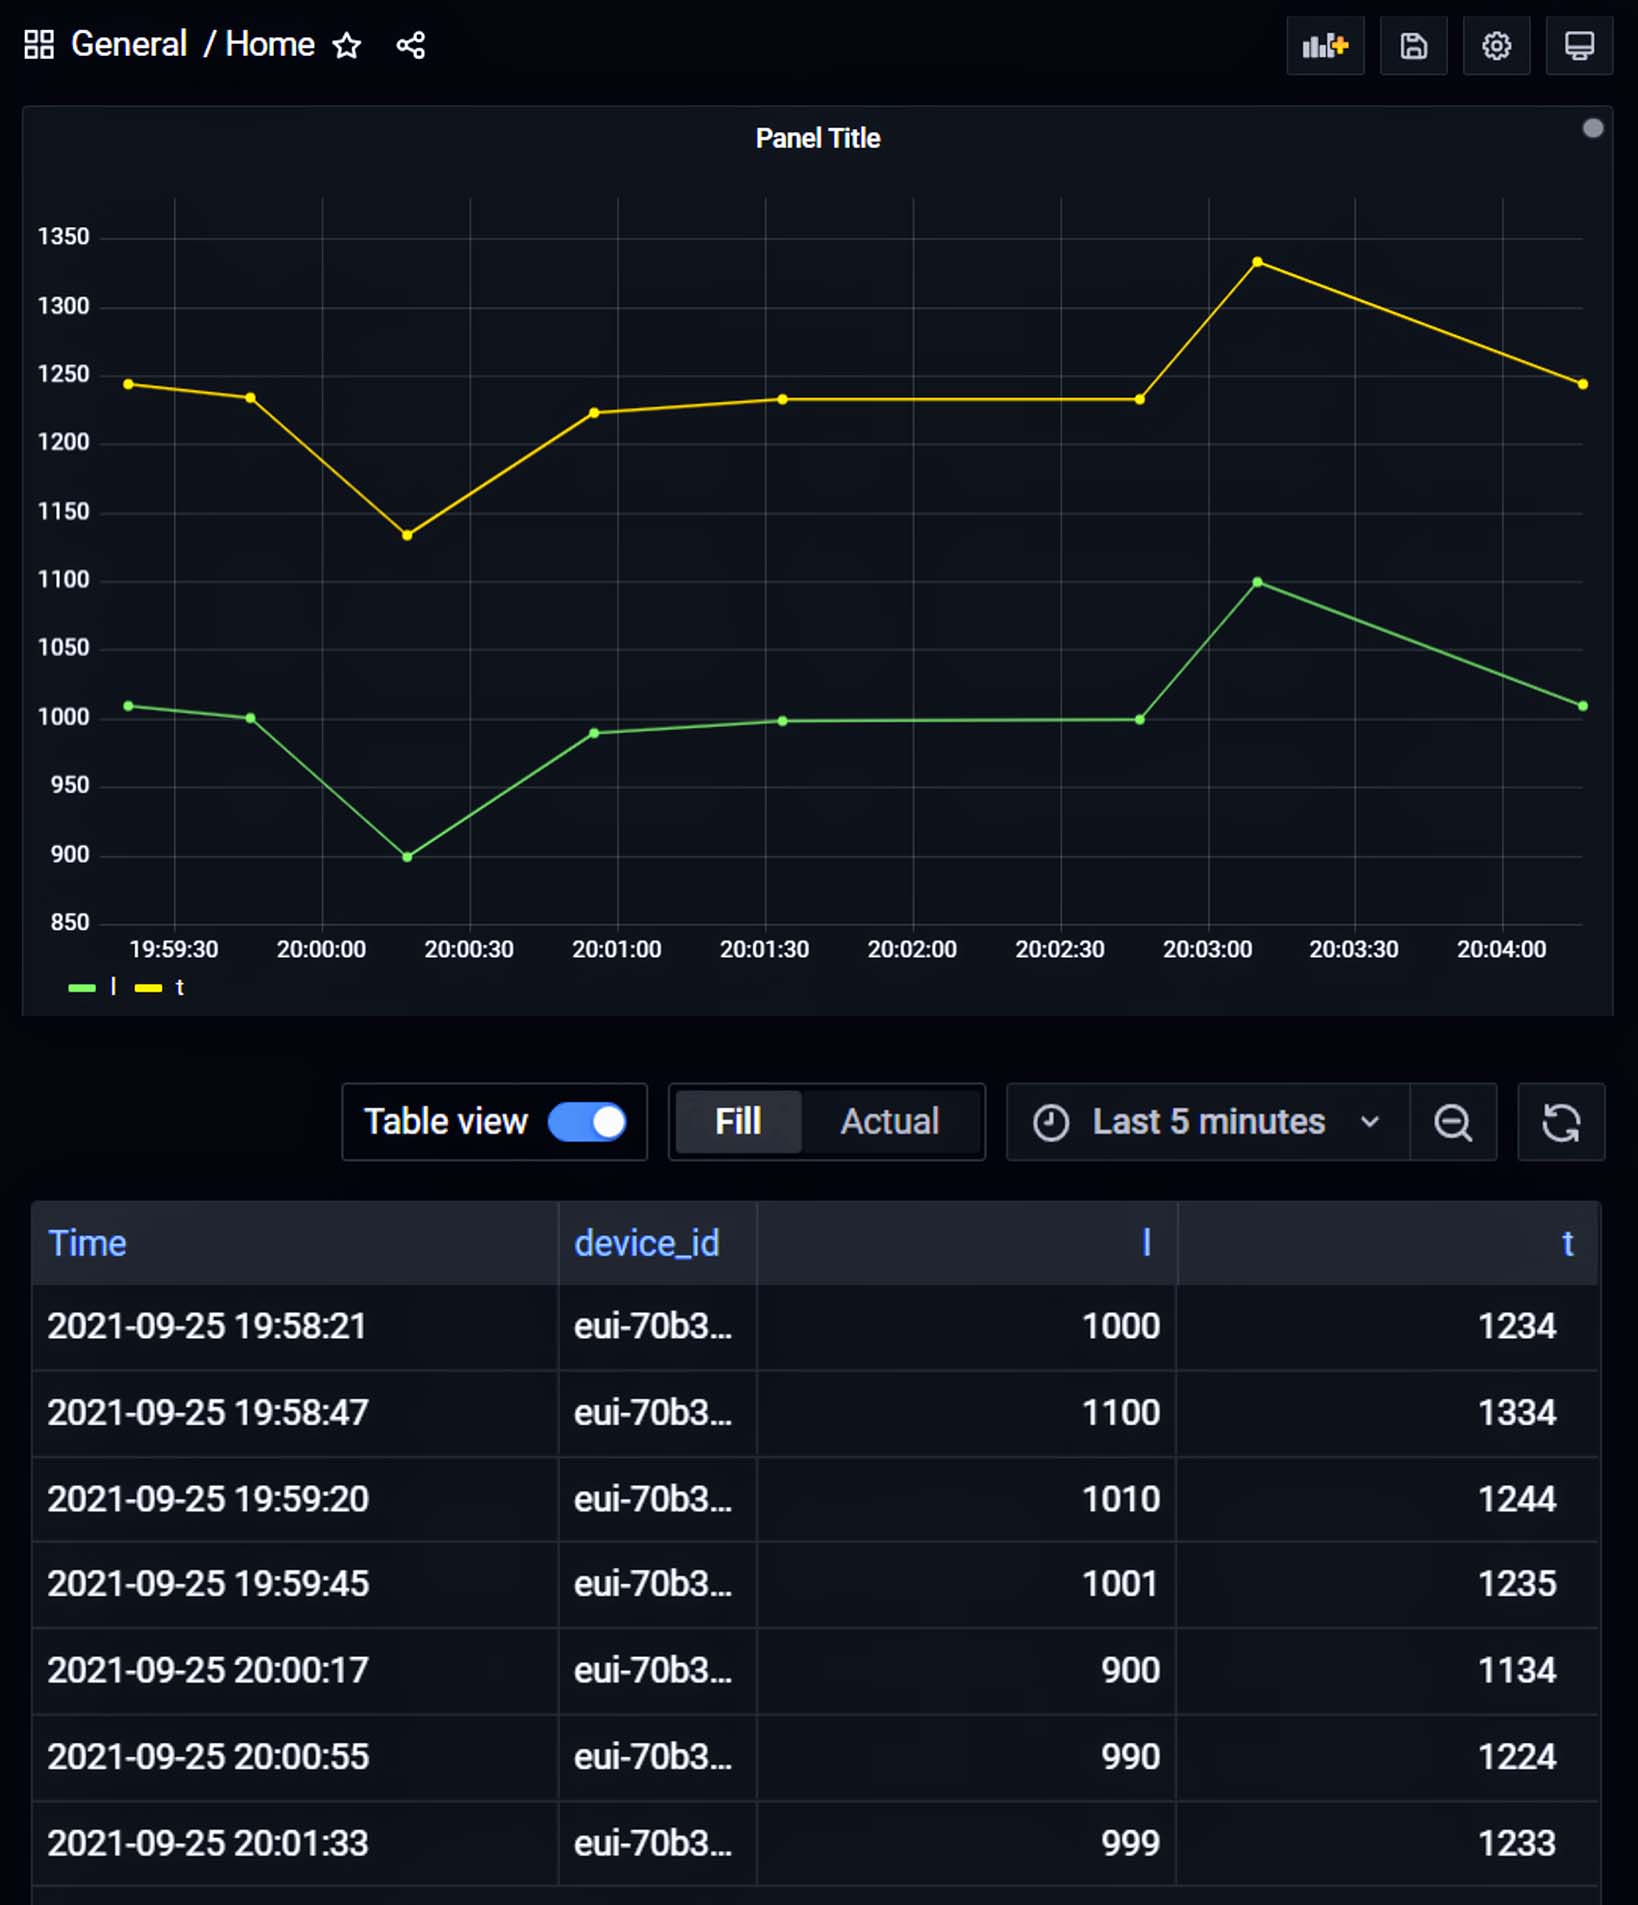
Check out this article for the details…
See also this demo of PineDio Stack with Roblox and The Things Network…
For decoding CBOR packets, can we call the TinyCBOR Library?
Sure, we can call the Decoder Functions in the TinyCBOR Library…
If we’re transmitting CBOR packets to a server (or cloud), we can decode them with a CBOR Library for Node.js, Go, Rust, …
We can decode CBOR Payloads in The Things Network with a CBOR Payload Formatter…
For Grafana we used a Go Library for CBOR…
There’s even a CBOR Library for Roblox and Lua Scripting…
TinyCBOR is available on various Embedded Operating Systems…
For the next article we shall take a quick detour and explore PineDio Stack transmitting Sensor Data to Roblox via The Things Network.
Then we shall head back and transmit BL602 / BL604’s Internal Temperature Sensor Data to The Things Network.
Many Thanks to my GitHub Sponsors for supporting my work! This article wouldn’t have been possible without your support.
Got a question, comment or suggestion? Create an Issue or submit a Pull Request here…
Here are the steps to build, flash and run the CBOR Firmware for BL602 and BL604…
(If we wish to add the TinyCBOR Library to an existing BL602 / BL604 project, check the next chapter)
Download the firmware…
## Download the master branch of lupyuen's bl_iot_sdk
git clone --recursive --branch master https://github.com/lupyuen/bl_iot_sdk
Build the Firmware Binary File pinedio_cbor.bin…
## TODO: Change this to the full path of bl_iot_sdk
export BL60X_SDK_PATH=$HOME/bl_iot_sdk
export CONFIG_CHIP_NAME=BL602

cd bl_iot_sdk/customer_app/pinedio_cbor
make

## For WSL: Copy the firmware to /mnt/c/blflash, which refers to c:\blflash in Windows
mkdir /mnt/c/blflash
cp build_out/pinedio_cbor.bin /mnt/c/blflash
More details on building bl_iot_sdk
Follow these steps to install blflash…
We assume that our Firmware Binary File pinedio_cbor.bin has been copied to the blflash folder.
Set BL602 / BL604 to Flashing Mode and restart the board…
For PineDio Stack BL604:
Set the GPIO 8 Jumper to High (Like this)
Disconnect the USB cable and reconnect
Or use the Improvised Reset Button (Here’s how)
For PineCone BL602:
Set the PineCone Jumper (IO 8) to the H Position (Like this)
Press the Reset Button
For BL10:
Connect BL10 to the USB port
Press and hold the D8 Button (GPIO 8)
Press and release the EN Button (Reset)
Release the D8 Button
For Ai-Thinker Ai-WB2, Pinenut and MagicHome BL602:
Disconnect the board from the USB Port
Connect GPIO 8 to 3.3V
Reconnect the board to the USB port
Enter these commands to flash pinedio_cbor.bin to BL602 / BL604 over UART…
## For Linux:
blflash flash build_out/pinedio_cbor.bin \
    --port /dev/ttyUSB0

## For macOS:
blflash flash build_out/pinedio_cbor.bin \
    --port /dev/tty.usbserial-1420 \
    --initial-baud-rate 230400 \
    --baud-rate 230400

## For Windows: Change COM5 to the BL602 / BL604 Serial Port
blflash flash c:\blflash\pinedio_cbor.bin --port COM5
(For WSL: Do this under plain old Windows CMD, not WSL, because blflash needs to access the COM port)
More details on flashing firmware
Set BL602 / BL604 to Normal Mode (Non-Flashing) and restart the board…
For PineDio Stack BL604:
Set the GPIO 8 Jumper to Low (Like this)
Disconnect the USB cable and reconnect
Or use the Improvised Reset Button (Here’s how)
For PineCone BL602:
Set the PineCone Jumper (IO 8) to the L Position (Like this)
Press the Reset Button
For BL10:
For Ai-Thinker Ai-WB2, Pinenut and MagicHome BL602:
Disconnect the board from the USB Port
Connect GPIO 8 to GND
Reconnect the board to the USB port
After restarting, connect to BL602 / BL604’s UART Port at 2 Mbps like so…
For Linux:
screen /dev/ttyUSB0 2000000For macOS: Use CoolTerm (See this)
For Windows: Use putty (See this)
Alternatively: Use the Web Serial Terminal (See this)
More details on connecting to BL602 / BL604
Here are the steps for adding the TinyCBOR Library to an existing BL602 or BL604 project…
We assume there’s an existing bl_iot_sdk folder.
Add tinycbor-bl602 as a submodule under bl_iot_sdk/components/3rdparty…
cd bl_iot_sdk/components/3rdparty
git submodule add https://github.com/lupyuen/tinycbor-bl602
Edit the Makefile for our project…
## Insert this line into the COMPONENTS block
COMPONENTS_TINYCBOR := tinycbor-bl602
...

## Insert this line into INCLUDE_COMPONENTS block
INCLUDE_COMPONENTS += $(COMPONENTS_TINYCBOR)
...

## This should appear after INCLUDE_COMPONENTS block
include $(BL60X_SDK_PATH)/make_scripts_riscv/project.mkInclude “cbor.h” in our source file…
##include "cbor.h" // For Tiny CBOR LibraryAnd start coding with TinyCBOR!
Here are the steps to build, flash and run the LoRaWAN Firmware for PineDio Stack BL604…
Download the LoRaWAN firmware and driver source code…
## Download the master branch of lupyuen's bl_iot_sdk
git clone --recursive --branch master https://github.com/lupyuen/bl_iot_sdk
In the customer_app/pinedio_lorawan folder, edit Makefile and find this setting…
CFLAGS += -DCONFIG_LORA_NODE_REGION=1Change “1” to your LoRa Region…
| Value | Region |
|---|---|
| 0 | No region |
| 1 | AS band on 923MHz |
| 2 | Australian band on 915MHz |
| 3 | Chinese band on 470MHz |
| 4 | Chinese band on 779MHz |
| 5 | European band on 433MHz |
| 6 | European band on 868MHz |
| 7 | South Korean band on 920MHz |
| 8 | India band on 865MHz |
| 9 | North American band on 915MHz |
| 10 | North American band on 915MHz with a maximum of 16 channels |
The GPIO Pin Numbers for LoRa SX1262 are defined in…
components/3rdparty/lora-sx1262/include/sx126x-board.hThey have been configured for PineDio Stack. (So no changes needed)
Build the Firmware Binary File pinedio_lorawan.bin…
## TODO: Change this to the full path of bl_iot_sdk
export BL60X_SDK_PATH=$HOME/bl_iot_sdk
export CONFIG_CHIP_NAME=BL602

cd bl_iot_sdk/customer_app/pinedio_lorawan
make

## For WSL: Copy the firmware to /mnt/c/blflash, which refers to c:\blflash in Windows
mkdir /mnt/c/blflash
cp build_out/pinedio_lorawan.bin /mnt/c/blflash
More details on building bl_iot_sdk
Follow these steps to install blflash…
We assume that our Firmware Binary File pinedio_lorawan.bin has been copied to the blflash folder.
Set BL602 / BL604 to Flashing Mode and restart the board…
For PineDio Stack BL604:
Set the GPIO 8 Jumper to High (Like this)
Disconnect the USB cable and reconnect
Or use the Improvised Reset Button (Here’s how)
For PineCone BL602:
Set the PineCone Jumper (IO 8) to the H Position (Like this)
Press the Reset Button
For BL10:
Connect BL10 to the USB port
Press and hold the D8 Button (GPIO 8)
Press and release the EN Button (Reset)
Release the D8 Button
For Ai-Thinker Ai-WB2, Pinenut and MagicHome BL602:
Disconnect the board from the USB Port
Connect GPIO 8 to 3.3V
Reconnect the board to the USB port
Enter these commands to flash pinedio_lorawan.bin to BL602 / BL604 over UART…
## For Linux:
blflash flash build_out/pinedio_lorawan.bin \
    --port /dev/ttyUSB0

## For macOS:
blflash flash build_out/pinedio_lorawan.bin \
    --port /dev/tty.usbserial-1420 \
    --initial-baud-rate 230400 \
    --baud-rate 230400

## For Windows: Change COM5 to the BL602 / BL604 Serial Port
blflash flash c:\blflash\pinedio_lorawan.bin --port COM5
(For WSL: Do this under plain old Windows CMD, not WSL, because blflash needs to access the COM port)
More details on flashing firmware
Set BL602 / BL604 to Normal Mode (Non-Flashing) and restart the board…
For PineDio Stack BL604:
Set the GPIO 8 Jumper to Low (Like this)
Disconnect the USB cable and reconnect
Or use the Improvised Reset Button (Here’s how)
For PineCone BL602:
Set the PineCone Jumper (IO 8) to the L Position (Like this)
Press the Reset Button
For BL10:
For Ai-Thinker Ai-WB2, Pinenut and MagicHome BL602:
Disconnect the board from the USB Port
Connect GPIO 8 to GND
Reconnect the board to the USB port
After restarting, connect to BL602 / BL604’s UART Port at 2 Mbps like so…
For Linux:
screen /dev/ttyUSB0 2000000For macOS: Use CoolTerm (See this)
For Windows: Use putty (See this)
Alternatively: Use the Web Serial Terminal (See this)
More details on connecting to BL602 / BL604
Let’s enter the LoRaWAN Commands to join The Things Network and transmit a Data Packet!
Log on to The Things Network. Browse to our Device and copy these values…
JoinEUI (Join Extended Unique Identifier)
DevEUI (Device Extended Unique Identifier)
AppKey (Application Key)
In the BL602 / BL604 terminal, press Enter to reveal the command prompt.
First we start the Background Task that will handle LoRa packets…
Enter this command…
create_taskNext we initialise the LoRa SX1262 and LoRaWAN Drivers…
init_lorawanSet the DevEUI…
las_wr_dev_eui 0xAB:0xBA:0xDA:0xBA:0xAB:0xBA:0xDA:0xBAChange “0xAB:0xBA:...” to your DevEUI
(Remember to change the “,” delimiter to “:”)
Set the JoinEUI…
las_wr_app_eui 0x00:0x00:0x00:0x00:0x00:0x00:0x00:0x00Change “0x00:0x00:...” to your JoinEUI
(Yep change the “,” delimiter to “:”)
Set the AppKey…
las_wr_app_key 0xAB:0xBA:0xDA:0xBA:0xAB:0xBA:0xDA:0xBA0xAB:0xBA:0xDA:0xBA:0xAB:0xBA:0xDA:0xBAChange “0xAB:0xBA:...” to your AppKey
(Again change “,” to “:”)
We send a request to join The Things Network…
las_join 1“1” means try only once.
We open an Application Port that will connect to The Things Network…
las_app_port open 2“2” is the Application Port Number
Finally we send a data packet to The Things Network over LoRaWAN…
las_app_tx_cbor 2 0 1234 2345This means…
Transmit a LoRaWAN Packet to Port 2
That contains the values t=1234 (Temperature), l=2345 (Light Level)
0 means that this is an Unconfirmed Message
(Because we’re not expecting an acknowledgement)
Our Sensor Data has been transmitted via LoRaWAN to The Things Network!
Check out this demo of PineDio Stack with Roblox and The Things Network…
Below are the fixes we made while porting the TinyCBOR library to BL602 / BL604…