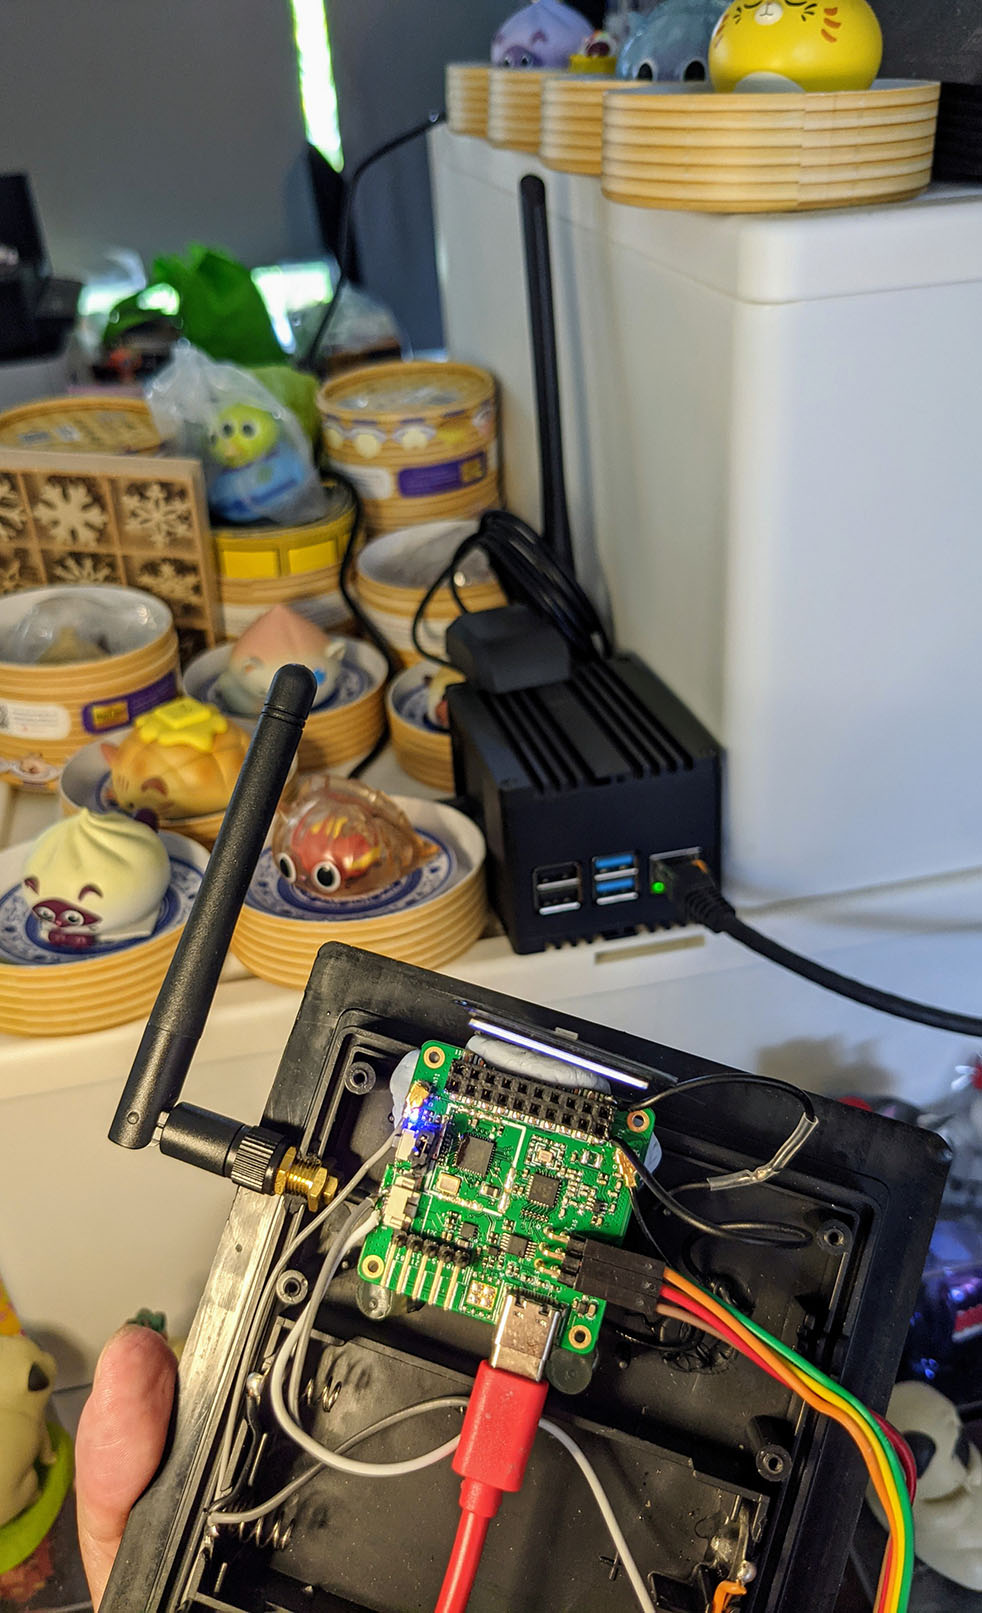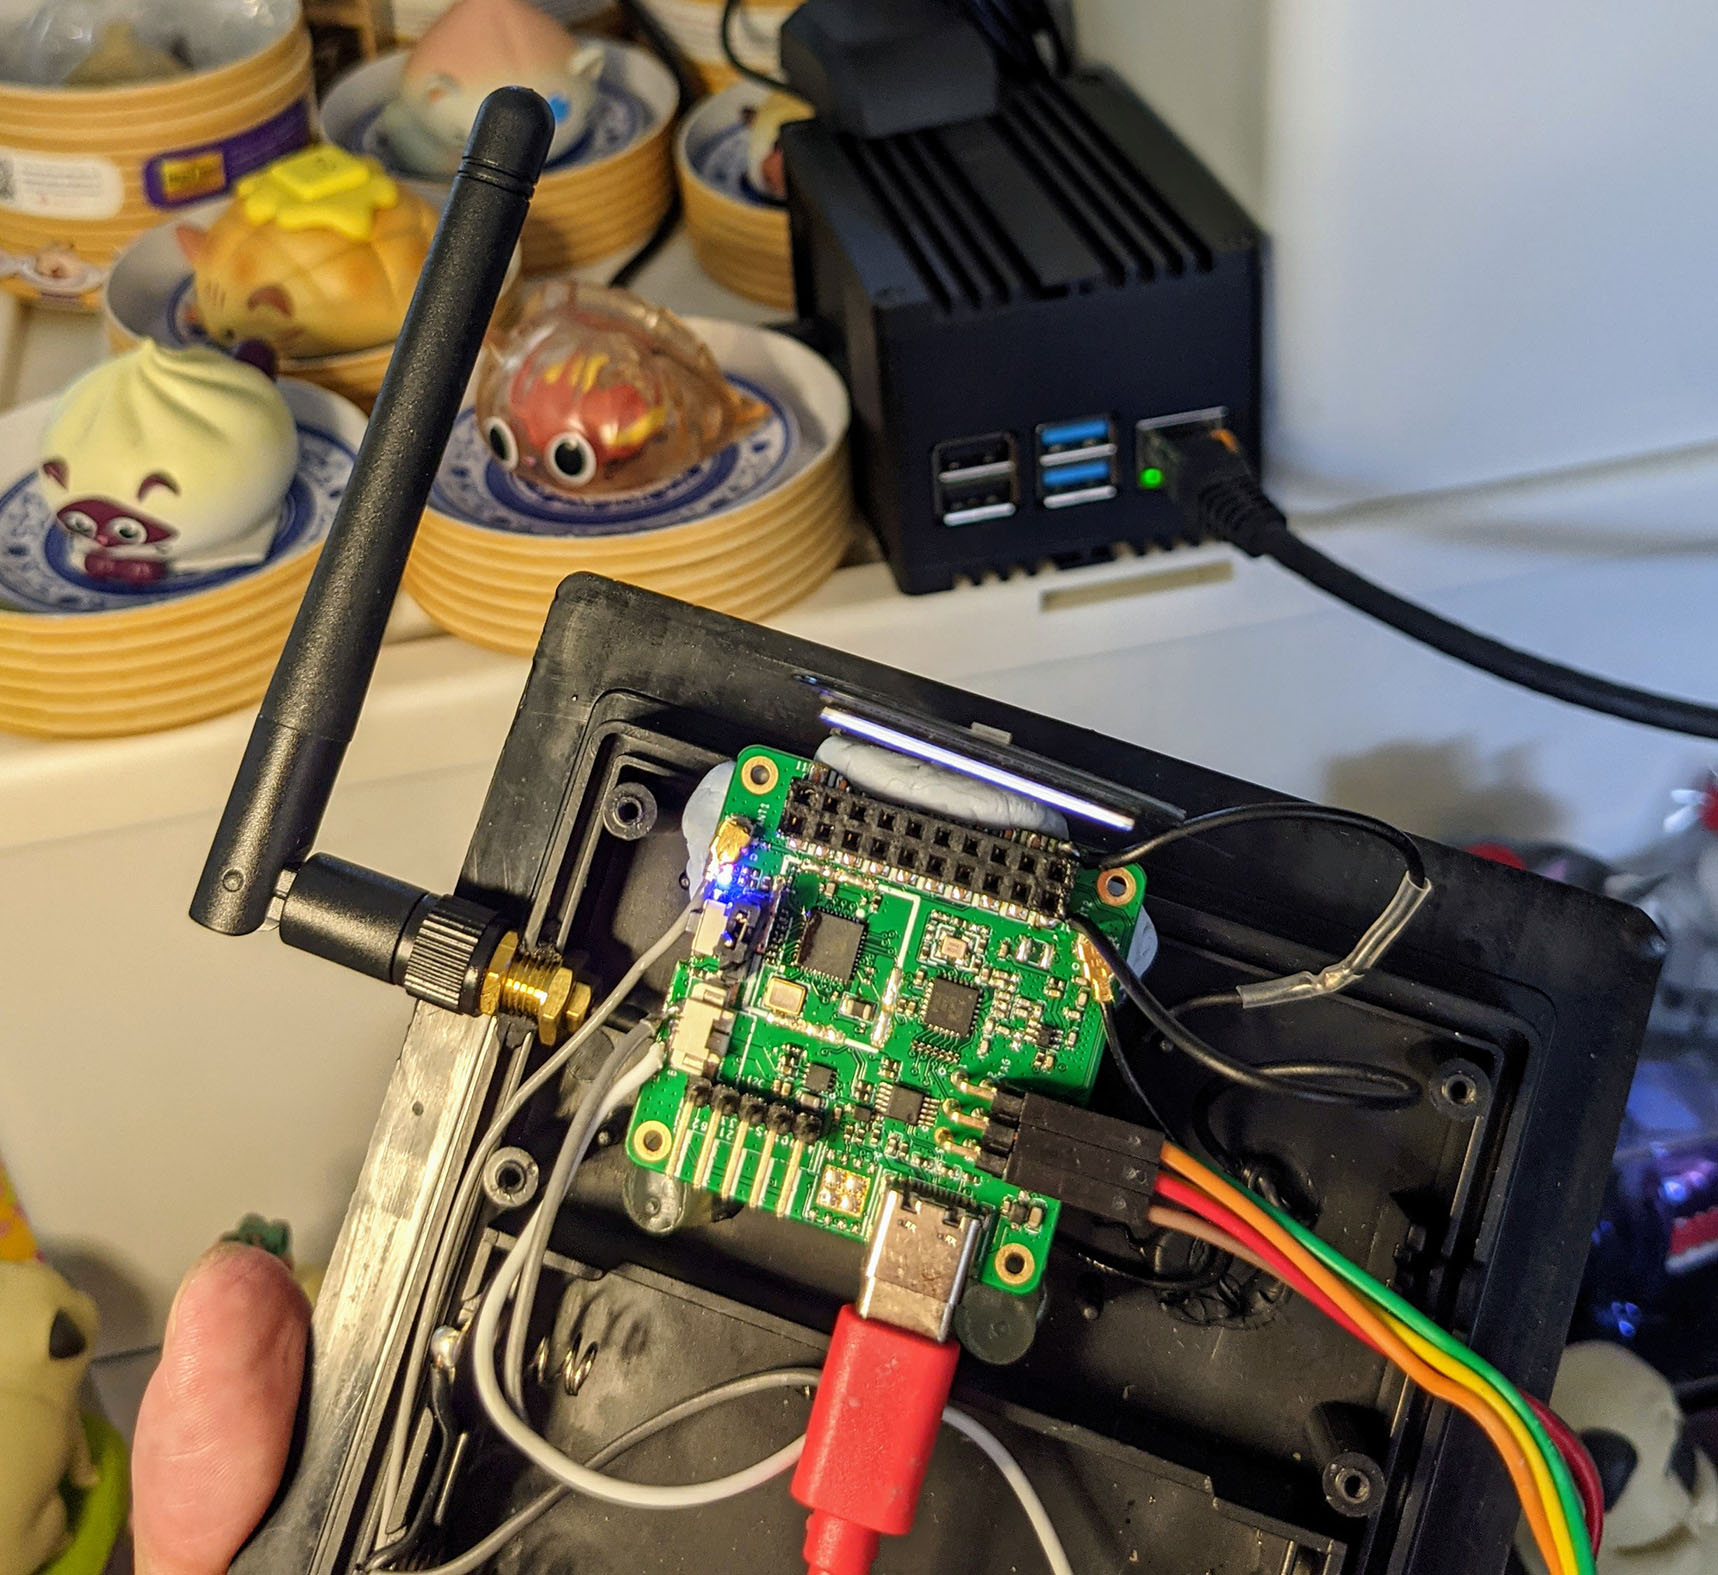
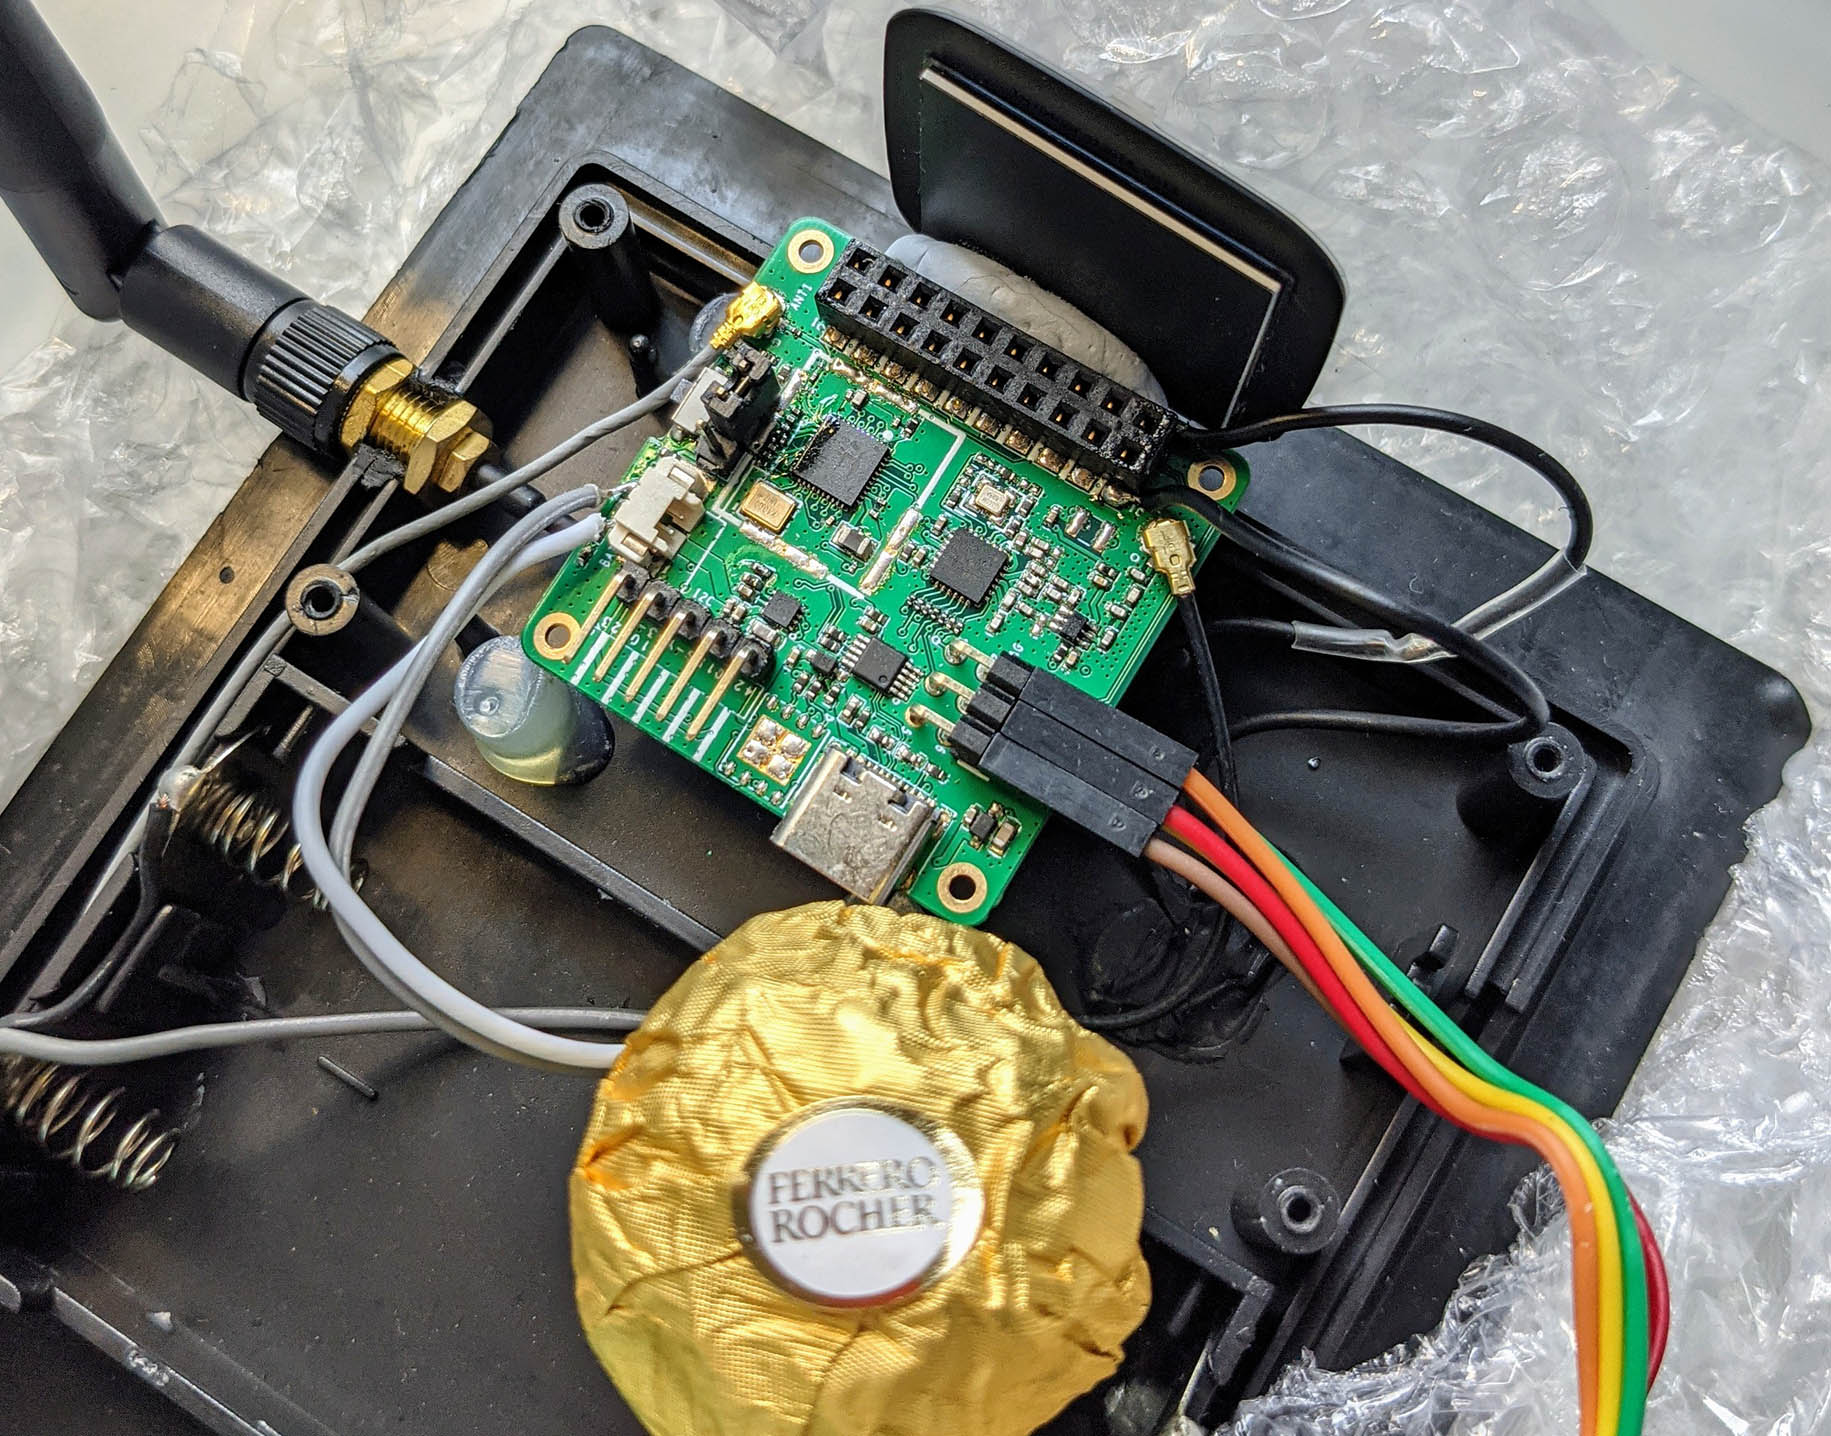
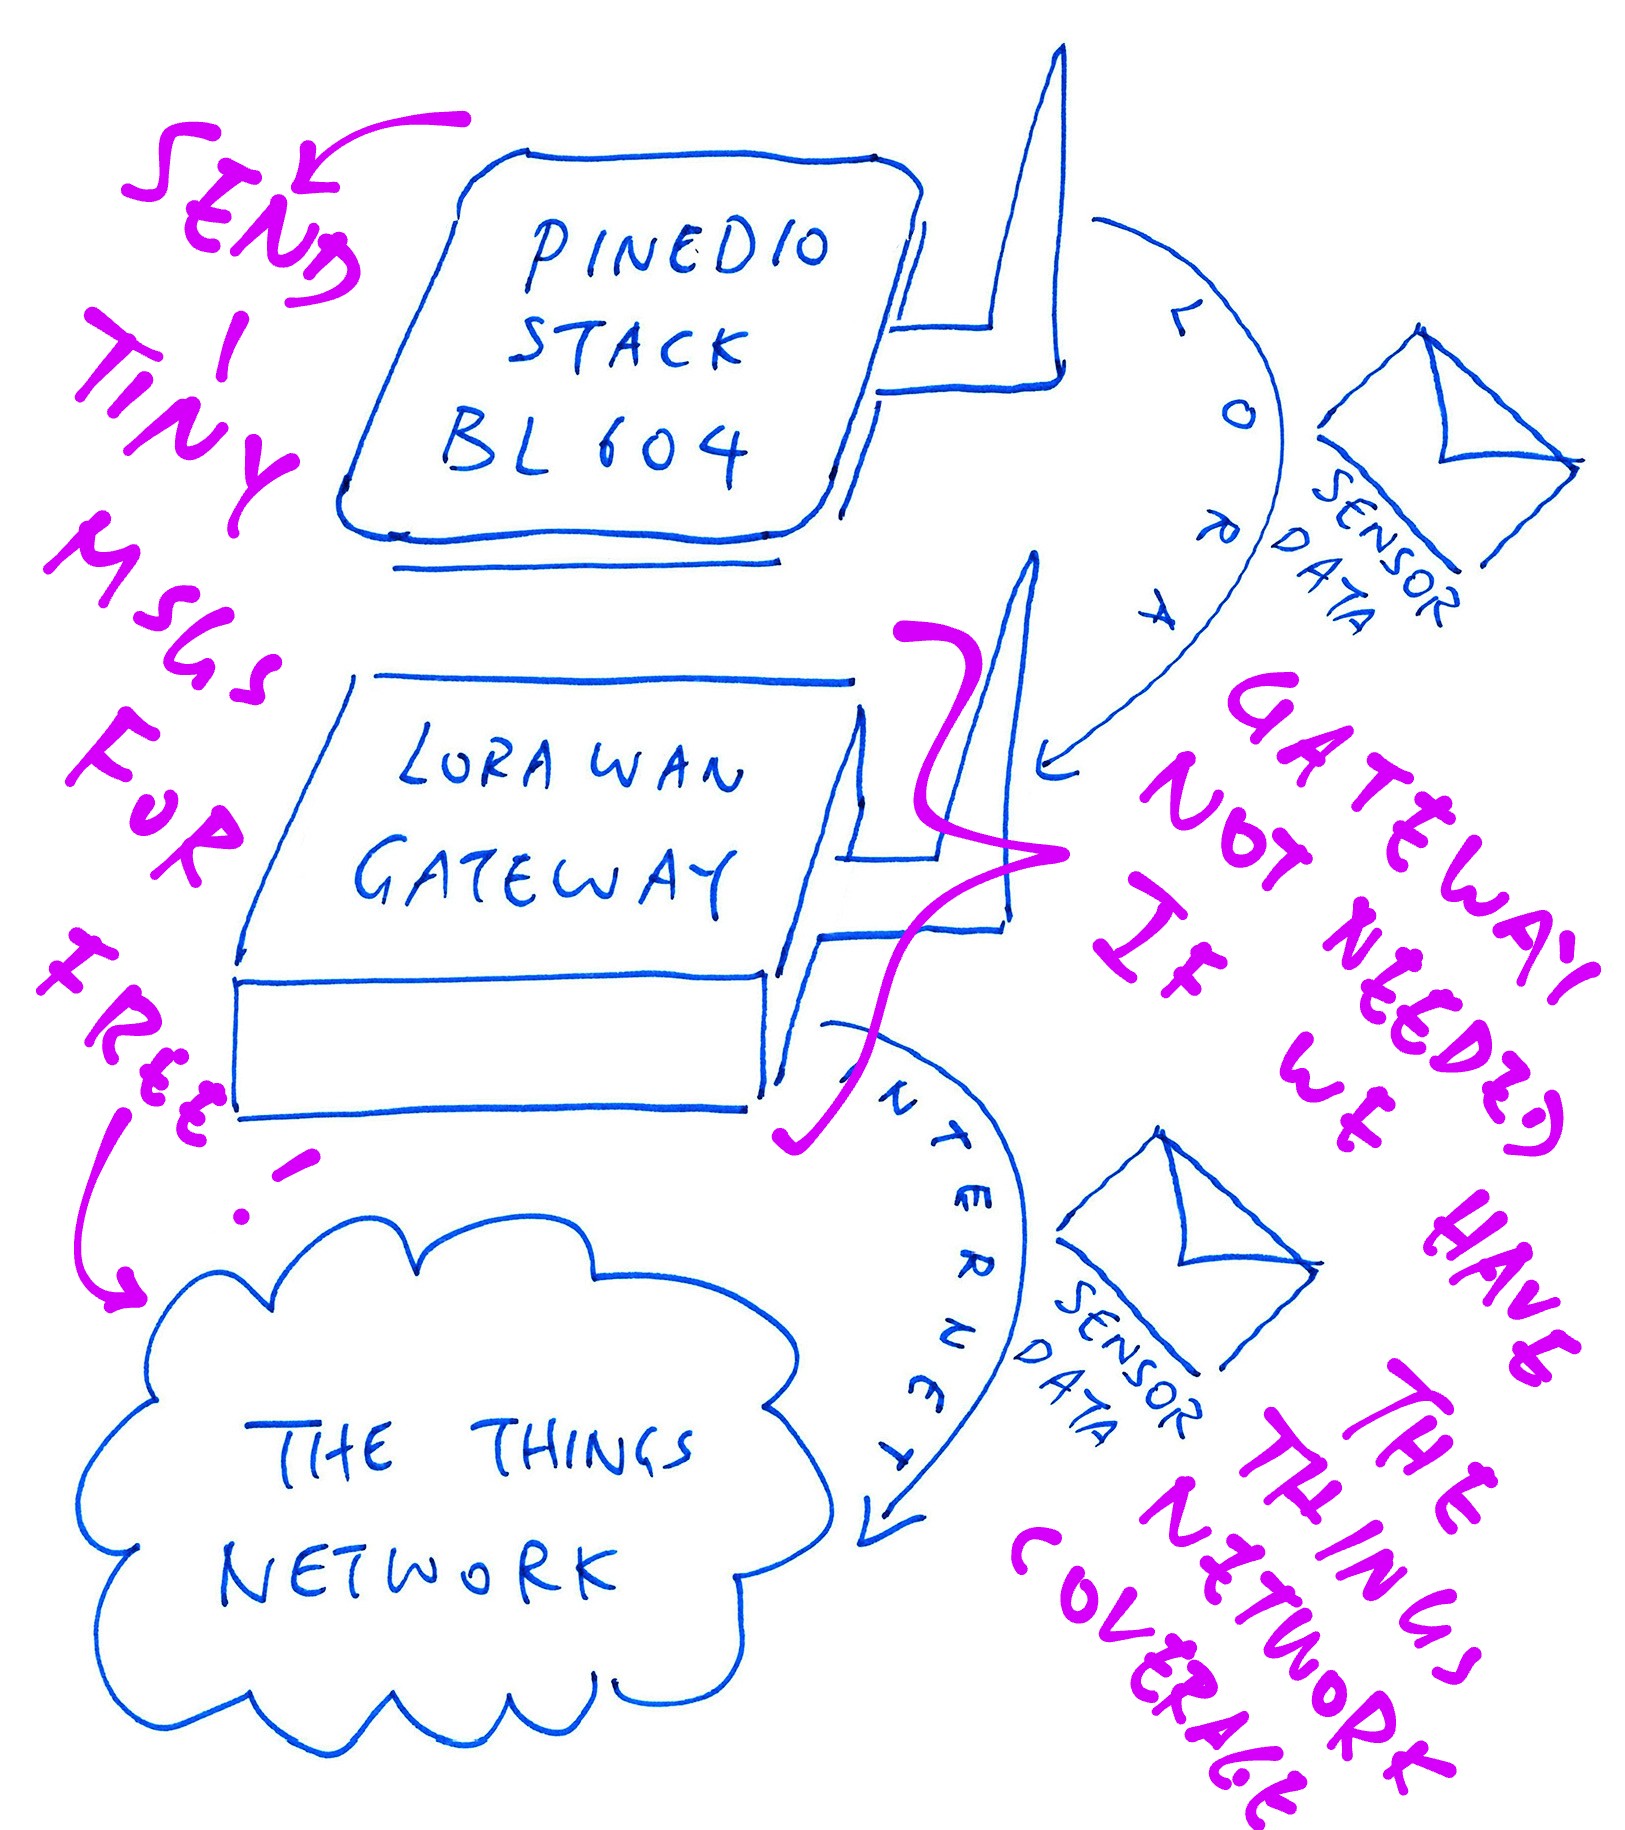
PineDio Stack BL604 RISC-V Board (foreground) talking to The Things Network via RAKWireless RAK7248 LoRaWAN Gateway (background)
📝 21 Sep 2021
What is The Things Network?
The Things Network is a crowd-sourced wireless network. And it works worldwide!
Our IoT Devices may connect to The Things Network and transmit Sensor Data to the Cloud.
How much does it cost?
Nothing! The public community network is Free for Fair Use.
(The network has been free since its launch in 2015)
Totally free! What’s the catch?
Here’s what we need…
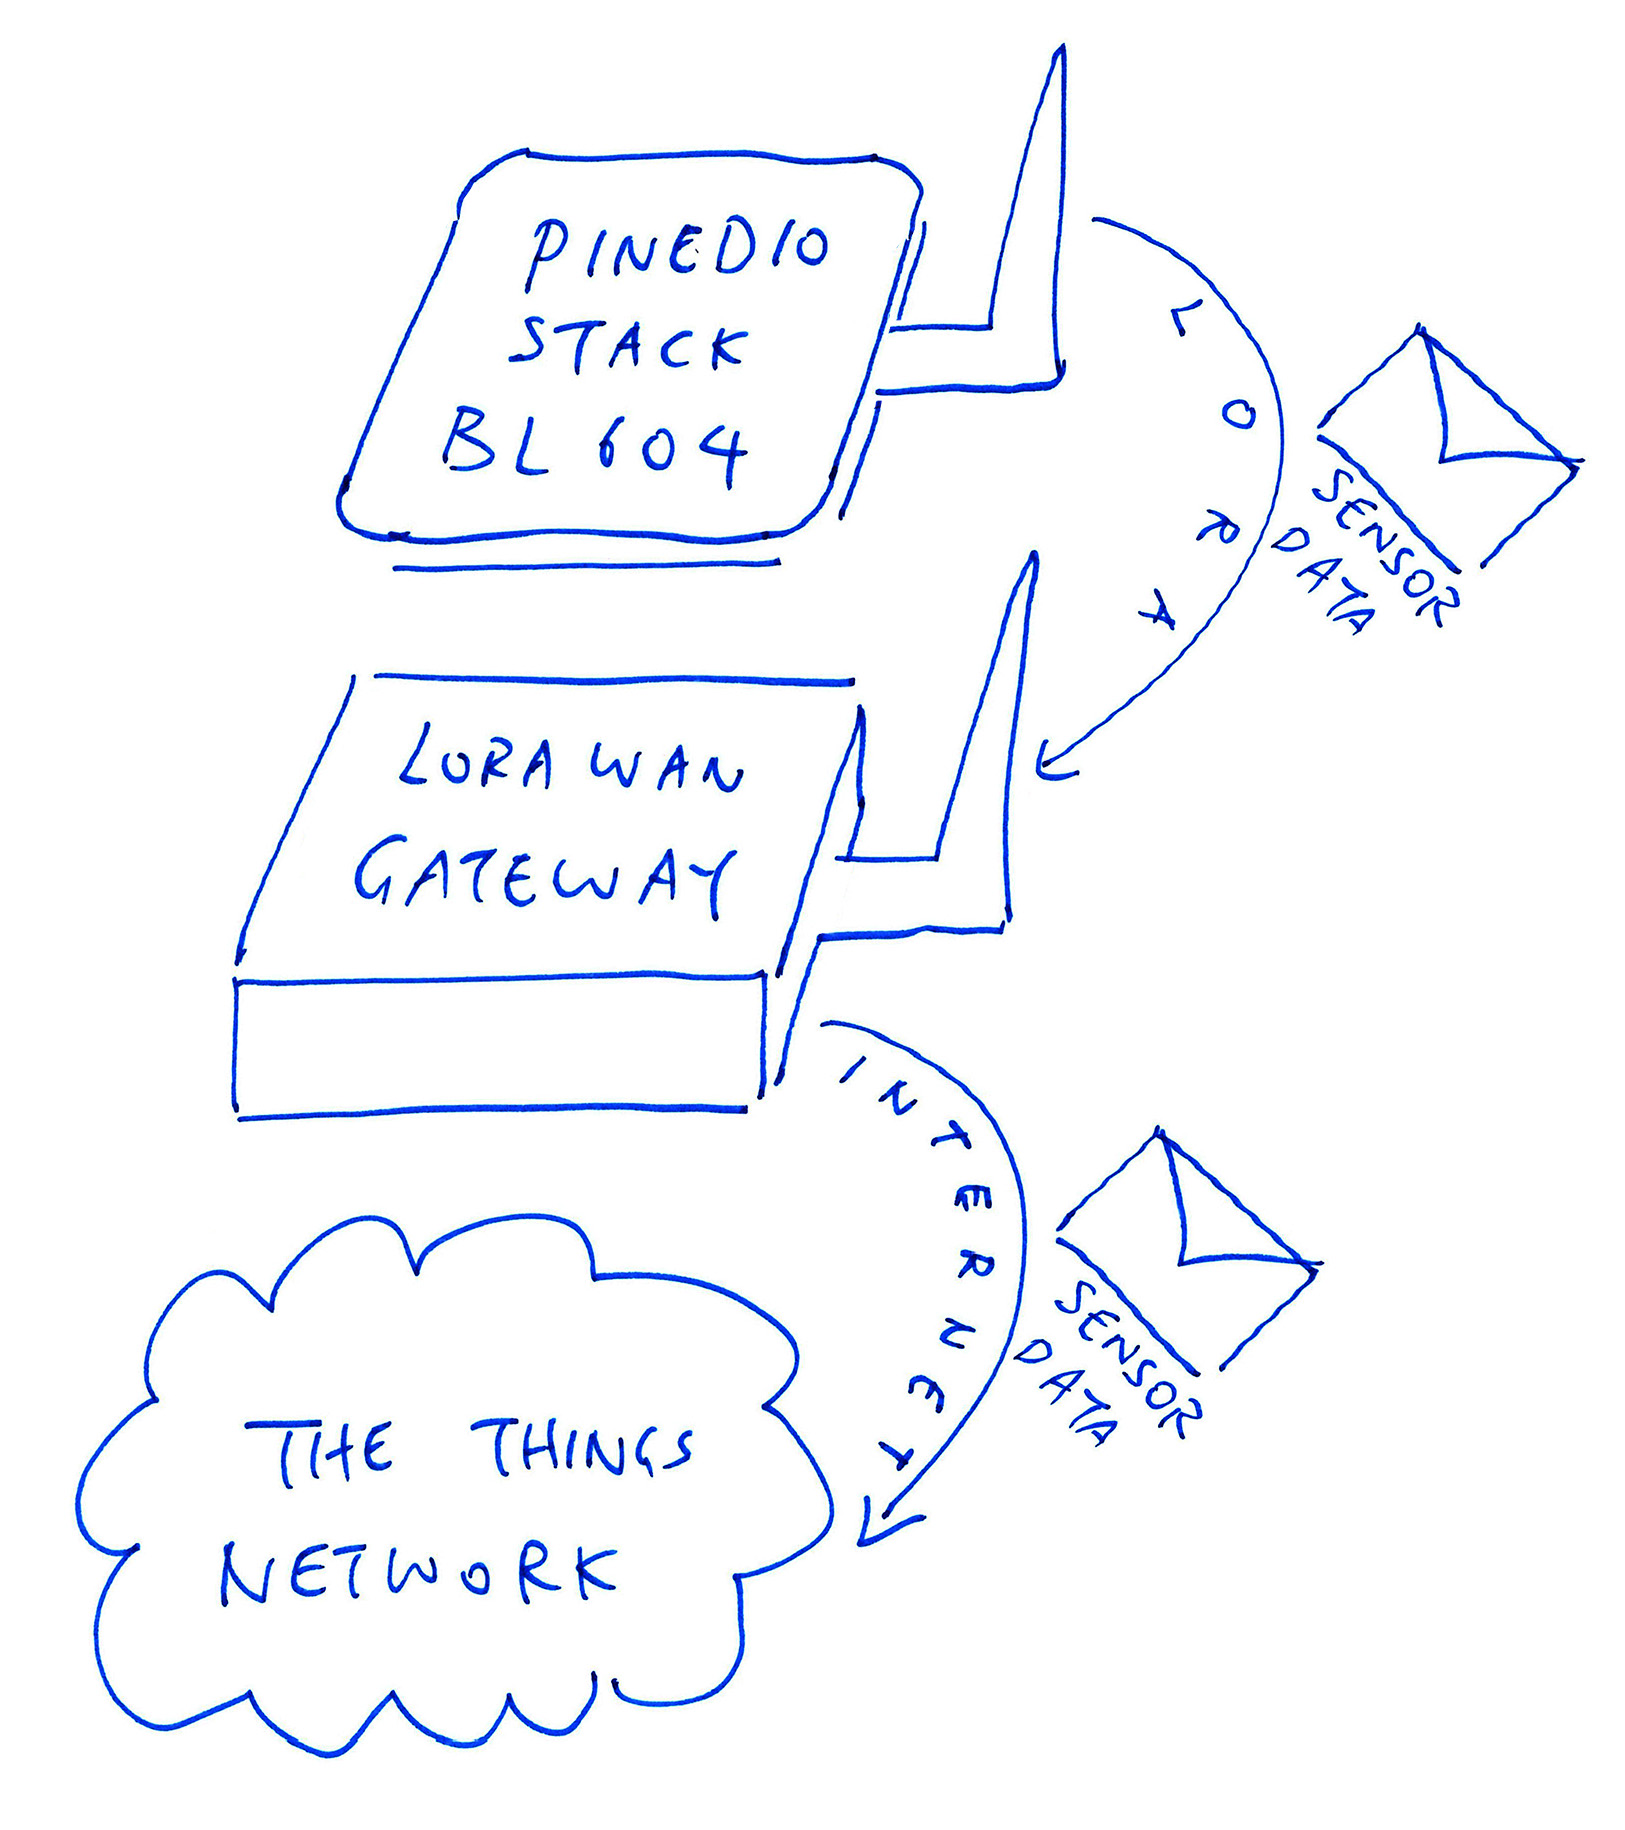
LoRa Wireless Module: We’ll use the Semtech SX1232 LoRa Transceiver (Transmitter + Receiver) that’s bundled with our PineDio Stack Board.
(More about this in a while)
Network Coverage: Check whether our area is covered by the network…
Fair Use: Because it’s a free network for Sensor Data, we can’t spam it with messages.
Each device may transmit roughly 10 tiny messages per hour.
(Assuming 12 bytes per message)
This varies by region, message size and data rate.
(More about this in a while)
Darn no coverage here. What now?
Everyone is welcome to join The Things Network and grow the network!
In a while I’ll explain how I added my LoRaWAN Gateway to The Things Network.
(I bought my RAKwireless RAK7248 Gateway for $280)
What is PineDio Stack?
PineDio Stack is a 32-bit RISC-V Microcontroller board…
Which has an onboard LoRa SX1262 Transceiver…
Today we’ll walk through the steps for connecting PineDio Stack to The Things Network…
(Skip this chapter if you have The Things Network coverage… You’re so lucky! 👍)
Sadly there’s no The Things Network coverage in my area. Lemme explain how I added my LoRaWAN Gateway (RAKWireless RAK7248) to The Things Network.
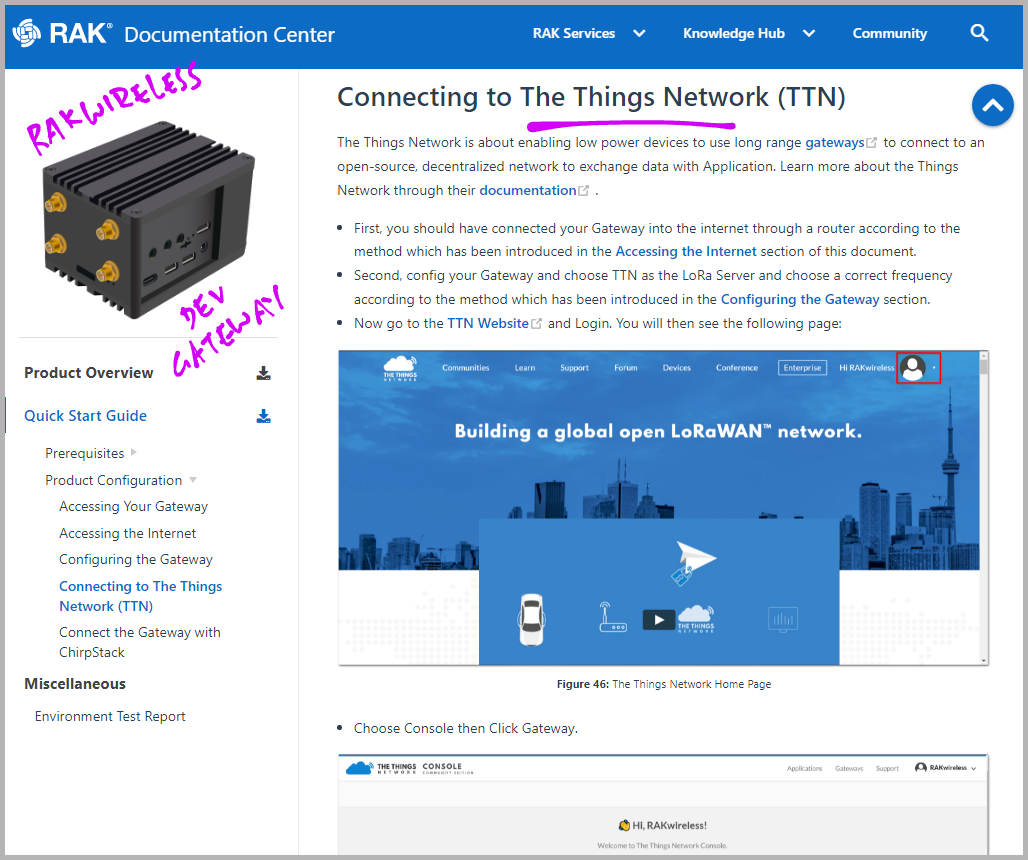
This is the official doc for adding RAKWireless RAK7248 (and similar gateways) to The Things Network…
Run “sudo gateway-config” as described to configure the gateway for The Things Network. (Instead of ChirpStack)
We create a free account on The Things Network…
Log in and select the nearest region. (Either US, Europe or Australia)
Click Gateways and Add Gateway…
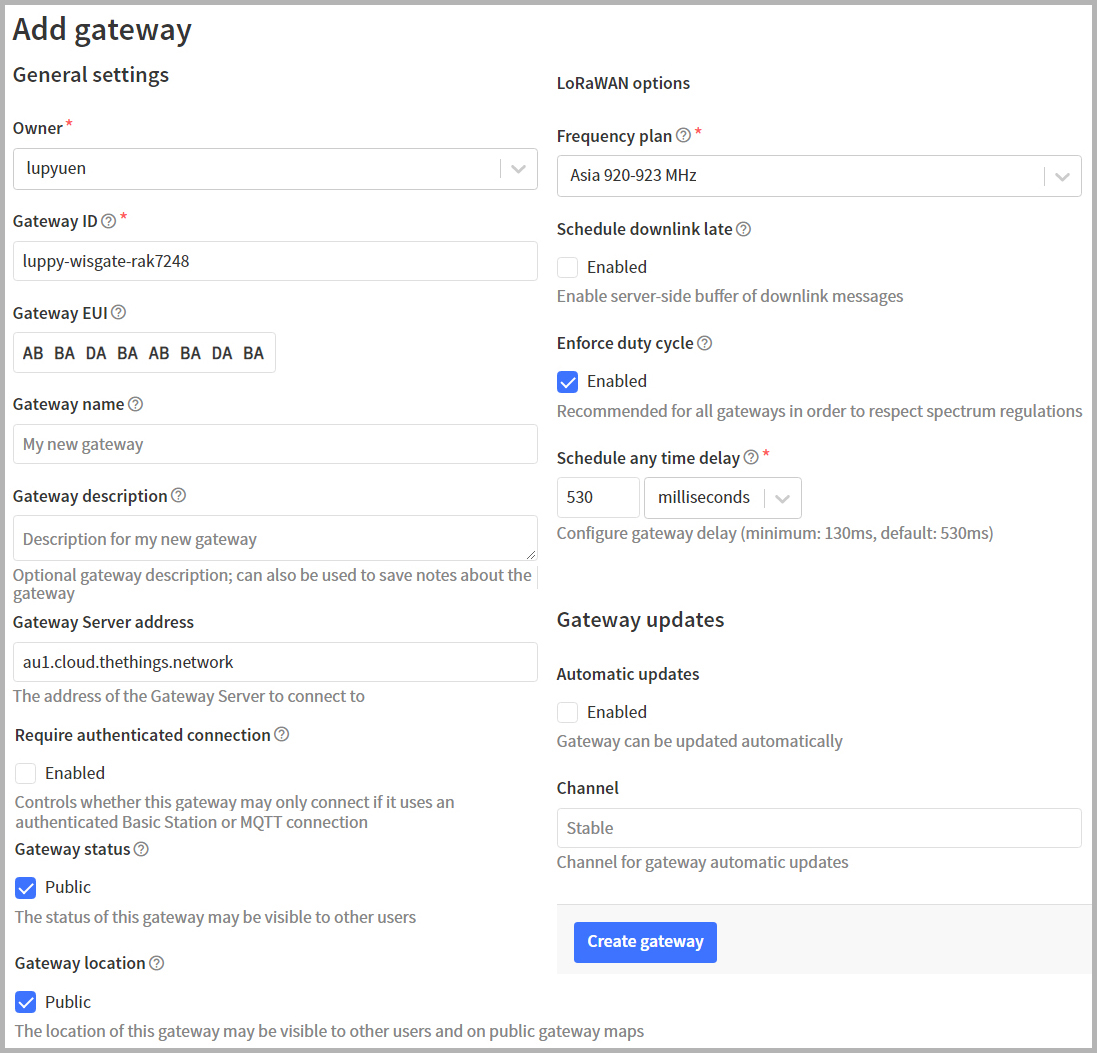
Gateway ID needs to be globally unique.
(Choose wisely!)
Gateway EUI (Extended Unique Identifier) comes from our LoRaWAN Gateway.
On our RAKwireless Gateway, run this command to get the EUI…
gateway-versionFrequency Plan: See this…
Fill in the fields and click “Create Gateway”
Take Note: This is missing from the RAKwireless docs…
The Things Network has been upgraded recently and there’s no longer the option for “Legacy Packet Forwarder”.
Instead we set the Server Address like so…
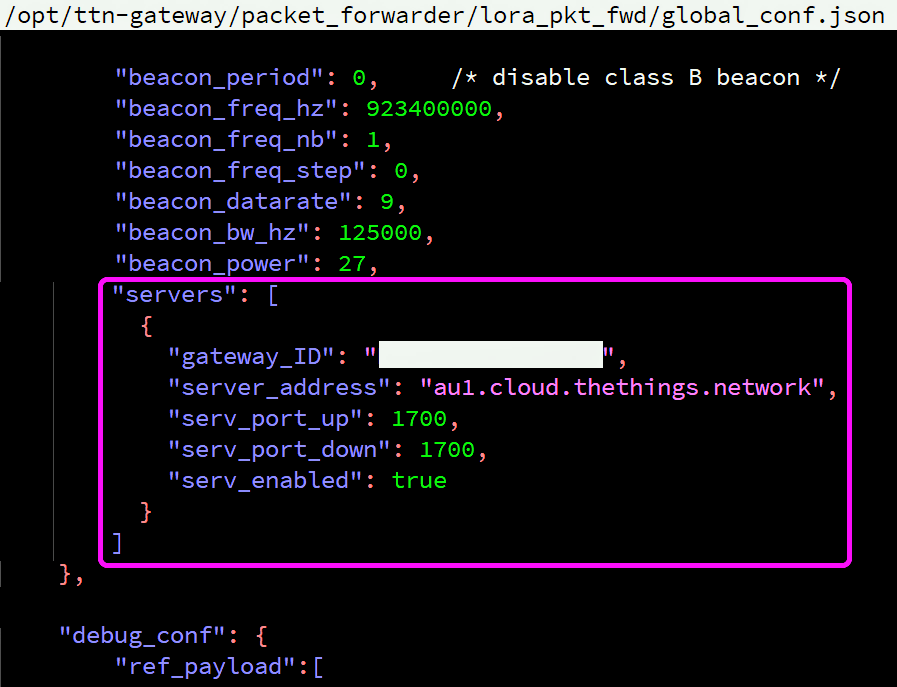
Browse to the Gateway that we have added
Click “Download global_conf.json”
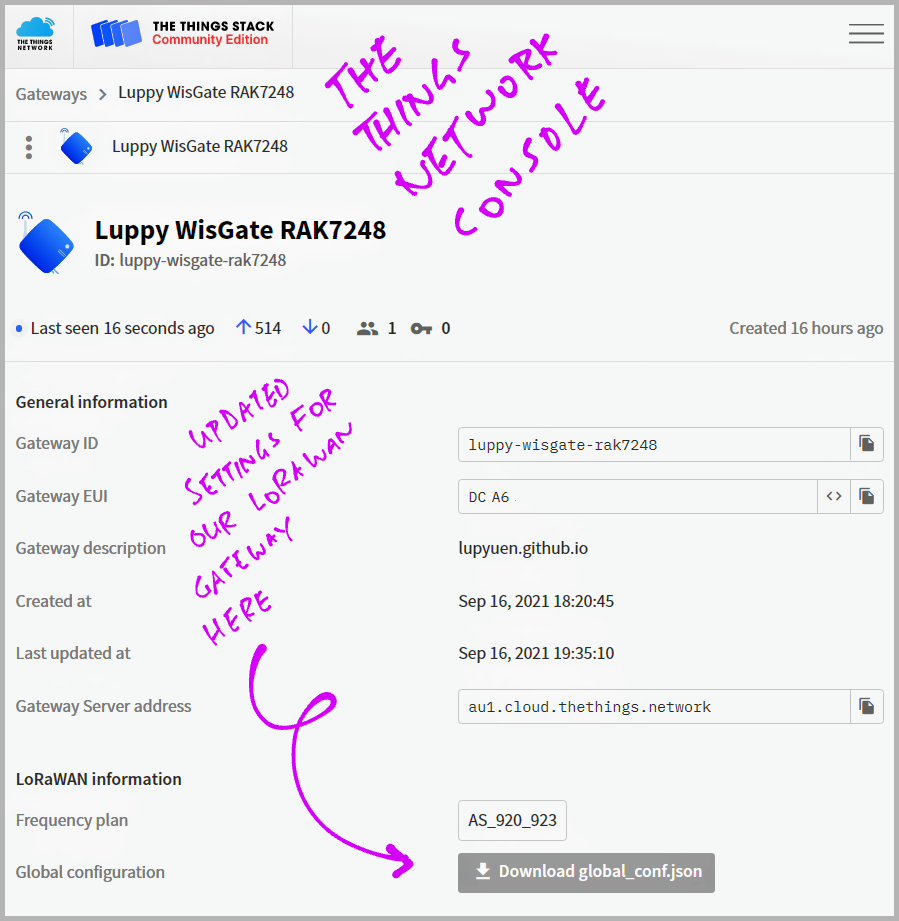
Open the Downloaded global_conf.json with a text editor.
It should look like this…
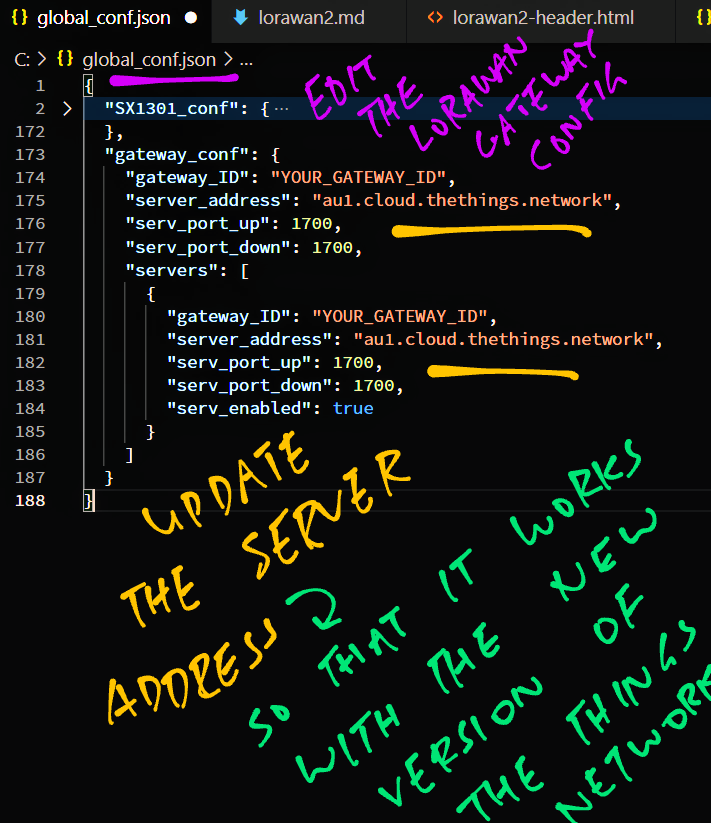
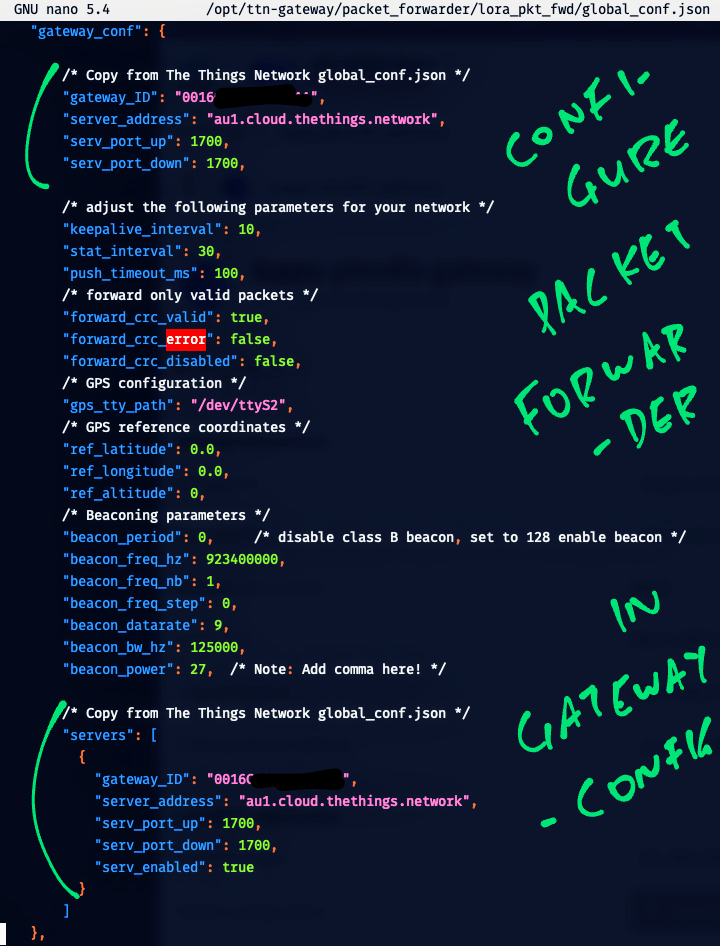
On our RAKwireless Gateway, run this…
sudo gateway-configSelect “Edit Packet Forwarder Config”
Look for the gateway_conf section…
Replace these values from the Downloaded global_conf.json…
"gateway_conf": {
  "gateway_ID":     ...,
  "server_address": ...,
  "serv_port_up":   ...,
  "serv_port_down": ...,
Scroll down and look for the end of the gateway_conf section (just after beacon_power)…
Insert the entire servers section from the Downloaded global_conf.json…
"servers": [ {
  "gateway_ID":     ...,
  "server_address": ...,
  "serv_port_up":   ...,
  "serv_port_down": ...,
} ]
(Check the trailing commas, especially after beacon_power!)
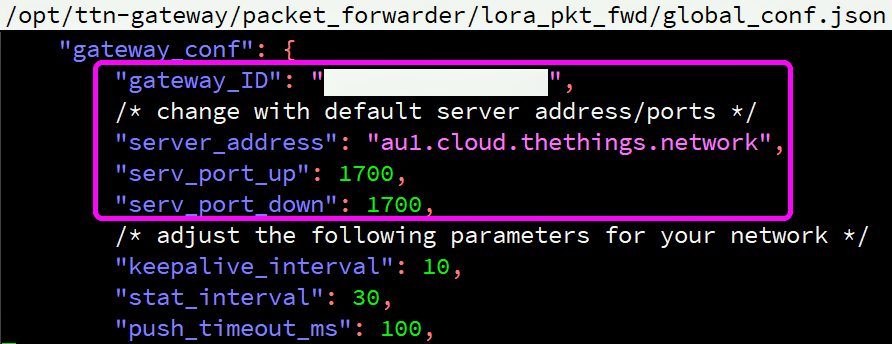
Our updated file should look like this…
Save the file.
Select “Restart Packet Forwarder”
How will we know if our Gateway is connected?
In The Things Network, browse to our Gateway and click “Live Data” (in the left bar)
We should see the Heartbeat Messages (Gateway Status) received from our Gateway…
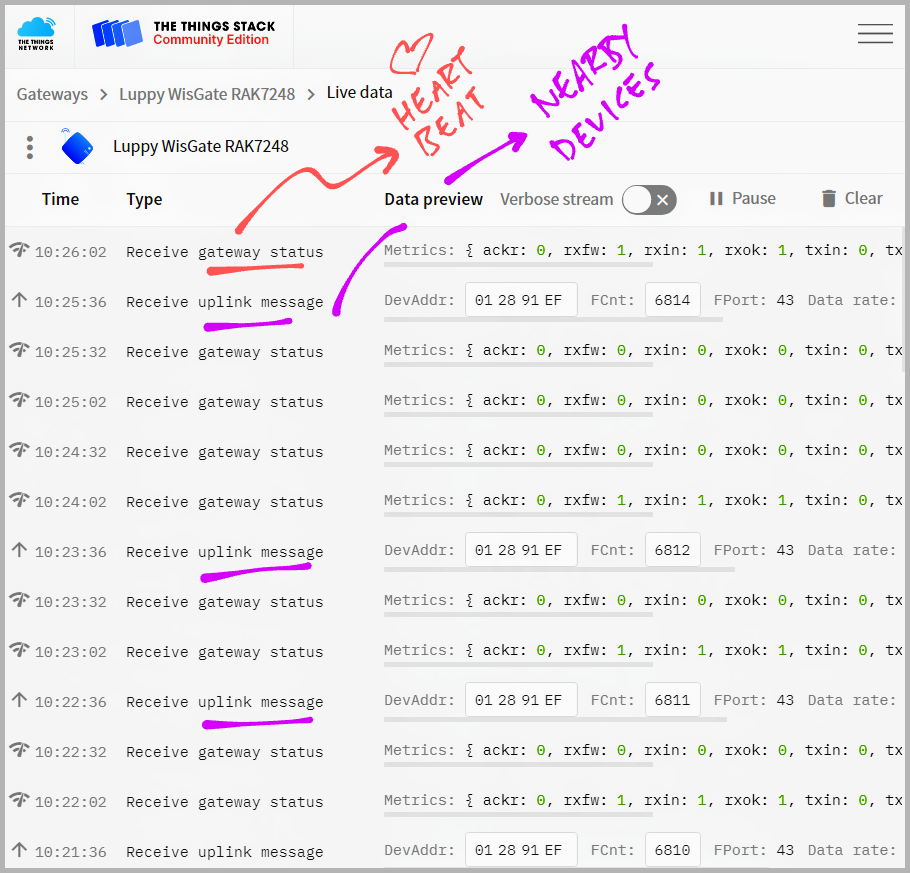
What are the Uplink Messages?
These are LoRa Messages from nearby devices that our Gateway has helpfully relayed to The Things Network.
Yep we’re officially a contributor to the globally-connected The Things Network!
In case of problems, check the Packet Forwarder Log on our Gateway…
sudo tail /var/log/daemon.log(See sample Packet Forwarder Log)
(If you skipped the previous chapter: Welcome back! We’ll need a free account on The Things Network: Click “Sign Up” here)
Before sending data to The Things Network, we need to add a device…
Log in to The Things Network.
Select the nearest region.
(Either US, Europe or Australia)
Click Applications and Add Application…
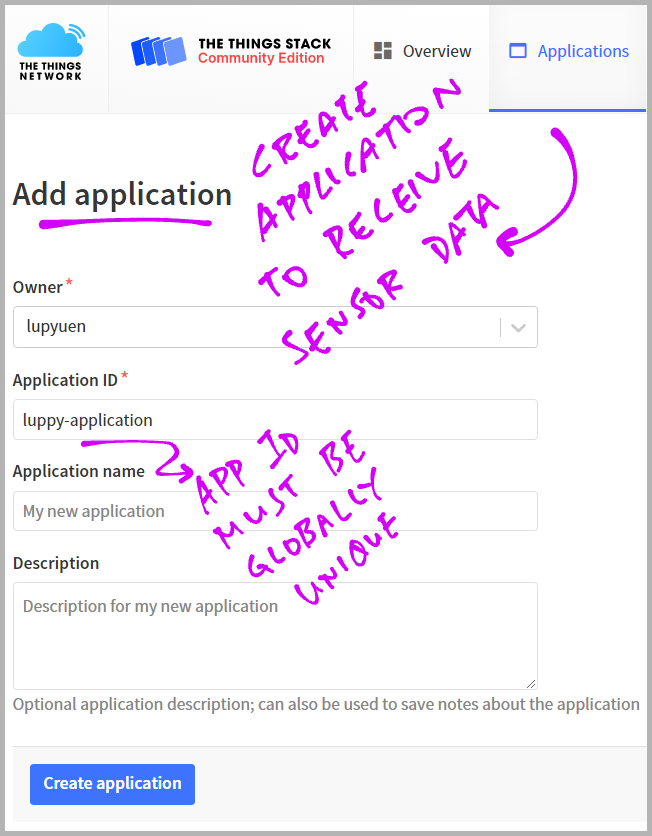
Our devices shall be registered under this Application.
Fill in any name for the Application ID. (Needs to be globally unique)
Click “Create Application”
In the Application, click "End Devices" (in the left bar)
Click “Add End Device”
Click “Manually”
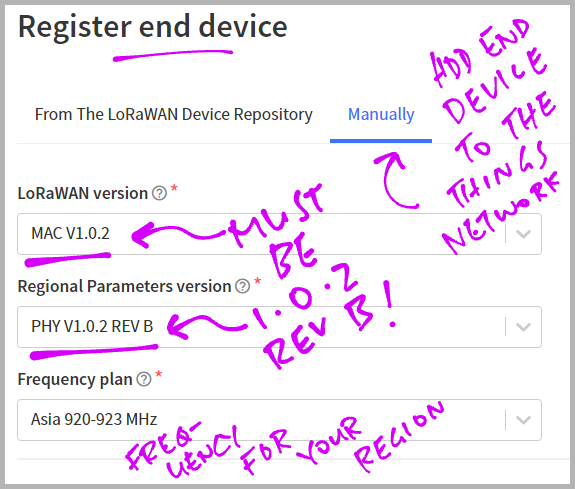
Fill in these fields…
LoRaWAN Version: MAC V1.0.2
Regional Parameters Version: PHY V1.0.2 REV B
Frequency Plan: See this…
Click “Show Advanced Activation”
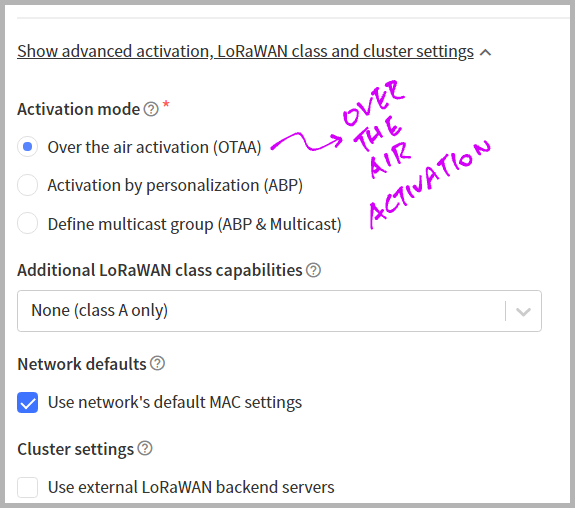
Activation Mode should be Over The Air Activation
For DevEUI, JoinEUI, AppKey and NwkKey:
Click the buttons for “Generate” and “Fill With Zeros”…
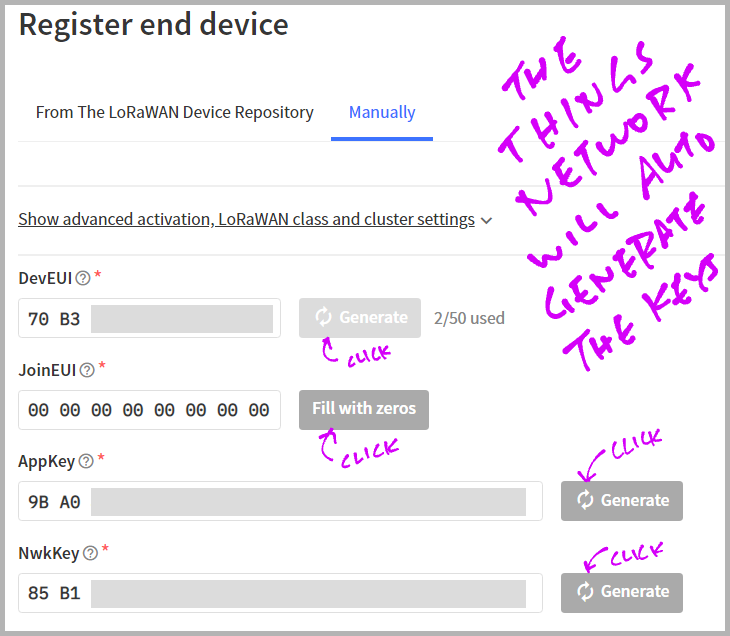
Click “Register End Device”
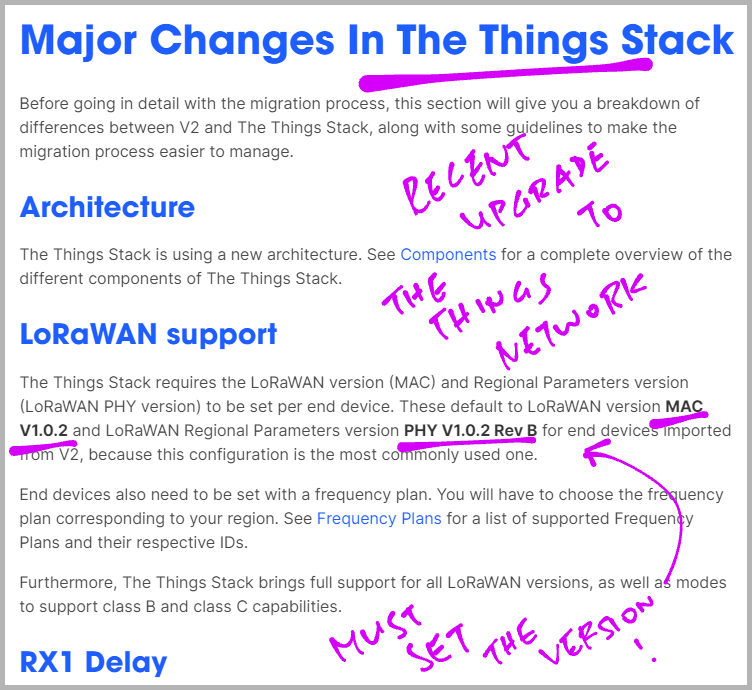
Why did we select LoRaWAN Version 1.0.2 Rev B?
This is the version of LoRaWAN that’s supported by our firmware for PineDio Stack.
(Our firmware is older than the upgraded version of The Things Network)
If you see “Message Integrity Code” Errors later, check the settings above for LoRaWAN Version.
(More about legacy LoRaWAN support)
Now we build, flash and run the LoRaWAN Firmware for PineDio Stack!
This is the Source Code for our LoRaWAN Firmware…
Which calls the following LoRaWAN and SX1262 Drivers…
Follow these instructions to build, flash and run the firmware…
We’re ready to…
Join PineDio Stack to The Things Network
(Because we need to join the network before sending data)
Send data from PineDio Stack to The Things Network
(And observe the data received by The Things Network!)
(Yep this is the same LoRaWAN Firmware that we ported from Apache Mynewt OS to BL602!)
Let’s join our PineDio Stack device to The Things Network!
Because we’re doing Over-The-Air Activation, we need to join the network every time we boot our device.
In The Things Network, browse to our Device and copy these values (needed for network activation)…
JoinEUI (Join Extended Unique Identifier)
DevEUI (Device Extended Unique Identifier)
AppKey (Application Key)
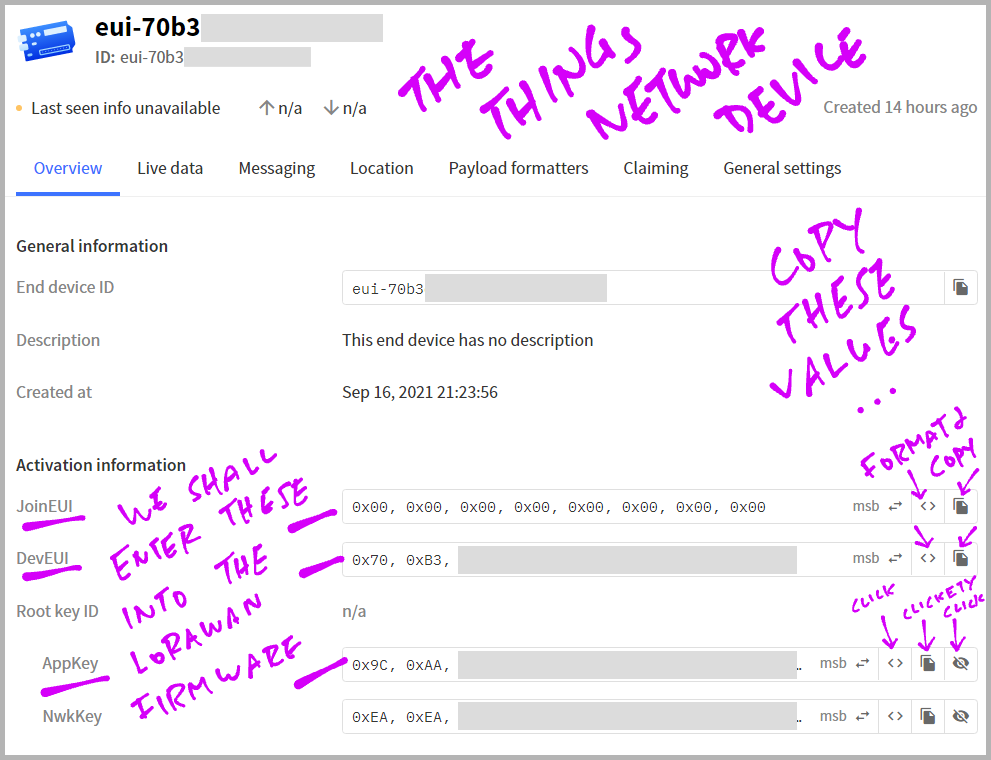
Click the icons shown above to reveal, format and copy the values.
Note that the copied values are formatted as…
0xAB, 0xBA, 0xDA, 0xBA, ...Later we shall convert the comma-delimited values to colon-separated values…
0xAB:0xBA:0xDA:0xBA:...Head over to the Serial Terminal for PineDio Stack.
At the PineDio Stack Command Prompt, enter these commands to join PineDio Stack to The Things Network…
First we start the Background Task that will handle LoRa packets…
create_taskNext we initialise the LoRa SX1262 and LoRaWAN Drivers…
init_lorawanSet the DevEUI…
las_wr_dev_eui 0xAB:0xBA:0xDA:0xBA:0xAB:0xBA:0xDA:0xBAChange “0xAB:0xBA:...” to your DevEUI
(Remember to change the “,” delimiter to “:”)
Set the JoinEUI…
las_wr_app_eui 0x00:0x00:0x00:0x00:0x00:0x00:0x00:0x00Change “0x00:0x00:...” to your JoinEUI
(Yep change the “,” delimiter to “:”)
Set the AppKey…
las_wr_app_key 0xAB:0xBA:0xDA:0xBA:0xAB:0xBA:0xDA:0xBA0xAB:0xBA:0xDA:0xBA:0xAB:0xBA:0xDA:0xBAChange “0xAB:0xBA:...” to your AppKey
(Again change “,” to “:”)
Finally we send a request to join The Things Network…
las_join 1“1” means try only once.
Head back to The Things Network. Browse to our Application and click “Live Data” (in the left bar)
We should see “Successfully Processed Join Request”…
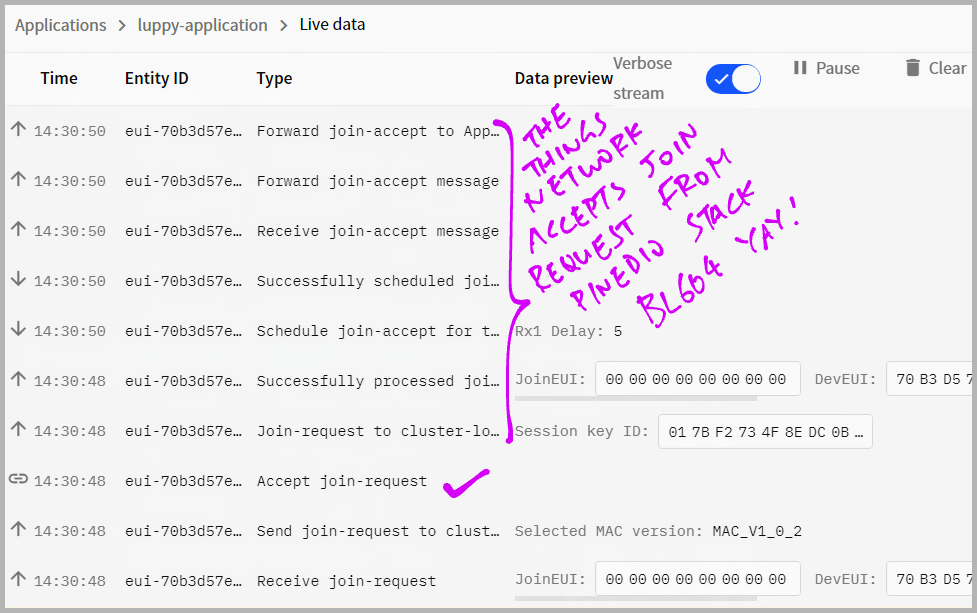
Yep our PineDio Stack has successfully joined The Things Network!
If we see “Message Integrity Code” Errors, check the Device Settings. The LoRaWAN Version should be 1.0.2 Rev B.
Finally we’re ready to send data from PineDio Stack to The Things Network!
At the PineDio Stack Command Prompt, enter these commands…
We open an Application Port that will connect to The Things Network…
las_app_port open 2“2” is the Application Port Number
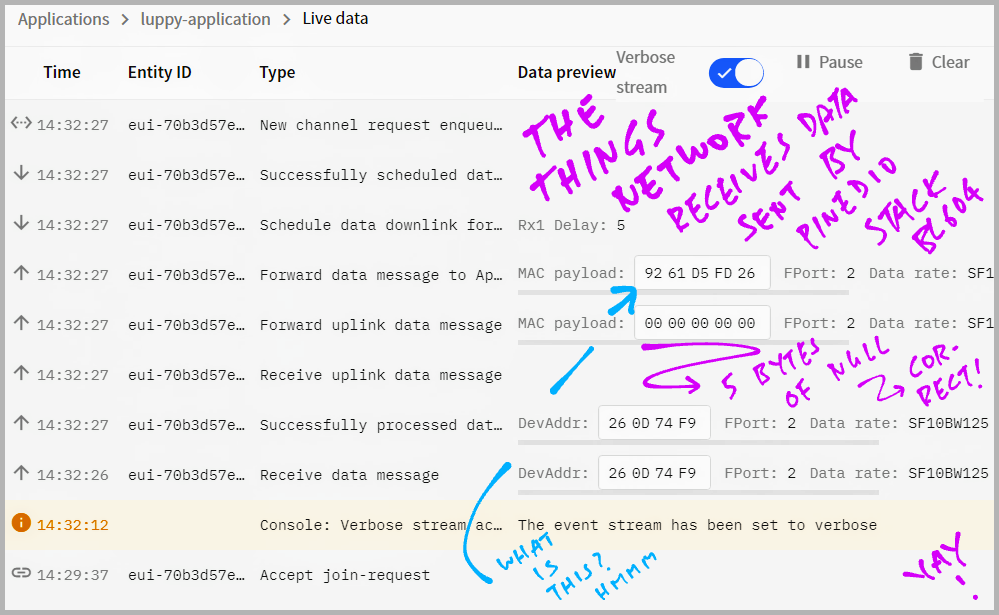
Then we send a Data Packet containing 5 bytes of data (0x00) to The Things Network at Port 2…
las_app_tx 2 5 0(“0” means that this is an Unconfirmed Message, we’re not expecting an acknowledgement from The Things Network)
Switch back to The Things Network. Browse to our Application and click “Live Data” (in the left bar)
We should see 5 bytes of 0x00 received by The Things Network…
And we’re done!
Sending 5 bytes of data to the network doesn’t sound particularly exciting?
Yep we’re just getting started!
In future articles we shall explore The Thing Network’s Cloud Integration features for processing our sensor data: MQTT, Webhooks, Storage, Downlinks, Payload Formatters, …
We shall visualise our sensor data with MQTT, Prometheus and Grafana…
We will store the sensor data in The Things Network and fetch them with Roblox over HTTP…
We may decode our sensor data in The Things Network with a Payload Formatter…
The Things Network exposes a HTTP POST API for us to push Downlink Messages to our devices…
Which will be useful for Remote Actuation of our devices.
Check this doc for the complete list of Cloud Integration features (including IFTTT and Node-RED)…
Thanks to The Things Network, we’ve just sent a tiny message to the Cloud… For Free!
(Assuming we have The Things Network coverage)
How’s the coverage for The Things Network worldwide?
Depends on the region.
According to the The Things Network Coverage Map, coverage in Singapore is really spotty…
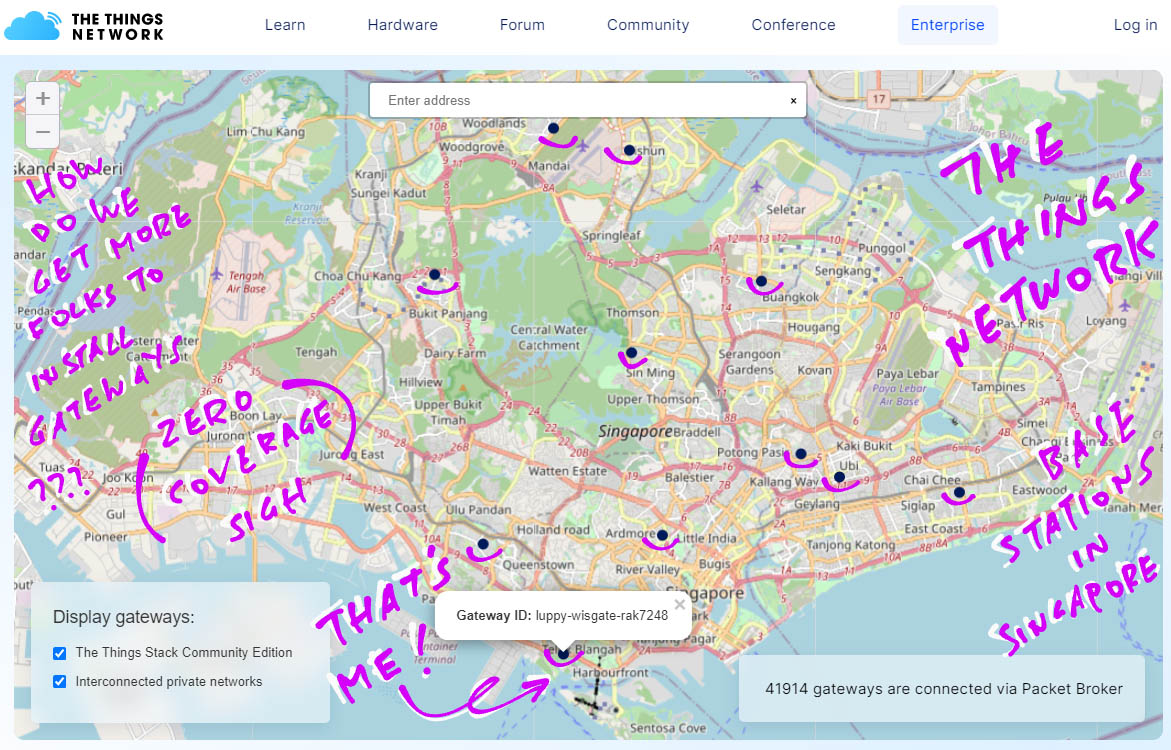
Can we extend The Things Network coverage?
We can install our own LoRaWAN Gateways and join them to The Things Network!
Schools could install gateways for The Things Network…
And share free access to The Things Network with homes, workplaces and devices nearby!
Hopefully with affordable, open-source gateways (like Pine64’s PineDio Gateway) we’ll grow The Things Network substantially…
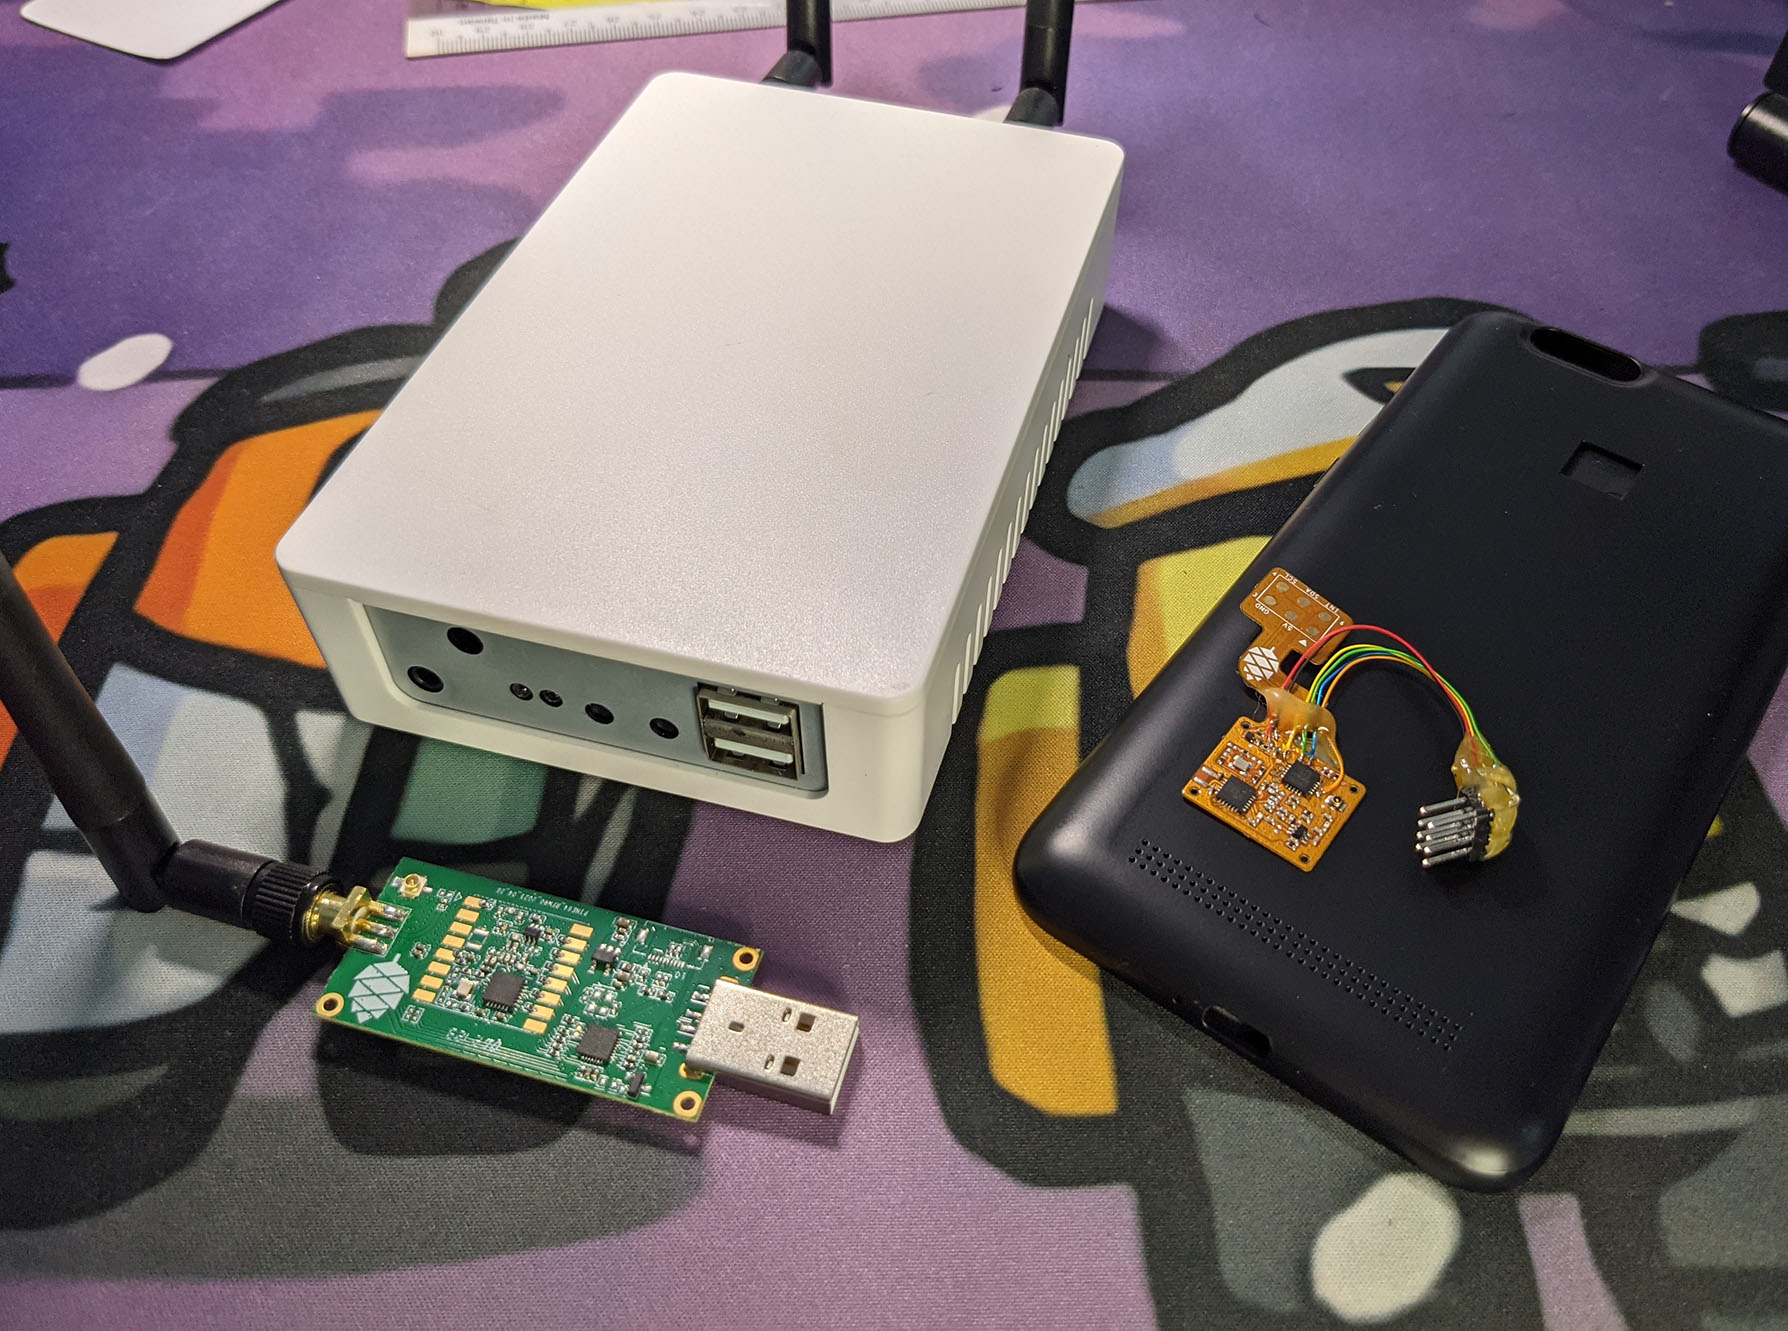
PineDio Gateway, PinePhone LoRa Backplate and LoRa USB Adapter
The Things Network is Free for Fair Use…
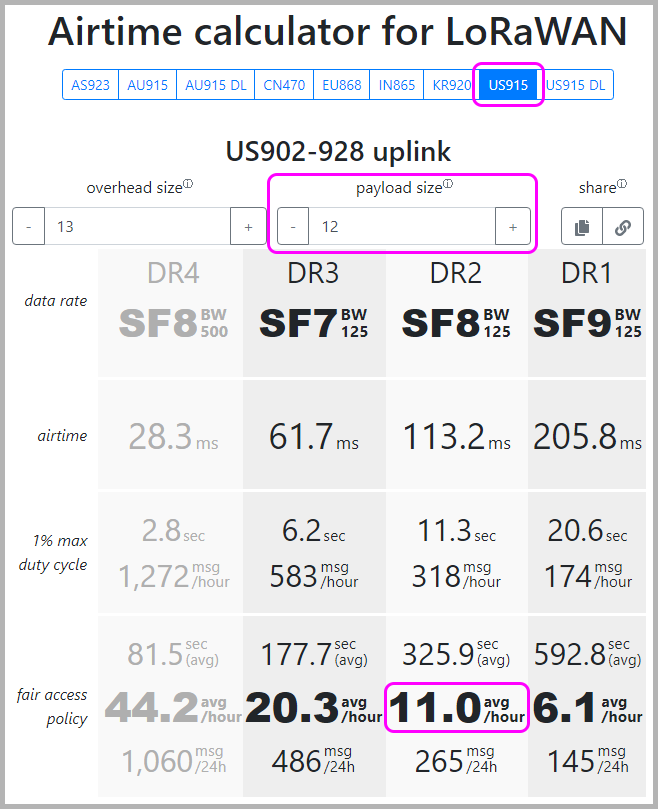
How many messages can we send in an hour?
Each device may transmit roughly 10 tiny messages per hour.
(Assuming 12 bytes per message)
This varies by region, message size and data rate, as explained here…
TLDR: We can send more messages to the network if we…
Reduce the Message Size
(Payload should be 12 bytes or smaller)
Select a Higher Data Rate
(Our LoRaWAN Driver uses DR2, which is 125 kbps)
Why does the message rate vary by region?
The Things Network operates on ISM Radio Bands, which are regulated differently across regions.
To comply with Local Regulations, each device is allowed to transmit data for up to X seconds per day. (Where X depends on the region)
This daily limit is known as the Duty Cycle, as explained here…
How can we optimise our messages?
Encode our message payload with CBOR (Concise Binary Object Representation) instead of JSON.
(CBOR works like a compressed, binary version of JSON)
This JSON Payload occupies 10 bytes…
{ "t": 1745 }While the CBOR version needs only 6 bytes!
To learn more about CBOR…
Wow… Fair Use sounds complicated!
This Airtime Calculator tells us how many messages we can send in an hour…
Select the Region (like US915), enter the Message Payload Size (say 12 bytes), look up the Data Rate (usually DR2) and our answer magically appears…
In the next article, PineDio Stack shall transmit Real-Time Sensor Data from a Temperature Sensor to The Things Network…
And we shall visualise the Sensor Data with Prometheus and Grafana…
Stay Tuned!
Got a question, comment or suggestion? Create an Issue or submit a Pull Request here…