📝 8 Oct 2021
Roblox is a Multiplayer Virtual World that lets us create 3D Objects and interact with them. (Free to create and play)
The Things Network is a Public Wireless Network that connects many IoT Gadgets around the world. (It’s free too)
Can we connect Roblox to The Things Network… To Monitor and Control Real-World Gadgets?
Think of the possibilities…
Walk around a Roblox House to monitor the temperature in our Smart Home.
Flip the lights on and off in the Virtual House, to control the lights in our Real Home.
Wander about a Roblox Farm to check on Farm Crops and Livestock in real life.
Teach young learners about Internet of Things (IoT)…
How Sensors and Actuators work, and how they impact our lives.
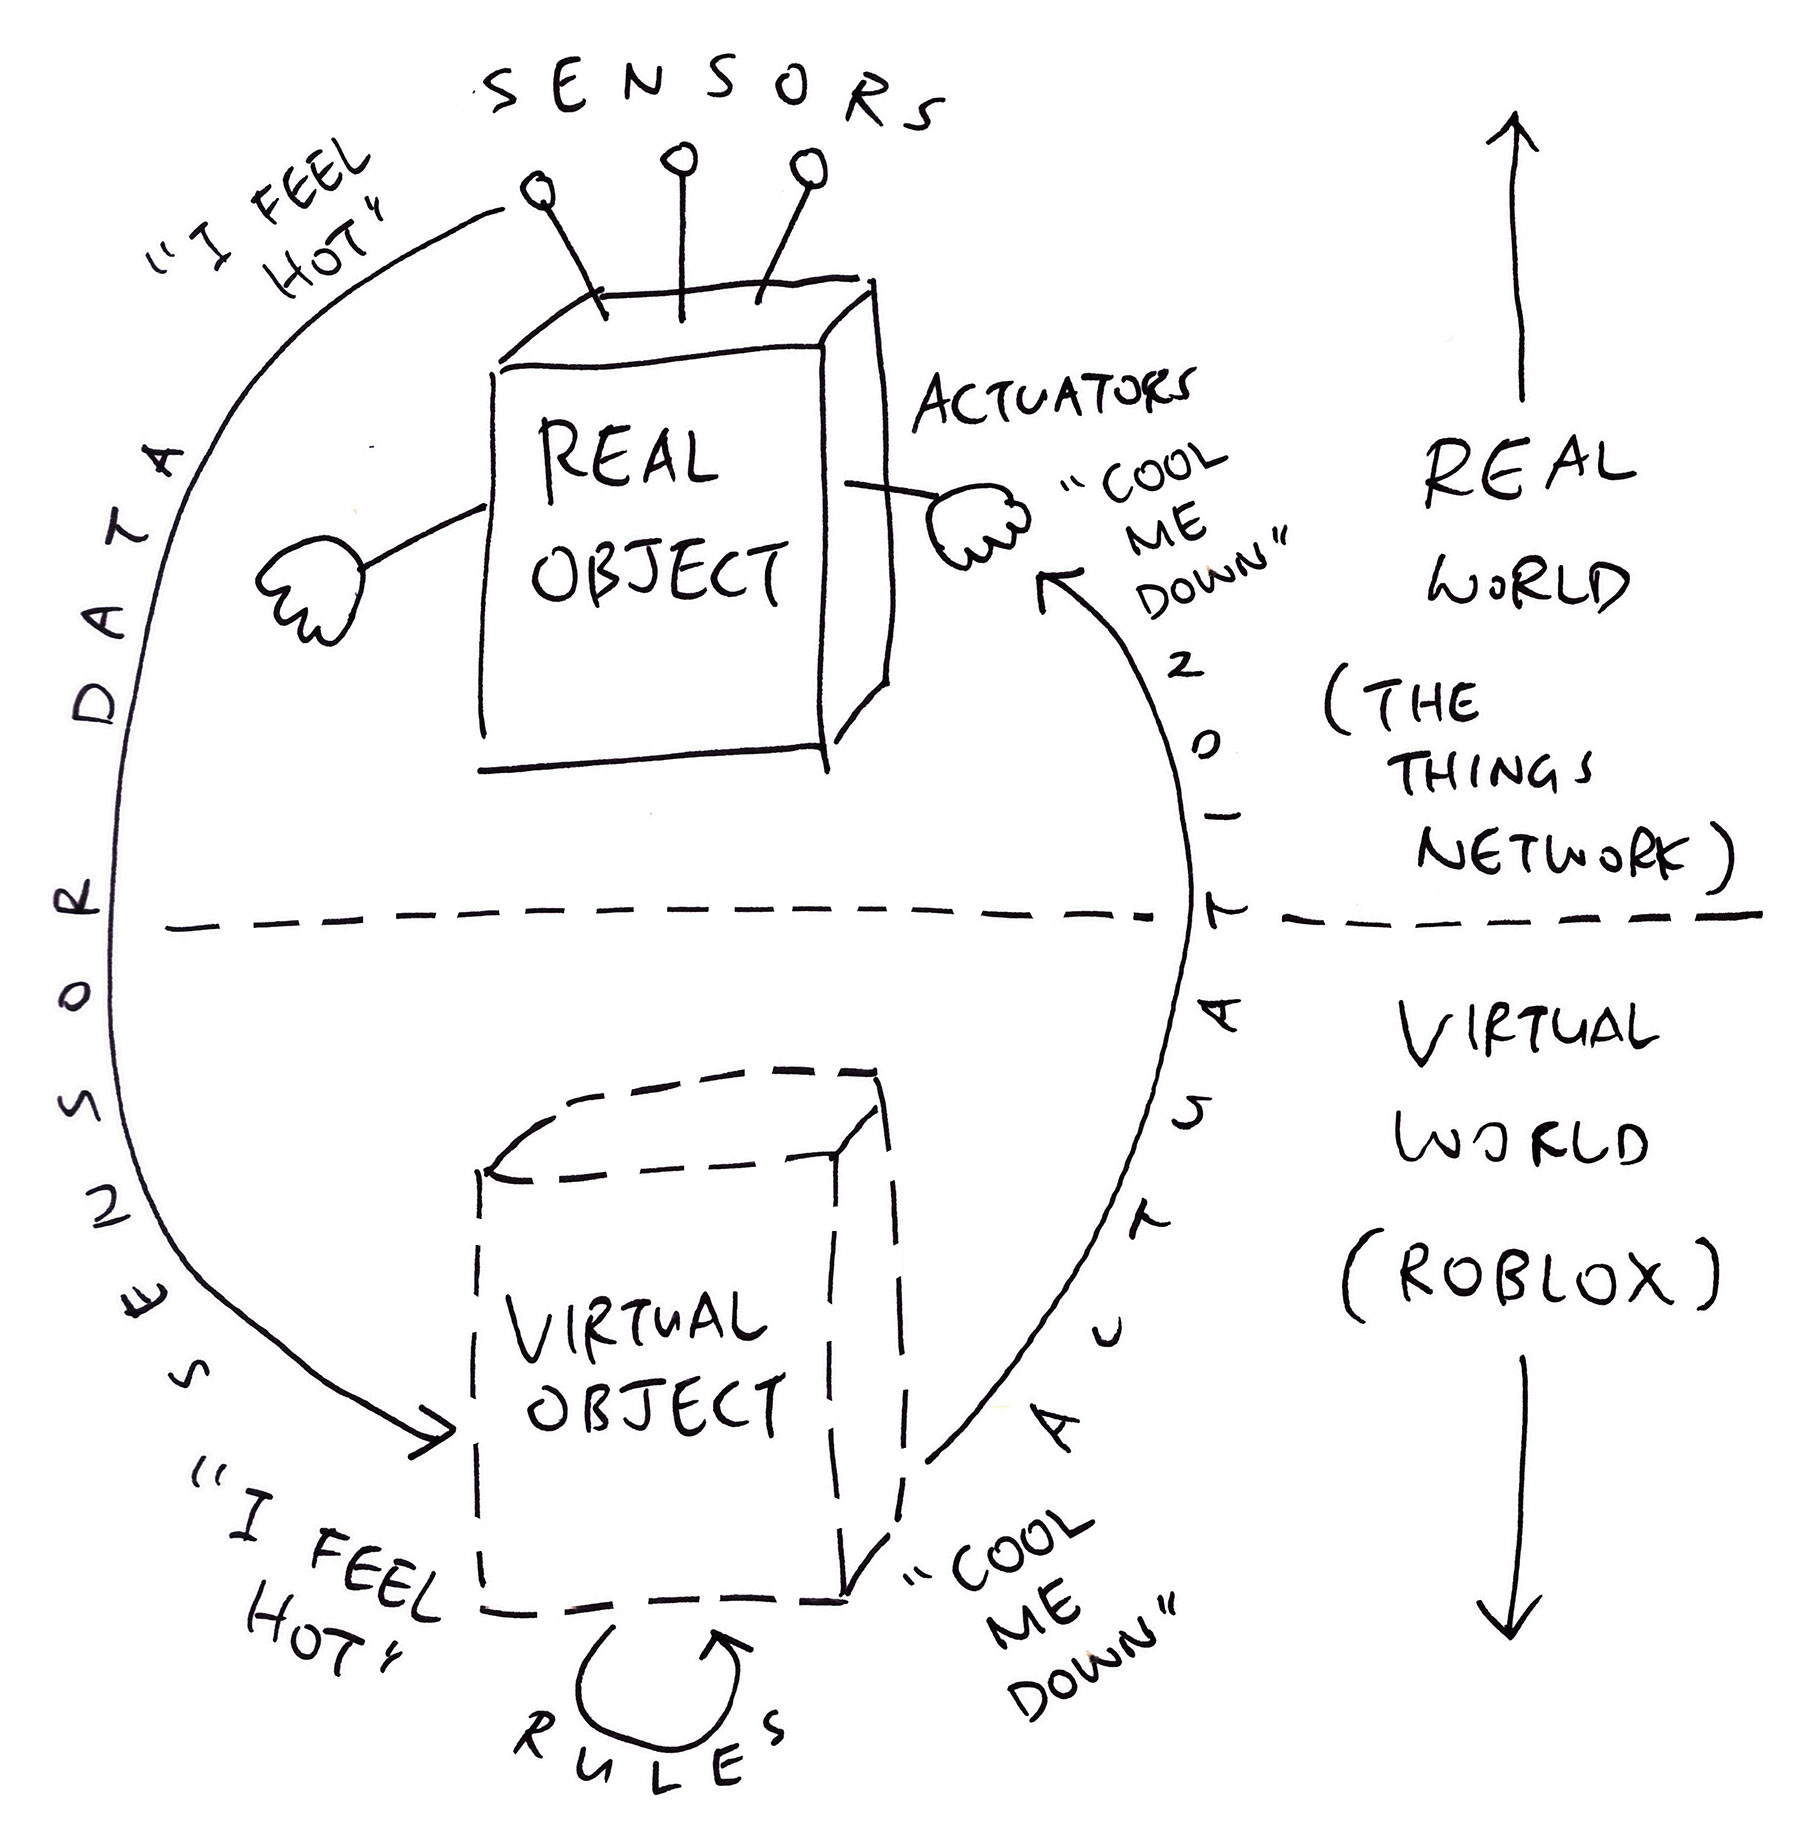
Sounds very “Free Guy” and “Matrix”-ish, but the above is actually a well-known concept in IoT: Digital Twin.
What’s a Digital Twin?
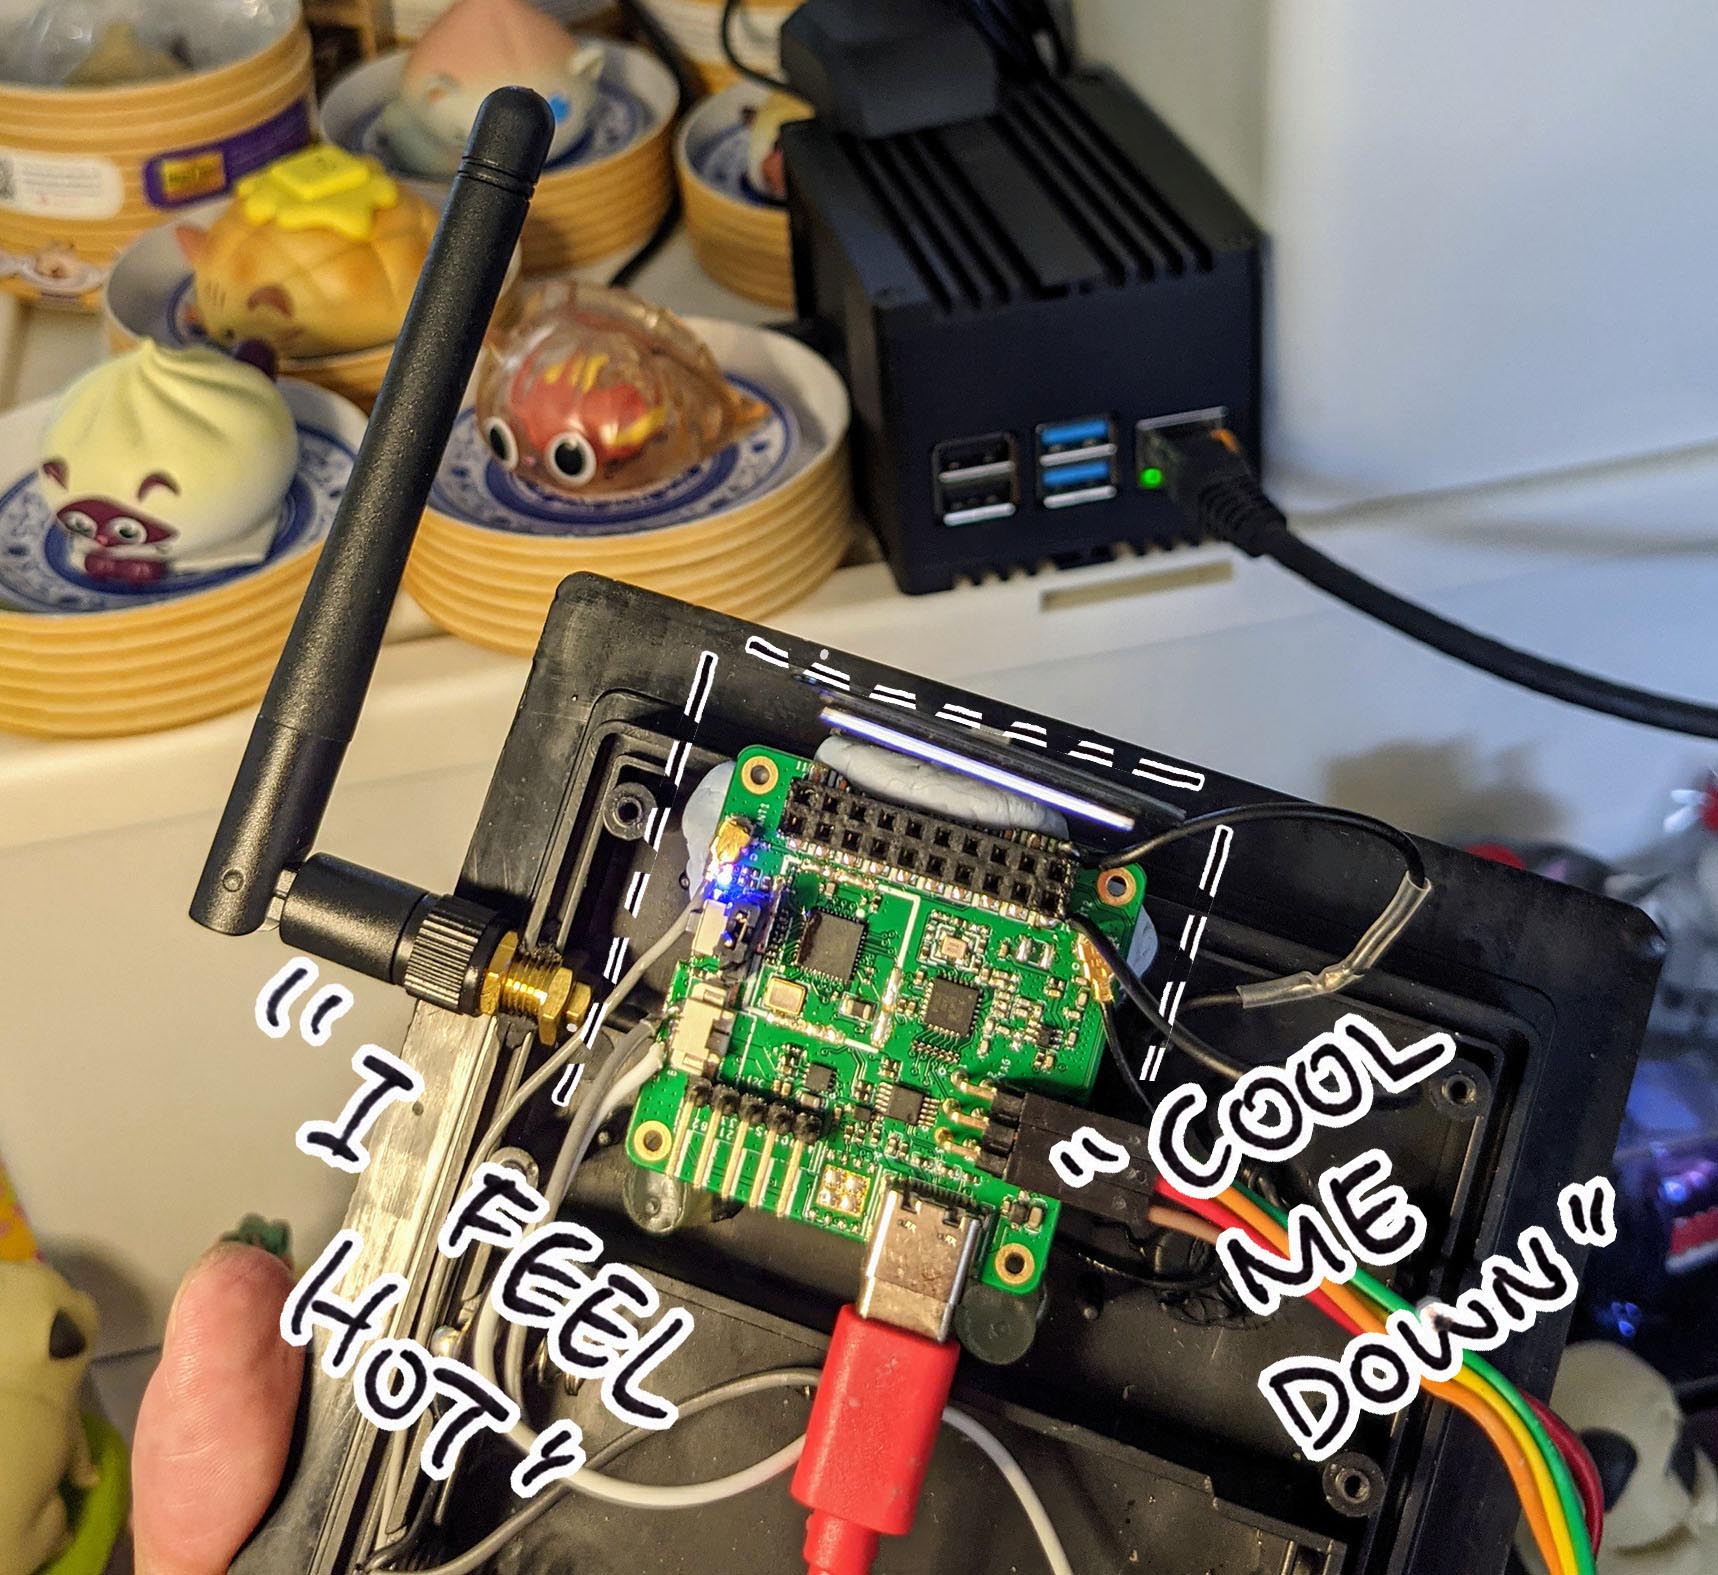
A Digital Twin is a Virtual Object that mirrors a Real-World Object through Sensors and Actuators. (Like the pic above)
For today’s experiment we shall take this IoT Gadget: PineDio Stack BL604 RISC-V Board…
And turn it into a Virtual Gadget in Roblox such that…
If our Real Gadget feels hot…
Then our Virtual Gadget looks hot too!
All Roblox Scripts may be found in this repo…
(Apologies if my Roblox looks rough… This is my first time using Roblox 🙏)
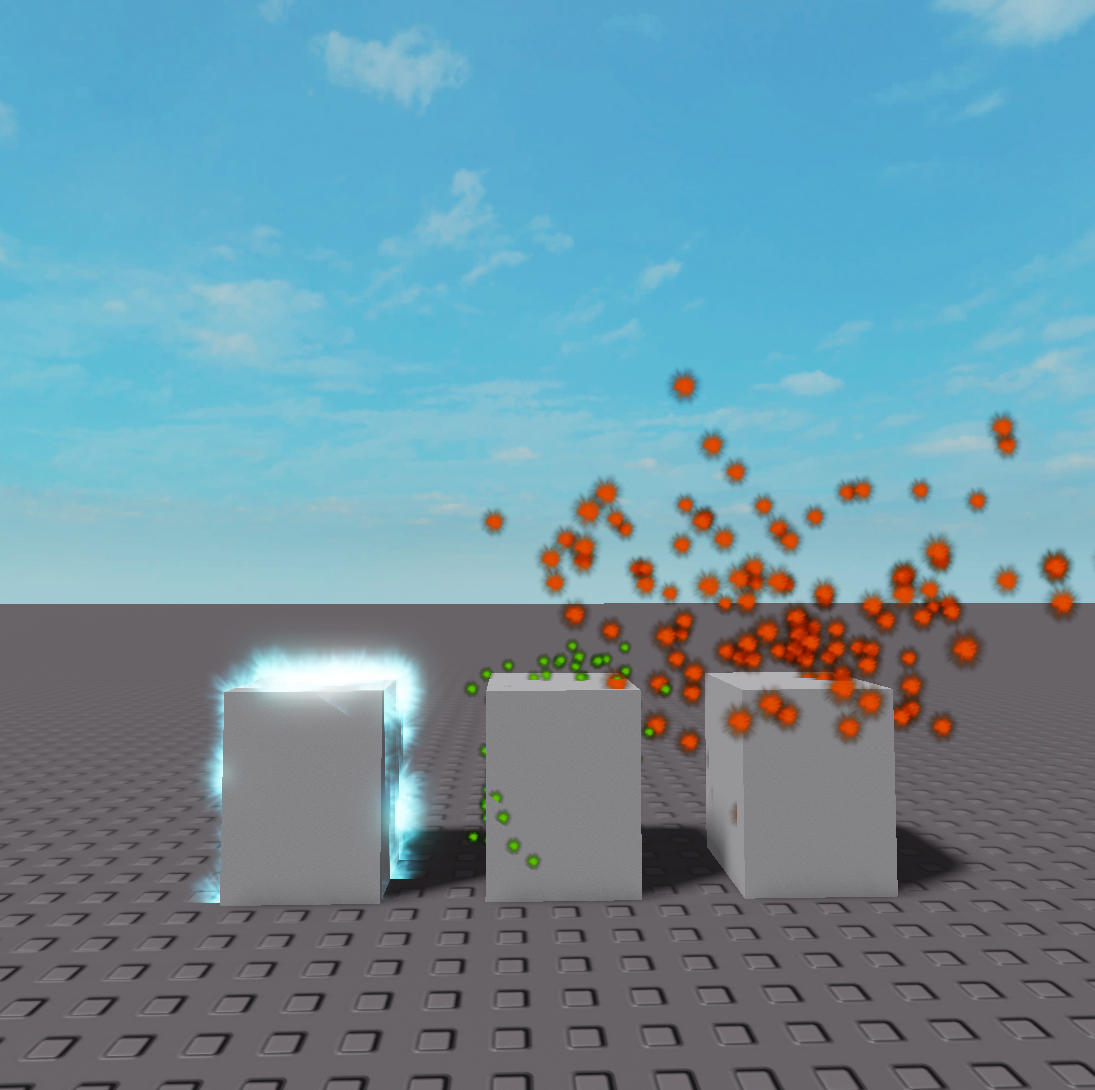
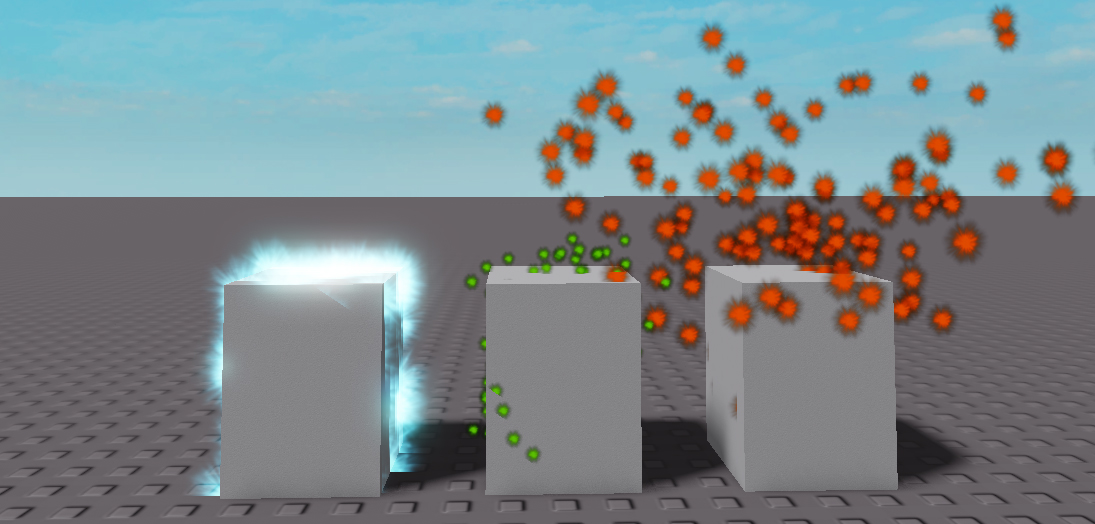
The pic shows what we shall accomplish with Roblox…
A Virtual Object that visualises the Live Temperature of our Real Object (PineDio Stack)
Freezing Cold (left)
Normal Temperature (middle)
(Think Shrek and green fireflies)
Fiery Hot (right)
In fact we’ll show 10,000 Levels of Hotness / Coldness, thanks to a little Math. (And Linear Interpolation)
What magic makes this mirroring possible?
This mirroring of real things in Roblox is possible because…
Roblox lets us write Lua Scripts that can make HTTP Requests to the internet
The Things Network exposes a HTTP Service that lets us retrieve the Sensor Data (like Temperature) sent by IoT Gadgets
Connect (1) to (2) and we’ll get a Roblox Gadget that mirrors the Hot / Cold State of a Real Gadget.
Let’s talk about Roblox Lua Scripts and HTTP Requests…
(More about Roblox Lua Scripting)
(More about The Things Network)
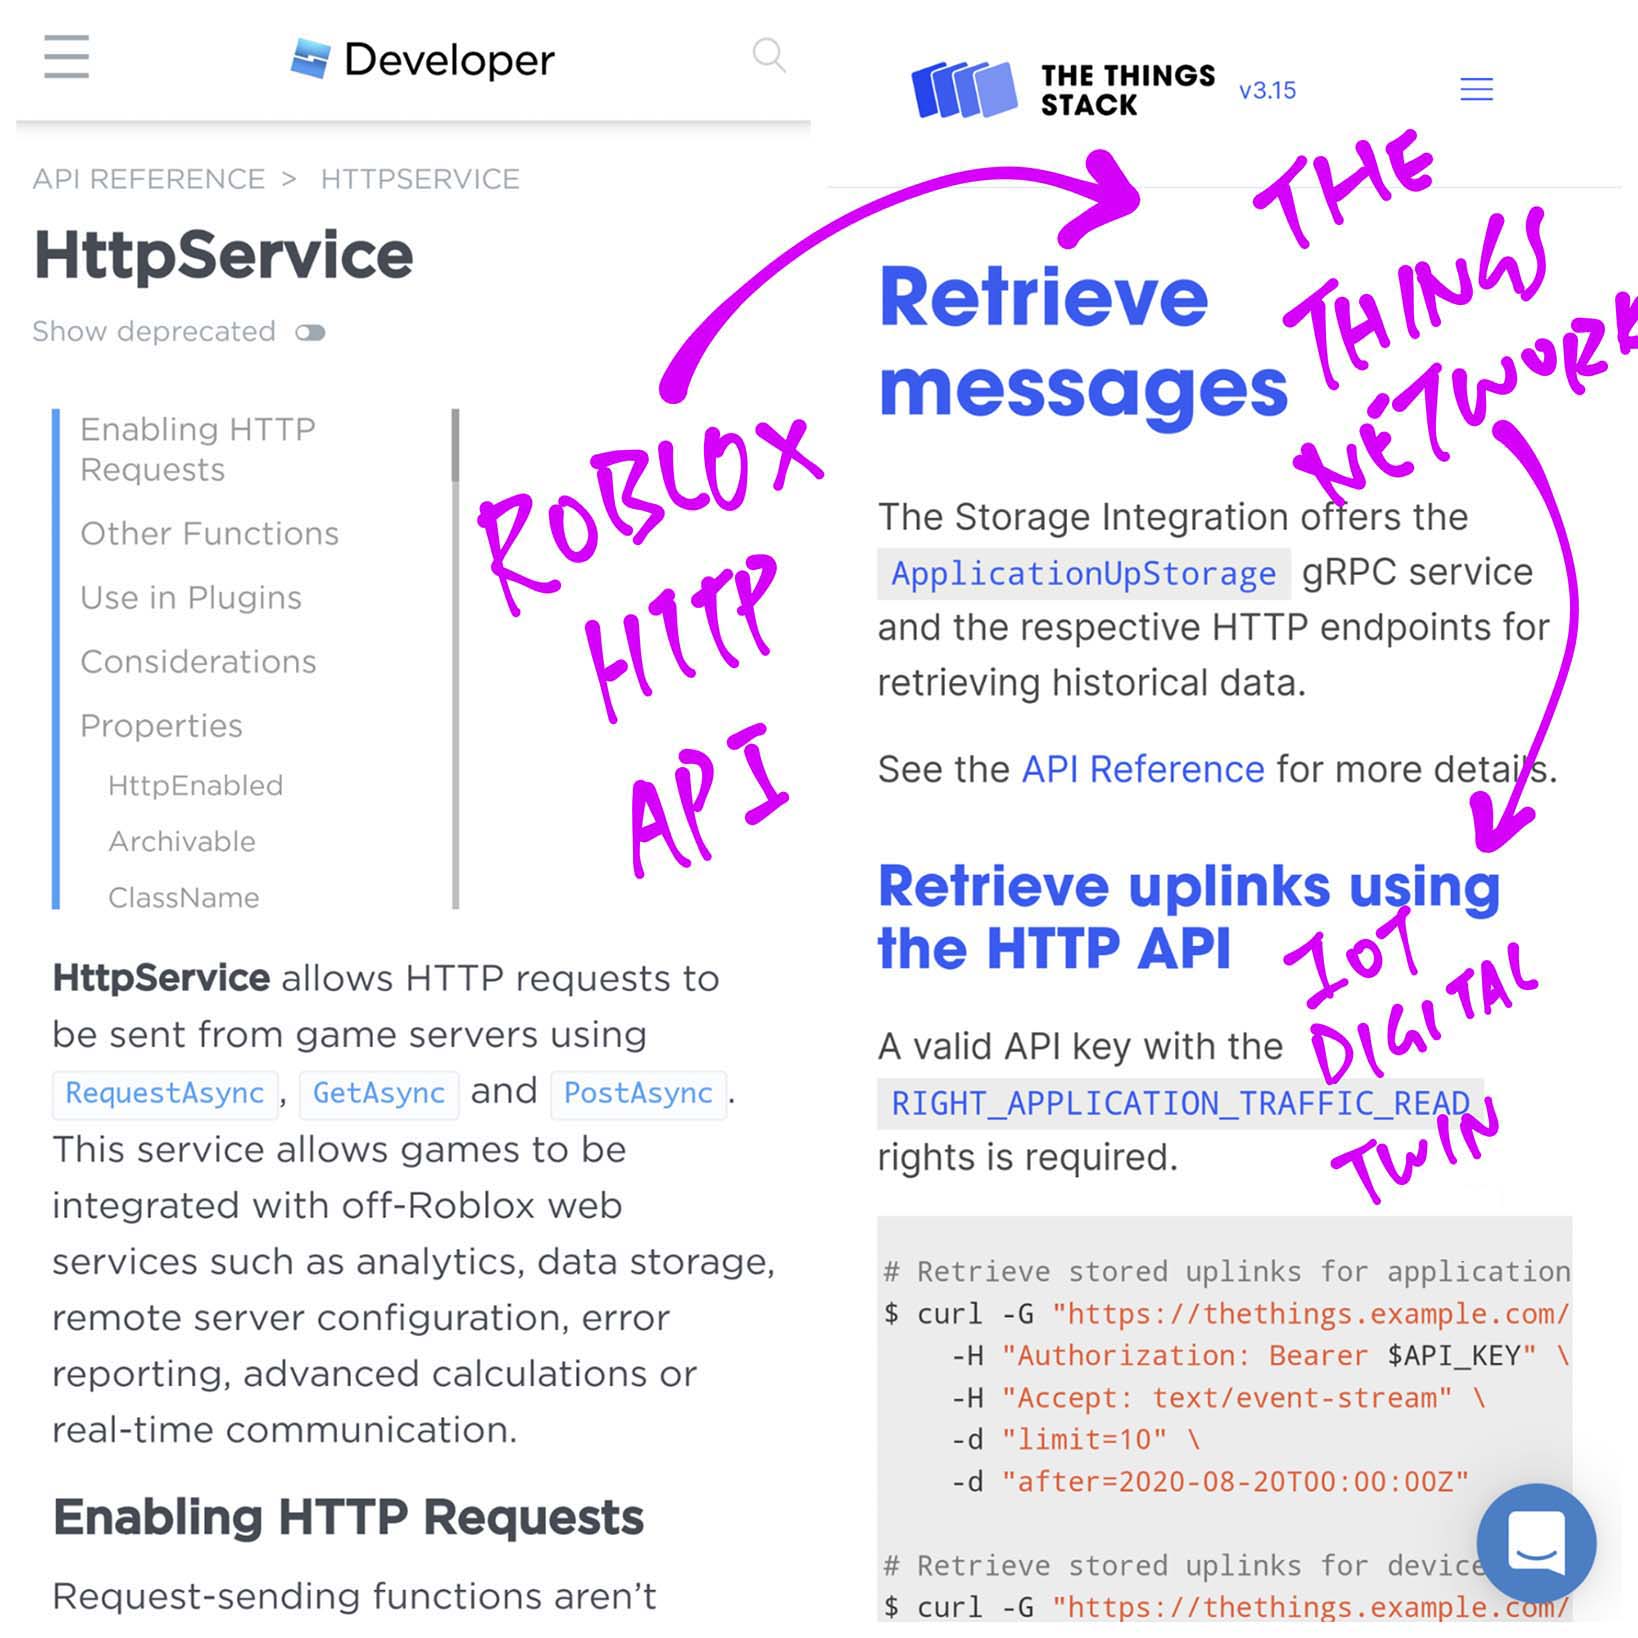
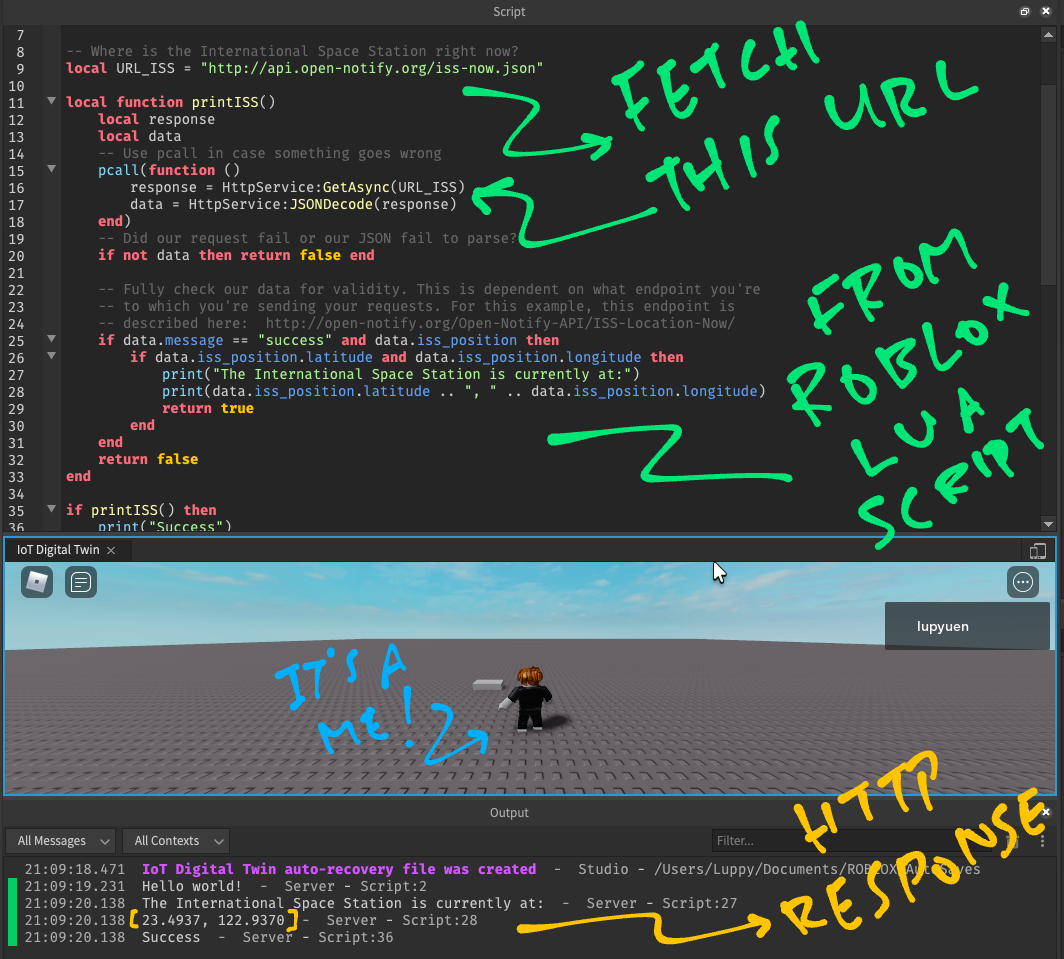
Roblox provides a HttpService API that we may call in our Lua Scripts to fetch External HTTP URLs (via GET and POST)…
Below we see HttpService in action, fetching the current latitude and longitude of International Space Station…
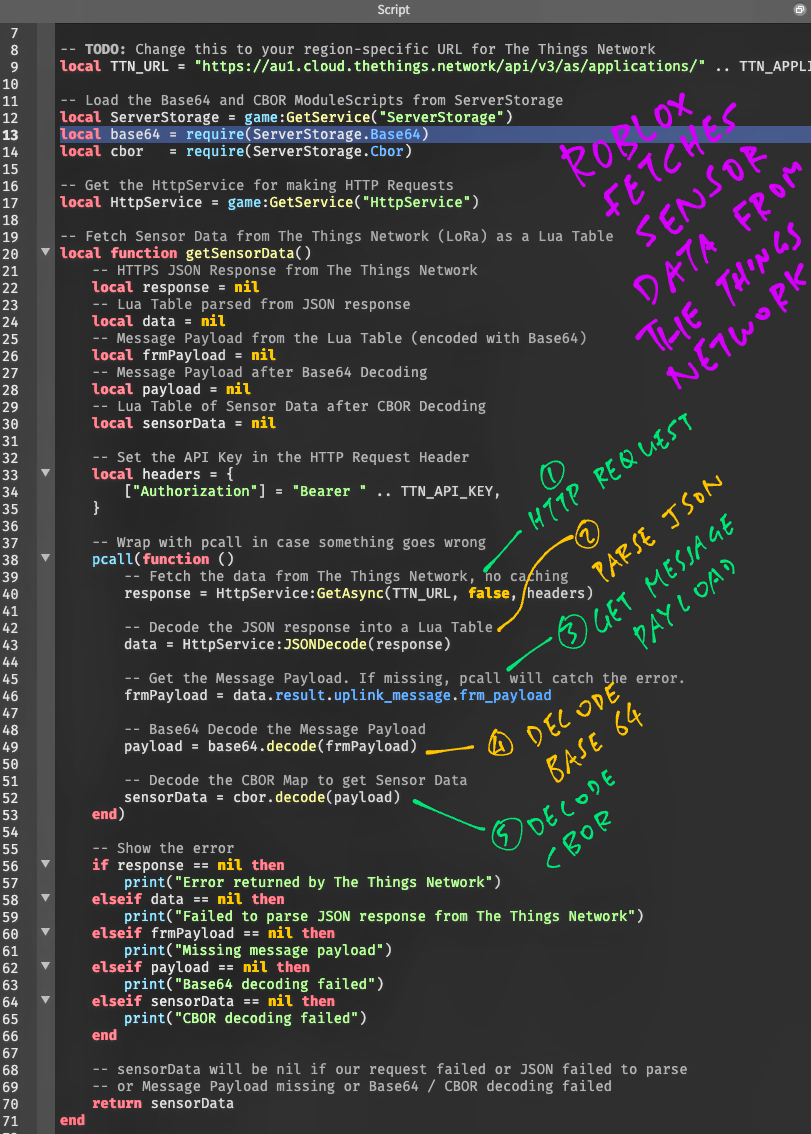
To fetch Sensor Data from The Things Network, we have created a getSensorData function in DigitalTwin.lua.
When we run this Roblox Script…
-- Fetch the Sensor Data from The Things Network (LoRa)
local sensorData = getSensorData()

-- Show the Temperature
if sensorData then
  print("Temperature:")
  print(sensorData.t)
else
  print("Failed to get sensor data")
endWe should see the Temperature Sensor Data fetched from The Things Network…
Temperature: 1236(This means 12.36 ºC, our values have been scaled up by 100 times)
Let’s study the code inside our getSensorData function.
We begin by defining the constants for accessing The Things Network: DigitalTwin.lua
-- Enable type checking
--!strict

-- TODO: Change this to your Application ID for The Things Network
-- (Must have permission to Read Application Traffic)
local TTN_APPLICATION_ID = "YOUR_APPLICATION_ID"

-- TODO: Change this to your API Key for The Things Network
local TTN_API_KEY = "YOUR_API_KEY"

-- TODO: Change this to your region-specific URL for The Things Network
local TTN_URL = "https://au1.cloud.thethings.network/api/v3/as/applications/" .. TTN_APPLICATION_ID .. "/packages/storage/uplink_message?limit=1&order=-received_at"(“..” in Lua means concatenate the strings)
Our URL for The Things Network (TTN_URL) looks like…
https://au1.cloud.thethings.network/api/v3/as/
  applications/YOUR_APPLICATION_ID/
  packages/storage/uplink_message
  ?limit=1&order=-received_at
(More about these settings in the Appendix)
Note that we enable Type Checking at the top…
-- Enable type checking
--!strict
This is super helpful for catching incorrect parameters passed to function calls.
Click View → Script Analysis to see the warnings.
(Ignore the two warnings for “Argument count mismatch”)
Next we get the HttpService from Roblox…
-- Get the HttpService for making HTTP Requests
local HttpService = game:GetService("HttpService")
HTTP Requests must be enabled in Roblox…
Click Home → Game Settings → Security → Allow HTTP Requests
We import the ModuleScripts that will be called to decode our Sensor Data…
-- Load the Base64 and CBOR ModuleScripts from ServerStorage
local ServerStorage = game:GetService("ServerStorage")
local base64 = require(ServerStorage.Base64)
local cbor   = require(ServerStorage.Cbor)
We’ll talk about Base64 and CBOR in a while.
(More about Roblox ModuleScripts)
Our function begins by declaring the variables…
-- Fetch Sensor Data from The Things Network (LoRa) as a Lua Table
local function getSensorData()
  -- HTTPS JSON Response from The Things Network
  local response = nil
  -- Lua Table parsed from JSON response
  local data = nil
  -- Message Payload from the Lua Table (encoded with Base64)
  local frmPayload = nil
  -- Message Payload after Base64 Decoding
  local payload = nil
  -- Lua Table of Sensor Data after CBOR Decoding
local sensorData = nilresponse: Contains the HTTP Response (JSON format) returned by The Things Network
data: Lua Table we get after parsing the JSON HTTP Response
frmPayload: Encoded Sensor Data, extracted from our Parsed JSON Response
payload: Sensor Data after Base64 Decoding
sensorData: Sensor Data after CBOR Decoding
We set the API Key in the HTTP Request Header (as “Authorization”)…
  -- Set the API Key in the HTTP Request Header
  local headers = {
    ["Authorization"] = "Bearer " .. TTN_API_KEY,
}(“..” in Lua means concatenate the strings)
Then we fetch the URL (via HTTP GET), passing the API Key in the headers…
  -- Wrap with pcall in case something goes wrong
  pcall(function ()

    -- Fetch the data from The Things Network, no caching
response = HttpService:GetAsync(TTN_URL, false, headers)What is “pcall”?
We wrap our code with “pcall” to catch any errors returned by the HTTP Fetching.
(Also for catching Decoding Errors)
If any error occurs, execution resumes after the “pcall” block.
And we’ll check for errors then.
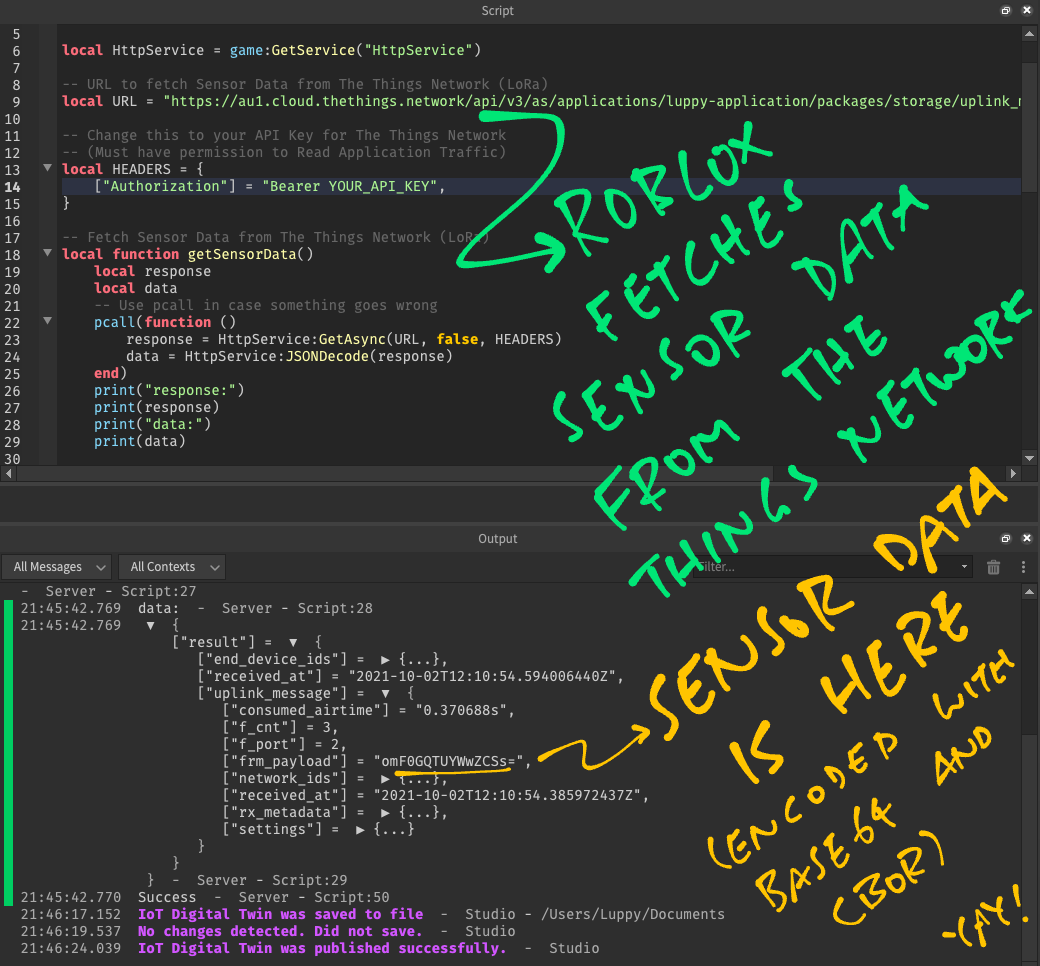
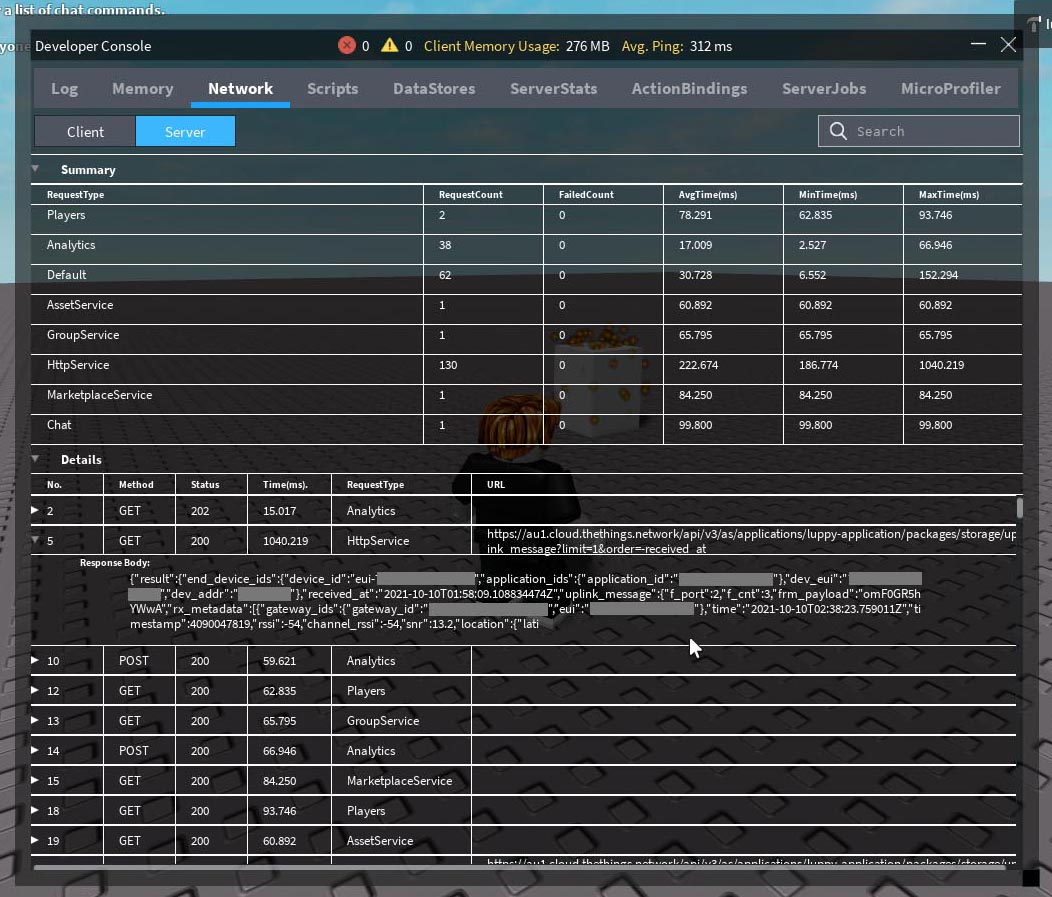
Now we decode the HTTP Response (JSON format) from The Things Network.
First we parse the JSON returned by The Things Network…
    -- Decode the JSON response into a Lua Table
    data = HttpService:JSONDecode(response)
(JSONDecode is documented here)
This returns a Lua Table that contains the JSON Fields.
(See the pic above)
As shown in the pic, we need to extract the Encoded Sensor Data from the field: result → uplink_message → frm_payload
    -- Get the Message Payload. If missing, pcall will catch the error.
    frmPayload = data.result.uplink_message.frm_payload
frmPayload contains the Sensor Data encoded with Base64 and CBOR.
(Looks like gibberish: “omF0GQTUYWwZCSs=”)
We call the Base64 and CBOR ModuleScripts to decode the Sensor Data…
    -- Base64 Decode the Message Payload
    payload = base64.decode(frmPayload)

    -- Decode the CBOR Map to get Sensor Data
    sensorData = cbor.decode(payload)

  -- End of pcall block
  end)
(More about Base64 and CBOR in a while)
sensorData now contains meaningful Sensor Data in a Lua Table…
{
  ["l"] = 2347,
  ["t"] = 1236
}
Above are the values recorded by our Light Sensor and Temperature Sensor, scaled up by 100 times.
Note that our “pcall” block ends here. So we check the errors next.
We’re at the spot after the “pcall” block.
We check for errors that could have occurred inside the “pcall” block…
  -- Show the error
  if response == nil then
    print("Error returned by The Things Network")
  elseif data == nil then
    print("Failed to parse JSON response from The Things Network")
  elseif frmPayload == nil then
    print("Missing message payload")
  elseif payload == nil then
    print("Base64 decoding failed")
  elseif sensorData == nil then
    print("CBOR decoding failed")
  end
This code checks for HTTP Request Errors and Decoding Errors.
Finally we return the Sensor Data (as a Lua Table) to the caller…
  -- sensorData will be nil if our request failed or JSON failed to parse
  -- or Message Payload missing or Base64 / CBOR decoding failed
  return sensorData
end
Our Sensor Data is returned as nil in case of error.
And that’s how our Roblox Script fetches Sensor Data from The Things Network!
Before heading deeper into our Roblox Scripts, let’s watch our Virtual Gadget in action!
Download and install Roblox Studio…
In Roblox Studio, click New → Classic Baseplate
We need to enable HTTP Requests…
At the top bar, click Home → Game Settings → Security → Allow HTTP Requests
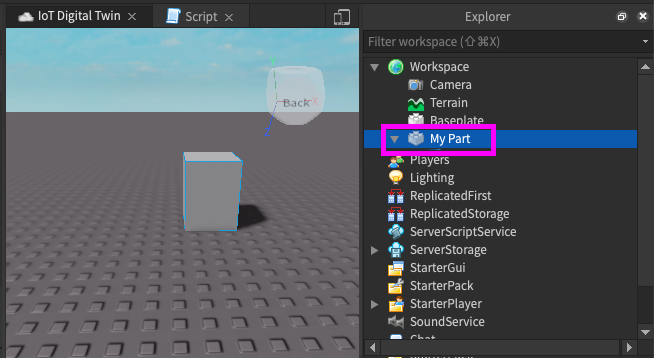
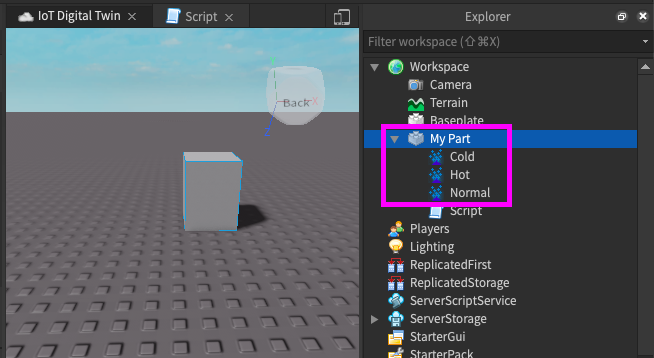
At Explorer → Workspace (at right)…
Click (+) and create a Part
(See pic above)
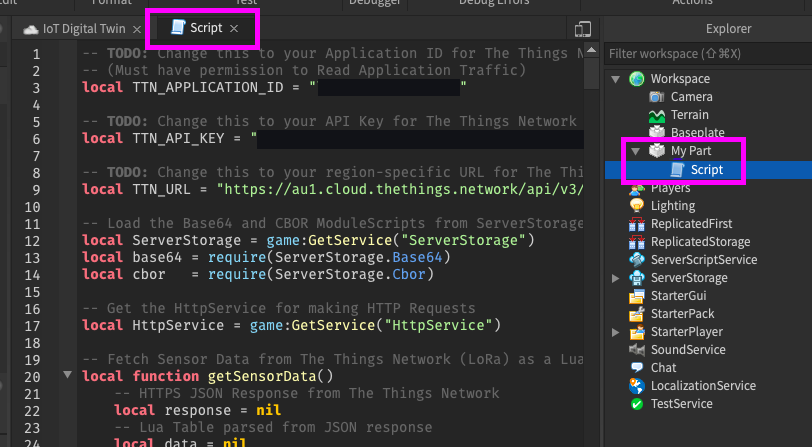
Under our Part…
Click (+) and create a Script
(See pic below)
Copy and paste the contents of this link into the script…
If we have an IoT Gadget connected to The Things Network:
Edit these settings…
-- TODO: Change this to your Application ID for The Things Network
-- (Must have permission to Read Application Traffic)
local TTN_APPLICATION_ID = "YOUR_APPLICATION_ID"

-- TODO: Change this to your API Key for The Things Network
local TTN_API_KEY = "YOUR_API_KEY"

-- TODO: Change this to your region-specific URL for The Things Network
local TTN_URL = "https://au1.cloud.thethings.network/api/v3/as/applications/" .. TTN_APPLICATION_ID .. "/packages/storage/uplink_message?limit=1&order=-received_at"If we don’t have an IoT Gadget:
Leave the above settings as is.
The script will run in Demo Mode, simulating a real gadget.
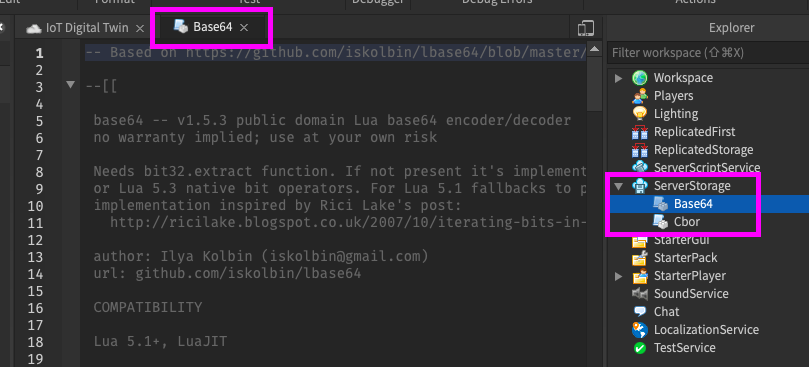
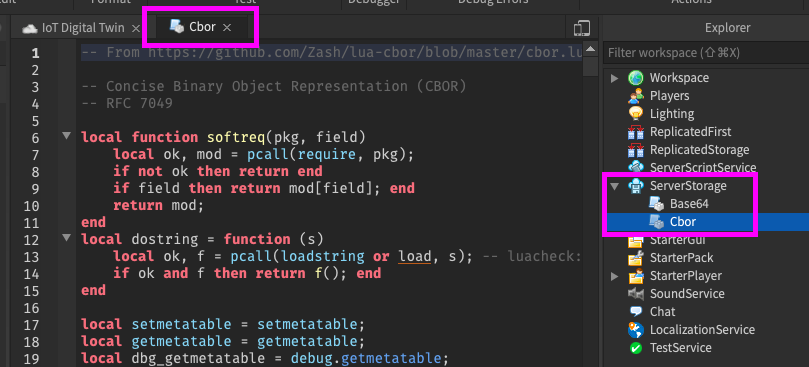
At Explorer → ServerStorage (at right)…
Click (+) and create two ModuleScripts:
Base64 and Cbor
(See pic above)
Copy and paste the the contents of these links into the ModuleScripts…
(Yep they need to be ModuleScripts. Normal Scripts won’t work)
At the top bar, click Home → Play
(Or press F5)
Roblox renders our Virtual Gadget in its Hot / Cold State!
Watch the Demo Video on YouTube
Why do we need CBOR Decoding?
Normally IoT Gadgets will transmit Sensor Data in JSON like so….
{
  "t": 1236,
  "l": 2347
}
That’s 19 bytes of JSON for Temperature Sensor and Light Sensor Data.
But this won’t fit into the Maximum Message Size for The Things Network: 12 bytes.
(Assuming 10 messages per hour)
Instead we compress the Sensor Data into Concise Binary Object Representation (CBOR) Format.
(CBOR works like a compact, binary form of JSON)
And we need only 11 bytes of CBOR!
a2 61 74 19 04 d4 61 6c 19 09 2b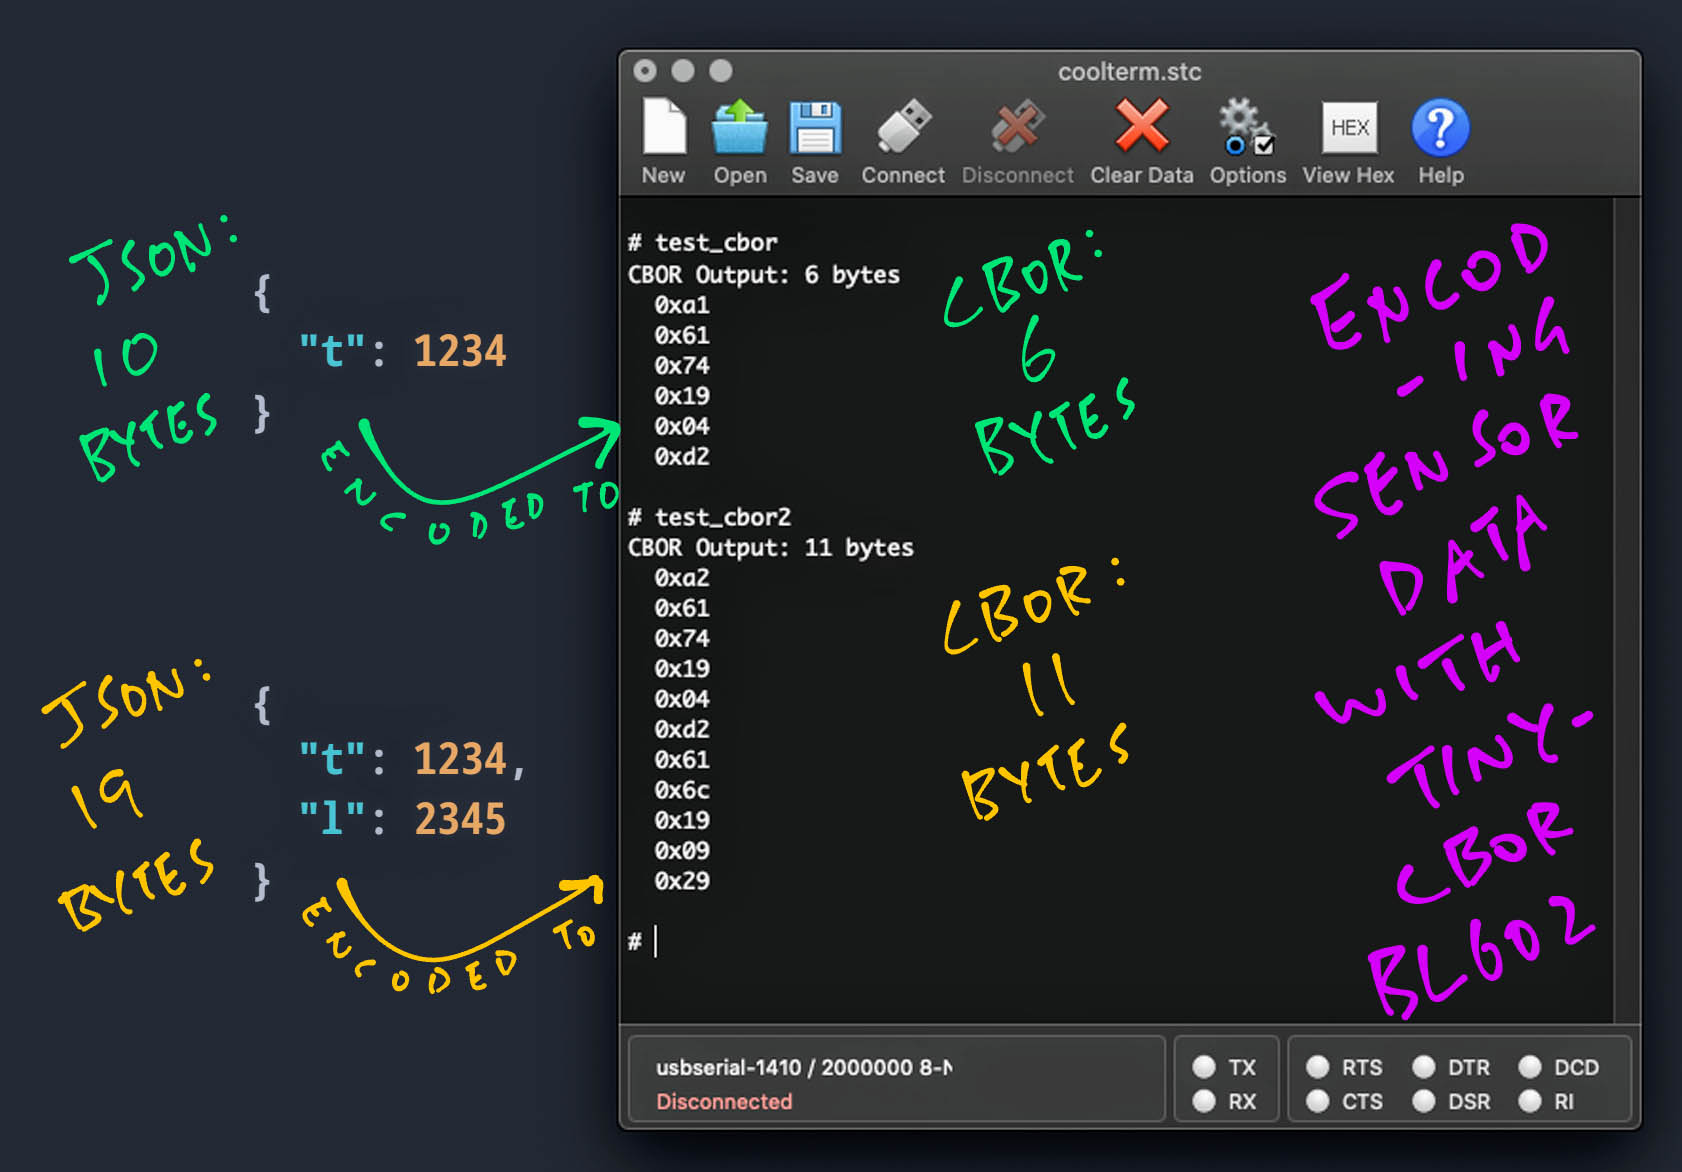
What about the Base64 Decoding?
Our IoT Gadget transmits Sensor Data to The Things Network in Binary Format (CBOR).
But our Roblox script fetches the Sensor Data in JSON Format, which can’t embed Binary Data.
Hence our Binary Data is converted to Text Format with Base64 Encoding, when fetched by Roblox.
Our Sensor Data encoded with CBOR…
a2 61 74 19 04 d4 61 6c 19 09 2bBecomes this Text String when encoded with Base64…
omF0GQTUYWwZCSs=This explains why we need two stages of decoding: Base64 followed by CBOR.
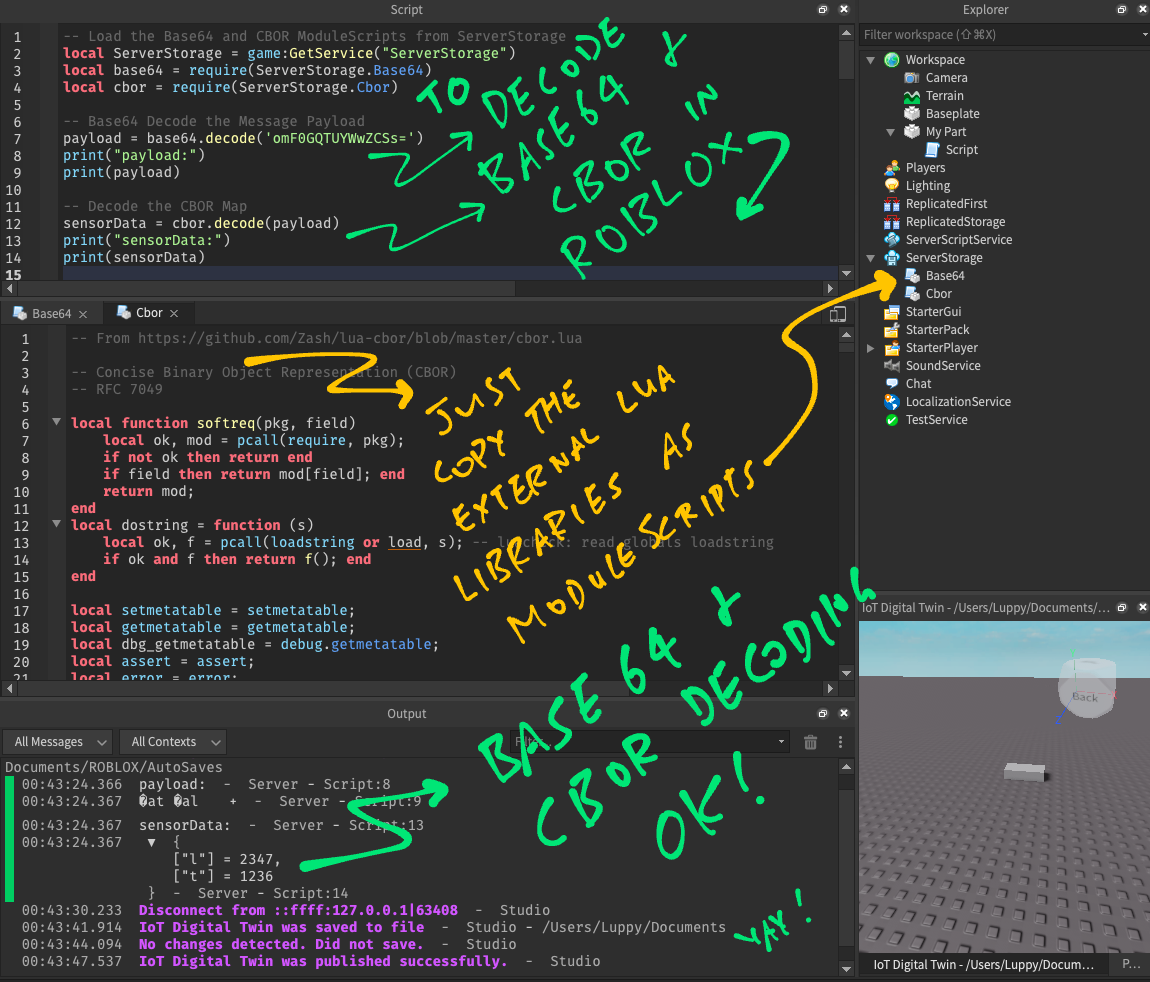
How do we decode Base64 and CBOR in Roblox?
We call these two ModuleScripts in ServerStorage…
Like so…
-- Load the Base64 and CBOR ModuleScripts from ServerStorage
local ServerStorage = game:GetService("ServerStorage")
local base64 = require(ServerStorage.Base64)
local cbor   = require(ServerStorage.Cbor)

-- Base64 Decode the Message Payload
payload = base64.decode('omF0GQTUYWwZCSs=')
print("payload:")
print(payload)

-- Decode the CBOR Map
sensorData = cbor.decode(payload)
print("sensorData:")
print(sensorData)We should see…
payload:
�at�al

sensorData:
{
  ["l"] = 2347,
  ["t"] = 1236
}
Did we create the ModuleScripts from scratch?
Nope, they were copied from existing Lua Libraries…
Was it difficult to port the Lua Libraries into Roblox?
Not at all! We changed only one line of code in Base64.lua from…
local extract = _G.bit32 and _G.bit32.extractTo…
local extract = bit32 and bit32.extractAnd the ModuleScripts worked perfectly!
How did we render the Temperature of our Roblox Gadget?
(The green fireflies thingy?)
We rendered the Temperature with a Roblox Particle Emitter.
This is how we render a Particle Emitter in our Roblox Script…
-- Create a Particle Emitter for Normal Temperature
local emitter = createParticleEmitter()The code above renders our Roblox Gadget with Normal Temperature.
(Yep Shrek and his green fireflies)
createParticleEmitter is defined in DigitalTwin.lua…
-- Create the Particle Emitter for Normal Temperature
-- Based on https://developer.roblox.com/en-us/api-reference/class/ParticleEmitter
local function createParticleEmitter()

  -- Create an instance of Particle Emitter and enable it
  local emitter = Instance.new("ParticleEmitter")
  emitter.Enabled = true
We begin by creating an Instance of Particle Emitter.
Next we set the rate of particles emitted and their lifetime…
  -- Number of particles = Rate * Lifetime
  emitter.Rate = 20 -- Particles per second
  emitter.Lifetime = NumberRange.new(5, 10) -- How long the particles should be alive (min, max)
(Why these Magic Numbers? We’ll learn later)
We set the texture of the particles to a Star Sparkle image…
  -- Visual properties
  -- Texture for the particles: "star sparkle particle" by @Vupatu
  -- https://www.roblox.com/library/6490035152/star-sparkle-particle
  emitter.Texture = "rbxassetid://6490035152"
(Somehow I couldn’t set the texture to “rbxasset:textures/particles/sparkles_main.dds”. Only “rbxassetid” works)
Our particles can change color, but we’ll stick to green (R=0.3, G=0.6, B=0.0)…
  -- For Color, build a ColorSequence using ColorSequenceKeypoint
  local colorKeypoints = {
    -- API: ColorSequenceKeypoint.new(time, color)
    ColorSequenceKeypoint.new( 0.0, Color3.new(0.3, 0.6, 0.0)),  -- At time=0: Green
    ColorSequenceKeypoint.new( 1.0, Color3.new(0.3, 0.6, 0.0))   -- At time=1: Green
  }
  emitter.Color = ColorSequence.new(colorKeypoints)
This Color Sequence says that from start (time=0) to end (time=1), the particles stay green.
We won’t vary the particle transparency either…
  -- For Transparency, build a NumberSequence using NumberSequenceKeypoint
  local numberKeypoints = {
    -- API: NumberSequenceKeypoint.new(time, size, envelop)
    NumberSequenceKeypoint.new( 0.0, 0.0);    -- At time=0, fully opaque
    NumberSequenceKeypoint.new( 1.0, 0.0);    -- At time=1, fully opaque
  }
  emitter.Transparency = NumberSequence.new(numberKeypoints)
From start to end, our particles are fully opaque.
We set the Light Emission and Influence…
  -- Light Emission and Influence
  emitter.LightEmission = 0 -- If 1: When particles overlap, multiply their color to be brighter
  emitter.LightInfluence = 1 -- If 0: Don't be affected by world lighting
We define the speed and spread of our particles…
  -- Speed properties
  emitter.EmissionDirection = Enum.NormalId.Top -- Emit towards top
  emitter.Speed = NumberRange.new(5.0, 5.0) -- Speed
  emitter.Drag = 10.0 -- Apply drag to particle motion
  emitter.VelocityInheritance = 0 -- Don't inherit parent velocity
  emitter.Acceleration = Vector3.new(0.0, 0.0, 0.0)
  emitter.LockedToPart = false -- Don't lock the particles to the parent
  emitter.SpreadAngle = Vector2.new(50.0, 50.0) -- Spread angle on X and Y
We set the size and rotation of our particles…
  -- Simulation properties
  local numberKeypoints2 = {
    NumberSequenceKeypoint.new(0.0, 0.2);  -- Size at time=0
    NumberSequenceKeypoint.new(1.0, 0.2);  -- Size at time=1
  }
  emitter.Size = NumberSequence.new(numberKeypoints2)
  emitter.ZOffset = 0.0 -- Render in front or behind the actual position
  emitter.Rotation = NumberRange.new(0.0, 0.0) -- Rotation
  emitter.RotSpeed = NumberRange.new(0.0) -- Do not rotate during simulation
Finally we add the emitter to our Roblox Part…
  -- Add the emitter to our Part
  emitter.Parent = script.Parent
  return emitter
end
And our Roblox Gadget starts emitting green particles to represent Normal Temperature!
(Centre one in the pic below)
All the Magic Numbers above… Where did they come from?
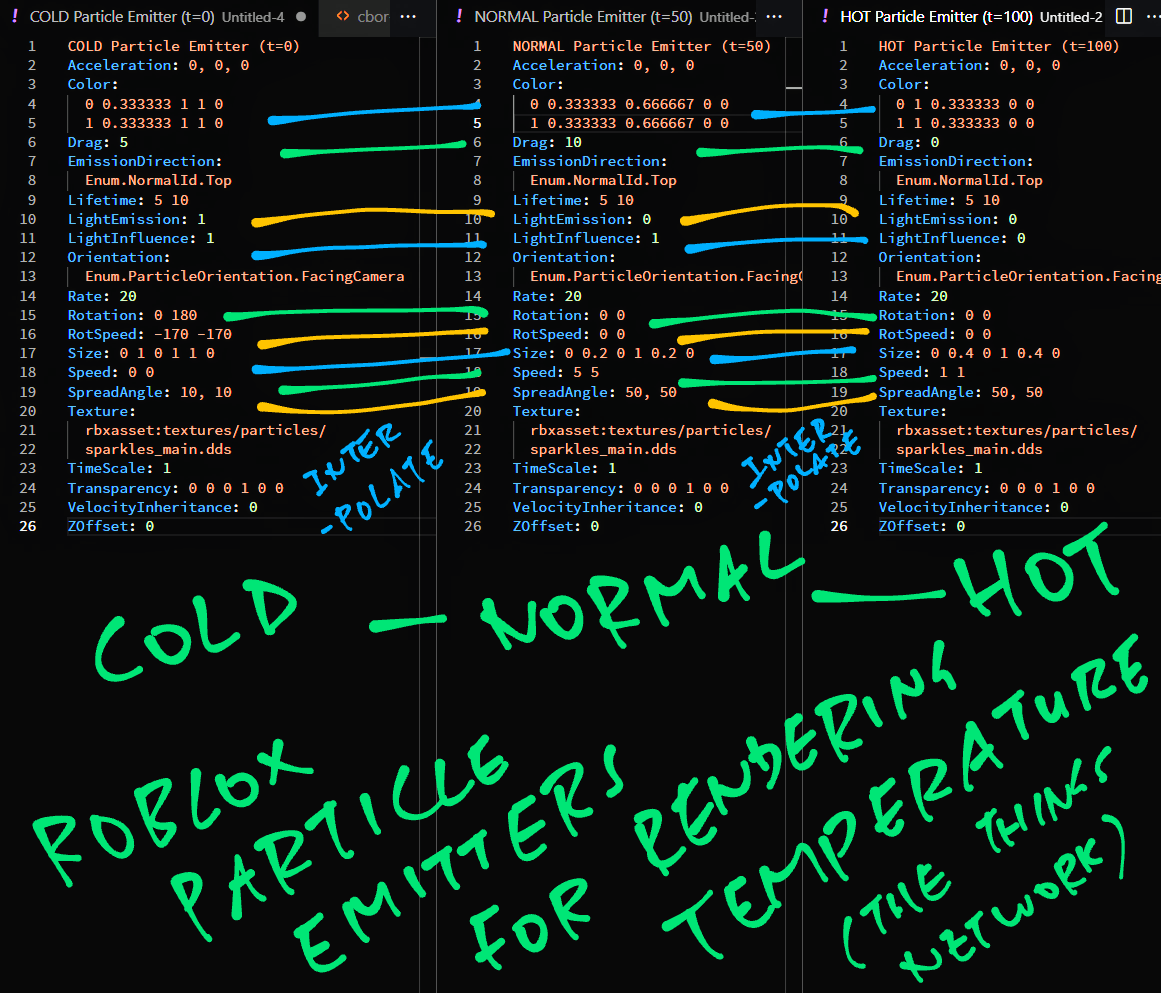
I created three Particle Emitters for the Cold, Normal and Hot Temperatures…
I tweaked them till they looked OK. Then I dumped the settings of the Particle Emitters like so…
-- Dump the 3 Particle Emitters: Cold, Normal, Hot
print("COLD Particle Emitter (t=0)")
dumpParticleEmitter(script.Parent.Cold)

print("NORMAL Particle Emitter (t=5000)")
dumpParticleEmitter(script.Parent.Normal)

print("HOT Particle Emitter (t=10000)")
dumpParticleEmitter(script.Parent.Hot)(dumpParticleEmitter is defined in DigitalTwin.lua)
The Particle Emitter settings look like…
NORMAL Particle Emitter (t=5000)
  Acceleration: 0, 0, 0
  Color:
    0 0.3 0.6 0 0
    1 0.3 0.6 0 0
  Drag: 10
...These are the Magic Numbers that we plugged into our createParticleEmitter function.
Why did we create the Particle Emitter in Roblox Script?
Why not reuse the Particle Emitters that we have created manually?
That’s because we want to render 10,000 Levels of Hotness / Coldness.
Our Roblox Script will tweak the Particle Emitter at runtime to render the Live Temperature.
Read on to learn how we do this with Linear Interpolation.
Previously we have dumped the settings for our Hot / Normal / Cold Particle Emitters…
COLD Particle Emitter (t=0)
  Drag:  5
  Speed: 0 0
  Color: (time, red, green, blue)
    0 0.3 1.0 1.0
    1 0.3 1.0 1.0
    ...

NORMAL Particle Emitter (t=5000)
  Drag:  10
  Speed: 5 5
  Color: (time, red, green, blue)
    0 0.3 0.6 0.0
    1 0.3 0.6 0.0
    ...

HOT Particle Emitter (t=10000)
  Drag:  0
  Speed: 1 1
  Color: (time, red, green, blue)
    0 1.0 0.3 0.0
    1 1.0 0.3 0.0
...The three emitters represent the Min / Mid / Max Temperatures…
t=0t=5000t=10000How shall we interpolate the three emitters… To render 10,000 Levels of Hotness / Coldness?
Based on the values above, we derive the following values that shall be interpolated into 10,000 levels as we transition between Cold / Normal / Hot…
Drag:
  COLD:   5
  NORMAL: 10
  HOT:    0

Speed:
  COLD:   0 0
  NORMAL: 5 5
  HOT:    1 1

Color: (time, red, green, blue)
  COLD:
    0 0.3 1.0 1.0
    1 0.3 1.0 1.0
  NORMAL:
    0 0.3 0.6 0.0
    1 0.3 0.6 0.0
  HOT:
    0 1.0 0.3 0.0
    1 1.0 0.3 0.0
    ...
(See the complete interpolation)
Let’s plug the derived values into our Roblox Script.
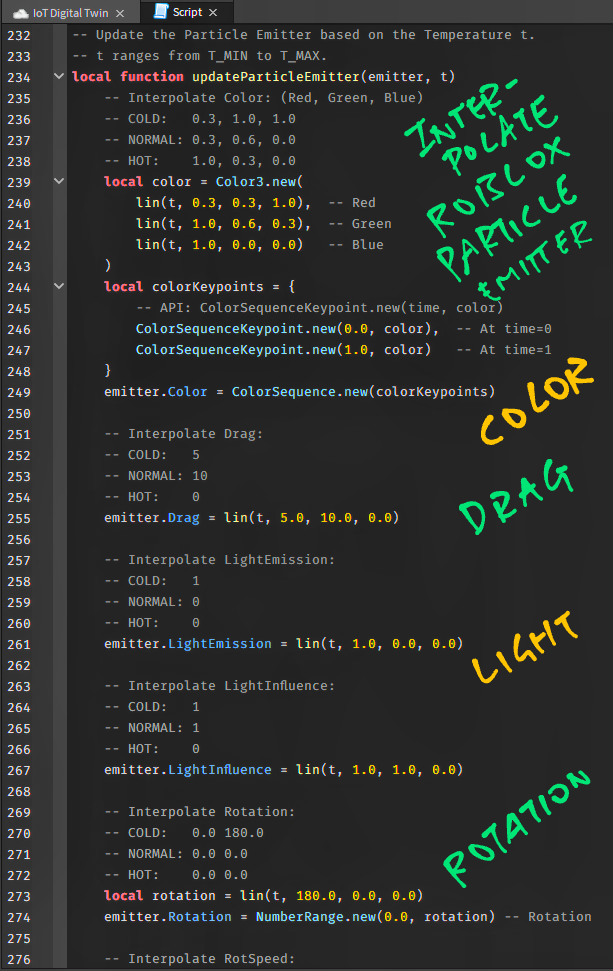
We take the values derived above and plug them into our updateParticleEmitter function from DigitalTwin.lua…
-- Update the Particle Emitter based on the Temperature t.
-- t ranges from T_MIN (0) to T_MAX (10,000).
local function updateParticleEmitter(emitter, t)

  -- Interpolate Drag:
  -- COLD:   5
  -- NORMAL: 10
  -- HOT:    0
  emitter.Drag = lin(t, 5.0, 10.0, 0.0)

  -- Interpolate Speed:
  -- COLD:   0 0
  -- NORMAL: 5 5
  -- HOT:    1 1
  local speed = lin(t, 0.0, 5.0, 1.0)
  emitter.Speed = NumberRange.new(speed, speed) -- Speed
lin is our helper function that computes Linear Interpolation.
(More about this in the next section)
In the code above we interpolate the Drag and Speed of our Particle Emitter, based on the Temperature (t).
For the color of our Particle Emitter, we compute the interpolated color…
  -- Interpolate Color: (Red, Green, Blue)
  -- COLD:   0.3, 1.0, 1.0
  -- NORMAL: 0.3, 0.6, 0.0
  -- HOT:    1.0, 0.3, 0.0
  local color = Color3.new(
    lin(t, 0.3, 0.3, 1.0),  -- Red
    lin(t, 1.0, 0.6, 0.3),  -- Green
    lin(t, 1.0, 0.0, 0.0)   -- Blue
  )
Then we update the Color Sequence based on the interpolated color…
  local colorKeypoints = {
    -- API: ColorSequenceKeypoint.new(time, color)
    ColorSequenceKeypoint.new(0.0, color),  -- At time=0
    ColorSequenceKeypoint.new(1.0, color)   -- At time=1
  }
  emitter.Color = ColorSequence.new(colorKeypoints)
(See the rest of the function here)
And we’re done! To render the Live Temperature, we call updateParticleEmitter like so…
-- Create a Particle Emitter for Normal Temperature
local emitter = createParticleEmitter()

-- Update the emitter to render Temperature=1234
updateParticleEmitter(emitter, 1234)Here’s how our Interpolating Particle Emitter looks…
How does the lin function compute Linear Interpolation?
Earlier we saw this…
-- Interpolate Drag:
-- COLD:   5
-- NORMAL: 10
-- HOT:    0
emitter.Drag = lin(t, 5.0, 10.0, 0.0)
This code interpolates the Drag of our Particle Emitter based on the Temperature (t).
The values passed to lin…
5.0, 10.0, 0.0Correspond to the Drag values for Min / Mid / Max Temperatures.
The Min / Mid / Max Temperatures are defined here: DigitalTwin.lua
-- Minimum, Maximum and Mid values for Temperature (t) that will be interpolated
local T_MIN = 0
local T_MAX = 10000
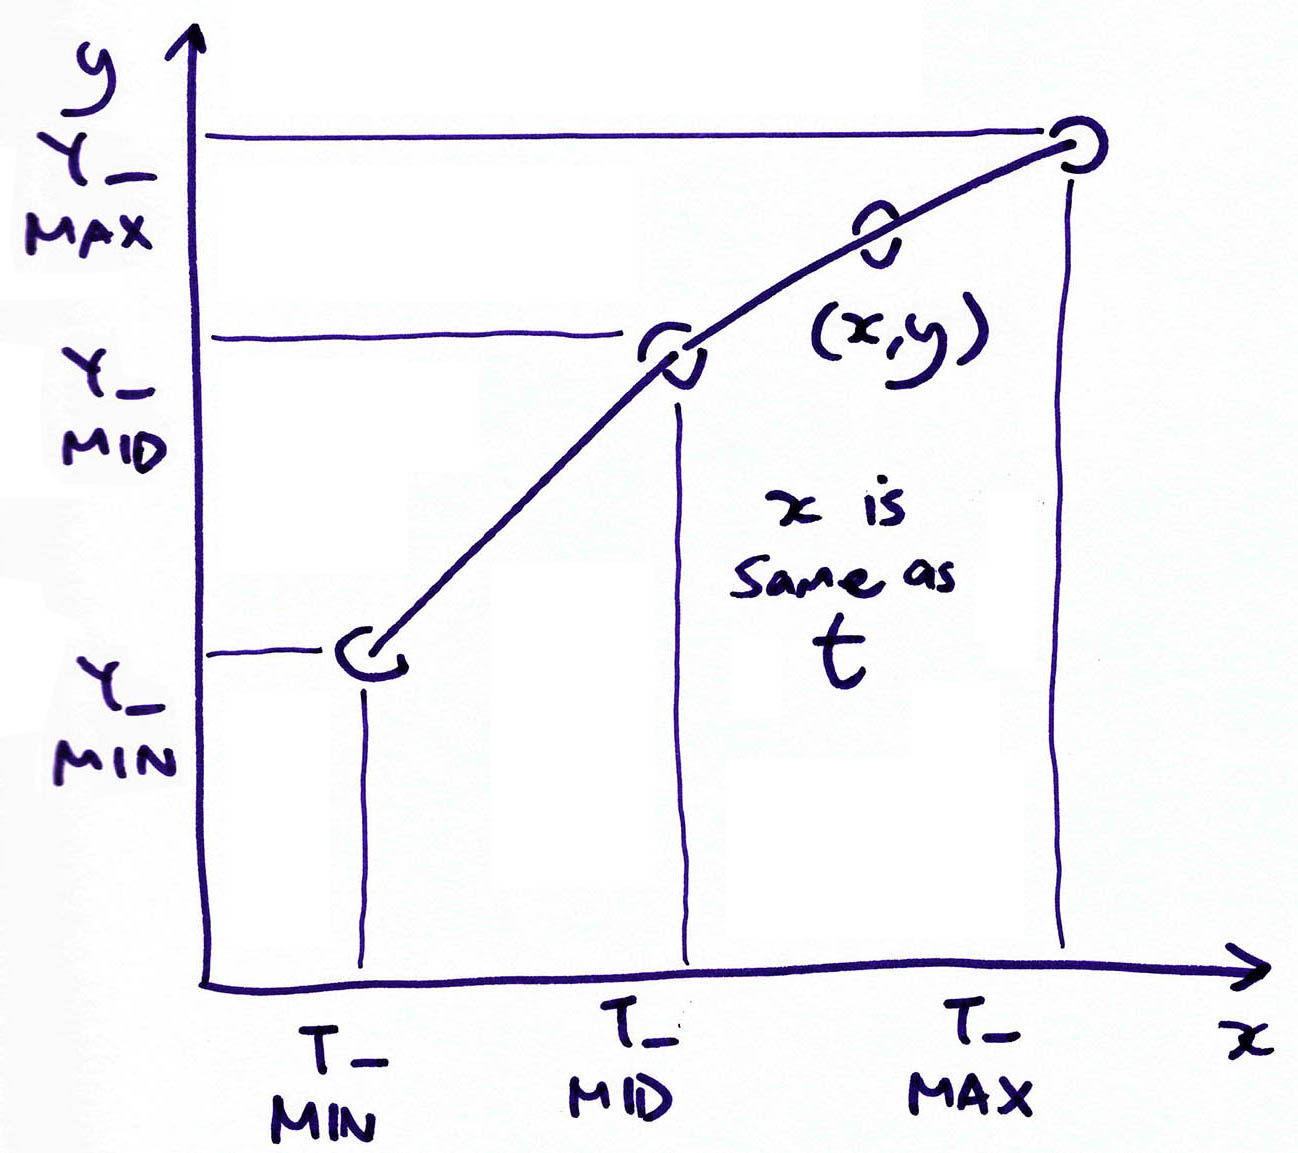
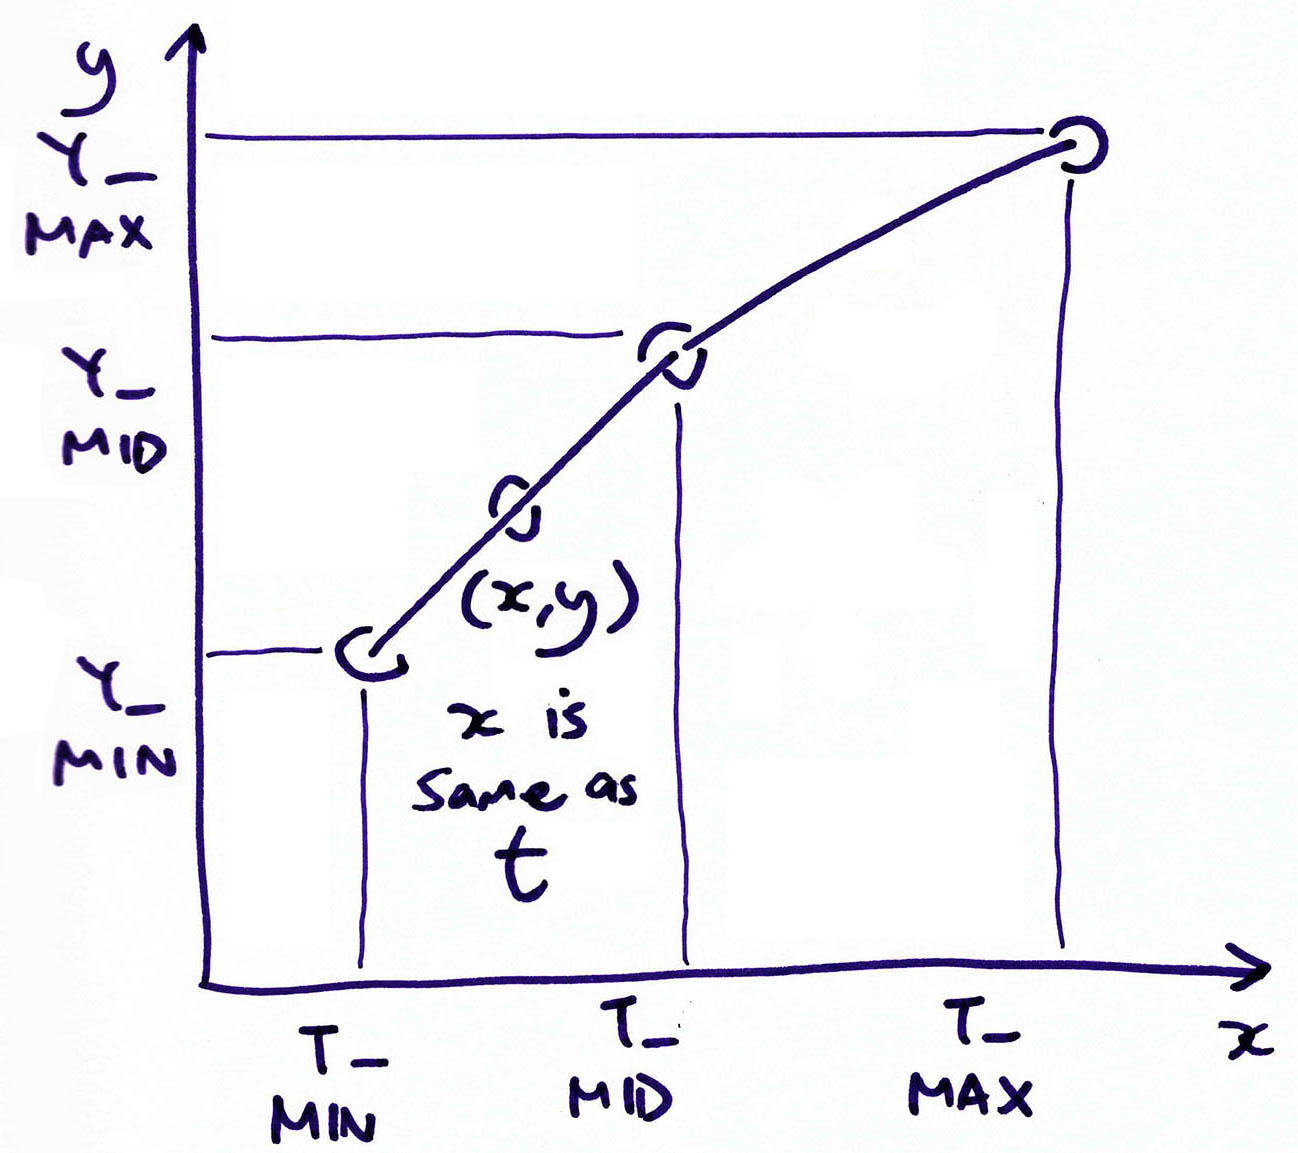
local T_MID = (T_MIN + T_MAX) / 2We compute the Linear Interpolation by drawing lines between the Min, Mid and Max values…
Note that we compute the Linear Interpolation a little differently depending on whether the Temperature is less or greater than 5,000 (T_MID)…
Below is our lin function that handles both cases: DigitalTwin.lua
-- Linear Interpolate the value of y, given that
-- (1) x ranges from T_MIN to T_MAX
-- (2) When x=T_MIN, y=yMin
-- (3) When x=T_MID, y=yMid
-- (4) When x=T_MAX, y=yMax
local function lin(x: number, yMin: number, yMid: number, yMax: number) : number
  local y: number
  if x < T_MID then
    -- Interpolate between T_MIN and T_MID
    y = yMin + (yMid - yMin) * (x - T_MIN) / (T_MID - T_MIN)
  else
    -- Interpolate between T_MID and T_MAX
    y = yMid + (yMax - yMid) * (x - T_MID) / (T_MAX - T_MID)
  end
  -- Force y to be between yMin and yMax
  if y < math.min(yMin, yMid, yMax) then
    y = math.min(yMin, yMid, yMax)
  end
  if y > math.max(yMin, yMid, yMax) then
    y = math.max(yMin, yMid, yMax)
  end
  return y
end
UPDATE: There’s another way to do Linear Interpolation in Roblox: TweenService
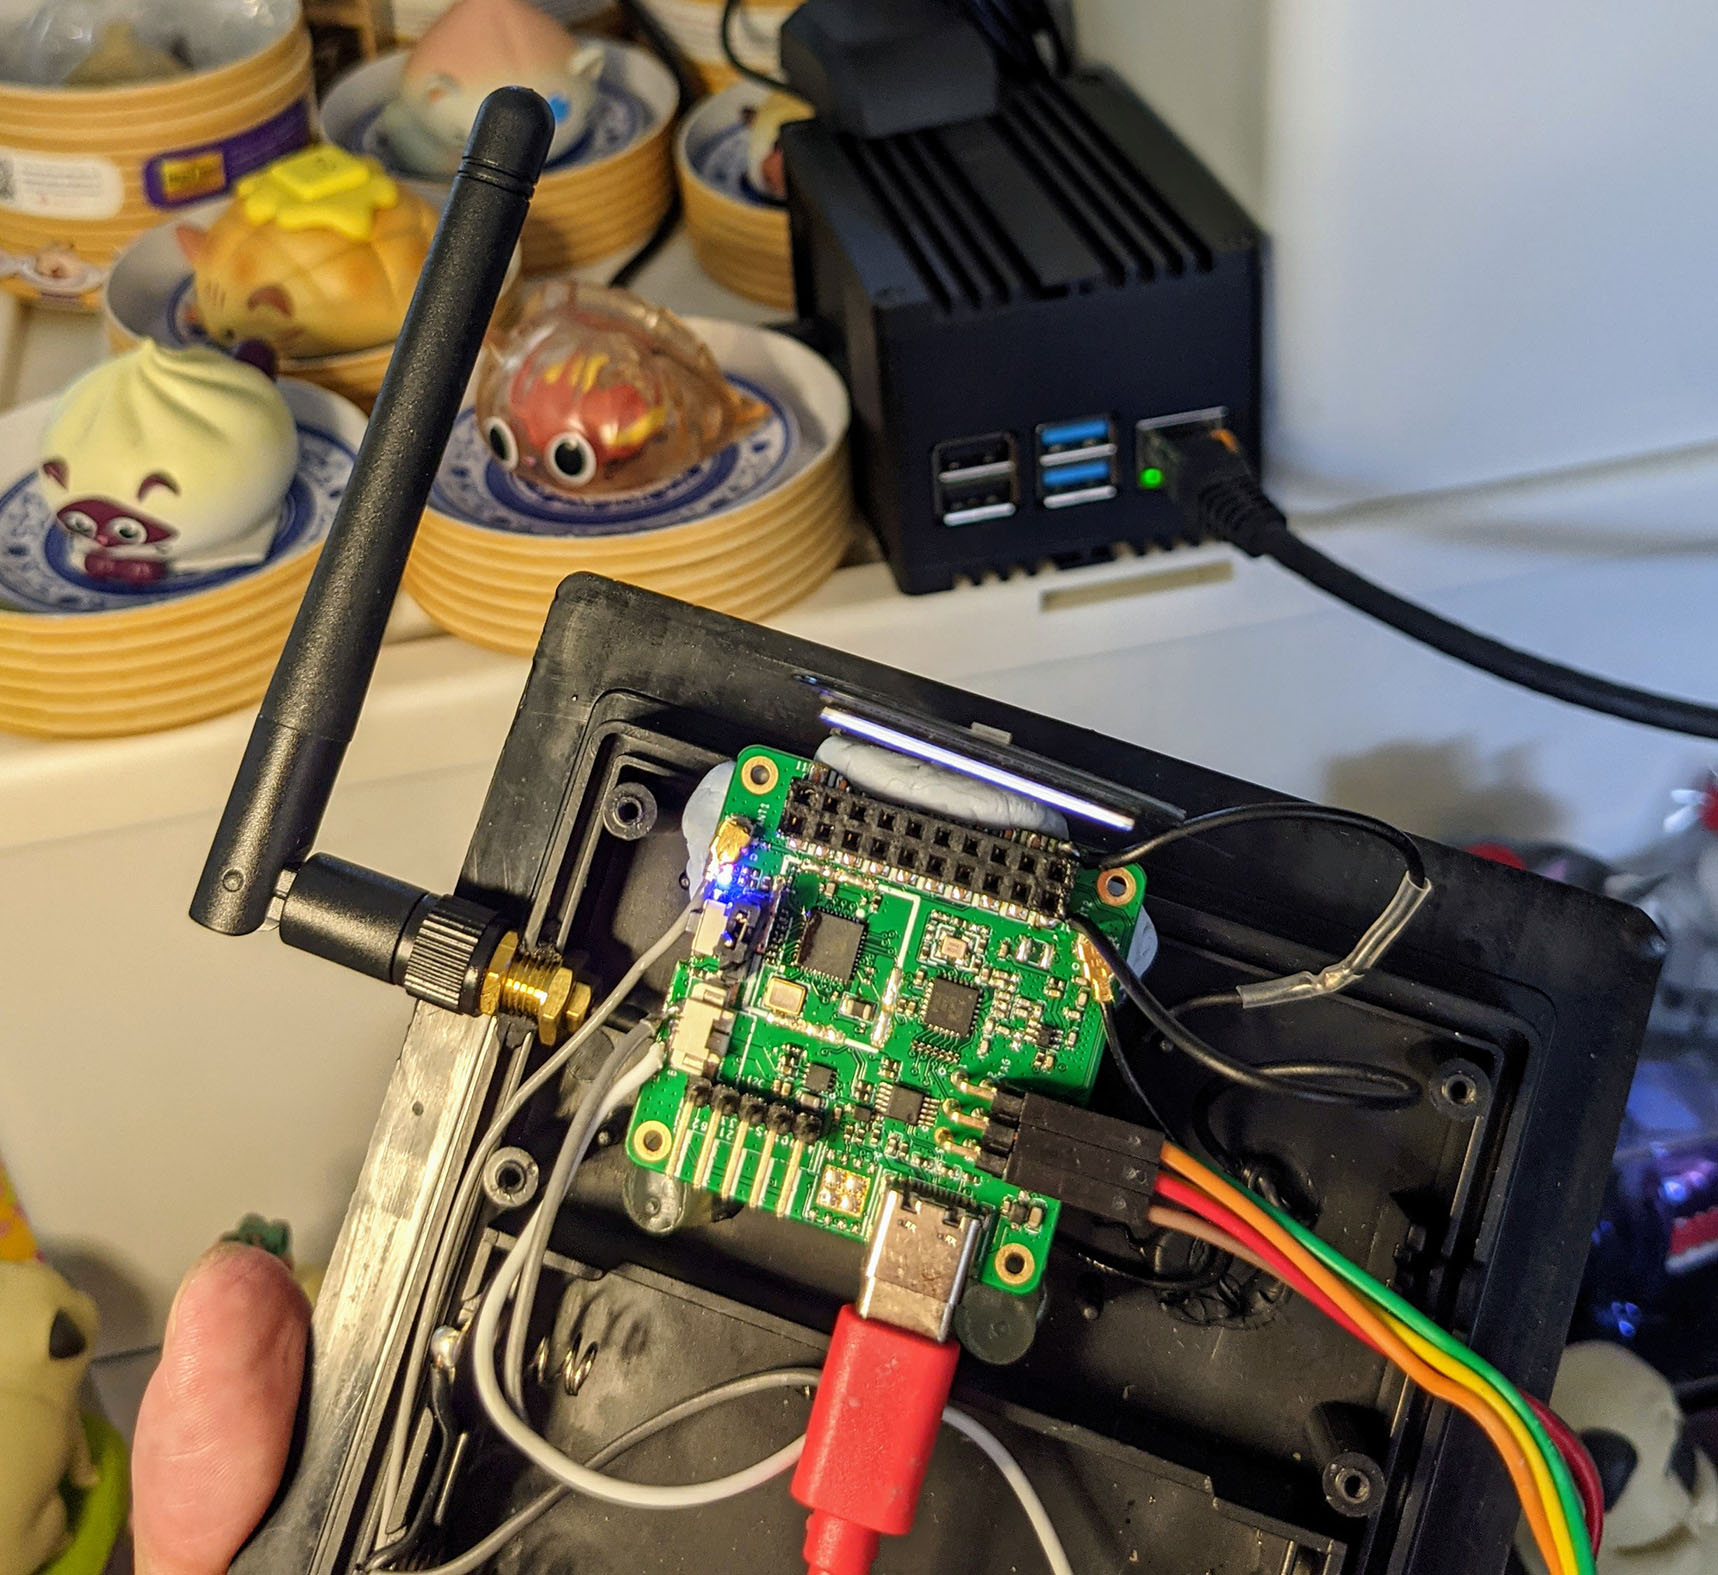
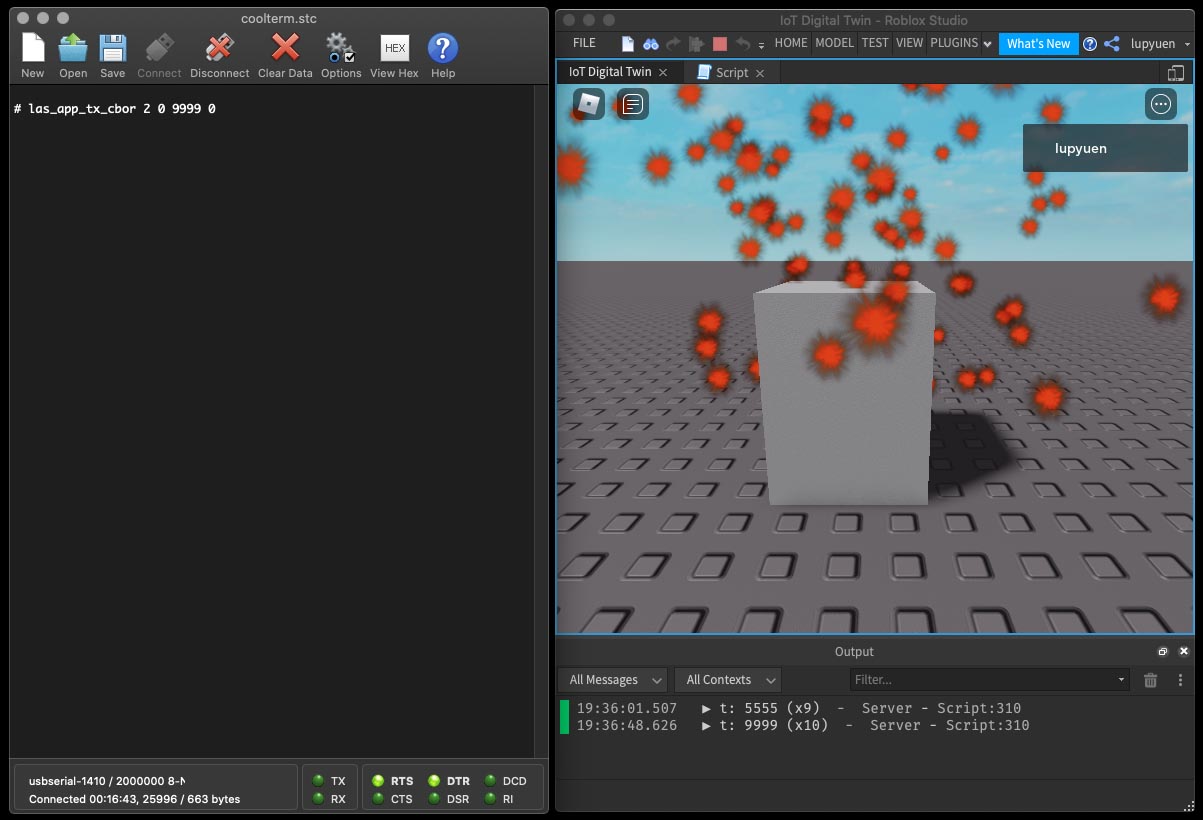
As promised, here’s the Real-Life Demo of our Roblox Digital Twin featuring PineDio Stack! (Pic above)
We follow the instructions below to run the LoRaWAN Firmware on PineDio Stack…
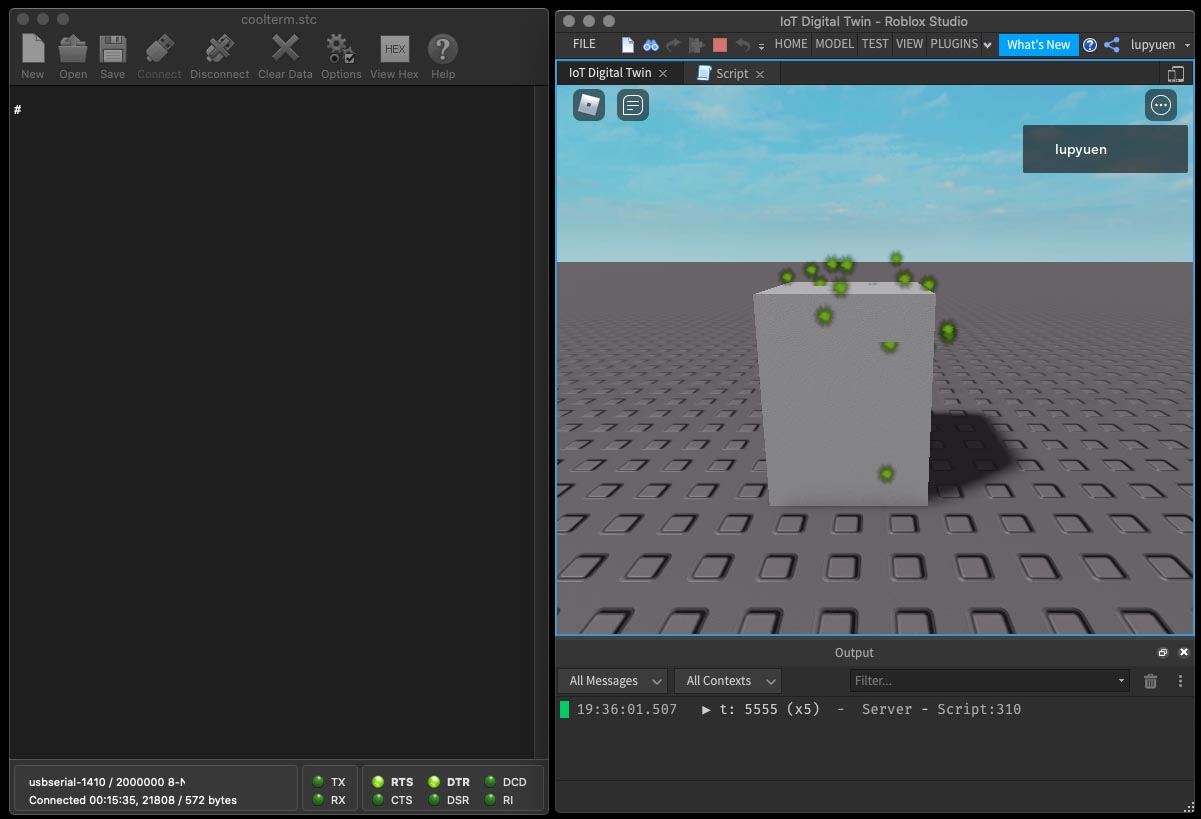
Our demo setup…
At Left: Serial Terminal connected to our PineDio Stack board
(We control PineDio Stack by entering commands into the Serial Terminal)
At Right: Roblox running our Digital Twin Script
Grey block is the Roblox Gadget that mirrors our real-world IoT Gadget (PineDio Stack)…
When PineDio Stack gets hot, the Roblox Gadget will look hot too!
We sync PineDio Stack (left) with Roblox Gadget (right) via The Things Network, the public wireless IoT network
Through The Things Network, Roblox fetches the Live Temperature of PineDio Stack every 5 seconds.
(Shown at lower right: 5555)
The temperature is now 55.55 ⁰C. Let’s set the PineDio Stack temperature to 99.99 ⁰C…
las_app_tx_cbor 2 0 9999 0(las_app_tx_cbor is explained here)
Our Roblox Gadget receives the high temperature and bursts into flames!
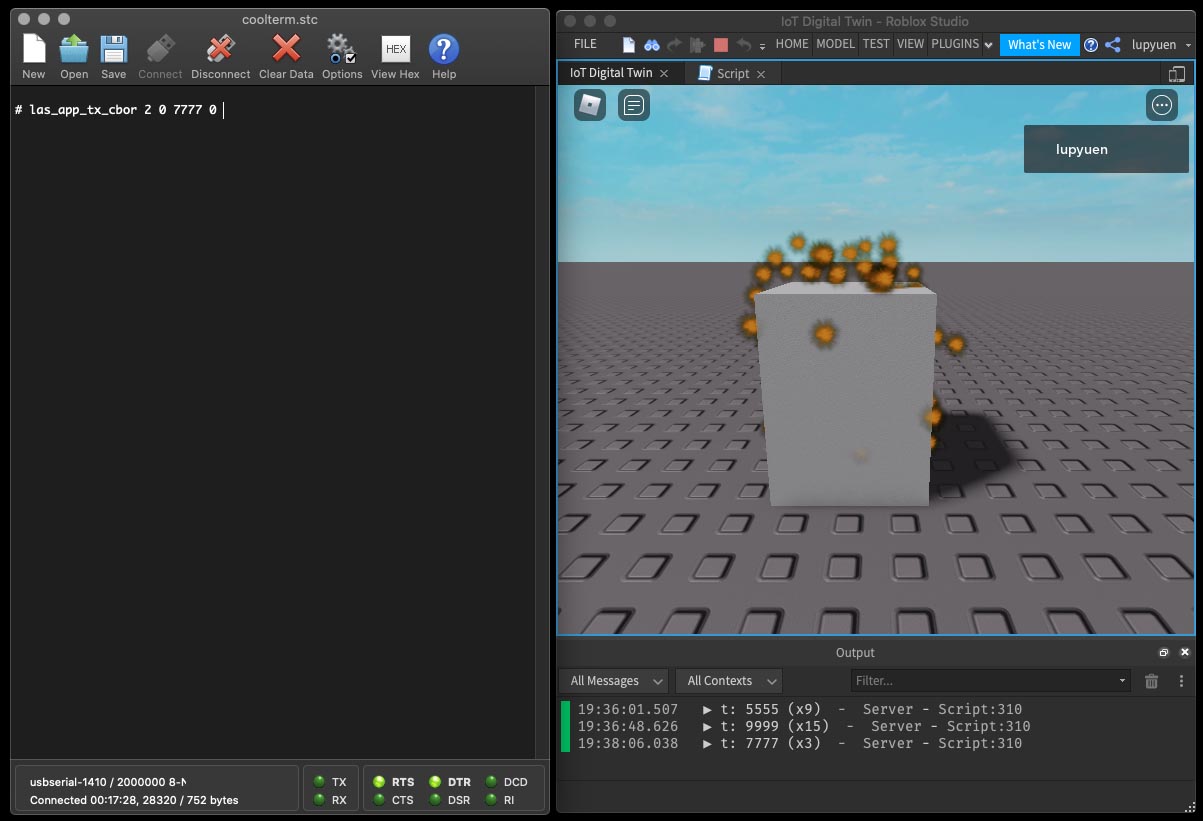
Let’s turn down PineDio Stack to 77.77 ⁰C…
las_app_tx_cbor 2 0 7777 0Our Roblox Gadget receives the updated temperature over The Things Network. And cools down a little.
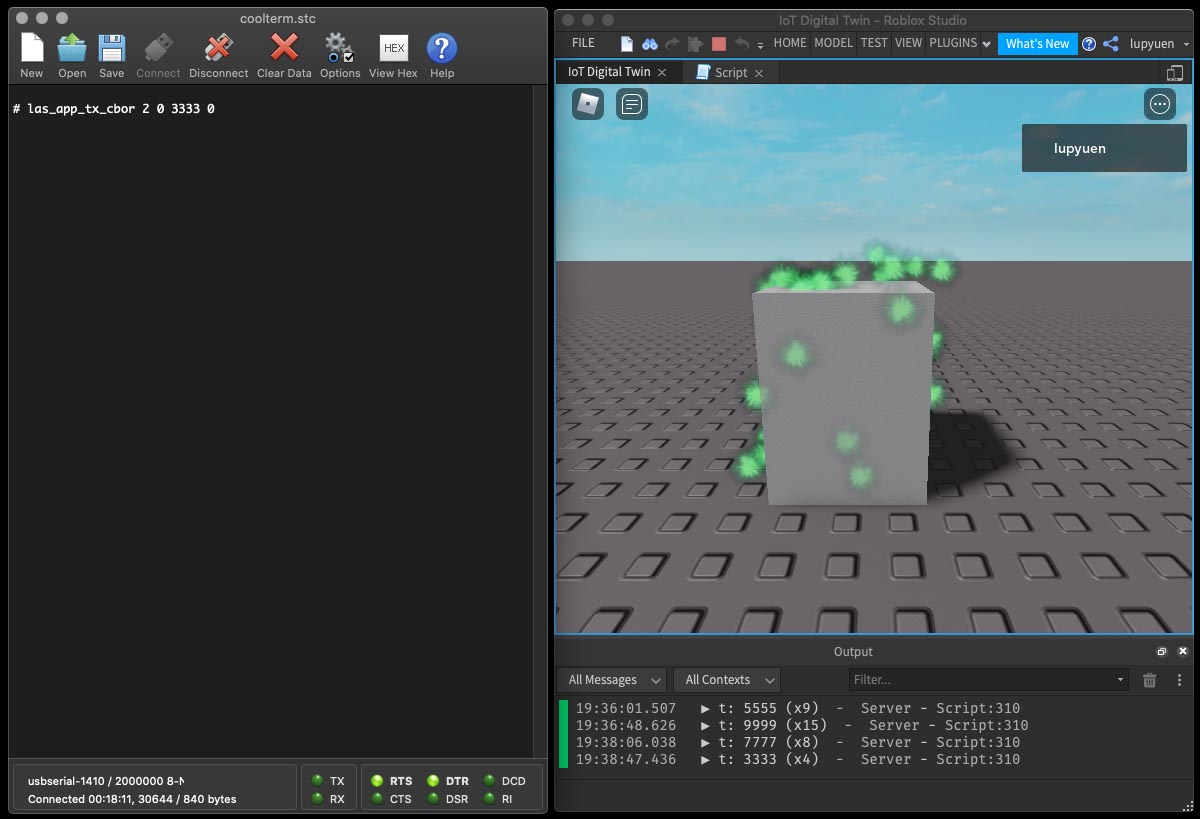
We cool PineDio Stack down to 33.33 ⁰C…
las_app_tx_cbor 2 0 3333 0Our Roblox Gadget turns blue.
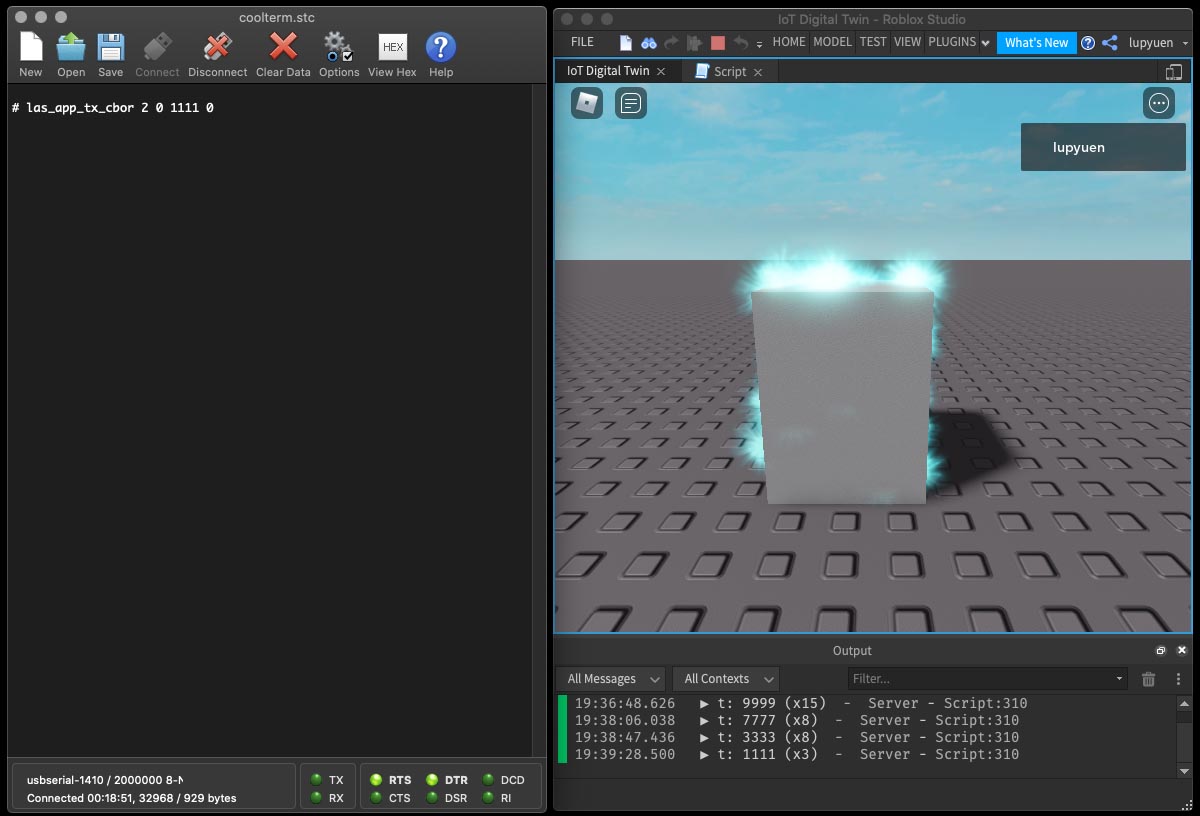
We start to freeze PineDio Stack at 11.11 ⁰C…
las_app_tx_cbor 2 0 1111 0Our Roblox Gadget turns into ice!
Below is the source code for the demo that we’ve seen. It calls all the functions that we’ve covered in this article: DigitalTwin.lua
-- Main Function. Fetch and render the Sensor Data from The Things Network every 5 seconds.
-- If fetch failed, show Demo Mode.
local function main()
  -- Create a Particle Emitter for Normal Temperature
  local emitter = createParticleEmitter()

  -- Loop forever fetching and rendering Sensor Data from The Things Network
  while true do
    -- Lua Table that will contain Sensor Data from The Things Network
    local sensorData = nil

    -- Temperature from The Things Network. Ranges from 0 to 10,000.
    local t = nil

    -- If API Key for The Things Network is defined...
    if TTN_API_KEY ~= "YOUR_API_KEY" then
      -- Fetch the Sensor Data from The Things Network
      sensorData = getSensorData()

      -- Get the Temperature if it exists
      if sensorData then
        t = sensorData.t
      end
    end

    -- If Temperature was successfully fetched from The Things Network...
    if t then
      -- Render the Temperature with our Particle Emitter
      print("t:", t)
      updateParticleEmitter(emitter, t)
    else
      -- Else render our Particle Emitter in Demo Mode
      print("Failed to get sensor data. Enter Demo Mode.")
      demoMode(emitter)
    end

    -- Sleep 5 seconds so we don't overwhelm The Things Network
    wait(5)
  end
end

-- Start the Main Function
main()That’s all for our demo today. Would be so fun if someday Roblox could overlay Real-World Objects through Augmented Reality… And show us Sensor Data in real time!
I’m new to Roblox, but I had fun connecting things in the real world to Roblox. I hope you enjoyed it too!
In the next article we shall head back to PineDio Stack coding, as we read and transmit PineDio Stack’s Internal Temperature Sensor to The Things Network.
Many Thanks to my GitHub Sponsors for supporting my work! This article wouldn’t have been possible without your support.
Got a question, comment or suggestion? Create an Issue or submit a Pull Request here…
lupyuen.github.io/src/roblox.md
This article is the expanded version of this Twitter Thread
Can Roblox control IoT Gadgets, like flipping the lights in our Smart Home on and off?
Yes this Remote Actuation is technically feasible, because The Things Network exposes a HTTP POST API for Roblox to push Downlink Messages to IoT Gadgets…
Our IoT Gadget would need to handle Downlink Messages and actuate accordingly. (Like switch the light on / off)
We may ignore these two Type Checking Warnings…
-- Base64 Decode the Message Payload
payload = base64.decode(frmPayload)

W000: (53,27) Argument count mismatch. Function expects 3 arguments, but only 1 is specified
-- Decode the CBOR Map to get Sensor Data
sensorData = cbor.decode(payload)
W000: (56,28) Argument count mismatch. Function expects 2 arguments, but only 1 is specifiedThat’s because the imported ModuleScripts (Base64 and Cbor) don’t support Type Checking.
Is our Roblox Script running on the Roblox Server or Client?
Our script runs on the Roblox Server. So the API Key is not visible by players.
Does the Roblox Server run our script all the time?
When a player joins the game, Roblox starts a server to run our script. (Up to 50 players per server)
When all players leave the game, Roblox shuts down the server.
If we don’t wish to decode CBOR in the Roblox Script, there’s another solution: Decode CBOR in The Things Network with a Payload Formatter…
Here are the steps to download and install Roblox Studio for macOS and Windows…
Sign up for a free account at roblox.com
Log in to roblox.com
Click “Create” at the top bar
Click “Start Creating”
The Roblox Studio Installer will be downloaded.
Click the Installer to install Roblox Studio.
For macOS: If the Installer (or upgrade) fails…
Reboot macOS.
Delete Roblox Studio in the Applications Folder.
Reinstall Roblox Studio.
(That’s how I fixed Roblox Studio on macOS)
To install Roblox Studio on Linux, see this…
If we’re in China, Roblox works a little differently. See this…
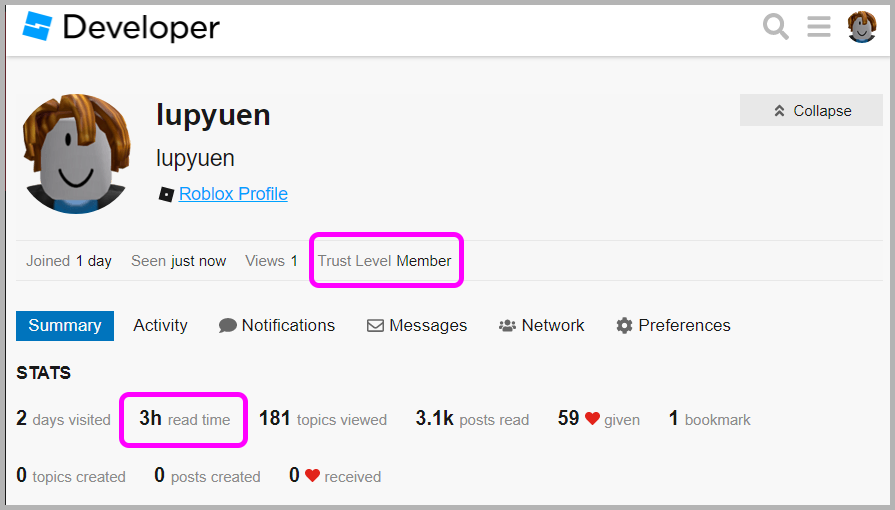
Remember to log in when browsing the Roblox Developer Forum.
This lets us “level up” quicker to receive posting privileges. (See this)
(We need roughly 3 hours of “Read Time” to get posting privilege)
During development, we created three Particle Emitters…
Cold Particle Emitter (t=0)
Acceleration: 0, 0, 0
Color: 0 0.333333 1 1 0 1 0.333333 1 1 0
Drag: 5
EmissionDirection: Enum.NormalId.Top
Lifetime: 5 10
LightEmission: 1
LightInfluence: 1
Orientation: Enum.ParticleOrientation.FacingCamera
Rate: 20
Rotation: 0 180
RotSpeed: -170 -170
Size: 0 1 0 1 1 0
Speed: 0 0
SpreadAngle: 10, 10
Texture: rbxasset:textures/particles/sparkles_main.dds
TimeScale: 1
Transparency: 0 0 0 1 0 0
VelocityInheritance: 0
ZOffset: 0
Normal Particle Emitter (t=5000)
Acceleration: 0, 0, 0
Color: 0 0.333333 0.666667 0 0 1 0.333333 0.666667 0 0
Drag: 10
EmissionDirection: Enum.NormalId.Top
Lifetime: 5 10
LightEmission: 0
LightInfluence: 1
Orientation: Enum.ParticleOrientation.FacingCamera
Rate: 20
Rotation: 0 0
RotSpeed: 0 0
Size: 0 0.2 0 1 0.2 0
Speed: 5 5
SpreadAngle: 50, 50
Texture: rbxasset:textures/particles/sparkles_main.dds
TimeScale: 1
Transparency: 0 0 0 1 0 0
VelocityInheritance: 0
ZOffset: 0
Hot Particle Emitter (t=10000)
Acceleration: 0, 0, 0
Color: 0 1 0.333333 0 0 1 1 0.333333 0 0
Drag: 0
EmissionDirection: Enum.NormalId.Top
Lifetime: 5 10
LightEmission: 0
LightInfluence: 0
Orientation: Enum.ParticleOrientation.FacingCamera
Rate: 20
Rotation: 0 0
RotSpeed: 0 0
Size: 0 0.4 0 1 0.4 0
Speed: 1 1
SpreadAngle: 50, 50
Texture: rbxasset:textures/particles/sparkles_main.dds
TimeScale: 1
Transparency: 0 0 0 1 0 0
VelocityInheritance: 0
ZOffset: 0
(The settings were dumped with the dumpParticleEmitter function in DigitalTwin.lua)
To render the Temperature in 10,000 levels (from t=0 to t=10000), we performed Linear Interpolation on the three Particle Emitters.
By matching the above settings (row by row), we derive the emitter settings that will be interpolated…
Color:
  COLD:
    0 0.333333 1 1 0
    1 0.333333 1 1 0
  NORMAL:
    0 0.333333 0.666667 0 0
    1 0.333333 0.666667 0 0
  HOT:
    0 1 0.333333 0 0
    1 1 0.333333 0 0

Drag:
  COLD:   5
  NORMAL: 10
  HOT:    0

LightEmission:
  COLD:   1
  NORMAL: 0
  HOT:    0

LightInfluence:
  COLD:   1
  NORMAL: 1
  HOT:    0

Rotation:
  COLD:   0 180
  NORMAL: 0 0
  HOT:    0 0

RotSpeed:
  COLD:   -170 -170
  NORMAL: 0    0
  HOT:    0    0

Size:
  COLD:   0 1   0 1 1   0
  NORMAL: 0 0.2 0 1 0.2 0
  HOT:    0 0.4 0 1 0.4 0

Speed:
  COLD:   0 0
  NORMAL: 5 5
  HOT:    1 1

SpreadAngle:
  COLD:   10, 10
  NORMAL: 50, 50
  HOT:    50, 50
To create a Particle Emitter for Normal Temperature, we call createParticleEmitter in DigitalTwin.lua
-- Create a Particle Emitter for Normal Temperature
local emitter = createParticleEmitter()
Then to interpolate the Particle Emitter for High / Mid / Low Temperatures, we call updateParticleEmitter in DigitalTwin.lua
(We’ve seen createParticleEmitter and updateParticleEmitter earlier)
Here’s how our demoMode function calls updateParticleEmitter to render the Temperature in Demo Mode. (High to low, then back to high)
From DigitalTwin.lua:
-- Demo Mode if we don't have an IoT Device connected to The Things Network.
-- Gradually update our Particle Emitter for Temperature=10,000 to 0 and back to 10,000.
local function demoMode(emitter)

  -- Gradually update the emitter for Temperature=10,000 to 0
  for t = T_MAX, T_MIN, -600 do
    print("t:", t)
    updateParticleEmitter(emitter, t)
    wait(4)
  end

  -- Gradually update the emitter for Temperature=0 to 10,000
  for t = T_MIN, T_MAX, 600 do
    print("t:", t)
    updateParticleEmitter(emitter, t)
    wait(4)
  end
end
Our Interpolating Particle Emitter in Demo Mode looks like this…
Note that rbxasset won’t work for setting the Texture…
-- This doesn't work
emitter.Texture = "rbxasset:textures/particles/sparkles_main.dds"
But rbxassetid works OK…
-- Texture for the particles: "star sparkle particle" by @Vupatu
-- https://www.roblox.com/library/6490035152/star-sparkle-particle
emitter.Texture = "rbxassetid://6490035152"Earlier we saw these settings for The Things Network in DigitalTwin.lua…
-- TODO: Change this to your Application ID for The Things Network
-- (Must have permission to Read Application Traffic)
local TTN_APPLICATION_ID = "YOUR_APPLICATION_ID"

-- TODO: Change this to your API Key for The Things Network
local TTN_API_KEY = "YOUR_API_KEY"

-- TODO: Change this to your region-specific URL for The Things Network
local TTN_URL = "https://au1.cloud.thethings.network/api/v3/as/applications/" .. TTN_APPLICATION_ID .. "/packages/storage/uplink_message?limit=1&order=-received_at"
This chapter explains the steps for getting the settings from The Things Network.
We assume that we have created an Application and Device in The Things Network…
To get the TTN_APPLICATION_ID…
Log on to The Things Network
Click Menu → Console
Select our region: Europe, North America or Australia.
Copy this setting…
(Your Region) → Applications → (Your Application) → Application ID
Paste it here…
-- TODO: Change this to your Application ID for The Things Network
-- (Must have permission to Read Application Traffic)
local TTN_APPLICATION_ID = "YOUR_APPLICATION_ID"For Roblox to fetch Sensor Data from The Things Network, we shall enable Storage Integration…
When Storage Integration is enabled, The Things Network will save the Uplink Messages transmitted by our devices.
(Saved messages will disappear after 2 or 3 days)
To enable Storage Integration, click…
(Your Application) → Integrations → Storage Integration → Activate Storage Integration
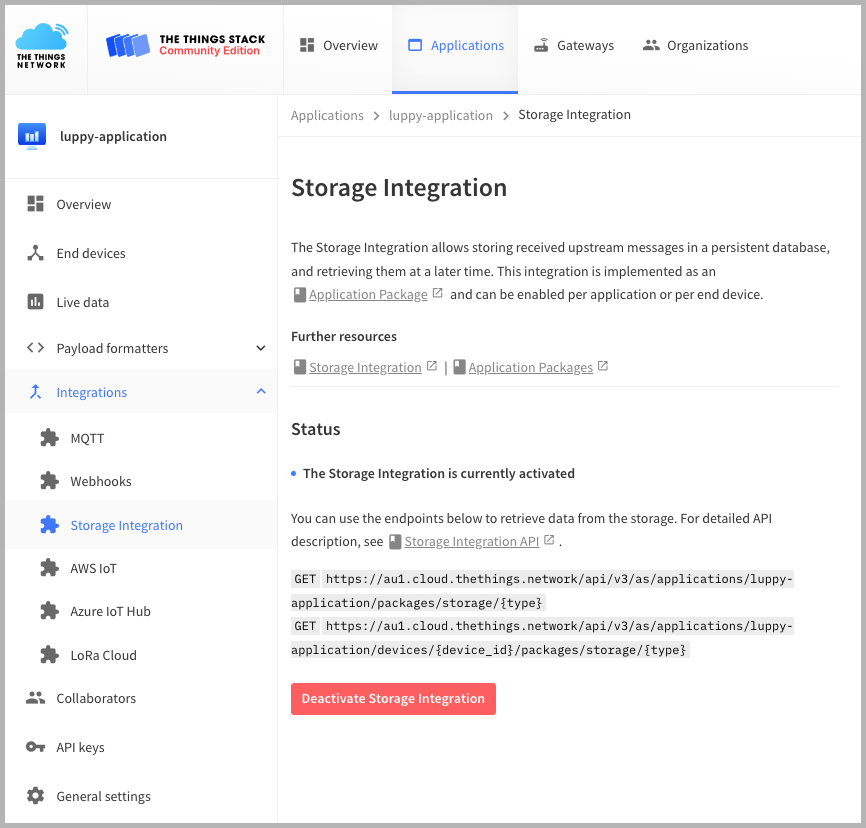
We’ll see the Region-Specific URL for retrieving data…
https://au1.cloud.thethings.network/api/v3/as/
  applications/YOUR_APPLICATION_ID/
  packages/storage/uplink_message
The first part of the URL…
au1.cloud.thethings.networkDepends on the region we’re using: Europe, North America or Australia.
Copy the first part of the URL and paste into the first part of TTN_URL…
-- TODO: Change this to your region-specific URL for The Things Network
local TTN_URL = "https://au1.cloud.thethings.network/api/v3/as/applications/" .. TTN_APPLICATION_ID .. "/packages/storage/uplink_message?limit=1&order=-received_at"(“..” in Lua means concatenate the strings)
Our full URL for The Things Network (TTN_URL) looks like…
https://au1.cloud.thethings.network/api/v3/as/
  applications/YOUR_APPLICATION_ID/
  packages/storage/uplink_message
  ?limit=1&order=-received_at
Note that we’re fetching the Latest Uplink Message from The Things Network…
?limit=1&order=-received_atMore about this in the next chapter.
Roblox needs an API Key to access the stored Uplink Messages from The Things Network.
To create an API Key, click…
(Your Application) → API Keys → Add API Key
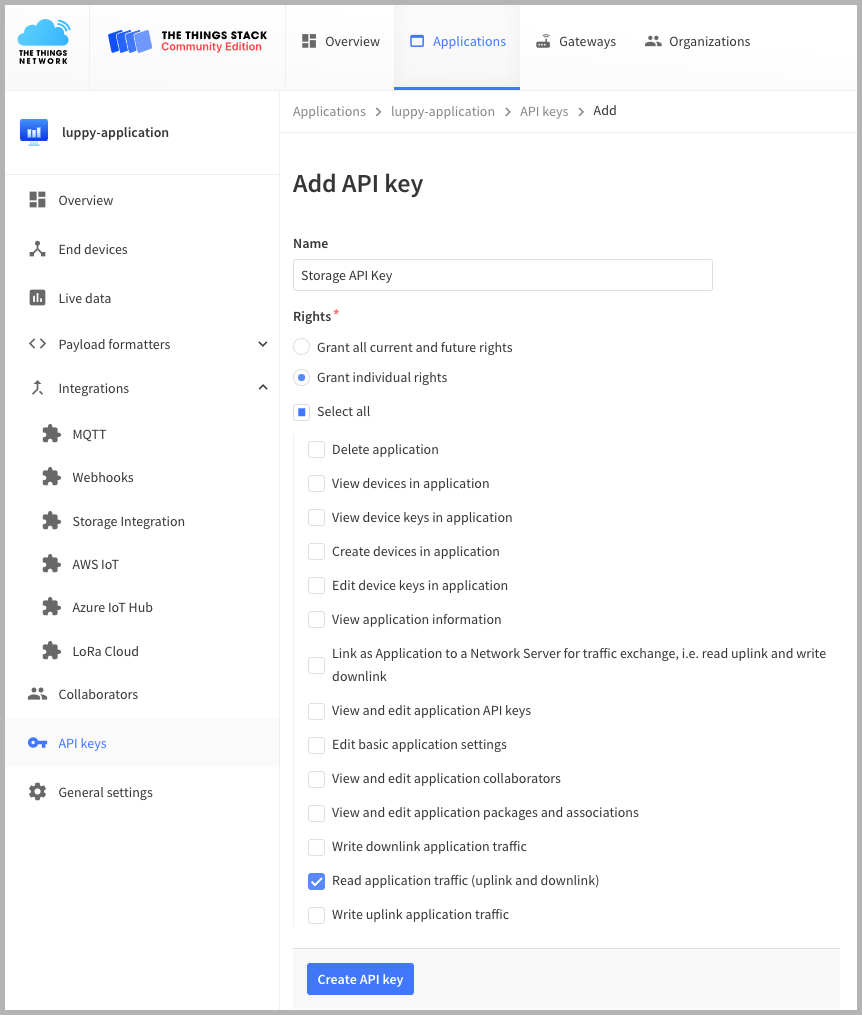
Click “Grant Individual Rights”
Click “Read application traffic (uplink and downlink)”
Click “Create API Key”
Copy the API Key and paste here…
-- TODO: Change this to your API Key for The Things Network
local TTN_API_KEY = "YOUR_API_KEY"If we publish our game for the public to join, players may see these (potentially sensitive) details in Roblox’s Server-Side Network Log…
(API Key is not visible fortunately)
So be careful when publishing our game for public access.
The Things Network exposes a HTTP GET API to fetch the Uplink Messages transmitted by our IoT Device…
(Assuming that Storage Integration is enabled. Saved messages will disappear after 2 or 3 days)
Here’s the command to fetch the latest Uplink Message…
curl \
  -G "https://au1.cloud.thethings.network/api/v3/as/applications/$YOUR_APPLICATION_ID/packages/storage/uplink_message" \
  -H "Authorization: Bearer $YOUR_API_KEY" \
  -H "Accept: text/event-stream" \
  -d "limit=1" \
  -d "order=-received_at"
(See the previous chapter for $YOUR_APPLICATION_ID and $YOUR_API_KEY. The first part of the URL is specific to our region: “au1.cloud.thethings.network”)
Which returns…
{
  "result": {
    "end_device_ids": {
      "device_id": "eui-YOUR_DEVICE_EUI",
      "application_ids": {
        "application_id": "luppy-application"
      },
      "dev_eui": "YOUR_DEVICE_EUI",
      "dev_addr": "YOUR_DEVICE_ADDR"
    },
    "received_at": "2021-10-02T12:10:54.594006440Z",
    "uplink_message": {
      "f_port": 2,
      "f_cnt": 3,
      "frm_payload": "omF0GQTUYWwZCSs=",
      "rx_metadata": [
        {
          "gateway_ids": {
            "gateway_id": "luppy-wisgate-rak7248",
            "eui": "YOUR_GATEWAY_EUI"
          },
          "time": "2021-10-02T13:04:34.552513Z",
          "timestamp": 3576406949,
          "rssi": -53,
          "channel_rssi": -53,
          "snr": 12.2,
          "location": {
            "latitude": 1.27125,
            "longitude": 103.80795,
            "altitude": 70,
            "source": "SOURCE_REGISTRY"
          },
          "channel_index": 4
        }
      ],
      "settings": {
        "data_rate": {
          "lora": {
            "bandwidth": 125000,
            "spreading_factor": 10
          }
        },
        "data_rate_index": 2,
        "coding_rate": "4/5",
        "frequency": "922600000",
        "timestamp": 3576406949,
        "time": "2021-10-02T13:04:34.552513Z"
      },
      "received_at": "2021-10-02T12:10:54.385972437Z",
      "consumed_airtime": "0.370688s",
      "network_ids": {
        "net_id": "000013",
        "tenant_id": "ttn",
        "cluster_id": "ttn-au1"
      }
    }
  }
}
result.uplink_message.frm_payload contains the Sensor Data that we need, encoded with Base64 and CBOR…
"frm_payload": "omF0GQTUYWwZCSs="Our Sensor Data is encoded with Concise Binary Object Representation (CBOR) to keep the LoRa Packets small (max 12 bytes), due to the Fair Use Policy of The Things Network…
More about CBOR Encoding…