📝 10 Mar 2022
“Will Apache NuttX RTOS talk I2C with Bosch BME280 Sensor… On the BL602 RISC-V SoC?”
…A friend and I pondered (8,000 miles apart) while working on the Temperature + Humidity + Air Pressure combo sensor.
Sounds like a fun challenge…
NuttX doesn’t have a driver for the BME280 Sensor
(Though it supports BMP280)
Can we port the BME280 Driver from Zephyr OS with a few tweaks?
(Spoiler: Yes we can!)
What’s inside a NuttX Sensor Driver anyway?
(How to build our own driver)
NuttX on BL602 is kinda new-ish
(Some features might not work the way we expect)
BL602’s I2C Port has interesting quirks. Will it work?
(Specifically: I2C Sub Address)
Read on to find out how we solved the challenge and created this driver…
(This BME280 Driver should work OK on other NuttX platforms, like ESP32)
Note: The NuttX Sensor API has been updated in Jul / Aug 2022. (See the changes)
Before we begin our exploration, verify that our BME280 Sensor works OK.
(Because we’ll see some unexpected behaviour in a while)
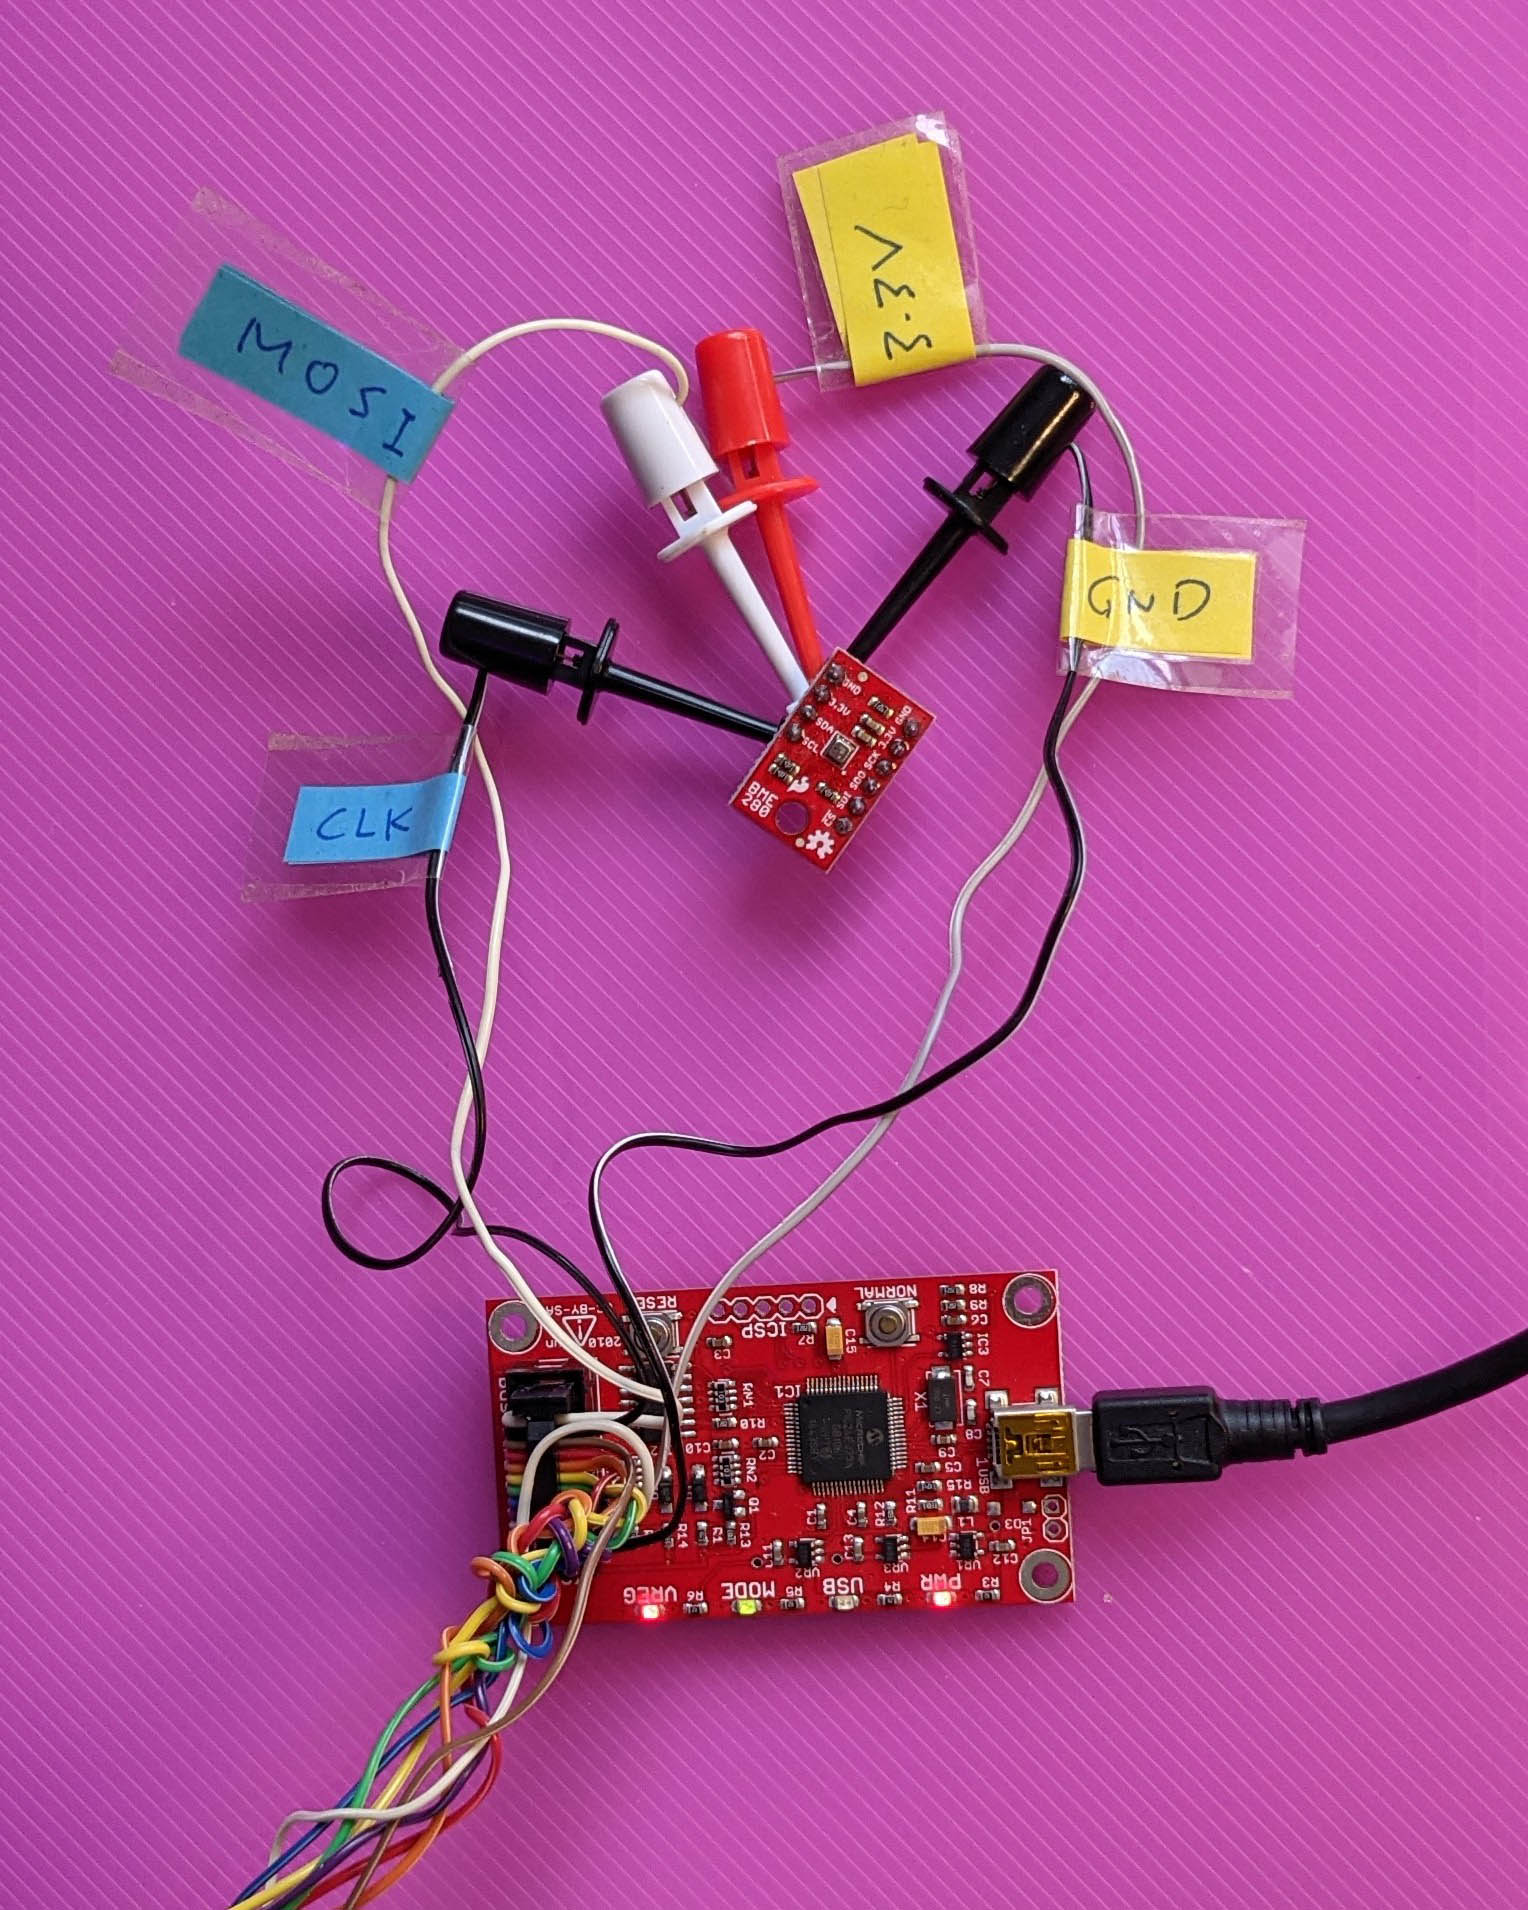
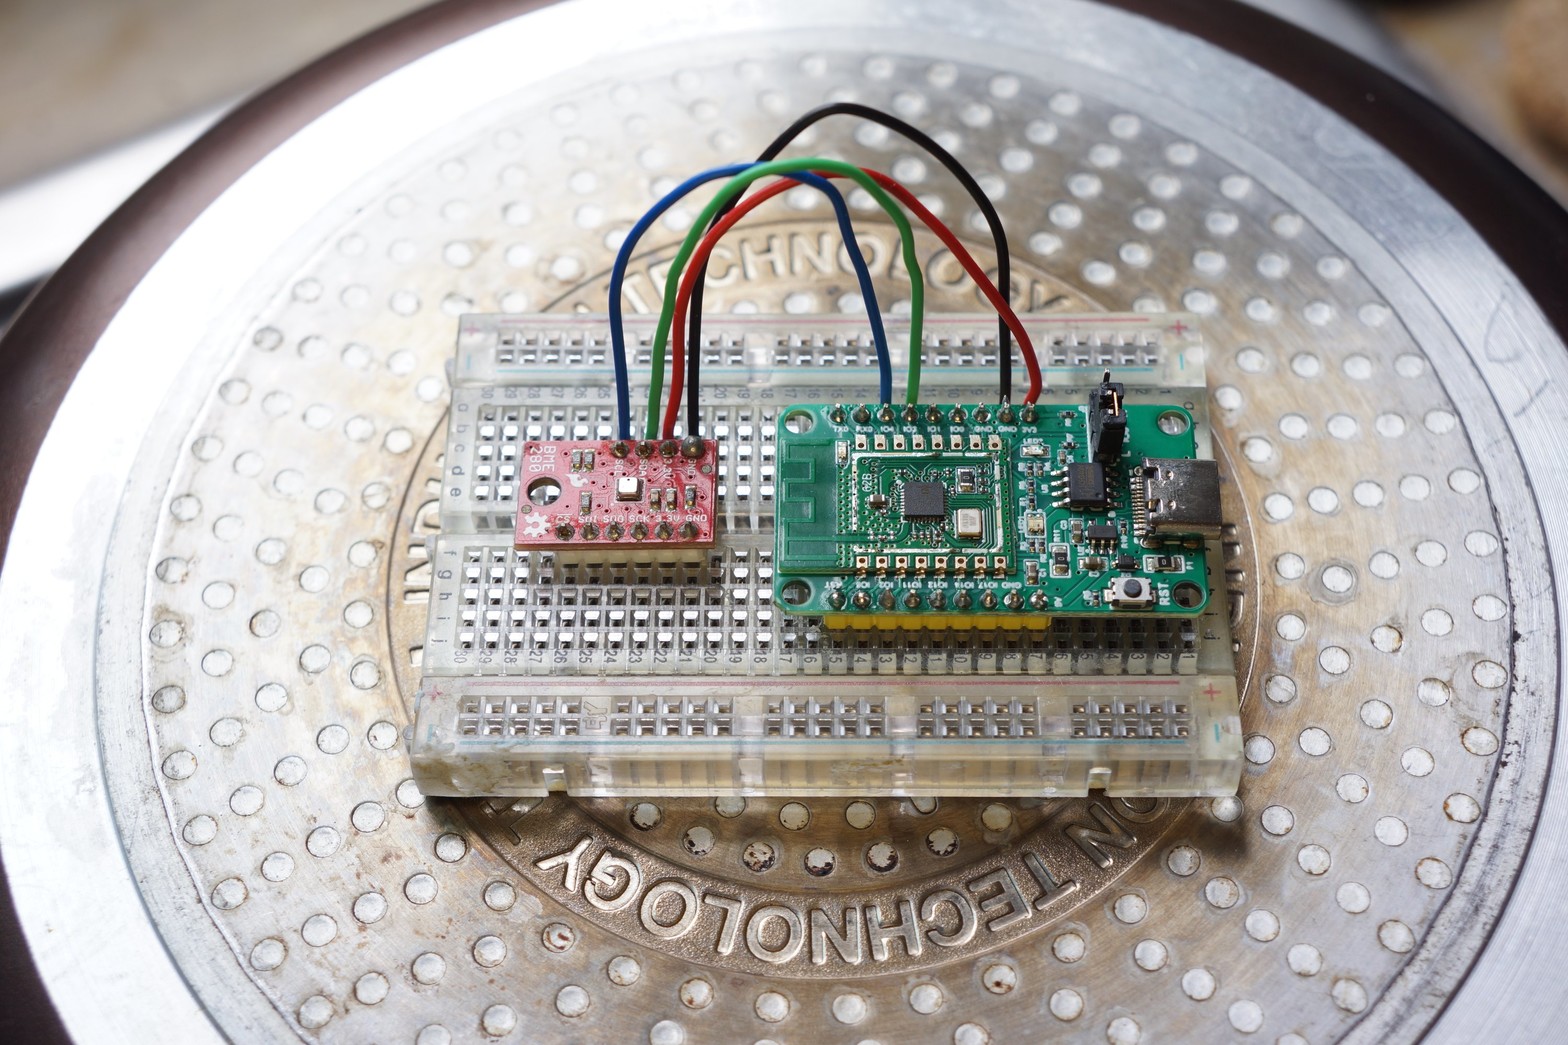
We used Bus Pirate (pic above) for testing our BME280 Sensor.
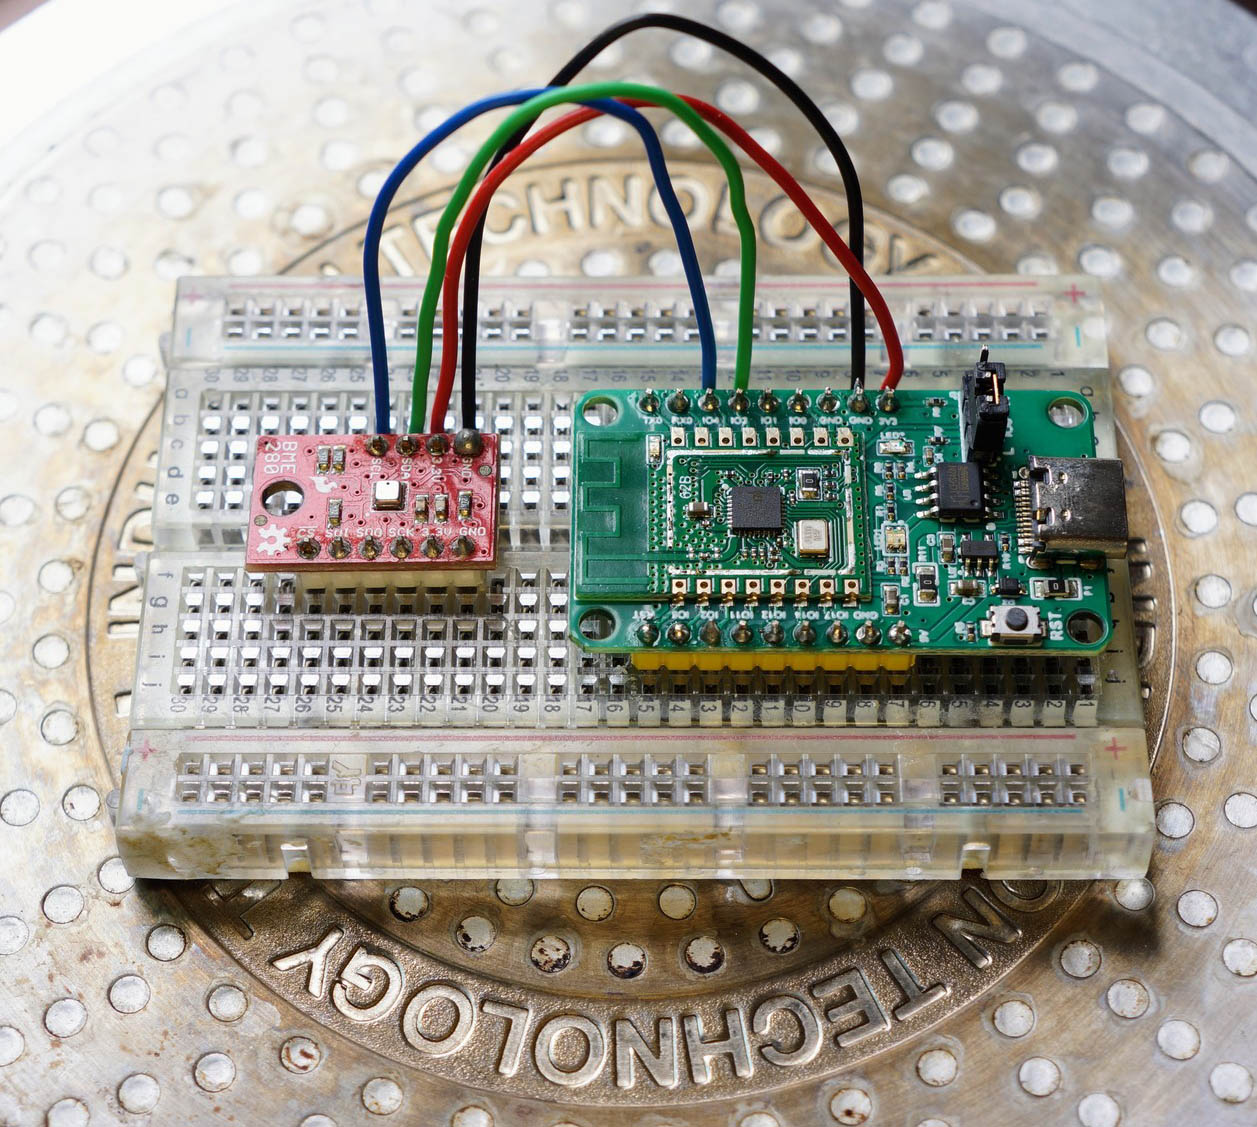
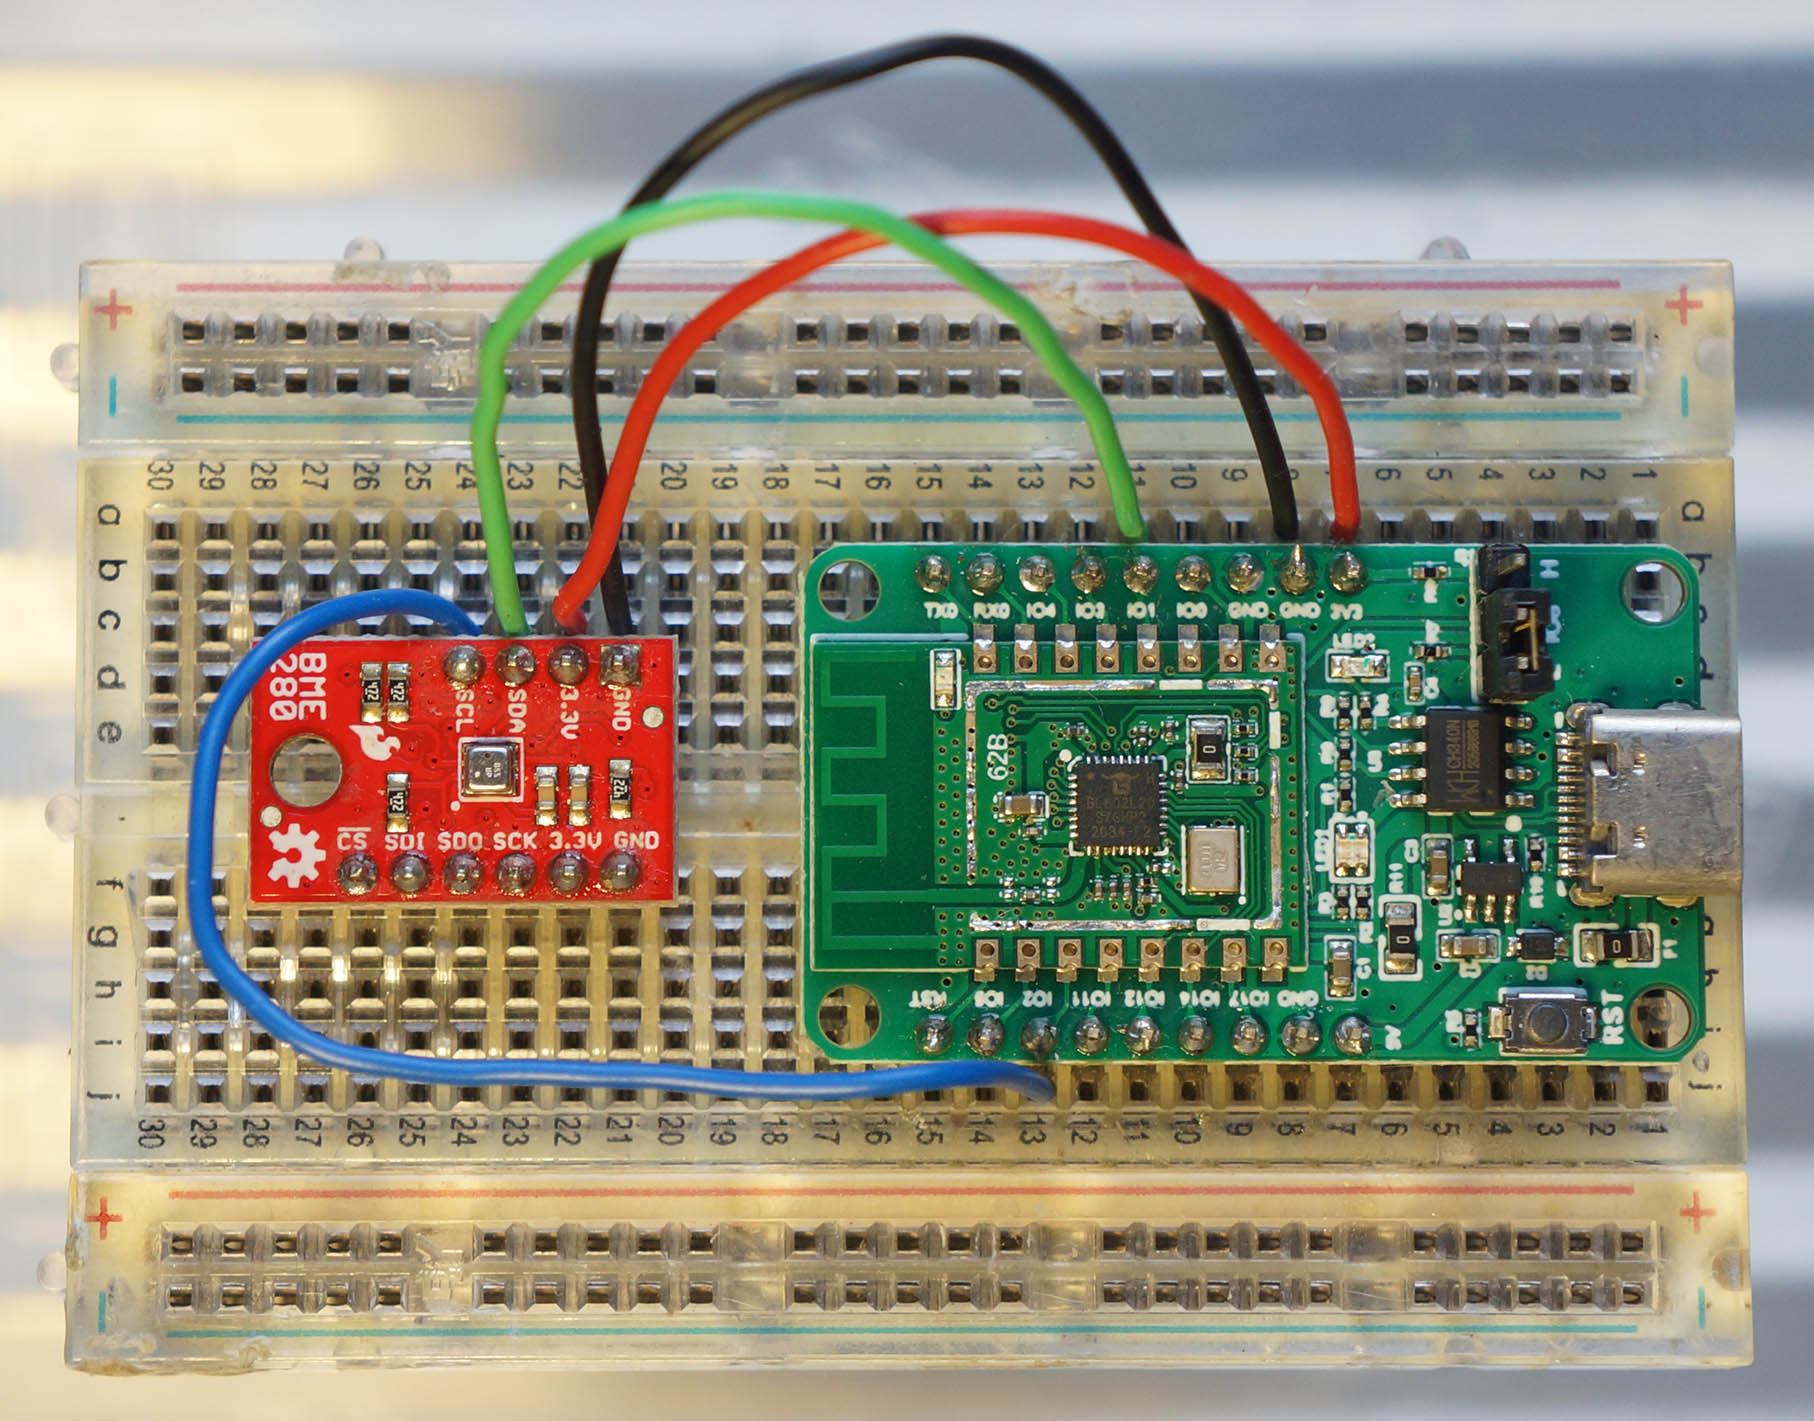
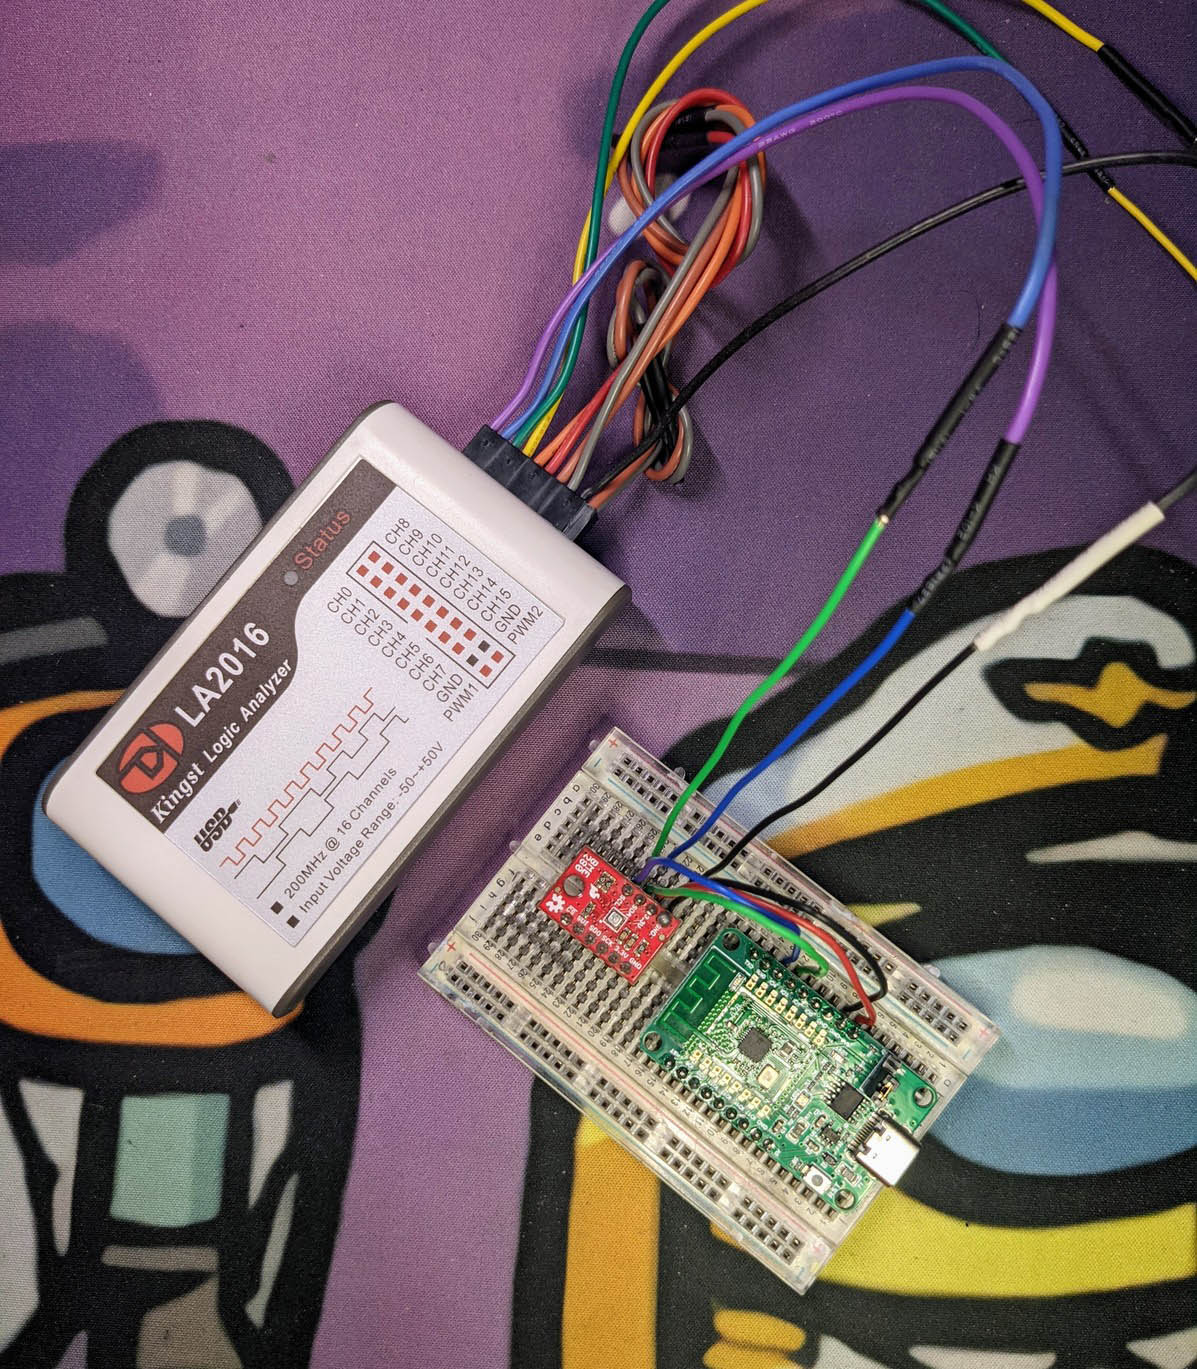
Next we connect BME280 to Pine64’s PineCone BL602 Board…
| BL602 Pin | BME280 Pin | Wire Colour |
|---|---|---|
GPIO 1 | SDA | Green |
GPIO 2 | SCL | Blue |
3V3 | 3.3V | Red |
GND | GND | Black |
The I2C Pins on BL602 are defined here: board.h
/* I2C Configuration */
#define BOARD_I2C_SCL \
  (GPIO_INPUT | GPIO_PULLUP | GPIO_FUNC_I2C | \
  GPIO_PIN2)
#define BOARD_I2C_SDA \
  (GPIO_INPUT | GPIO_PULLUP | GPIO_FUNC_I2C | \
  GPIO_PIN1)
(Which pins can be used? See this)
What if we’re connecting to ESP32?
For ESP32: The GPIO Pin Numbers for the I2C Port (I2C0) are defined in Kconfig and menuconfig…
config ESP32_I2C0_SCLPIN
  int "I2C0 SCL Pin"
  default 22
  range 0 39

config ESP32_I2C0_SDAPIN
  int "I2C0 SDA Pin"
  default 23
  range 0 39
Do we need Pull-Up Resistors?
We’re using the SparkFun BME280 Breakout Board, which has Pull-Up Resistors. (So we don’t need to add our own)
What happens now?
Coming up we have a lengthy exploration of BME280 on BL602.
If we’re only interesting in running the NuttX BME280 Driver (on BL602, ESP32 and other platforms), jump to this section for the instructions…
But if we’re keen to go deep inside the BME280 driver… Read on!
NuttX doesn’t have a BME280 Driver, but there’s a NuttX Driver for BMP280, the downsized (rightsized?) sibling of BME280.
(BMP280 works like BME280 for sensing Air Pressure and Temperature, but without Humidity)
Let’s test the BMP280 Driver on BL602 and fix any I2C quirks.
Follow these steps to download and configure NuttX…
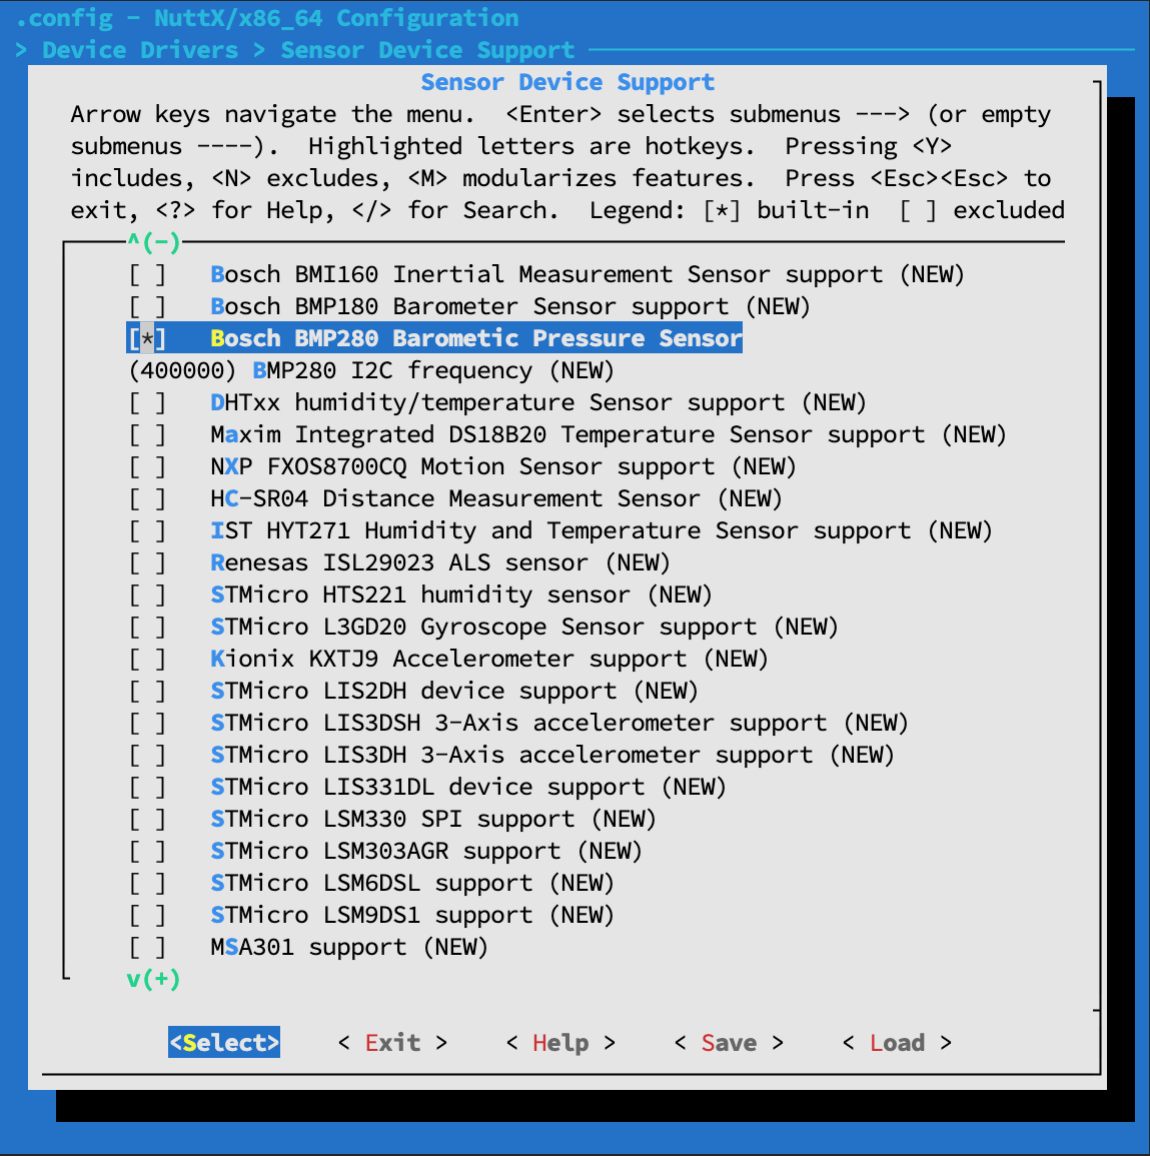
Enable the BMP280 Driver in menuconfig…
Check the box for “Device Drivers” → “Sensor Device Support”
Select “Sensor Device Support”
Check the box for “Bosch BMP280 Barometic Pressure Sensor”
Will NuttX’s BMP280 Driver really work with our BME280?
Yep the BMP280 Driver ought to read the Air Pressure and Temperature from our BME280 Sensor. (But not Humidity)
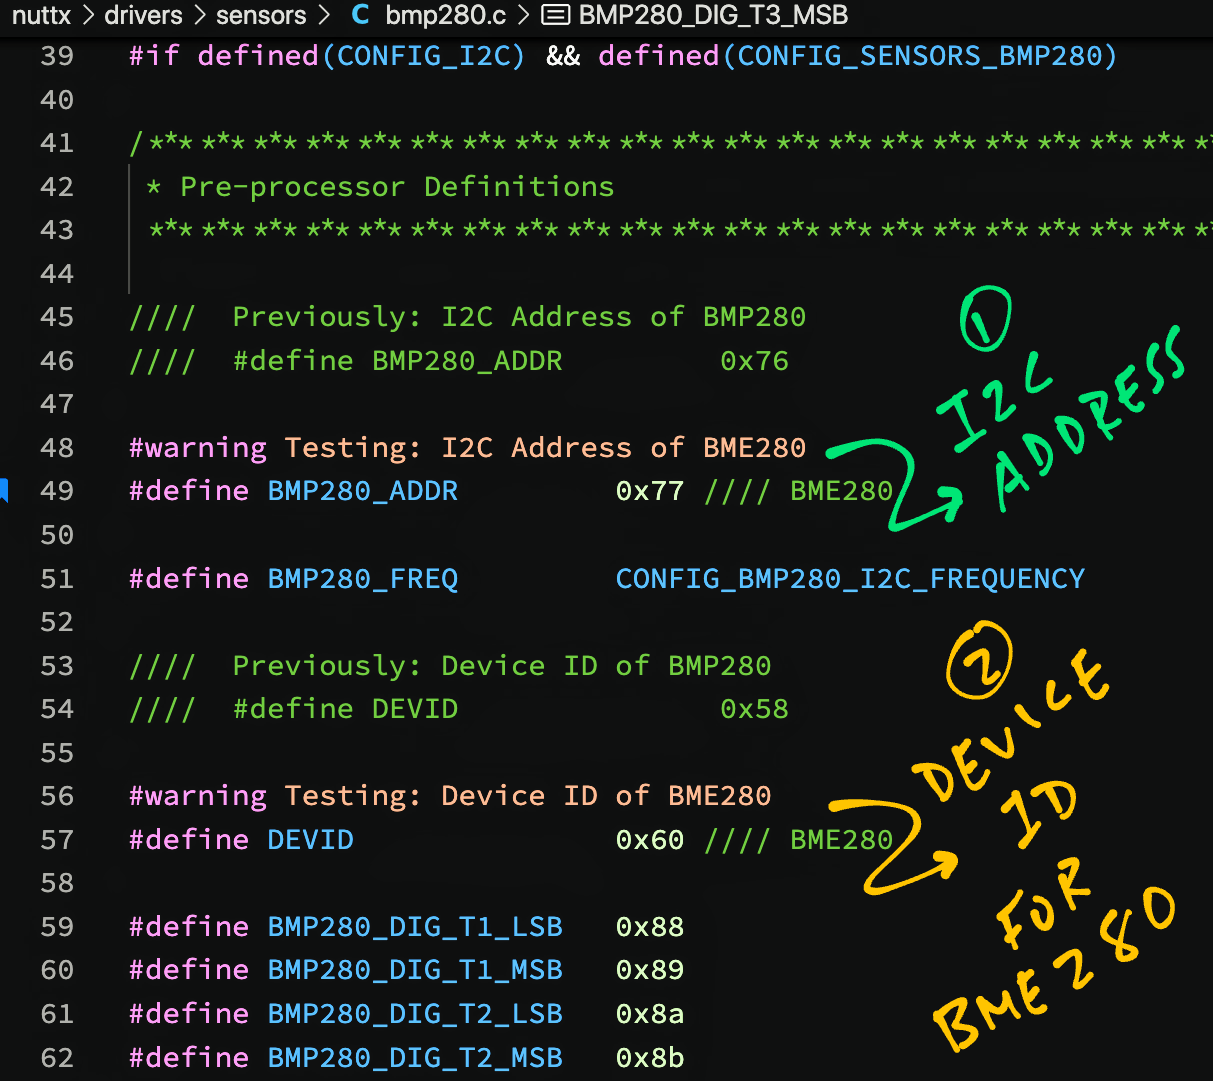
Just that we need to we change the I2C Address and Device ID in the BMP280 Driver: bmp280.c
//  Previously: I2C Address of BMP280
//  #define BMP280_ADDR     0x76

//  Testing: I2C Address of BME280
#define BMP280_ADDR         0x77

//  Previously: Device ID of BMP280
//  #define DEVID           0x58

//  Testing: Device ID of BME280
#define DEVID               0x60
(FYI: Zephyr uses the same driver for BMP280 and BME280)
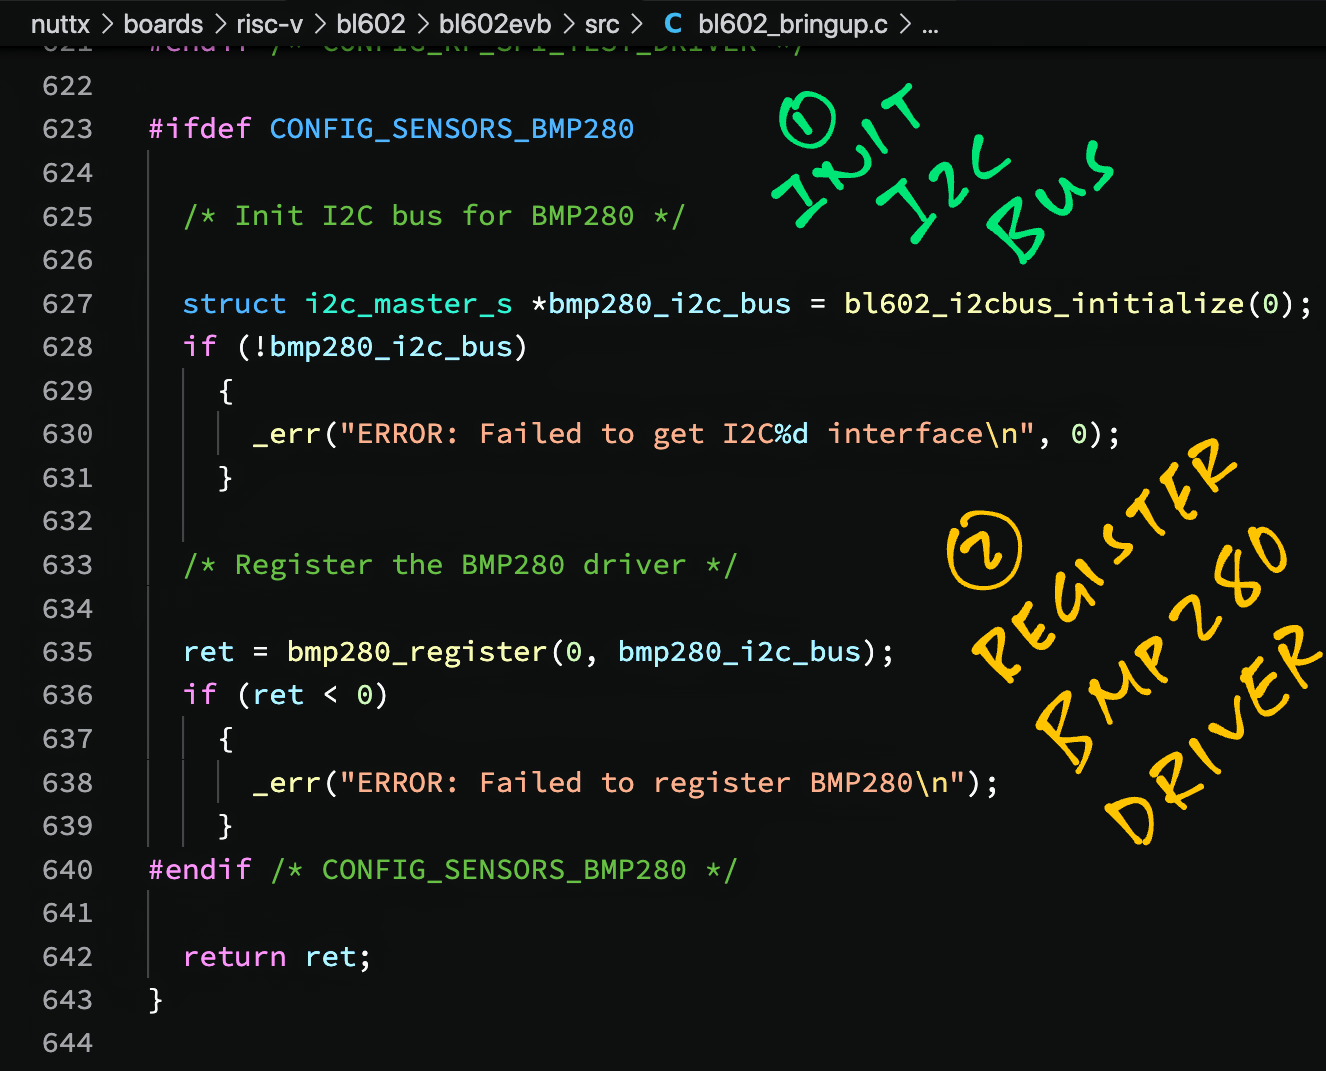
Next we load the BMP280 Driver at startup: bl602_bringup.c
#ifdef CONFIG_SENSORS_BMP280
#include <nuttx/sensors/bmp280.h>
#endif  //  CONFIG_SENSORS_BMP280
...
int bl602_bringup(void) {
...
#ifdef CONFIG_SENSORS_BMP280
  //  Init I2C bus for BMP280
  struct i2c_master_s *bmp280_i2c_bus =
    bl602_i2cbus_initialize(0);
  if (!bmp280_i2c_bus) {
    _err("ERROR: Failed to get I2C%d interface\n", 0);
  }

  //  Register the BMP280 driver
  ret = bmp280_register(0, bmp280_i2c_bus);
  if (ret < 0) {
    _err("ERROR: Failed to register BMP280\n");
  }
#endif // CONFIG_SENSORS_BMP280(bmp280_register is defined here)
For ESP32: Edit the function esp32_bringup in esp32_bringup.c so that it calls bmp280_register
We’re ready to test the BMP280 Driver! Build, flash and run NuttX with these steps…
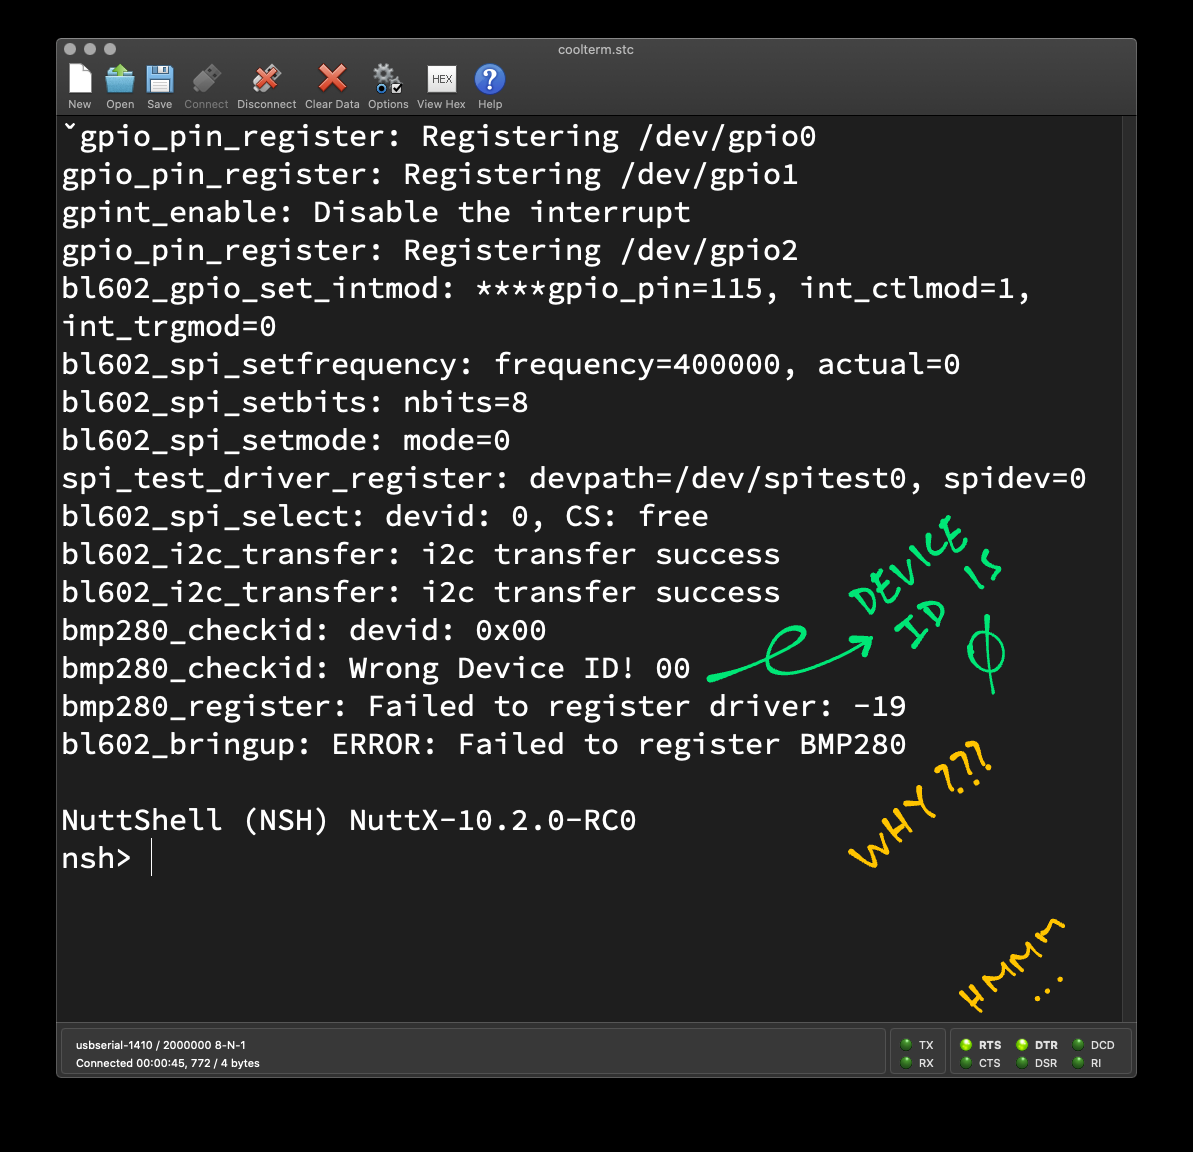
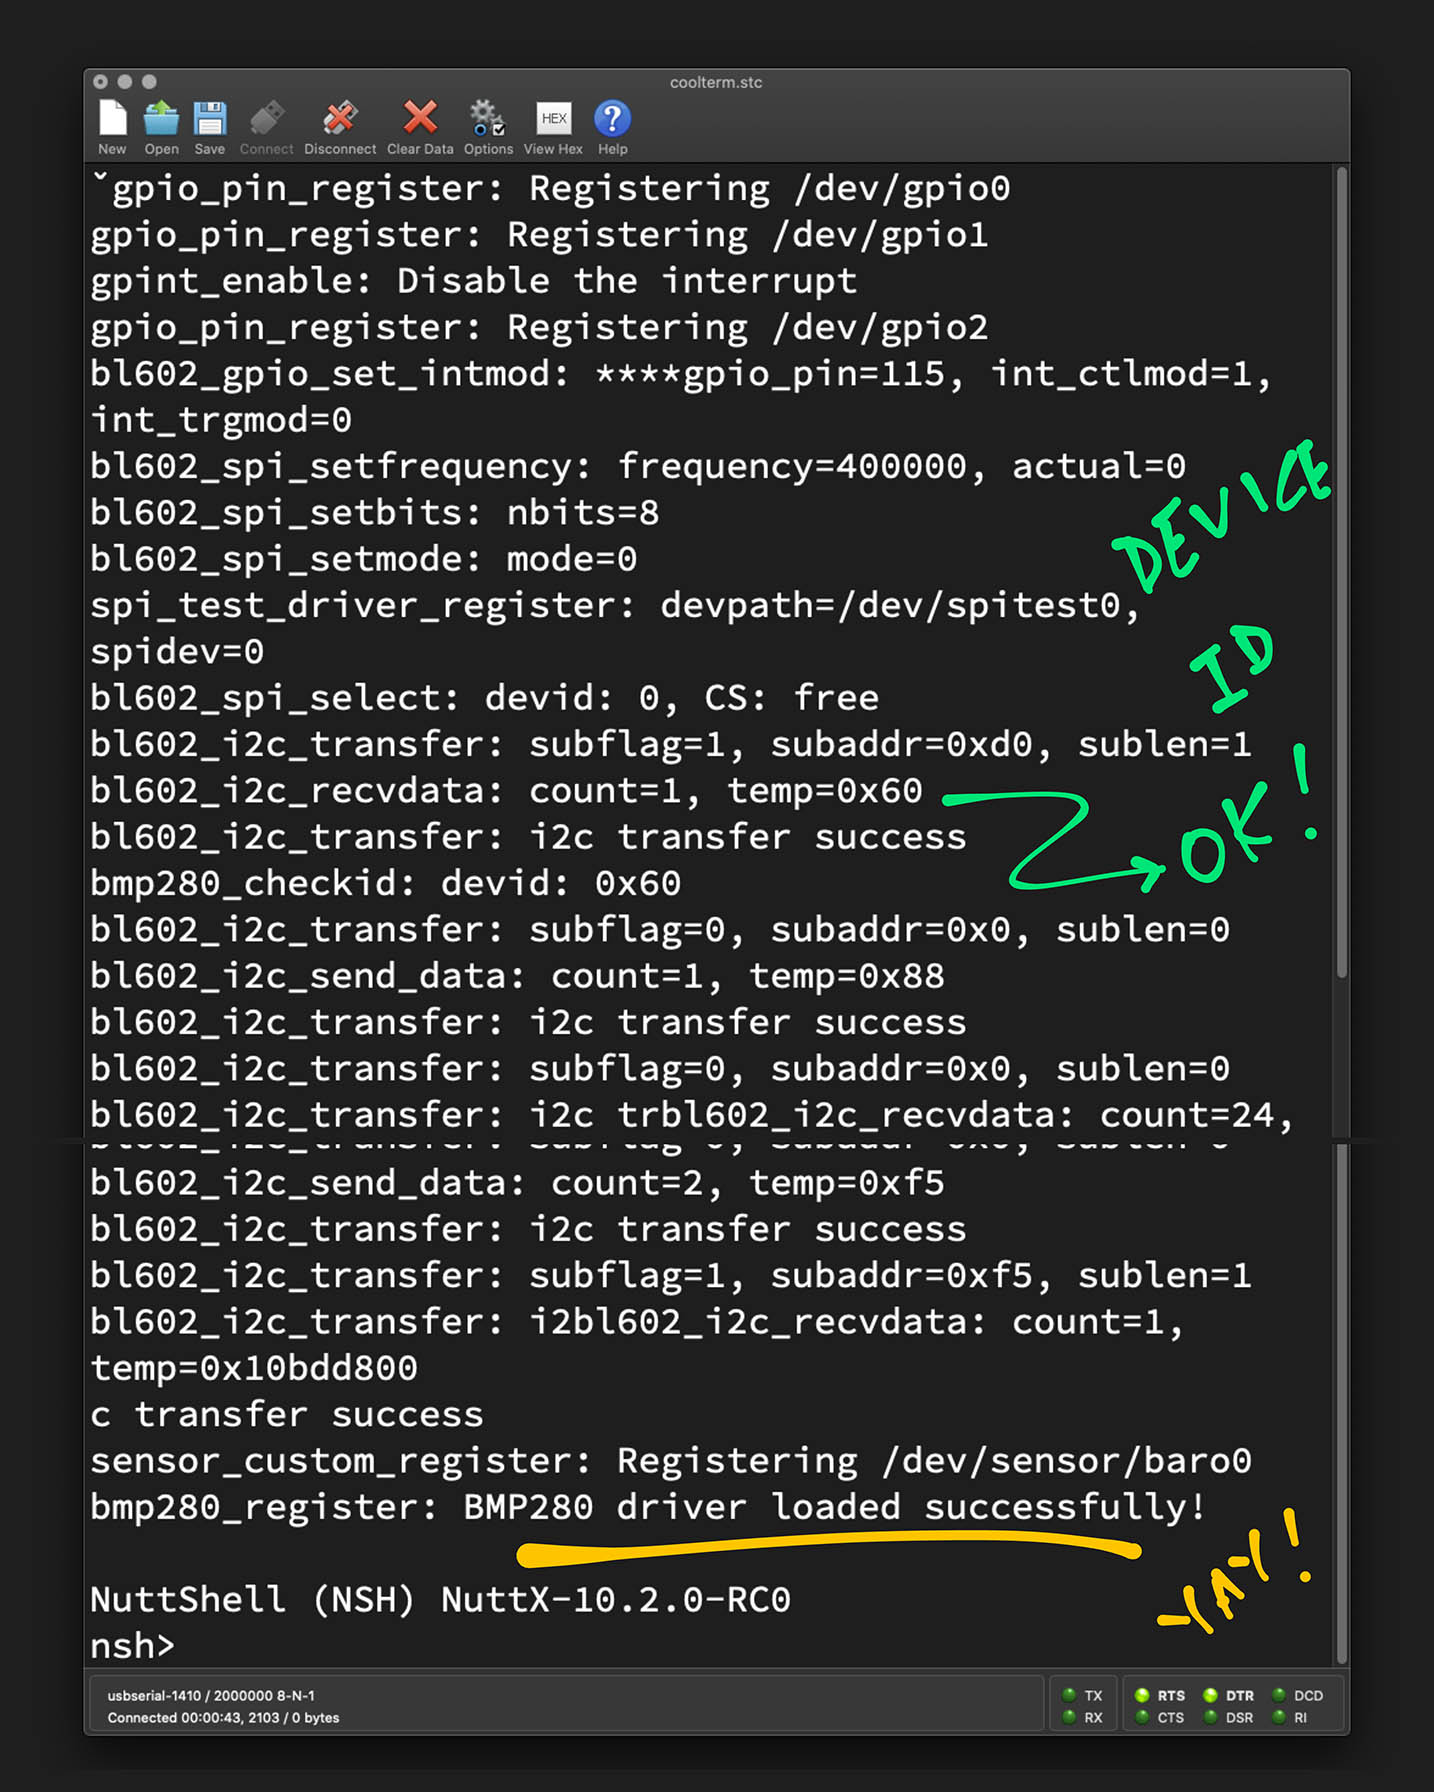
Something unexpected happens when we boot NuttX on BL602…
bl602_i2c_transfer: i2c transfer success
bmp280_checkid:  devid: 0x00
bmp280_checkid:  Wrong Device ID! 00
bmp280_register: Failed to register driver: -19
bl602_bringup: ERROR: Failed to register BMP280This says that the BMP280 Driver was expecting Device ID 0x60… But it got 0x00 instead!
Let’s find out why 🤔
To track down why we’re not reading the right Device ID, let’s connect a Logic Analyser and inspect the bits on the I2C Bus…
The I2C Data captured by our Logic Analyser looks surprising…
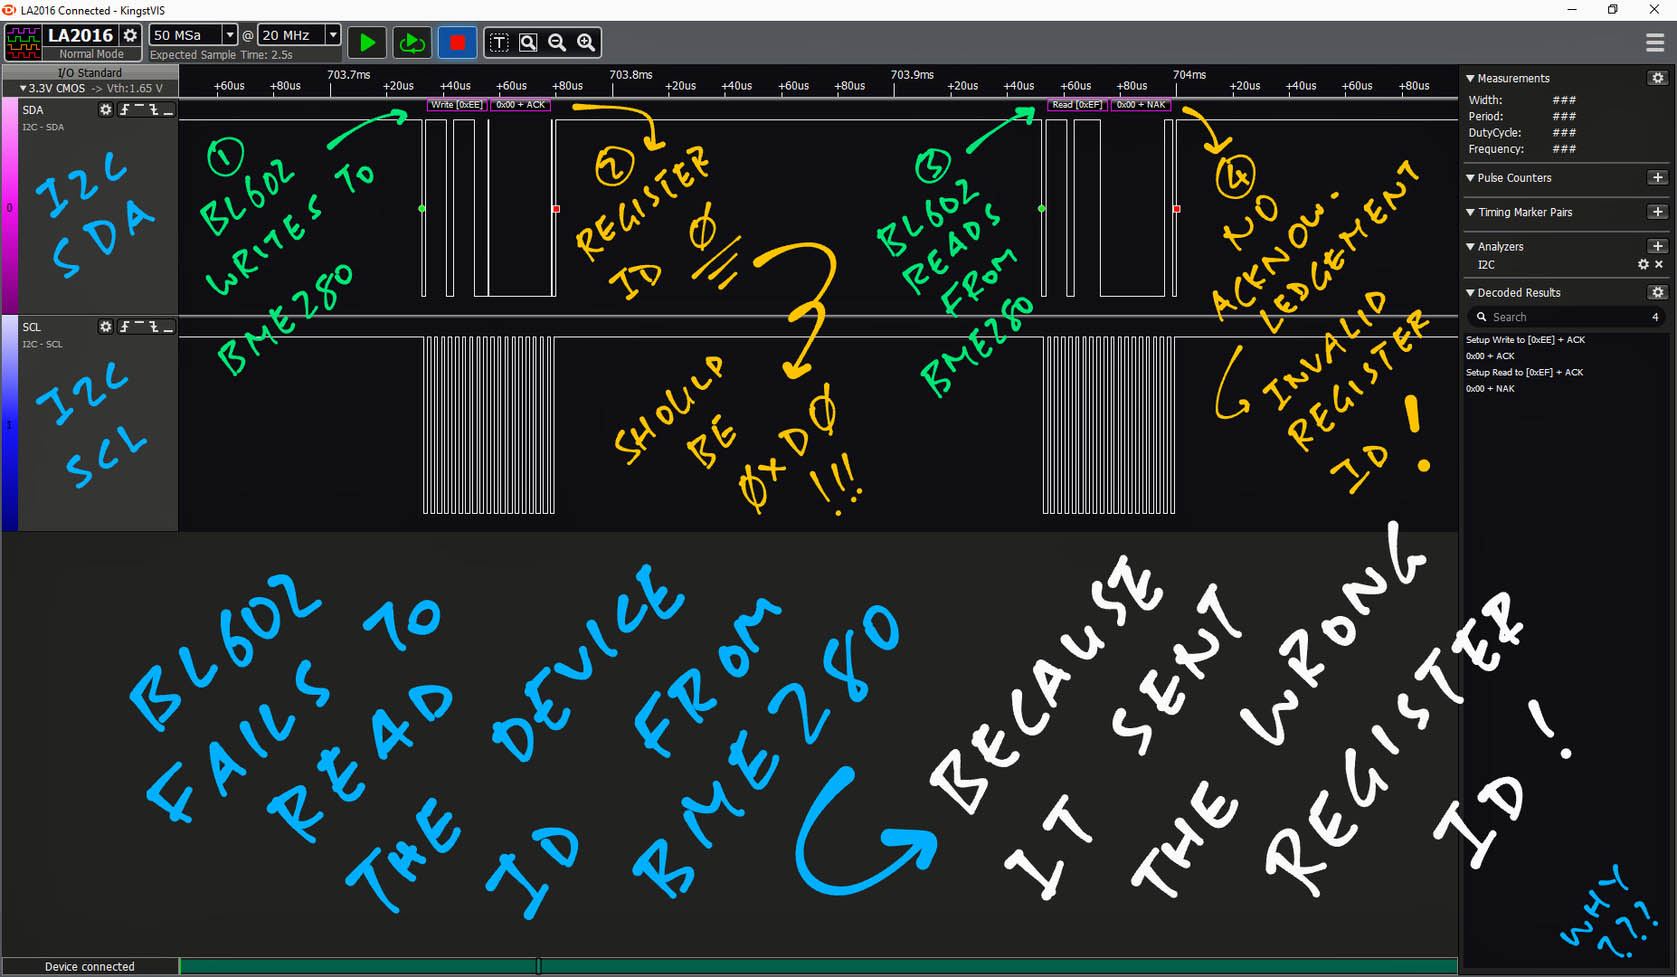
The pic above shows that BL602 sent the wrong Register ID to BME280…
Write  [0xEE]
0x00 + ACK (Register ID is 0x00, which is incorrect!)
Read   [0xEF]
0x00 + NAK (Invalid result, because Register ID is incorrect!)
To read the Device ID, the Register ID should be 0xD0, not 0x00!
Let’s fix this 🤔
(Here’s why Register ID should be 0xD0)
Is there something special about BL602’s I2C Port?
BL602 has a peculiar I2C Port…
We need to send the I2C Sub Address (Register ID) separately from the I2C Data!
(Which might have caused the BMP280 Driver to fail)
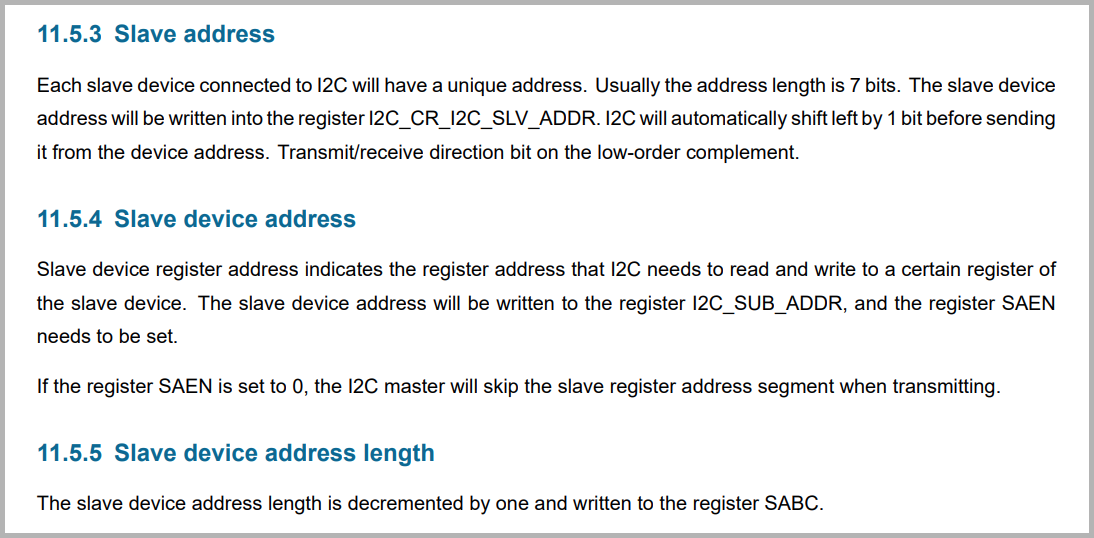
When we browse the NuttX code for BL602’s I2C Driver, we realise that it supports I2C Sub Addresses: bl602_i2c.c
static int bl602_i2c_transfer(struct i2c_master_s *dev, struct i2c_msg_s *msgs, int count) {
  ...
  //  if msgs[i].flag I2C_M_NOSTOP,means start i2c with subddr
  if (msgs[i].flags & I2C_M_NOSTOP) {
    priv->subflag = 1;
    priv->subaddr = 0;
    for (j = 0; j < msgs[i].length; j++) {
      priv->subaddr += msgs[i].buffer[j] << (j * 8);
    }
    priv->sublen = msgs[i].length;
    i++;
But it needs the flag I2C_M_NOSTOP to be set!
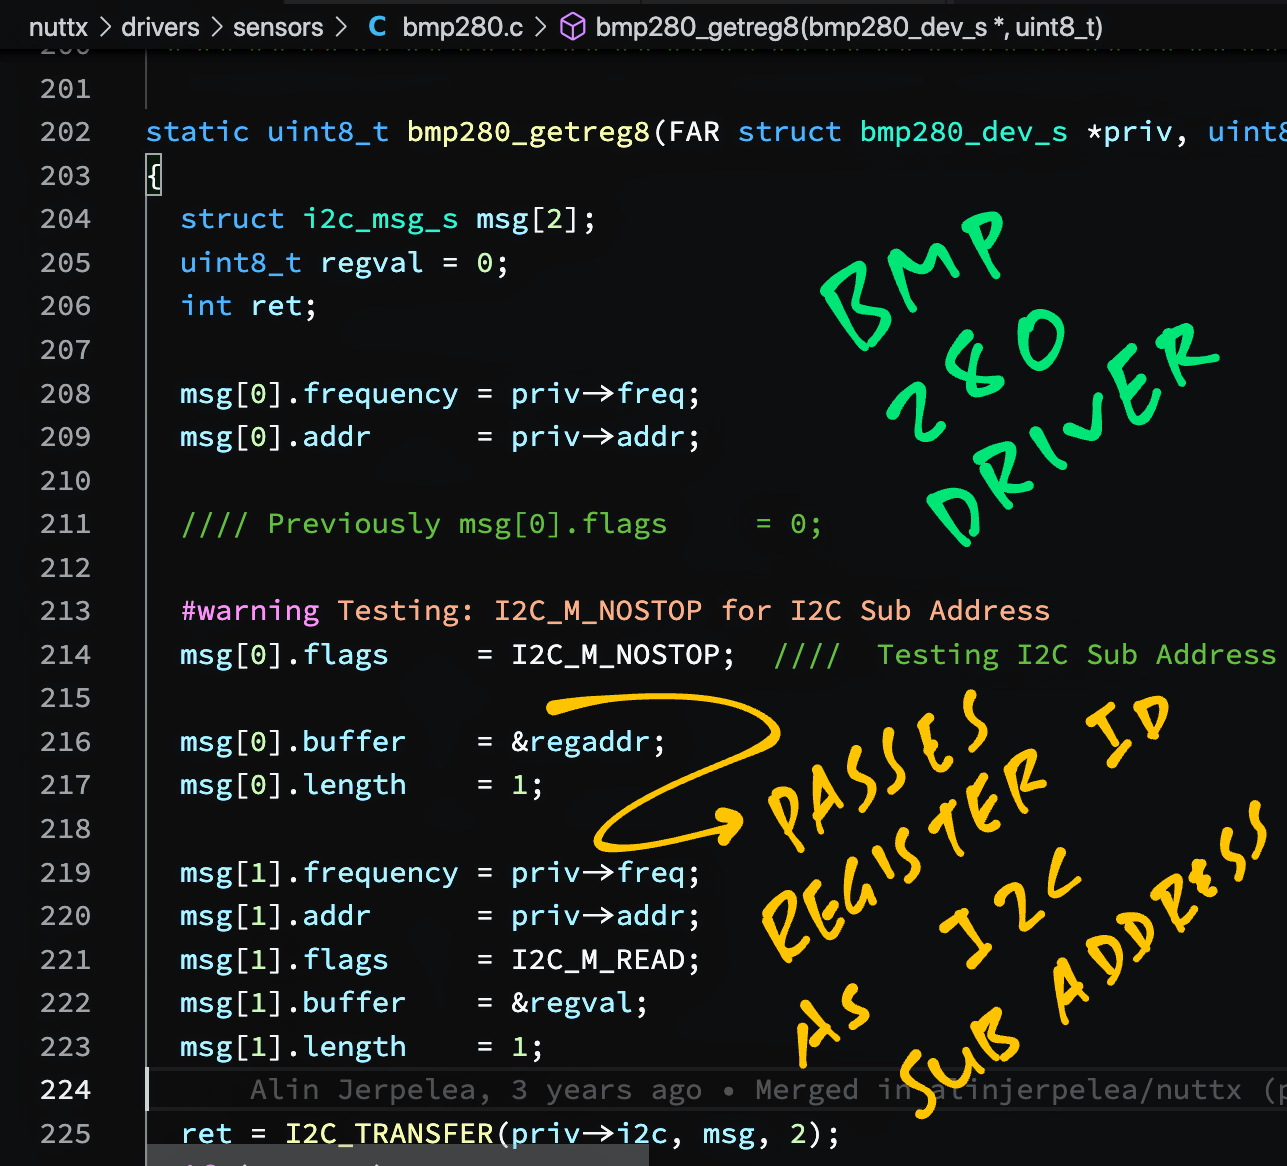
Let’s patch the NuttX BMP280 Driver to send the Register ID as I2C Sub Address (instead of I2C Data) when we’re reading a BMP280 Register: bmp280.c
// Read a single BME280 Register
static uint8_t bmp280_getreg8(FAR struct bmp280_dev_s *priv, uint8_t regaddr) {
...
msg[0].frequency = priv->freq;
msg[0].addr = priv->addr;
#ifdef CONFIG_BL602_I2C0
// For BL602: Register ID must be passed as I2C Sub Address
msg[0].flags = I2C_M_NOSTOP;
#else
// Otherwise pass Register ID as I2C Data
msg[0].flags = 0;
#endif // CONFIG_BL602_I2C0
msg[0].buffer = ®addr;
msg[0].length = 1;(We patch bmp280_getregs and bmp280_putreg8 too)
What about writing to BMP280 Registers? Do we need to set the I2C Sub Address?
Yes we need to send the Register ID and Register Value as I2C Sub Address, followed by an I2C Read.
We’ve patched the BMP280 Driver to send the Register ID as I2C Sub Address. Let’s run it!
sensor_custom_register: Registering /dev/uorb/sensor_baro0
bmp280_register: BMP280 driver loaded successfully!
NuttShell (NSH) NuttX-10.2.0-RC0Yep our patched BMP280 Driver loads successfully!
(Because it receives the correct Device ID from BMP280)
BMP280 appears on NuttX as /dev/uorb/sensor_baro0…
nsh> ls /dev/uorb
/dev/uorb:
 sensor_baro0
Let’s read the baro0 device.
(How we enable logging for BL602 I2C Driver)
NuttX provides a Sensor Test App that will read our BMP280 Device at /dev/uorb/sensor_baro0…
(We’ll study the code later)
We configure NuttX to enable the Sensor Test App…
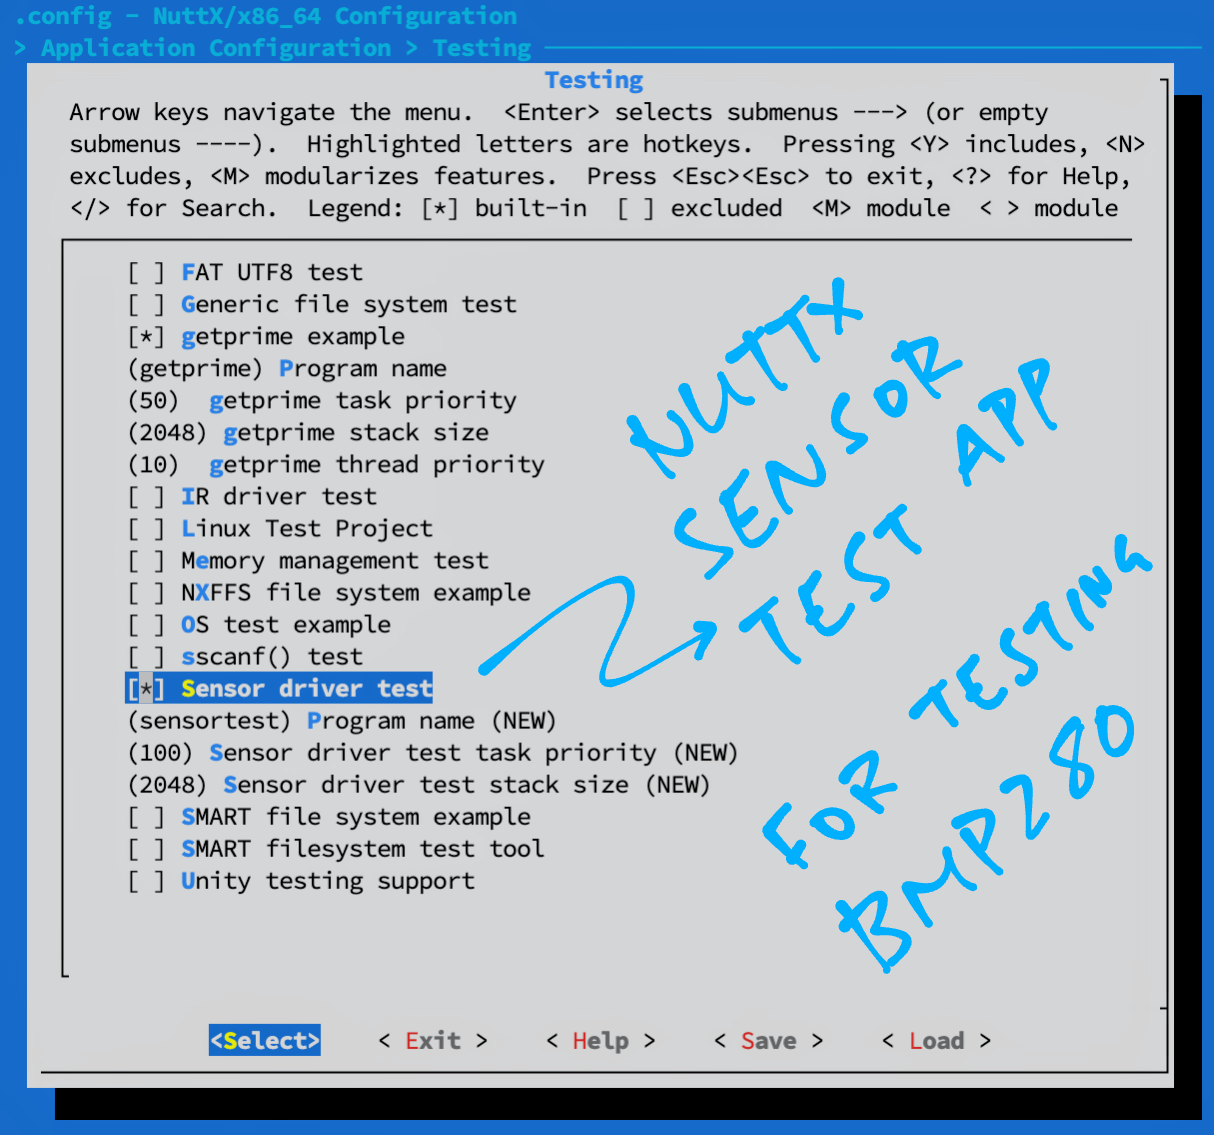
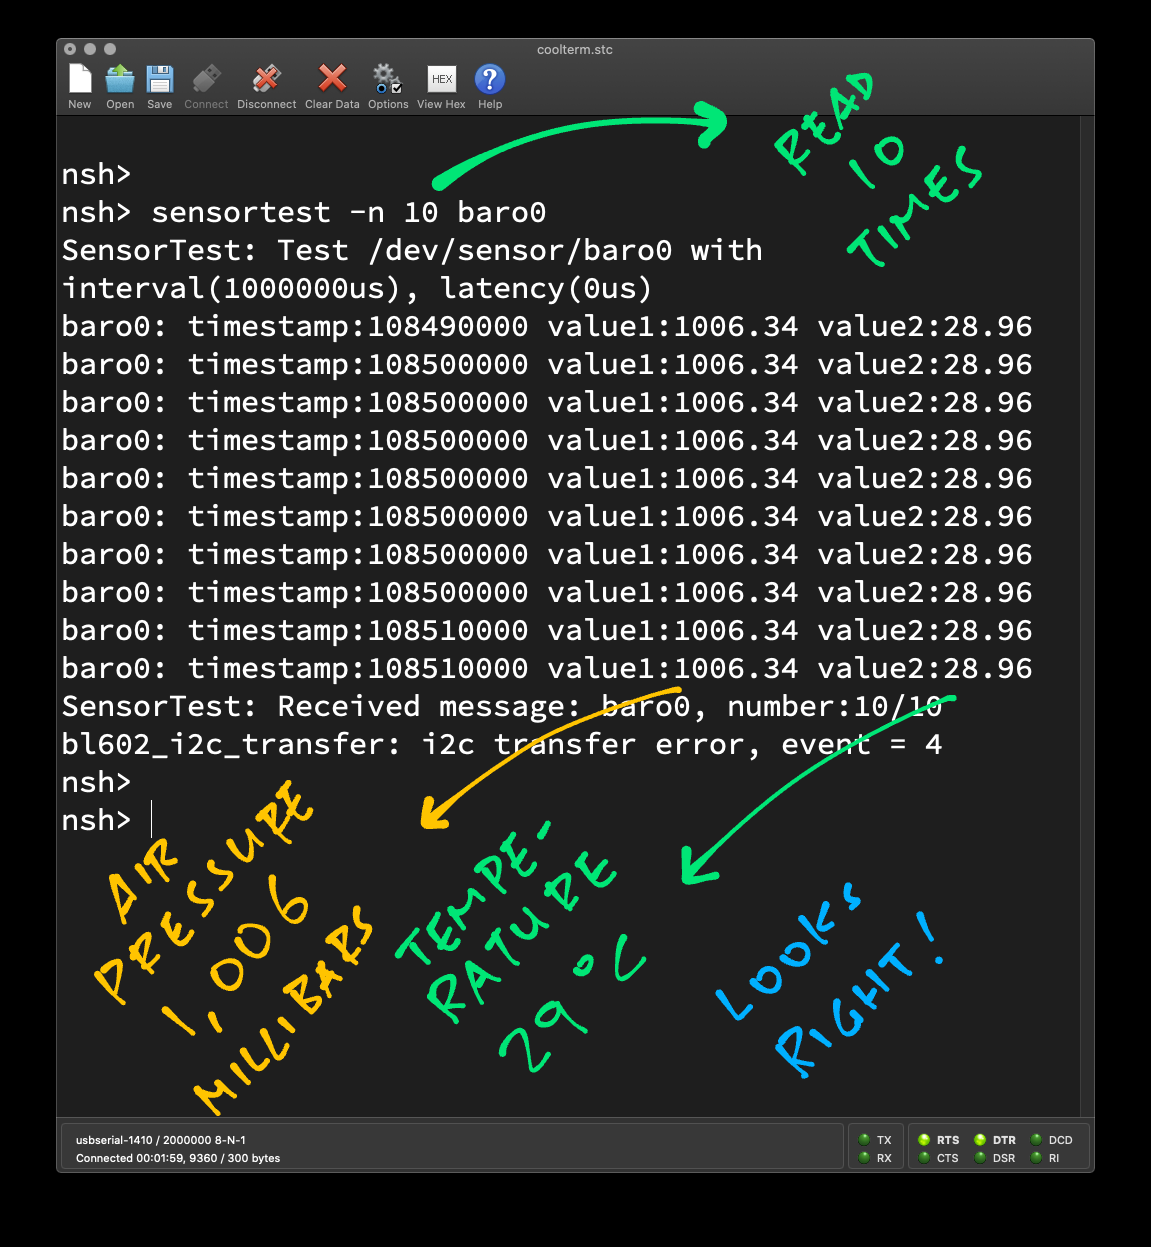
Build, flash and run NuttX. To read 10 sensor values from /dev/uorb/sensor_baro0, enter this at the NuttX Shell…
nsh> sensortest -n 10 baro0
SensorTest: Test /dev/uorb/sensor_baro0 with interval(1000000us), latency(0us)
baro0: timestamp:30680000 value1:674.93 value2:22.18
baro0: timestamp:30680000 value1:674.93 value2:22.18
baro0: timestamp:30680000 value1:674.93 value2:22.18
baro0: timestamp:30680000 value1:674.93 value2:22.18
baro0: timestamp:30680000 value1:674.93 value2:22.18
baro0: timestamp:30690000 value1:674.93 value2:22.18
baro0: timestamp:30690000 value1:674.93 value2:22.18
baro0: timestamp:30690000 value1:674.93 value2:22.18
baro0: timestamp:30690000 value1:1006.21 value2:30.78
baro0: timestamp:30690000 value1:1006.21 value2:30.78
SensorTest: Received message: baro0, number:10/10We see the Air Pressure and Temperature: 1,006.21 millibars at 30.78 °C.
(Air Pressure at Sea Level is 1,013.25 millibars)
Yep this looks reasonable for Sunny Singapore by the Seaside!
Now let’s port the BME280 Driver from Zephyr OS to NuttX, so we can get the Humidity.
NuttX BMP280 Driver vs Zephyr BME280 Driver
NuttX’s BMP280 Driver works OK with our BME280 Sensor. But we’re missing one thing: Humidity.
Let’s port the BME280 Driver from Zephyr OS to NuttX…
Why not code the BME280 Driver based on the datasheet?
Well yes we could… But then the rest of this article would become an academic exercise 😉
Why port from Zephyr OS?
Zephyr has an extensive collection of drivers.
The NuttX porting steps that we establish today might work for other Zephyr drivers, with minimal changes!
Porting a driver from Zephyr to NuttX sounds hard!
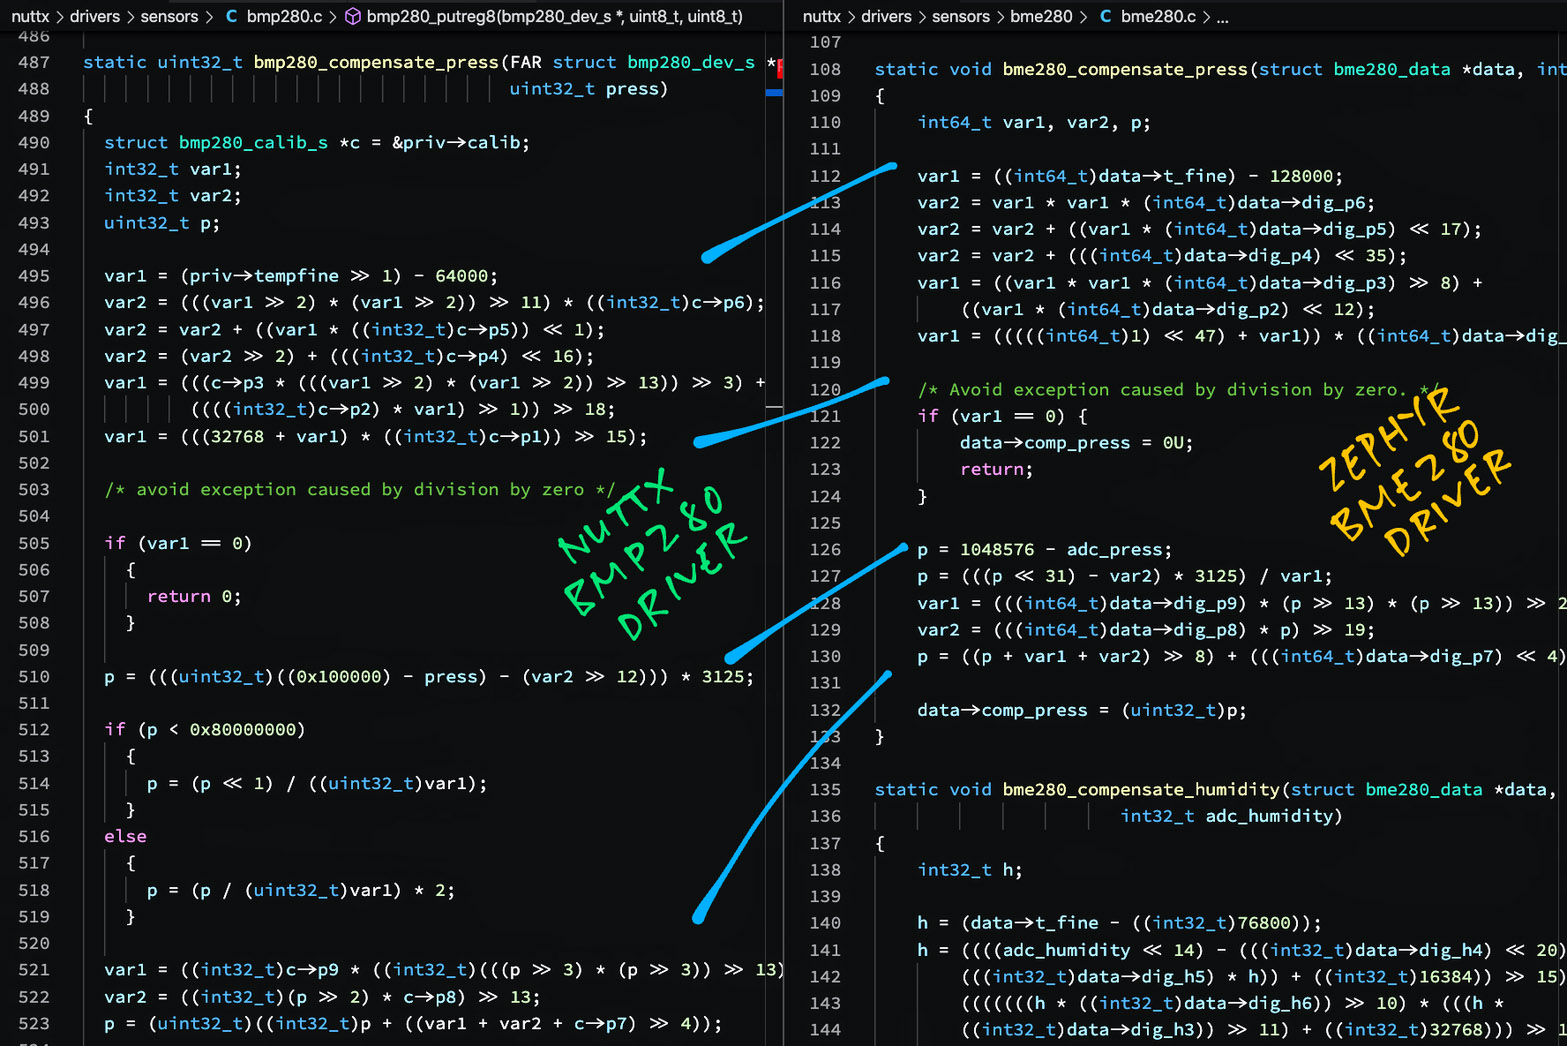
Zephyr’s BME280 Driver looks highly similar to NuttX’s BMP280 Driver. (Pic above)
Thus porting Zephyr’s BME280 Driver to NuttX might not be so hard!
Zephyr’s BME280 Driver exposes these functions: bme280-nuttx/bme280.c
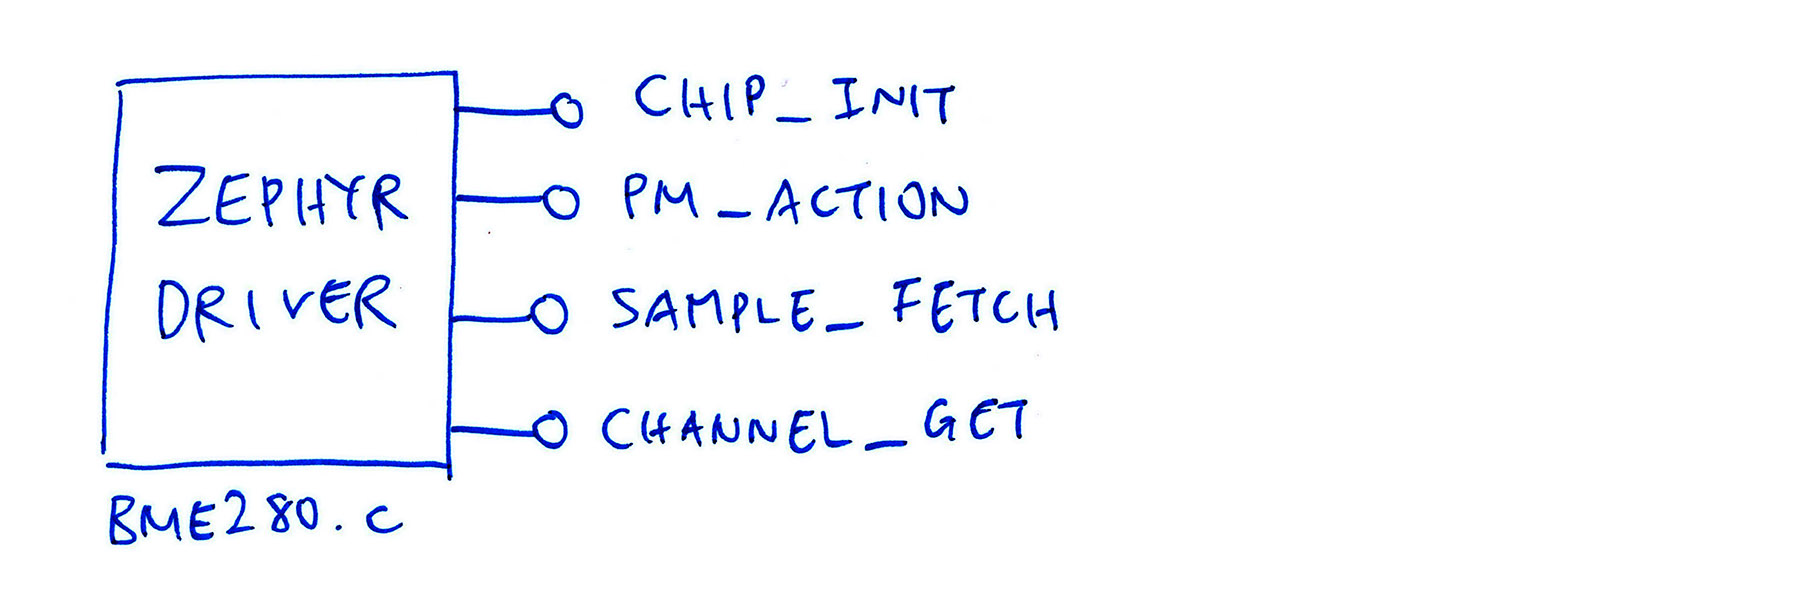
bme280_chip_init: Initialise the BME280 Sensor
bme280_pm_action: Suspend the BME280 Sensor (Low Power Mode) or resume to Normal Power Mode
bme280_sample_fetch: Fetch a sample from the BME280 Sensor
bme280_channel_get: Get the Temperature / Humidity / Pressure from the fetched sample
(bme280_sample_fetch and bme280_channel_get are explained in the Zephyr Sensor Docs)
But NuttX expects a different interface for Sensor Drivers: bme280-nuttx/driver.c
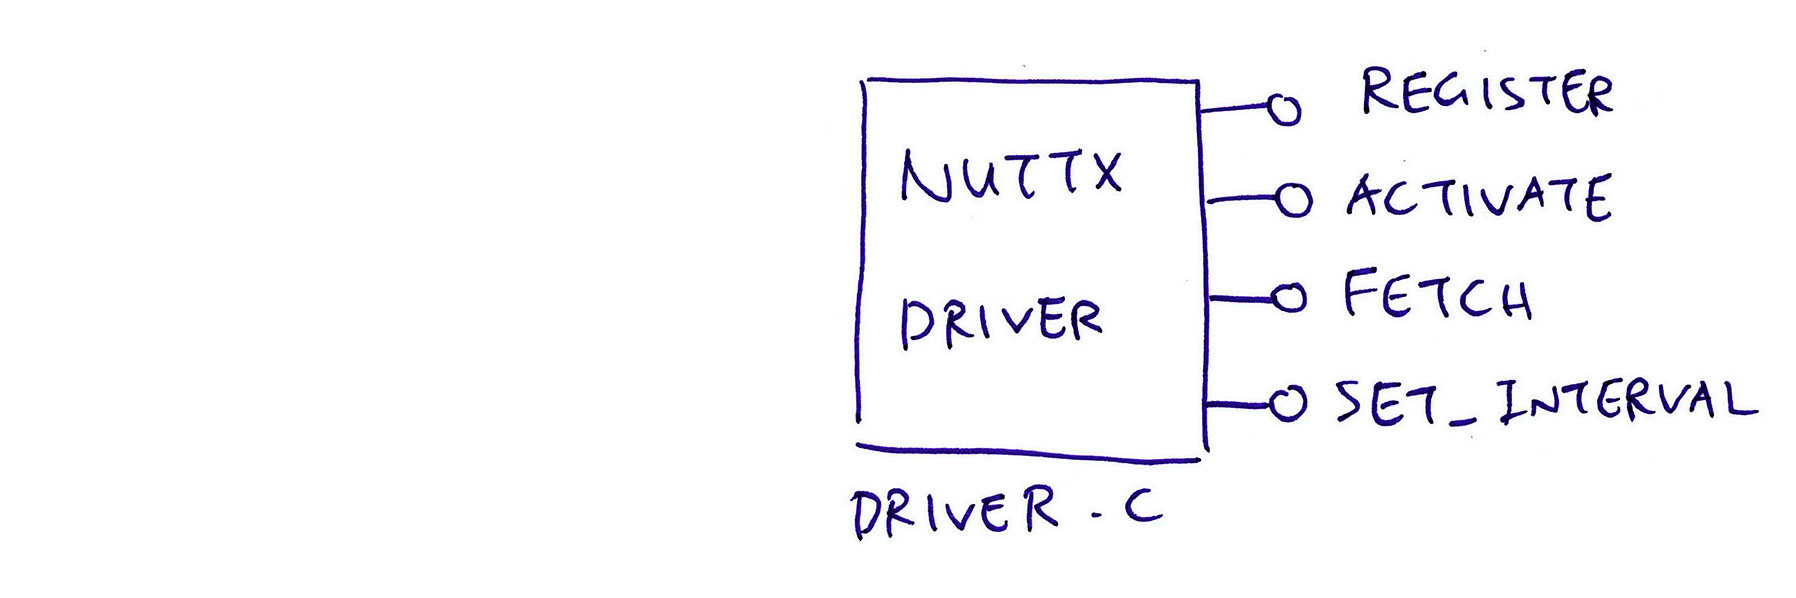
bme280_register: Register the sensor at startup and suspend the sensor
bme280_activate: Suspend the sensor (Low Power Mode) or resume to Normal Power Mode
bme280_fetch: Fetch the sensor values (Temperature / Humidity / Pressure)
bme280_set_interval: Set the Standby Interval for the sensor
Our job is to map the Zephyr BME280 Driver to the Sensor Driver Interface expected by NuttX…
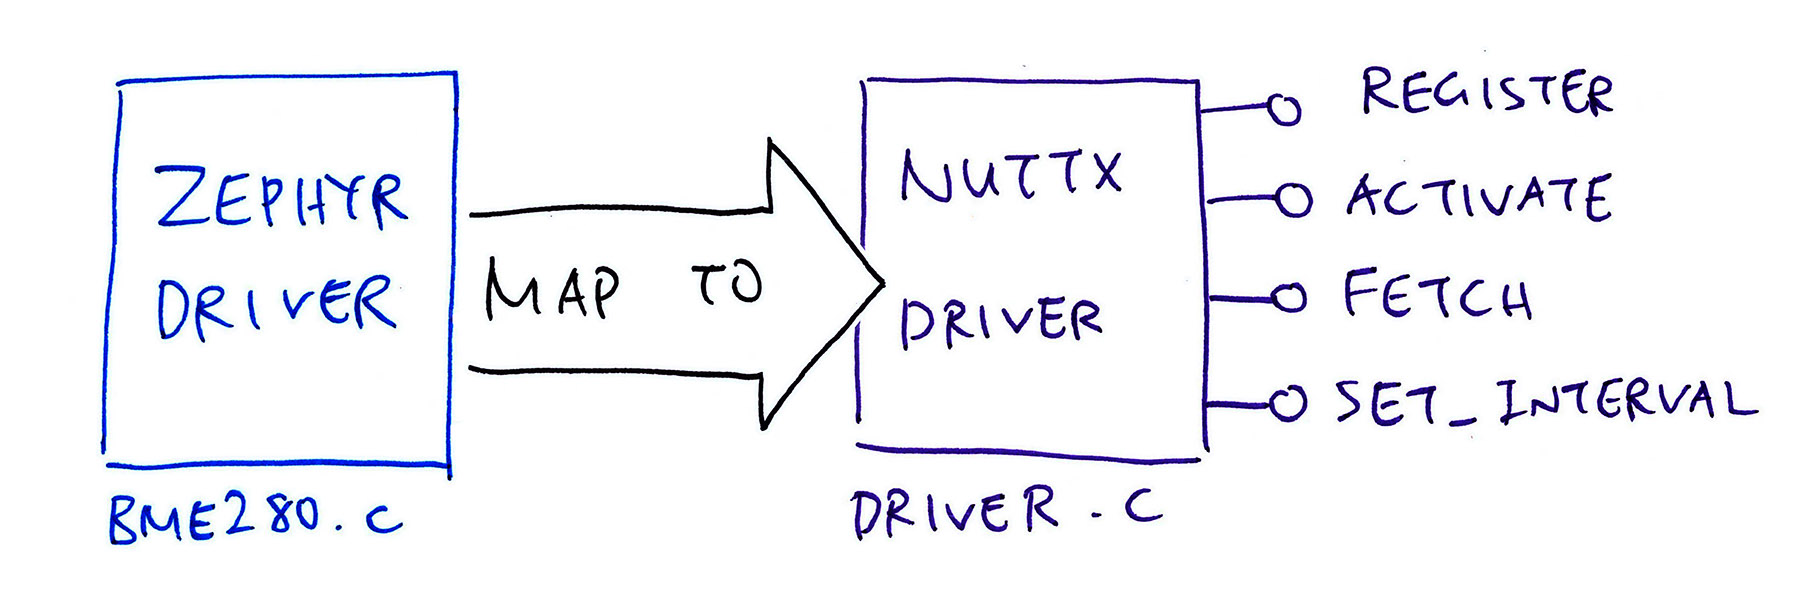
| Zephyr Driver | NuttX Driver |
|---|---|
| bme280_chip_init, bme280_pm_action | bme280_register |
| bme280_pm_action | bme280_activate |
| bme280_sample_fetch, bme280_channel_get | bme280_fetch |
| (Static Interval) | bme280_set_interval |
We’ll cover the details in the next section.
What about bme280_set_interval?
Zephyr assumes that the Standby Interval is Static. (Defined at compile time)
Whereas NuttX expects the Standby Interval to be set at runtime.
To handle this, we code the bme280_set_interval function ourselves in NuttX.
Our NuttX BME280 Driver reads the Sensor Data from the Zephyr Driver in two steps…
Fetch a sample from the BME280 Sensor
Get the Temperature, Humidity and Pressure from the fetched sample
This is how we do it: driver.c
//  Fetch pressure, temperature and humidity from sensor
static int bme280_fetch(
  FAR struct device *priv,  //  NuttX Device Struct
  FAR struct sensor_baro *baro_data,  //  Returns pressure and temperature (if non-null)
  FAR struct sensor_humi *humi_data   //  Returns humidity (if non-null)
) {

  //  Zephyr BME280 Driver assumes that sensor is not in sleep mode
  if (!priv->activated) {
    snerr("Device must be active before fetch\n");
    return -EIO;
  }
We begin by verifying that the sensor is in Normal Power Mode.
(activated is set by bme280_activate)
Next we call the Zephyr Driver to fetch a sample from BME280…
  //  Fetch the sensor sample (from Zephyr BME280 Driver)
  int ret = bme280_sample_fetch(
    priv,            //  NuttX Device Struct
    SENSOR_CHAN_ALL  //  Fetch Temperature, Humidity and Pressure
  );
if (ret < 0) { return ret; }(bme280_sample_fetch is defined here)
The fetched sample contains Temperature, Humidity and Pressure.
To get the Pressure we call the Zephyr Driver…
  //  Get the pressure (from Zephyr BME280 Driver)
  struct sensor_value val;
  ret = bme280_channel_get(
    priv,               //  NuttX Device Struct
    SENSOR_CHAN_PRESS,  //  Get Pressure from fetched sample
    &val                //  Pressure in Fixed Point format
  );
if (ret < 0) { return ret; }(bme280_channel_get is defined here)
This returns a Zephyr sensor_value struct that stores the Pressure as a Fixed-Point Number.
We convert the Pressure (kilopascal) from Fixed Point to Float (in millibars)…
  //  Convert pressure to float, scale up by 10 to convert kilopascal to millibars
float pressure = get_sensor_value(&val) * 10;(get_sensor_value is defined here)
We do the same to get the Temperature (°C) from the fetched sample…
  //  Get the temperature (from Zephyr BME280 Driver)
  ret = bme280_channel_get(
    priv,                      //  NuttX Device Struct
    SENSOR_CHAN_AMBIENT_TEMP,  //  Get Temperature from fetched sample
    &val                       //  Temperature in Fixed Point format
  );
  if (ret < 0) { return ret; }
  float temperature = get_sensor_value(&val);
And the Humidity (relative %)…
  //  Get the humidity (from Zephyr BME280 Driver)
  ret = bme280_channel_get(
    priv,                  //  NuttX Device Struct
    SENSOR_CHAN_HUMIDITY,  //  Get Humidity from fetched sample
    &val                   //  Humidity in Fixed Point format
  );
  if (ret < 0) { return ret; }
  float humidity = get_sensor_value(&val);
Sensor Values in NuttX are timestamped. We get the timestamp like so…
  //  Get the timestamp
  struct timespec ts;
  clock_systime_timespec(&ts);
  uint64_t timestamp = 1000000ull * ts.tv_sec + ts.tv_nsec / 1000;
Finally we return the Pressure and Temperature data…
  //  Return the pressure and temperature data
  if (baro_data != NULL) {
    baro_data->pressure    = pressure;
    baro_data->temperature = temperature;
    baro_data->timestamp   = timestamp;
  }
And the Humidity…
  //  Return the humidity data
  if (humi_data != NULL) {
    humi_data->humidity    = humidity;
    humi_data->timestamp   = timestamp;
  }
  return 0;
}
That’s how we call the Zephyr Driver to fetch the BME280 Sensor Data!
Why did we return the Sensor Data as two structs: baro_data and humi_data?
That’s because our NuttX BME280 Driver is implemented as a Composite Sensor: Barometer Sensor + Humidity Sensor.
More about this in the next chapter.

Mapping the Power Management functions (Low Power Mode) from Zephyr to NuttX is straightforward: driver.c
//  If enable is true, set Power Mode to normal. Else set to sleep mode.
static int bme280_activate(
    FAR struct device *priv,  //  NuttX Device Struct
    bool enable               //  True for Normal Mode, False for Sleep Mode
) {
  int ret = 0;
  if (enable) {
    //  Set power mode to normal (from Zephyr BME280 Driver)
    ret = bme280_pm_action(
      priv,                     //  NuttX Device Struct
      PM_DEVICE_ACTION_RESUME   //  Resume from Sleep Mode
    );
  } else {
    //  Set to sleep mode (from Zephyr BME280 Driver)
    ret = bme280_pm_action(
      priv,                     //  NuttX Device Struct
      PM_DEVICE_ACTION_SUSPEND  //  Suspend to Sleep Mode
    );
  }
  //  Remember the power mode
  if (ret >= 0) { priv->activated = enable; }
  return ret;
}
What’s the Standby Interval?
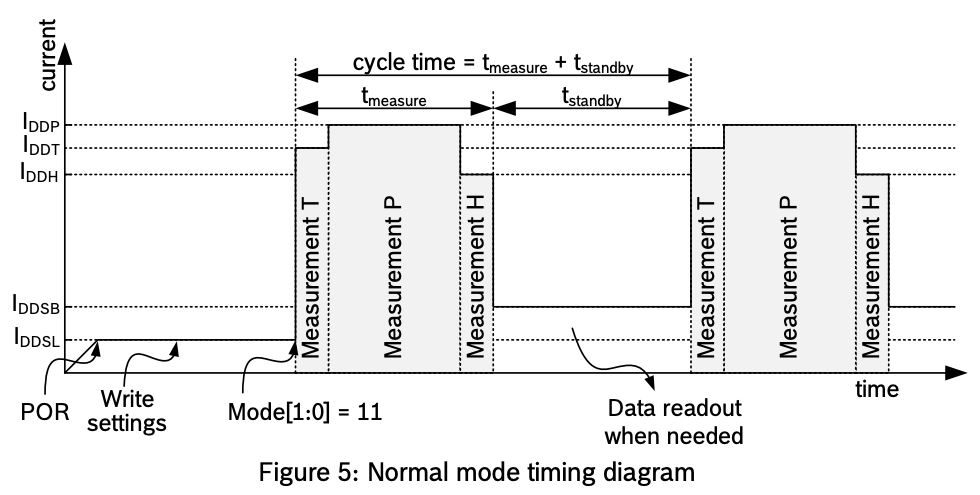
BME280 automatically measures the Temperature, Humidity and Pressure at periodic intervals. (Without any intervention from our microcontroller)
The time interval between measurements is the Standby Interval.
(t_standby in the pic above)
Standby Intervals work differently in Zephyr vs NuttX?
Zephyr defines the Standby Interval at Compile Time, it can’t be changed at runtime. (See this)
But NuttX configures the Standby Interval at runtime. That’s why we coded this function to set the Standby Interval: driver.c
//  Set Standby Interval for the sensor
static int bme280_set_interval(
  FAR struct device *priv,     //  NuttX Device Struct
  FAR unsigned int *period_us  //  Standby Interval in microseconds
) {
  //  Convert the Standby Interval to BME280 constant
  int ret = 0;
  uint8_t regval;
  switch (*period_us) {
    case 500:
      regval = BME280_STANDBY_05_MS; break;
    ...
    case 4000000:
      regval = BME280_STANDBY_4000_MS; break;
    default:
      ret = -EINVAL; break;
  }

  //  Set the Standby Interval
  if (ret == 0) {
    ret = bme280_set_standby(priv, regval);
  }
  return ret;
}
bme280_set_standby is defined below: driver.c
//  Set Standby Duration. Zephyr assumes that Standby Duration is static, so we set it in NuttX.
static int bme280_set_standby(
  FAR struct device *priv,  //  NuttX Device Struct
  uint8_t value             //  BME280 constant for Standby Duration
) {
  //  Set the standby duration value by writing to BME280 Register
  int ret = bme280_reg_read(priv, BME280_REG_CONFIG, &v_data_u8, 1);
  uint8_t v_data_u8 = (v_data_u8 & ~(0x07 << 5)) | (value << 5);
  ret = bme280_reg_write(priv, BME280_REG_CONFIG, v_data_u8);
  ...
  //  Check the standby duration value by reading from BME280 Register
  ret = bme280_reg_read(priv, BME280_REG_CONFIG, &v_data_u8, 1);
  uint8_t v_sb_u8 = (v_data_u8 >> 5) & 0x07;
// Omitted: Return error if v_sb_u8 != value(bme280_reg_read and bme280_reg_write are defined here)
(bme280_set_interval and bme280_set_standby were cloned from the NuttX BMP280 Driver)
We’ll cover bme280_register in the next chapter.
What kinds of Sensors are supported by NuttX?
Temperature, Humidity, Pressure, GPS, ECG, PM 2.5 and many more. (Here’s the list)
NuttX’s BMP280 Driver implements a Barometer Sensor that provides Pressure and Temperature values.
What about BME280? Is there a NuttX Sensor that supports Pressure + Temperature + Humidity?
Sadly no. Thus our BME280 Driver shall implement a Composite Sensor that behaves like two NuttX Sensors combined…
Barometer Sensor: /dev/uorb/sensor_baro0
(For Pressure and Temperature)
Humidity Sensor: /dev/uorb/sensor_humi0
(For Humidity)
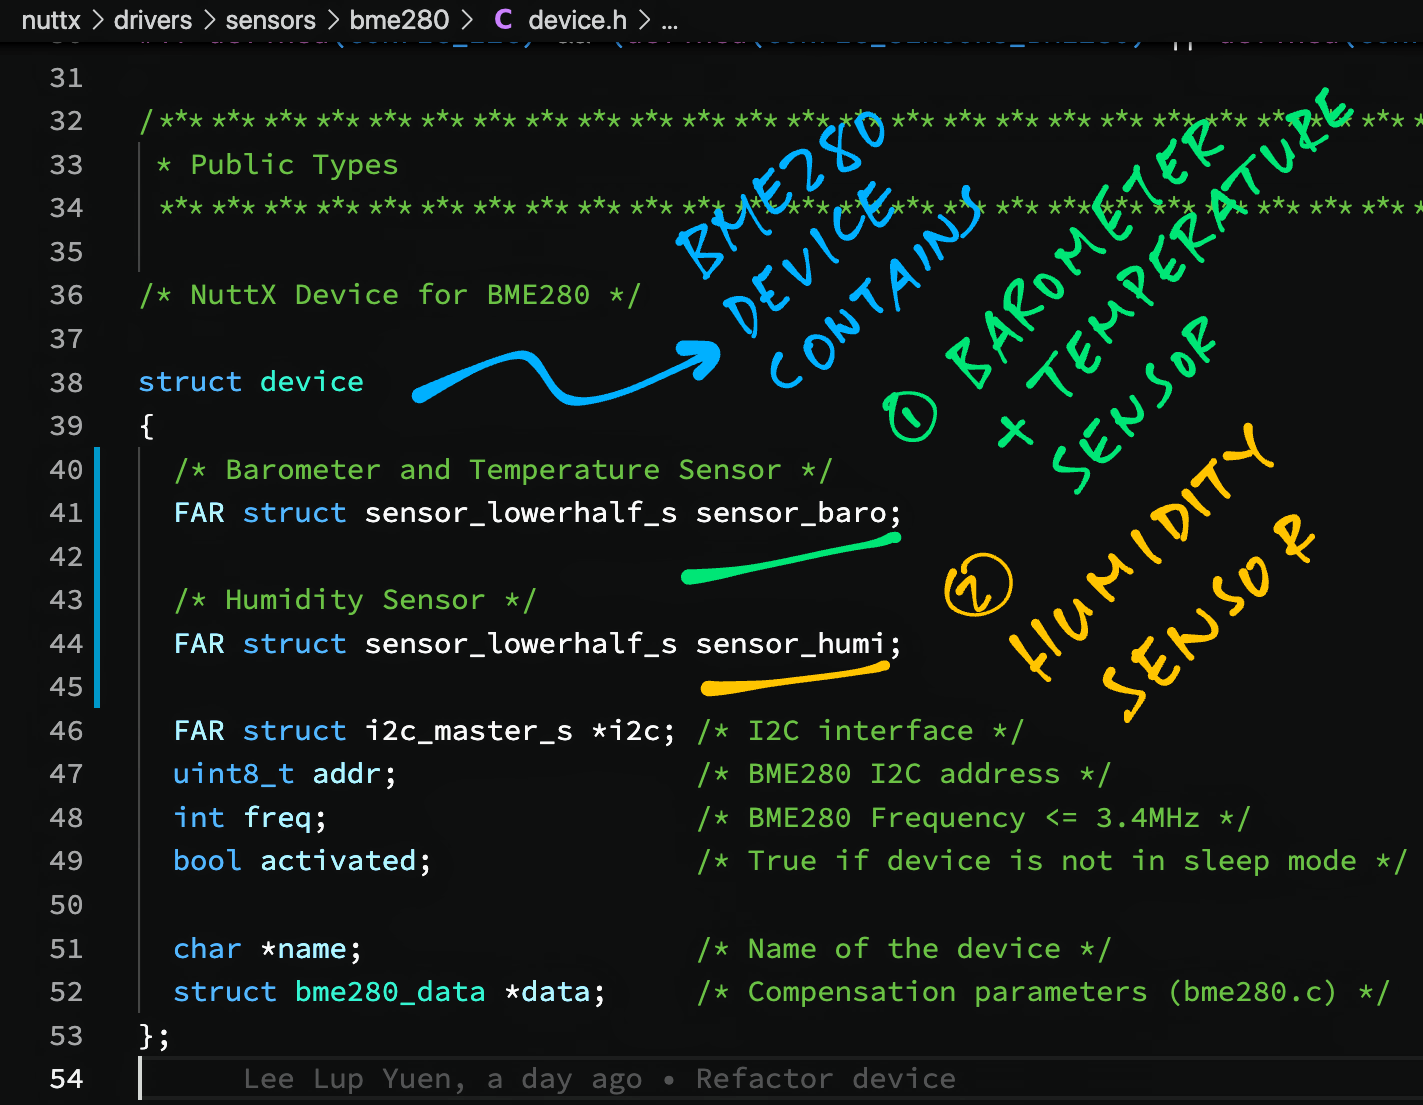
We mash together the two sensors like so: device.h
//  NuttX Device for BME280
struct device {
  //  Barometer Sensor (Pressure + Temperature)
  FAR struct sensor_lowerhalf_s sensor_baro;
  //  Humidity Sensor
  FAR struct sensor_lowerhalf_s sensor_humi;

  FAR struct i2c_master_s *i2c;  //  NuttX I2C interface
  uint8_t addr;                  //  BME280 I2C address
  int     freq;                  //  BME280 Frequency <= 3.4MHz
  bool    activated;             //  True if device is not in sleep mode
  char    *name;                 //  Name of the device (BME280)
  struct  bme280_data *data;     //  Compensation parameters (bme280.c)
};
Let’s dive into the implementation of the two NuttX Sensors.
Earlier we talked about the functions exposed by our NuttX Sensor Driver…
Now we expose the functions twice (double exposure?) as the Sensor Operations for our Barometer and Humidity Sensors: driver.c
//  Operations for Barometer Sensor
static const struct sensor_ops_s g_baro_ops = {
  .activate      = bme280_activate_baro,
  .fetch         = bme280_fetch_baro,
  .set_interval  = bme280_set_interval_baro,
};

//  Operations for Humidity Sensor
static const struct sensor_ops_s g_humi_ops = {
  .activate      = bme280_activate_humi,
  .fetch         = bme280_fetch_humi,
  .set_interval  = bme280_set_interval_humi,
};
Barometer Sensor vs Humidity Sensor… How different are the Sensor Operations?
The Sensor Operations look highly similar. This is how we fetch the Barometer Sensor Data: driver.c
//  Called by NuttX to fetch pressure and temperature from sensor
static int bme280_fetch_baro(
  FAR struct sensor_lowerhalf_s *lower,  //  Barometer Sensor
  FAR struct file *filep,  // NuttX File
  FAR char *buffer,  //  Buffer to return Sensor Data
  size_t buflen      //  Size of Buffer
) {
  //  Get NuttX Device Struct
  FAR struct device *priv = container_of(
    lower,              //  Barometer Sensor
    FAR struct device,  //  NuttX Device Struct
    sensor_baro         //  Barometer Sensor Struct
  );

  //  Validate buffer size
  struct sensor_baro baro_data;
  if (buflen != sizeof(baro_data)) { return -EINVAL; }

  //  Fetch the sensor data
  int ret = bme280_fetch(priv, &baro_data, NULL);
  if (ret < 0) { return ret; }

  //  Return the sensor data
  memcpy(buffer, &baro_data, sizeof(baro_data));
  return buflen;
}
And this is how we fetch the Humidity Sensor Data: driver.c
//  Called by NuttX to fetch humidity from sensor
static int bme280_fetch_humi(
  FAR struct sensor_lowerhalf_s *lower,  //  Humidity Sensor
  FAR struct file *filep,  // NuttX File
  FAR char *buffer,  //  Buffer to return Sensor Data
  size_t buflen      //  Size of Buffer
) {
  //  Get NuttX Device Struct
  FAR struct device *priv = container_of(
    lower,              //  Humidity Sensor
    FAR struct device,  //  NuttX Device Struct
    sensor_humi         //  Humidity Sensor Struct
  );

  //  Validate buffer size
  struct sensor_humi humi_data;
  if (buflen != sizeof(humi_data)) { return -EINVAL; }

  //  Fetch the sensor data
  int ret = bme280_fetch(priv, NULL, &humi_data);
  if (ret < 0) { return ret; }

  //  Return the sensor data
  memcpy(buffer, &humi_data, sizeof(humi_data));
  return buflen;
}
(We’ve seen bme280_fetch earlier)
The other Sensor Operations look similar too…
bme280_activate_baro vs bme280_activate_humi
(Both functions call bme280_activate)
bme280_set_interval_baro vs bme280_set_interval_humi
(Both functions call bme280_set_interval)
At NuttX Startup we register the Barometer and Humidity Sensors: driver.c
//  Register the BME280 device at startup
int bme280_register(
  int devno,  //  Instance number for driver
  FAR struct i2c_master_s *i2c  //  I2C Interface
) {
  //  Initialize the NuttX Device Struct
  FAR struct device *priv = (FAR struct device *)kmm_zalloc(sizeof(struct device));
  ...
  //  Allocate the Compensation Parameters
  struct bme280_data *data = (FAR struct bme280_data *)kmm_zalloc(sizeof(struct bme280_data));
  priv->data = data;
  ...
  //  Initialize the Barometer Sensor
  priv->sensor_baro.ops  = &g_baro_ops;
  priv->sensor_baro.type = SENSOR_TYPE_BAROMETER;

  //  Initialize the Humidity Sensor
  priv->sensor_humi.ops  = &g_humi_ops;
  priv->sensor_humi.type = SENSOR_TYPE_RELATIVE_HUMIDITY;

  //  Initialize the Sensor Hardware (Zephyr BME280 Driver)
  int ret = bme280_chip_init(priv);
  ...
  //  Set Power Mode to sleep (Zephyr BME280 Driver)
  ret = bme280_pm_action(priv, PM_DEVICE_ACTION_SUSPEND);
  ...
  //  Register the Barometer Sensor
  ret = sensor_register(&priv->sensor_baro, devno);
  ...
  //  Register the Humidity Sensor
  ret = sensor_register(&priv->sensor_humi, devno);
The function above is called at startup by bl602_bringup: bl602_bringup.c
#ifdef CONFIG_SENSORS_BME280
#include <nuttx/sensors/bme280.h>
#endif /* CONFIG_SENSORS_BME280 */
...
int bl602_bringup(void) {
  ...
#ifdef CONFIG_SENSORS_BME280
  //  Init I2C bus for BME280
  struct i2c_master_s *bme280_i2c_bus = bl602_i2cbus_initialize(0);
  if (!bme280_i2c_bus) { _err("ERROR: Failed to get I2C%d interface\n", 0); }

  //  Register the BME280 driver
  ret = bme280_register(0, bme280_i2c_bus);
  if (ret < 0) { _err("ERROR: Failed to register BME280\n"); }
#endif  //  CONFIG_SENSORS_BME280
For ESP32: Edit the function esp32_bringup in esp32_bringup.c so that it calls bme280_register
One last thing before running the BME280 Driver: We need to bundle together the NuttX and Zephyr Drivers.
Our BME280 Driver consists of two source files: bme280.c and driver.c. Will this work with NuttX?
Nope this won’t compile with NuttX, because it assumes that every Sensor Driver lives in its own file. (Like bmp280.c)
To work around this, we bundle together the Zephyr Driver (bme280.c) and NuttX Driver (driver.c) into a single source file…
And we create a Symbolic Link at drivers/sensors/bme280.c…
## Go to the NuttX Sensors Source directory
pushd nuttx/nuttx/drivers/sensors

## Add the BME280 Driver as a submodule
git submodule add \
  https://github.com/lupyuen/bme280-nuttx \
  bme280

## Create the Symbolic Link to the bundled source file
ln -s \
  bme280/bundle.c \
  bme280.c

## Return to the top directory
popd
We do the same for the bundled include file bme280-nuttx/bundle.h…
## Go to the NuttX Sensors Include directory
pushd nuttx/nuttx/include/nuttx/sensors

## Create the Symbolic Link to the bundled include file
ln -s \
  ../../../drivers/sensors/bme280/bundle.h \
  bme280.h

## Return to the top directory
popd
Which is Sym-Linked at include/nuttx/sensors/bme280.h
This bundling looks complicated. Why not merge the Zephyr and NuttX Drivers into a single source file?
We wanted to reuse the Zephyr Driver with minimal changes so that…
We can track changes to the Zephyr source code…
By isolating the parts that were modified for NuttX
And hopefully we can apply the same steps to port other Zephyr Drivers to NuttX.
Let’s look inside the bundle.
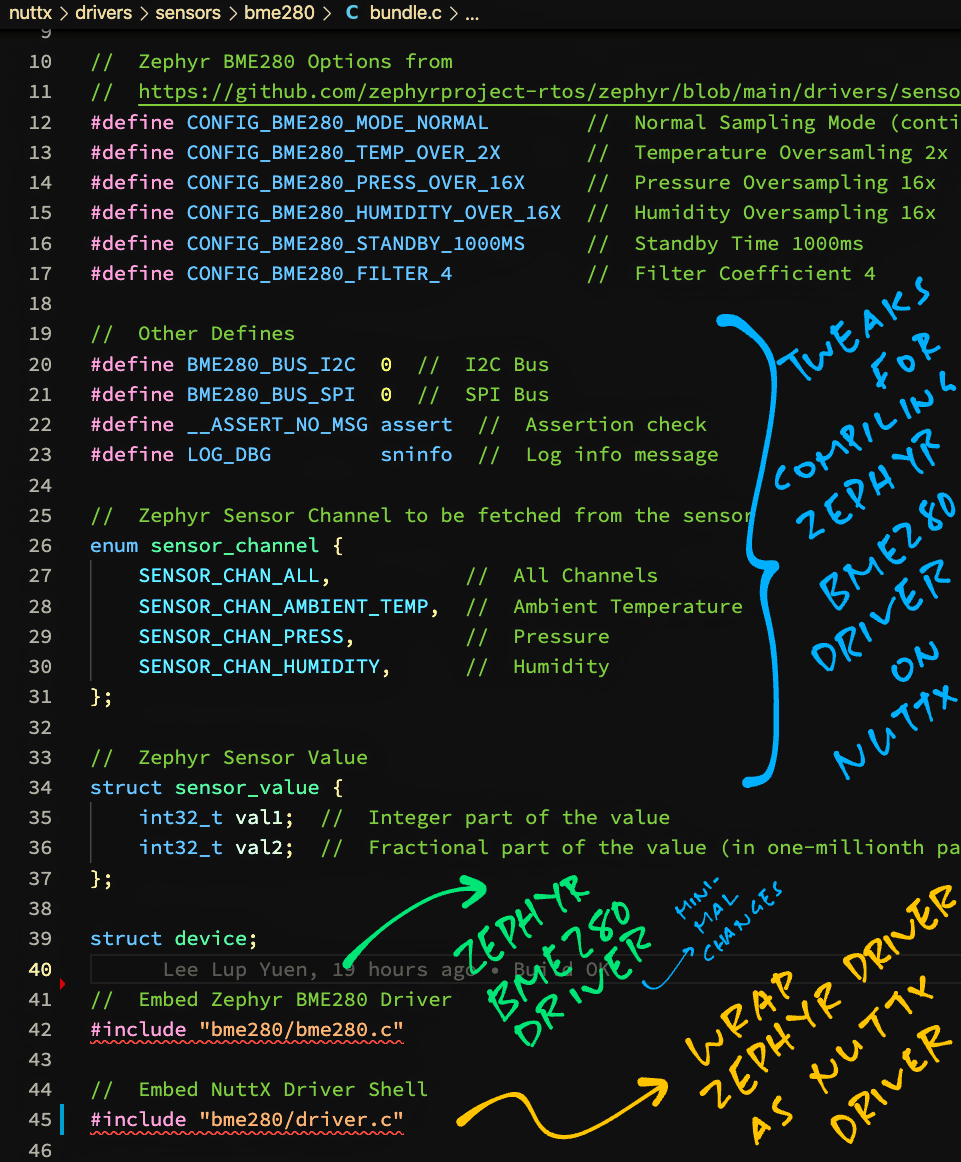
What’s inside the bundled source file bundle.c?
We define the Constants and Macros needed by the Zephyr Driver: bundle.c
//  Zephyr BME280 Options from
//  https://github.com/zephyrproject-rtos/zephyr/blob/main/drivers/sensor/bme280/Kconfig
#define CONFIG_BME280_MODE_NORMAL        //  Normal Sampling Mode (continuous measurements)
#define CONFIG_BME280_TEMP_OVER_2X       //  Temperature Oversamling 2x
#define CONFIG_BME280_PRESS_OVER_16X     //  Pressure Oversampling 16x
#define CONFIG_BME280_HUMIDITY_OVER_16X  //  Humidity Oversampling 16x
#define CONFIG_BME280_STANDBY_1000MS     //  Standby Time 1000ms. Note: Will be overwritten in bme280_set_standby
#define CONFIG_BME280_FILTER_4           //  Filter Coefficient 4
#define CONFIG_PM_DEVICE                 //  Enable Power Management

//  Other Zephyr Defines
#define BME280_BUS_I2C  0  //  I2C Bus
#define BME280_BUS_SPI  0  //  SPI Bus
#define __ASSERT_NO_MSG DEBUGASSERT  //  Assertion check
#define LOG_DBG         sninfo       //  Log info message
#define K_MSEC(ms)      (ms * 1000)  //  Convert milliseconds to microseconds
#define k_sleep(us)     usleep(us)   //  Sleep for microseconds
#define sys_le16_to_cpu(x) (x)       //  Convert from little endian to host endian. TODO: Handle big endian
Followed by the Zephyr Types: bundle.c
//  Zephyr Sensor Channel to be fetched from the sensor
enum sensor_channel {
  SENSOR_CHAN_ALL,           //  All Channels
  SENSOR_CHAN_AMBIENT_TEMP,  //  Ambient Temperature
  SENSOR_CHAN_PRESS,         //  Pressure
  SENSOR_CHAN_HUMIDITY,      //  Humidity
};

//  Zephyr Power Management Action
enum pm_device_action {
  PM_DEVICE_ACTION_SUSPEND,  //  Suspend the sensor
  PM_DEVICE_ACTION_RESUME,   //  Resume the sensor
};

//  Zephyr Power Management State
enum pm_device_state {
  PM_DEVICE_STATE_ACTIVE,     //  Sensor is active
  PM_DEVICE_STATE_SUSPENDED,  //  Sensor is suspended
};

//  Zephyr Sensor Value
struct sensor_value {
  int32_t val1;  //  Integer part of the value
  int32_t val2;  //  Fractional part of the value (in one-millionth parts)
};
And finally we embed the source code of the Zephyr and NuttX Drivers: bundle.c
//  Embed Zephyr BME280 Driver
#include "bme280/bme280.c"

//  Embed NuttX Driver Wrapper
#include "bme280/driver.c"
Yes this looks peculiar…
Sacrilege! We’re #include-ing C source files?!
Yeah this is probably the only way to port the Zephyr Driver to NuttX with the fewest changes.
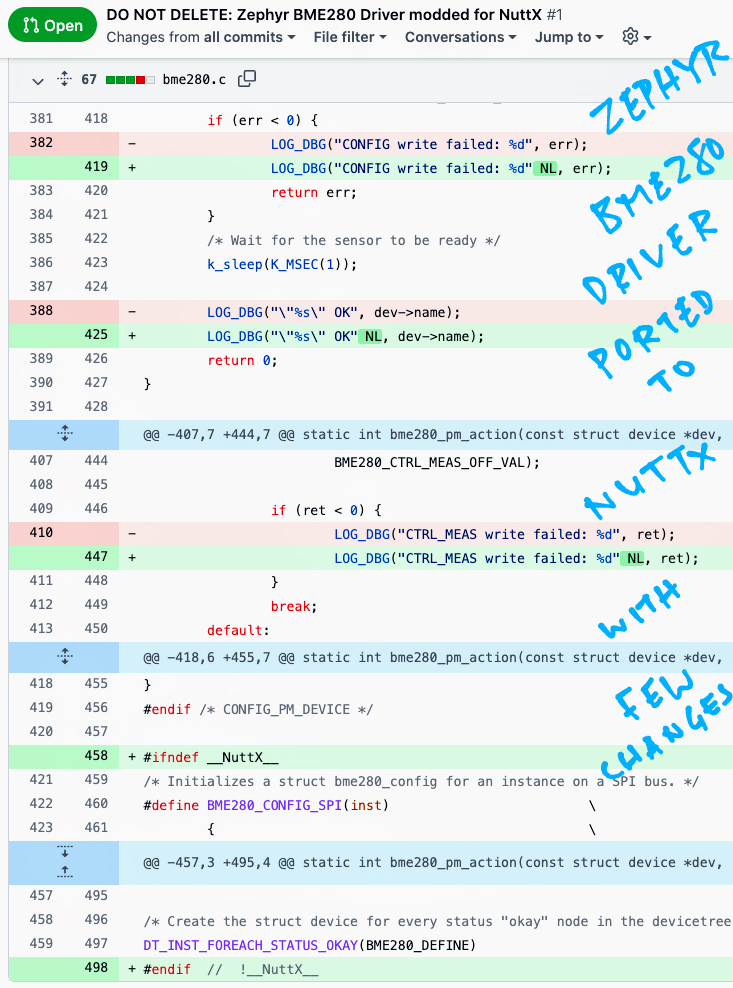
Check out the minor modifications we made to the Zephyr BME280 Driver while porting to NuttX…
In future we might merge the source files to clean this up. Not that hard!
We’re finally ready to run our BME280 Driver!
Follow these steps to build, flash and run NuttX (with our driver inside)…
At the NuttX Shell, enter this command to list the NuttX Sensors…
ls /dev/uorbWe should see our BME280 Barometer and Humidity Sensors…
/dev/uorb:
 baro0
 humi0
To read the BME280 Barometer Sensor once, enter this command…
sensortest -n 1 baro0We should see the Air Pressure and Temperature readings…
SensorTest: Test /dev/uorb/sensor_baro0 with interval(1000000us), latency(0us)
baro0:
  timestamp: 43760000
  value1:     1011.29
  value2:       29.09
SensorTest: Received message: baro0, number:1/1
This says that the Air Pressure is 1,011.29 millibars and the Temperature is 29.09 °C.
Now enter this command to read the BME280 Humidity Sensor once…
sensortest -n 1 humi0We should see the Relative Humidity…
SensorTest: Test /dev/uorb/sensor_humi0 with interval(1000000us), latency(0us)
humi0:
  timestamp: 60120000
  value:     90.58
SensorTest: Received message: humi0, number:1/1
This says that the Relative Humidity is 90.58 %.
Yep our BME280 Driver runs successfully on NuttX!
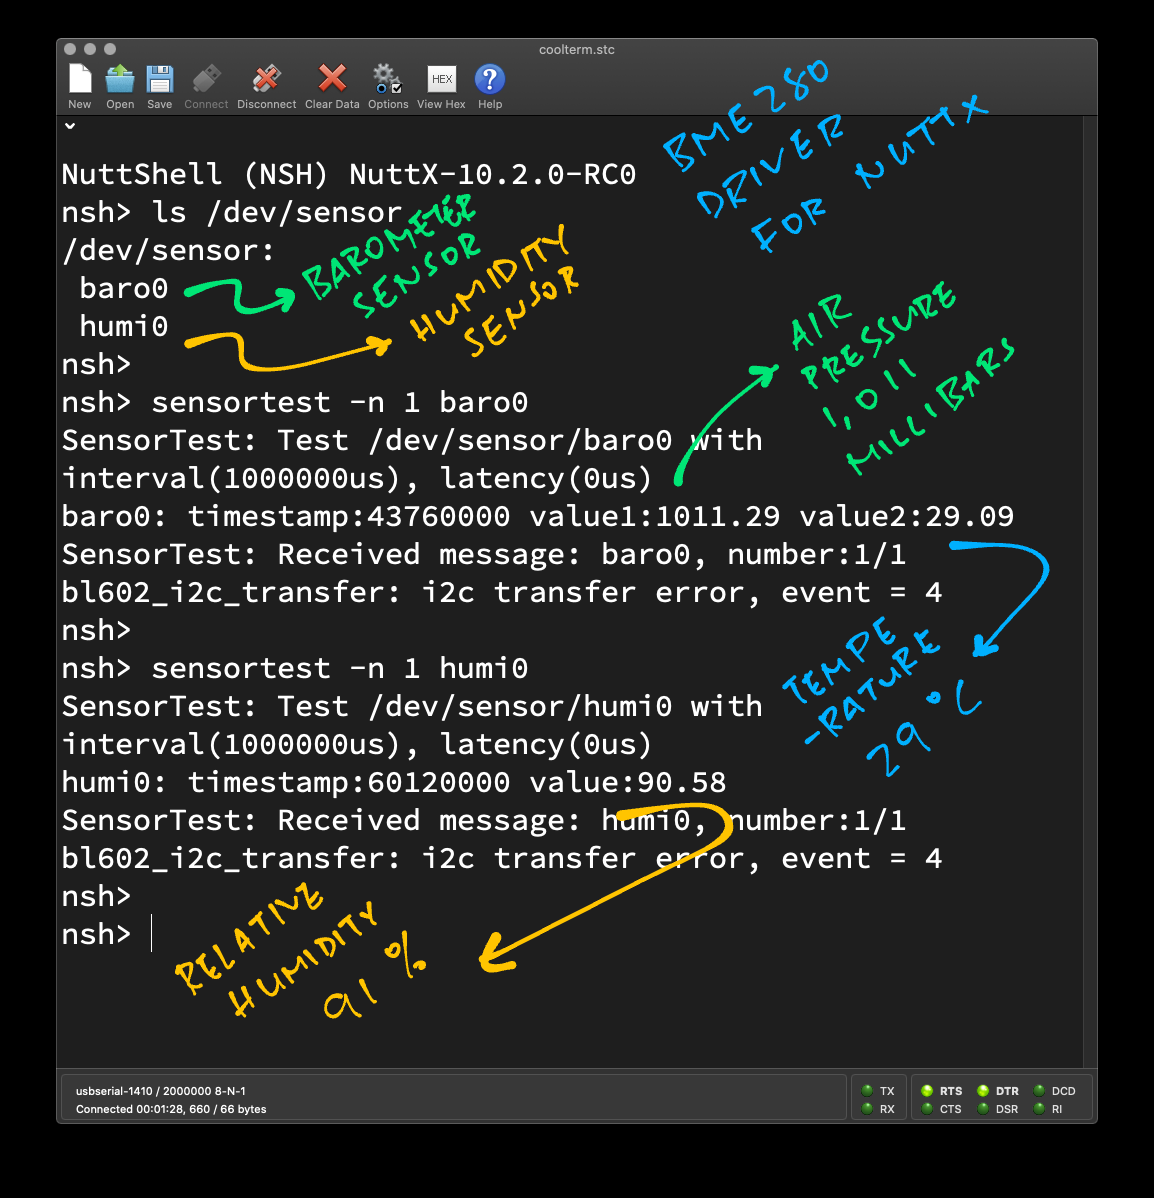
Just now we ran the Sensor Test App to read BME280’s Barometer and Humidity Sensors (pic above)…
nsh> sensortest -n 1 baro0
baro0:
  timestamp: 43760000
  value1:     1011.29
  value2:       29.09

nsh> sensortest -n 1 humi0
humi0:
  timestamp: 60120000
  value:     90.58
(That’s 1,011.29 millibars, 29.09 °C, 90.58 % Humidity)
Let’s take a quick look inside the Sensor Test App, so that we can code our own Sensor Apps: sensortest.c
//  Sensor Test App
int main(int argc, FAR char *argv[]) {
  ...
  //  Allocate buffer for Sensor Data.
  //  len is Sensor Data size: sizeof(struct sensor_baro)
  FAR char *buffer = calloc(1, len);
The app begins by allocating a buffer for the Sensor Data Struct: sensor_baro (Barometer) or sensor_humi (Humidity).
Next we open the Sensor Device: /dev/uorb/sensor_baro0 (Barometer) or /dev/uorb/sensor_humi0 (Humidity)…
  //  Open the Sensor Device.
  //  devname looks like "/dev/uorb/sensor_baro0"
  int fd = open(devname, O_RDONLY | O_NONBLOCK);
  if (fd < 0) { /* Handle error */ ... }
We set the Standby Interval and Batch Latency…
  //  Set Standby Interval
  int ret = ioctl(fd, SNIOC_SET_INTERVAL, interval);
  if (ret < 0) { /* Handle error */ ... }

  //  Set Batch Latency
  ret = ioctl(fd, SNIOC_BATCH, latency);
  if (ret < 0) { /* Handle error */ ... }
We prepare to poll our sensor…
  //  Prepare to poll the Sensor
  struct pollfd fds;
  fds.fd     = fd;
  fds.events = POLLIN;
Then we poll, read and print the Sensor Data…
  //  Repeat until all samples have been read
  while ((!count || received < count) && !g_should_exit) {

    //  If Sensor Data is available...
    if (poll(&fds, 1, -1) > 0) {

      //  Read the Sensor Data
      if (read(fd, buffer, len) >= len) {

        //  Print the Sensor Data
        received++;
        g_sensor_info[idx]
          .print(buffer, name);
      }
    }
  }
(We’ll see g_sensor_info and print in a while)
Finally we close the sensor…
  //  Close the Sensor Device and free the buffer
  close(fd);
  free(buffer);
Let’s talk about the printing of Sensor Data.
Earlier we saw this code for printing Sensor Data…
//  Print the Sensor Data
g_sensor_info[idx]
  .print(buffer, name);
What’s g_sensor_info?
g_sensor_info is a Lookup Table that defines the Print Function for every Sensor Type.
(Remember that the Sensor Test App needs to handle all Sensor Types)
Here’s the Print Function for our Barometer Sensor: sensortest.c
//  Print Barometer Sensor Data: Pressure and Temperature
static void print_valf2(const char *buffer, const char *name) {

  //  Cast buffer as Barometer Sensor Data
  struct sensor_baro *event =
    (struct sensor_baro *) buffer;

  //  Print Pressure and Temperature
  printf(
    "%s: timestamp:%" PRIu64 " value1:%.2f value2:%.2f\n",
    name,
    event->timestamp,
    event->pressure,
    event->temperature
  );
}
And here’s the Print Function for our Humidity Sensor: sensortest.c
//  Print Humidity or Proximity Sensor Data
static void print_valf(const char *buffer, const char *name) {

  //  Cast buffer as Proximity Sensor Data,
  //  which has same size as Humidity Sensor Data
  struct sensor_prox *event =
    (struct sensor_prox *) buffer;

  //  Print Humidity or Proximity
  printf(
    "%s: timestamp:%" PRIu64 " value:%.2f\n",
    name,
    event->timestamp,
    event->proximity
  );
}
But we’re printing Humidity, not Proximity… Why cast to sensor_prox?
Yep we should cast to sensor_humi instead…
//  Cast buffer as Humidity Sensor Data
struct sensor_humi *event =
  (struct sensor_humi *) buffer;
The Sensor Test App reuses the same function print_valf for printing both Humidity and Proximity Sensor Data. Which is OK because both structs contain the same field types.
How is the Print Function defined for each Sensor Type?
The Print Functions are defined in the Lookup Table g_sensor_info: sensortest.c
//  Lookup Table of all Sensor Types
static const struct sensor_info g_sensor_info[] = {
  ...
  //  Print Barometer Sensor Data with print_valf2
  { print_valf2,
    sizeof(struct sensor_baro),
    "baro" },

  //  Print Humidity Sensor Data with print_valf
  { print_valf,
    sizeof(struct sensor_humi),
    "humi" },
For our own Sensor App we probably won’t need this Lookup Table, since we know which Sensor Type we’re using.
(And we don’t need to cast our Sensor Data Structs too)
Today we described the steps for porting the BME280 Driver from Zephyr OS to NuttX.
(And we fixed an I2C quirk on BL602)
I hope you’ll be inspired to port other Zephyr drivers to NuttX!
Besides Zephyr OS, where else can we find drivers for NuttX?
Embedded Rust might be a terrific source of drivers for NuttX.
(Check out the Embedded Rust drivers)
But first we need to wrap up the NuttX I2C ioctl Interface as a Rust Embedded HAL.
We’ll cover this in the next article…
The BME280 Driver can also be called from Zig…
Many Thanks to my GitHub Sponsors for supporting my work! This article wouldn’t have been possible without your support.
Got a question, comment or suggestion? Create an Issue or submit a Pull Request here…
lupyuen.github.io/src/bme280.md
This article is the expanded version of this Twitter Thread
The design of the NuttX Sensor API is discussed here…
How to access the I2C Port in a NuttX App via ioctl? See this…
The BL602 NuttX I2C Driver works in mysterious ways (because of the I2C Sub Address). In this section we’ll explain how to make the driver work correctly, and attempt to decipher the original intentions of the driver’s creator.
BL602 has a peculiar I2C Port that requires us to send the Register ID as I2C Sub Address (I2C_SUB_ADDR), separately from the I2C Data…
Will BL602 I2C work if we disable I2C Sub Address?
Nope. If we disable I2C Sub Address, the Register ID sent will be 0x00. (See this)
Thus we must set the Register ID as I2C Sub Address when reading and writing I2C Registers. Here’s how we do this by passing the I2C_M_NOSTOP flag…
When reading an I2C Register, we set the flag I2C_M_NOSTOP like so: bme280-nuttx/driver.c
//  Read from 8-bit BME280 registers
static int bme280_reg_read(const struct device *priv,
  uint8_t start, uint8_t *buf, int size) {
  struct i2c_msg_s msg[2];
  int ret;

  //  Send Register ID
  msg[0].frequency = priv->freq;
  msg[0].addr      = priv->addr;
#ifdef CONFIG_BL602_I2C0
  //  For BL602: Register ID must be passed as I2C Sub Address
  msg[0].flags     = I2C_M_NOSTOP;
#else
  //  Otherwise pass Register ID as I2C Data
  msg[0].flags     = 0;
#endif  //  CONFIG_BL602_I2C0
  msg[0].buffer    = &start;
  msg[0].length    = 1;

  //  Receive Register Value
  msg[1].frequency = priv->freq;
  msg[1].addr      = priv->addr;
  msg[1].flags     = I2C_M_READ;
  msg[1].buffer    = buf;
  msg[1].length    = size;

  //  Execute I2C transfers
  ret = I2C_TRANSFER(priv->i2c, msg, 2);
This transmits the Register ID as I2C Sub Address, then receives the Register Value.
When writing an I2C Register, we need two steps…
Send the Register ID and Register Value (in a single chunk) as I2C Sub Address
Followed by I2C Read
Here’s how: bme280-nuttx/driver.c
//  Write to an 8-bit BME280 register
static int bme280_reg_write(const struct device *priv, uint8_t reg,
  uint8_t val) {
  struct i2c_msg_s msg[2];
  uint8_t txbuffer[2];
  uint8_t rxbuffer[1];
  int ret;

  //  Transmit buffer contains Register ID and value
  txbuffer[0] = reg;
  txbuffer[1] = val;

  //  Send Register ID and value
  msg[0].frequency = priv->freq;
  msg[0].addr      = priv->addr;
#ifdef CONFIG_BL602_I2C0
  //  For BL602: Register ID and value must be passed as I2C Sub Address
  msg[0].flags     = I2C_M_NOSTOP;
#else
  //  Otherwise pass Register ID and value as I2C Data
  msg[0].flags     = 0;
#endif  //  CONFIG_BL602_I2C0
  msg[0].buffer    = txbuffer;
  msg[0].length    = 2;

  //  For BL602: We read I2C Data because this
  //  forces BL602 to send the first message correctly
  msg[1].frequency = priv->freq;
  msg[1].addr      = priv->addr;
  msg[1].flags     = I2C_M_READ;
  msg[1].buffer    = rxbuffer;
  msg[1].length    = sizeof(rxbuffer);

  //  Execute I2C transfers
ret = I2C_TRANSFER(priv->i2c, msg, 2);Why must we do I2C Read after sending the Register ID and value?
We’re not sure why this happens with the BL602 I2C Driver. But it works correctly when we checked with a Logic Analyser.
Here’s what happens when we run the code above to write 0xA0 to Register ID 0xF5 at I2C Address 0x77…
Setup Write to [0xEE] + ACK
0xF5 + ACK
0xA0 + ACK
Setup Read to [0xEF] + ACK
0xA0 + NAK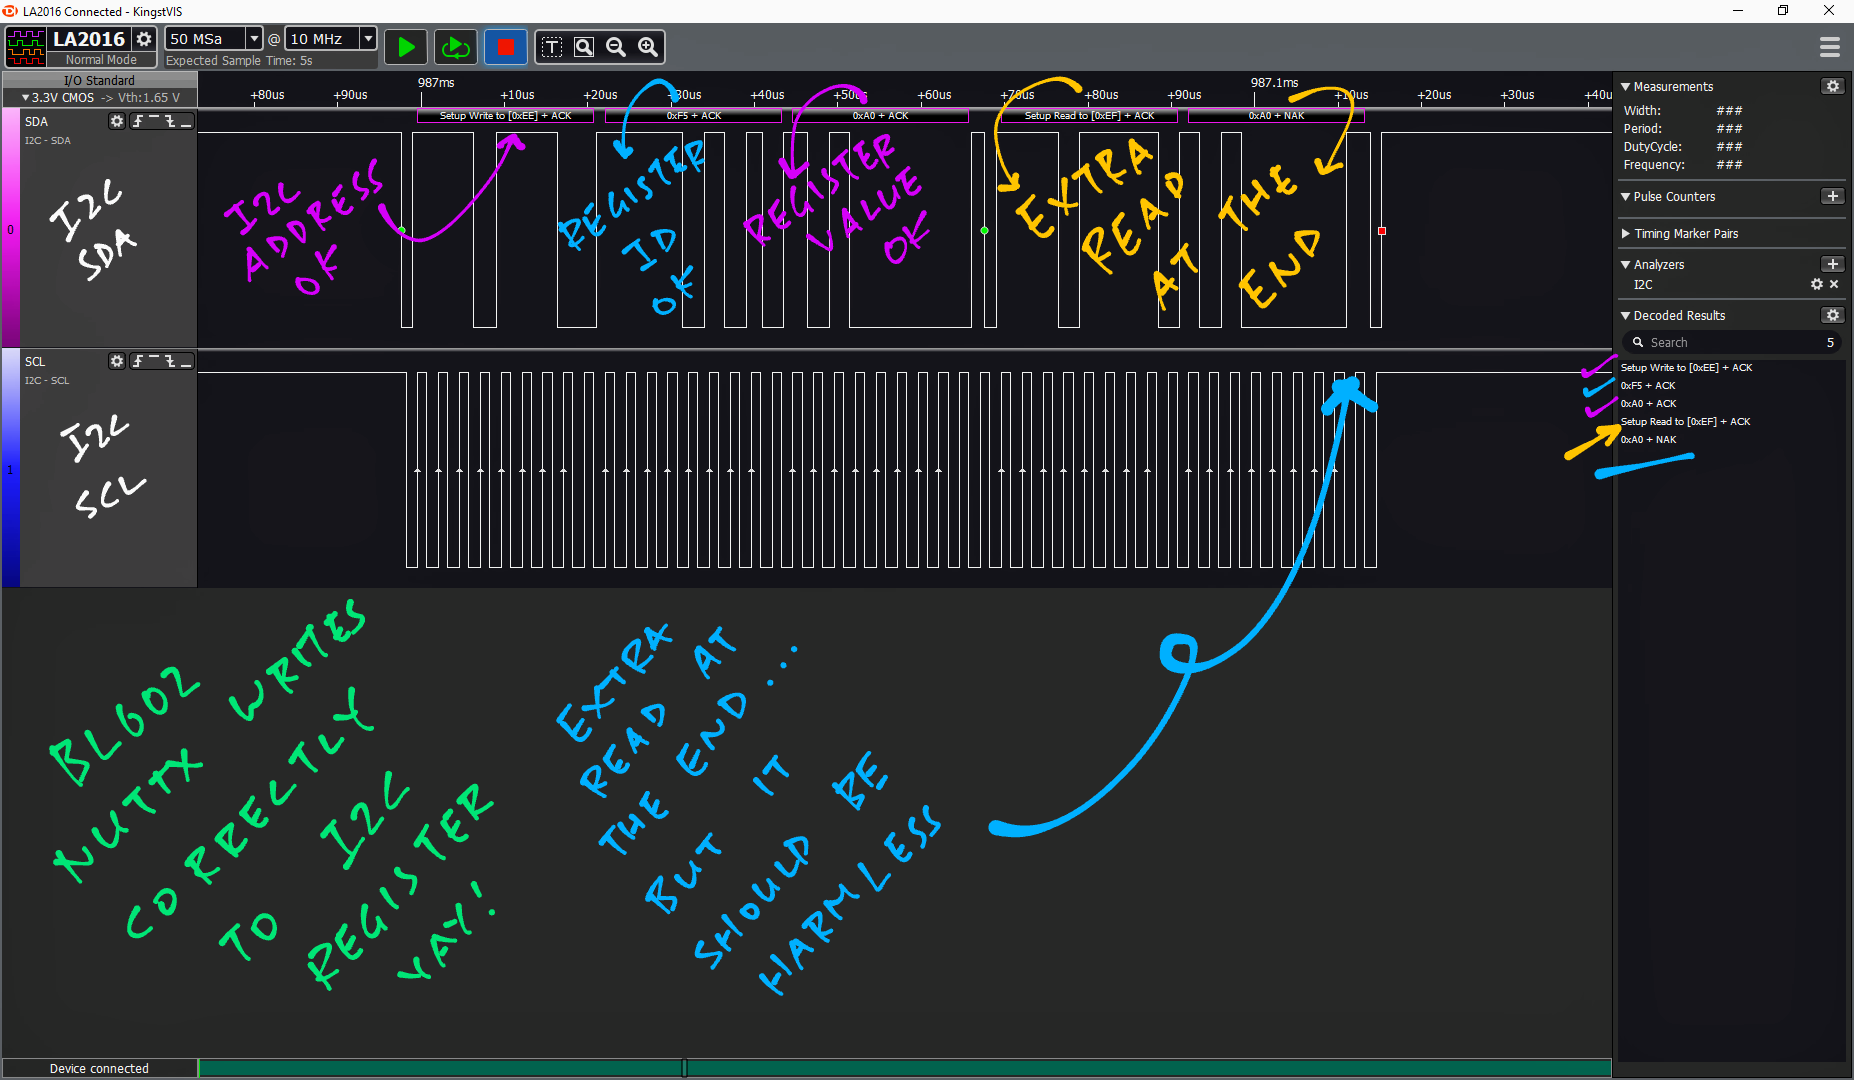
Which looks correct. There’s an extra I2C Read at the end, but it’s harmless.
What if we write to the I2C Register without reading?
The I2C Address is sent incorrectly (0x02) and the I2C Write gets truncated…
Setup Write to [0x02] + NAK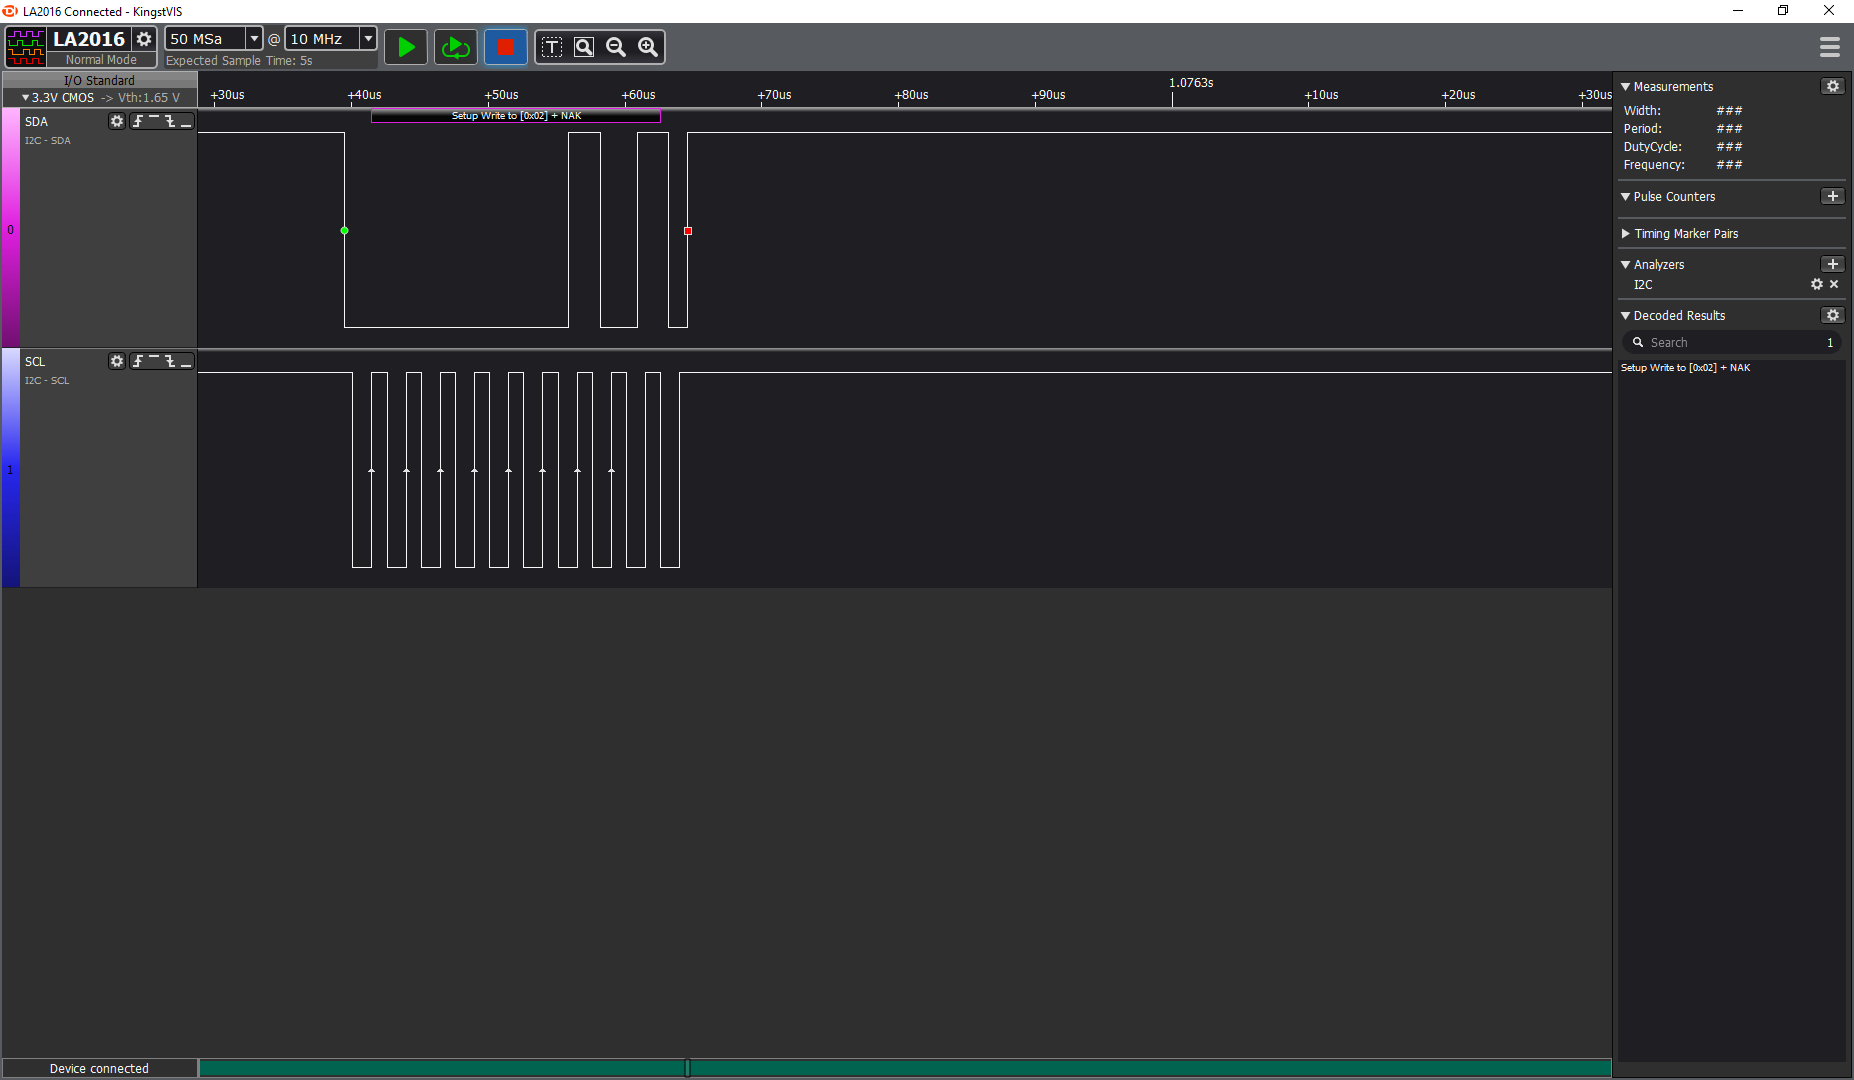
What if we send the Register ID and Register Value as I2C Data (flags = 0) instead of I2C Sub Address?
The Register ID and value are sent incorrectly as 0x00 0x00…
Setup Write to [0xEE] + ACK
0x00 + ACK
0x00 + ACK
(...600 microseconds later...)
Setup Read to [0xEF] + ACK
0x00 + NAK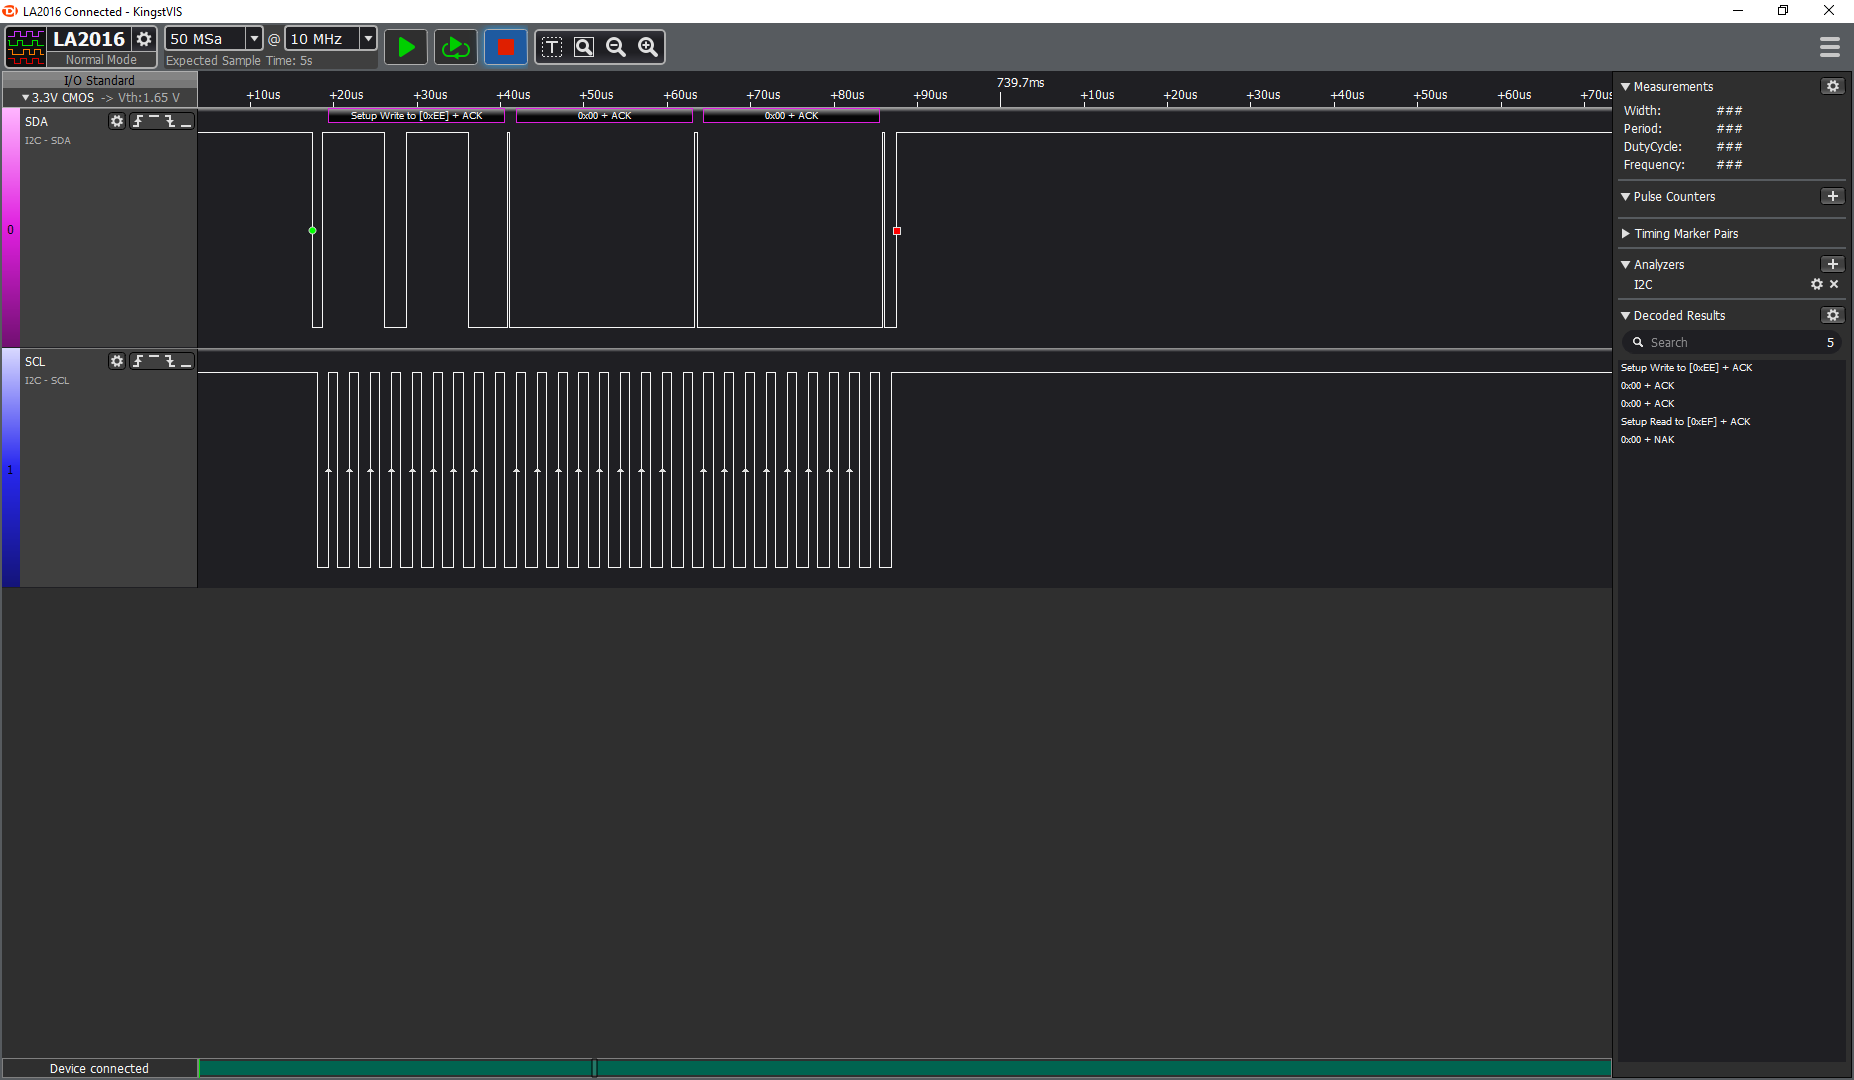
Let’s try to make sense of this mysterious behaviour…
How is I2C Sub Address supposed to work on BL602 anyway?
Let’s compare with the I2C Driver from Bouffalo Lab’s official BL602 IoT SDK…
Here’s the code that reads Register ID 0xD0 from I2C Address 0x77…
//  Define I2C message and buffer
static i2c_msg_t read_msg;    //  Message for reading I2C Data
static uint8_t read_buf[32];  //  Buffer for reading I2C Data

static void test_i2c_start_read(char *buf, int len, int argc, char **argv) {
  //  Start reading data from I2C device
  //  Expect result 0x60 for BME280, 0x58 for BMP280
  int data_len = 1;  //  Bytes to be read
  memset(read_buf, 0, sizeof(read_buf));

  //  Set the I2C operation
  read_msg.i2cx    = 0;            //  I2C Port
  read_msg.direct  = I2C_M_READ;   //  Read I2C data
  read_msg.block   = I2C_M_BLOCK;  //  Wait until data has been read

  //  Set the I2C buffer
  read_msg.buf     = read_buf;     //  Read buffer
  read_msg.len     = data_len;     //  Number of bytes to be read
  read_msg.idex    = 0;            //  Index of next byte to be read into buf

  //  Set device address and register address
  read_msg.addr    = 0x77;   //  BME280 I2C Secondary Address (Primary Address is 0x76)
  read_msg.subflag = 1;      //  Enable Register Address
  read_msg.subaddr = 0xd0;   //  Register Address (BME280 Chip ID)
  read_msg.sublen  = 1;      //  Length of Register Address (bytes)

  //  Start the I2C transfer and enable I2C interrupts
  gpstmsg = &read_msg;
  i2c_transfer_start(&read_msg);
Note that this code executes only one I2C Transfer.
(BL602 NuttX requires two I2C Transfers: One for Register ID, another for Register Value)
From BL602 IoT SDK we see that each I2C Transfer is allowed to specify an I2C Sub Address on top of each I2C Read / Write Transfer.
But on NuttX it seems that this overlay of I2C Sub Address on I2C Read / Write Transfers is not supported.
The creator of the BL602 NuttX I2C Driver has decided to split the I2C Sub Address and I2C Read / Write as two separate I2C Transfers.
We see this in the BL602 NuttX I2C Driver: bl602_i2c.c
//  Execute the I2C transfers
static int bl602_i2c_transfer(struct i2c_master_s *dev, struct i2c_msg_s *msgs, int count) {
  ...
  priv->msgv = msgs;

  //  Execute each I2C Transfer...
  for (i = 0; i < count; i++)
    {
      priv->bytes    = 0;
      priv->i2cstate = EV_I2C_END_INT;

      bl602_i2c_set_freq(msgs[i].frequency);

      //  If I2C_M_NOSTOP is specified,
      //  send entire message as I2C Sub Address
      if (msgs[i].flags & I2C_M_NOSTOP)
        {
          priv->subflag = 1;
          priv->subaddr = 0;
          for (j = 0; j < msgs[i].length; j++)
            {
              priv->subaddr += msgs[i].buffer[j] << (j * 8);
            }

          //  Note: Entire message is the I2C Sub Address!
          priv->sublen = msgs[i].length;
          i++;
        }
      //  Else send message as I2C Data
      //  (Read / Write Transfer)
      else
        {
          priv->subflag = 0;
          priv->subaddr = 0;
          priv->sublen  = 0;
        }

      priv->msgid = i;
      bl602_i2c_start_transfer(priv);
This driver code shows that each I2C Transfer is either…
I2C Sub Address
Or I2C Data (Read / Write Transfer)
No mixing of the two is allowed.
I haven’t deciphered the rest of the I2C Driver, but I think this separation of I2C Sub Address causes problems for I2C Write. Hence the need to do I2C Read after I2C Write.
In summary: The creator of the BL602 NuttX I2C Driver might have force-fitted I2C Sub Address into the NuttX I2C Interface, causing problems for I2C Write.
The solution? We might need to extend the NuttX I2C Interface to support I2C Sub Addresses. (Instead of I2C_M_NOSTOP)
(Besides BL602, NXP Microcontrollers are probably the only ones that support I2C Sub Addresses)
How is the I2C Sub Address configured on NuttX?
Below is the code from the BL602 I2C Driver that configures the I2C Sub Address for each I2C Transfer: bl602_i2c.c
//  Configure the parameters for an I2C Transfer
static void bl602_i2c_config_para(struct bl602_i2c_priv_s *priv) {
  struct i2c_msg_s *msg = &priv->msgv[priv->msgid];

  //  Set the I2C Direction: Read or write
  if (msg->flags & I2C_M_READ)
    {
      modifyreg32(BL602_I2C_CONFIG, 0, I2C_CONFIG_CR_I2C_PKT_DIR);
    }
  else
    {
      modifyreg32(BL602_I2C_CONFIG, I2C_CONFIG_CR_I2C_PKT_DIR, 0);
    }

  //  Set the I2C Address
  modifyreg32(BL602_I2C_CONFIG,
              I2C_CONFIG_CR_I2C_SLV_ADDR_MASK,
              msg->addr << I2C_CONFIG_CR_I2C_SLV_ADDR_SHIFT);

  //  If this I2C Transfer is for I2C Sub Address...
  if (priv->subflag > 0)
    {
      //  Enable I2C Sub Address
      modifyreg32(BL602_I2C_CONFIG, 0, I2C_CONFIG_CR_I2C_SUB_ADDR_EN);
      //  Set the I2C Sub Address length
      modifyreg32(BL602_I2C_CONFIG,
                  I2C_CONFIG_CR_I2C_SUB_ADDR_BC_MASK,
                  (priv->sublen - 1) << I2C_CONFIG_CR_I2C_SUB_ADDR_BC_SHIFT);
    }
  else
    {
      //  Else disable I2C Sub Address
      modifyreg32(BL602_I2C_CONFIG, I2C_CONFIG_CR_I2C_SUB_ADDR_EN, 0);
    }

  //  Set the I2C Message Length
  modifyreg32(BL602_I2C_CONFIG,
              I2C_CONFIG_CR_I2C_PKT_LEN_MASK,
              (msg->length - 1) << I2C_CONFIG_CR_I2C_PKT_LEN_SHIFT);

  //  If this I2C Transfer is for I2C Sub Address...
  if (priv->subflag > 0)
    {
      //  Set the I2C Sub Address
      putreg32(priv->subaddr, BL602_I2C_SUB_ADDR);
    }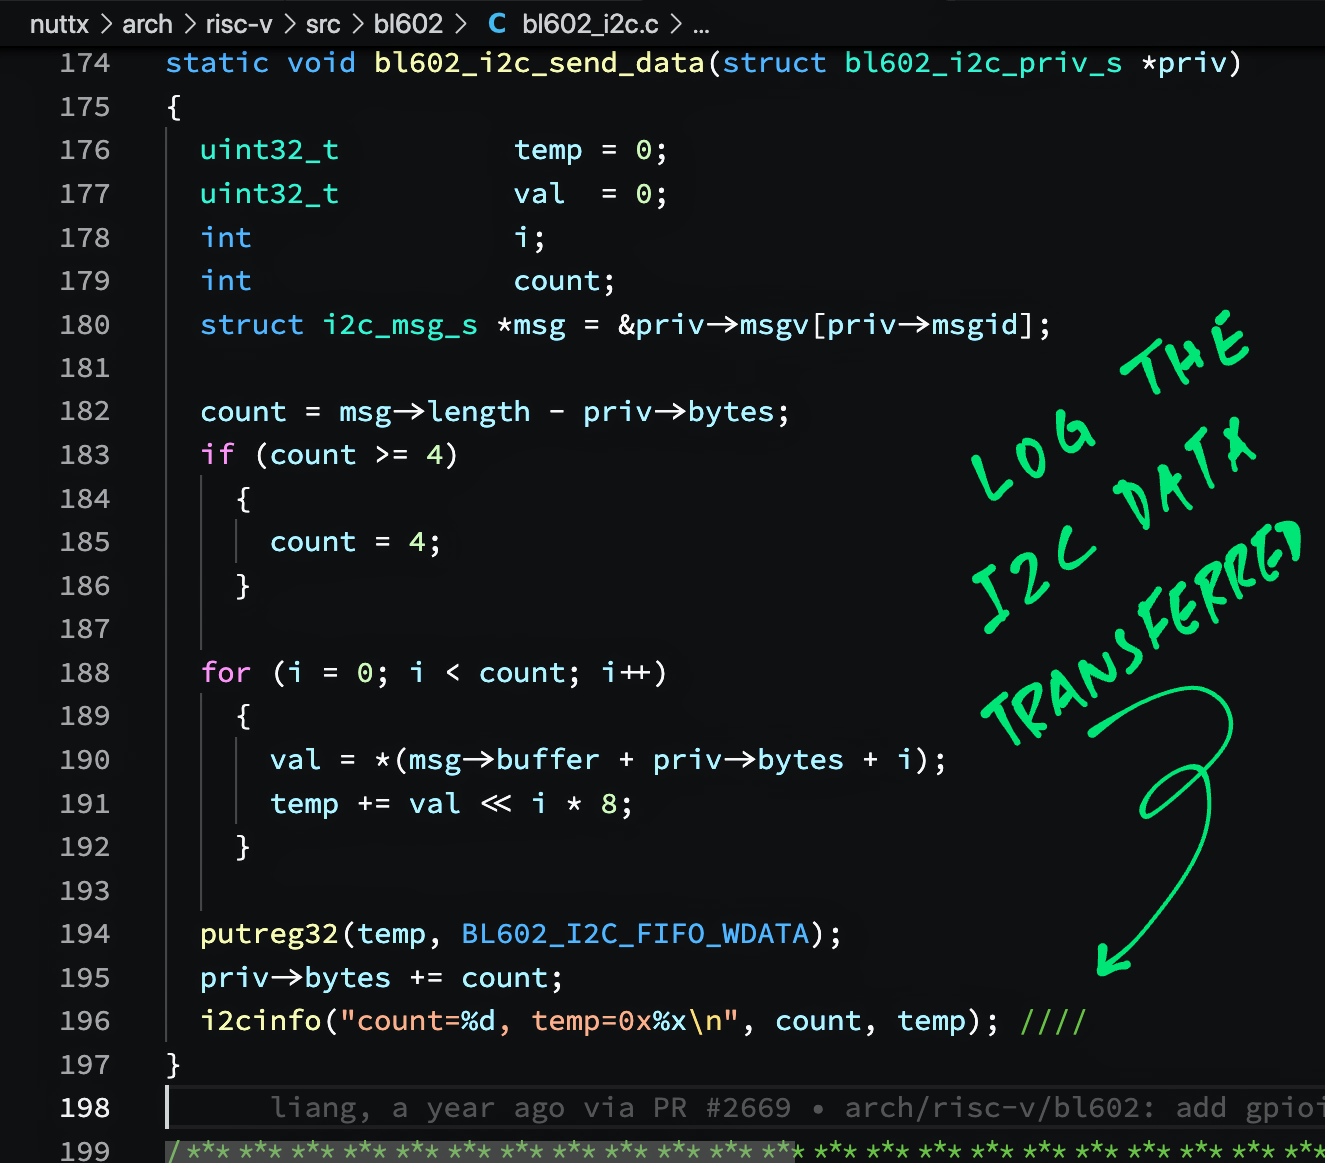
}Here’s how we modded the BL602 I2C Driver on NuttX to log the I2C transfers…
For sending I2C data: bl602_i2c.c
static void bl602_i2c_send_data(struct bl602_i2c_priv_s *priv)
{
  ...
  putreg32(temp, BL602_I2C_FIFO_WDATA);
  priv->bytes += count;
  //  Insert this
  i2cinfo("count=%d, temp=0x%x\n", count, temp);
}
For receiving I2C data: bl602_i2c.c
static void bl602_i2c_recvdata(struct bl602_i2c_priv_s *priv)
{
  ...
  count = msg->length - priv->bytes;
  temp  = getreg32(BL602_I2C_FIFO_RDATA);
  //  Insert this
  i2cinfo("count=%d, temp=0x%x\n", count, temp);
For I2C transfers: bl602_i2c.c
static int bl602_i2c_transfer(struct i2c_master_s *dev,
                              struct i2c_msg_s *   msgs,
                              int                      count)
{
  ...
  for (i = 0; i < count; i++)
    {
      ...
      priv->msgid = i;
      //  Insert this before bl602_i2c_start_transfer
i2cinfo("subflag=%d, subaddr=0x%x, sublen=%d\n", priv->subflag, priv->subaddr, priv->sublen);(For BL602, BL604 and ESP32)
Below are the steps to build, flash and run NuttX on BL602, BL604 and ESP32.
The instructions below will work on Linux (Ubuntu), WSL (Ubuntu) and macOS.
(Instructions for other platforms)
To use the NuttX BME280 Driver, download the modified source code for NuttX OS and NuttX Apps…
mkdir nuttx
cd nuttx
git clone --recursive https://github.com/lupyuen/nuttx nuttx
git clone --recursive https://github.com/lupyuen/nuttx-apps apps
Or if we prefer to add the BME280 Driver to our NuttX Project, follow these instructions…
(For PineDio Stack BL604: The BME280 Driver is already preinstalled)
Now we configure our NuttX project…
Install the build prerequisites…
Configure the build…
cd nuttx
## For BL602: Configure the build for BL602
./tools/configure.sh bl602evb:nsh
## For PineDio Stack BL604: Configure the build for BL604
./tools/configure.sh bl602evb:pinedio
## For ESP32: Configure the build for ESP32.
## TODO: Change "esp32-devkitc" to our ESP32 board.
./tools/configure.sh esp32-devkitc:nsh
## Edit the Build Config
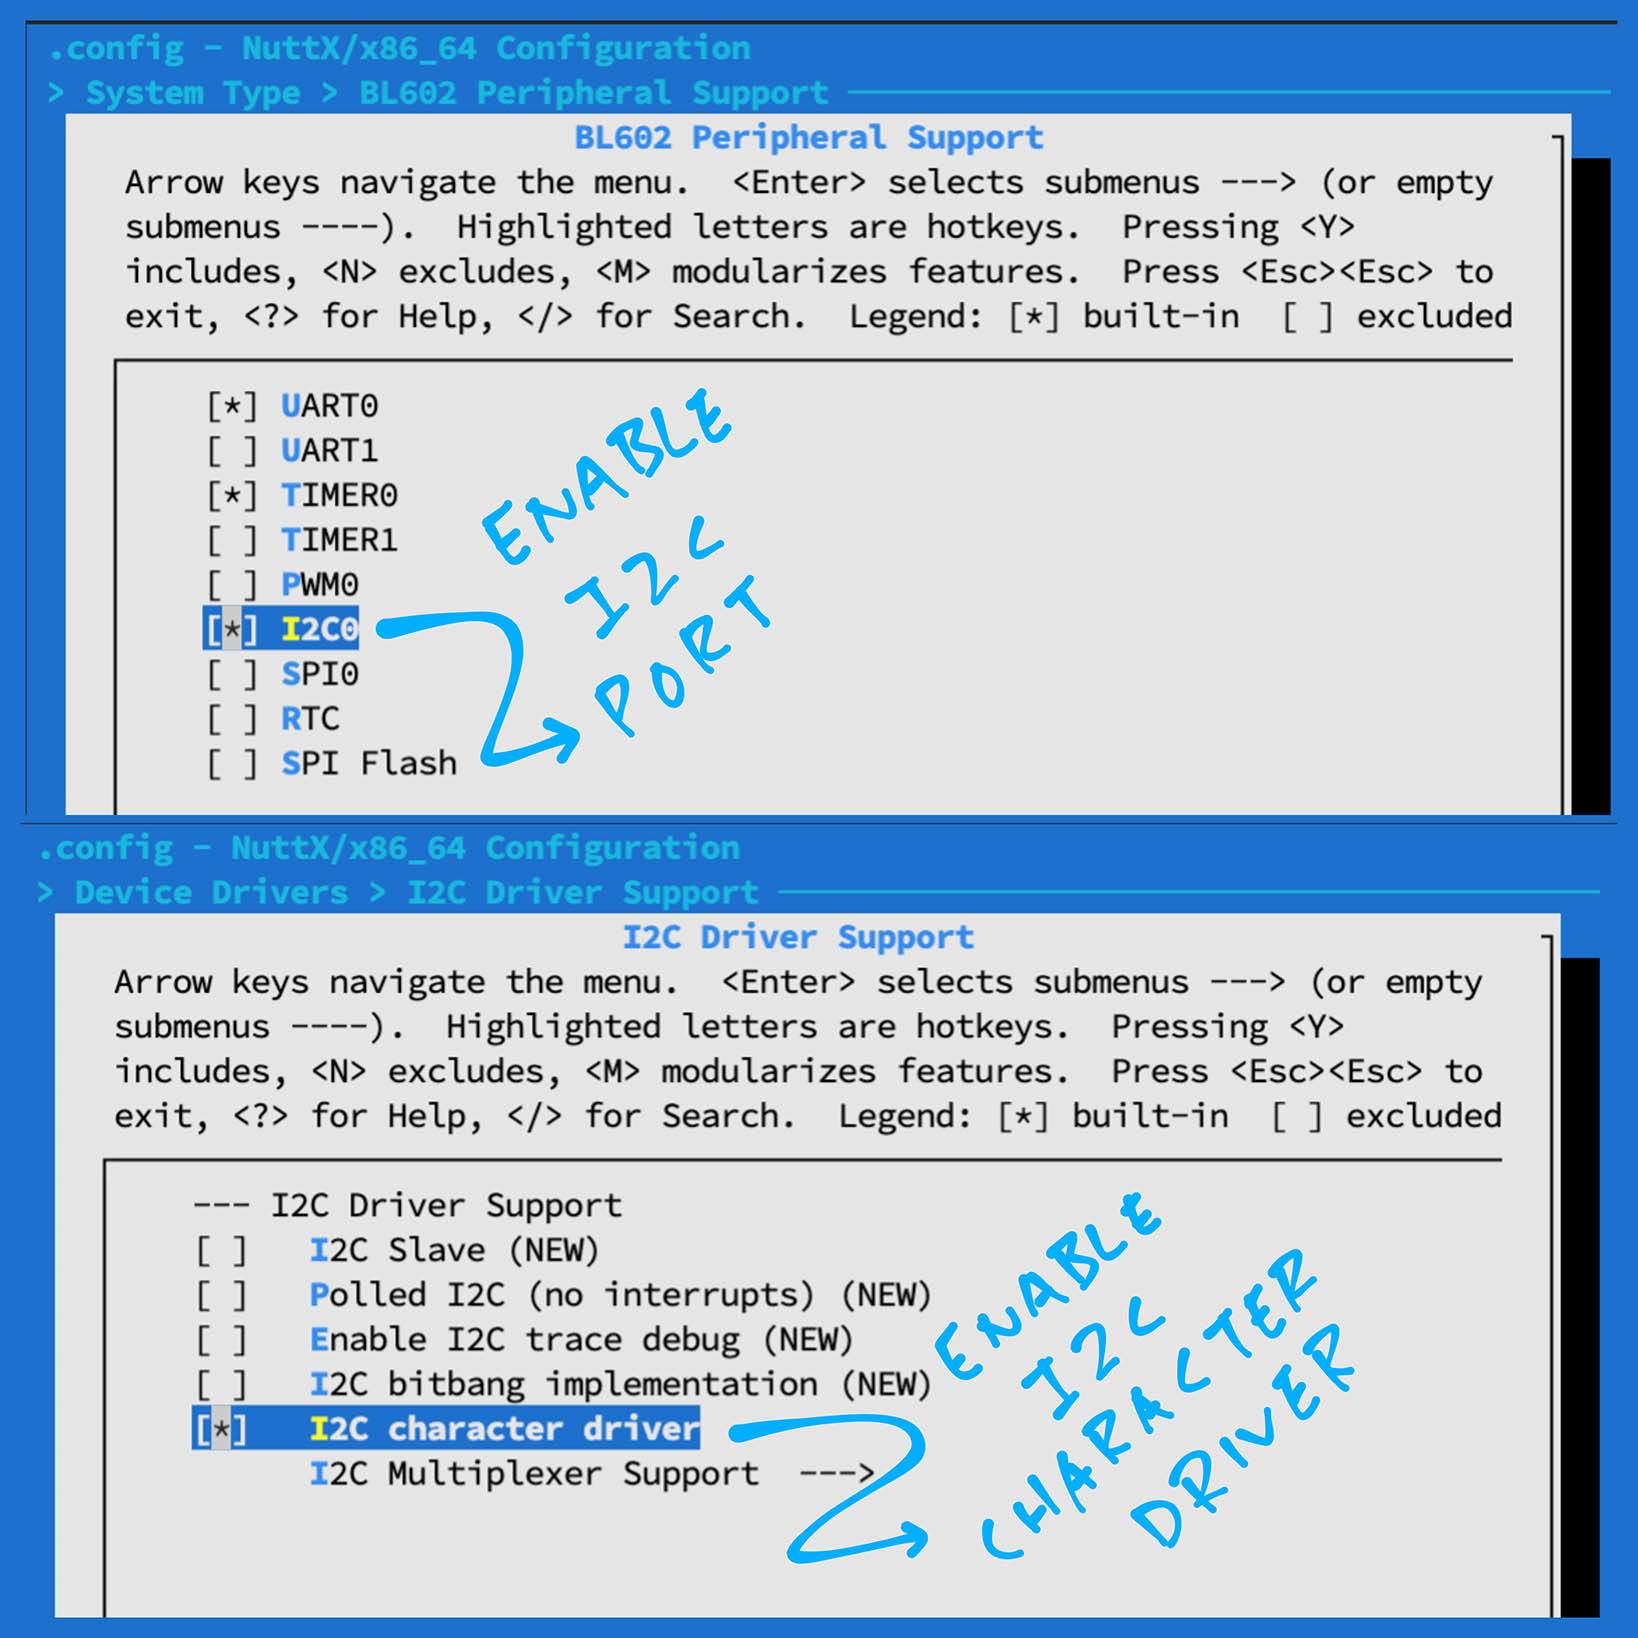
make menuconfig Enable I2C0 Port…
For BL602 / BL604: Check the box for “System Type” → “BL602 Peripheral Support” → “I2C0”
For ESP32: Check the box for “System Type” → “ESP32 Peripheral Select” → “I2C 0”
Hit “Exit” until the Top Menu appears. (“NuttX/x64_64 Configuration”)
Enable I2C Character Driver…
Check the box for “Device Drivers” → “I2C Driver Support” → “I2C Character Driver”
Hit “Exit” until the Top Menu appears. (“NuttX/x64_64 Configuration”)
Enable BME280 Driver…
Check the box for “Device Drivers” → “Sensor Device Support”
Select “Sensor Device Support”
Check the box for “Bosch BME280 Sensor”
Hit “Exit” until the Top Menu appears. (“NuttX/x64_64 Configuration”)
The BME280 Driver will appear in NuttX at /dev/uorb/sensor_baro0 and /dev/uorb/sensor_humi0
Enable Sensor Driver Test App…
Check the box for “Application Configuration” → “Testing” → “Sensor Driver Test”
Set “Sensor Driver Test Stack Size” to 4096
Hit “Exit” until the Top Menu appears. (“NuttX/x64_64 Configuration”)
Enable ls command…
Select “Application Configuration” → “NSH Library” → “Disable Individual commands”
Uncheck “Disable ls”
Hit “Exit” until the Top Menu appears. (“NuttX/x64_64 Configuration”)
Enable Logging and Assertion Checks…
Select “Build Setup” → “Debug Options”
Check the boxes for the following…
Enable Debug Features
Enable Error Output
Enable Warnings Output
Enable Informational Debug Output
Enable Debug Assertions
I2C Debug Features
I2C Error Output
I2C Warnings Output
I2C Informational Output
Sensor Debug Features
Sensor Error Output
Sensor Warnings Output
Sensor Informational Output
Hit “Exit” until the Top Menu appears. (“NuttX/x64_64 Configuration”)
Save the configuration and exit menuconfig
Follow these steps to build NuttX for BL602, BL604 or ESP32…
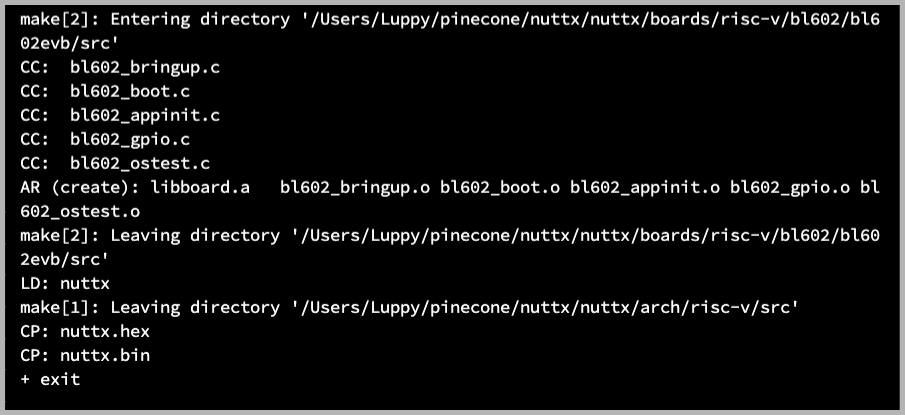
To build NuttX, enter this command…
makeWe should see…
LD: nuttx
CP: nuttx.hex
CP: nuttx.binFor WSL: Copy the NuttX Firmware to the c:\blflash directory in the Windows File System…
##  /mnt/c/blflash refers to c:\blflash in Windows
mkdir /mnt/c/blflash
cp nuttx.bin /mnt/c/blflash
For WSL we need to run blflash under plain old Windows CMD (not WSL) because it needs to access the COM port.
In case of problems, refer to the NuttX Docs…
For ESP32: See instructions here (Also check out this article)
For BL602 / BL604: Follow these steps to install blflash…
We assume that our Firmware Binary File nuttx.bin has been copied to the blflash folder.
Set BL602 / BL604 to Flashing Mode and restart the board…
For PineDio Stack BL604:
Set the GPIO 8 Jumper to High (Like this)
Disconnect the USB cable and reconnect
Or use the Improvised Reset Button (Here’s how)
For PineCone BL602:
Set the PineCone Jumper (IO 8) to the H Position (Like this)
Press the Reset Button
For BL10:
Connect BL10 to the USB port
Press and hold the D8 Button (GPIO 8)
Press and release the EN Button (Reset)
Release the D8 Button
For Ai-Thinker Ai-WB2, Pinenut and MagicHome BL602:
Disconnect the board from the USB Port
Connect GPIO 8 to 3.3V
Reconnect the board to the USB port
Enter these commands to flash nuttx.bin to BL602 / BL604 over UART…
## For Linux: Change "/dev/ttyUSB0" to the BL602 / BL604 Serial Port
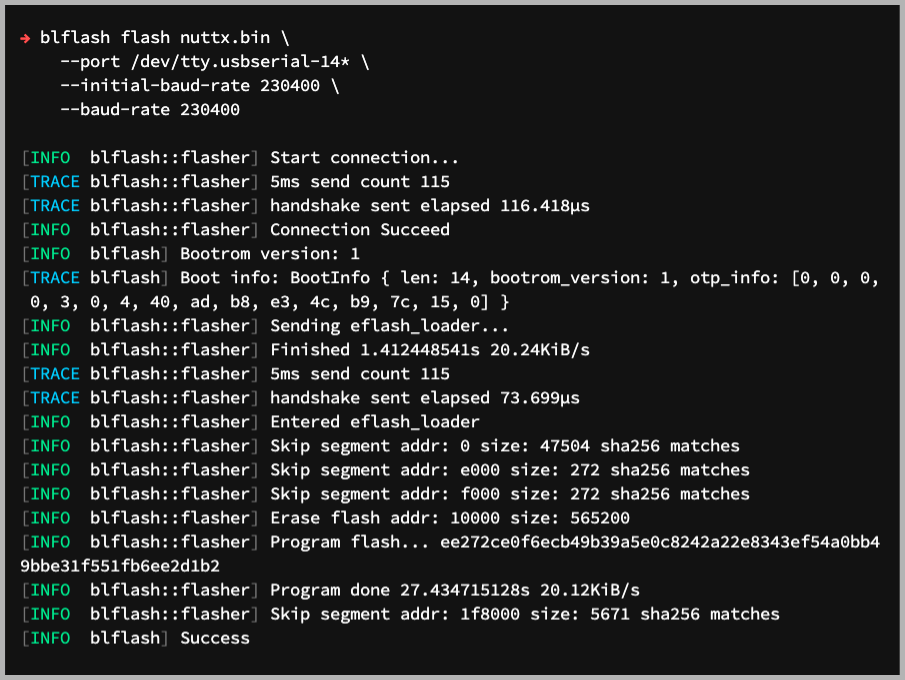
blflash flash nuttx.bin \
--port /dev/ttyUSB0
## For macOS: Change "/dev/tty.usbserial-1410" to the BL602 / BL604 Serial Port
blflash flash nuttx.bin \
--port /dev/tty.usbserial-1410 \
--initial-baud-rate 230400 \
--baud-rate 230400
## For Windows: Change "COM5" to the BL602 / BL604 Serial Port
blflash flash c:\blflash\nuttx.bin --port COM5For WSL: Do this under plain old Windows CMD (not WSL) because blflash needs to access the COM port.
(Flashing WiFi apps to BL602 / BL604? Remember to use bl_rfbin)
(More details on flashing firmware)
For ESP32: Use Picocom to connect to ESP32 over UART…
picocom -b 115200 /dev/ttyUSB0For BL602 / BL604: Set BL602 / BL604 to Normal Mode (Non-Flashing) and restart the board…
For PineDio Stack BL604:
Set the GPIO 8 Jumper to Low (Like this)
Disconnect the USB cable and reconnect
Or use the Improvised Reset Button (Here’s how)
For PineCone BL602:
Set the PineCone Jumper (IO 8) to the L Position (Like this)
Press the Reset Button
For BL10:
For Ai-Thinker Ai-WB2, Pinenut and MagicHome BL602:
Disconnect the board from the USB Port
Connect GPIO 8 to GND
Reconnect the board to the USB port
After restarting, connect to BL602 / BL604’s UART Port at 2 Mbps like so…
For Linux:
screen /dev/ttyUSB0 2000000For macOS: Use CoolTerm (See this)
For Windows: Use putty (See this)
Alternatively: Use the Web Serial Terminal (See this)
Press Enter to reveal the NuttX Shell…
NuttShell (NSH) NuttX-10.2.0-RC0
nsh>
Congratulations NuttX is now running on BL602 / BL604!
(More details on connecting to BL602 / BL604)
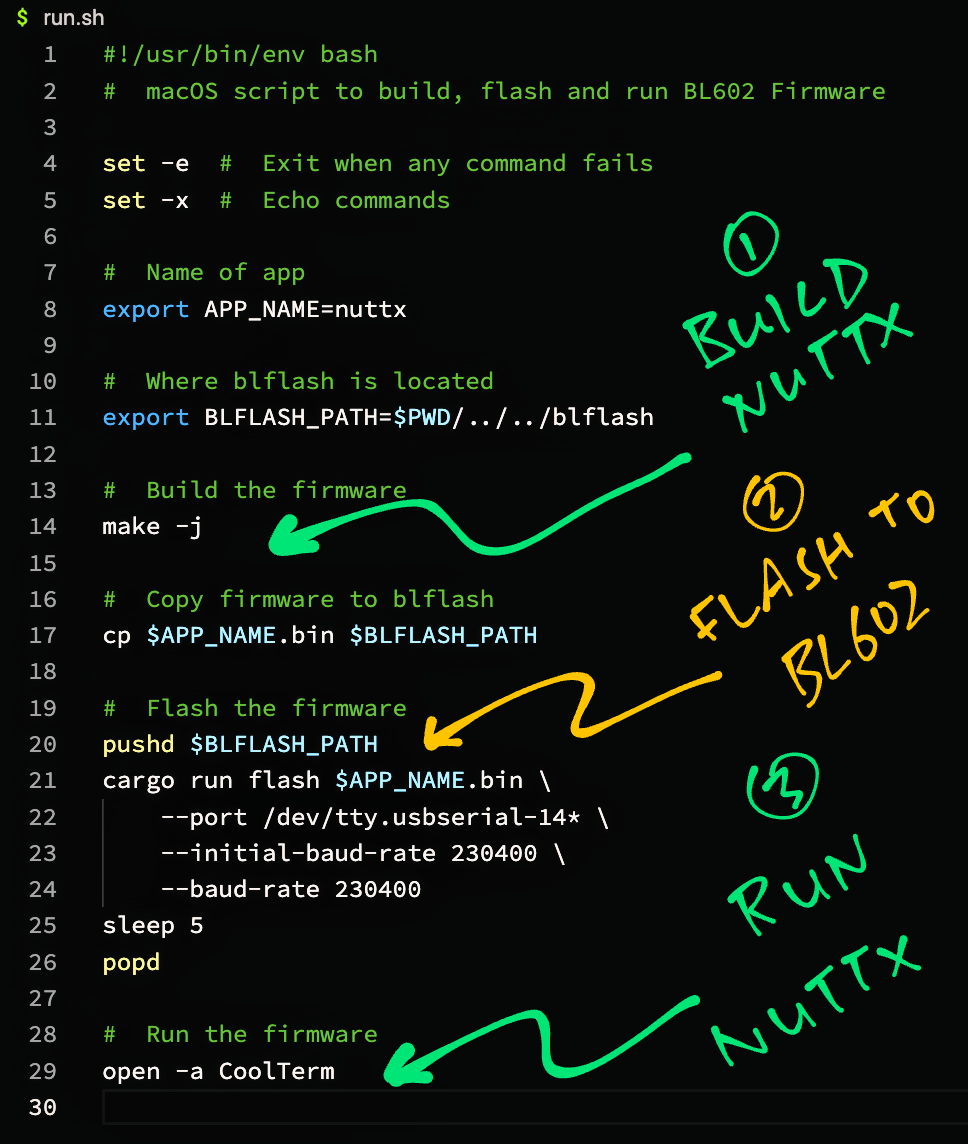
macOS Tip: Here’s the script I use to build, flash and run NuttX on macOS, all in a single step: run.sh