📝 22 Mar 2022
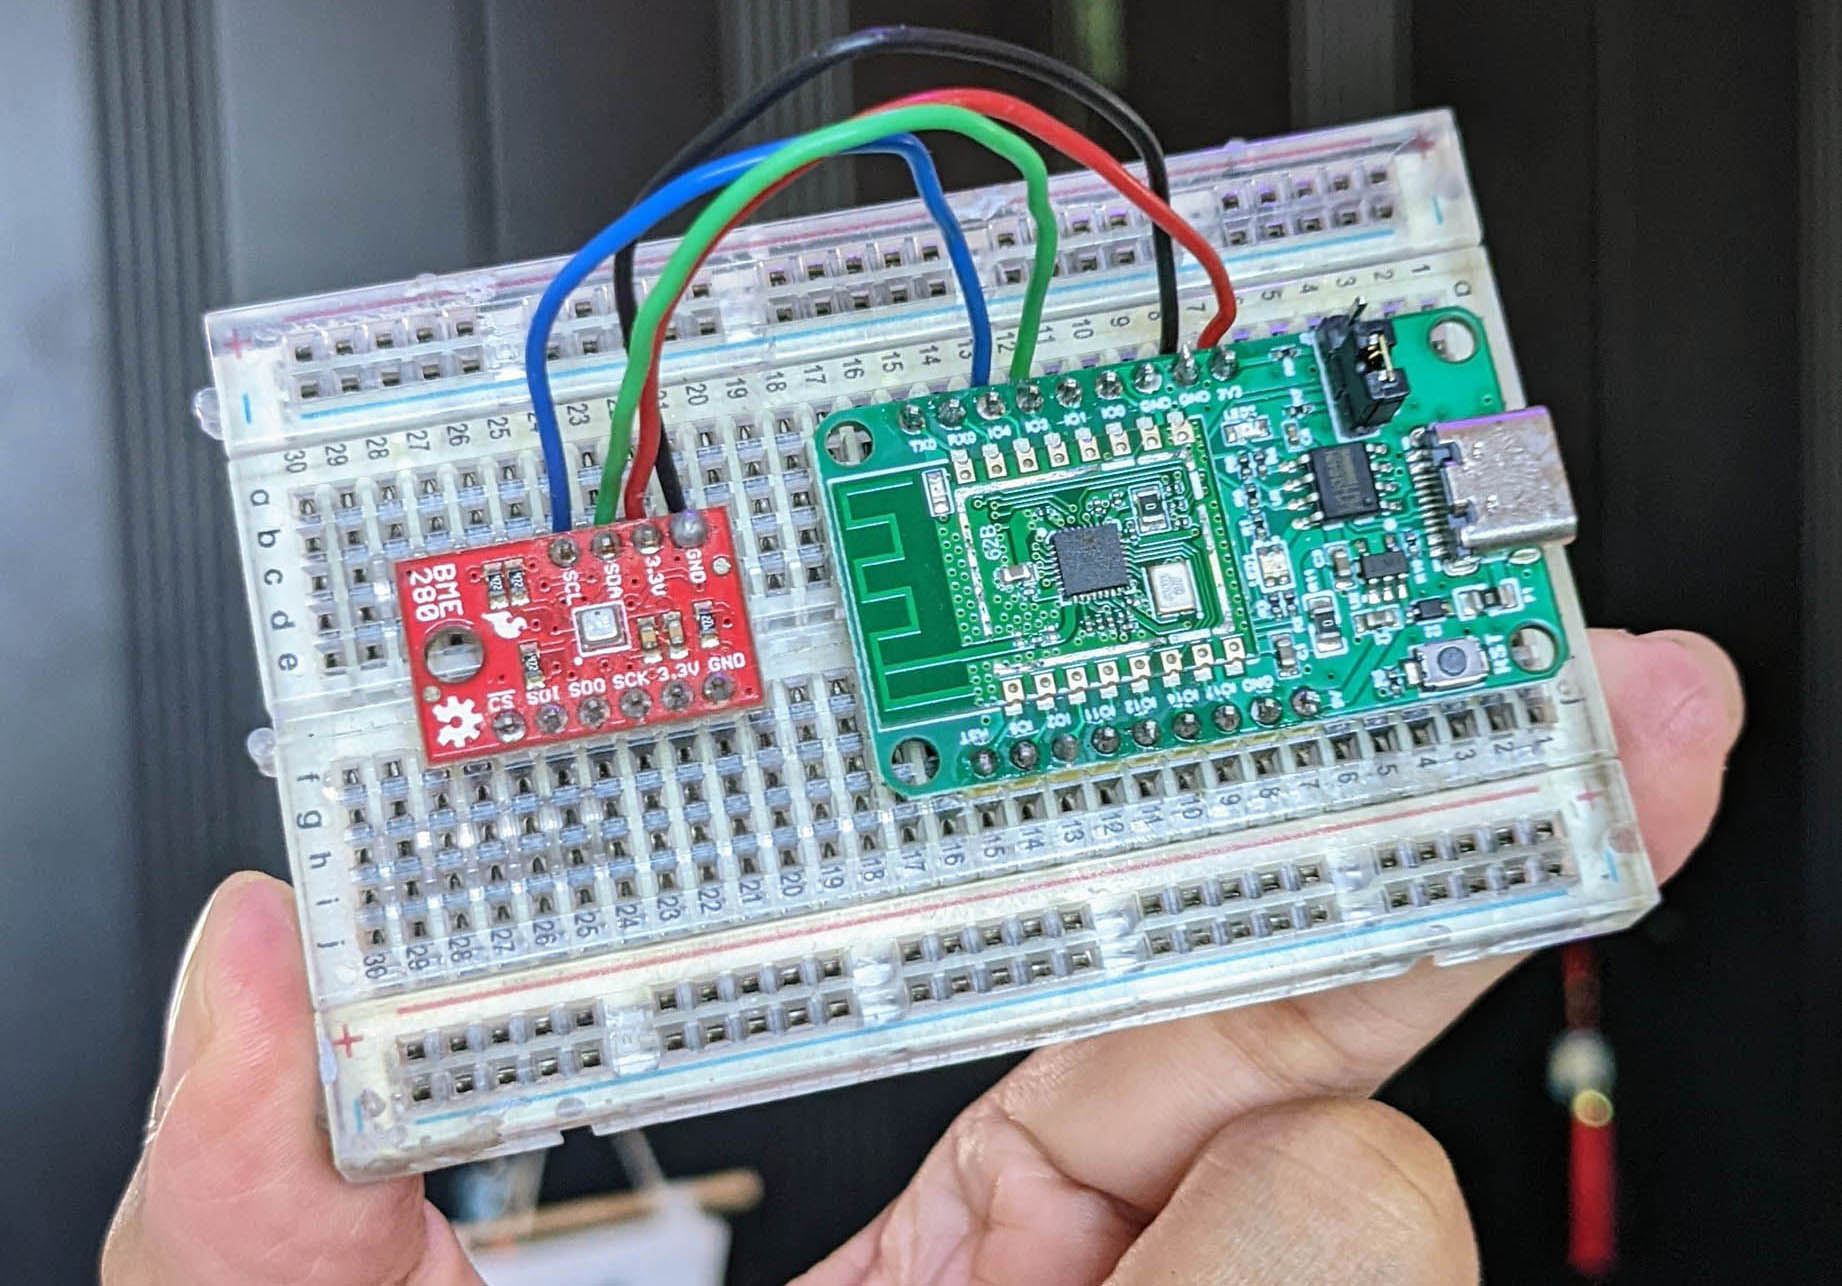
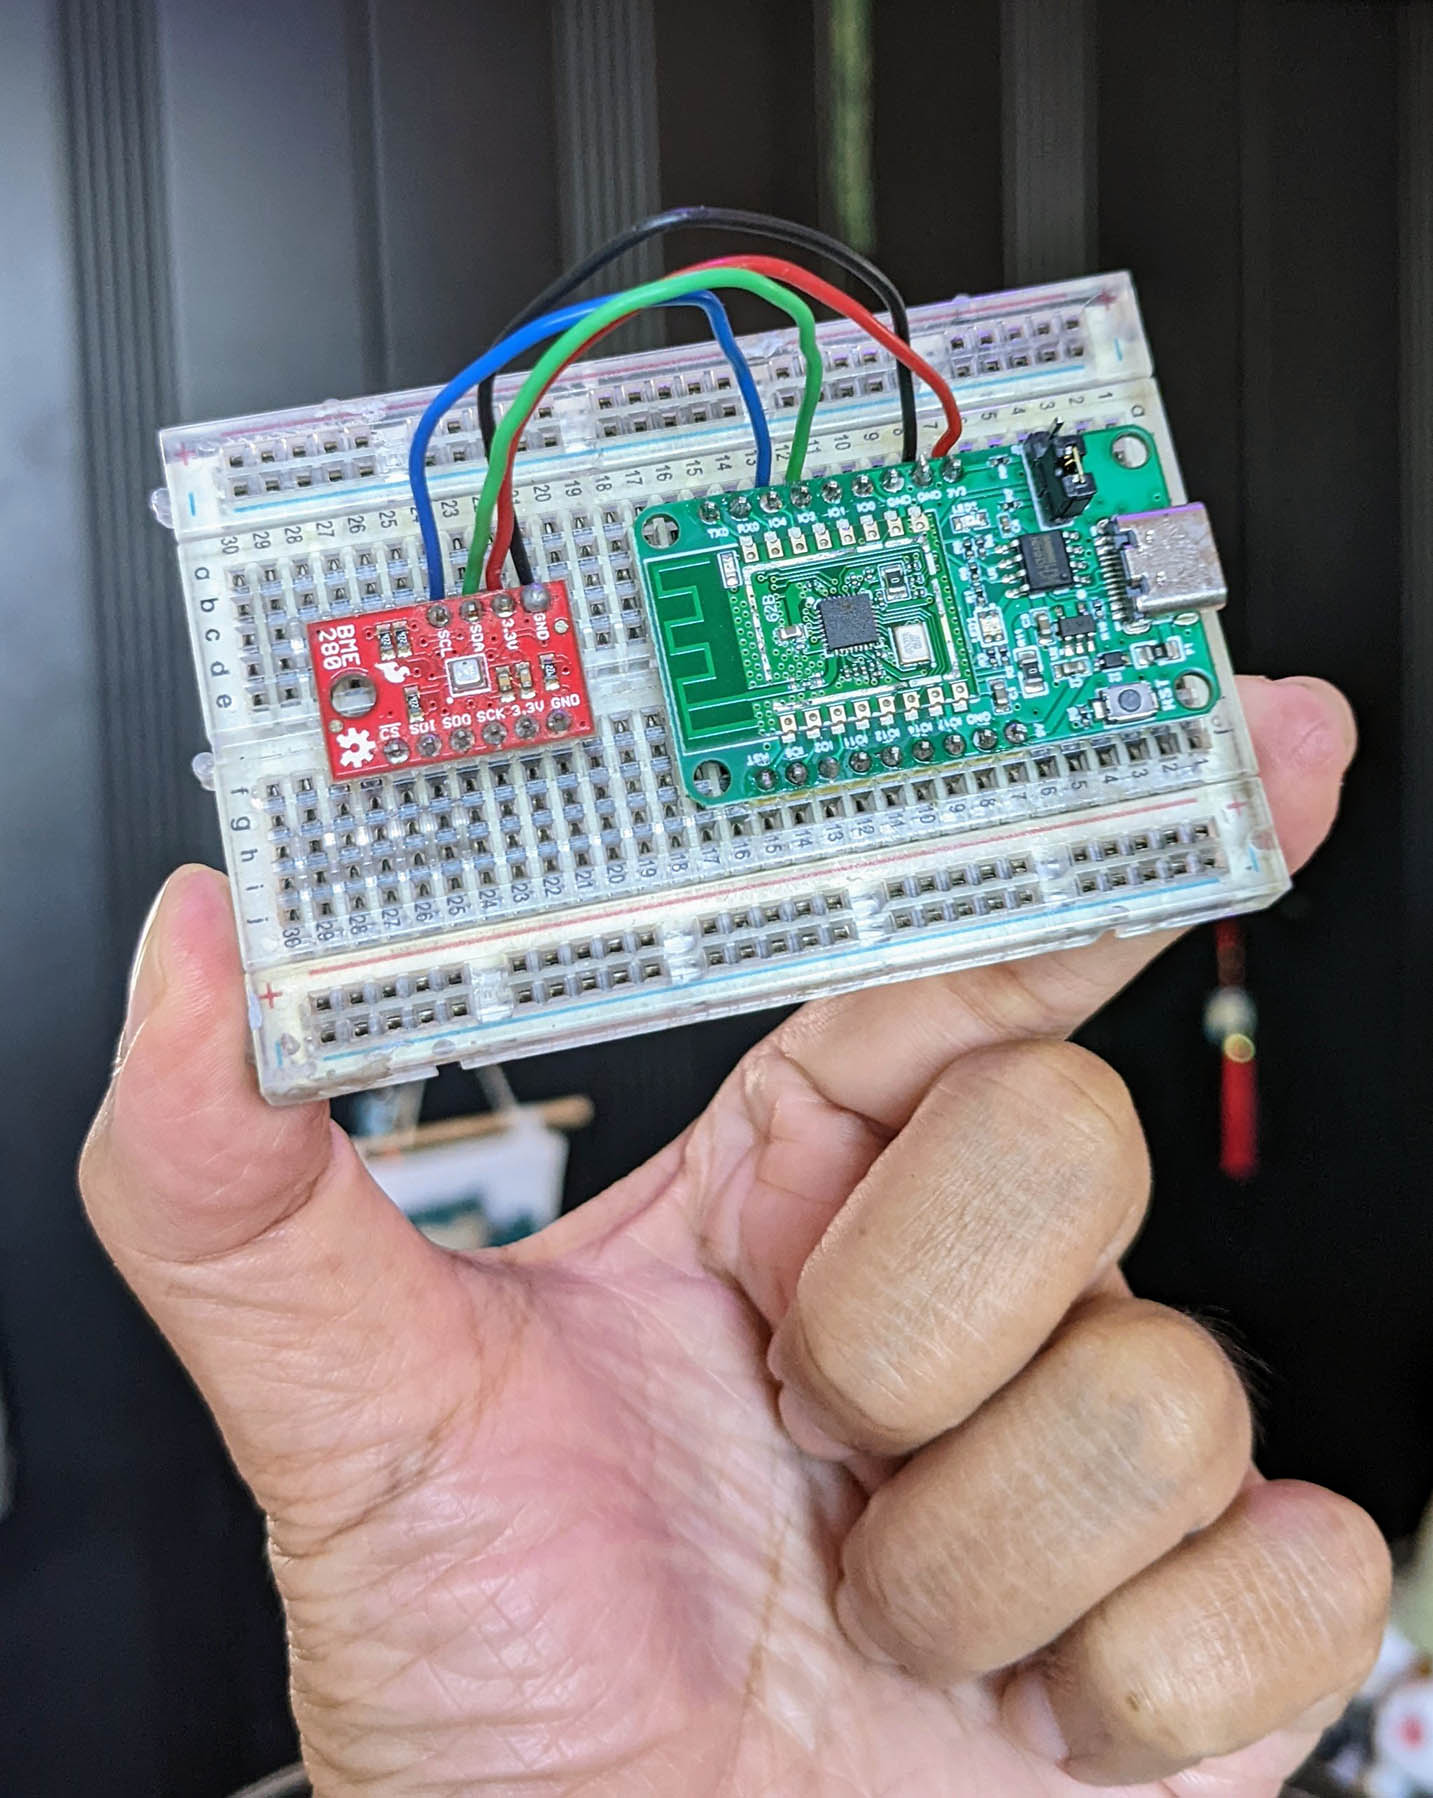
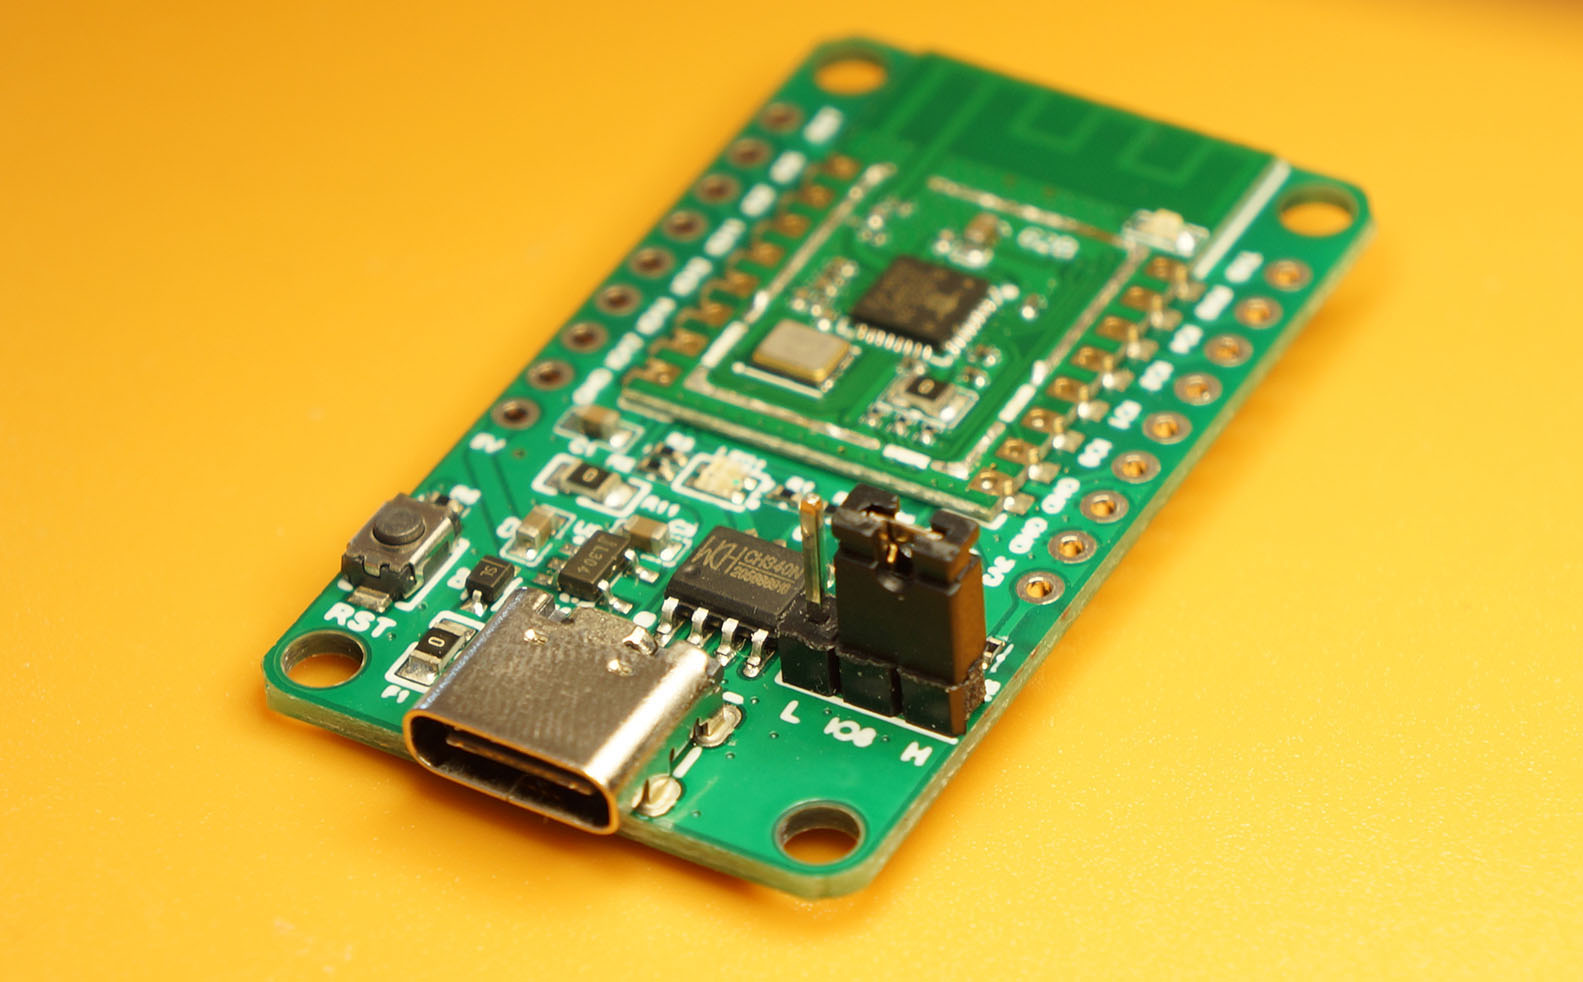
Bosch BME280 Sensor connected to Pine64 PineCone BL602 RISC-V Board
I2C is a great way to connect all kinds of Sensor Modules when we’re creating an IoT Gadget. Like sensors for temperature, light, motion, spectroscopy, soil moisture, GPS, LIDAR, … and many more!
But where will we get the Software Drivers for the I2C Sensors?
Embedded Rust has a large collection of drivers for I2C Sensors. And they will work on many platforms!
Today we shall experiment with the Rust Driver for Bosch BME280 Sensor (Temperature / Humdity / Air Pressure). And learn how we made it work on the (Linux-like) Apache NuttX RTOS.
We’ll run this on the BL602 RISC-V SoC (pic above), though it should work fine on ESP32 and other NuttX platforms.
Let’s dive into our Rust I2C App for NuttX…
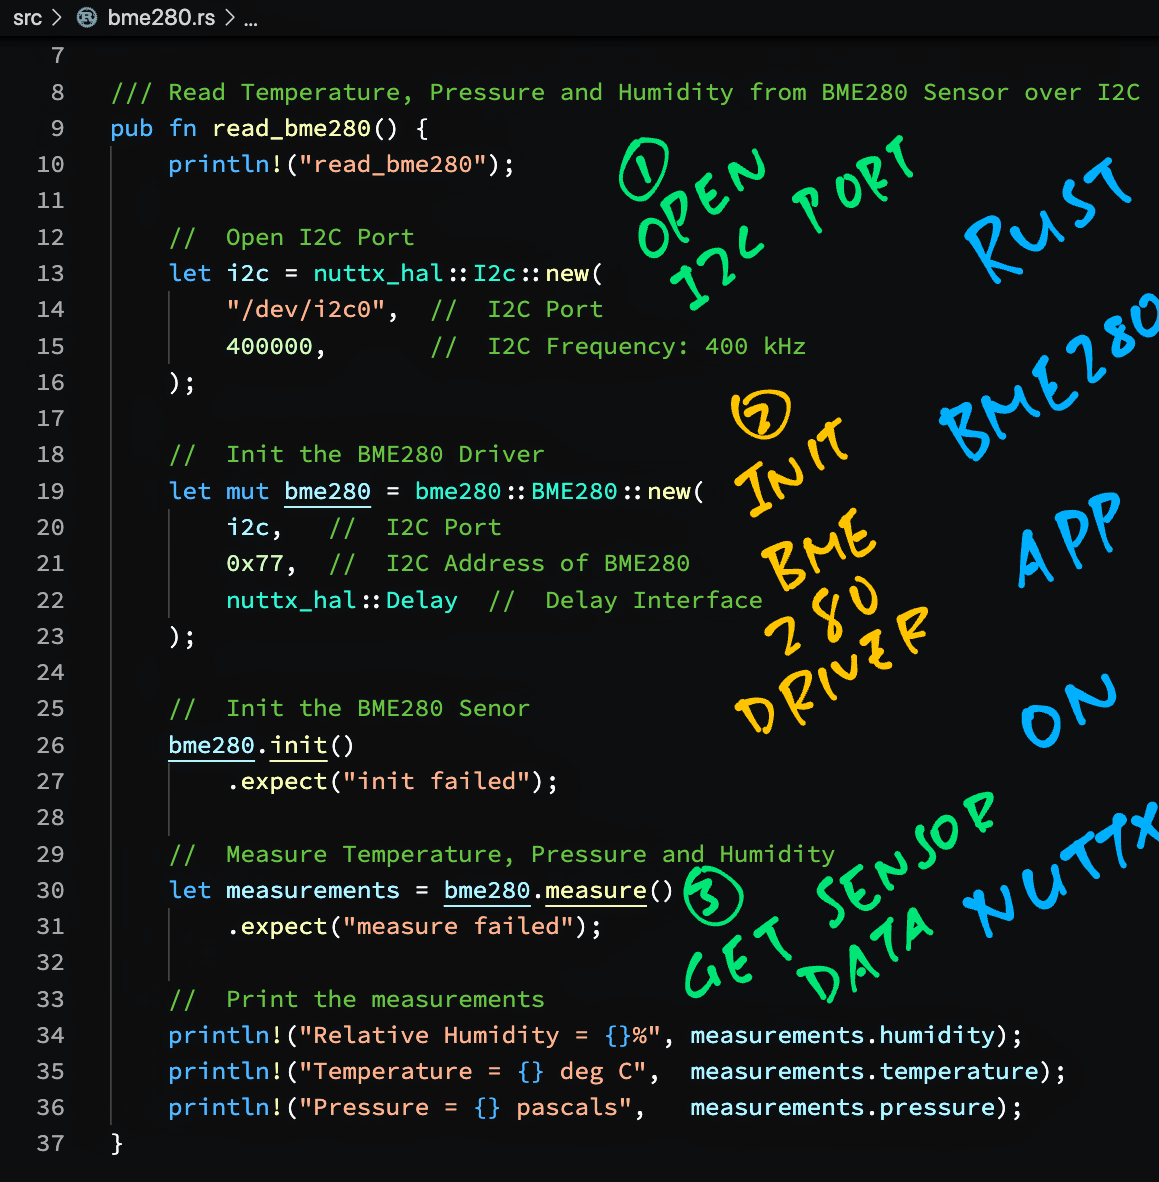
Here’s how we read the Temperature, Humidity and Air Pressure from the BME280 Sensor: rust/src/bme280.rs
/// Read Temperature, Pressure and Humidity from BME280 Sensor over I2C
pub fn read_bme280() {

  //  Open I2C Port
  let i2c = nuttx_embedded_hal::I2c::new(
    "/dev/i2c0",  //  I2C Port
    400000,       //  I2C Frequency: 400 kHz
  ).expect("open failed");
We begin by opening the I2C Port “/dev/i2c0”, configured for 400 kHz.
(This halts with an error if the I2C Port doesn’t exist)
What’s nuttx_embedded_hal?
That’s the Hardware Abstraction Layer (HAL) for NuttX, coded in Rust. (More about this in a while)
Next we initialise the BME280 Driver…
// Init the BME280 Driver
let mut bme280 = bme280::BME280::new(
i2c, // I2C Port
0x77, // I2C Address of BME280
nuttx_embedded_hal::Delay // Delay Interface
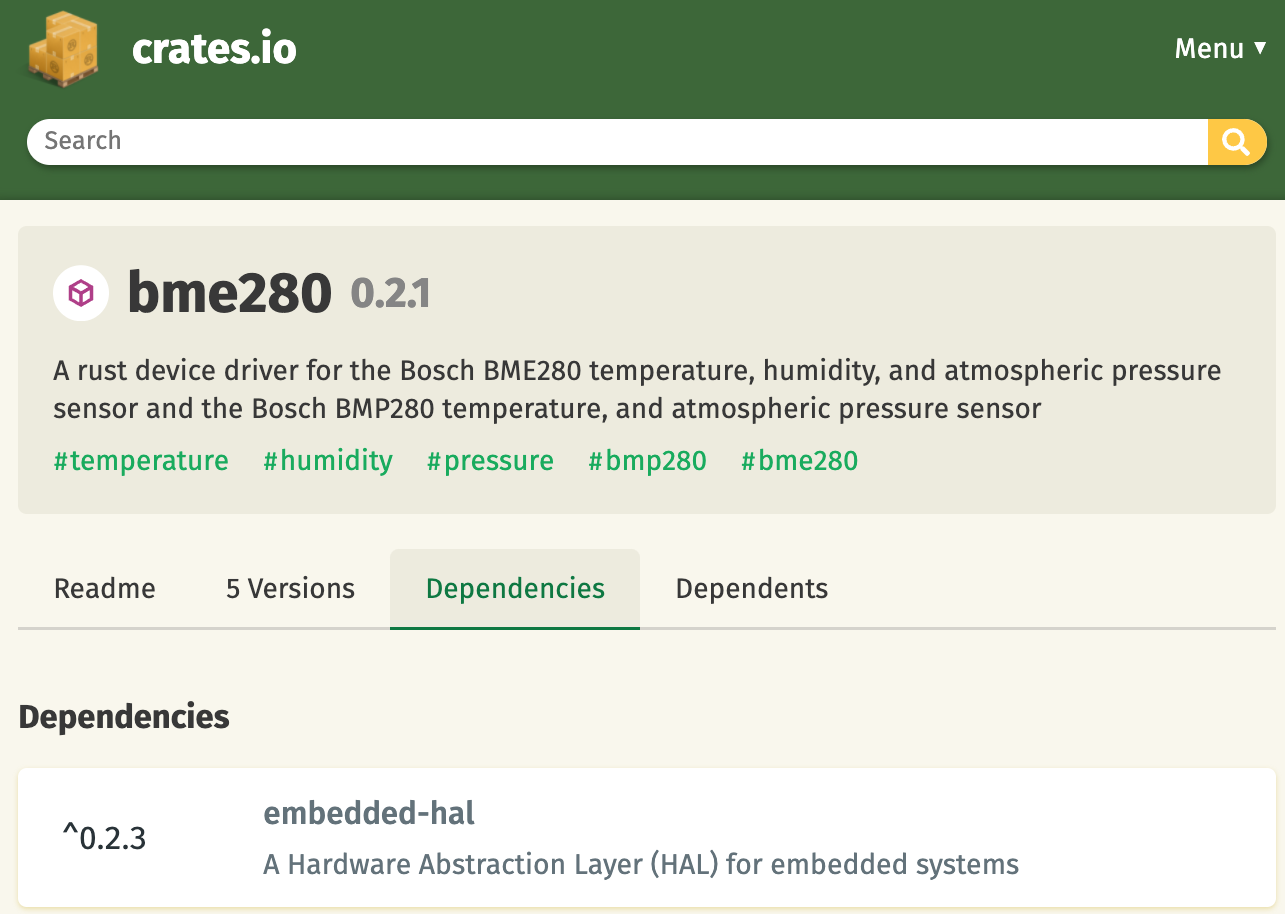
);BME280 comes from the BME280 Driver Crate. (As we’ll see soon)
Before reading the BME280 Sensor, we initialise the sensor…
  //  Init the BME280 Sensor
  bme280.init()
    .expect("init failed");
(This halts with an error if the initialisation fails)
We’re ready to read the Temperature, Humidity and Air Pressure from the BME280 Sensor…
  //  Measure Temperature, Pressure and Humidity
  let measurements = bme280.measure()
    .expect("measure failed");
Finally we print the Sensor Data…
  //  Print the measurements
  println!("Relative Humidity = {}%",
    measurements.humidity);
  println!("Temperature = {} deg C",
    measurements.temperature);
  println!("Pressure = {} pascals",
    measurements.pressure);
}
That’s all we need to read the Sensor Data from the BME280 Sensor!
Where is println defined?
println comes from our NuttX Embedded HAL. We import it at the top…
//  Import Libraries
use nuttx_embedded_hal::{  //  NuttX Embedded HAL
  println,                 //  Print a formatted message
};
Before running our Rust App, let’s connect the BME280 Sensor.
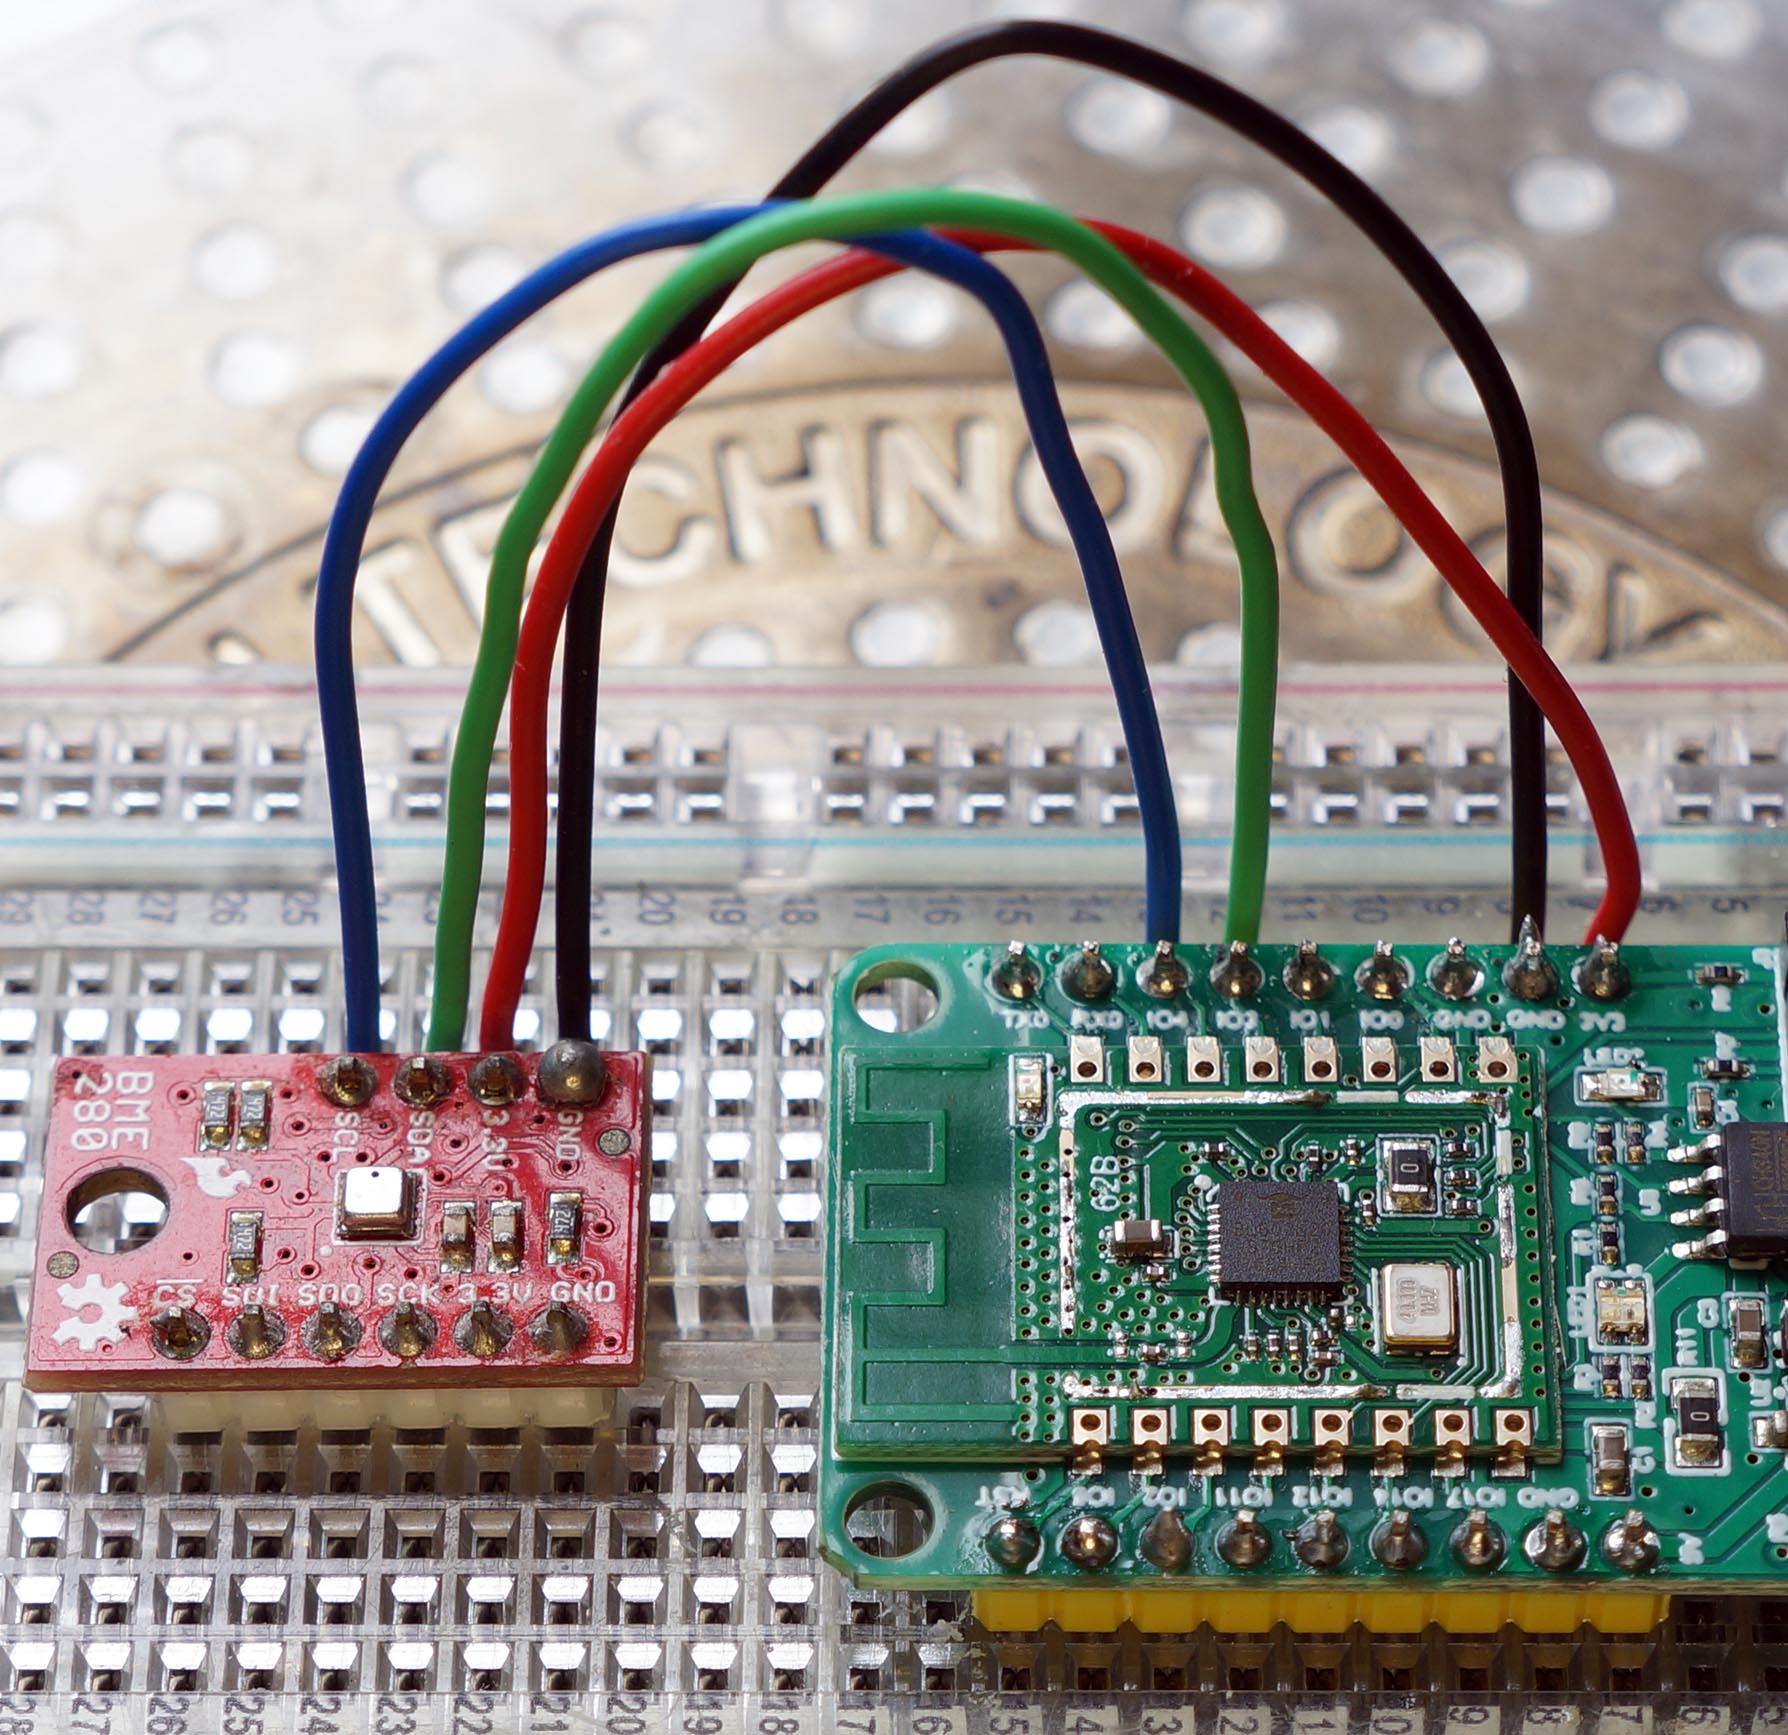
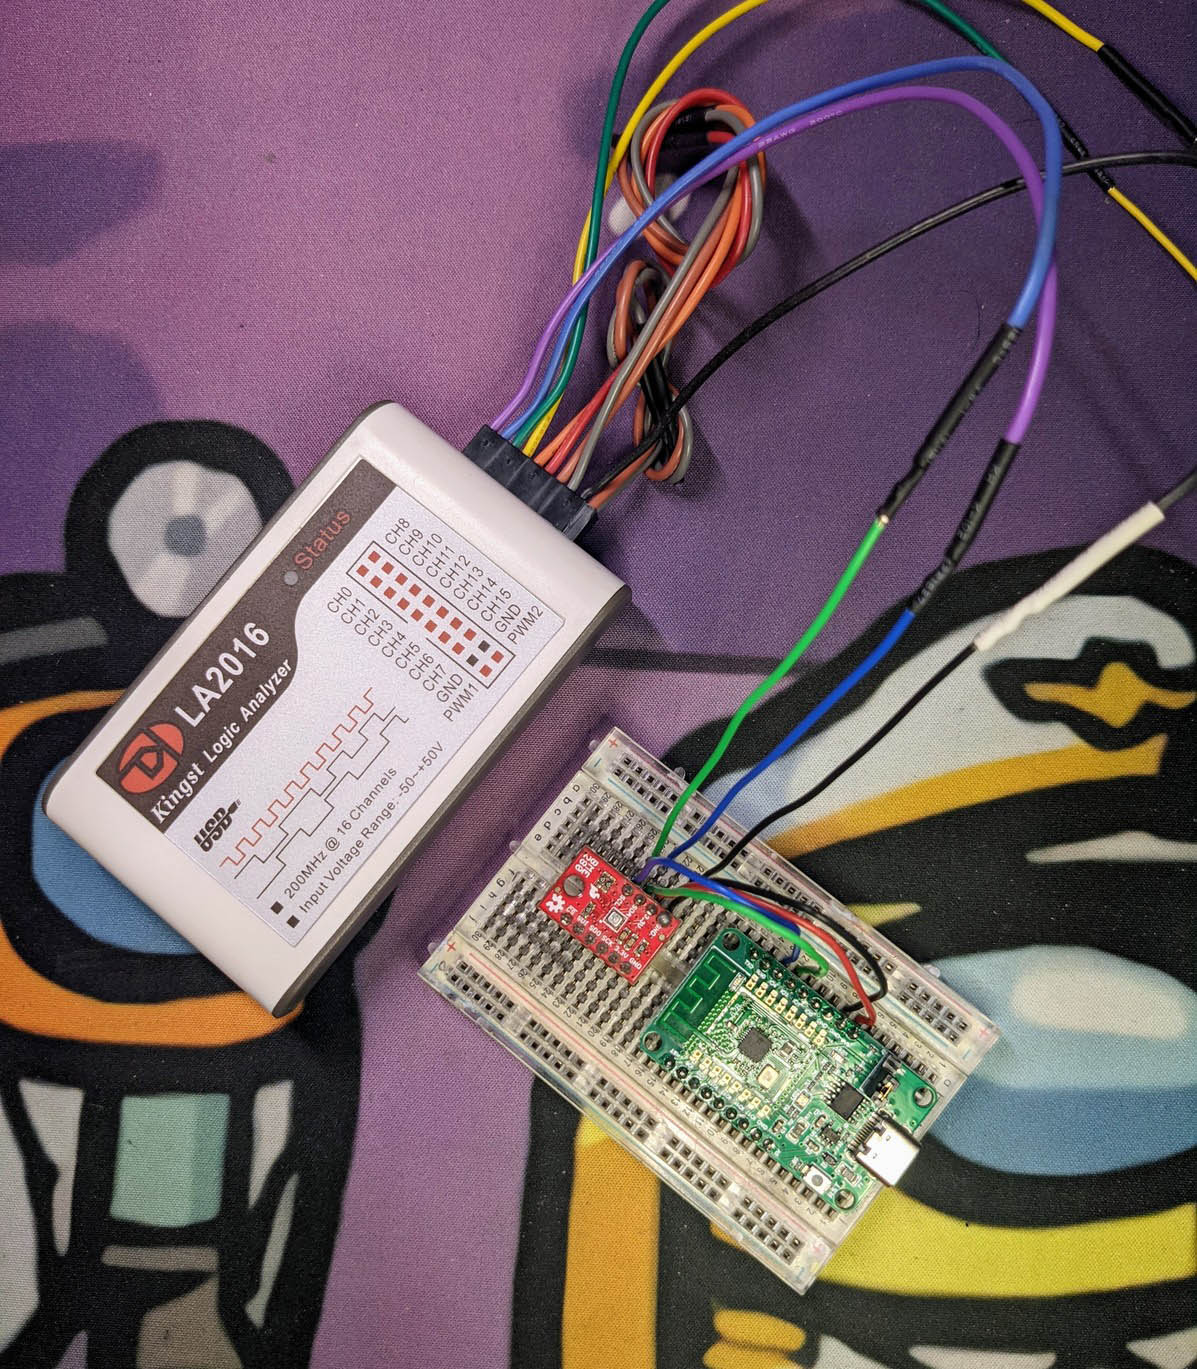
We connect BME280 to Pine64’s PineCone BL602 Board as follows (pic above)…
| BL602 Pin | BME280 Pin | Wire Colour |
|---|---|---|
GPIO 3 | SDA | Green |
GPIO 4 | SCL | Blue |
3V3 | 3.3V | Red |
GND | GND | Black |
The I2C Pins on BL602 are defined here: board.h
/* I2C Configuration */
#define BOARD_I2C_SCL \
  (GPIO_INPUT | GPIO_PULLUP | GPIO_FUNC_I2C | \
  GPIO_PIN4)
#define BOARD_I2C_SDA \
  (GPIO_INPUT | GPIO_PULLUP | GPIO_FUNC_I2C | \
  GPIO_PIN3)
(Which pins can be used? See this)
We disabled the UART1 Port because it uses the same pins as I2C: board.h
#ifdef TODO  /* Remember to check for duplicate pins! */
#define BOARD_UART_1_RX_PIN \
  (GPIO_INPUT | GPIO_PULLUP | GPIO_FUNC_UART | \
  GPIO_PIN3)
#define BOARD_UART_1_TX_PIN \
  (GPIO_INPUT | GPIO_PULLUP | GPIO_FUNC_UART | \
  GPIO_PIN4)
#endif  /* TODO */
(UART0 is used by the Serial Console)
What if we’re connecting to ESP32?
For ESP32: The GPIO Pin Numbers for the I2C Port (I2C0) are defined in Kconfig and menuconfig…
config ESP32_I2C0_SCLPIN
  int "I2C0 SCL Pin"
  default 22
  range 0 39

config ESP32_I2C0_SDAPIN
  int "I2C0 SDA Pin"
  default 23
  range 0 39
Do we need Pull-Up Resistors?
We’re using the SparkFun BME280 Breakout Board, which has Pull-Up Resistors. (So we don’t need to add our own)
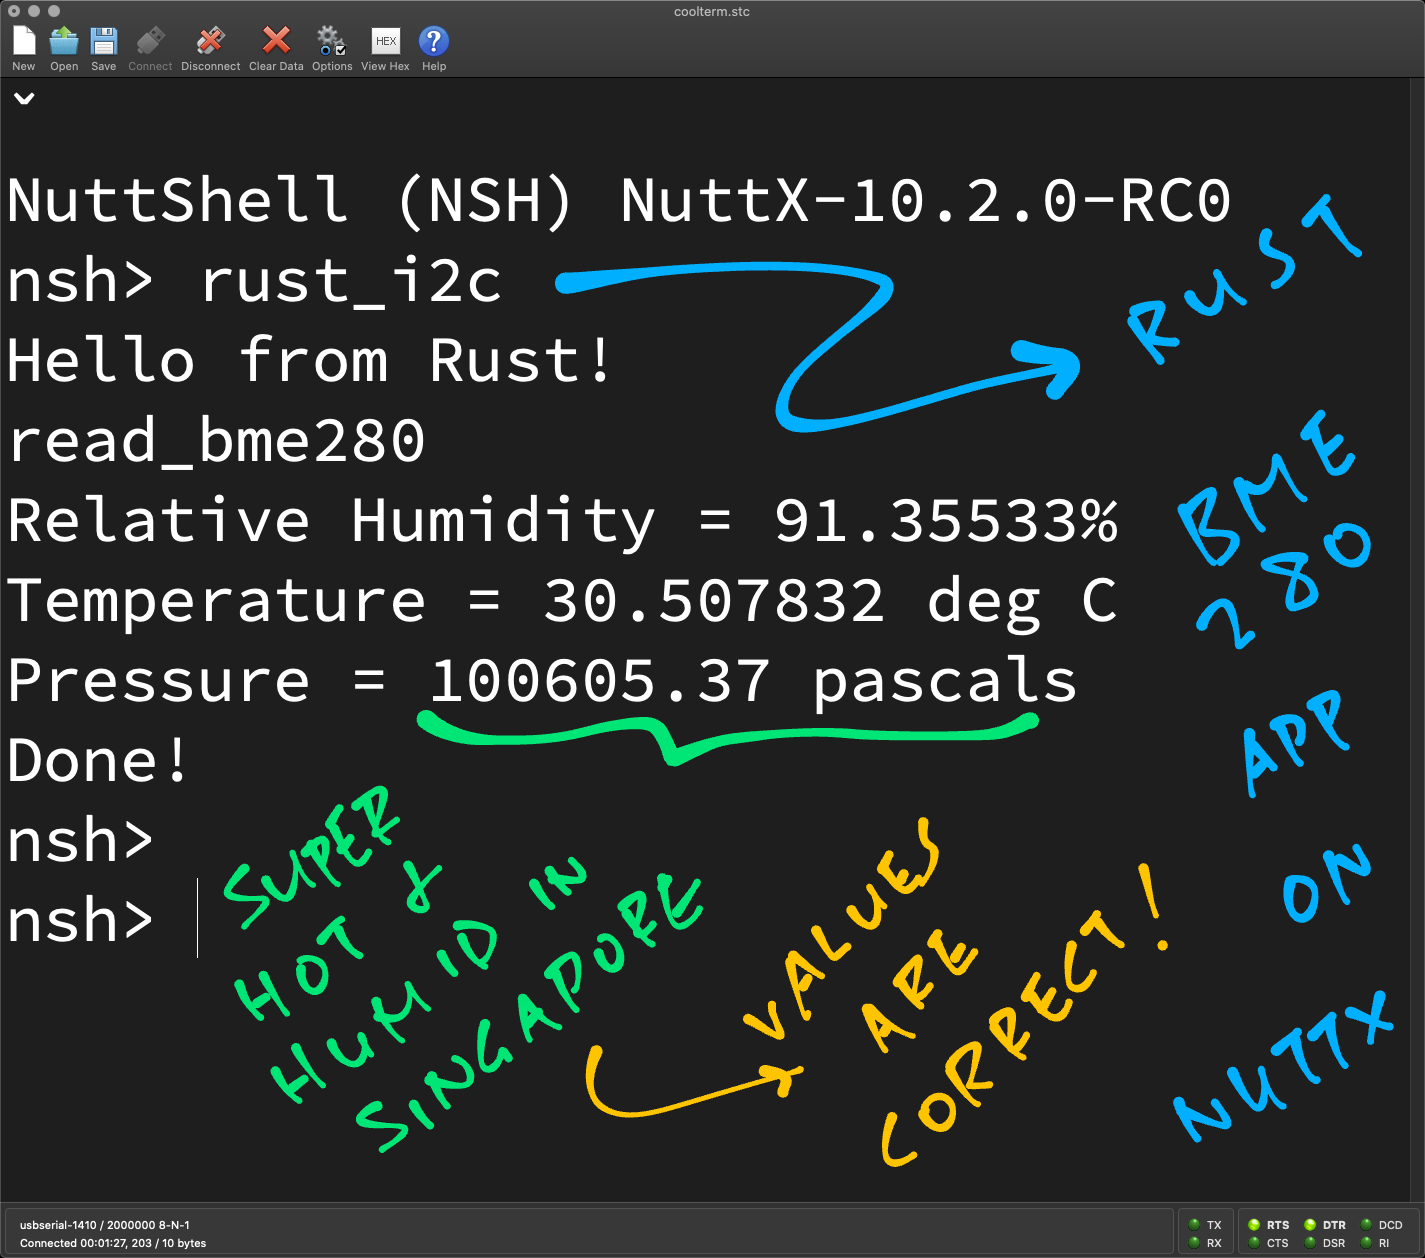
We’re ready to run our Rust App on NuttX!
Follow these steps to build, flash and run NuttX…
At the NuttX Shell, enter this command to list the NuttX Devices…
ls /devWe should see our I2C Port that’s connected to BME280…
/dev:
 i2c0
 ...
To read the BME280 Sensor, enter this command…
rust_i2cWe should see the Relative Humidity, Temperature and Air Pressure…
read_bme280
Relative Humidity = 89.284164%
Temperature = 29.942907 deg C
Pressure = 100483.04 pascals
Done!The Rust Driver for BME280 runs successfully on NuttX!
We ran the Rust Driver for BME280 on NuttX… Without any code changes?
Yeah amazing right? Earlier we saw this: rust/src/bme280.rs
  //  Init the BME280 Driver
  let mut bme280 = bme280::BME280
    ::new( ... );
BME280 comes from the Rust Embedded Driver for BME280 (pic above)…
That we have added to our Cargo.toml…
## External Rust libraries used by this module.  See crates.io.
[dependencies]

## BME280 Driver: https://crates.io/crates/bme280
bme280 = "0.2.1"

## NuttX Embedded HAL: https://crates.io/crates/nuttx-embedded-hal
nuttx-embedded-hal = "1.0.10"

## Rust Embedded HAL: https://crates.io/crates/embedded-hal
embedded-hal = "0.2.7"
The Rust Driver for BME280 works on NuttX because of NuttX Embedded HAL. Let’s look inside.
(BTW: Always use the latest version of NuttX Embedded HAL)
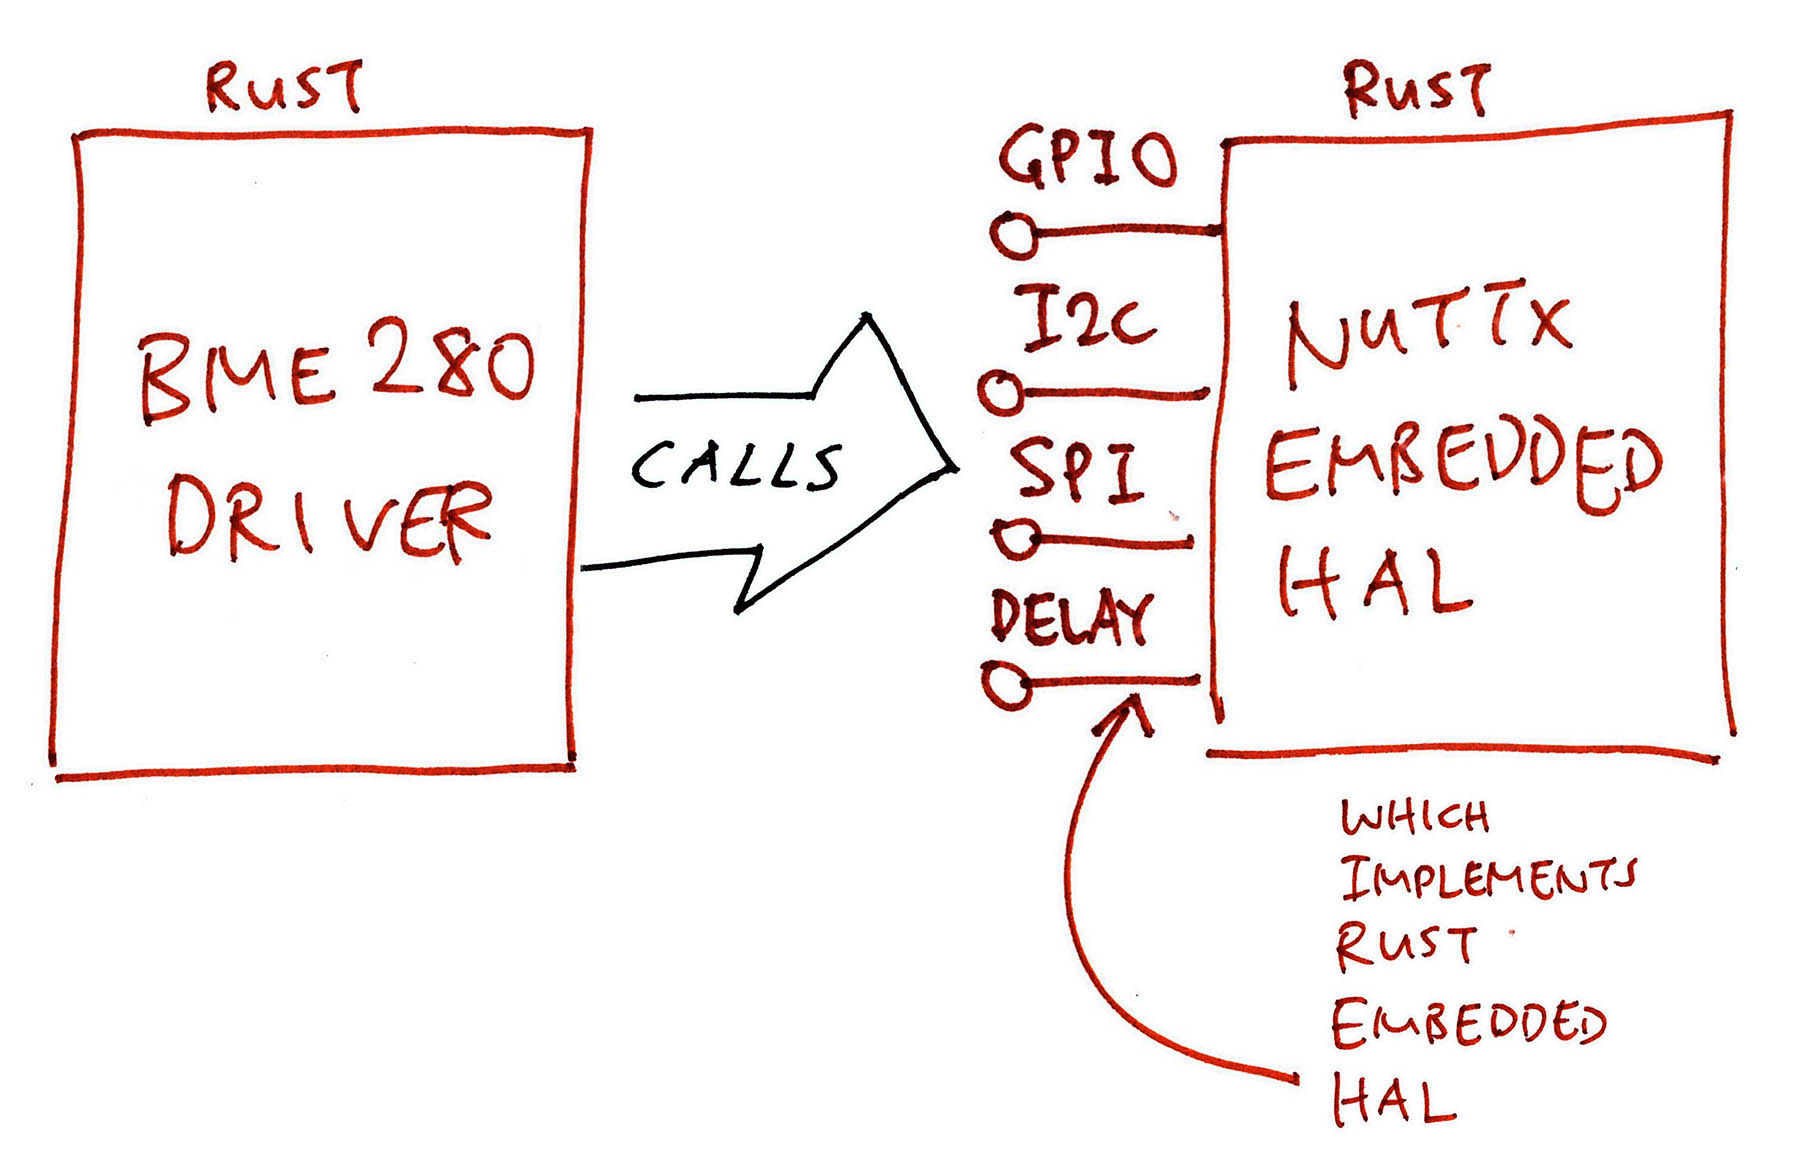
What’s NuttX Embedded HAL?
NuttX Embedded HAL (Hardware Abstraction Layer) is the Rust Library that exposes a Standard Rust Interface for the Input / Output Ports on NuttX: GPIO, I2C, SPI, …
Earlier we called NuttX Embedded HAL to open the I2C Port: bme280.rs
//  Open I2C Port
let i2c = nuttx_embedded_hal::I2c::new(
  "/dev/i2c0",  //  I2C Port
  400000,       //  I2C Frequency: 400 kHz
).expect("open failed");
And we passed it to the BME280 Driver…
//  Init the BME280 Driver
let mut bme280 = bme280::BME280::new(
  i2c,   //  I2C Port
  0x77,  //  I2C Address of BME280
  nuttx_embedded_hal::Delay  //  Delay Interface
);(Delay also comes from NuttX Embedded HAL)
But BME280 Driver doesn’t know anything about NuttX?
That’s OK because the BME280 Driver and NuttX Embedded HAL both talk through the same interface: Rust Embedded HAL. (Pic above)
Rust Embedded HAL is the standard interface used by Rust Embedded Drivers (like the BME280 Driver) to talk to the GPIO / I2C / SPI ports.
(Rust Driver for LoRa SX1262 works on NuttX too)
That’s why Rust Embedded Drivers can run on many platforms?
Yep because the Rust Embedded HAL has been implemented on many platforms: Linux, FreeBSD, nRF52, STM32 Blue Pill, …
And now NuttX! (As NuttX Embedded HAL)
Can we call NuttX Embedded HAL in our own Rust Programs?
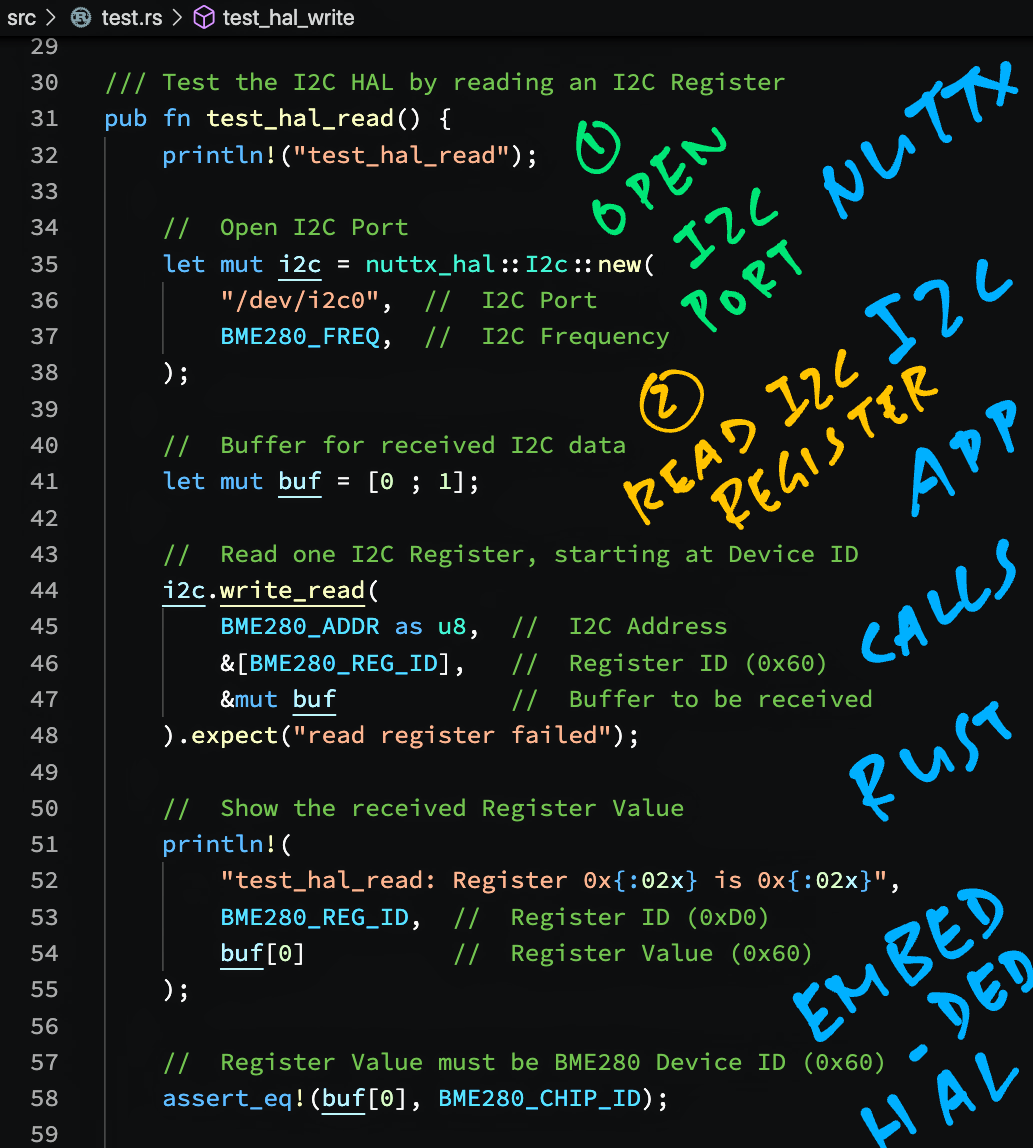
Yes we can! This is how we call NuttX Embedded HAL to read an I2C Register on BME280: test.rs
/// Read an I2C Register
pub fn test_hal_read() {

  //  Open I2C Port
  let mut i2c = nuttx_embedded_hal::I2c::new(
    "/dev/i2c0",  //  I2C Port
    400000,       //  I2C Frequency: 400 kHz
  ).expect("open failed");
This opens the I2C Port “/dev/i2c0” at 400 kHz. (We’ve seen this earlier)
Next we prepare a one-byte Receive Buffer that will receive the Register Value…
  //  Buffer for received Register Value (1 byte)
  let mut buf = [0 ; 1];  //  Init to 0
Then we call NuttX Embedded HAL to read Register 0xD0 from I2C Address 0x77…
  //  Read I2C Register
  i2c.write_read(
    0x77,     //  I2C Address
    &[0xD0],  //  Register ID
    &mut buf  //  Buffer to be received (Register Value)
  ).expect("read register failed");
Our Receive Buffer now contains the Register Value 0x60…
  //  Register Value must be BME280 Device ID (0x60)
  assert_eq!(buf[0], 0x60);
}
That’s how we call NuttX Embedded HAL to read an I2C Register!
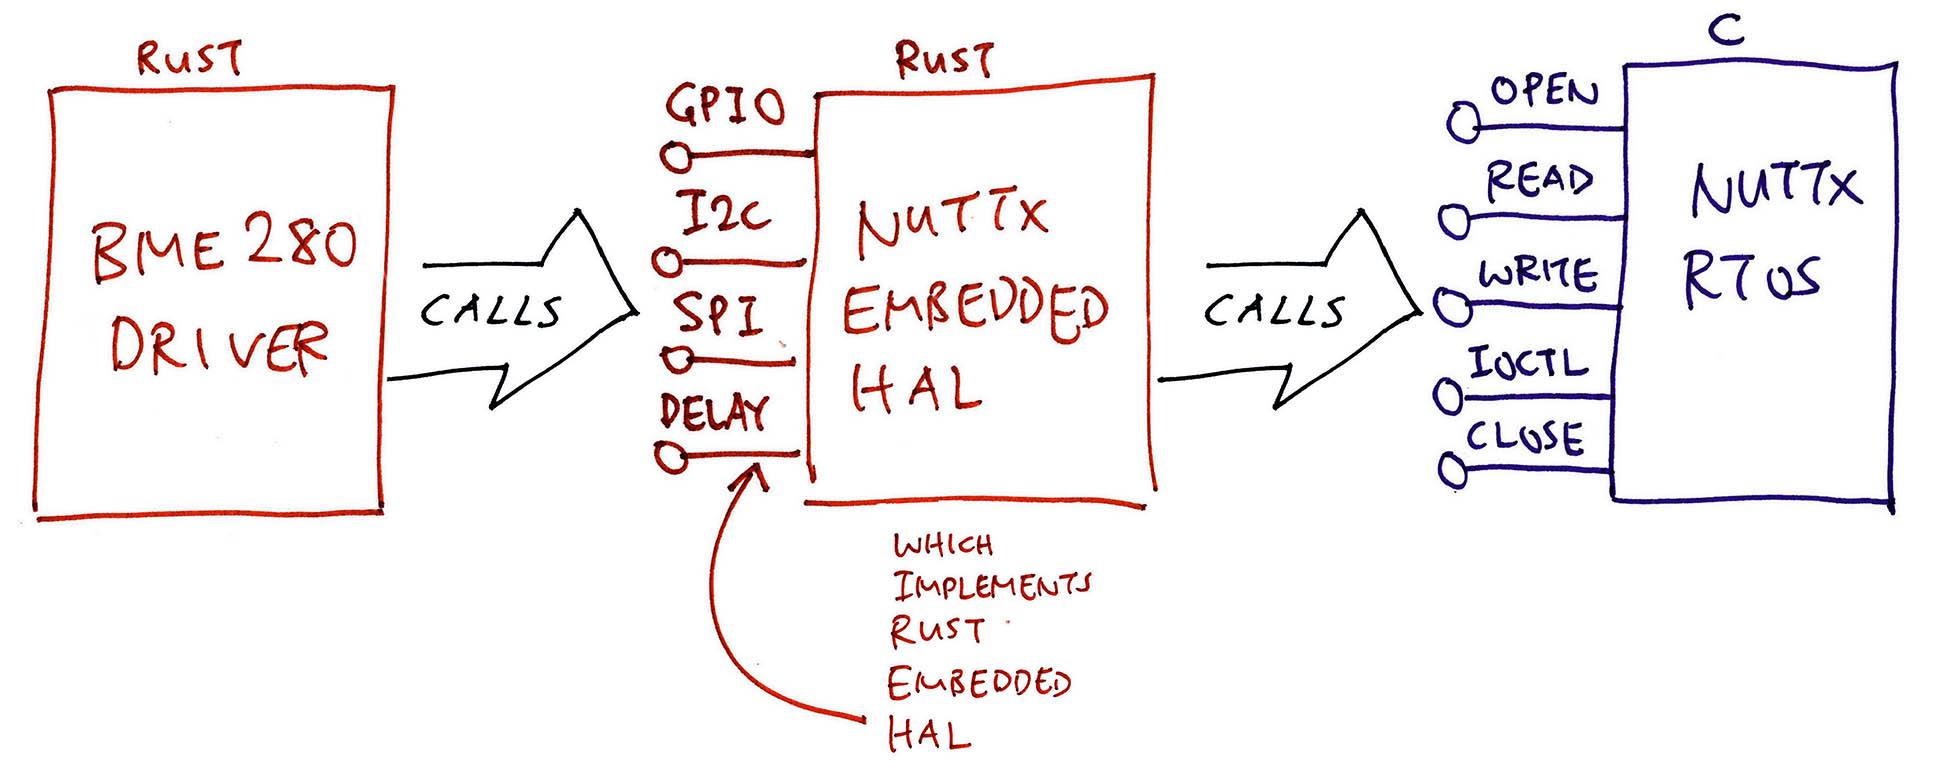
How did we implement I2C in the NuttX Embedded HAL?
NuttX Embedded HAL accesses the I2C Port by calling the NuttX I2C Interface: open(), ioctl() and close(). (Pic above)
Check out the details in the Appendix…
What about writing to I2C Registers?
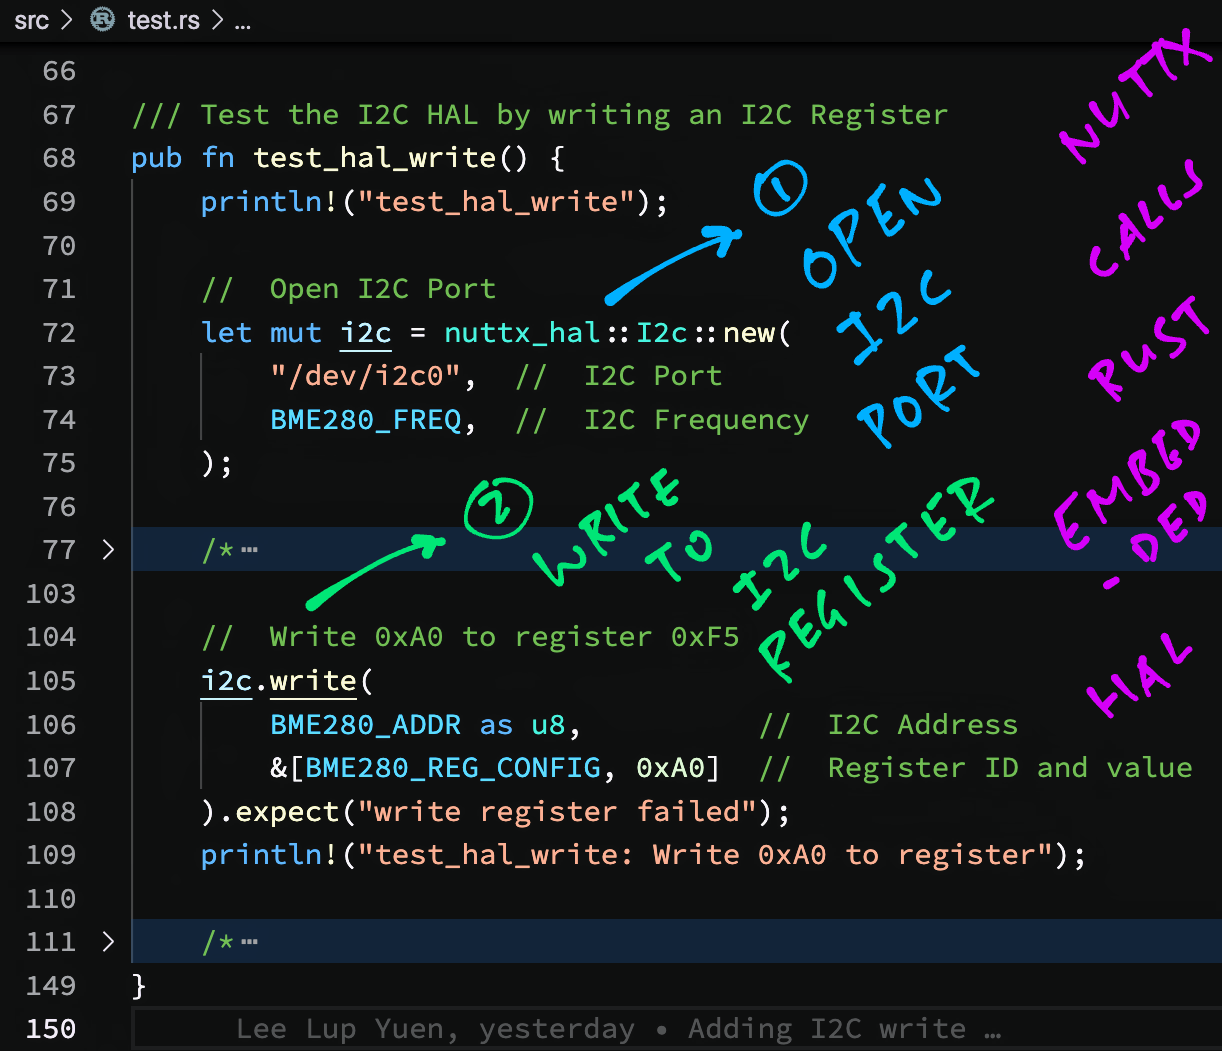
This code calls NuttX Embedded HAL to write an I2C Register: test.rs
/// Write an I2C Register
pub fn test_hal_write() {

  //  Open I2C Port
  let mut i2c = nuttx_embedded_hal::I2c::new(
    "/dev/i2c0",  //  I2C Port
    400000,       //  I2C Frequency: 400 kHz
  ).expect("open failed");

  //  Write 0xA0 to Register 0xF5
  i2c.write(
    0x77,          //  I2C Address
    &[0xF5, 0xA0]  //  Register ID and value
  ).expect("write register failed");
The implementation of i2c.write in NuttX Embedded HAL is explained here…
When we connect a Logic Analyser, we’ll see something unusual…
Setup Write to [0xEE] + ACK
0xF5 + ACK
0xA0 + ACK
Setup Read to [0xEF] + ACK
0xA0 + NAK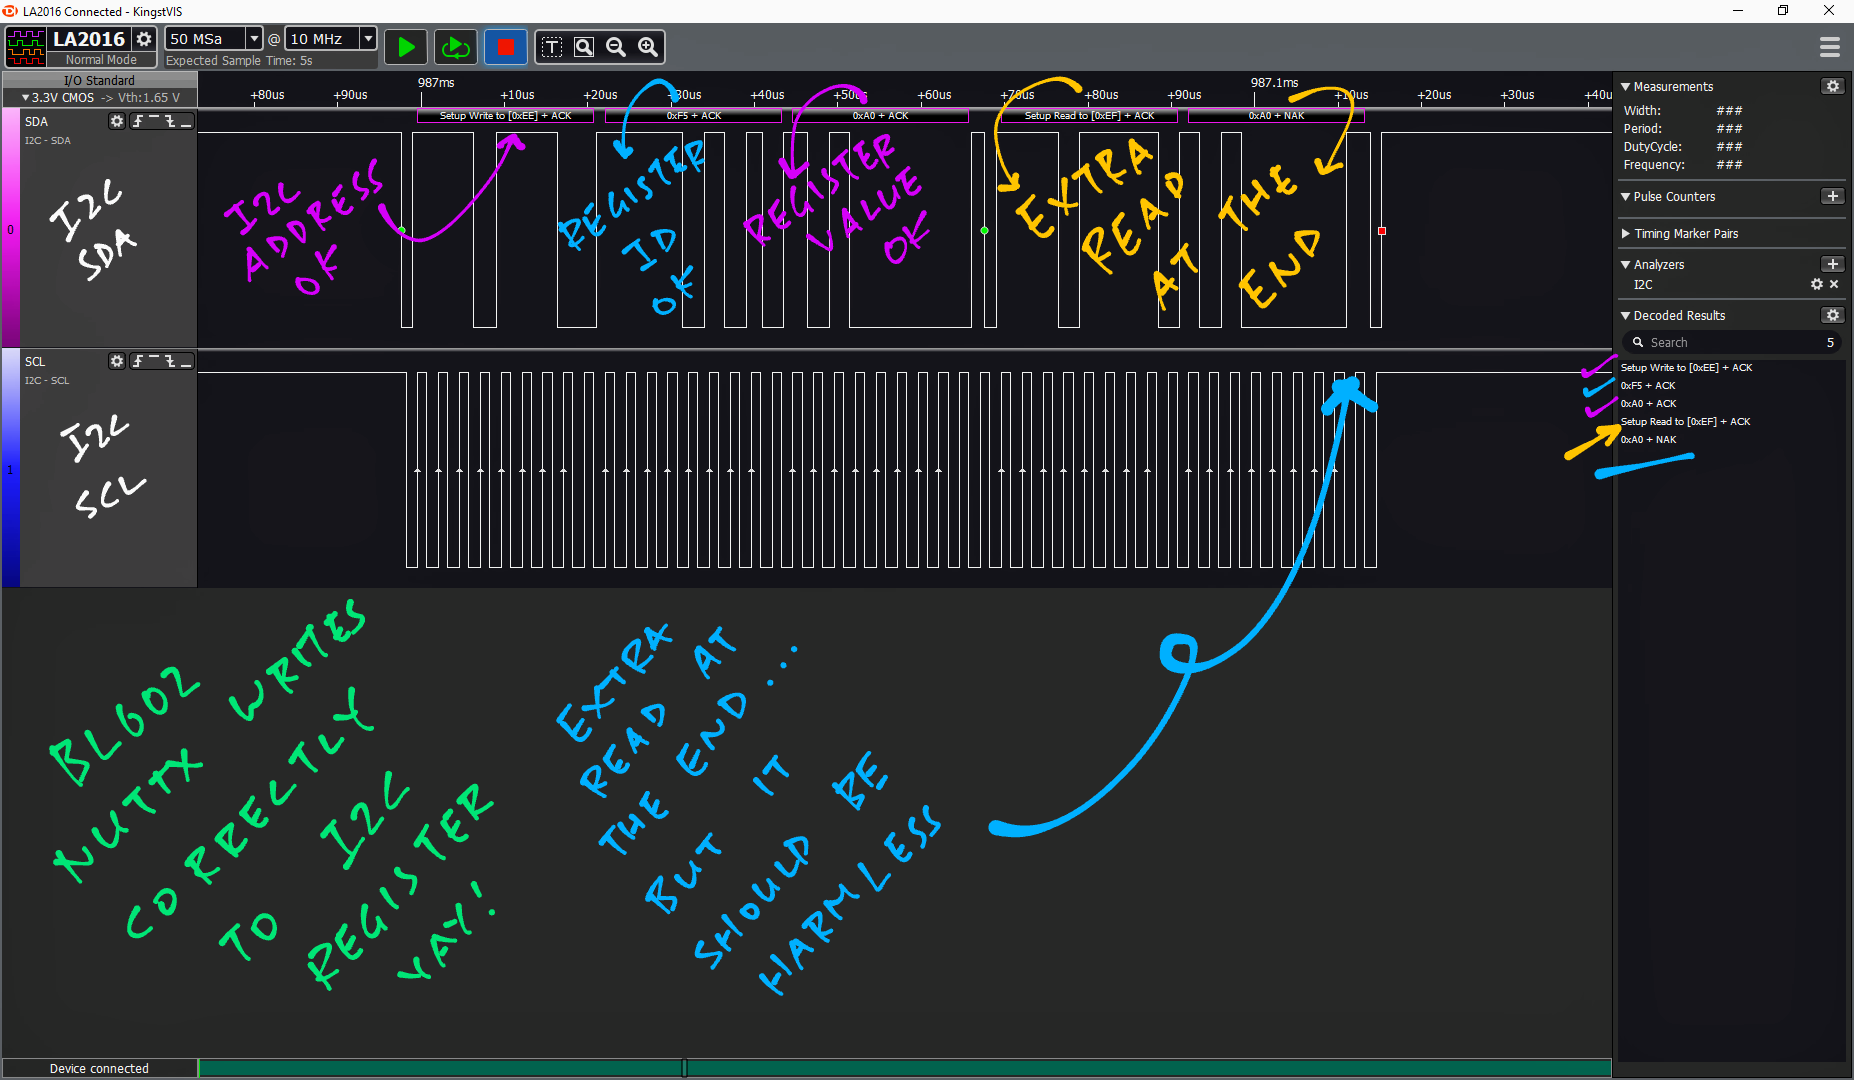
There’s an extra I2C Read at the end, right after writing the Register ID 0xF5 and Register Value 0xA0.
But it’s harmless. NuttX Embedded HAL does this to work around the I2C quirks on BL602…
What about GPIO and SPI on NuttX Embedded HAL?
Yep they have been implemented in NuttX Embedded HAL…
I had lots of fun running Rust on NuttX, I hope you’ll enjoy it too!
If you’re keen to make Rust on NuttX better, or if there’s something I should port to Rust on NuttX, please lemme know! 🙏
Many Thanks to my GitHub Sponsors for supporting my work! This article wouldn’t have been possible without your support.
Got a question, comment or suggestion? Create an Issue or submit a Pull Request here…
lupyuen.github.io/src/rusti2c.md
How was NuttX Embedded HAL implemented in Rust?
NuttX Embedded HAL accesses the I2C Port by calling the NuttX I2C Interface: open(), ioctl() and close(). (Pic above)
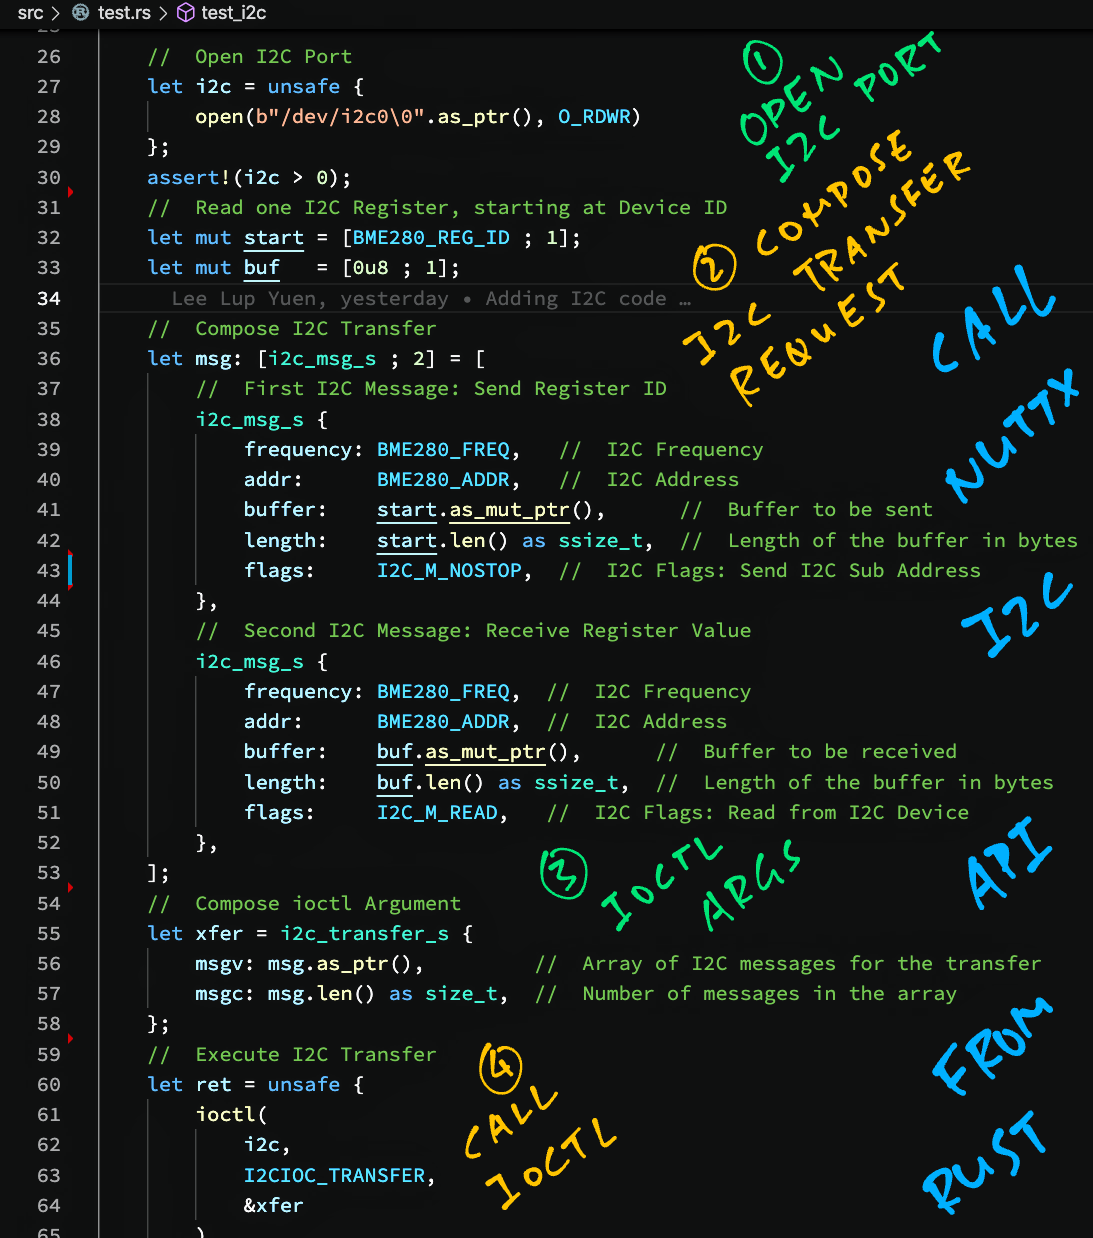
To understand why, let’s look at a NuttX Rust Program that reads an I2C Register on BME280: rust/src/test.rs
/// Read an I2C Register
pub fn test_i2c() {

  //  Open I2C Port
  let i2c = unsafe {
    open(b"/dev/i2c0\0".as_ptr(), O_RDWR)
  };
  assert!(i2c > 0);
We begin by calling open() to open the I2C Port.
This is flagged as “unsafe” because we’re calling a C Function. (See this)
Next we prepare the buffers that will be sent and received over I2C…
  //  Send the Register ID 0xD0 (1 byte)
  let mut start = [0xD0 ; 1];

  //  Receive the Register Value (1 byte)
  let mut buf   = [0 ; 1];
We’ll read the I2C Register in 2 steps…
Send the Register ID 0xD0
Receive the Register Value
We define the First Step: Send the Register ID…
  //  Compose I2C Transfers
  let msg = [

    //  First I2C Message: Send Register ID
    i2c_msg_s {
      frequency: 400000,  //  I2C Frequency: 400 kHz
      addr:      0x77,    //  I2C Address
      buffer:    start.as_mut_ptr(),      //  Buffer to be sent (Register ID)
      length:    start.len() as ssize_t,  //  Length of the buffer in bytes

      //  For BL602: Register ID must be passed as I2C Sub Address
      #[cfg(target_arch = "riscv32")]  //  If architecture is RISC-V 32-bit...
      flags:     I2C_M_NOSTOP,  //  I2C Flags: Send I2C Sub Address

      //  Otherwise pass Register ID as I2C Data
      #[cfg(not(target_arch = "riscv32"))]  //  If architecture is not RISC-V 32-bit...
      flags:     0,  //  I2C Flags: None

      //  TODO: Check for BL602 specifically, not just RISC-V 32-bit
},(I2C_M_NOSTOP is needed because of a BL602 quirk)
And here’s the Second Step: Receive the Register Value…
    //  Second I2C Message: Receive Register Value
    i2c_msg_s {
      frequency: 400000,  //  I2C Frequency: 400 kHz
      addr:      0x77,    //  I2C Address
      buffer:    buf.as_mut_ptr(),      //  Buffer to be received
      length:    buf.len() as ssize_t,  //  Length of the buffer in bytes
      flags:     I2C_M_READ,   //  I2C Flags: Read from I2C Device
    },
  ];
Finally we execute the two steps by calling ioctl()…
  //  Compose ioctl Argument
  let xfer = i2c_transfer_s {
    msgv: msg.as_ptr(),         //  Array of I2C messages for the transfer
    msgc: msg.len() as size_t,  //  Number of messages in the array
  };

  //  Execute I2C Transfers
  let ret = unsafe {
    ioctl(
      i2c,              //  I2C Port
      I2CIOC_TRANSFER,  //  I2C Transfer
      &xfer             //  I2C Messages for the transfer
    )
  };
  assert!(ret >= 0);
The Register Value appears in our Receive Buffer…
  //  Register Value must be BME280 Device ID (0x60)
  assert!(buf[0] == 0x60);

  //  Close the I2C Port
  unsafe { close(i2c); }
}The above Rust code looks highly similar to the C version…
Let’s look at the NuttX Types and Constants that we have ported from C to Rust.
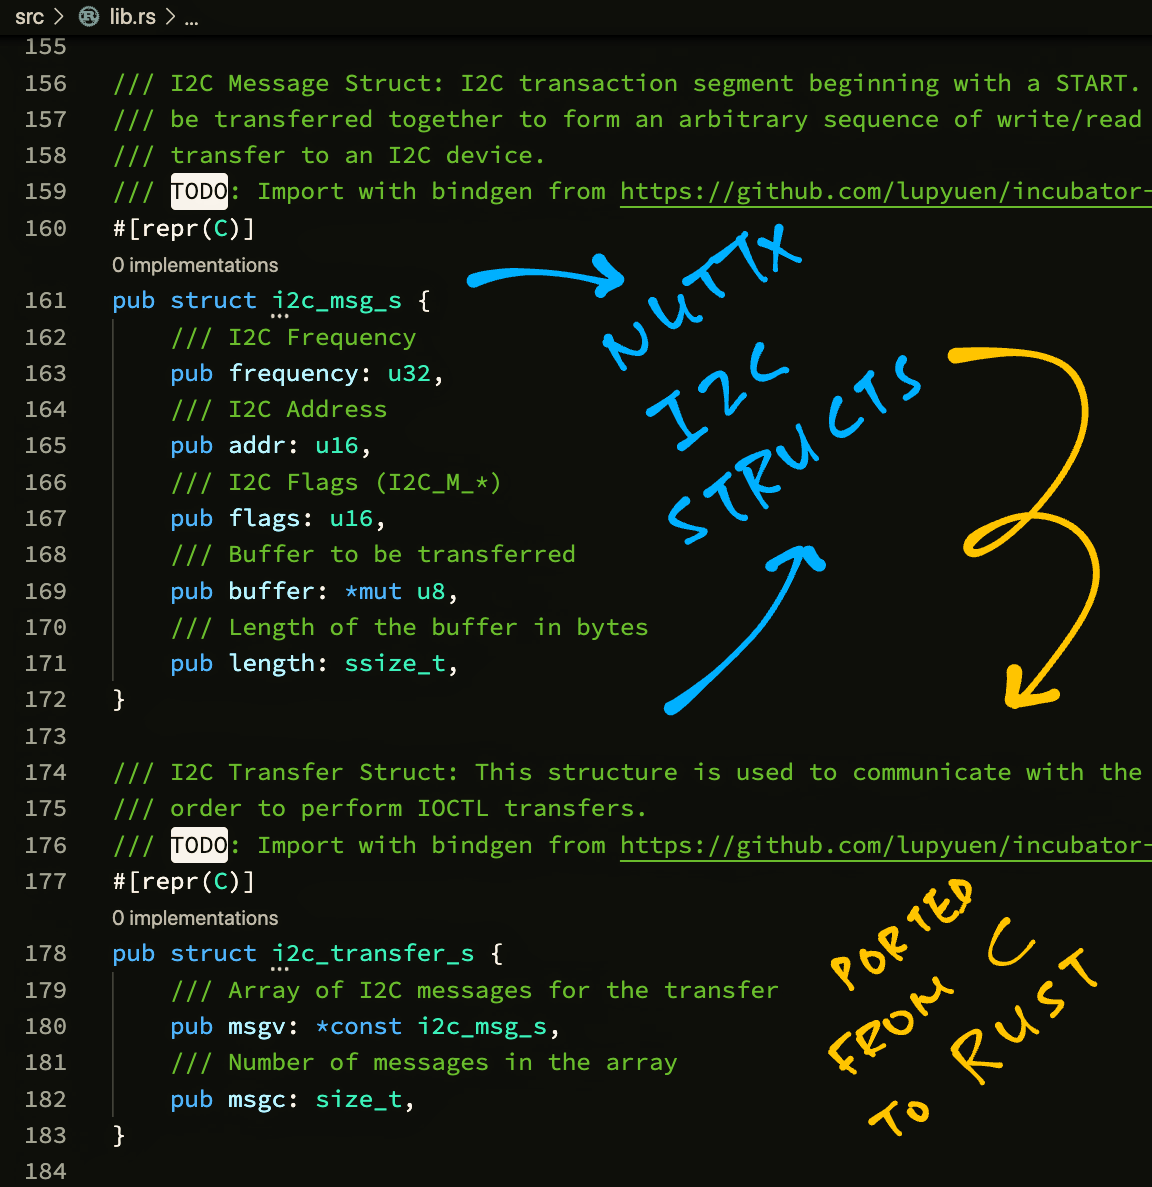
What are i2c_msg_s and i2c_transfer_s in the code above?
They are NuttX I2C Types that we have ported from C to Rust.
i2c_msg_s is the I2C Message Struct that defines each message that will be sent or received over I2C: nuttx-embedded-hal/src/lib.rs
/// I2C Message Struct: I2C transaction segment beginning with a START. A number of these can
/// be transferred together to form an arbitrary sequence of write/read
/// transfer to an I2C device.
/// Ported from C: https://github.com/lupyuen/nuttx/blob/rusti2c/include/nuttx/i2c/i2c_master.h#L208-L215
#[repr(C)]
pub struct i2c_msg_s {
    /// I2C Frequency
    pub frequency: u32,
    /// I2C Address
    pub addr: u16,
    /// I2C Flags (I2C_M_*)
    pub flags: u16,
    /// Buffer to be transferred
    pub buffer: *mut u8,
    /// Length of the buffer in bytes
    pub length: ssize_t,
}
i2c_transfer_s contains an array of I2C Message Structs that will be sent / received when we call ioctl() to execute the I2C Transfer…
/// I2C Transfer Struct: This structure is used to communicate with the I2C character driver in
/// order to perform IOCTL transfers.
/// Ported from C: https://github.com/lupyuen/nuttx/blob/rusti2c/include/nuttx/i2c/i2c_master.h#L231-L235
#[repr(C)]
pub struct i2c_transfer_s {
    /// Array of I2C messages for the transfer
    pub msgv: *const i2c_msg_s,
    /// Number of messages in the array
    pub msgc: size_t,
}
What about I2C_M_NOSTOP, I2C_M_READ and I2CIOC_TRANSFER?
I2C_M_NOSTOP, I2C_M_READ and I2CIOC_TRANSFER are NuttX I2C Constants that we have ported from C to Rust.
The code above goes into NuttX Embedded HAL like so…
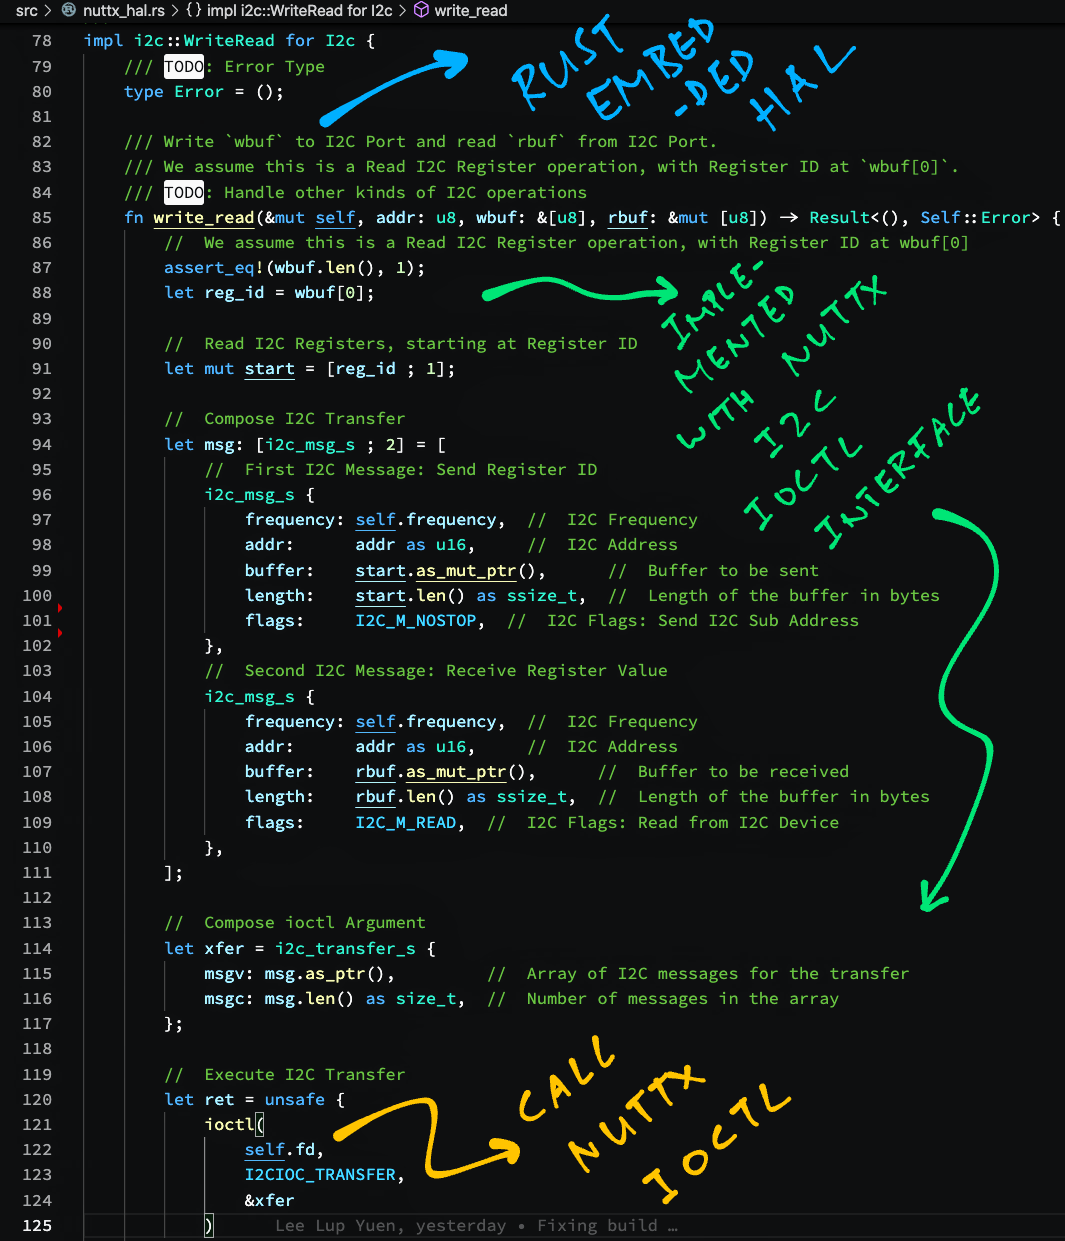
This conforms to the I2C Interface that’s expected by Rust Embedded HAL…
/// NuttX Implementation of I2C WriteRead
impl i2c::WriteRead for I2c {
  ...
  /// Write `wbuf` to I2C Port and read `rbuf` from I2C Port.
  /// We assume this is a Read I2C Register operation, with Register ID at `wbuf[0]`.
  /// TODO: Handle other kinds of I2C operations
  fn write_read(
      &mut self,       //  I2C Bus
      addr: u8,        //  I2C Address
      wbuf: &[u8],     //  Buffer to be sent (Register ID)
      rbuf: &mut [u8]  //  Buffer to be received
  ) -> Result<(), Self::Error>  //  In case of error, return an error code
{ ... }What about the calls to open() and close()?
We moved open() into the new() constructor: hal.rs
/// NuttX Implementation of I2C Bus
impl I2c {
  /// Create an I2C Bus from a Device Path (e.g. "/dev/i2c0")
  pub fn new(path: &str, frequency: u32) -> Result<Self, i32> {

    //  Open the NuttX Device Path (e.g. "/dev/i2c0") for read-write
    let fd = open(path, O_RDWR);
    if fd < 0 { return Err(fd) }

    //  Return the I2C Bus
    Ok(Self { fd, frequency })
  }
}And we moved close() into the drop() destructor: hal.rs
/// NuttX Implementation of I2C Bus
impl Drop for I2c {

  /// Close the I2C Bus
  fn drop(&mut self) {
    unsafe { close(self.fd) };
  }
}
I2c Struct contains a NuttX File Descriptor and the I2C Frequency: hal.rs
/// NuttX I2C Bus
pub struct I2c {
  /// NuttX File Descriptor
  fd: i32,
  /// I2C Frequency in Hz
  frequency: u32,
}
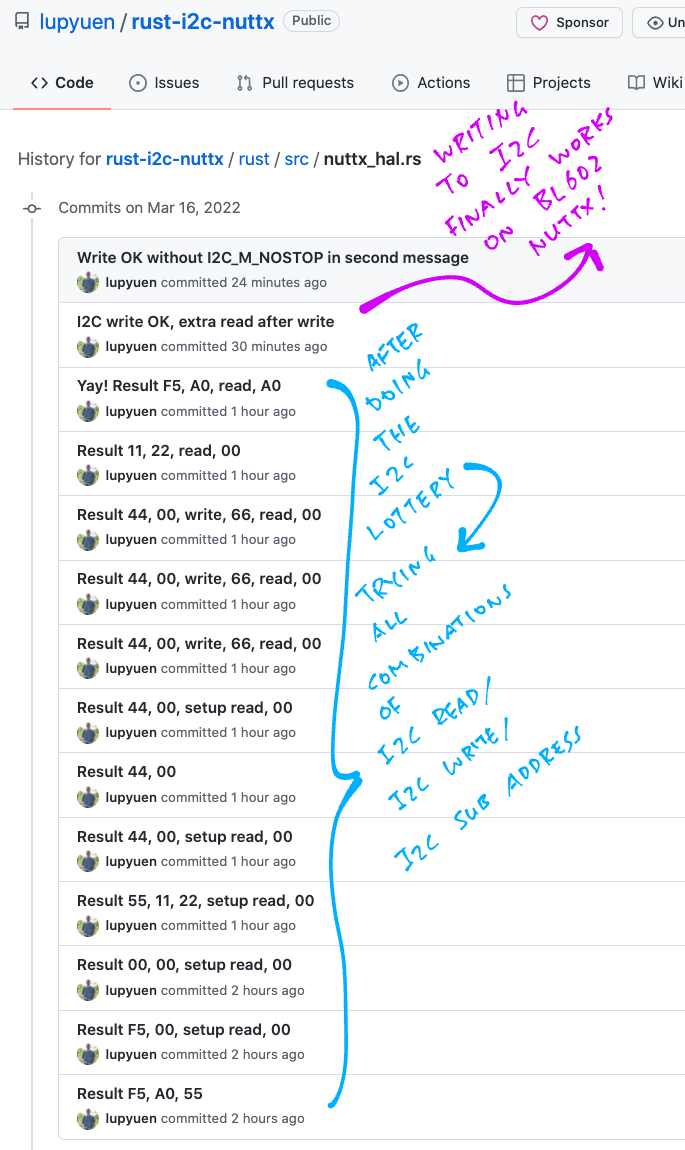
BL602 has a peculiar I2C Port that uses I2C Sub Addresses…
We tried all sequences of I2C Read / Write / Sub Address. Only this strange sequence works for writing to I2C Registers…
Write I2C Register ID and Register Value together as I2C Sub Address
Followed by Read I2C Data
Here’s the implementation in NuttX Embedded HAL: hal.rs
/// NuttX Implementation of I2C Write
impl i2c::Write for I2c {
    /// Error Type
    type Error = i32;

    /// Write `buf` to I2C Port.
    /// We assume this is a Write I2C Register operation, with Register ID at `buf[0]`.
    /// TODO: Handle other kinds of I2C operations
    fn write(&mut self, addr: u8, buf: &[u8]) -> Result<(), Self::Error> {
        //  Copy to local buffer because we need a mutable reference
        let mut buf2 = [0 ; 64];
        assert!(buf.len() <= buf2.len());
        buf2[..buf.len()].copy_from_slice(buf);

        //  Buffer for received I2C data
        let mut rbuf = [0 ; 1];

        //  Compose I2C Transfer
        let msg = [
            //  First I2C Message: Send Register ID and I2C Data as I2C Sub Address
            i2c_msg_s {
                frequency: self.frequency,  //  I2C Frequency
                addr:      addr as u16,     //  I2C Address
                buffer:    buf2.as_mut_ptr(),     //  Buffer to be sent
                length:    buf.len() as ssize_t,  //  Number of bytes to send

                //  For BL602: Register ID must be passed as I2C Sub Address
                #[cfg(target_arch = "riscv32")]  //  If architecture is RISC-V 32-bit...
                flags:     crate::I2C_M_NOSTOP,  //  I2C Flags: Send I2C Sub Address

                //  Otherwise pass Register ID as I2C Data
                #[cfg(not(target_arch = "riscv32"))]  //  If architecture is not RISC-V 32-bit...
                flags:     0,  //  I2C Flags: None

                //  TODO: Check for BL602 specifically (by target_abi?), not just RISC-V 32-bit
            },
            //  Second I2C Message: Read I2C Data, because this forces BL602 to send the first message correctly
            i2c_msg_s {
                frequency: self.frequency,  //  I2C Frequency
                addr:      addr as u16,     //  I2C Address
                buffer:    rbuf.as_mut_ptr(),      //  Buffer to be received
                length:    rbuf.len() as ssize_t,  //  Number of bytes to receive
                flags:     I2C_M_READ,  //  I2C Flags: Read I2C Data
            },
        ];

        //  Compose ioctl Argument to write I2C Registers
        let xfer = i2c_transfer_s {
            msgv: msg.as_ptr(),         //  Array of I2C messages for the transfer
            msgc: msg.len() as size_t,  //  Number of messages in the array
        };

        //  Execute I2C Transfer to write I2C Registers
        let ret = unsafe {
            ioctl(
                self.fd,          //  I2C Port
                I2CIOC_TRANSFER,  //  I2C Transfer
                &xfer             //  I2C Messages for the transfer
            )
        };
        assert!(ret >= 0);
        Ok(())
    }
}
Our Logic Analyser shows that BL602 writes correctly to the I2C Register (with a harmless I2C Read at the end)…
Setup Write to [0xEE] + ACK
0xF5 + ACK
0xA0 + ACK
Setup Read to [0xEF] + ACK
0xA0 + NAK

This is how we read an I2C Register in C from a NuttX App…
static int bme280_reg_read(const struct device *priv,
    uint8_t start, uint8_t *buf, int size)
{
  DEBUGASSERT(priv != NULL);
  DEBUGASSERT(buf != NULL);
  struct i2c_msg_s msg[2];
  int ret;

  msg[0].frequency = priv->freq;
  msg[0].addr      = priv->addr;

#ifdef CONFIG_BL602_I2C0
  //  For BL602: Register ID must be passed as I2C Sub Address
  msg[0].flags     = I2C_M_NOSTOP;
#else
  //  Otherwise pass Register ID as I2C Data
  msg[0].flags     = 0;
#endif  //  CONFIG_BL602_I2C0

  msg[0].buffer    = &start;
  msg[0].length    = 1;

  msg[1].frequency = priv->freq;
  msg[1].addr      = priv->addr;
  msg[1].flags     = I2C_M_READ;
  msg[1].buffer    = buf;
  msg[1].length    = size;

ret = I2C_TRANSFER(priv->i2c, msg, 2);How do we call I2C_TRANSFER from a NuttX App? Thanks to the I2C Demo App we have the answer…
int i2ctool_get(FAR struct i2ctool_s *i2ctool, int fd, uint8_t regaddr,
                FAR uint16_t *result)
{
  struct i2c_msg_s msg[2];
  ...
int ret = i2cdev_transfer(fd, msg, 2);i2cdev_transfer is defined as…
int i2cdev_transfer(int fd, FAR struct i2c_msg_s *msgv, int msgc)
{
  struct i2c_transfer_s xfer;

  /* Set up the IOCTL argument */

  xfer.msgv = msgv;
  xfer.msgc = msgc;

  /* Perform the IOCTL */

  return ioctl(fd, I2CIOC_TRANSFER, (unsigned long)((uintptr_t)&xfer));
}We ported the code above to NuttX Embedded HAL. (See this)
Earlier we’ve seen i2c_msg_s and i2c_transfer_s. They are defined as…
struct i2c_msg_s
{
  uint32_t frequency;         /* I2C frequency */
  uint16_t addr;              /* Slave address (7- or 10-bit) */
  uint16_t flags;             /* See I2C_M_* definitions */
  FAR uint8_t *buffer;        /* Buffer to be transferred */
  ssize_t length;             /* Length of the buffer in bytes */
};struct i2c_transfer_s
{
FAR struct i2c_msg_s *msgv; /* Array of I2C messages for the transfer */
size_t msgc; /* Number of messages in the array. */
};I2CIOC_TRANSFER is defined as…
#define I2CIOC_TRANSFER _I2CIOC(0x0001)_I2CIOC is defined as…
#define _I2CIOC(nr) _IOC(_I2CBASE,nr)_IOC and _I2CBASE are defined as…
#define _IOC(type,nr) ((type)|(nr))#define _I2CBASE (0x2100) /* I2C driver commands */We ported these C Types and Constants to NuttX Embedded HAL. (See this)
(For BL602, BL604 and ESP32)
Below are the steps to build, flash and run NuttX on BL602, BL604 and ESP32.
The instructions below will work on Linux (Ubuntu), WSL (Ubuntu) and macOS.
(Instructions for other platforms)
Download the modified source code for NuttX OS and NuttX Apps…
mkdir nuttx
cd nuttx
git clone --recursive --branch rusti2c https://github.com/lupyuen/nuttx nuttx
git clone --recursive --branch rusti2c https://github.com/lupyuen/nuttx-apps apps
Or if we prefer to add the Rust Library and App to our NuttX Project, follow these instructions…
(For PineDio Stack BL604: The Rust Library and App are already preinstalled)
Now we configure our NuttX project…
Install the build prerequisites…
Install Rust from rustup.rs
Configure the build…
cd nuttx

## For BL602: Configure the build for BL602
./tools/configure.sh bl602evb:nsh

## For PineDio Stack BL604: Configure the build for BL604
./tools/configure.sh bl602evb:pinedio

## For ESP32: Configure the build for ESP32.
## TODO: Change "esp32-devkitc" to our ESP32 board.
./tools/configure.sh esp32-devkitc:nsh

## Edit the Build Config
make menuconfig
Enable our Rust Library…
Check the box for “Library Routines” → “Rust Library”
Hit “Exit” until the Top Menu appears. (“NuttX/x64_64 Configuration”)
Enable our Rust I2C App…
Check the box for “Application Configuration” → “Examples” → “Rust I2C App”
Hit “Exit” until the Top Menu appears. (“NuttX/x64_64 Configuration”)
Enable I2C0 Port…
For BL602 / BL604: Check the box for “System Type” → “BL602 Peripheral Support” → “I2C0”
For ESP32: Check the box for “System Type” → “ESP32 Peripheral Select” → “I2C 0”
Hit “Exit” until the Top Menu appears. (“NuttX/x64_64 Configuration”)
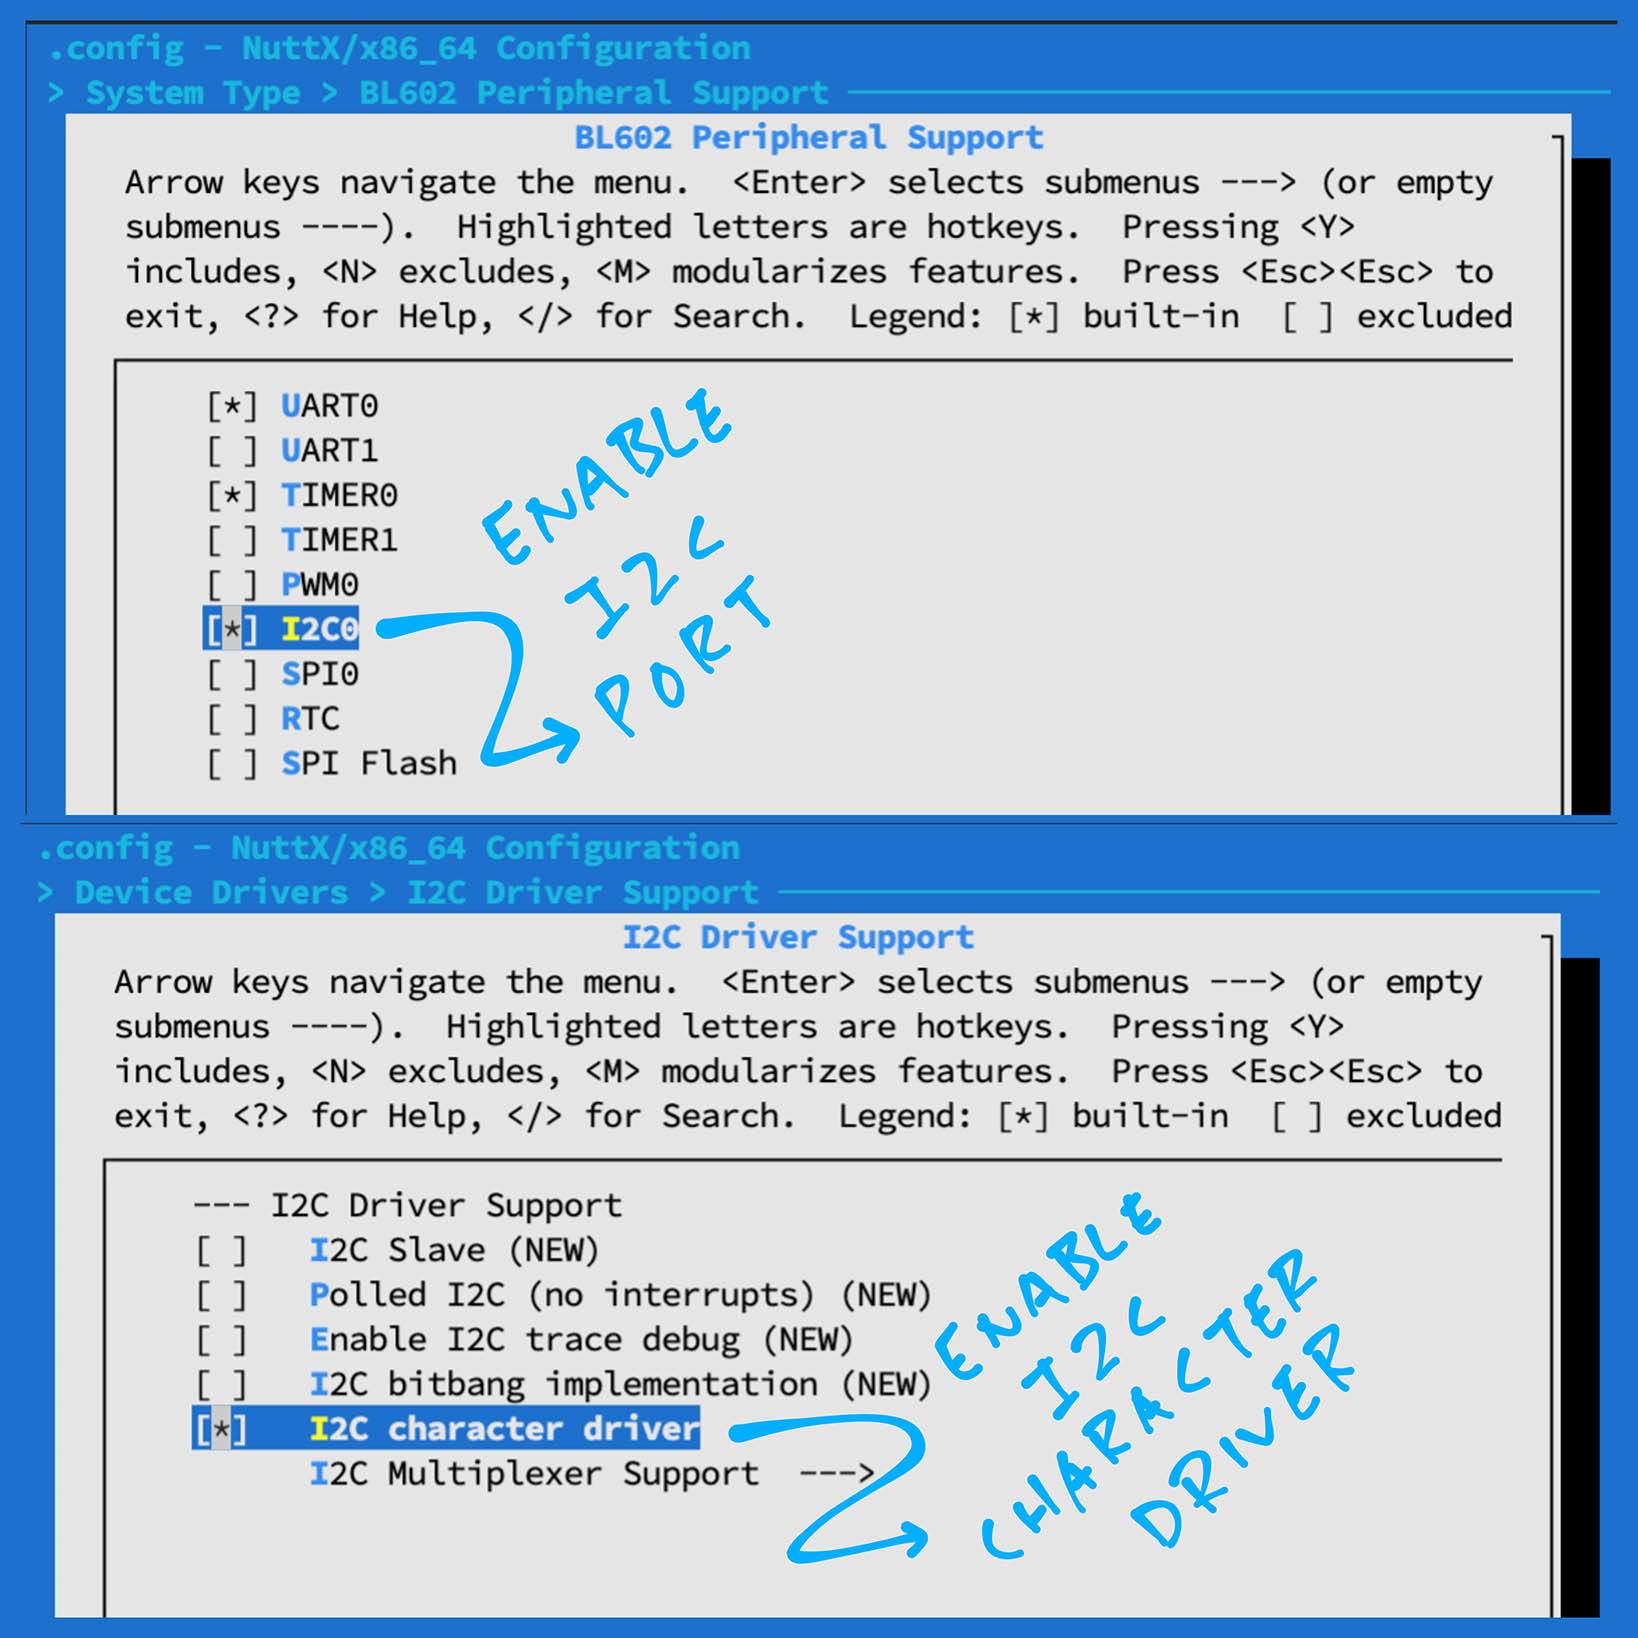
Enable I2C Character Driver…
Check the box for “Device Drivers” → “I2C Driver Support” → “I2C Character Driver”
Hit “Exit” until the Top Menu appears. (“NuttX/x64_64 Configuration”)
Enable ls command…
Select “Application Configuration” → “NSH Library” → “Disable Individual commands”
Uncheck “Disable ls”
Hit “Exit” until the Top Menu appears. (“NuttX/x64_64 Configuration”)
Enable Logging and Assertion Checks…
Select “Build Setup” → “Debug Options”
Check the boxes for the following…
Enable Debug Features
Enable Error Output
Enable Warnings Output
Enable Informational Debug Output
Enable Debug Assertions
I2C Debug Features
I2C Error Output
I2C Warnings Output
I2C Informational Output
Hit “Exit” until the Top Menu appears. (“NuttX/x64_64 Configuration”)
Save the configuration and exit menuconfig
For BL602 / BL604: Skip to the next section
For ESP32-C3 (RISC-V):
Run this command to install the Rust Target…
rustup target add riscv32imc-unknown-none-elfSet “rust_build_target” and “rust_build_target_folder” to…
riscv32imc-unknown-none-elf
Remove “-Z build-std=core” from “rust_build_options”
For ESP32 (Xtensa):
Install the Rust compiler fork with Xtensa support. (See this)
Set “rust_build_target” and “rust_build_target_folder” to…
xtensa-esp32-none-elf
Remove “-Z build-std=core” from “rust_build_options”
Follow these steps to build NuttX for BL602, BL604 or ESP32…
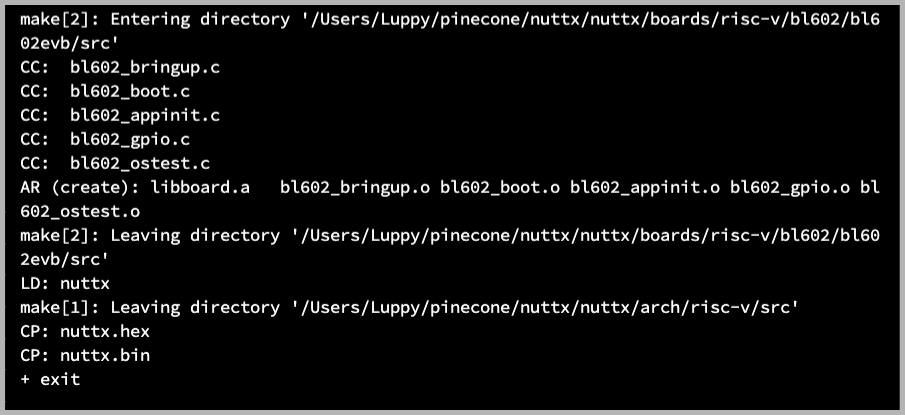
To build NuttX with Rust, run the Rust Build Script run.sh…
pushd apps/examples/rust_i2c
./run.sh
popdWe should see…
LD: nuttx
CP: nuttx.hex
CP: nuttx.binIgnore the errors at the “Flash NuttX” and “Run NuttX” steps
For WSL: Copy the NuttX Firmware to the c:\blflash directory in the Windows File System…
##  /mnt/c/blflash refers to c:\blflash in Windows
mkdir /mnt/c/blflash
cp nuttx.bin /mnt/c/blflash
For WSL we need to run blflash under plain old Windows CMD (not WSL) because it needs to access the COM port.
In case of problems, refer to the NuttX Docs…
For ESP32: See instructions here (Also check out this article)
For BL602 / BL604: Follow these steps to install blflash…
We assume that our Firmware Binary File nuttx.bin has been copied to the blflash folder.
Set BL602 / BL604 to Flashing Mode and restart the board…
For PineDio Stack BL604:
Set the GPIO 8 Jumper to High (Like this)
Disconnect the USB cable and reconnect
Or use the Improvised Reset Button (Here’s how)
For PineCone BL602:
Set the PineCone Jumper (IO 8) to the H Position (Like this)
Press the Reset Button
For BL10:
Connect BL10 to the USB port
Press and hold the D8 Button (GPIO 8)
Press and release the EN Button (Reset)
Release the D8 Button
For Ai-Thinker Ai-WB2, Pinenut and MagicHome BL602:
Disconnect the board from the USB Port
Connect GPIO 8 to 3.3V
Reconnect the board to the USB port
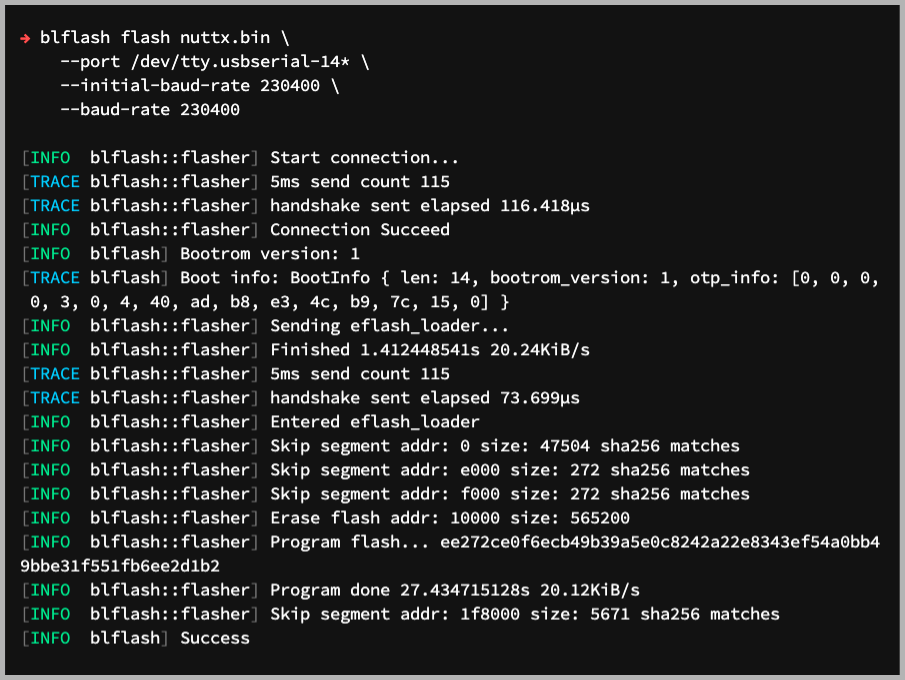
Enter these commands to flash nuttx.bin to BL602 / BL604 over UART…
## For Linux: Change "/dev/ttyUSB0" to the BL602 / BL604 Serial Port
blflash flash nuttx.bin \
  --port /dev/ttyUSB0

## For macOS: Change "/dev/tty.usbserial-1410" to the BL602 / BL604 Serial Port
blflash flash nuttx.bin \
  --port /dev/tty.usbserial-1410 \
  --initial-baud-rate 230400 \
  --baud-rate 230400

## For Windows: Change "COM5" to the BL602 / BL604 Serial Port
blflash flash c:\blflash\nuttx.bin --port COM5For WSL: Do this under plain old Windows CMD (not WSL) because blflash needs to access the COM port.
(Flashing WiFi apps to BL602 / BL604? Remember to use bl_rfbin)
(More details on flashing firmware)
For ESP32: Use Picocom to connect to ESP32 over UART…
picocom -b 115200 /dev/ttyUSB0For BL602 / BL604: Set BL602 / BL604 to Normal Mode (Non-Flashing) and restart the board…
For PineDio Stack BL604:
Set the GPIO 8 Jumper to Low (Like this)
Disconnect the USB cable and reconnect
Or use the Improvised Reset Button (Here’s how)
For PineCone BL602:
Set the PineCone Jumper (IO 8) to the L Position (Like this)
Press the Reset Button
For BL10:
For Ai-Thinker Ai-WB2, Pinenut and MagicHome BL602:
Disconnect the board from the USB Port
Connect GPIO 8 to GND
Reconnect the board to the USB port
After restarting, connect to BL602 / BL604’s UART Port at 2 Mbps like so…
For Linux:
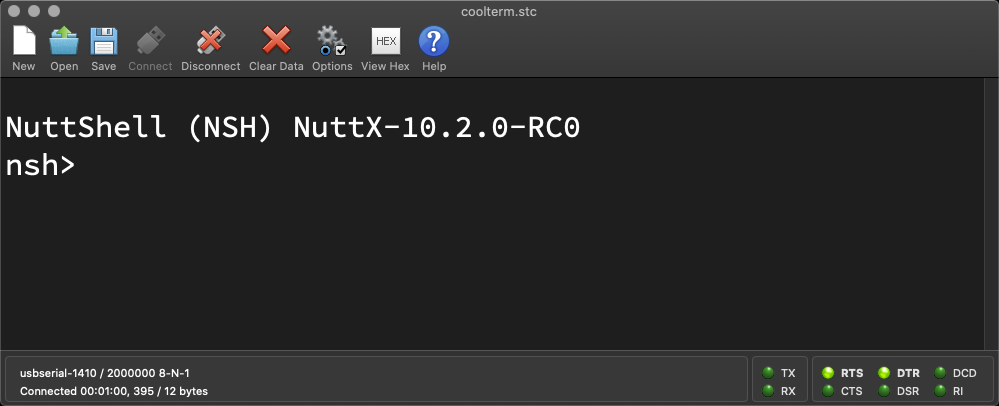
screen /dev/ttyUSB0 2000000For macOS: Use CoolTerm (See this)
For Windows: Use putty (See this)
Alternatively: Use the Web Serial Terminal (See this)
Press Enter to reveal the NuttX Shell…
NuttShell (NSH) NuttX-10.2.0-RC0
nsh>
Congratulations NuttX is now running on BL602 / BL604!
(More details on connecting to BL602 / BL604)
Bosch BME280 Sensor connected to Pine64 PineCone BL602 RISC-V Board
