
📝 19 Aug 2022
What if we could drag-and-drop NuttX Sensors… To create quick prototypes for IoT Sensor Apps?
Let’s do it! The pic above shows the IoT Sensor App that we’ll build with Visual Programming, the drag-and-drag way.
This produces a Zig Program that will…
Read the Sensor Data from a NuttX Sensor (like Bosch BME280)
Encode the Sensor Data (with CBOR)
Transmit the encoded data to a Wireless IoT Network (like LoRaWAN)
And it has been tested with Apache NuttX RTOS on Pine64’s PineCone BL602 RISC-V Board. (Pic below)
Why are we doing this?
Programming NuttX Sensors today feels rather cumbersome, with lots of Boilerplate Code and Error Handling. Which might overwhelm those among us who are new to NuttX Sensors.
Perhaps we can wrap the code into a Visual Component that we’ll simply pick and drop into our program?
This might also be perfect for quick experiments with various NuttX Sensors.
(More about this below)
Why Zig?
Zig has neat features (like Type Inference and Compile-Time Expressions) that will greatly simplify the code that’s auto-generated for our Visual Program.
We could have done this in C… But it would’ve taken a lot more time and effort.
(We’ll come back to this)
Let’s get started!
We’ll head down into the Source Code for our project…
And learn how how we ended up here…
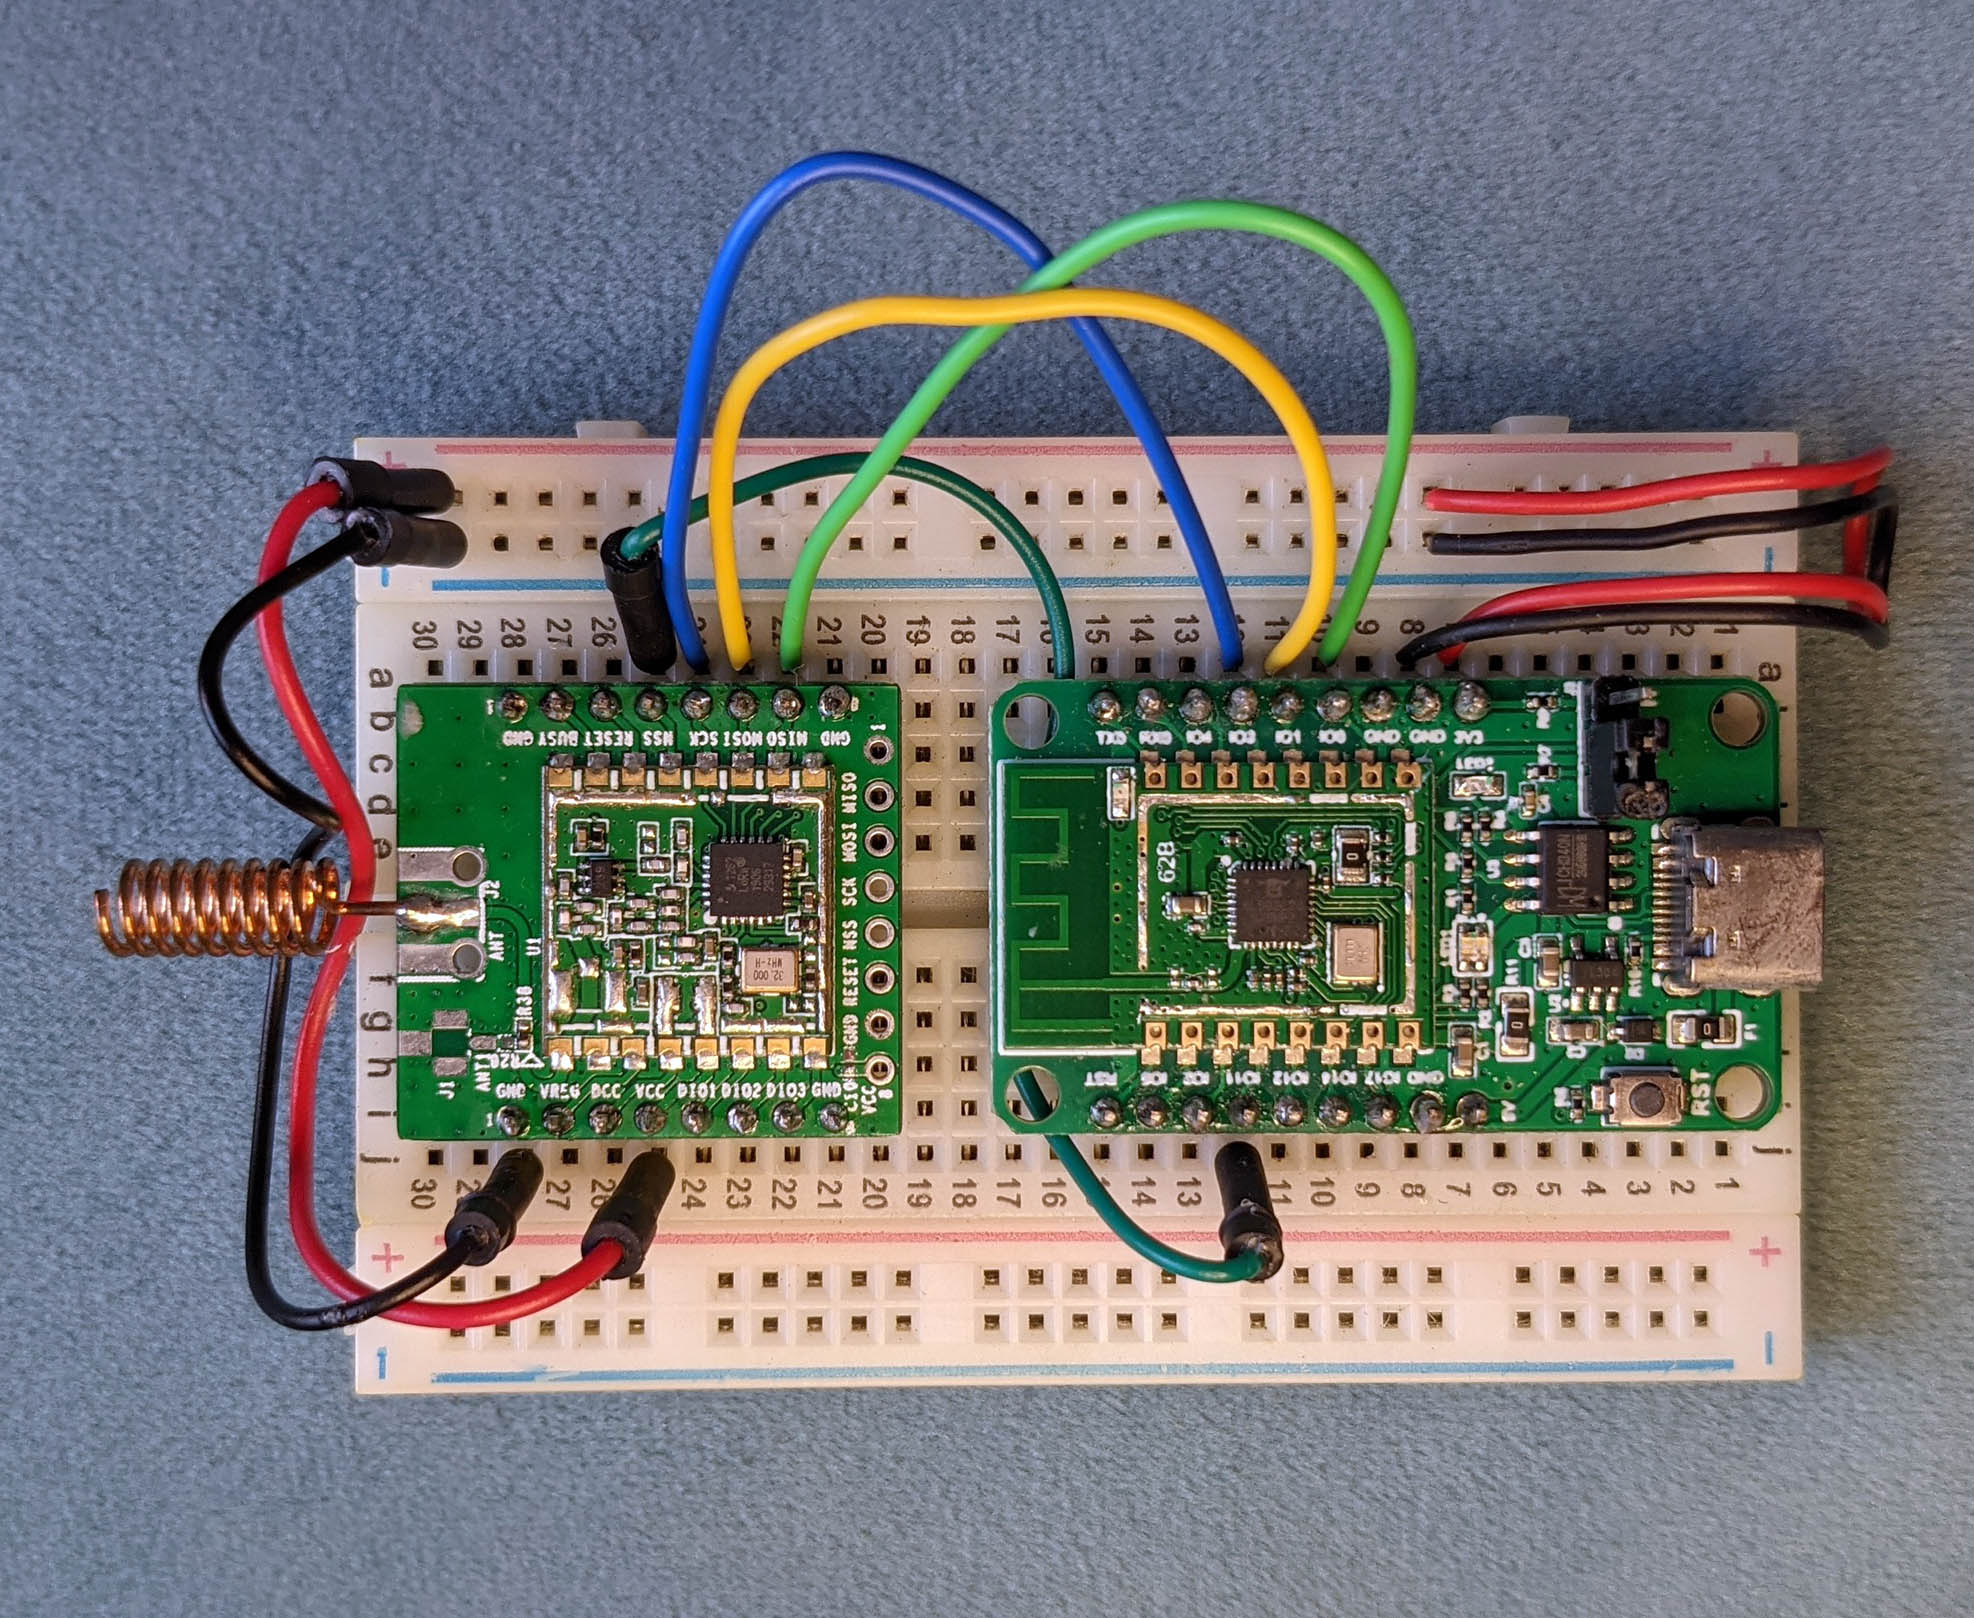
PineCone BL602 Board (right) connected to Semtech SX1262 LoRa Transceiver (left)
What’s an IoT Sensor App anyway?
Suppose we’re building an IoT Sensor Device that will monitor Temperature, Humidity and Air Pressure.
The firmware in our device will periodically read and transmit the Sensor Data like this…
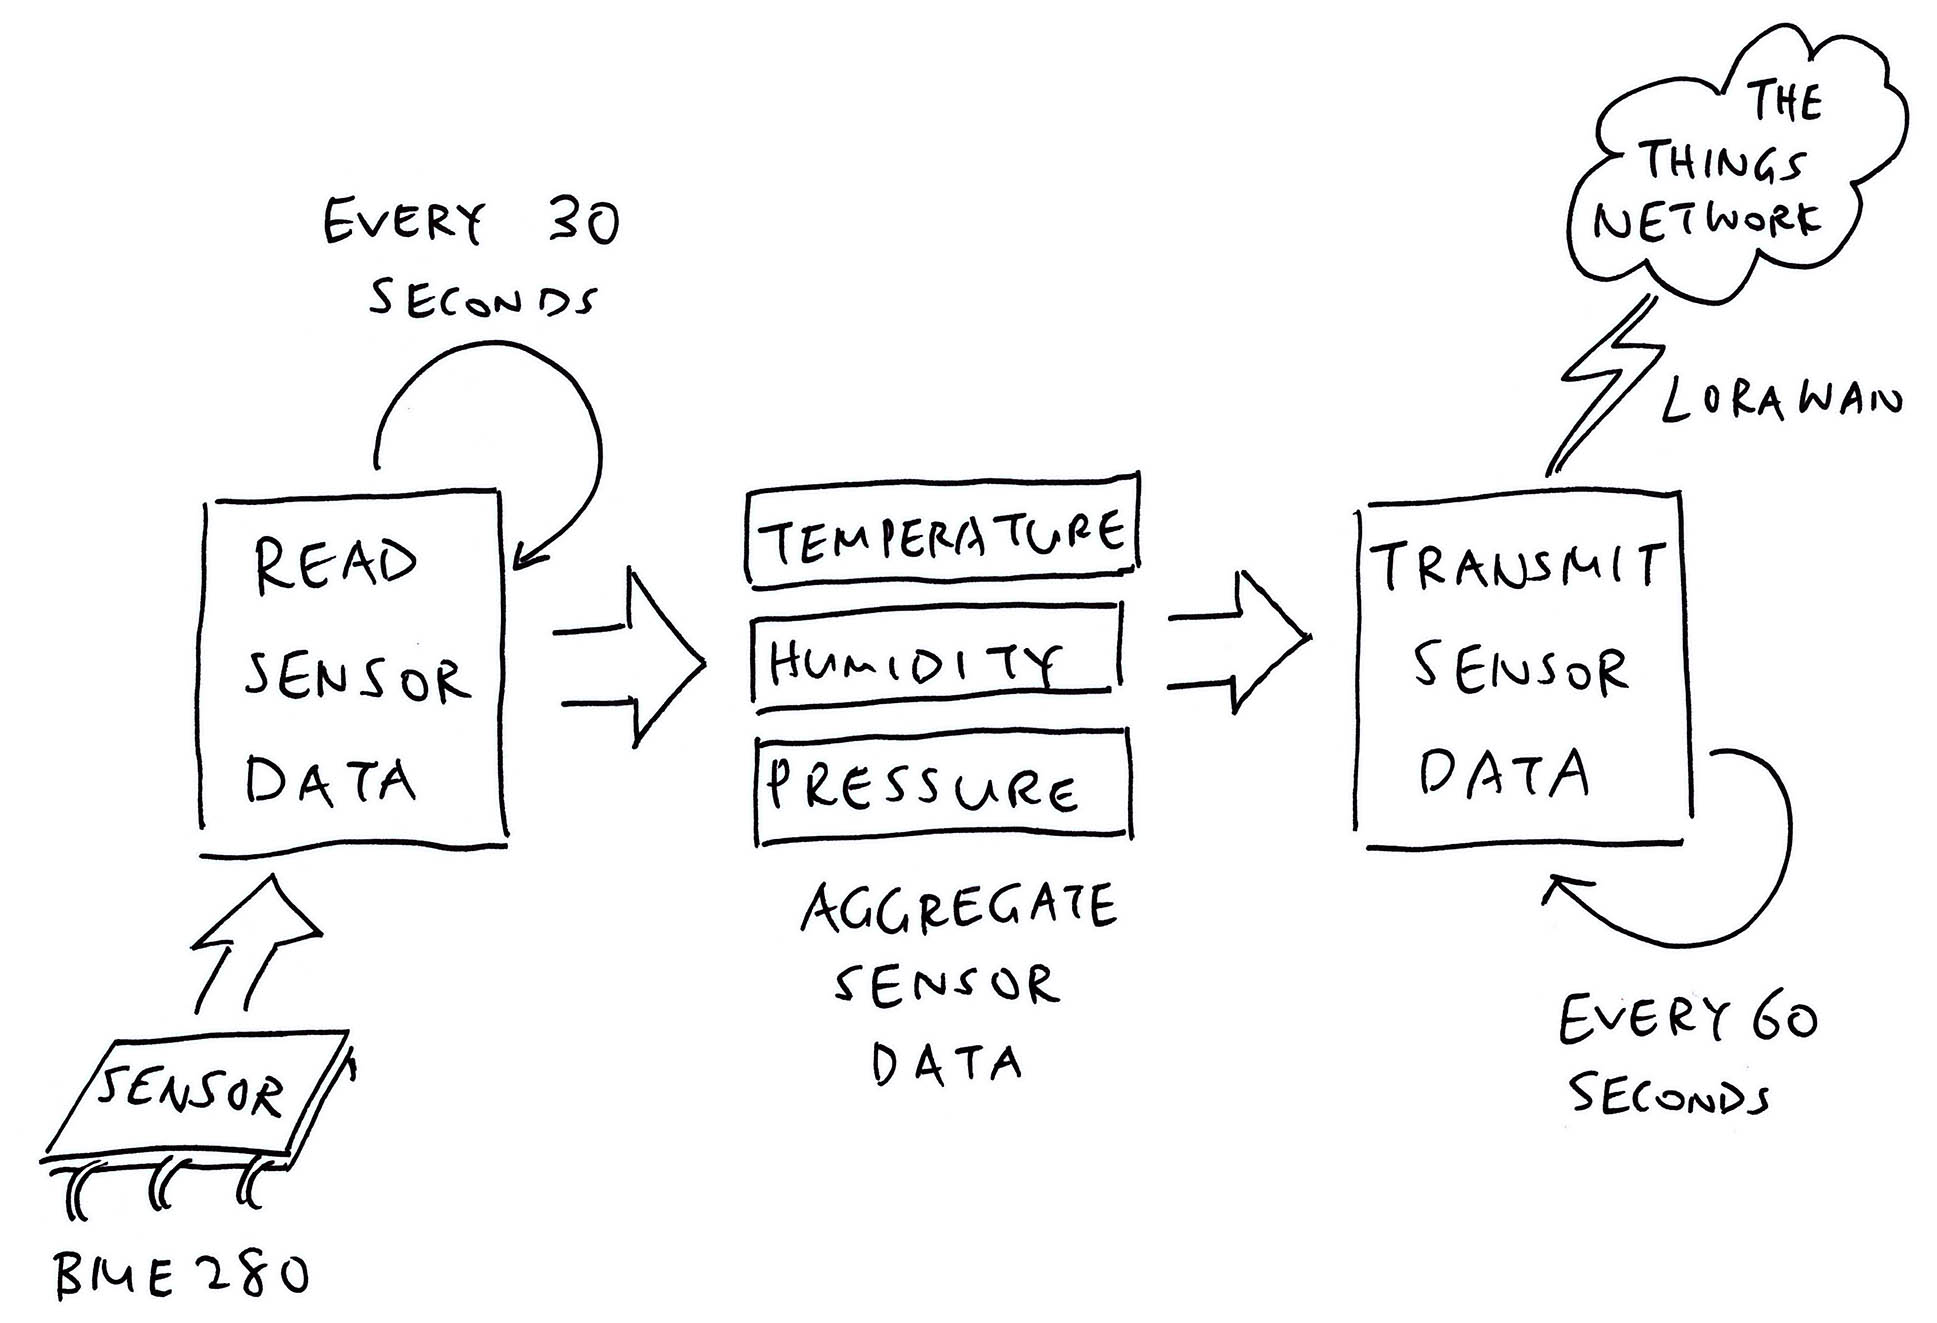
Which we might build as an IoT Sensor App like so…
NOTE: “/dev/sensor” has been changed to “/dev/uorb”
That’s our focus for today: Create NuttX Firmware that will…
Read a NuttX Sensor (like Bosch BME280)
Encode the Sensor Data with CBOR
Transmit the Sensor Data over LoRaWAN
How will we do the drag-n-drop?
We’ll implement the visual coding with Blockly, the Scratch-like browser-based coding toolkit.
Previously we have customised Blockly to generate Zig Programs…
Now we’ll extend Blockly to produce IoT Sensor Apps.
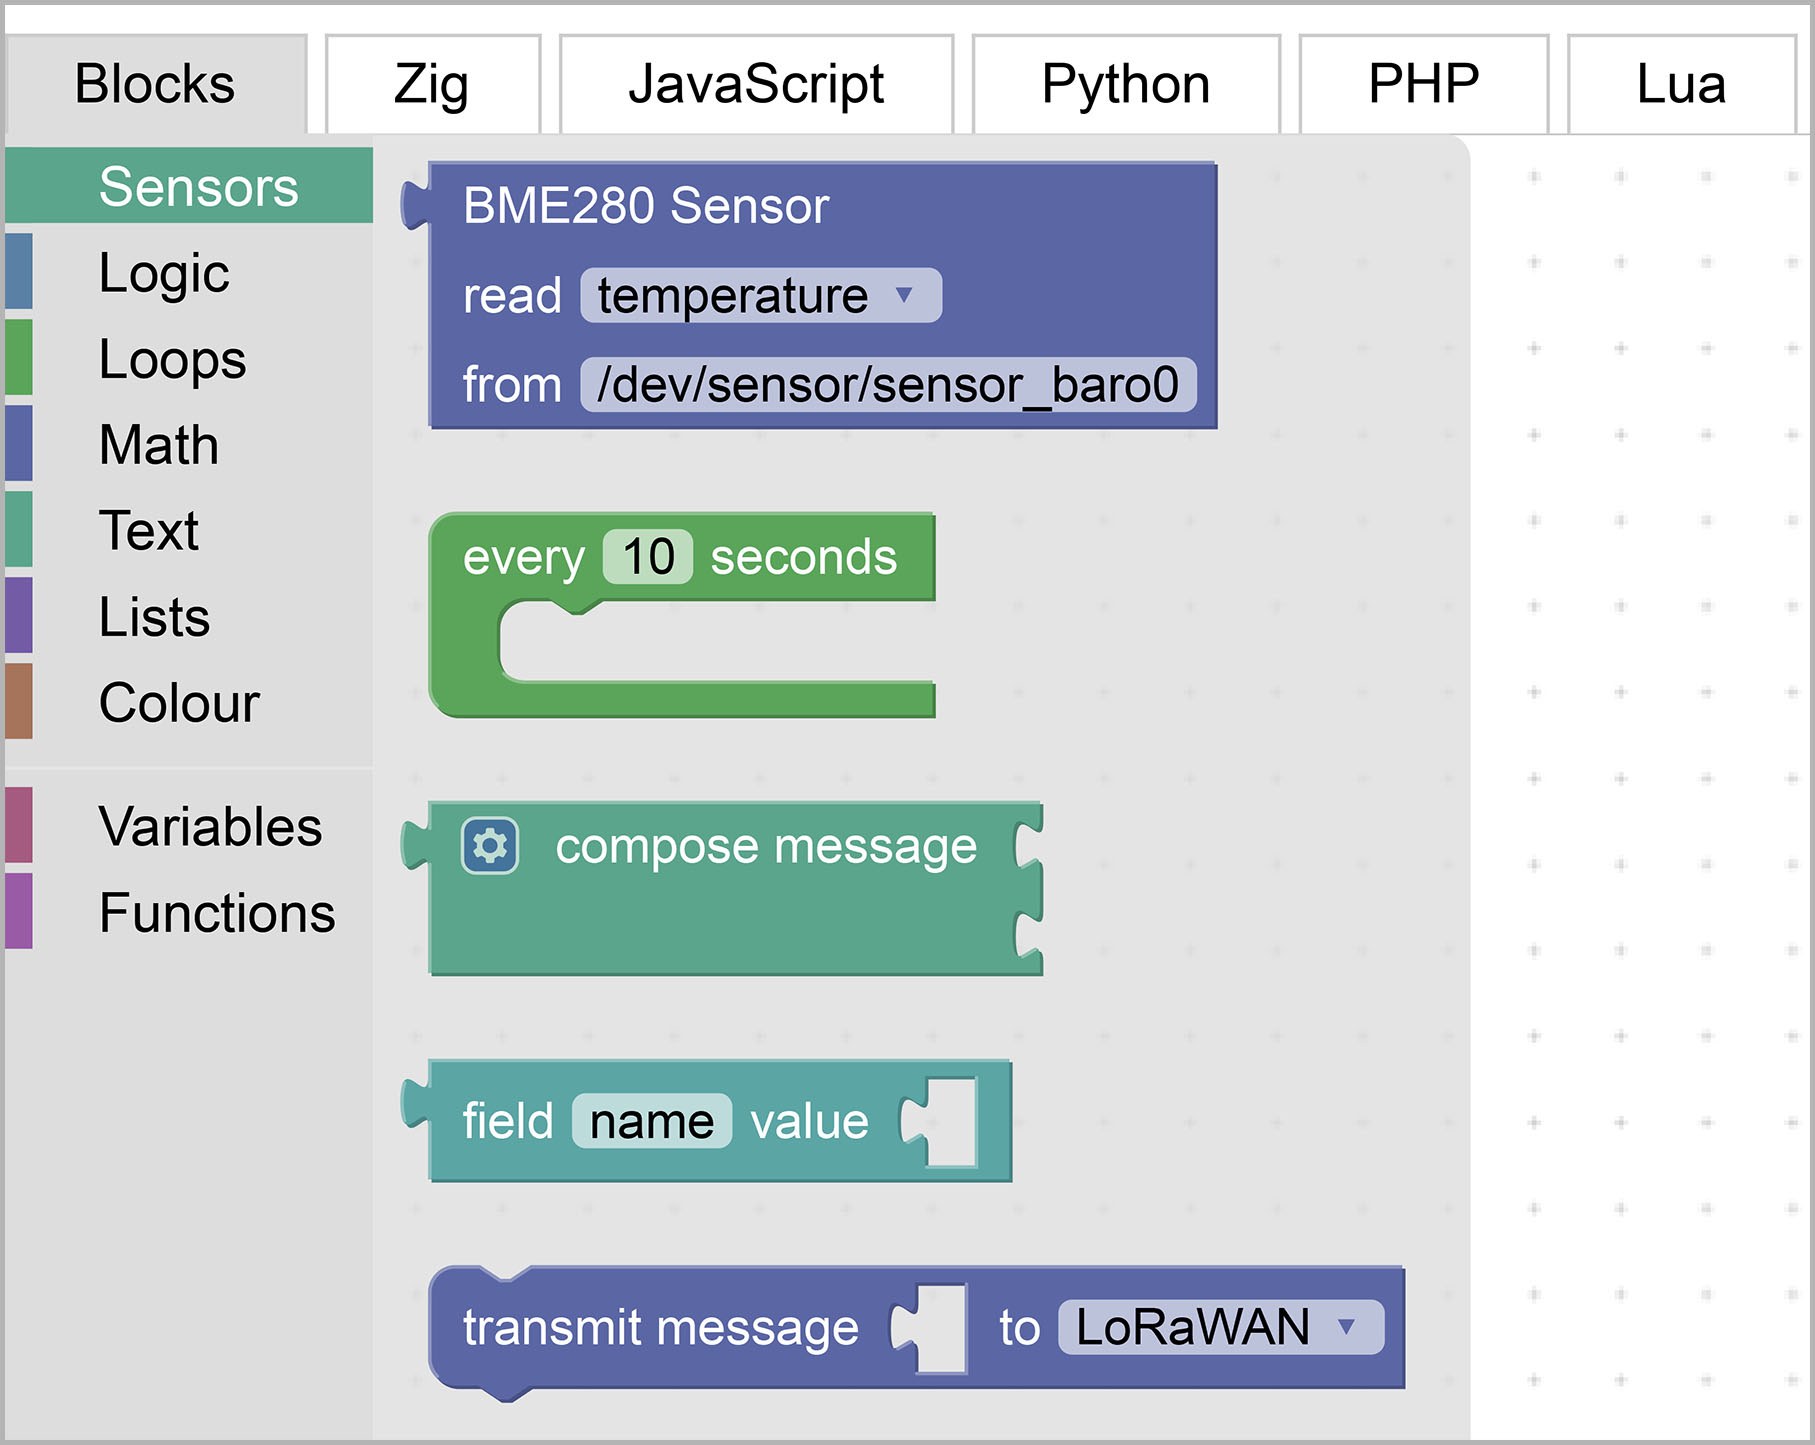
NuttX Blocks that we have added to Blockly
In Blockly, we create programs by picking and dropping Interlocking Blocks.
Each Block will emit Zig Code that we’ll compile and run with NuttX.
To support IoT Sensor Apps, we extend Blockly and add the following NuttX Blocks (pic above)…
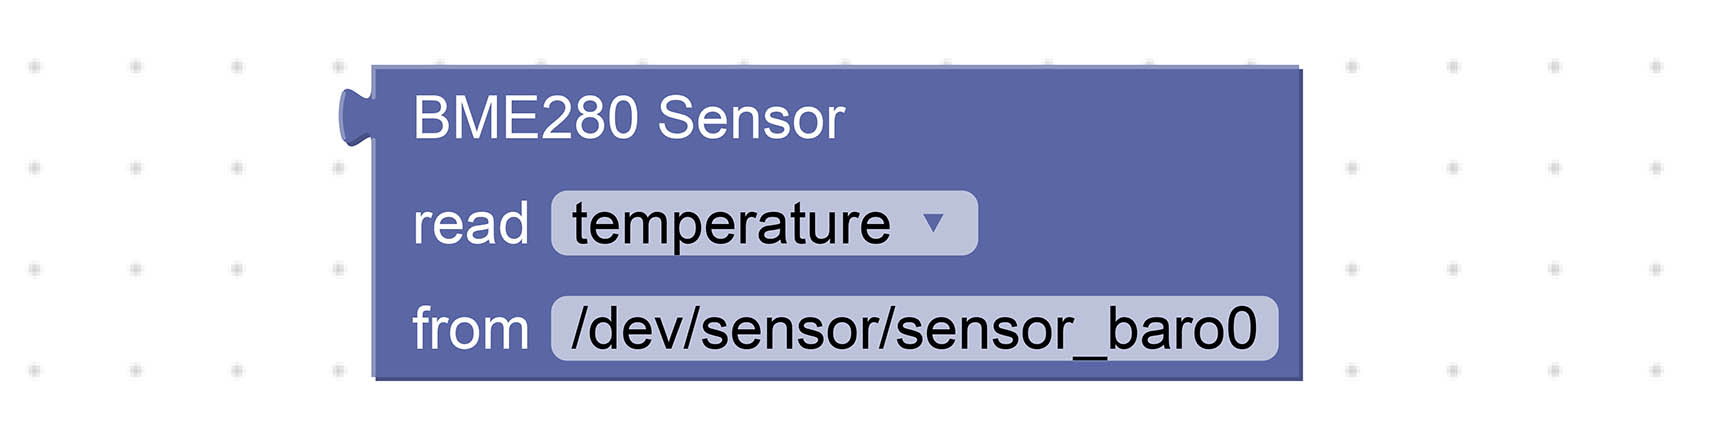
BME280 Sensor Block: Read Temperature / Humidity / Pressure from Bosch BME280 Sensor
Compose Message Block: Compose a CBOR Message with our Sensor Data
Transmit Message Block: Transmit a CBOR Message to LoRaWAN
Every Block: Do something every X seconds
Let’s inspect our NuttX Blocks and the Zig Code that they produce.
NOTE: “/dev/sensor” has been changed to “/dev/uorb”
As pictured above, our BME280 Sensor Block reads Temperature, Humidity and Pressure from the Bosch BME280 Sensor.
Our Sensor Block will generate this Zig Code…
try sen.readSensor(           // Read BME280 Sensor
  c.struct_sensor_baro,       // Sensor Data Struct
  "temperature",              // Sensor Data Field
  "/dev/uorb/sensor_baro0"    // Path of Sensor Device
);This calls our Zig Function readSensor to read a NuttX Sensor at the specified path.
(readSensor is defined in the Sensor Module sen)
What’s try?
That’s how we handle errors in Zig. If readSensor fails with an error, we stop the current function and return the error to the caller.
But struct_sensor_baro is not a value, it’s a Struct Type!
Yep struct_sensor_baro is actually a Struct Type that Zig has auto-imported from NuttX. (As defined here)
So Zig will let us pass Struct Types to a Function?
That’s the neat thing about Zig… It will let us pass Compile-Time Expressions (like Struct Types) to Zig Functions (like readSensor).
The Zig Compiler will substitute the Struct Type inside the code for readSensor. (Which works like a C Macro)
Another neat thing: “temperature” above is also a Compile-Time Expression, because it’s a Field Name in the sensor_baro Struct. Metaprogramming gets so cool!
(More about readSensor in the Appendix)
Why the full path “/dev/uorb/sensor_baro0”? Why not just “baro0”?
Call me stupendously stubborn, but I think it might be better for learners to see the full path of NuttX Sensors?
So we have a better understanding of NuttX Sensors and how to troubleshoot them.
What about other sensors? BMP280, ADXL345, LSM330, …
We plan to create a Sensor Block for every sensor that’s supported by NuttX.
Thus we can build all kinds of IoT Sensor Apps by dragging-n-dropping the Sensor Blocks for BMP280, ADXL345, LSM330, …
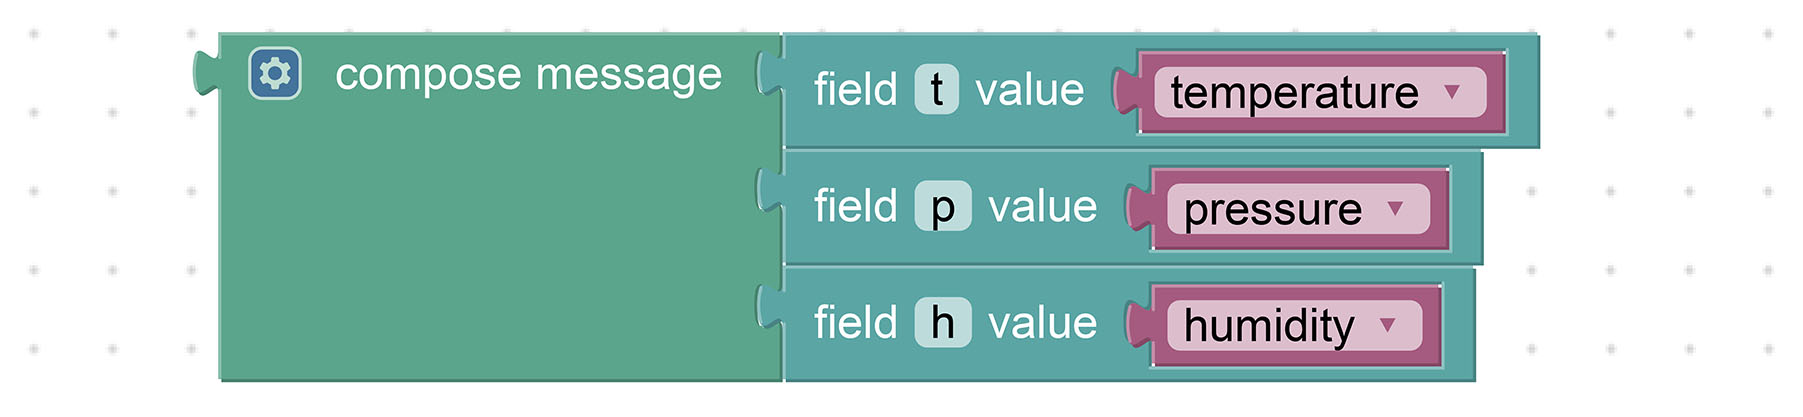
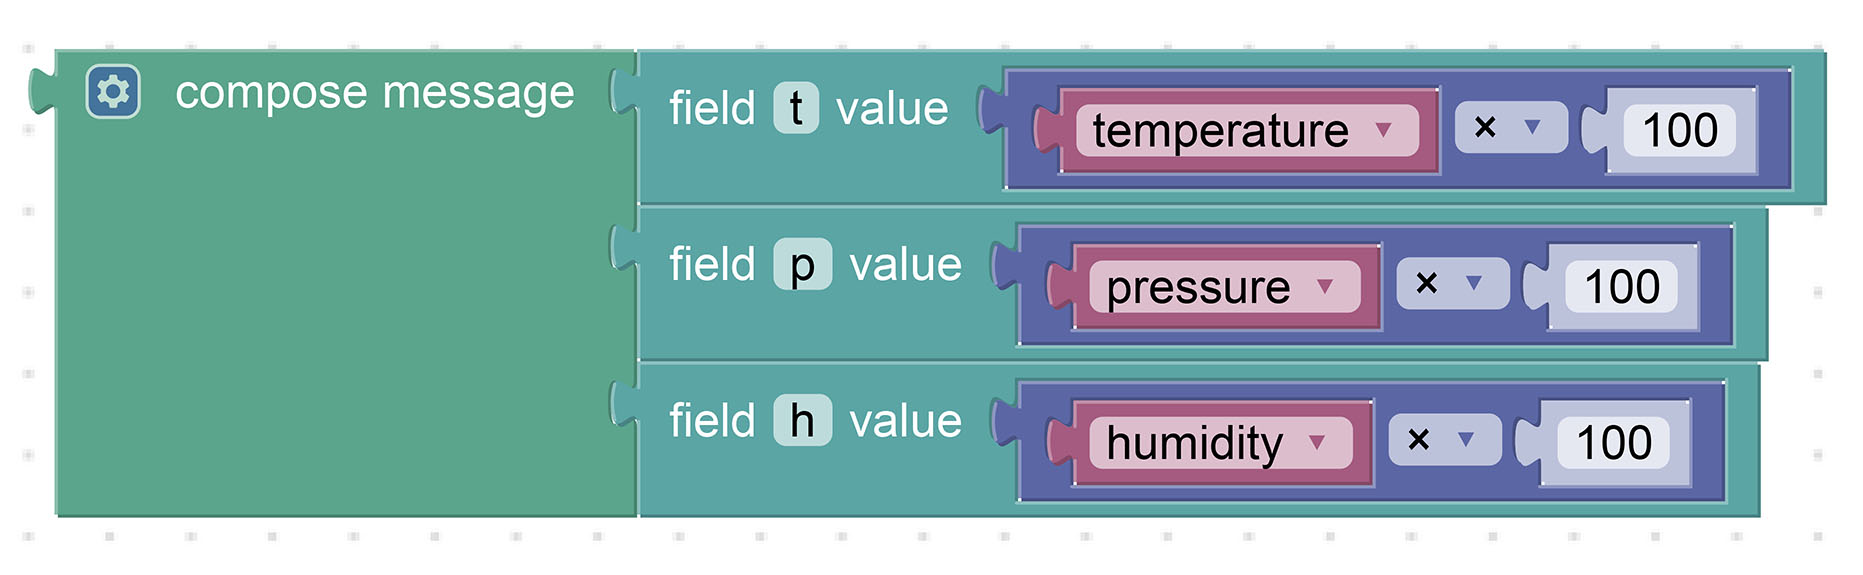
The Compose Message Block composes a CBOR Message with the specified Keys (Field Names) and Values (Sensor Data).
(Think of CBOR as a compact, binary form of JSON)
CBOR Messages usually require fewer bytes than JSON to represent the same data. They work better with Low-Bandwidth Networks. (Like LoRaWAN)
The Block above will generate this Zig Code…
const msg = try composeCbor(.{  // Compose CBOR Message
  "t", temperature,
  "p", pressure,
  "h", humidity,
});Which calls our Zig Function composeCbor to create the CBOR Message.
What’s .{ ... }?
That’s how we pass a Variable Number of Arguments to a Zig Function.
Is it safe? What if we make a mistake and omit a Key or a Value?
composeCbor uses Compile-Time Validation to verify that the parameters are OK.
If we omit a Key or a Value (or if they have the wrong Types), the Zig Compiler will stop us during compilation.
(composeCbor is explained here)

The Transmit Message Block (above) transmits a CBOR Message to LoRaWAN (the low-power, long-range, low-bandwidth IoT Network)…
// Transmit message to LoRaWAN
try transmitLorawan(msg);And probably other IoT Networks in future: NB-IoT, LTE-M, Matter, Bluetooth, WiFi, MQTT, …
(transmitLorawan is explained here)

Lastly we have the Every Block (above) that executes the Enclosed Blocks every X seconds…
// Every 10 seconds...
while (true) {
  // TODO: Enclosed Blocks
  ...

  // Wait 10 seconds
  _ = c.sleep(10);
}What’s “_ = something”?
Zig Compiler helpfully stops us if we forget to use the Return Value of a function.
We write “_ = ...” to tell Zig Compiler that we won’t use the Return Value of the sleep function. (Imported from NuttX)
Sleepy fish? This sleeping looks fishy…
Yep this sleep won’t work for some types of IoT Sensor Apps.
We’ll revisit this in a while.
How did we add these NuttX Blocks to Blockly?
Blockly provides Blockly Developer Tools for creating our Custom Blocks.
We’ll explain the steps in the Appendix…
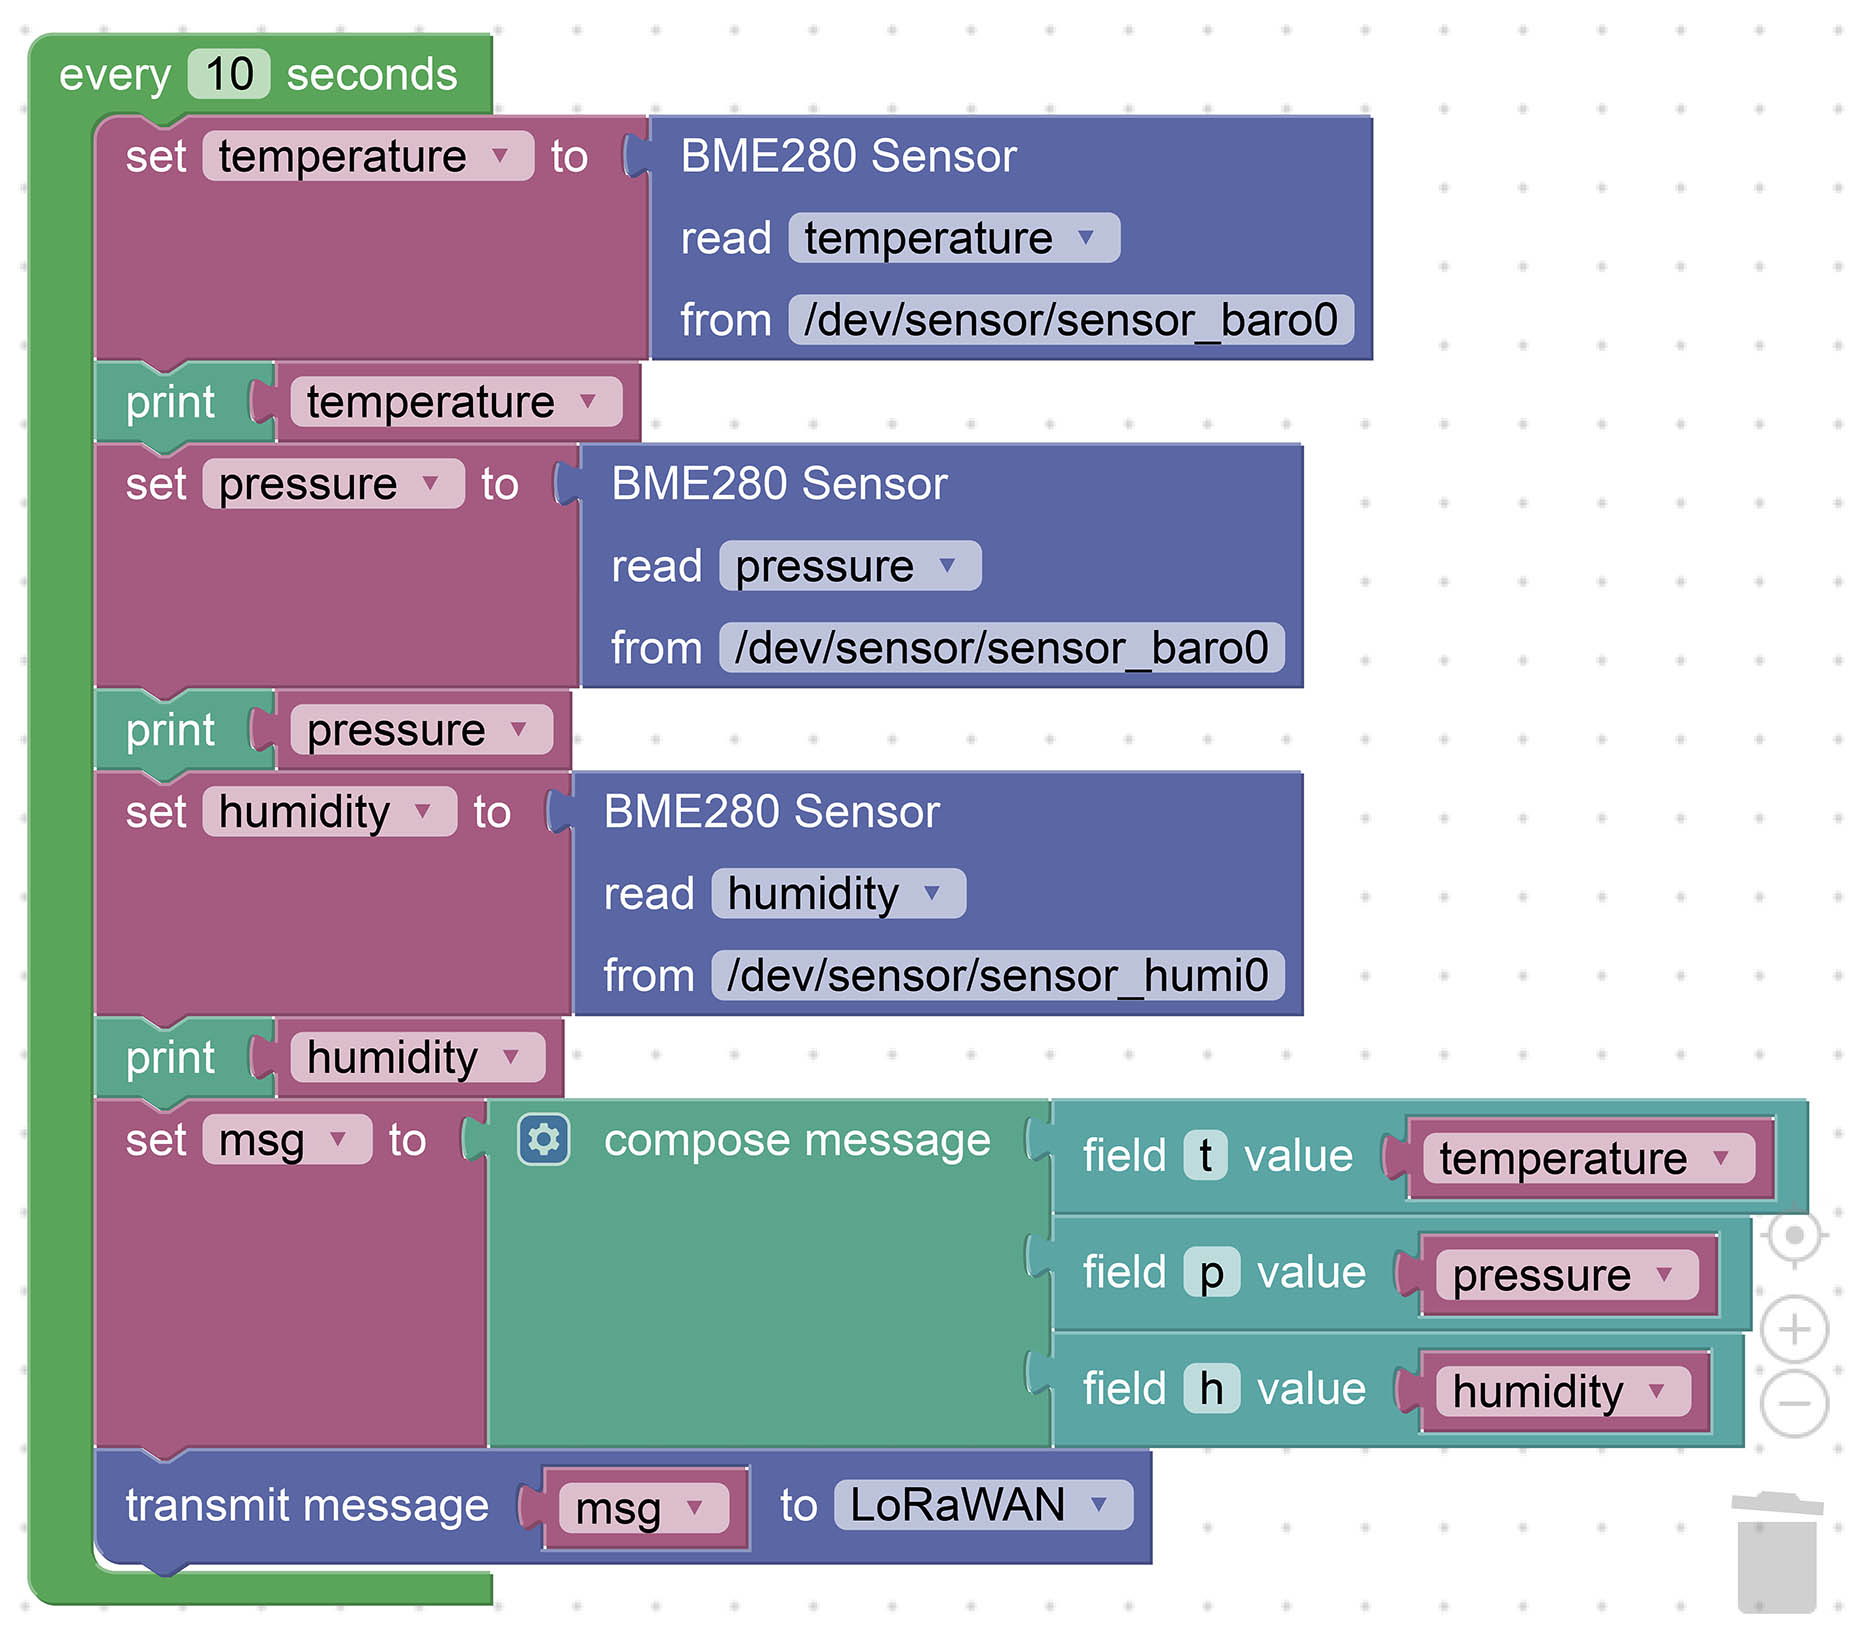
To test the NuttX Blocks, let’s drag-n-drop an IoT Sensor App that will…
Read Sensor Data: Read the Temperature, Pressure and Humidity from BME280 Sensor
Print Sensor Data: Print the above values
Compose Message: Create a CBOR Message with the Temperature, Pressure and Humidity values
Transmit Message: Send the CBOR Message to LoRaWAN
First we download our Zig Sensor App (that imports the NuttX Sensor API into Zig)…
##  Download our Zig Sensor App for NuttX
git clone --recursive https://github.com/lupyuen/visual-zig-nuttx
(We’ll paste our generated Zig Program inside here)
Now head over to our Custom Blockly Website…
Drag-n-drop the Blocks to assemble this Visual Program…
NOTE: “/dev/sensor” has been changed to “/dev/uorb”
To find the above Blocks, click the Blocks Toolbox (at left) and look under “Sensors”, “Variables” and “Text”…
Note that we read Humidity from “sensor_humi0” instead of “sensor_baro0”.
Click the Zig Tab. We’ll see this Zig Program…
/// Main Function
pub fn main() !void {

  // Every 10 seconds...
  while (true) {
    const temperature = try sen.readSensor(  // Read BME280 Sensor
      c.struct_sensor_baro,       // Sensor Data Struct
      "temperature",              // Sensor Data Field
      "/dev/uorb/sensor_baro0"    // Path of Sensor Device
    );
    debug("temperature={}", .{ temperature });

    const pressure = try sen.readSensor(  // Read BME280 Sensor
      c.struct_sensor_baro,       // Sensor Data Struct
      "pressure",                 // Sensor Data Field
      "/dev/uorb/sensor_baro0"    // Path of Sensor Device
    );
    debug("pressure={}", .{ pressure });

    const humidity = try sen.readSensor(  // Read BME280 Sensor
      c.struct_sensor_humi,       // Sensor Data Struct
      "humidity",                 // Sensor Data Field
      "/dev/uorb/sensor_humi0"    // Path of Sensor Device
    );
    debug("humidity={}", .{ humidity });

    const msg = try composeCbor(.{  // Compose CBOR Message
      "t", temperature,
      "p", pressure,
      "h", humidity,
    });

    // Transmit message to LoRaWAN
    try transmitLorawan(msg);

    // Wait 10 seconds
    _ = c.sleep(10);
  }
}Copy the code inside the Main Function. (Yep copy the while loop)
Paste the code inside the Zig Sensor App that we have downloaded earlier…
(Look for “Paste Visual Program Here”)
Can we save the Blocks? So we don’t need to drag them again when retesting?
Click the JSON Tab and copy the Blockly JSON that appears.
Whenever we reload Blockly, just paste the Blockly JSON back into the JSON Tab. The Blocks will be automagically restored.
We’re ready to build and test our IoT Sensor App! But first we prep our hardware…
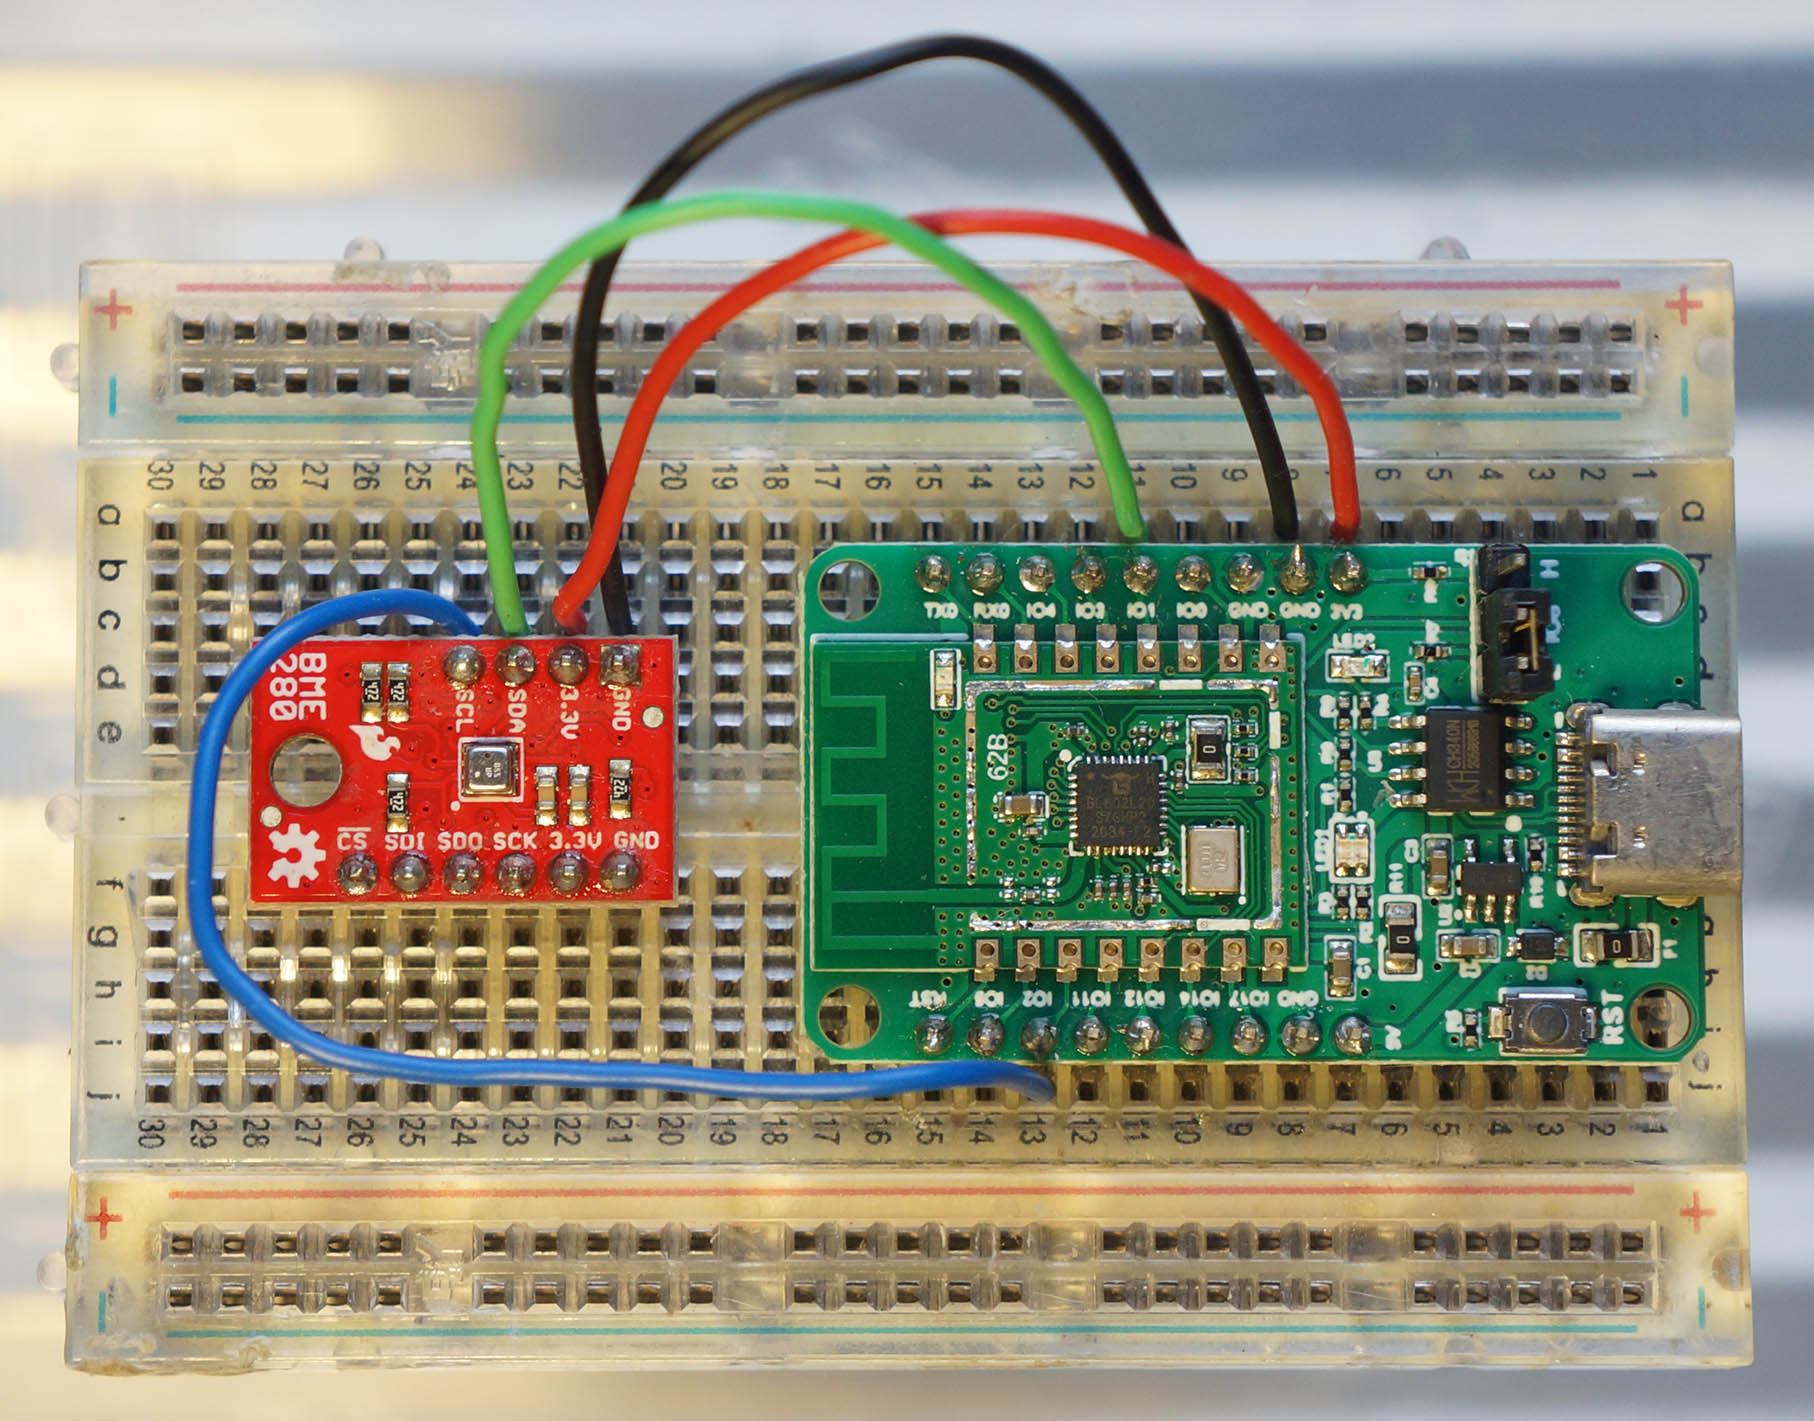
Pine64 PineCone BL602 RISC-V Board connected to Bosch BME280 Sensor
For testing our IoT Sensor App, we connect the BME280 Sensor (I2C) to Pine64’s PineCone BL602 Board (pic above)…
| BL602 Pin | BME280 Pin | Wire Colour |
|---|---|---|
GPIO 1 | SDA | Green |
GPIO 2 | SCL | Blue |
3V3 | 3.3V | Red |
GND | GND | Black |
The I2C Pins on BL602 are defined here: board.h
/* I2C Configuration */
#define BOARD_I2C_SCL \
  (GPIO_INPUT | GPIO_PULLUP | GPIO_FUNC_I2C | \
  GPIO_PIN2)
#define BOARD_I2C_SDA \
  (GPIO_INPUT | GPIO_PULLUP | GPIO_FUNC_I2C | \
  GPIO_PIN1)
(Which pins can be used? See this)
Below are the steps to compile our IoT Sensor App for NuttX.
We download the latest version of Zig Compiler (0.10.0 or later), extract it and add to PATH…
Then we download and compile NuttX for BL602…
The downloaded version of NuttX already includes our BME280 Driver…
Check that the following have been enabled in the NuttX Build…
Remember to set “Sensor Driver Test Stack Size” to 4096.
(Because our Zig App needs additional Stack Space)
After building NuttX, compile our IoT Sensor App…
##  Zig Sensor App that we have downloaded earlier.
##  TODO: Paste our visual program into visual-zig-nuttx/visual.zig
cd visual-zig-nuttx

##  Compile the Zig App for BL602
##  (RV32IMACF with Hardware Floating-Point)
##  TODO: Change "$HOME/nuttx" to your NuttX Project Directory
zig build-obj \
  --verbose-cimport \
  -target riscv32-freestanding-none \
  -mcpu=baseline_rv32-d \
  -isystem "$HOME/nuttx/nuttx/include" \
  -I "$HOME/nuttx/apps/include" \
sensortest.zigNote that target and mcpu are specific to BL602…
Also specific to BL602 is the ARCH_RISCV Macro in visual-zig-nuttx/sensor.zig
How did we get the Compiler Options -isystem and -I?
Remember that we’ll link our Compiled Zig App into the NuttX Firmware.
Hence the Zig Compiler Options must be the same as the GCC Options used to compile NuttX.
(See the GCC Options for NuttX)
Next comes a quirk specific to BL602: We must patch the ELF Header from Software Floating-Point ABI to Hardware Floating-Point ABI…
##  Patch the ELF Header of `sensortest.o` from
##  Soft-Float ABI to Hard-Float ABI
xxd -c 1 sensortest.o \
  | sed 's/00000024: 01/00000024: 03/' \
  | xxd -r -c 1 - sensortest2.o
cp sensortest2.o sensortest.oFinally we inject our Compiled Zig App into the NuttX Project Directory and link it into the NuttX Firmware…
##  Copy the compiled app to NuttX and overwrite `sensortest.o`
##  TODO: Change "$HOME/nuttx" to your NuttX Project Directory
cp sensortest.o $HOME/nuttx/apps/testing/sensortest/sensortest*.o

##  Build NuttX to link the Zig Object from `sensortest.o`
##  TODO: Change "$HOME/nuttx" to your NuttX Project Directory
cd $HOME/nuttx/nuttx
make

##  For WSL: Copy the NuttX Firmware to c:\blflash for flashing
mkdir /mnt/c/blflash
cp nuttx.bin /mnt/c/blflash
We’re ready to run our IoT Sensor App!

IoT Sensor App running on PineCone BL602
Follow these steps to flash and boot NuttX (with our Zig App inside) on BL602…
In the NuttX Shell, enter this command to start our IoT Sensor App…
sensortest visual(sensortest is explained here)
Our IoT Sensor App should correctly read the Temperature, Pressure and Humidity from BME280 Sensor, and transmit the values to LoRaWAN (simulated)…
NuttShell (NSH) NuttX-10.3.0
nsh> sensortest visual
Zig Sensor Test
Start main

temperature=31.05
pressure=1007.44
humidity=71.49
composeCbor
  t: 31.05
  p: 1007.44
  h: 71.49
  msg=t:31.05,p:1007.44,h:71.49,
transmitLorawan
  msg=t:31.05,p:1007.44,h:71.49,

temperature=31.15
pressure=1007.40
humidity=70.86
composeCbor
  t: 31.15
  p: 1007.40
  h: 70.86
  msg=t:31.15,p:1007.40,h:70.86,
transmitLorawan
msg=t:31.15,p:1007.40,h:70.86,Yep we have successfully created an IoT Sensor App with Blockly, Zig and NuttX! 🎉
Can we test without NuttX?
To test our IoT Sensor App on Linux / macOS / Windows (instead of NuttX), add the stubs below to simulate a NuttX Sensor…
Once again… Why are we doing this in Zig?
It’s easier to generate Zig Code for our IoT Sensor App. That’s because Zig supports…
Type Inference: Zig Compiler will fill in the missing Types
Compile-Time Expressions: Zig Compiler will let us manipulate Struct Types and Fields at Compile-Time
Compile-Time Variable Arguments: Zig Compiler will validate the Variable Arguments for our Function
We could have programmed Blockly to generate C Code. But it would be messy, here’s why…
In many Compiled Languages (including C), we need to specify the Types for our Constants (and Variables)…
// This is a Float (f32)
const temperature: f32 = try sen.readSensor(...);

// This is a Struct (CborMessage)
const msg: CborMessage = try composeCbor(...);
But thanks to Type Inference, we may omit the Types in Zig…
// Zig Compiler infers that this is a Float
const temperature = try sen.readSensor(...);

// Zig Compiler infers that this is a Struct
const msg = try composeCbor(...);This simplifies the Code Generation in Blockly, since we don’t track the Types.
Earlier we saw this for reading the BME280 Sensor…
// Read Temperature from BME280 Sensor
temperature = try sen.readSensor(
  c.struct_sensor_baro,       // Sensor Data Struct
  "temperature",              // Sensor Data Field
  "/dev/uorb/sensor_baro0"    // Path of Sensor Device
);Looks concise and tidy, but readSensor has 2 surprises…
struct_sensor_baro is actually a Struct Type
(Auto-imported by Zig from NuttX)
“temperature” is actually a Struct Field Name
(From the sensor_baro Struct)
The Zig Compiler will substitute the Struct Type and Field Name inside the code for readSensor. (Which works like a C Macro)
(More about readSensor in the Appendix)
Is this doable in C?
Possibly, if we define a C Macro that embeds the entire readSensor function.
(Which might be a headache for maintenance)
Zig has a neat way of handling Variable Arguments at Compile-Time.
Remember composeCbor from earlier?
// Compose CBOR Message with a
// Variable Number of Keys and Values
const msg = try composeCbor(.{
  "t", temperature,
  "p", pressure,
  "h", humidity,
});
composeCbor accepts a Variable Number of Arguments and it uses Compile-Time Validation to verify that the parameters are OK.
If we omit a Key or a Value (or if they have the wrong Types), the Zig Compiler will stop us during compilation.
(composeCbor is explained here)
Could we have done this in C?
In C, we would call some messy macros to validate and manipulate the parameters at Compile-Time.
Or implement as Variadic Functions in C, without the Compile-Time Type Checking.
That’s why Zig is a better target for Automated Code Generation in Blockly.
Expected firmware for our IoT Sensor Device
Remember earlier we drew the pic above for our IoT Sensor Firmware?
Then we kinda glossed over the details and made this IoT Sensor App…
NOTE: “/dev/sensor” has been changed to “/dev/uorb”
To run this in the Real World, we need some tweaks…
Is it really OK to transmit messages to LoRaWAN every 10 seconds?
Nope it’s NOT OK to send messages every 10 seconds! LoRaWAN imposes limits on the Message Rate.
We can send one LoRaWAN Message roughly every 20 to 60 seconds, depending on the Message Size.
So we tweak the Loop to run every 60 seconds?
Well then our Sensor Data (Temperature / Pressure / Humidity) would become stale and inaccurate.
We need to collect and aggregate the Sensor Data more often.
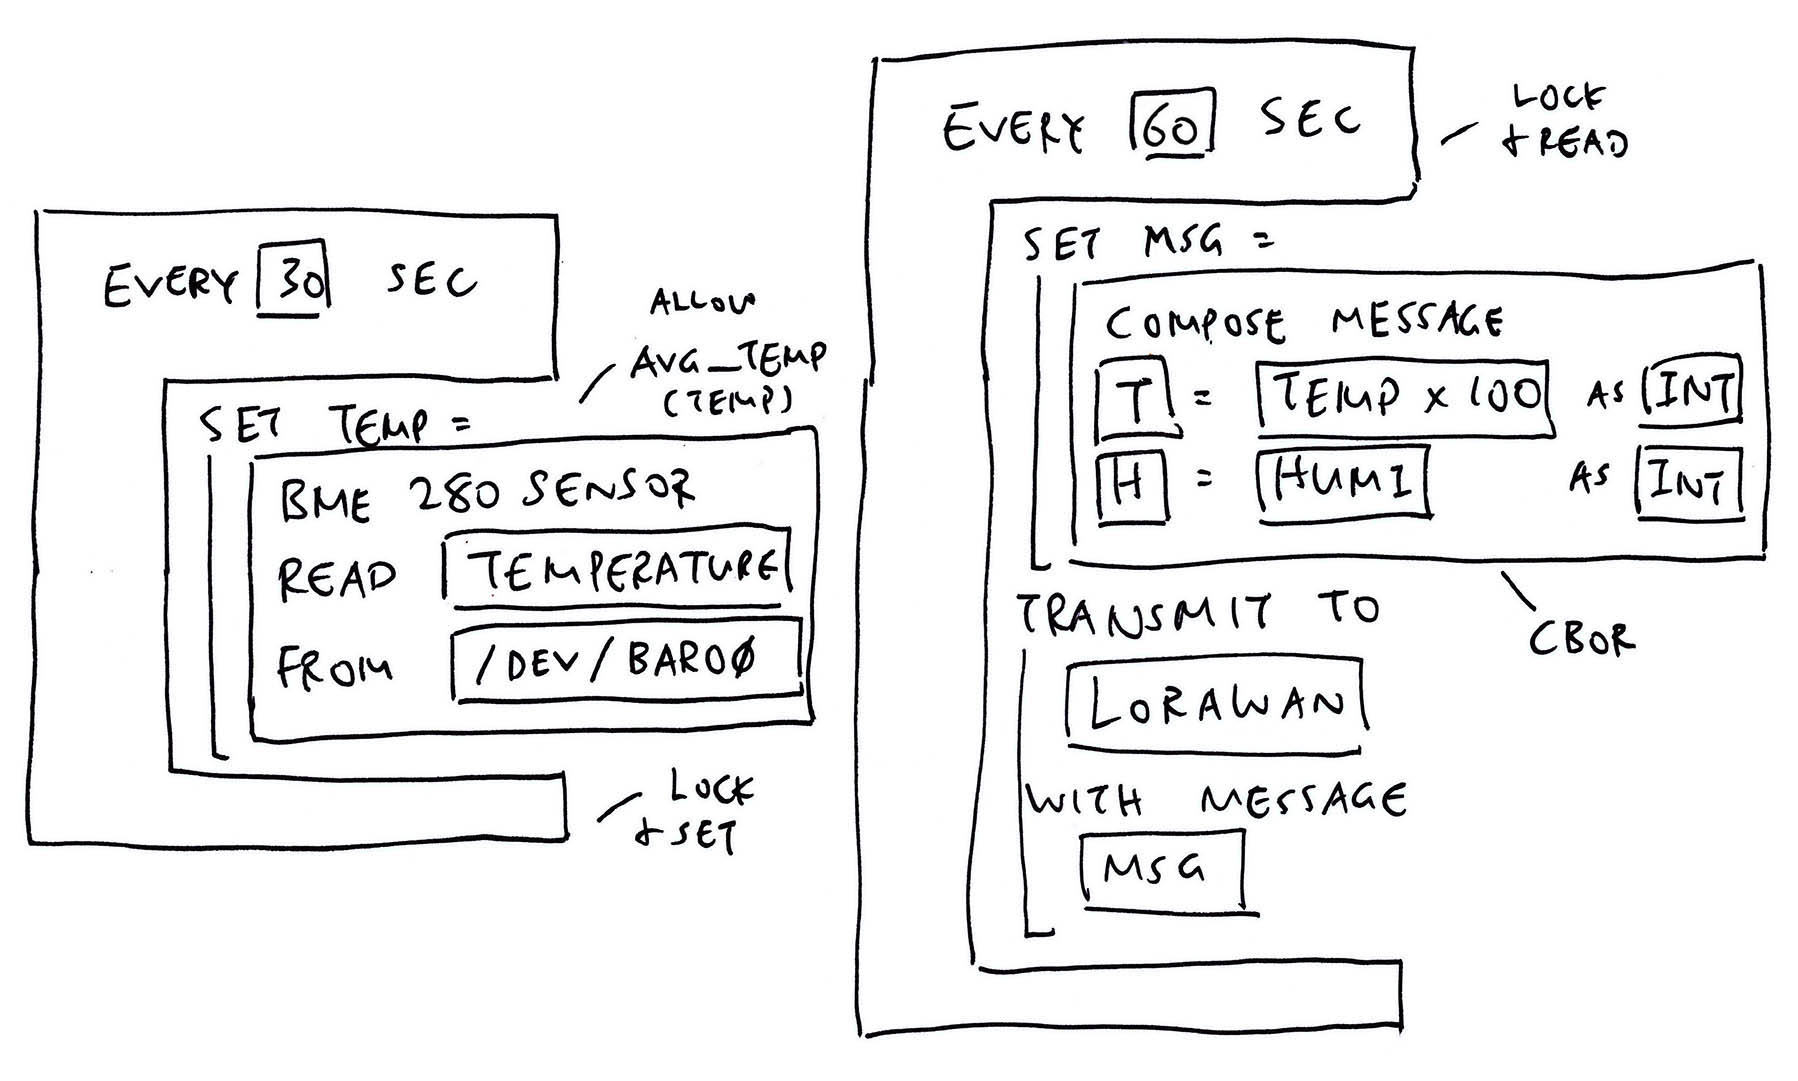
This means splitting into two loops: Read Sensor Loop and Transmit Loop…
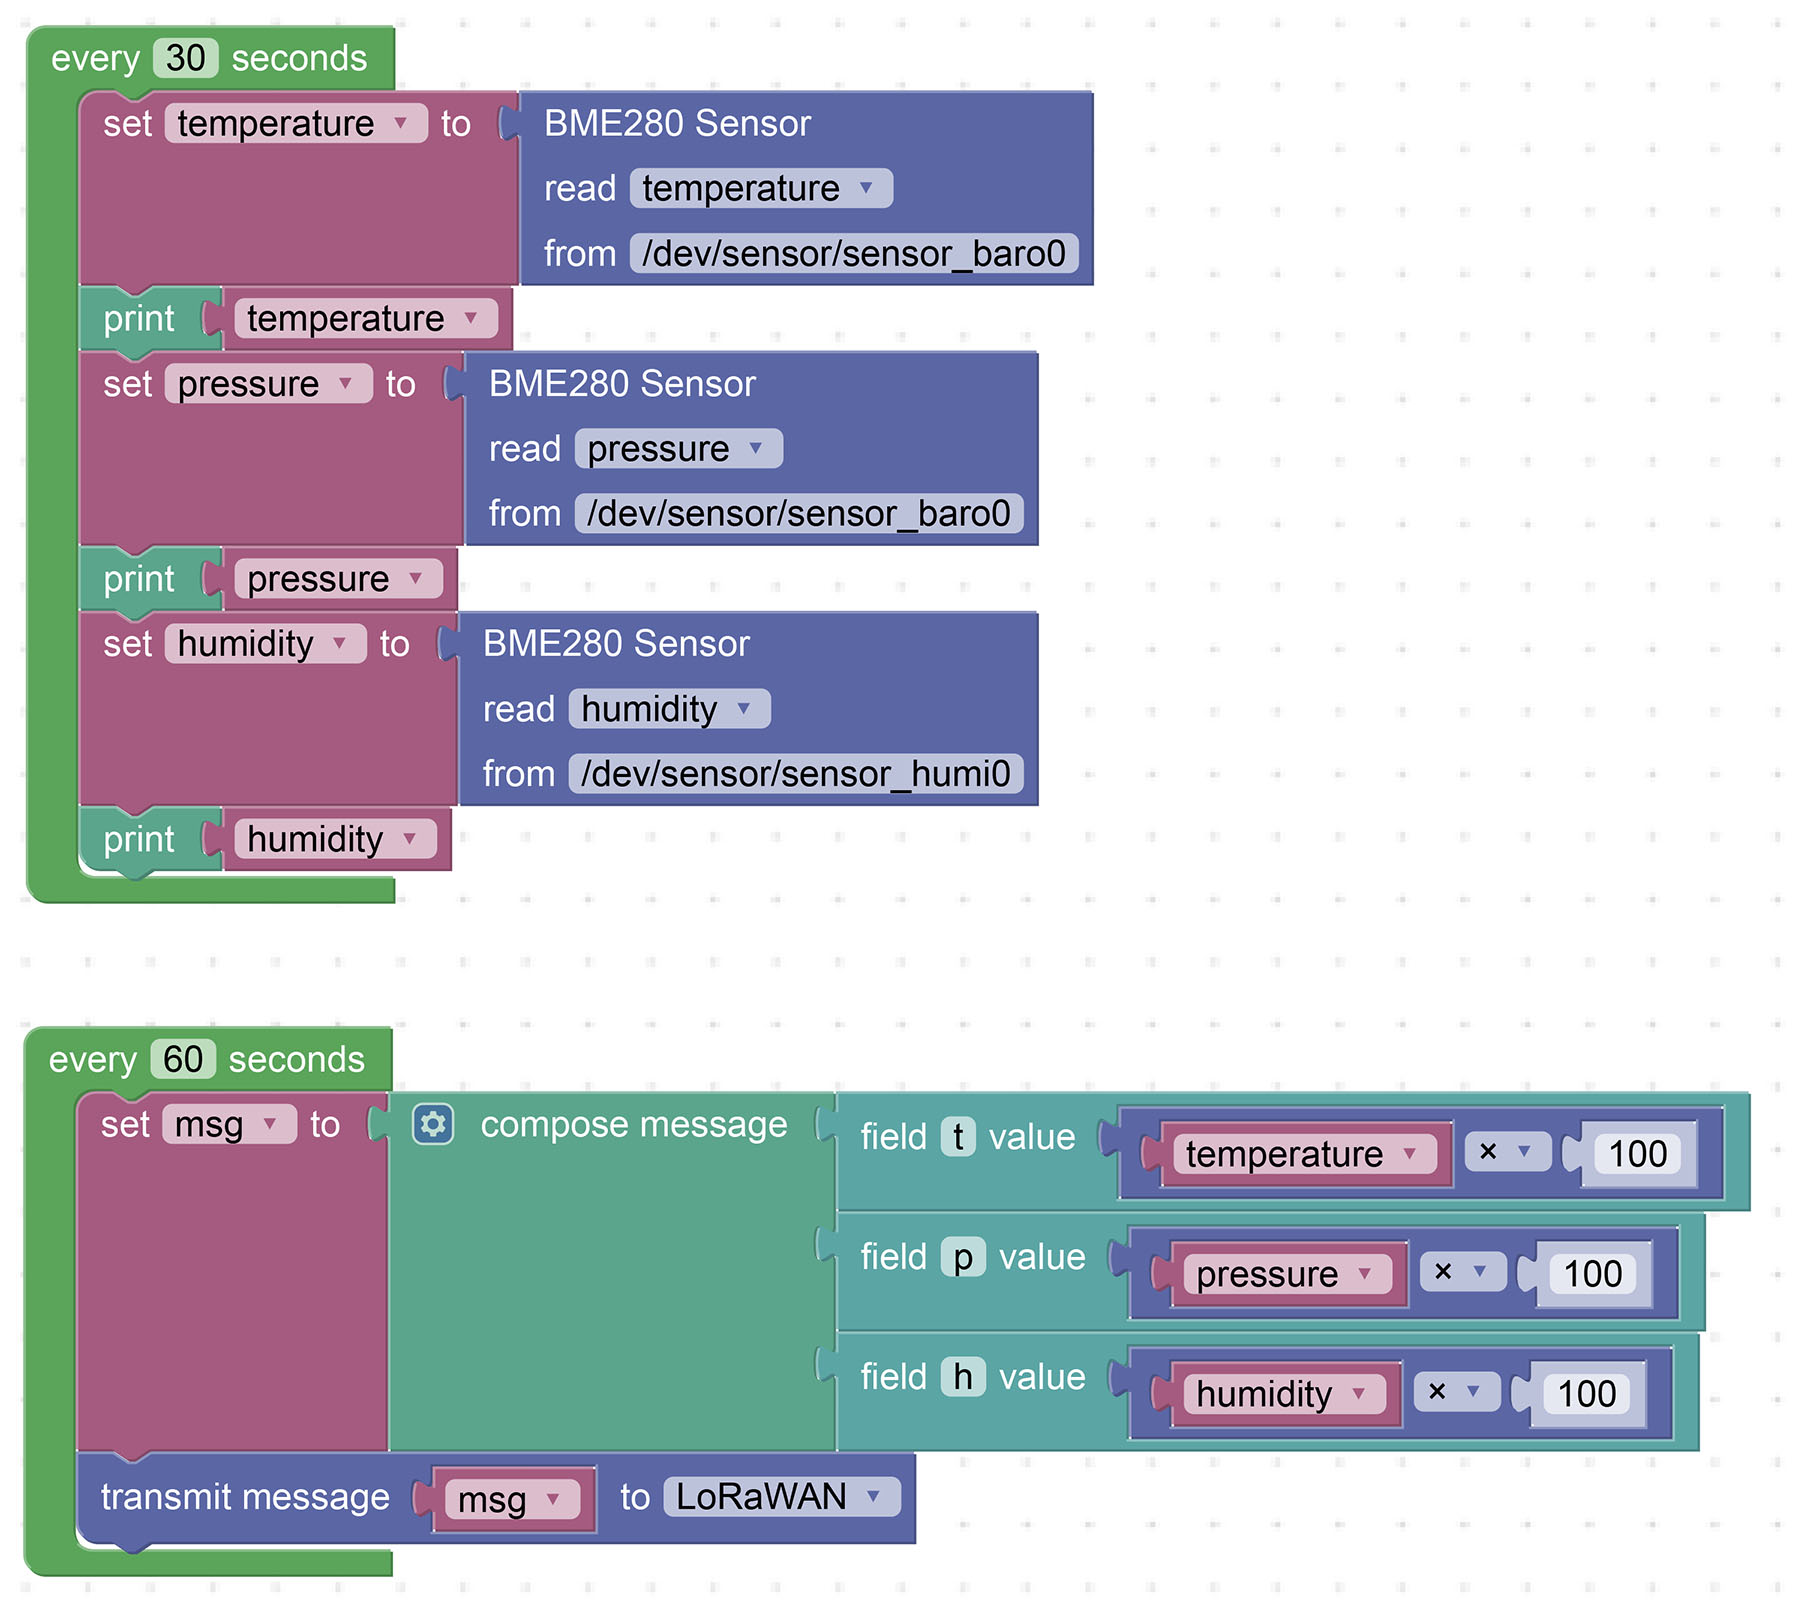
NOTE: “/dev/sensor” has been changed to “/dev/uorb”
(We’ll explain “x100” in the next section)
Missing from the pic: We need to compute the Average Temperature / Pressure / Humidity over the past 60 seconds.
And we transmit the Average Sensor Data. (Instead of the Raw Sensor Data)
This gives us better Sensor Data through frequent sampling, even though we’re sending one message every minute.
(Some sensors like BME280 can actually do frequent sampling on their own. Check for Standby Interval)
Will Blockly and Zig support two Loops?
Not yet. With two Loops, we have the problem of Sleepy Fishes…
// Read Sensor Loop...
while (true) {
  ...
  // Wait 30 seconds
  _ = c.sleep(30);
}

// Transmit Loop...
while (true) {
  ...
  // Wait 60 seconds
  _ = c.sleep(60);
}

// Oops! Transmit Loop will never run!
We loop forever (calling sleep) in the First Loop, thus we’ll never reach the Second Loop.
So we should do this with Timers instead?
Yep our Loops shall be implemented with proper Multithreaded Timers.
Like from NimBLE Porting Layer. (Or just plain NuttX Timers)
Let’s sum up the tweaks that we need…
Grand Plan for our IoT Sensor App
In the previous section we talked about the quirks in our IoT Sensor App and why it won’t work in the Real World.
This is how we’ll fix it…
sleep won’t work for Multiple Loops. We’ll switch to Multithreaded Timers instead
(From NimBLE Porting Layer or just plain NuttX Timers)
Our Read Sensor Loop needs to pass the Aggregated Sensor Data to Transmit Loop
Since both Loops run concurrently, we need to Lock the Sensor Data during access
(Hence the Locking and Averaging in the sketch above)
Our app shall transmit LoRaWAN Messages every 60 seconds, due to the Message Rate limits. (Here’s why)
CBOR Messages are smaller if we encode our Sensor Data as Integers (instead of Floating-Point Numbers)
We propose to scale up our Sensor Data by 100 (pic below) and encode them as Integers. (Which preserves 2 decimal places)
We’ll probably test LoRaWAN with Waveshare’s LoRa SX1262 Breakout Board (non-sponsored)
(Because our current LoRa SX1262 Board is reserved for NuttX Automated Testing)
Waveshare’s I2C Multi-Sensor Board (non-sponsored) looks super interesting for mixing-n-matching Multiple Sensors
Sensor Data scaled by 100 and encoded as integers
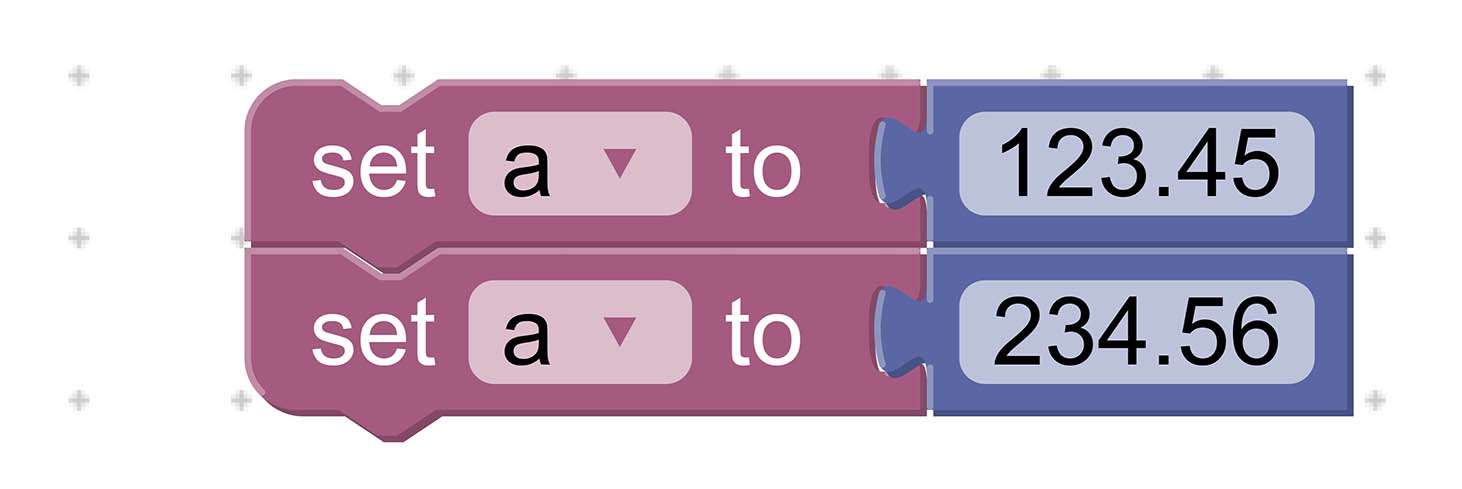
Some Blocks won’t emit valid Zig Code
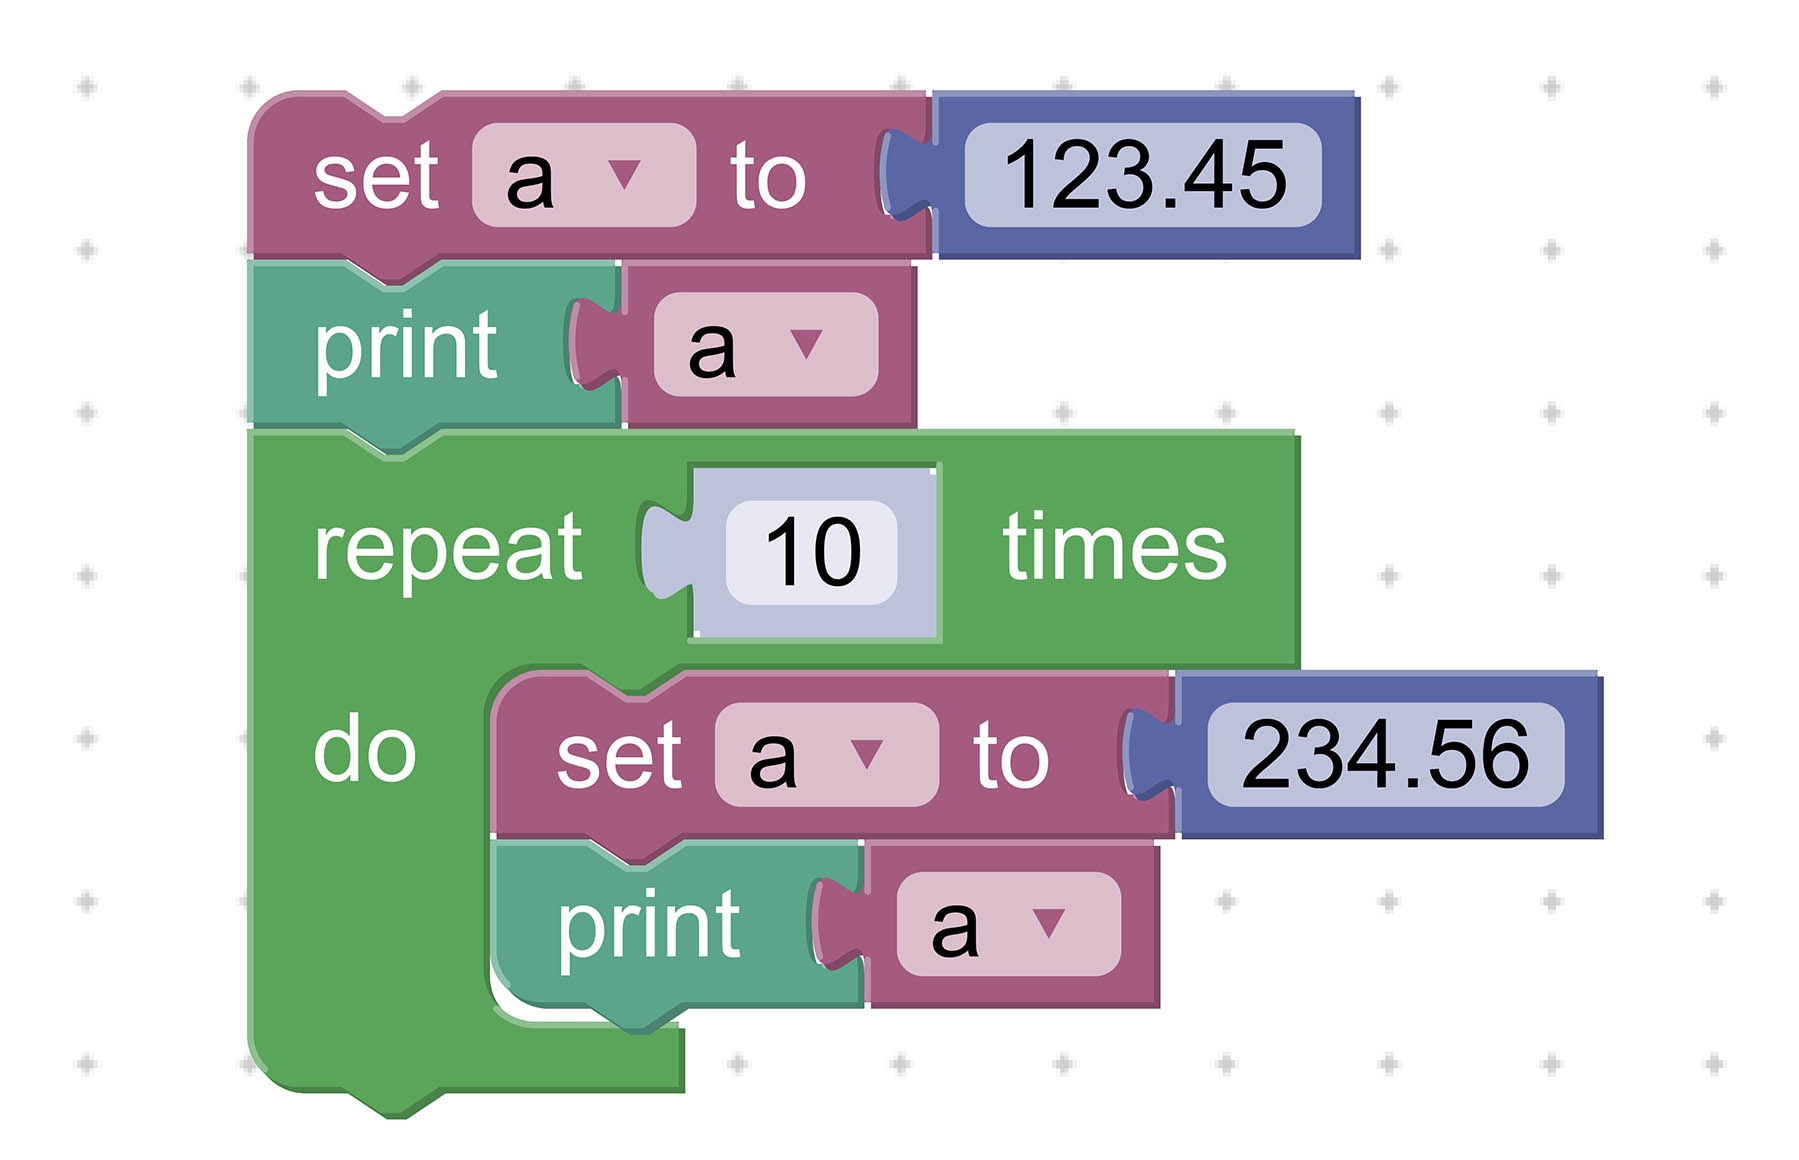
Double Assignment fails with Zig and Blockly…
Shadowed Identifiers won’t work either…
Copying the Zig Code from Blockly into NuttX feels cumbersome. We might streamline this by wrapping Blockly as a Desktop App.
There’s plenty to be fixed, please lemme know if you’re keen to help! 🙏
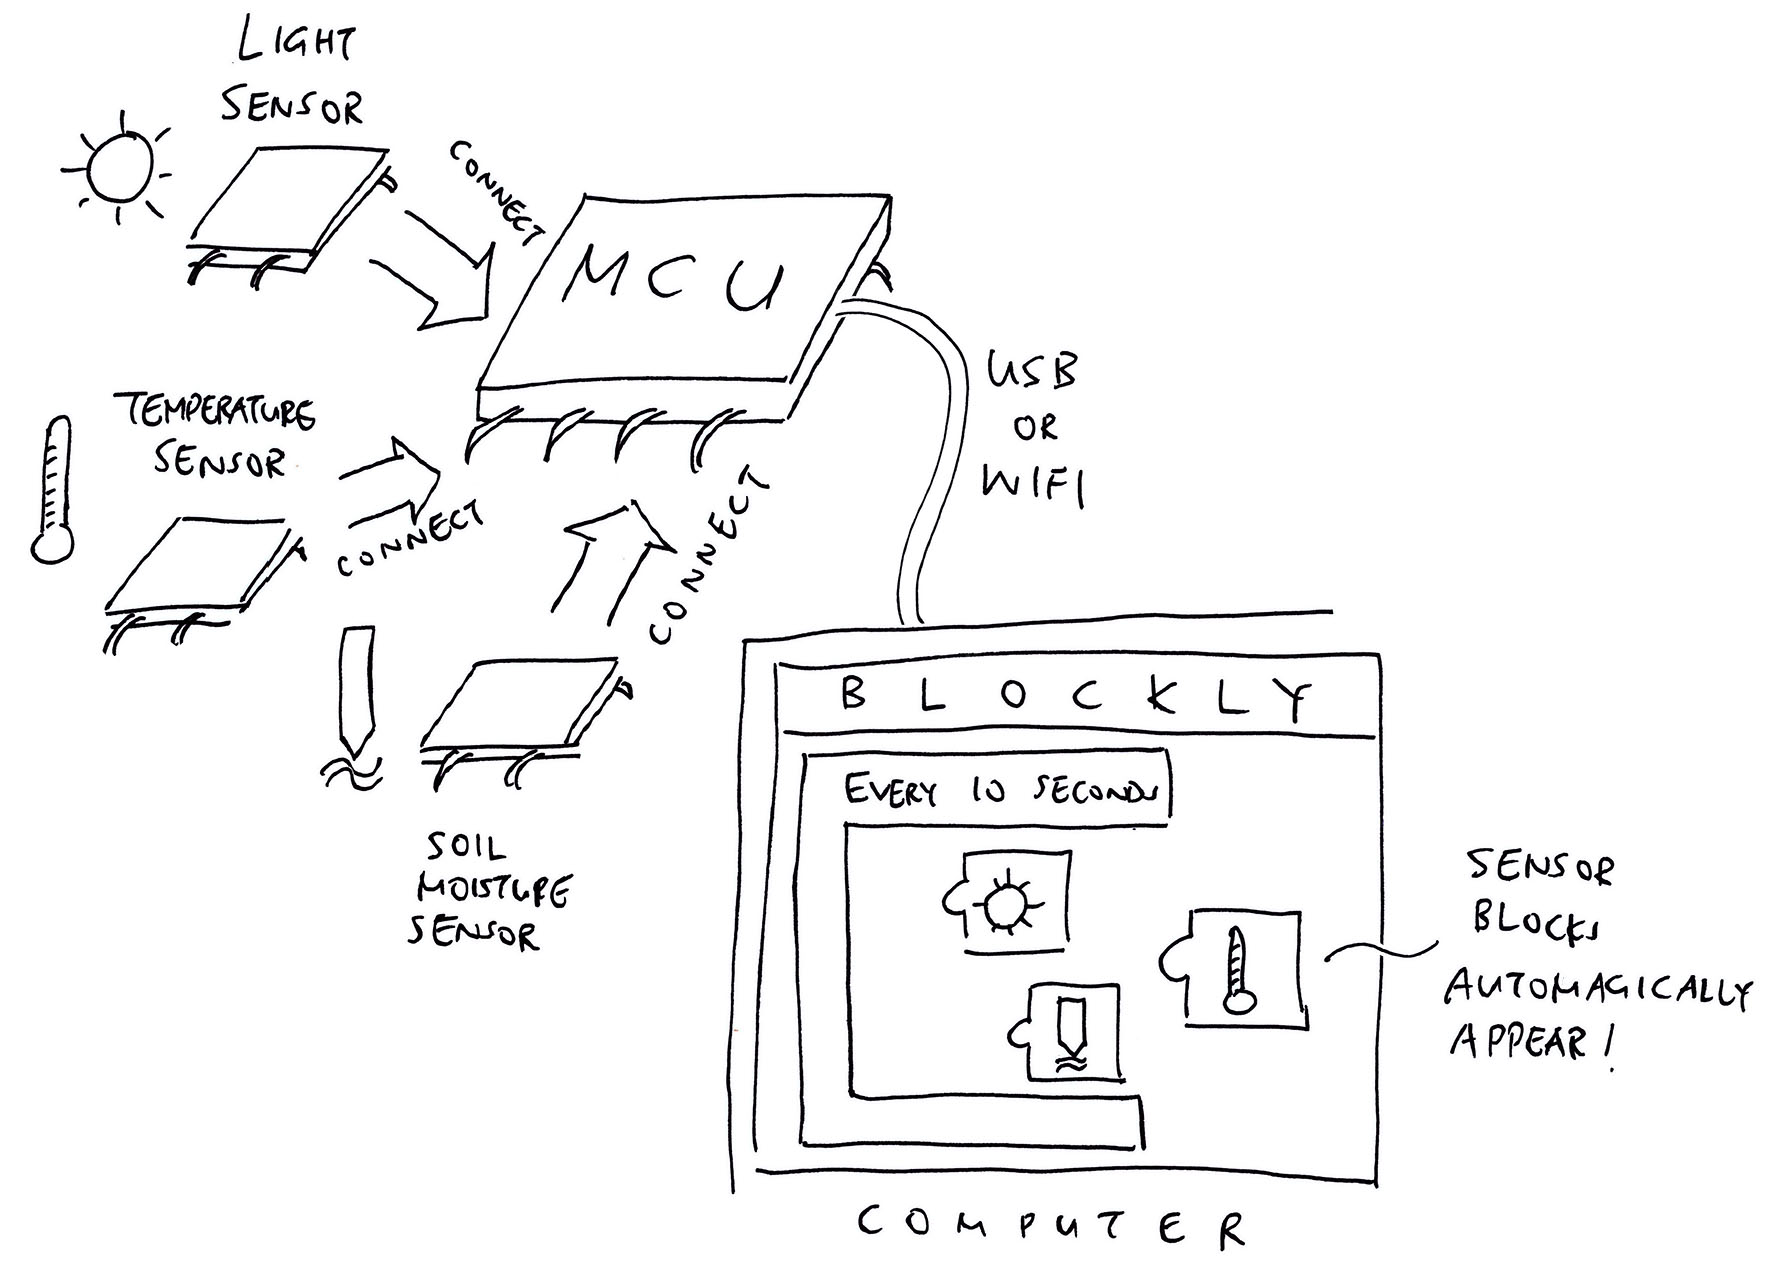
Connect a Sensor to our Microcontroller and it pops up in Blockly!
Alan Carvalho de Assis has a brilliant idea for an Embedded Dev Tool that’s modular, visual, plug-and-play…
“I think creating some modular solution to compete with Arduino could be nice! Imagine that instead of wiring modules in the breadboard people just plug the device in the board and it recognize the device and add it to some graphical interface”
“For example, you just plug a temperature sensor module in your board and it will identify the module type and you can pass this Temperature variable to use in your logic application”
Just connect a Sensor to our Microcontroller… And it pops up in Blockly, all ready for us to read the Sensor Data! (Pic above)
To detect the Sensor, we could use SPD (Serial Presence Detection), like for DDR Memory Modules.
(Or maybe we scan the I2C Bus and read the Chip ID?)
What do you think? Please let us know! 🙏
(Would be great if we could create a Proof-of-Concept using Universal Perforated Board)
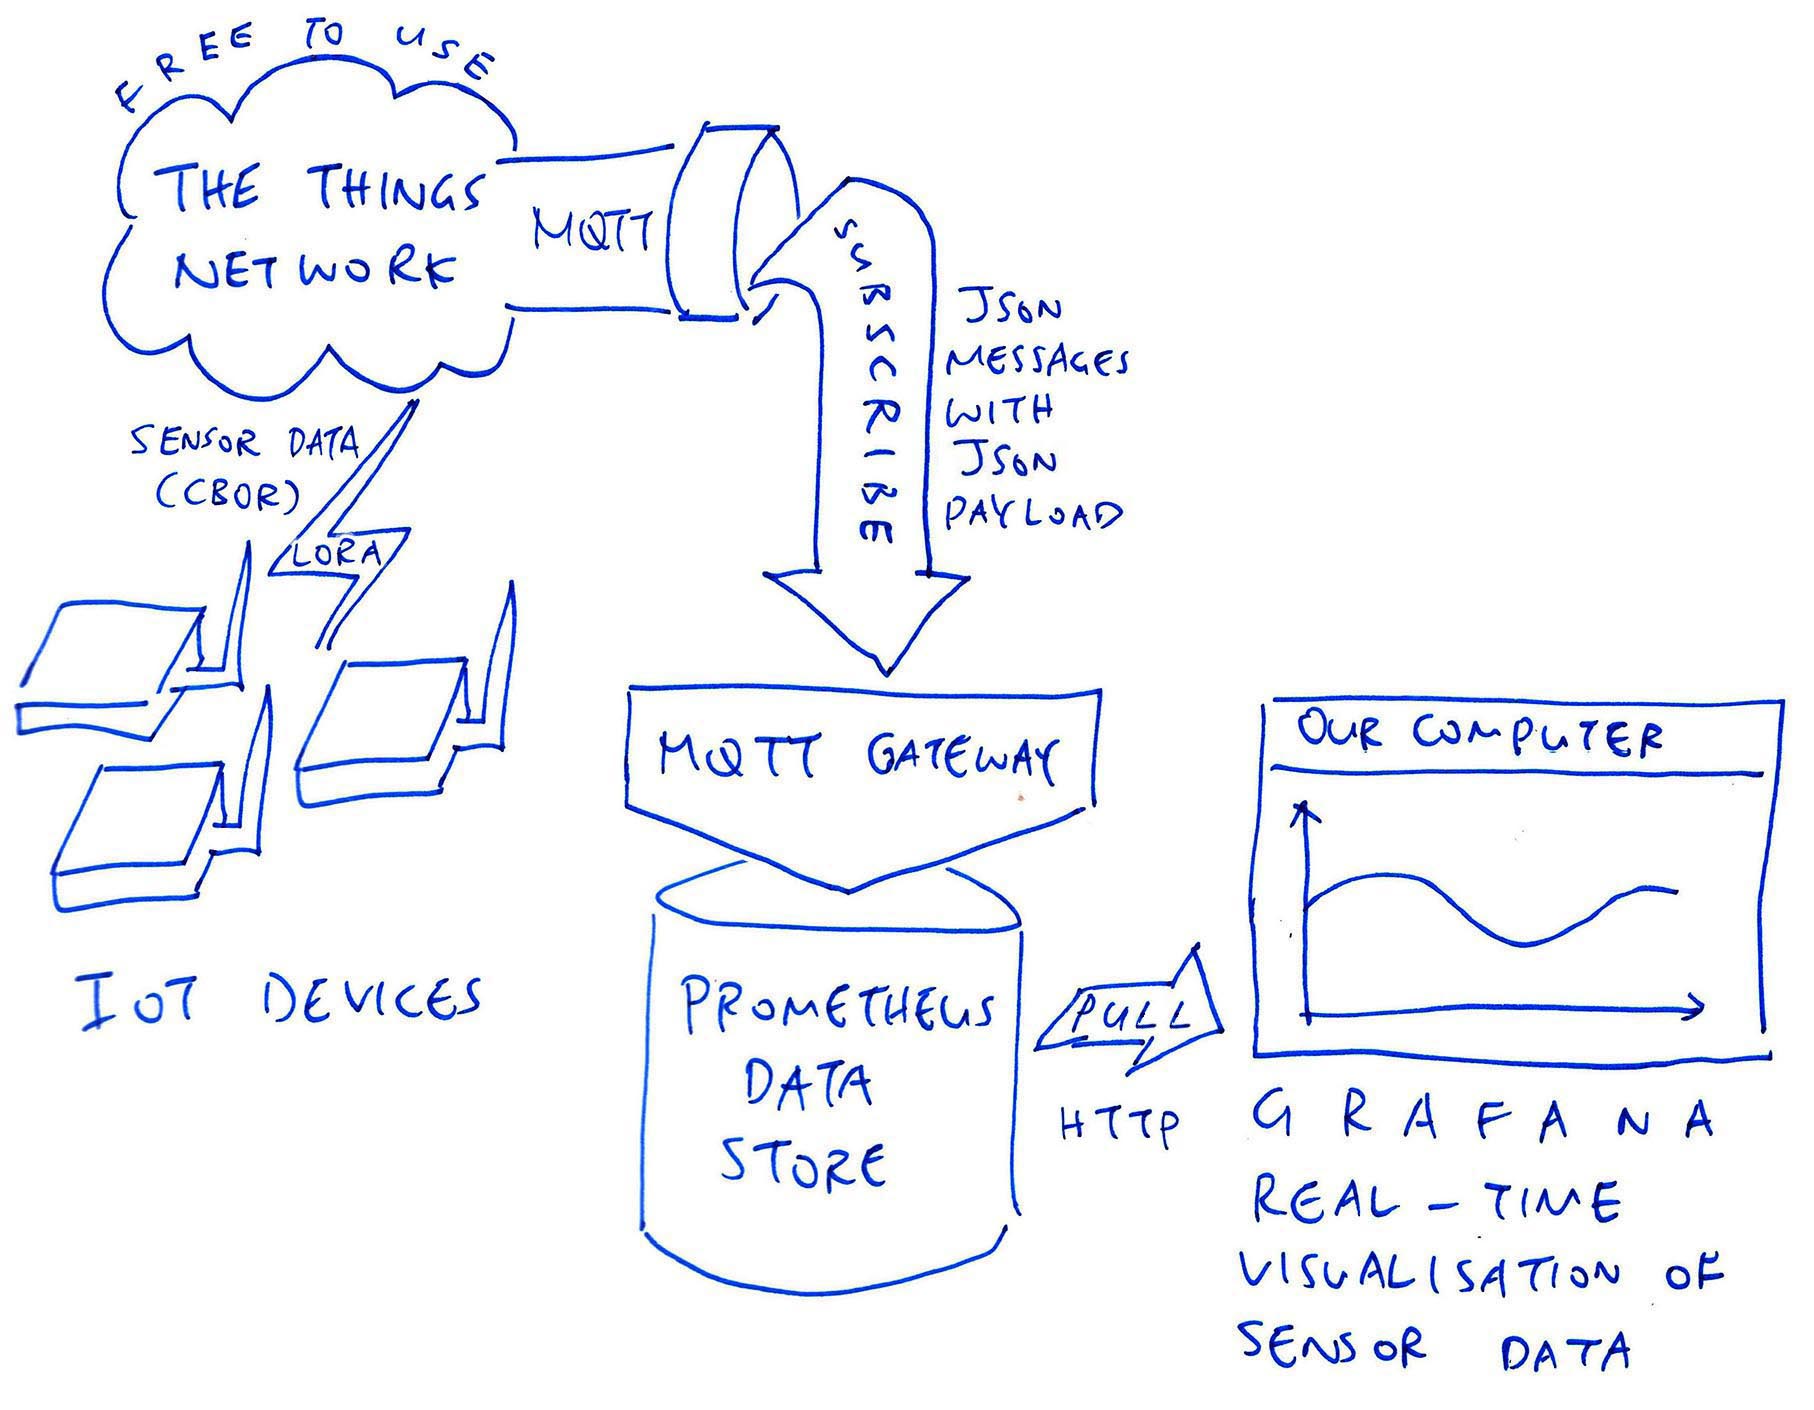
Up Next: Prometheus, Grafana and The Things Network
This has been an exhilarating journey into IoT, Zig and Visual Programming that spans four articles (including this one)…
I hope you’ll join me for more!
Check out my earlier work on Zig and NuttX…
Many Thanks to my GitHub Sponsors for supporting my work! This article wouldn’t have been possible without your support.
Got a question, comment or suggestion? Create an Issue or submit a Pull Request here…
lupyuen.github.io/src/visual.md
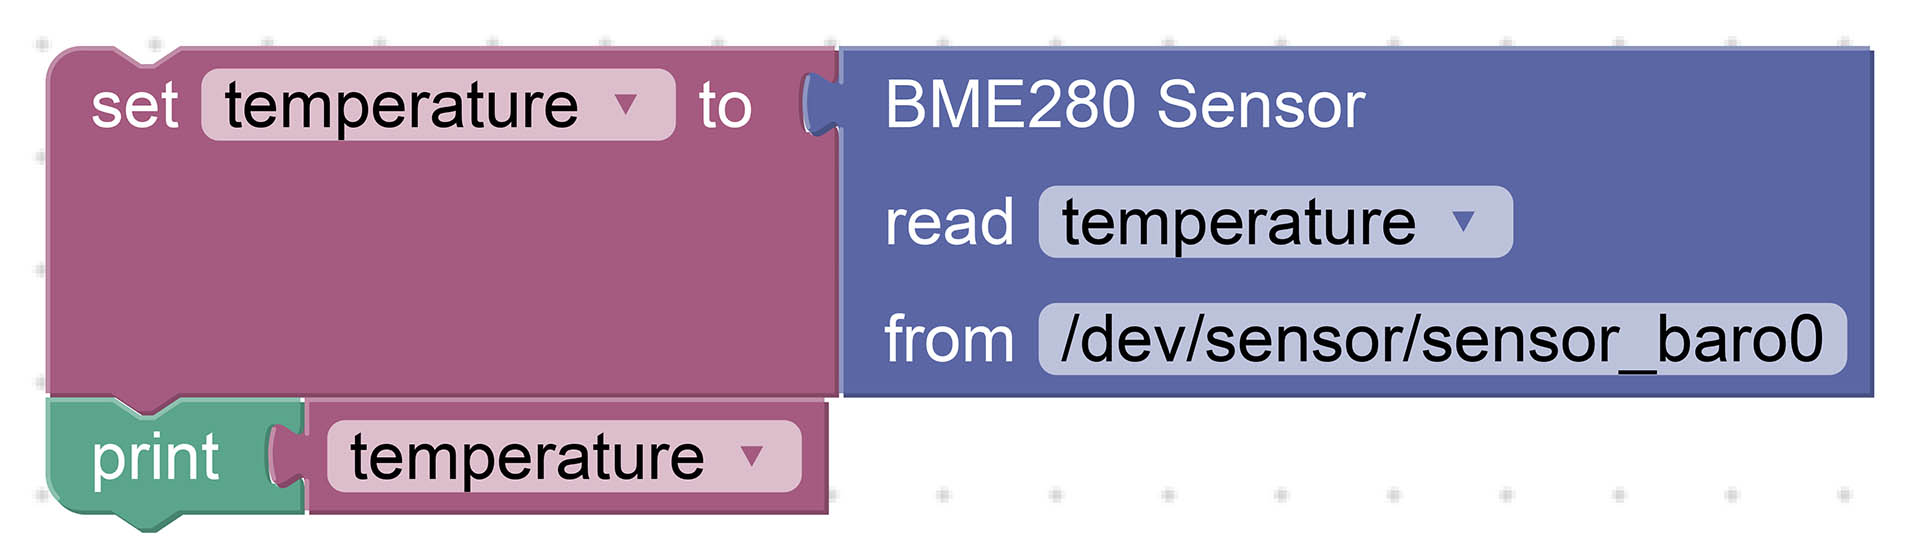
NOTE: “/dev/sensor” has been changed to “/dev/uorb”
As pictured above, our BME280 Sensor Block reads Temperature, Humidity and Pressure from the Bosch BME280 Sensor.
The Blocks above will generate this Zig Code…
// Read the Temperature
const temperature = try sen.readSensor(
  c.struct_sensor_baro,       // Sensor Data Struct to be read
  "temperature",              // Sensor Data Field to be returned
  "/dev/uorb/sensor_baro0"    // Path of Sensor Device
);

// Print the Temperature
debug("temperature={}", .{ temperature });Looks concise and tidy, but readSensor has 2 surprises…
struct_sensor_baro is actually a Struct Type
(Auto-imported by Zig from NuttX)
“temperature” is actually a Struct Field Name
(From the sensor_baro Struct)
The Zig Compiler will substitute the Struct Type and Field Name inside the code for readSensor. (Which works like a C Macro)
How does it work?
readSensor declares the Sensor Data Struct Type and Sensor Data Field as comptime…
/// Read a Sensor and return the Sensor Data
pub fn readSensor(
  comptime SensorType: type,        // Sensor Data Struct to be read, like c.struct_sensor_baro
  comptime field_name: []const u8,  // Sensor Data Field to be returned, like "temperature"
  device_path: []const u8           // Path of Sensor Device, like "/dev/uorb/sensor_baro0"
) !f32 { ...Which means that Zig Compiler will substitute the values at Compile-Time (like a C Macro)…
SensorType changes to c.struct_sensor_baro
field_name changes to “temperature”
readSensor will then use SensorType to refer to the sensor_baro Struct…
  // Define the Sensor Data Type.
  // Zig Compiler replaces `SensorType` by `c.struct_sensor_baro`
  var sensor_data = std.mem.zeroes(
    SensorType
);And readSensor will use field_name to refer to the “temperature” field…
  // Return the Sensor Data Field.
  // Zig Compiler replaces `field_name` by "temperature"
  return @field(
    sensor_data,  // Sensor Data Type from above
    field_name    // Field Name is "temperature"
);Check out this doc for details on comptime and Zig Metaprogramming…
What’s inside readSensor?
Let’s look at the implementation of readSensor in sensor.zig and walk through the steps for reading a NuttX Sensor…
We begin by opening the NuttX Sensor Device: sensor.zig
/// Read a Sensor and return the Sensor Data
pub fn readSensor(
  comptime SensorType: type,        // Sensor Data Struct to be read, like c.struct_sensor_baro
  comptime field_name: []const u8,  // Sensor Data Field to be returned, like "temperature"
  device_path: []const u8           // Path of Sensor Device, like "/dev/uorb/sensor_baro0"
) !f32 {

  // Open the Sensor Device
  const fd = c.open(
    &device_path[0],           // Path of Sensor Device
    c.O_RDONLY | c.O_NONBLOCK  // Open for read-only
  );
open() should look familiar… On Linux we open Devices the same way.
What’s “[]const u8”?
That’s a Slice of Bytes, roughly equivalent to a String in C.
What’s “!f32”?
That’s the Return Type of our function…
Our function returns the Sensor Data as a 32-bit Floating-Point Number
(Hence “f32”)
But it might return an Error
(Hence the “!”)
Why the “c.” prefix?
We write “c.something” for Functions, Types and Macros imported from C.
Next we check if the Sensor Device has been successfully opened…
  // Check for error
  if (fd < 0) {
    std.log.err(
      "Failed to open device:{s}",
      .{ c.strerror(errno()) }
    );
    return error.OpenError;
  }
If the Sensor Device doesn’t exist, we print a Formatted Message to the Error Log and return an Error.
What’s “{s}”?
That’s for printing a Formatted String in Zig.
It’s equivalent to “%s” in C…
printf("Failed to open device:%s", strerror(errno()));What’s “.{ ... }”?
That’s how we pass a list of Arguments when printing a Formatted Message.
If we have no Arguments, we write “.{}”
(“.{ ... }” creates an Anonymous Struct)
We’ve just opened the Sensor Device and we must close it later…
But the Control Flow gets complicated because we might need to handle Errors and quit early. In C we’d code this with “goto”.
For Zig we do this nifty trick…
  // Close the Sensor Device when this function returns
  defer {
    _ = c.close(fd);
  }
When we write “defer”, this chunk of code will be executed when our function returns.
This brilliantly solves our headache of closing the Sensor Device when we hit Errors later.
Why the “_ = something”?
Zig Compiler stops us if we forget to use the Return Value of a Function.
We write “_ = something” to tell Zig Compiler that we’re not using the Return Value.
Some sensors (like BME280) will automatically measure Sensor Data at Periodic Intervals. (Like this)
Let’s assume that our sensor will measure Sensor Data every 1 second…
  // Set Standby Interval
  const interval: c_uint = 1_000_000;  // 1,000,000 microseconds (1 second)
  var ret = c.ioctl(
    fd,                  // Sensor Device
    SNIOC_SET_INTERVAL,  // ioctl Command
    interval             // Standby Interval
);(c_uint is equivalent to “unsigned int” in C)
In case of error, we quit…
  // Check for error
  if (ret < 0 and errno() != c.ENOTSUP) {
    std.log.err("Failed to set interval:{s}", .{ c.strerror(errno()) });
    return error.IntervalError;
}(IntervalError is defined here)
Which also closes the Sensor Device. (Due to our earlier “defer”)
We set the Batch Latency, if it’s needed by our sensor…
  // Set Batch Latency
  const latency: c_uint = 0;  // No latency
  ret = c.ioctl(
    fd,             // Sensor Device
    c.SNIOC_BATCH,  // ioctl Command
    latency         // Batch Latency
  );
And we check for error…
  // Check for error
  if (ret < 0 and errno() != c.ENOTSUP) {
    std.log.err("Failed to batch:{s}", .{ c.strerror(errno()) });
    return error.BatchError;
}After the enabling the sensor, we poll the sensor to check if Sensor Data is available…
  // Poll for Sensor Data
  var fds = std.mem.zeroes(c.struct_pollfd);
  fds.fd = fd;
  fds.events = c.POLLIN;
  ret = c.poll(&fds, 1, -1);

  // Check if Sensor Data is available
  if (ret <= 0) {
    std.log.err("Sensor data not available", .{});
    return error.DataError;
  }
std.mem.zeroes creates a pollfd Struct that’s initialised with nulls.
(The struct lives on the stack)
We allocate a buffer (on the stack) to receive the Sensor Data…
  // Define the Sensor Data Type
  var sensor_data = std.mem.zeroes(
    SensorType
  );
  const len = @sizeOf(
    @TypeOf(sensor_data)
  );
Remember that SensorType is a comptime Compile-Time Type.
Zig Compiler will change SensorType to a Struct Type like c.struct_sensor_baro
std.mem.zeroes returns a Sensor Data Struct, initialised with nulls.
We read the Sensor Data into the struct…
  // Read the Sensor Data
  const read_len = c.read(fd, &sensor_data, len);

  // Check size of Sensor Data
  if (read_len < len) {
    std.log.err("Sensor data incorrect size", .{});
    return error.SizeError;
}Finally we return the Sensor Data Field…
  // Return the Sensor Data Field
  return @field(
    sensor_data,  // Sensor Data Type from above
    field_name    // Field Name like "temperature"
  );
}
Remember that field_name is a comptime Compile-Time String.
Zig Compiler will change field_name to a Field Name like “temperature”
And that’s how readSensor reads the Sensor Data from a NuttX Sensor!
Compose Message Block
The Compose Message Block composes a CBOR Message with the specified Keys (Field Names) and Values (Sensor Data).
(Think of CBOR as a compact, binary form of JSON)
CBOR Messages usually require fewer bytes than JSON to represent the same data. They work better with Low-Bandwidth Networks. (Like LoRaWAN)
The Block above will generate this Zig Code…
const msg = try composeCbor(.{  // Compose CBOR Message
  "t", temperature,
  "p", pressure,
  "h", humidity,
});Which will show this output…
composeCbor
  t: 31.05
  p: 1007.44
  h: 71.49
msg=t:31.05,p:1007.44,h:71.49,composeCbor accepts a variable number of arguments? Strings as well as numbers?
Yep, here’s the implementation of composeCbor: visual.zig
/// TODO: Compose CBOR Message with Key-Value Pairs
/// https://lupyuen.github.io/articles/cbor2
fn composeCbor(args: anytype) !CborMessage {
  debug("composeCbor", .{});
  comptime {
    assert(args.len % 2 == 0);  // Missing Key or Value
  }

  // Process each field...
  comptime var i: usize = 0;
  var msg = CborMessage{};
  inline while (i < args.len) : (i += 2) {

    // Get the key and value
    const key   = args[i];
    const value = args[i + 1];

    // Print the key and value
    debug("  {s}: {}", .{
      @as([]const u8, key),
      floatToFixed(value)
    });

    // Format the message for testing
    var slice = std.fmt.bufPrint(
      msg.buf[msg.len..],
      "{s}:{},",
      .{
        @as([]const u8, key),
        floatToFixed(value)
      }
    ) catch { _ = std.log.err("Error: buf too small", .{}); return error.Overflow; };
    msg.len += slice.len;
  }
  debug("  msg={s}", .{ msg.buf[0..msg.len] });
  return msg;
}(floatToFixed is explained here)
CborMessage is a Struct that contains the CBOR Buffer…
/// TODO: CBOR Message
/// https://lupyuen.github.io/articles/cbor2
const CborMessage = struct {
  buf: [256]u8 = undefined,  // Limit to 256 bytes
  len: usize = 0,            // Length of buffer
};
Note that composeCbor’s parameter is declared as anytype…
fn composeCbor(args: anytype) { ...That’s why composeCbor accepts a variable number of arguments with different types.
To handle each argument, the Zig Compiler will unroll (expand) this inline comptime loop during compilation…
  // Zig Compiler will unroll (expand) this Loop.
  // Process each field...
  comptime var i: usize = 0;
  inline while (i < args.len) : (i += 2) {

    // Get the key and value
    const key   = args[i];
    const value = args[i + 1];

    // Print the key and value
    debug("  {s}: {}", .{
      @as([]const u8, key),
      floatToFixed(value)
    });
    ...
  }
(Think of it as a C Macro, expanding our code during compilation)
Thus if we have 3 pairs of Key-Values, Zig Compiler will emit the above code 3 times.
(floatToFixed is explained here)
What happens if we omit a Key or a Value when calling composeCbor?
This comptime Assertion Check will fail during compilation…
// This assertion fails at Compile-Time
// if we're missing a Key or a Value
comptime {
  assert(args.len % 2 == 0);
}
What happens if we pass incorrect Types for the Key or Value?
composeCbor expects the following Types…
Key should be a (string-like) Byte Slice ([]const u8)
Value should be a Floating-Point Number (f32)
If the Types are incorrect, Zig Compiler will stop us here during compilation…
    // Print the key and value
    debug("  {s}: {}", .{
      @as([]const u8, key),
      floatToFixed(value)
});(floatToFixed is explained here)
Hence composeCbor might look fragile with its Variable Arguments and Types…
const msg = try composeCbor(.{  // Compose CBOR Message
  "t", temperature,
  "p", pressure,
  "h", humidity,
});
But Zig Compiler will actually stop us during compilation if we pass invalid arguments.
The implementation of CBOR Encoding is missing?
Yep we shall import the TinyCBOR Library from C to implement the CBOR Encoding in composeCbor…
Transmit Message Block
The Transmit Message Block (above) transmits a CBOR Message to LoRaWAN (the low-power, long-range, low-bandwidth IoT Network)…
// Transmit message to LoRaWAN
try transmitLorawan(msg);Which will show this output…
transmitLorawan
msg=t:31.05,p:1007.44,h:71.49,The implementation of transmitLorawan is currently a stub…
/// TODO: Transmit message to LoRaWAN
fn transmitLorawan(msg: CborMessage) !void {
  debug("transmitLorawan", .{});
  debug("  msg={s}", .{ msg.buf[0..msg.len] });
}We shall implement LoRaWAN Messaging by calling the LoRaWAN Library that’s imported from C…
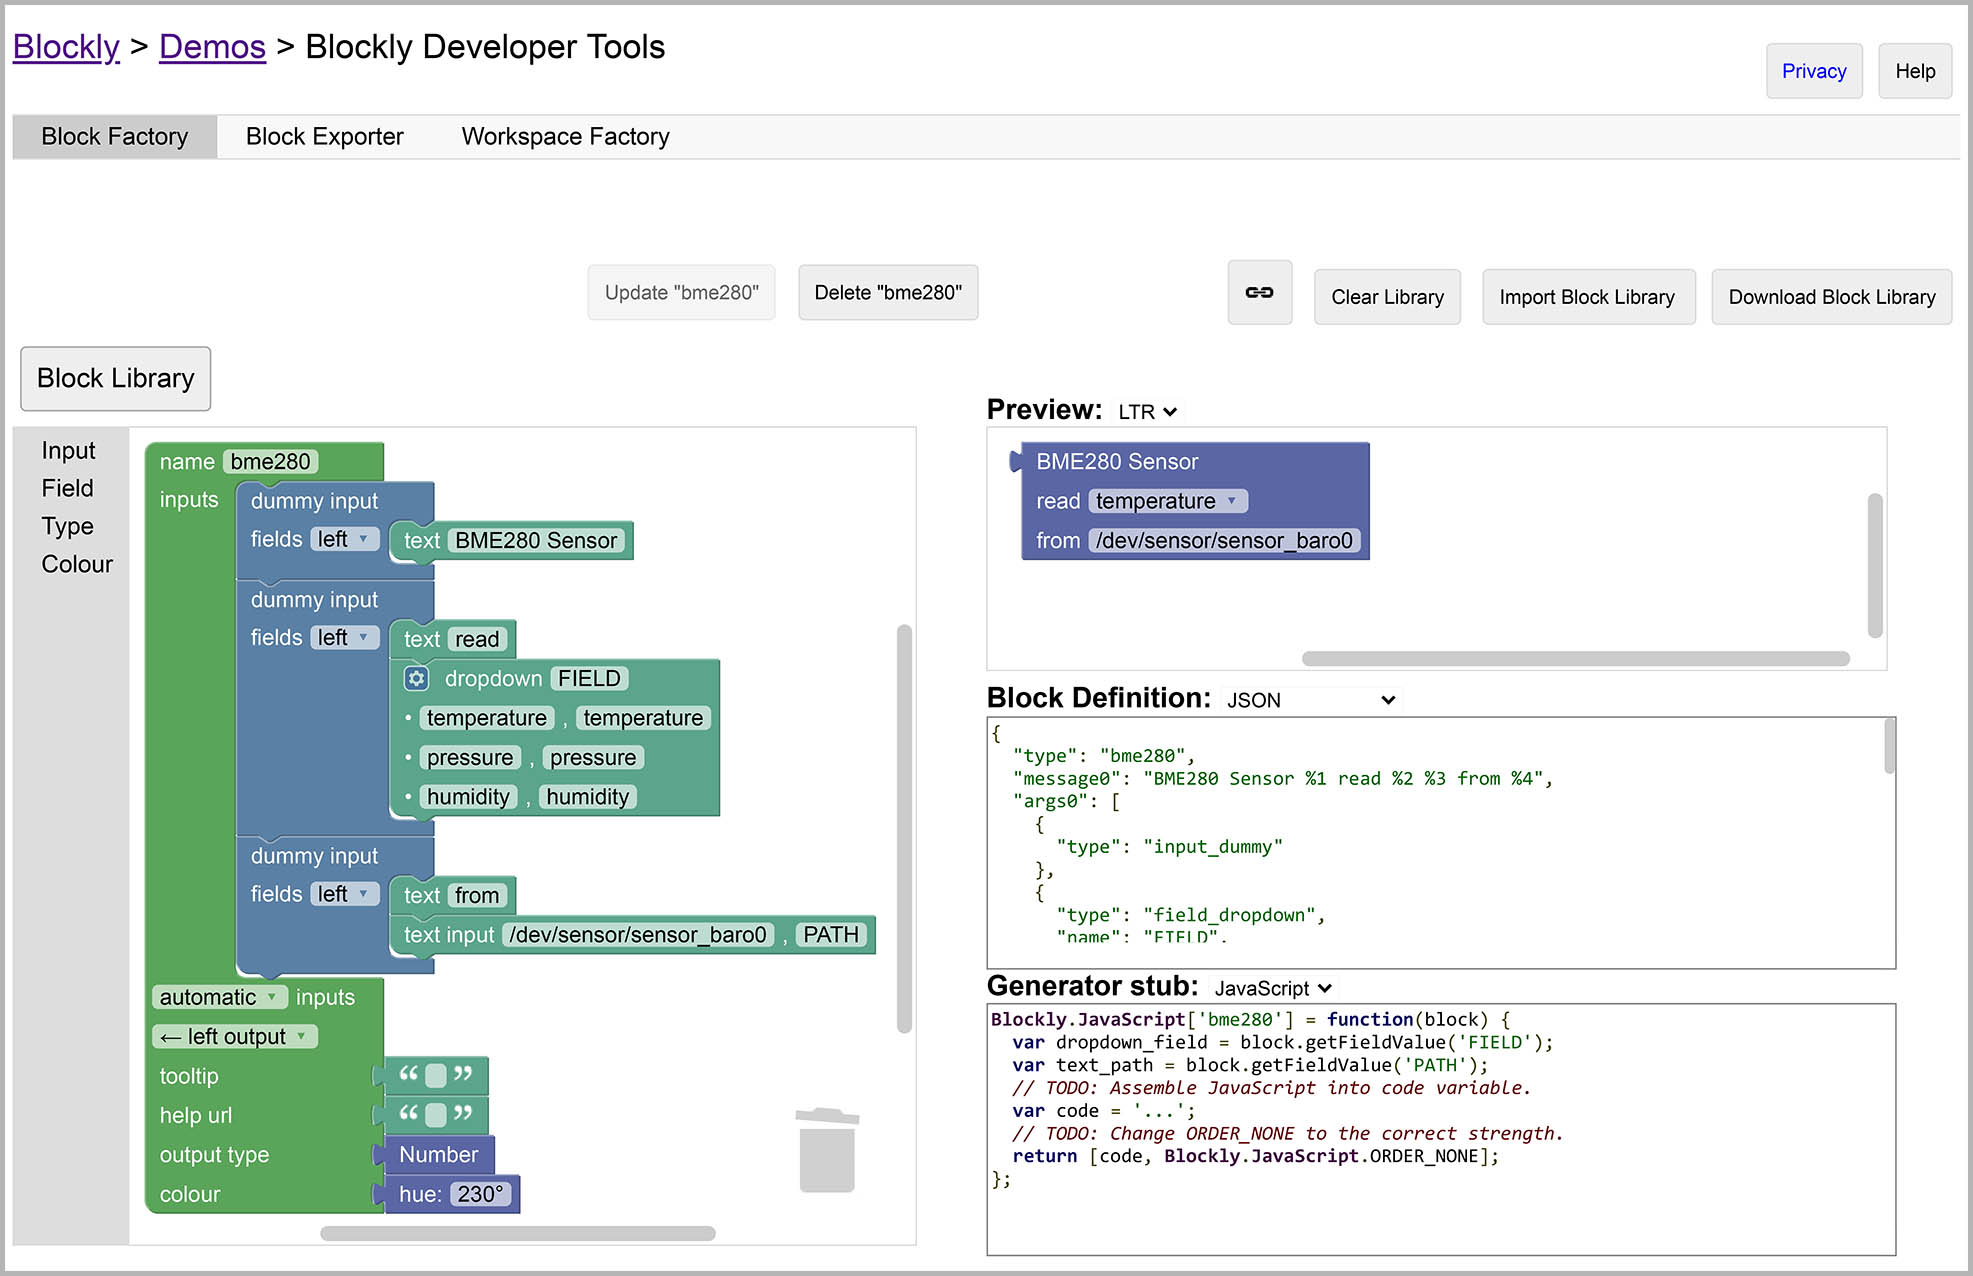
Blockly Developer Tools
In the previous article we have customised Blockly to generate Zig Programs…
For this article we added Custom Blocks to Blockly to produce IoT Sensor Apps…
This is how we loaded our Custom Blocks into Blockly…
Each Custom Block has a Code Generator that will emit Zig Code…
The Compose Message Block is more sophisticated, we implemented it as a Custom Extension in Blockly…
Official docs for Blockly Custom Blocks…
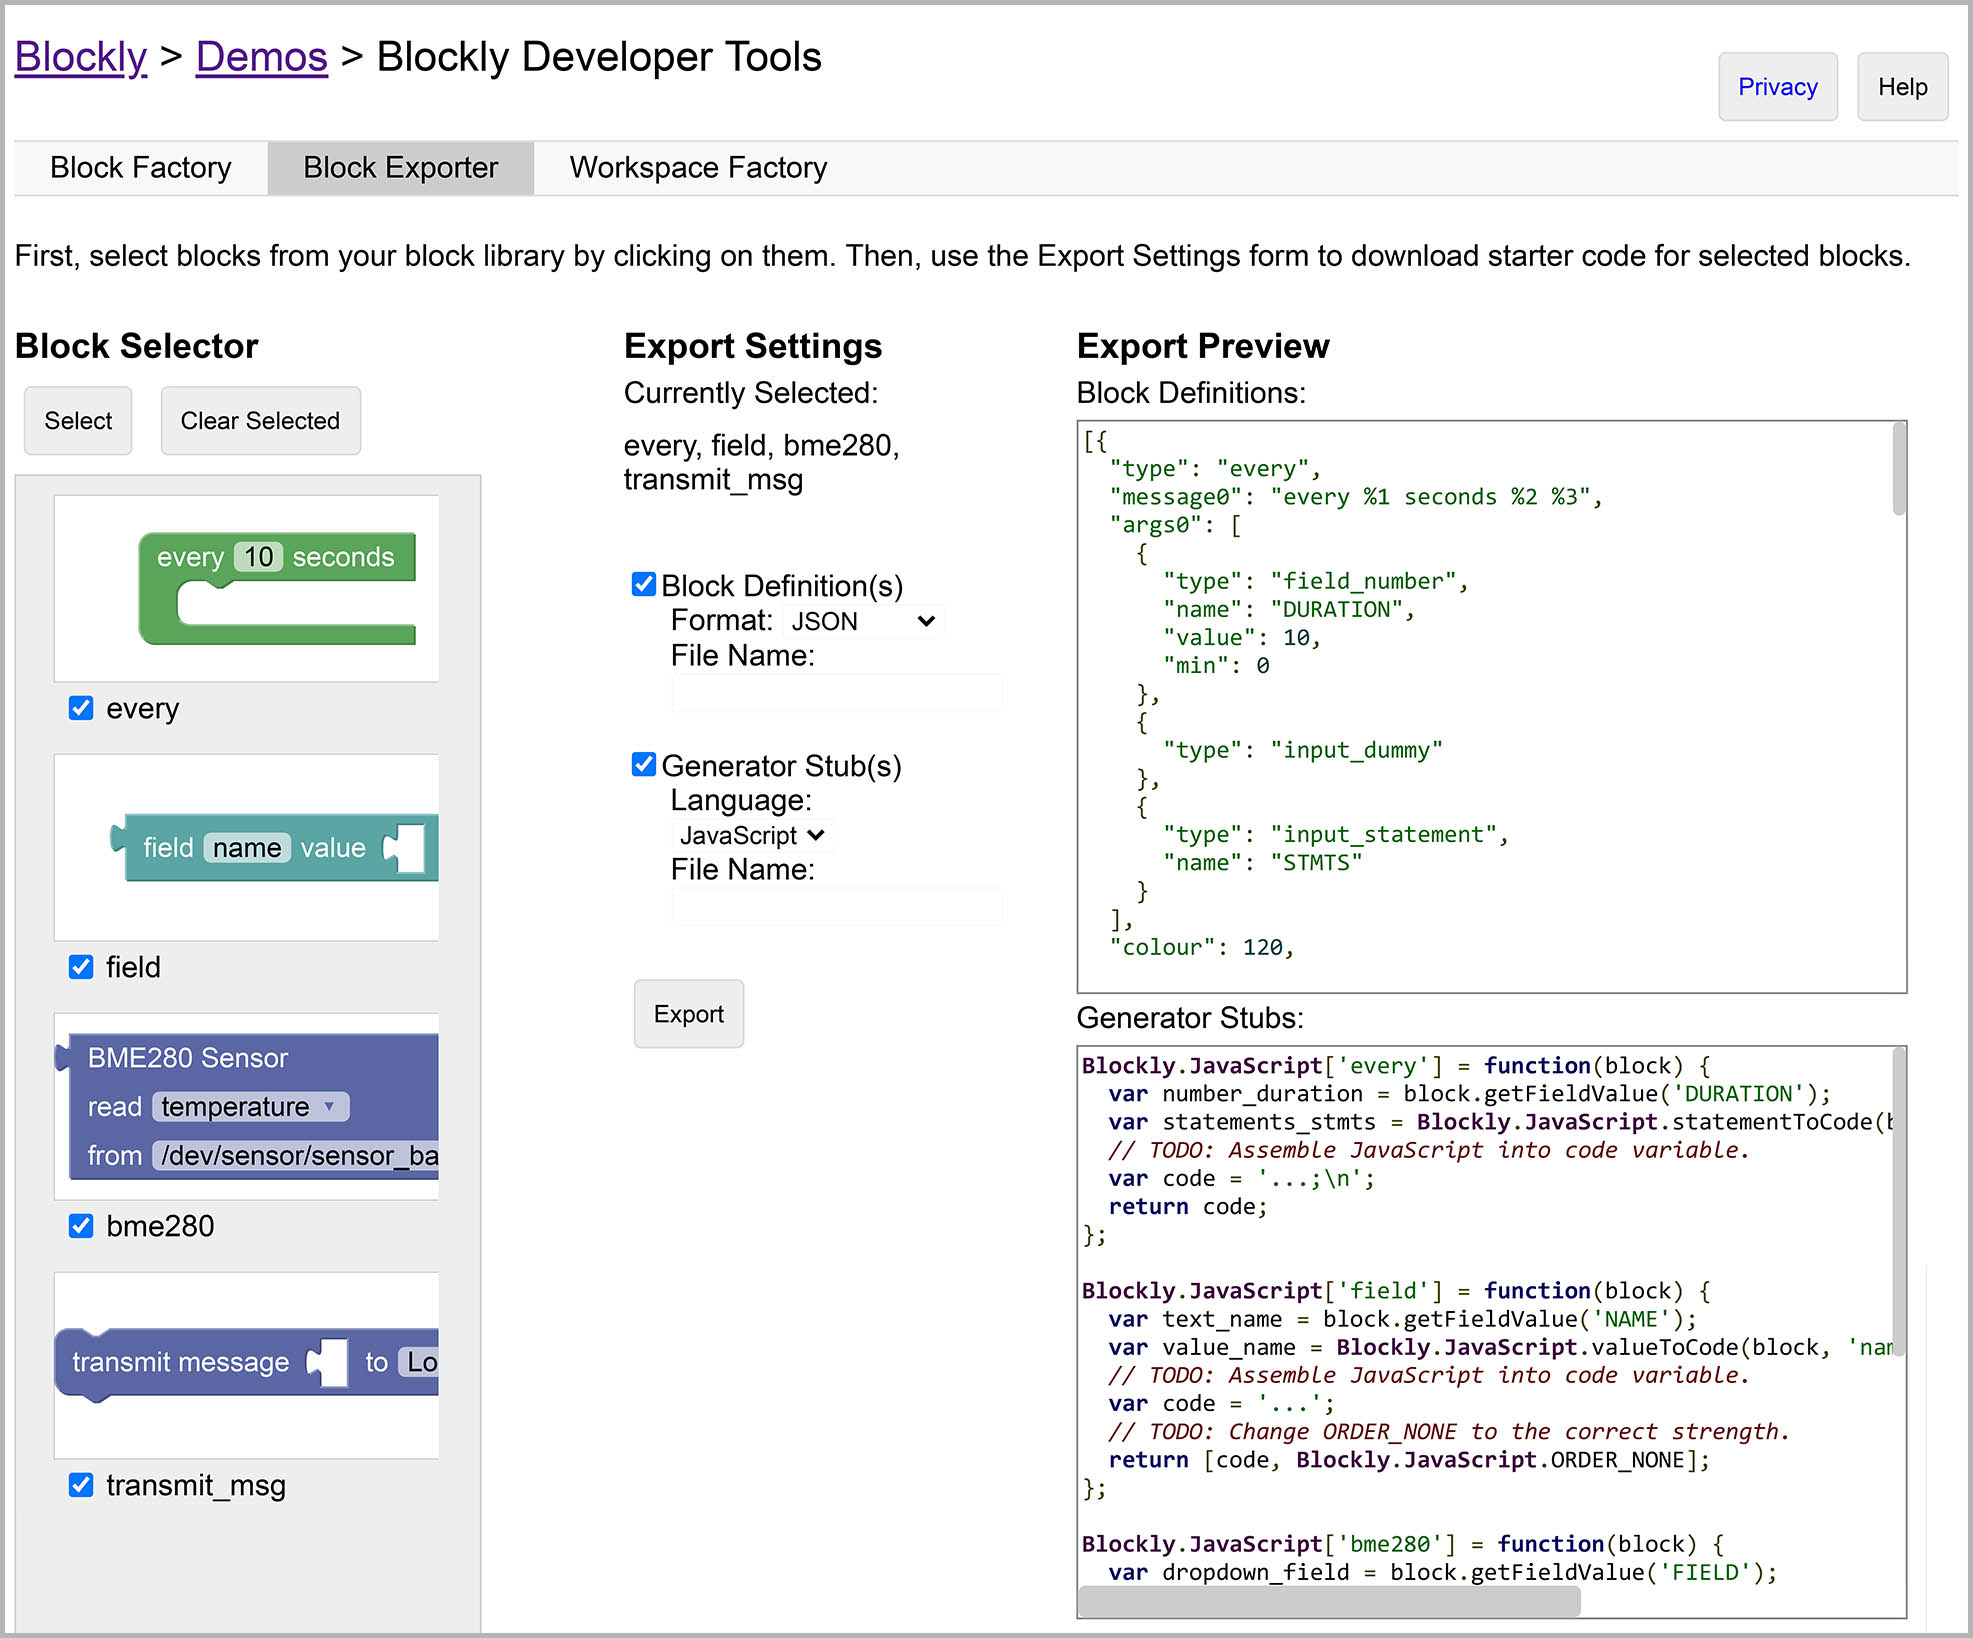
Block Exporter in Blockly Developer Tools