Connect STM32 Blue Pill to NB-IoT with Quectel BC95-G and Apache Mynewt
In the previous article we learnt the AT commands for sending sensor data to a CoAP Server via a Quectel NB-IoT module. Now let’s build an IoT sensor with a real microcontroller — STM32 Blue Pill — and a real NB-IoT module — Quectel BC95-G!
Why are we building it with Apache Mynewt realtime operating system?
Because handling the AT commands for the Quectel module is a little complicated… Imagine we’re polling the temperature sensor every 10 seconds and transmitting the sensor data via NB-IoT. But the Quectel module hasn’t responded to our AT command yet. Do we give up and crash the application?
Fortunately Mynewt is fully capable of multitasking — it will wait for the AT command to complete (or cancel it in case of timeout). It has a built-in CoAP library for composing CoAP messages. And drivers for many sensors. So Mynewt is perfect for building NB-IoT devices!
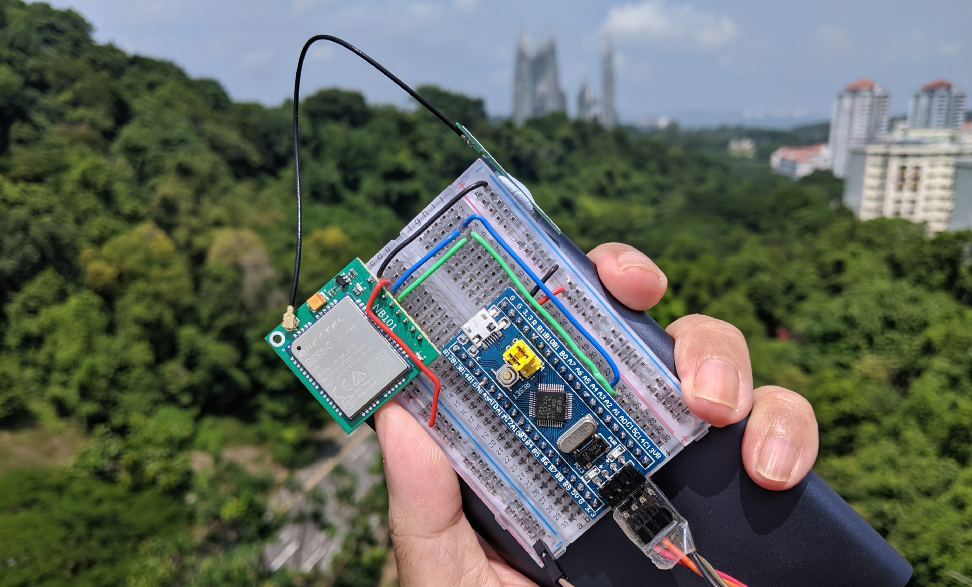
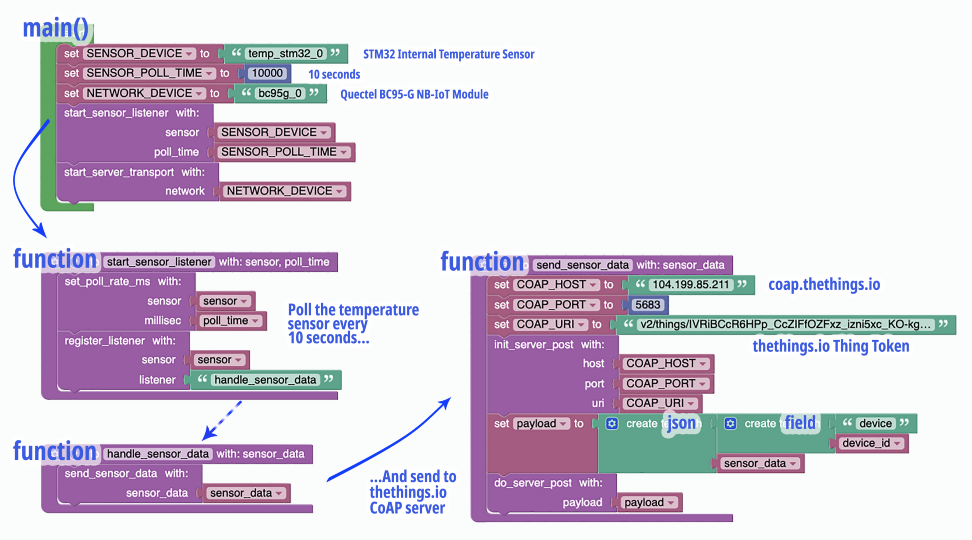
Here’s what we’ll be building today…
The complete source code is located here…
Hardware Required
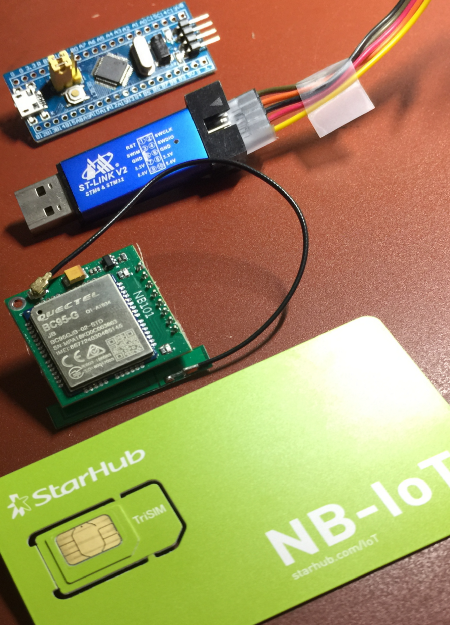
STM32 Blue Pill, ST-Link V2, Quectel BC95-G breakout board with antenna, NB-IoT SIM
We’ll need the following hardware…
1️⃣ STM32 Blue Pill
3️⃣ Quectel BC95-G Global NB-IoT Module (breakout board with antenna). I ordered mine here. The manual in Chinese is here.
4️⃣ NB-IoT SIM from your local NB-IoT network operator
Many thanks to StarHub for sponsoring the NB-IoT SIM that I used for this tutorial!
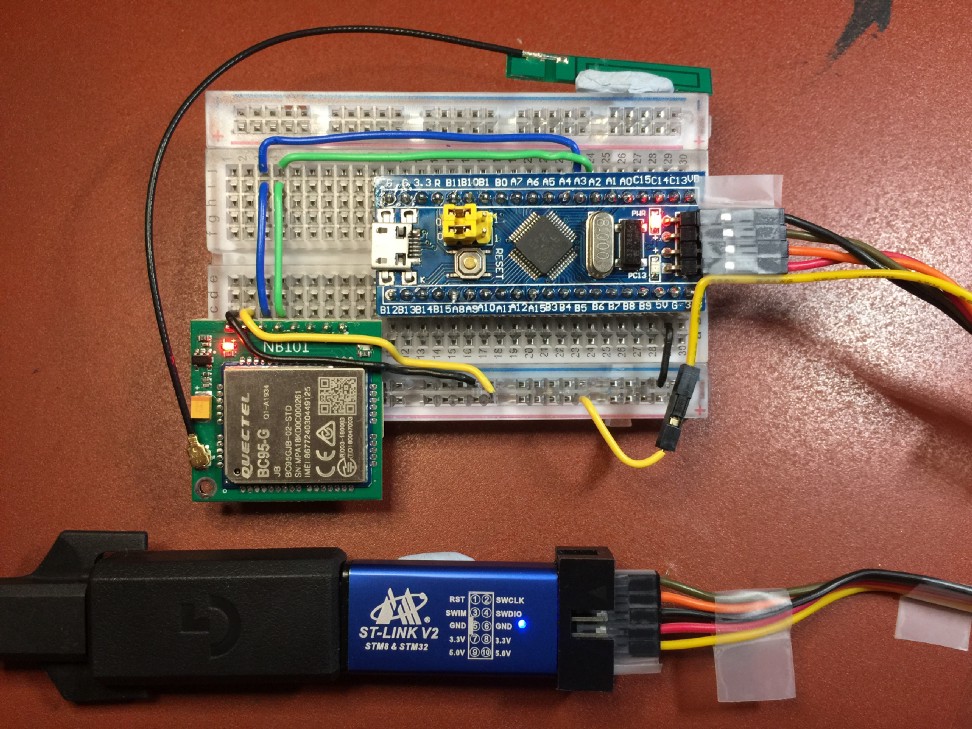
Blue Pill connected to Quectel BC95-G and ST-Link
Connect Blue Pill to Quectel Module
Connect Blue Pill to Quectel BC95-G and ST-Link as follows…
Both yellow jumpers on Blue
Pill should be set to the 0 position, as shown in the above
photo.
Note that we are powering the Quectel module with 5V from ST-Link instead of 3.3V from Blue Pill. That’s because the module requires more power than Blue Pill can provide. (How did I find out? Because the module kept restarting when I powered it from Blue Pill.)
Check the documentation for your Quectel breakout board to confirm that it supports 5V. (Mine does)
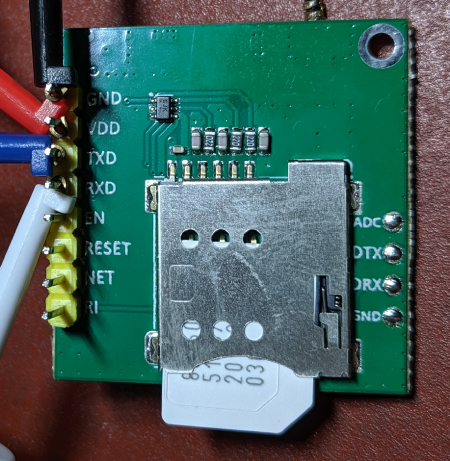
SIM partially exposed to show the unusual orientation
Insert the NB-IoT SIM according to the orientation shown in the photo. (Yes the SIM notch faces outward, not inward)
Remember: Always connect the antenna before powering up the NB-IoT module!
Don’t connect ST-Link to your computer yet, we’ll need to install the ST-Link driver in a while.
Install Mynewt
Follow the instructions below to install the Mynewt build and application files on Windows…
The NB-IoT Program
We have just installed a simple program that reads Blue Pill’s internal temperature sensor every 10 seconds and sends the data to a CoAP Server (thethings.io) over the NB-IoT network.
Function main()

From https://github.com/lupyuen/stm32bluepill-mynewt-sensor/blob/nbiot/apps/my_sensor_app/src/main.c
main() in apps/my_sensor_app/src/main.c
is the function called upon device startup. Mynewt applications are required to call sysinit() to start the system services and drivers, including the
drivers for the internal temperature sensor and the NB-IoT module.
start_sensor_listener() is called next to set up the polling
schedule for the temperature sensor. We’ll study this in a while.
start_server_transport()
is called to connect the NB-IoT module to the NB-IoT network. This may take a few seconds to complete,
so start_server_transport() will perform the connection as a background task. start_server_transport() is part of the Sensor Network Library.
The main event loop appears at
the end of the main() function. This is required by Mynewt for
processing system events.

Functions start_network_sensor() and handle_sensor_data()
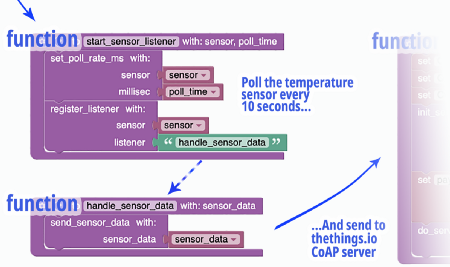
start_sensor_listener() in apps/my_sensor_app/src/sensor.c
is called by main() to set the polling schedule for the
temperature sensor.
sensor_set_poll_rate_ms()
is the Mynewt system function that’s called to set the temperature sensor (temp_stm32_0)
to be polled every 10,000 milliseconds (or 10 seconds)
What happens when Mynewt has polled the sensor data?
In the call to sensor_register_listener() (another
Mynewt system function), we instruct Mynewt to call our function handle_sensor_data() whenever it has polled for new sensor data.
Every 10 seconds after Mynewt
has obtained the raw sensor data from the temperature sensor, Mynewt calls handle_sensor_data() in apps/my_sensor_app/src/sensor.c
to work on the raw sensor data.
handle_sensor_data() wraps the raw sensor data into a sensor_value. Here we specify that the raw sensor data should be
transmitted as an integer with field name t. It then calls send_sensor_data() to transmit the sensor value.
Why do we
transmit the raw sensor data as an integer value (like 1715) instead of a floating-point value (like
32.1 degrees Celsius)?
Remember that we are creating an embedded application for a constrained, low-power microcontroller with little ROM and RAM. On constrained devices, it takes a lot of ROM and RAM to convert temperature values from integer to floating-point.
Hence we conserve device resources when we transmit sensor values in their raw, integer forms and let the IoT cloud (thethings.io) convert the values into floating-point.
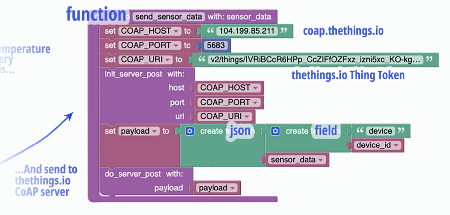
Function send_sensor_data()
From https://github.com/lupyuen/stm32bluepill-mynewt-sensor/blob/nbiot/apps/my_sensor_app/src/network.c
send_sensor_data() in apps/my_sensor_app/src/network.c
is called by handle_sensor_data() to transmit sensor data. In
this program we’re transmitting sensor data to the CoAP server at thethings.io.
thethings.io requires our sensor data to be in this JSON format…
{"values":[
    {"key":"device",
     "value":"010203"},
    {"key":"t",
     "value":1715}
]}
By calling the macros CP_ROOT,
CP_ARRAY,
CP_ITEM_STR
and CP_ITEM_INT_VAL,
the program composes a JSON message in the above format based on our raw temperature value t.
When do_server_post()
is called, the JSON message is encoded as the payload of a CoAP message. The CoAP message is
transmitted as a UDP packet to thethings.io over the NB-IoT network.
What’s device in the JSON message? We’ll find out in a while.
Run The Program
1️⃣ Click Debug → Start Debugging
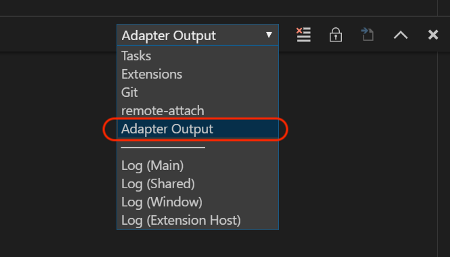
2️⃣ Click View → Output
Select Adapter Output to see the Blue Pill log
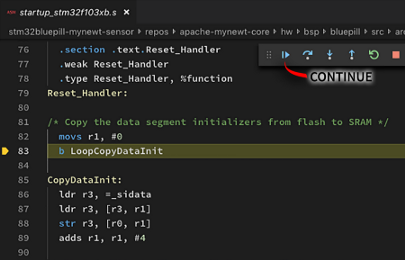
3️⃣ The debugger pauses at the
line with LoopCopyDataInit
Click Continue or press F5
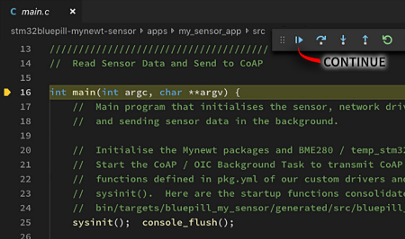
4️⃣ The debugger pauses next
at the main() function.
Click Continue or press F5
The program should now poll the internal temperature sensor every 10 seconds and transmit to thethings.io. Let’s study the Blue Pill execution log…
Check The Log
The log from our Blue Pill should look like this. When we see this in the log…
AT> NCONFIG=AUTOCONNECT,FALSE
AT= OK
It means that the program has sent this AT command to the NB-IoT module…
AT+NCONFIG=AUTOCONNECT,FALSE
Followed by Carriage Return
CR 0x0d and Line Feed
LF 0x0a characters. Then
the NB-IoT module responded with…
OK
Since AT+ is present in all AT commands, we won’t show the prefix AT+ in the log. All the AT commands below are explained in my
previous article.
From https://github.com/lupyuen/stm32bluepill-mynewt-sensor/blob/nbiot/logs/standalone-node.log#L61-L89
When the program starts, it
disables NB-IoT module’s auto-connection (NCONFIG=AUTOCONNECT,FALSE) and reboots the NB-IoT module (NRB).
It selects NB-IoT Frequency Band 8 (NBAND=8),
enables the NB-IoT radio transceiver (CFUN=1) and starts
attaching to the NB-IoT network (CGATT=1)
The NB-IoT Frequency Band depends on your country and your NB-IoT network operator. Check with your NB-IoT network operator for the Frequency Band to use.
The NB-IoT Band is configured
here: targets/bluepill_my_sensor/syscfg.yml
The program queries the NB-IoT
registration status (CEREG?). The response +CEREG:0,2 means that the NB-IoT module is still registering with
the NB-IoT network.
From https://github.com/lupyuen/stm32bluepill-mynewt-sensor/blob/nbiot/logs/standalone-node.log#L102-L109
The program continues to query
the registration status (CEREG?). In a few seconds, we get the
response +CEREG:0,1 which means that the NB-IoT module has
registered with the NB-IoT network.
We send CGATT? to check whether we have been attached to the NB-IoT network.
The response +CGATT:1 means that we have been successfully
attached to the NB-IoT network. We may start transmitting data to the network.
Before transmitting, we ask
the NB-IoT module to allocate a local UDP port (NSOCR=DGRAM,17,0,1). The module returns local port 1.
From https://github.com/lupyuen/stm32bluepill-mynewt-sensor/blob/nbiot/logs/standalone-node.log#L113-L127
Next the program reads the
Blue Pill’s internal temperature sensor (every 10 seconds) and obtains the raw temperature value 1757.
The program composes the CoAP message with JSON payload (described earlier)…
{"values": [
  {"key": "device",
   "value": "ac913c..."},
  {"key": "t",
   "value": 1757}
]}
…And transmits the CoAP
message via the AT command NSOST=… (not shown in the log).
The hex numbers 58 02 00 01 ... are the bytes of the encoded
CoAP message. You may decode the CoAP message with Wireshark as explained in the previous
article.
The CoAP message is
transmitted by the NB-IoT module to the CoAP server at thethings.io. Notice that the message includes
a device ID ac913c... This is a random
number that’s transmitted in every CoAP message.
When we Ctrl-Click the URL in the log…
https://blue-pill-geolocate.appspot.com?device=ac913c…
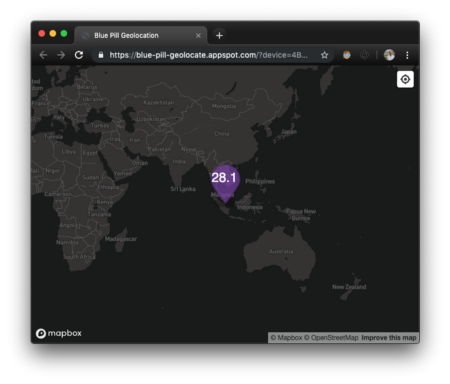
Web page with computed temperature
…We see a web page with the
computed temperature value in degrees Celsius. That’s because thethings.io has
converted the raw temperature into the actual temperature (in degrees Celsius). We have
installed a script at thethings.io that
pushes the computed temperature to blue-pill-geolocate.appspot.com, so that we could see the computed
temperature.
The URL (and the random number) changes each time we restart the program. More details about the setup for thethings.io may be found in the previous article.
What’s Next?
In the next article we’ll create more NB-IoT devices… this time with Visual Rust!
Also we’ll be checking out these exciting NB-IoT developer kits with onboard low-power STM32 microcontrollers and Quectel NB-IoT modules. Stay tuned!

NB-IoT developer kit with onboard Quectel BC35-G Global NB-IoT module and STM32L431RCT6 microcontroller. From https://item.taobao.com/item.htm?spm=a230r.1.14.27.67a75d82e8brCe&id=577708190839&ns=1&abbucket=15#detail
References
The following Quectel
documents were very useful for understanding the AT commands. Download them from (free registration
required) https://www.quectel.com/support/downloadb/TechnicalDocuments.htm
- Quectel BC95-G Hardware Design V1.3: Details of the BC95-G pins
- Quectel BC95 & BC95-G & BC68 Application Design Guide V1.1: Designing applications for BC68
- Quectel BC95-G & BC68 AT Commands Manual V1.4: AT commands
- Quectel BC95-G & BC68 CoAP Application Note V1.0: AT commands for CoAP. Unfortunately I was not able to use the AT commands here to transmit the payload correctly (the transmitted payload was always empty). So I decided to encode the CoAP messages myself.
💎 Advanced Topic: Quectel BC95-G Driver for Mynewt
The Mynewt driver I have created for Quectel BC95-G is located here…
https://github.com/lupyuen/stm32bluepill-mynewt-sensor/tree/nbiot/libs/bc95g
driver.cpp
contains the main logic for the driver. It sends AT commands and handles responses and timeouts.
ATParser
and BufferedSerial
libraries (ported from mbed) are called by driver.cpp to parse
the AT responses from the Quectel module. The dynamic heap memory allocation in the original mbed
version has been replaced by static memory buffers, to reduce RAM and ROM size.
creator.cpp
contains the driver creation code required by Mynewt
transport.cpp
provides the OIC (Open Interconnect Consortium) network transport required for transmitting CoAP
messages via Mynewt’s OIC framework
syscfg.yml
defines one configuration setting: NBIOT_BAND, the NB-IoT band
(defaults to 8)
pkg.yml
instructs Mynewt to call bc95g_create()
to initialise the driver during startup
Why do we use
mbufs when transmitting sensor data? Like in
bc95g_socket_tx_mbuf()?
An mbuf
(“memory buffer”) is a chain of
memory blocks that’s optimised for transmitting network messages. Recall the structure of our CoAP
message from the previous
article… Every CoAP message has a Preamble and an Options Header
that are usually fixed in length for the session. But the Payload of
the message may vary, depending on the sensor data.
Shall we keep reallocating and deallocating the memory blocks for the Preamble, Options and Payload every time we transmit a CoAP message?
No, we may actually reuse the same mbuf to hold the fixed-length
Preamble and Options. But depending on the sensor data, we’ll attach one or more mbufs to the chain to hold the entire Payload. This speeds up the
composition of CoAP messages.
That’s why in the driver code
we see the program walking through each mbuf in the chain and transmitting
each mbuf. This keeps the networking code highly efficient, just
like early versions of the Unix
operating system.