
IoT sensor device with STM32 Blue Pill microcontroller, Quectel BC95-G global NB-IoT module and 18650 lithium ion battery
Visual Embedded Rust Programming with Visual Studio Code
Create and edit Embedded Rust programs for STM32 Blue Pill and Apache Mynewt… By dragging and dropping blocks!

Tomato Crop and Temperature Sensors on Moon Base One
The year is 2029. Humans are populating the Moon, starting at Moon Base One.
You have one and only one responsibility… Making sure that the crop garden on Moon Base One produces beautiful red tomatoes.
How would you create the IoT sensor devices to monitor the growing conditions of the crop garden?
…Like reading the temperature periodically and transmitting the data to an IoT server?
Would you open up a text editor and write a C program to control the sensor devices?
And troubleshoot problems with invalid C pointers crashing the sensor devices?
Fortunately in 2029 there will be a better way to create embedded programs… Visual Embedded Rust!
Create programs for IoT devices… Just by dragging and dropping!
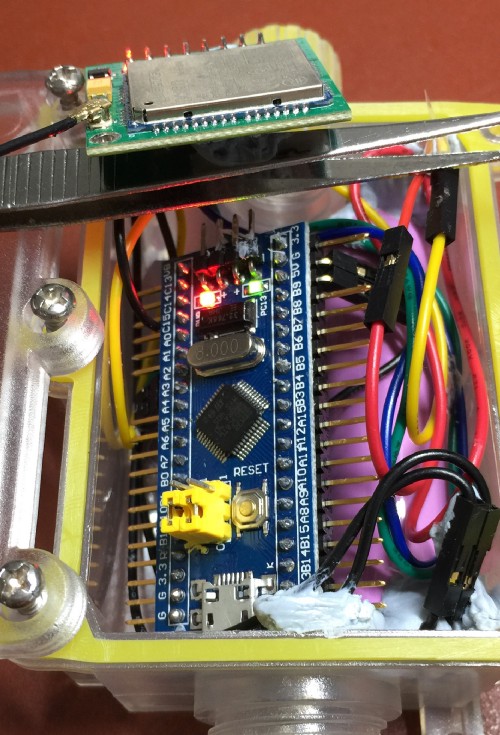
STM32 Blue Pill, the $2 microcontroller inside our IoT sensor gadget. Powered by a 18650 lithium ion battery (in pink). Connected to NB-IoT network via a Quectel BC95-G Global NB-IoT module (top left).
Today we’ll learn to create an IoT sensor application for a microcontroller that’s tiny, affordable (under $2) and yet packs a powerful punch… STM32 Blue Pill.
Instead of coding in C, we’ll do it the futuristic way — by drawing the program with blocks!
Our visual program will be converted into Rust, a modern programming language that performs well on the tiniest microcontrollers.
Rust enables us to write Safe Code, so our devices won’t crash due to bad pointers.
If you don’t have a Blue Pill (under $2 at AliExpress), no worries! You’re invited on our journey to learn and understand how IoT programs could be created visually.
💎 If you’re a seasoned coder like me, we have goodies for you too! You’ll find Advanced Topics in the second half of this tutorial, watch out for the diamond 💎 icons
Our First Visual Rust Program
For the first part of the tutorial, all we need is a computer (Windows, macOS or Linux). We’ll create a simple Visual Program, just follow these steps…
1️⃣ Install Visual Studio Code
Are you using a Raspberry Pi or
Nvidia Jetson Nano?
Get the community build of Visual Studio Code
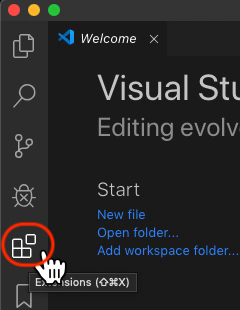
2️⃣ Launch Visual Studio Code
Click Extensions

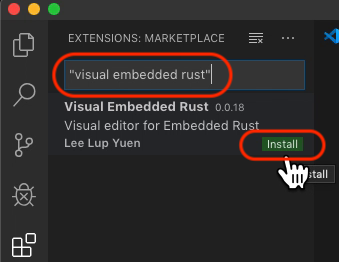
3️⃣ Search for "visual embedded rust" with quotes
Click Install to install the Visual Embedded
Rust extension
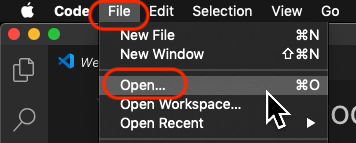
4️⃣ Click File → Open to open any folder

5️⃣ In the Explorer → (Folder Name) pane at top left, create a new Rust source
file, like lib.rs
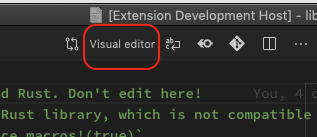
6️⃣ Edit the Rust source file.
Click Visual Editor at top right
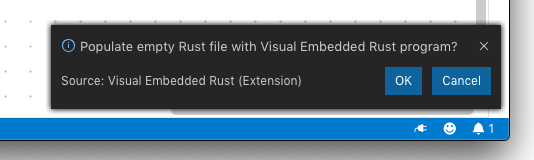
7️⃣ When prompted to populate the
visual program into the Rust source file, click OK
8️⃣ Click the Rust source file to see the generated Rust code. Save the file to save the visual program.
You should see the screen below. Let’s study the four main blocks (or functions) in the Visual Program…
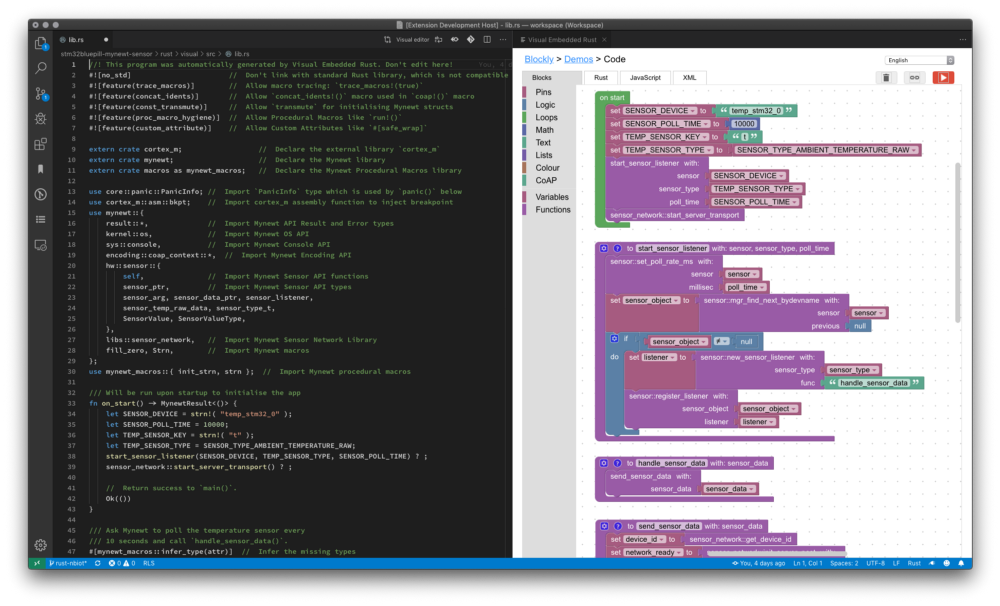
Editing a Visual Embedded Rust program with Visual Studio Code
[1] On Start
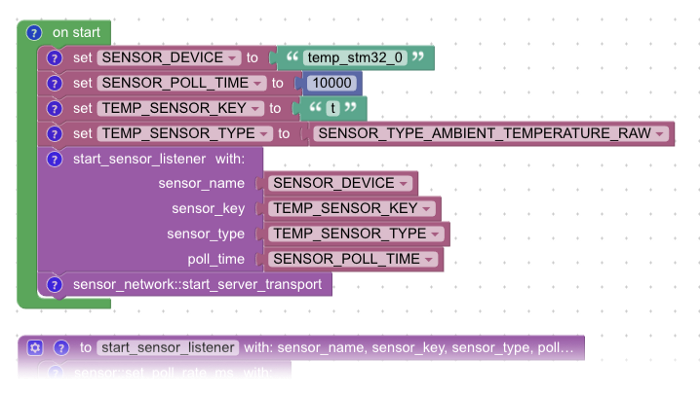
On Start marks the start of the program. Here we define some
constants — values used by the program that won’t change as the program runs…
1️⃣ SENSOR_DEVICE is the name of the sensor that the program will poll
(check periodically). We’ll be polling Blue Pill’s Internal Temperature Sensor, which is named temp_stm32_0
2️⃣ SENSOR_POLL_TIME is the time interval (in milliseconds) for polling
the sensor. We’ll set this to 10 seconds (or 10,000 milliseconds)
3️⃣ TEMP_SENSOR_KEY is the name of the sensor data field that our
program will send to the server. We’ll call it t to tell the
server we’re sending a temperature value.
4️⃣ TEMP_SENSOR_TYPE is the type of sensor data that our program will
send: Raw ambient temperature in whole numbers (integers from 0
to 4095), hence SENSOR_TYPE_AMBIENT_TEMPERATURE_RAW
Why do we send the temperature in
raw form instead of the usual decimal (floating-point) form like 28.9 degrees Celsius? That’s because Blue Pill has very limited RAM
and ROM. Sending the raw temperature without conversion will save us from reserving RAM and ROM that
would be needed for the floating-point conversion. We’ll let the server convert instead.
By Rust convention, constants are
named in uppercase. Hence we name the constants as SENSOR_DEVICE
instead of sensor_device
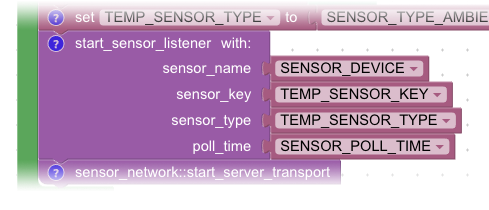
Next we call the function start_sensor_listener to begin polling the temperature sensor every
10 seconds. More about this in the next section.
Finally we call start_server_transport, which is a system function defined in the
sensor_network library. This function starts a background task
to establish a connection to the NB-IoT network. For this tutorial, we’ll be transmitting sensor data
over the NB-IoT network, which is available
worldwide.
It may take a few seconds to complete, but the function executes in the background so it won’t hold up other tasks, like polling the temperature sensor.
Take note of the Rust convention…
sensor_network::start_server_transport refers to the function
start_server_transport that’s found inside the Rust Library
sensor_network. Rust Libraries are also known as “Crates”.
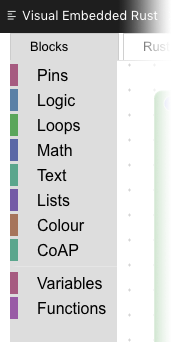
Blocks Bar
How was the
On Start function
created?
By dragging and dropping the blocks from the Blocks Bar at the left of the Visual Program.
That’s how we create a Visual Program… By arranging the blocks to compose a program!
Check this out…
Creating the On Start function with Visual Embedded Rust
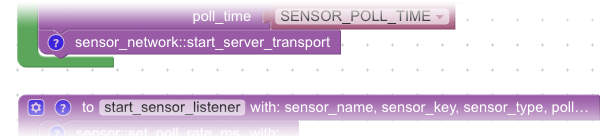
[2] Start Sensor Listener
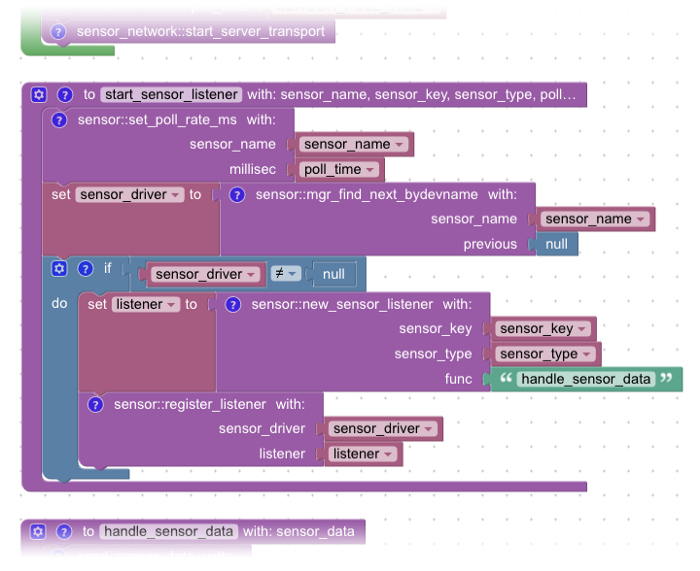
To start_sensor_listener With ... is the way that we define
functions in the Visual Program. Here we define start_sensor_listener as a function that accepts 4 parameters (or
inputs), whose values we have seen from the previous section…
1️⃣ sensor_name: Name of the sensor to be polled. Set to SENSOR_DEVICE (i.e. temp_stm32_0)
2️⃣ sensor_key: Name of the sensor data field to be sent to the server.
Set to TEMP_SENSOR_KEY (i.e. t)
3️⃣ sensor_type: Type of sensor data that will be sent to the server.
Set to SENSOR_TYPE_AMBIENT_TEMPERATURE_RAW
4️⃣ poll_time: Time interval (in milliseconds) for polling the sensor.
Set to SENSOR_POLL_TIME (i.e. 10,000 milliseconds or 10 seconds)
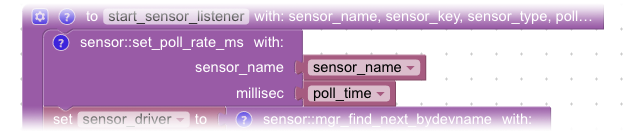
Next we call the system function
set_poll_rate_ms, defined in the sensor library. The sensor
library comes from the Apache Mynewt operating system, which
manages all sensors on the Blue Pill.
By calling the function set_poll_rate_ms with sensor_name set to temp_stm32_0 and poll_time set
to 10000 (milliseconds), we are asking the system to poll the
temperature sensor every 10 seconds. And the system will happily fetch the temperature value on our
behalf every 10 seconds.
What shall we do with the temperature value? We’ll define a Listener Function to transmit the data. But first…
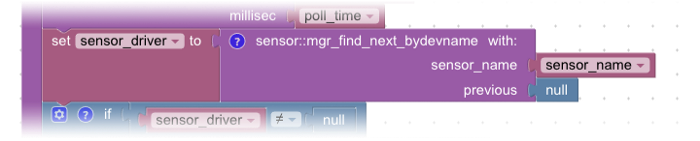
We call function mgr_find_next_bydevname (also from the sensor library) to fetch the sensor driver from the system and store
it in the variable sensor_driver. By passing the sensor_name as temp_stm32_0,
the function returns the driver responsible for managing the temperature sensor. The driver will be
used for setting the Listener Function in a while.

Before that, we check the sensor
driver was actually found. If we had misspelt the name of the sensor, the sensor driver would not be
found and it would be set to null, a special Rust value that
means “nothing”. Hence we check to ensure that sensor_driver is
not null.
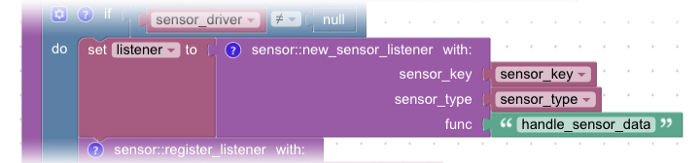
We create a sensor listener
(stored as listener) by calling the system function new_sensor_listener, passing in the sensor_key (set to t) and the
sensor_type (raw ambient temperature). func is the name of the Listener Function that will be called after
reading the sensor data: handle_sensor_data. Which we’ll cover
in the next section.
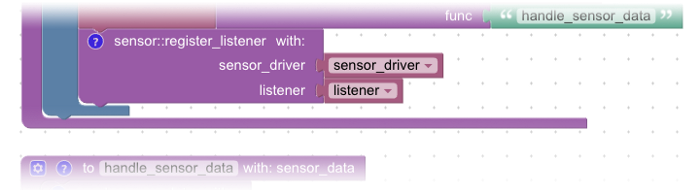
To register the Listener Function
in the system, we call the system function register_listener,
passing in the sensor_driver and the sensor listener that we
have just created.
After that, the operating system
will automatically read the temperature sensor every 10 seconds and call our function handle_sensor_data with the temperature value.
If you’re curious how the
complicated start_sensor_listener function was created from
scratch, check out this video…
Creating the start_sensor_listener function with Visual Embedded Rust
[3] Handle Sensor Data

How shall we handle the
temperature data that has been read? handle_sensor_data passes
the sensor data to another function send_sensor_data that
transmits the sensor data to the server. More about send_sensor_data in a while.
The function handle_sensor_data doesn’t seem to do much… why did we design the
program this way? It’s meant for future expansion — when we need more complicated logic for handling
sensor data, we’ll put the logic into handle_sensor_data
handle_sensor_data could be extended to handle multiple sensors,
aggregating the sensor data before transmitting. Or it could check for certain conditions and decide
whether it should transmit the data. This program structure gives us the most room to expand for the
future.
[4] Send Sensor Data
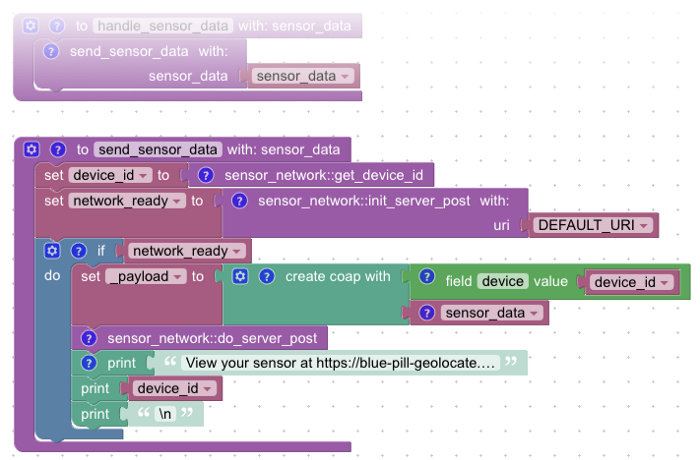
The final function in our
program, send_sensor_data, is called by handle_sensor_data to transmit sensor data. The parameter sensor_data contains the field name t and the sensor value, like 1715. Remember that this is a raw temperature value. The server will
convert the raw value to degrees Celsius later.

We call get_device_id from the sensor_network library to fetch the Device ID from the system. This
is a long string of random letters and digits like a8b2c7d8e9b2... Each time we restart Blue Pill we’ll get a different
Device ID. We’ll use this Device ID later to identify our Blue Pill uniquely and check whether the
server has received the temperature sensor data from our Blue Pill.

Next we call init_server_post (also from sensor_network library) to prepare a sensor data message that will
be sent to the server. Because Blue Pill has limited RAM, this function will ensure that only one task
is allowed to compose messages at any time. The other tasks will have to wait for their turn.
init_server_post returns a true/false result (known as a boolean)
that indicates whether the NB-IoT network connection has been established. This stored in the variable
network_ready.

Only when network_ready is true, which means that the device has connected to
the NB-IoT network, then we proceed to compose a CoAP Message.

What’s a CoAP Message? It’s a standard format for transmitting sensor data over NB-IoT. Here we are transmitting two data values in the CoAP Message...
1️⃣ device_id: The randomly-generated Device ID that uniquely identifies
our Blue Pill. This field shall be transmitted with the field name device
2️⃣ sensor_data: Contains the field name t and the sensor value, like 1715

The CoAP Message is transmitted
only when function do_server_post is called. Again this
transmission takes place in a background task, so it won’t hold up our program from polling the
sensor.
Notice that _payload is named differently… it begins with an underscore _. By Rust convention, variables that are set but not read should be
named with an underscore _ as the first character. Because the
Rust Compiler will warn us about unused variables.
This effectively tells the Rust
Compiler: “Yes I’m setting the variable _payload and I’m not using the value… Please don’t
warn me that I may have misspelt the name _payload"
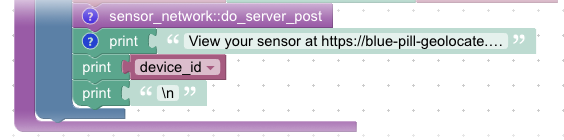
At the end of the function, we
display a URL in the Blue Pill log that contains the Device ID. The URL looks like this: https://blue-pill-geolocate.appspot.com/?device=5cfca8c…
Later we’ll click this URL to verify that the server has received our sensor data.
💎 CoAP Messages are explained in this article
The Visual Program
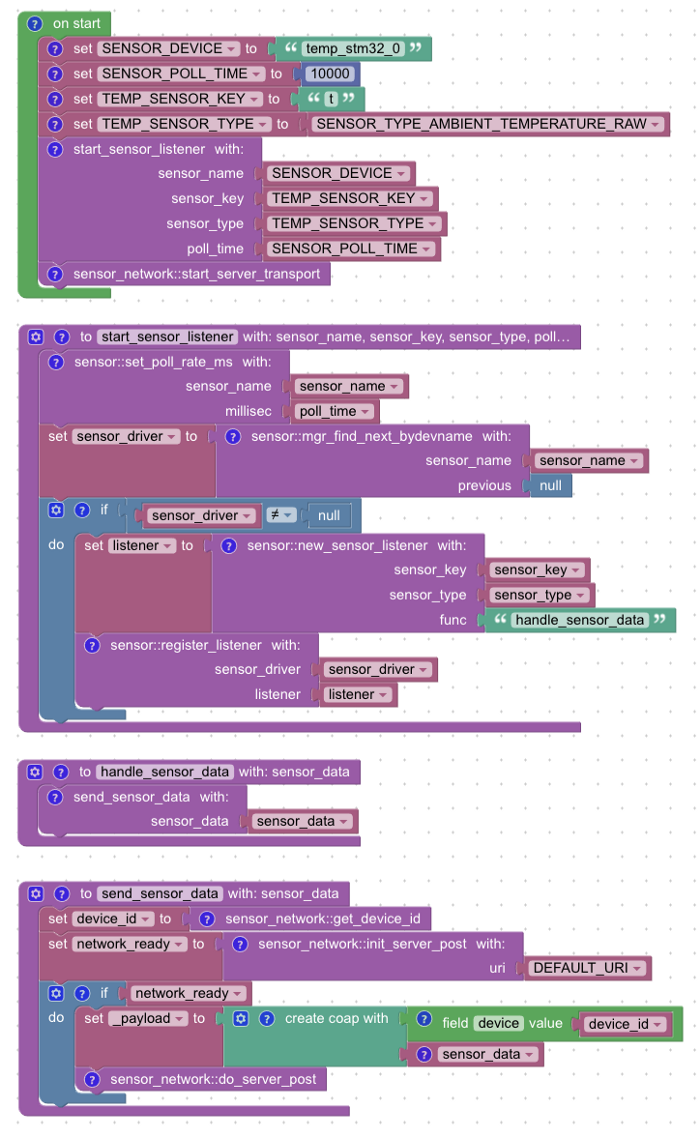
And that’s the complete program for an IoT sensor device that reads the temperature sensor every 10 seconds and transmits the data to the server over the NB-IoT network.
When expressed as a Visual Program, it looks so simple and elegant! Now let’s prove to ourselves that it really works…
💎 The Rust code that’s generated is a special kind of Rust code known as “Typeless Rust”. Check the sections “What’s Wrong With Rust? Types!” and “Typeless Rust”. To understand the generated Rust code, read this article
Compile The Rust Program
Ready to experience for yourself how a Rust program gets compiled into ROM firmware? You don’t need a Blue Pill yet, just follow these steps…
1️⃣ Follow the instructions here to install Embedded Rust and Apache Mynewt
You may skip the sections “Optional: Install Rust Language Server” and “Optional: Program Settings”
2️⃣ Copy your Visual Program
source file to stm32bluepill-mynewt-sensor/rust/app/src/lib.rs.
Overwrite the existing file.
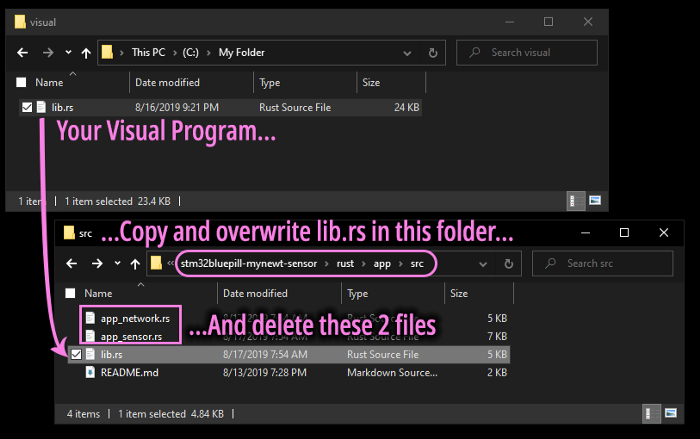
3️⃣ Delete the files app_network.rs and app_sensor.rs in that folder
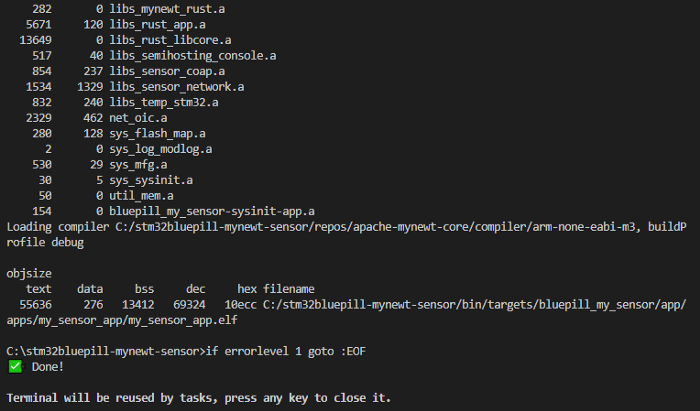
4️⃣ Compile the Rust program by
clicking Terminal → Run Task → [2] Build bluepill_my_sensor
When our Rust program has been successfully compiled as Blue Pill ROM firmware, we should see this…
If you wish to make any changes
to the Visual Program, use the Visual Editor to edit the file stm32bluepill-mynewt-sensor/rust/app/src/lib.rs
💎 How was the Rust code merged into the Mynewt build? Check the section “Advanced Topic: Hosting Rust on Mynewt”
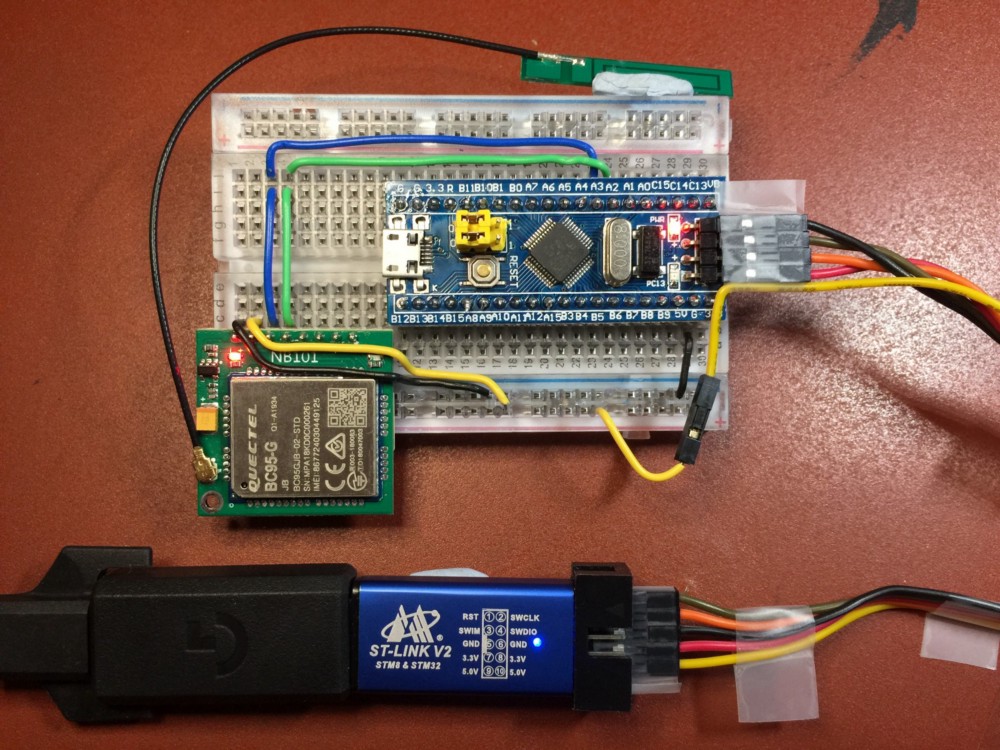
Blue Pill connected to Quectel BC95-G NB-IoT module and ST-Link V2
Flash The Firmware To Blue Pill
Time to use our Blue Pill! The next step is to flash the firmware into Blue Pill’s ROM. We’ll need to connect the Blue Pill to the USB port of our computer via an ST-Link V2 adapter.
Optional: To transmit sensor data over the NB-IoT network, we’ll also need a Quectel BC95-G Global NB-IoT Module (breakout board with antenna). And an NB-IoT SIM from your local NB-IoT network operator.
1️⃣ Connect the hardware by following the instructions here
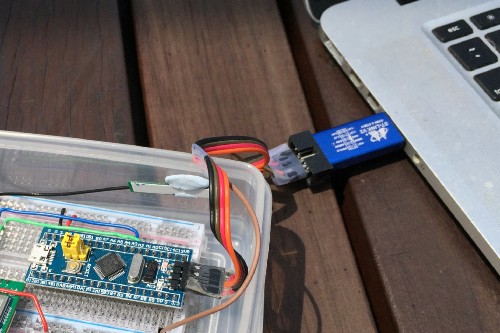
Blue Pill and ST-Link connected to USB port
2️⃣ Check that the Blue Pill is connected to ST-Link…
And that the ST-Link is connected to your computer’s USB port.
Now let’s head back to Visual Studio Code…
3️⃣ Click Terminal → Run Task → [4] Load bluepill_boot
This flashes the bootloader to Blue Pill, to start the Apache Mynewt operating system upon startup. If it shows errors, compare with this flash log.
4️⃣ Click Terminal → Run Task → [5] Load bluepill_my_sensor
This flashes the firmware (containing our Visual Program) to Blue Pill. If it shows errors, compare with this flash log.
💎 Blue Pill was chosen for a reason… Check the section “Why Blue Pill? Power vs Price Compromise”
Run The Program
Now we are ready to run the Visual Program on our Blue Pill IoT device!
1️⃣ Click Debug → Start Debugging
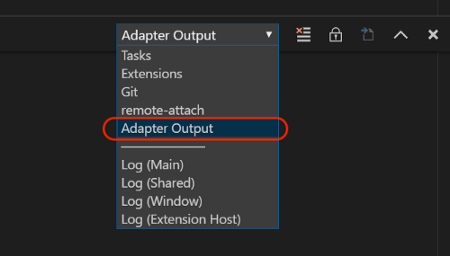
2️⃣ Click View → Output
Select Adapter Output to see the Blue Pill log

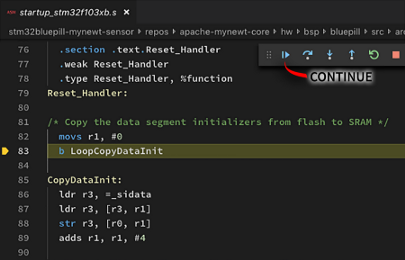
3️⃣ The debugger pauses at the
line with LoopCopyDataInit
Click Continue or press F5
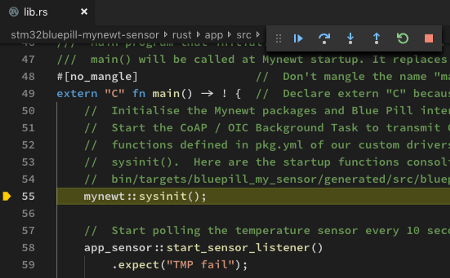
4️⃣ The debugger pauses next at
the main() function.
Click Continue or press F5
Our Blue Pill should now poll its internal temperature sensor every 10 seconds. It should also transmit the temperature data to the CoAP server hosted at thethings.io. Exactly like the temperature sensor on Moon Base One!
Here’s what you’ll see…
Running the Visual Embedded Rust program
The Blue Pill log should look like this.
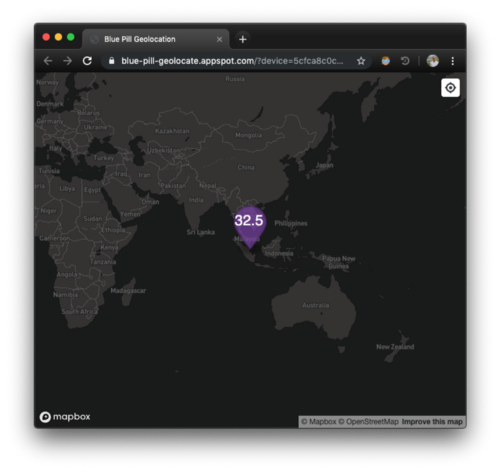
Upon clicking the URL https://blue-pill-geolocate.appspot.com/?device=5cfca8c… that’s
shown in the Blue Pill log, we’ll see a web page that displays the temperature received by the server
at thethings.io.
The server has converted the raw temperature into degrees Celsius. Remember that we convert the temperature at the server to conserve RAM and ROM on Blue Pill.
💎 To understand the messages in the Blue Pill log, read the section “Check The Log”. The configuration of the CoAP Server at thethings.io is explained here.
The End…?
Keen to learn how Visual Embedded Rust was created? Check out this companion article on 💎 Advanced Topics for Visual Embedded Rust Programming…
If you would like to join me in making Rust simpler for beginners, drop me a note!