
STM32 Blue Pill — Unit Testing with Qemu Blue Pill Emulator
The year is 2029. Humans are populating the Moon, starting at Moon Base One. Two Moon Base Operators observe something highly unusual in the crop garden of beautiful red tomatoes…
Operator 1: WHAT’S WITH THE SPRINKLERS !!! They were working fine a moment ago… if the sprinklers keep spraying like this, our tomato crop will be ruined!
Operator 2: You know there’s something strange going on… I can feel it… Some alien presence controlling our sprinklers…
Operator 1: Our IoT Dashboards have gone nuts! Why are we getting negative values for some Humidity Sensors? Wait… did you roll out firmware updates for our STM32-BLUER-PILL Monitoring Devices?
Operator 2: We replaced a thousand BLUER-PILL devices by STM32-BLUEST-PILL just now. We flashed the old BLUER-PILL firmware onto the new BLUEST-PILL devices. I’m 100% certain it works!
Operator 1: I don’t see any records of Unit Testing… Didn’t you run the Embedded Unit Tests after flashing?
Operator 2: Uh what’s Embedded Unit Testing? They never taught that in school… oh wait I remember now… BLUEST-PILL comes with a new BME281 Humidity Sensor that works a little differently from the old BME280 sensor… Yep our firmware is bad…
Operator 1: NOOOOOOO! Our tomatoes are turning to MUSH !!!
Computing sensor values in IoT devices can be prone to bugs… And Unit Testing can help to stop the bugs before they pollute the entire IoT chain. Check out this complicated computation…
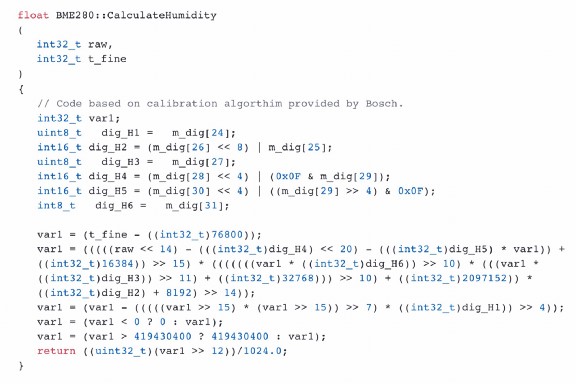
BME280 Humidity Sensor Computation. From https://github.com/finitespace/BME280/blob/master/src/BME280.cpp
This is the
actual function used to compute the ambient humidity for the BME280
Humidity Sensor (just like the story). It’s hard to
figure out whether this function computes the humidity correctly given the sensor’s register values
(m_dig[]).
With Unit Testing we can plug in specific input values and verify that the output value is correct. When we repeat this verification for many sets of input and output values (called Test Cases), we will be more confident that the function is correct. Say farewell to Mushy Moon Tomatoes as we learn…
- What’s a Test Case and Test Suite
- Qemu, the Blue Pill Emulator
- How I used Qemu for Automated Unit Testing
- Side Effects in Unit Testing
- Floating-point precision in Unit Testing and Test Coverage
What’s A Test Case?
We’ll use the Unity Unit Test Library (not the game toolkit). Here’s a simple Test Case that divides two numbers and verifies the result…
x = 2205.1969;
y = 270.8886;
r = x / y;
TEST_ASSERT_EQUAL_DOUBLE( 8.140604292687105, r );
TEST_ASSERT_EQUAL_DOUBLE() is a macro from the Unity library that
compares the Expected Result 8.14… with the Actual Result r. If the Expected and Actual Results (of type double) are not the same, the Unity library flags the Test Case as
FAILED. So that we can
troubleshoot and fix the problem.
We have just seen a trivial Test Case. Usually we’ll be verifying the output of a function given some inputs like this…
x = 2205.1969;
y = 270.8886;
r = __wrap___aeabi_ddiv(x, y);
TEST_ASSERT_EQUAL_DOUBLE( 8.140604292687105  , r );
Here we are
testing a function __wrap___aeabi_ddiv(). We don’t really know
what the function does, but we expect it to behave like the division of two doubles. So we can call Unity to verify the same Expected and Actual
Results.
Besides comparing doubles, Unity supports other types as well, like…
TEST_ASSERT_EQUAL_INT(    a,        2 );
TEST_ASSERT_EQUAL_FLOAT(  pi,       3.45 );
TEST_ASSERT_EQUAL_STRING( greeting, "Attention, Dr. Surly" );
What’s A Test Suite?
The more Test Cases we write, the more confident we’ll be that the tested function works correctly. When we group the related Test Cases into a function, we get a Test Suite like this…
From https://github.com/lupyuen/stm32bluepill-unittest/blob/master/lib/nano-float/test/test.c#L64-L71
To run the Test Suites, we call their functions like this…
int test_nanofloat(void) {
    //  Run unit tests.
    UNITY_BEGIN();
    RUN_TEST(test_aeabi_ddiv);
    RUN_TEST(test_aeabi_dmul);
    RUN_TEST(test_aeabi_dadd);
    RUN_TEST(test_aeabi_dsub);
    ...
    UNITY_END();
Calling test_nanofloat() will execute all the Test Suites for our nano-float library. Where do we call test_nanofloat()?
#include <logger.h>
#ifdef UNIT_TEST
extern int test_nanofloat(void);
#endifint main(void)
{
 enable_log(); //  Enable logging via Arm Semihosting.
               //  Note: ST Link must be connected.#ifdef UNIT_TEST
 test_nanofloat();
#endif debug_force_flush();   //  Flush the debug buffer before we halt.
 for (;;) {}            //  Loop forever.
}#ifdef UNIT_TEST
#include "../lib/nano-float/test/test.c"
#endif
I prefer to
call test_nanofloat() from the main() function, surrounded by #ifdef UNIT_TEST. So the unit test code will not be compiled into
the embedded program unless we define UNIT_TEST.
UNIT_TEST is defined as a compiler option in platformio.ini…
[env:bluepill_f103c8]
...
build_flags =
    ; Enable unit test. Comment this line to disable unit test.
    -D UNIT_TEST
    -D UNITY_FLOAT_PRECISION=0.000001
    -D UNITY_DOUBLE_PRECISION=0.000001
    -D UNITY_OUTPUT_CHAR=unity_output_char
    -D UNITY_INCLUDE_DOUBLE
    -D UNITY_EXCLUDE_SETJMP_H
    -D UNITY_EXCLUDE_MATH_H
And that’s how
the main() function executes all our Test Cases. We’ll cover the
UNITY_FLOAT_PRECISION and UNITY_DOUBLE_PRECISION options in a while.
When we run the complete Unit Test it looks like this… (Click “CC” to view the annotations)
Running Blue Pill Unit Tests. Click “CC” to view the annotations.
If any of the
Test Cases failed, you’ll see a FAILED message. Control-click
the failed Test Case to jump to the line that failed… (Click “CC” to view the annotations)
Failed Blue Pill Unit Test. Click “CC” to view the annotations.
Automated Unit Tests
The code above includes over 200 Test Cases. Which is typical for Unit Testing because we try to be thorough in our testing with all kinds of inputs. But running a few hundred Test Cases on a real microcontroller (like Blue Pill) may slow down our embedded development.
What if we could have a “Virtual” Blue Pill that’s emulated on Windows or macOS? A Windows or macOS program that pretends to be a real Blue Pill, runs the same programs as a real Blue Pill, even pretends to have the same LED, Timers, GPIO, … like a real Blue Pill?
Because it emulates a Blue Pill, we could use it to run Unit Tests again and again. We could run the Unit Tests automatically whenever we update our Blue Pill program… That would be really helpful right?
Fortunately the “Virtual” Blue Pill actually exists: It’s called the Qemu Blue Pill Emulator. That’s what we saw in the videos above. There was no physical Blue Pill connected in the demos that we saw. The installation requires a few steps so let’s walk through the steps…
Install Qemu Blue Pill Emulator
For Windows:
1️⃣ Install Windows Subsystem for Linux. Choose Ubuntu.
2️⃣ Click Start → Bash on Ubuntu on Windows
3️⃣ At the
bash command prompt, enter these commands…
cd /mnt/cgit clone https://github.com/beckus/qemu_stm32.gitcd qemu_stm32sudo apt install libglib2.0-devgit submodule update --init pixmangit submodule update --init dtc./configure --enable-debug --target-list="arm-softmmu"make
This installs
Qemu into the folder C:\qemu_stm32
For macOS:
1️⃣ Install MacPorts
2️⃣ Open a command prompt and enter these commands…
cd ~git clone https://github.com/beckus/qemu_stm32.gitcd qemu_stm32sudo port install glib2-develgit submodule update --init pixmangit submodule update --init dtc./configure --enable-debug \
  --target-list=”arm-softmmu” \
  --python=python2 \
  --disable-cocoamake
For the configure step we assume Python version 2 is installed as python2
This installs
Qemu into the folder qemu_stm32 located at your Home folder.
Run Unit Tests With Qemu Emulator
The easiest way to compile a Blue Pill program and start it with the Qemu Blue Pill Emulator is to use Visual Studio Code with the PlatformIO Extension. We’ll now download the Test Cases shown in the demo and run them with Qemu…
1️⃣ For Windows only: Click Start → Bash on Ubuntu on Windows.
Enter…
cd /mnt/c
git clone https://github.com/lupyuen/stm32bluepill-unittest
2️⃣ For macOS only: Open a macOS command prompt. Enter…
cd ~
git clone https://github.com/lupyuen/stm32bluepill-unittest
3️⃣ Install
Visual Studio Code for Windows or macOS from https://code.visualstudio.com/Download
4️⃣ Launch
Visual Studio Code.
Install the PlatformIO
Extension.
Check this video for the
PlatformIO installation. Click “CC” to view the instructions.
5️⃣ Click File → OpenBrowse to the C:\ folder (for Windows) or the Home folder (for macOS)
Select
the folderstm32bluepill-unittest
6️⃣ Click the “PlaformIO Build” command (the ☑️ button at the lower left)
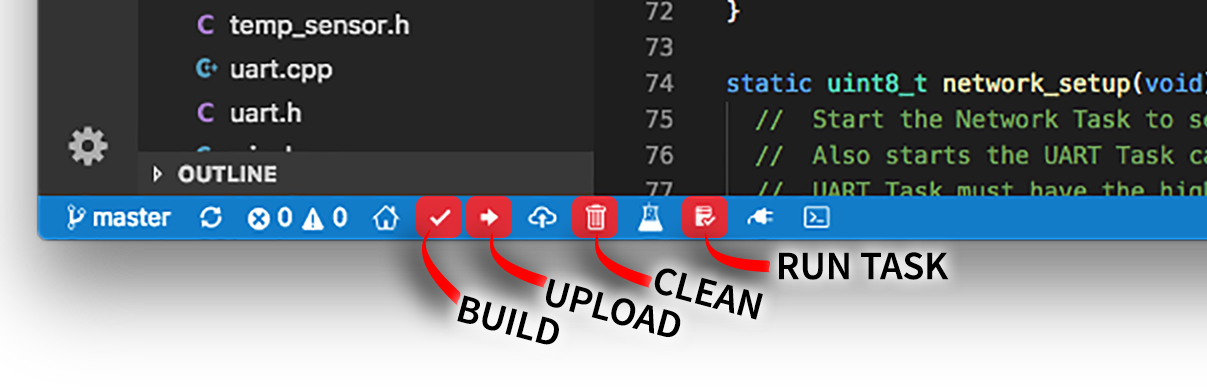
Command buttons in the status bar
7️⃣ Click Tasks → Run Task → 🔗 Emulate STM32 Blue Pill
This starts the Qemu emulator and executes the Blue Pill program, which contains our Test Cases. We should see a log like this to indicate that the Qemu Blue Pill Emulator has executed all the Test Cases successfully…
> Executing task: bash -c '../qemu_stm32/arm-softmmu/qemu-system-arm
-M stm32-f103c8 -semihosting
-kernel .pioenvs/bluepill_f103c8/firmware.bin' <
Starting...
src\../lib/nano-float/test/test.c:433:test_aeabi_ddiv:PASS
src\../lib/nano-float/test/test.c:434:test_aeabi_dmul:PASS
src\../lib/nano-float/test/test.c:435:test_aeabi_dadd:PASS
src\../lib/nano-float/test/test.c:436:test_aeabi_dsub:PASS
...
45 Tests 0 Failures 0 Ignored
All functions called
Usage: 01 > 04 / 02 > 04 / 03 > 04 / 04 > 04 ...
Done
How Does Qemu Emulator Work?
How did the
Qemu Emulator get started in Visual Studio Code? We clicked the 🔗 Emulate STM32 Blue Pill Task, which is defined in the
configuration file .vscode/tasks.json…
"label": "🔗 Emulate STM32 Blue Pill",
"type": "shell",
"options": {
  "cwd": "${workspaceFolder}"
},
"windows": {
  "command": "bash",
  "args": [
    "-c",
    "../qemu_stm32/arm-softmmu/qemu-system-arm -M stm32-f103c8 -semihosting -kernel .pioenvs/bluepill_f103c8/firmware.bin"
  ]
},
"osx": {
  "command": "../qemu_stm32/arm-softmmu/qemu-system-arm -M stm32-f103c8 -semihosting -kernel .pioenvs/bluepill_f103c8/firmware.bin"
}
From the Task definition, we see that the command line for starting Qemu looks like this…
../qemu_stm32/arm-softmmu/qemu-system-arm \
    -M stm32-f103c8 \
    -semihosting \
    -kernel .pioenvs/bluepill_f103c8/firmware.bin
1️⃣ qemu-system-arm: This is the Windows
or macOS executable that emulates the Blue Pill. It’s a highly complex Windows or macOS program that
can execute Blue Pill machine code (Arm Cortex-M3), read and write to simulated RAM and ROM, and
access Blue Pill peripherals (like the Blue Pill onboard LED) simulated in software.
2️⃣ -M stm32-f103c8: Emulate the Blue
Pill microcontroller (STM32F103C8)
3️⃣ -semihosting: The Logging library in
our program uses Arm Semihosting to display console messages. This option enables the display of Arm
Semihosting messages.
4️⃣ -kernel .pioenvs/bluepill_f103c8/firmware.bin:
Specifies the Blue Pill ROM image that will be “flashed” into the emulated Blue Pill ROM for
execution. The firmware.bin file contains the executable code
and data of our Blue Pill program, produced by the gcc compiler
during the PlatformIO Build step.
Qemu Blue Pill Emulator is still under development but it’s already great for running computation-based Unit Tests. What about other types of Unit Tests with sensors and actuators?
Beware Of Side Effects
When a Blue Pill program accesses some sensor or actuator, we say that the program causes a Side Effect. Programs with Side Effects are harder to test because we need to reset the sensor and actuator back to their original states before starting the test.
Just imagine how we would test a program that uses a real BME280 Humidity Sensor… Before every test we would have to reset the Humidity Sensor to a fixed value, because it affects the outcome of the test. Automating a test that causes Side Effects is no longer possible if somebody needs to tweak the sensor or actuator by hand.
Qemu Blue Pill Emulator may not be 100% accurate when emulating Timers, GPIOs, UART, I2C, SPI, … So beware if we’re using these in our Unit Test. If our Unit Test is simply based on some computation without Side Effects, it should run fine on the Qemu Emulator.
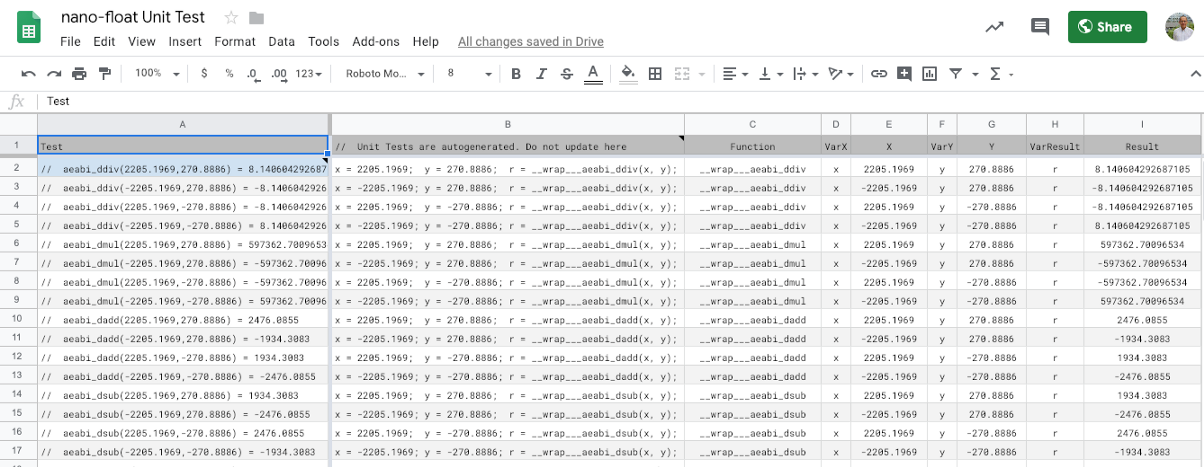
nano-float unit tests automatically extracted from the nano-float source code. From https://docs.google.com/spreadsheets/d/1Uogm7SpgWVA4AiP6gqFkluaozFtlaEGMc4K2Mbfee7U/edit#gid=1740497564
How I used Qemu Emulator for Unit Testing
The Test Cases
we have seen in the demo above are the real-life Test Cases I used for testing nano-float, a floating-point math library that’s optimised for Blue
Pill, taking up only a tiny fraction of the ROM space compared with the standard math library. I wrote
about nano-float in my
previous article.
With over 200 Test Cases, writing the Unit Test code by hand will be tedious and hard to maintain. That’s why I created a Google Sheets spreadsheet that generates the Unit Test code…
The spreadsheet
automatically extracts the Test Cases that I have embedded inside the nano-float library source code like this…
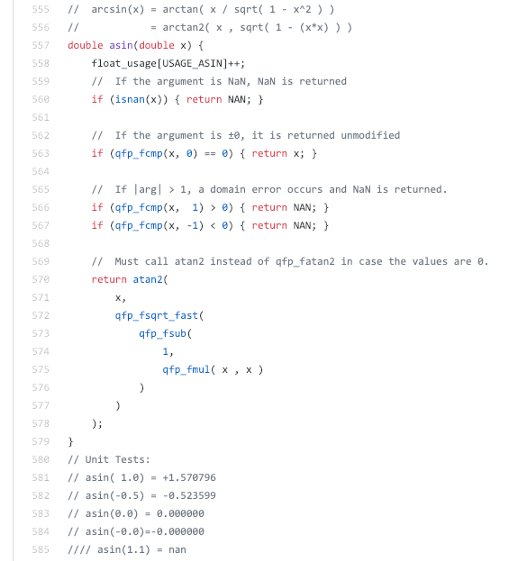
nano-float library source code and the unit test cases below. From https://github.com/lupyuen/codal-libopencm3/blob/master/lib/nano-float/src/functions.c#L555-L585
The spreadsheet parses the Test Cases and generates Test Suites in this familiar format…

Test Suite generated by the spreadsheet. From https://github.com/lupyuen/stm32bluepill-unittest/blob/master/lib/nano-float/test/test.c#L332-L336
[env:bluepill_f103c8]
...
build_flags =
    ; Enable unit test. Comment this line to disable unit test.
    -D UNIT_TEST
    -D UNITY_FLOAT_PRECISION=0.000001
    -D UNITY_DOUBLE_PRECISION=0.000001
    -D UNITY_OUTPUT_CHAR=unity_output_char
    -D UNITY_INCLUDE_DOUBLE
    -D UNITY_EXCLUDE_SETJMP_H
    -D UNITY_EXCLUDE_MATH_H
Floating Point Precision
The above gcc compiler options were configured in platformio.ini.
Note that we defined UNITY_FLOAT_PRECISION and UNITY_DOUBLE_PRECISION as 0.000001. How do they affect the Unit Testing? If you remember this
test case…
x = 2205.1969;
y = 270.8886;
r = __wrap___aeabi_ddiv(x, y);
TEST_ASSERT_EQUAL_DOUBLE( 8.140604292687105  , r );
It divides two
doubles and compares the result of the division to 8.140604292687105. But in reality, there will be some loss of precision when we store a
floating-point number as float or double.
As
we have seen in our previous article, floats can store up
to 6 significant decimal digits and doubles can store up to 15 significant decimal
digits. So the result of our division may actually be 8.14060 if we store the result as a float.
That’s why we
have defined UNITY_FLOAT_PRECISION and UNITY_DOUBLE_PRECISION as 0.000001… It means that we are only interested in comparing the
first 6 decimal places for floats and doubles. Any discrepancy beyond the 6th decimal place should be
ignored.
Why have we set
UNITY_FLOAT_PRECISION and UNITY_DOUBLE_PRECISION to the same precision? The nano-float library downscales the precision of all math computations
from double to single.
This was done to reduce the math library code size to fit on Blue Pill. So for this specific library
it makes sense to set both precisions to be the same. For other libraries, probably not.
Test Coverage
At the end of
the Unit Testing, we saw the message All Functions Called
followed by a list of numbers…
> Executing task: bash -c '../qemu_stm32/arm-softmmu/qemu-system-arm
-M stm32-f103c8 -semihosting
-kernel .pioenvs/bluepill_f103c8/firmware.bin' <
Starting...
src\../lib/nano-float/test/test.c:433:test_aeabi_ddiv:PASS
src\../lib/nano-float/test/test.c:434:test_aeabi_dmul:PASS
src\../lib/nano-float/test/test.c:435:test_aeabi_dadd:PASS
src\../lib/nano-float/test/test.c:436:test_aeabi_dsub:PASS
...
45 Tests 0 Failures 0 Ignored
All functions called
Usage: 01 > 04 / 02 > 04 / 03 > 04 / 04 > 04 ...
Done
When we run
Unit Tests, we should ensure that all the functions that we’re testing
(aeabi_ddiv, aeabi_dmul) are actually called. It’s possible that we may have omitted some compiler
option (like wrap) or preprocessor symbols (like UNIT_TEST) that could cause the functions being tested to be called
incorrectly.
In Unit Testing, the Test Coverage info tells us the functions that have been called when we run Unit Tests. For our simplified Test Coverage, we used an array of counters to track the functions called…
//  We count the number of times each function was called.
//  So we can check whether our unit tests cover all functions.
enum float_usage_index {
    USAGE_AEABI_DDIV,
    USAGE_AEABI_DMUL,
    USAGE_AEABI_DADD,
    USAGE_AEABI_DSUB,
    ...static uint8_t float_usage[LAST_FLOAT_USAGE_INDEX];

double __wrap___aeabi_ddiv(double n, double d) {
    float_usage[USAGE_AEABI_DDIV]++;
    return qfp_fdiv_fast(n, d);
}
float_usage_index is an array of counters that count how many times
each function was called. When our Unit Test code shows the
message…
All functions called
…It means that
the code has verified that every counter in the float_usage_index array was one (or greater). So all our functions
have indeed been called and we have 100% Test Coverage. Below that we see…
Usage: 01 > 04 / 02 > 04 / 03 > 04 / 04 > 04 ...
This is a diagnostic message for Test Coverage that says…
Function 01 (aeabi_ddiv): Called 04 times
Function 02 (aeabi_dmul): Called 04 times
Function 03 (aeabi_dadd): Called 04 times
Function 04 (aeabi_dsub): Called 04 times
...
And that’s all you need to get your Unit Tests running on Blue Pill. Build your Unit Tests early, and run them often!
The Big Picture
This is the third article in a series of articles that explain how I ported and optimised the MakeCode visual programming tool for Blue Pill…
1️⃣ The first article explains RAM and ROM memory optimisation…
2️⃣ The second article explains floating-point math optimisation…
In the next article we’ll finally integrate all the tools and techniques from the three articles and learn about the MakeCode Bootloader, an incredibly complex Blue Pill program that does so much and still fits in 64 KB ROM!