Connect STM32 Blue Pill to ESP8266 with Apache Mynewt
The ESP8266 WiFi
module is a brilliant invention… It connects your microcontroller to the WiFi network
(and the internet) through simple AT commands. Since it sends and receives network packets on your behalf (UDP and TCP), creating IoT
gadgets will be so easy!
But building an embedded
application with ESP8266 can be challenging… We can’t really be sure when an
AT
command will complete. Maybe the server was slow in responding. Or the WiFi connection has
dropped and the module needs to reconnect.
Today we’ll learn to solve this problem with Apache Mynewt, a real-time embedded operating system. We’ll create an IoT application for STM32 Blue Pill that multitasks the ESP8266 module with a temperature sensor. So while we’re waiting for an ESP8266 command to complete, the application can continue to process the sensor data at regular intervals.
Like in the real world, our IoT application will transmit sensor data to an IoT server, via the CoAP protocol, over the ESP8266 WiFi connection. We’ll also dig deeper into WiFi networking… Is it possible to compute your location accurately based on the data scanned by the ESP8266 module?
You’ll be amazed how easy it is to do WiFi Geolocation with ESP8266, once we have our simple CoAP application running. The accuracy of WiFi Geolocation will startle you!
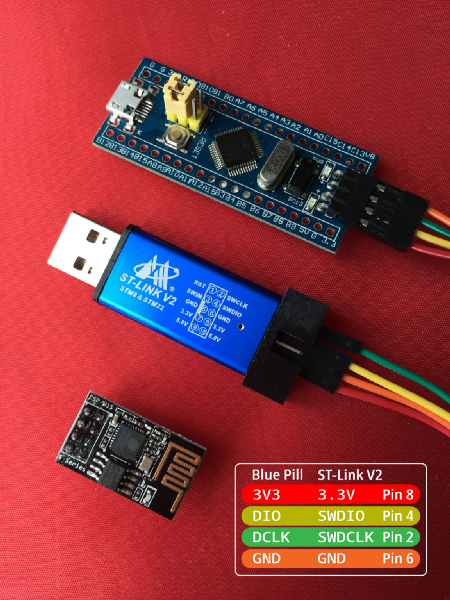
Top to bottom: STM32 Blue Pill, ST-Link V2 USB Adapter (compatible), ESP8266 WiFi Module. Connect Blue Pill to ST-Link V2 as shown at lower right. The two yellow jumpers on Blue Pill should be connected as shown.
Here’s what we need for the tutorial…
1️⃣ STM32 Blue Pill
2️⃣ ST-Link
V2 USB Adapter
(or compatible)
3️⃣ ESP8266 WiFi Module
Connect Blue Pill to ESP8266 as follows…

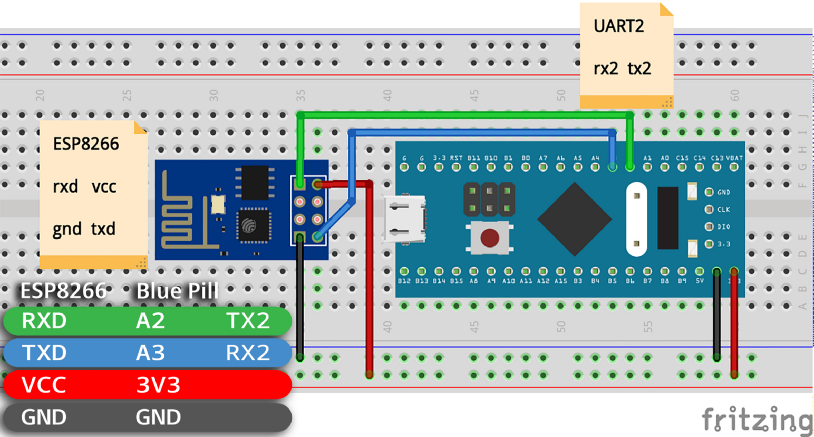
Connecting Blue Pill to ESP8266. Fritzing File: https://github.com/lupyuen/stm32bluepill-mynewt-sensor/blob/master/esp8266.fzz
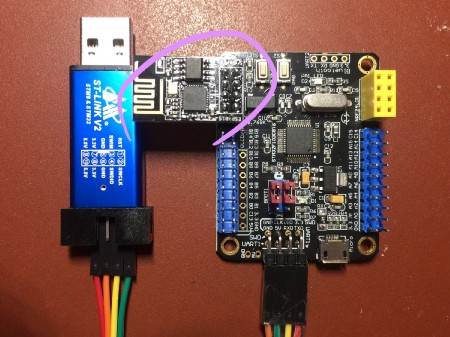
Supersized STM32 Blue Pill with ESP8266 module plugged in
The tutorial also works with this Supersized STM32 Blue Pill with ESP8266 module plugged in.
Watch the video to see our application in action, installed on a real Blue Pill.
Click CC to display the annotations.
Our application running on Blue Pill, reading the temperature sensor and sending to our CoAP server
💎 Sections marked with a diamond are meant for advanced developers. If you’re new to embedded programming, you may skip these sections
Application Overview
(If you haven’t read my introductory tutorial on Mynewt, check it out here)
Here’s the complete source code for the IoT application, libraries and drivers used in this tutorial…
Let’s peek at the top-level
functions in apps/my_sensor_app/src
to understand how this application will read Blue Pill’s internal temperature
sensor and send the temperature data to a CoAP server…
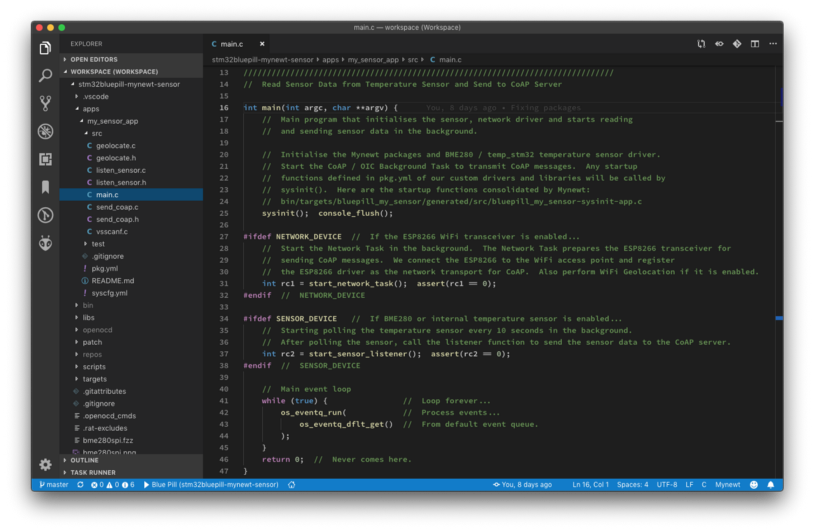
1️⃣ At startup, our main program
main.c
delegates the reading of sensor data to listen_sensor.c.
It also delegates the transmitting of sensor data to send_coap.c.
Mynewt understands the dependencies between our drivers and libraries. It ensures that the drivers and libraries are initialised in the correct sequence.
2️⃣ Sensor handler listen_sensor.c
instructs Mynewt to poll the internal temperature sensor and to call a custom Listener Function that will
transmit the polled data (via send_coap.c).
With Mynewt it’s easy to configure a sensor to be polled at regular intervals. Mynewt’s Sensor Framework lets us define a Listener Function that will be called after polling.
3️⃣ Network handler send_coap.c
starts ESP8266 WiFi networking and transmits the
temperature data to a CoAP server like thethings.io.
We’ll create a Mynewt driver for ESP8266 that supports multitasking, with locking to prevent multiple commands from running concurrently. Mynewt supports CoAP so we’ll create a simple library to transmit sensor data as CoAP messages.
Closer View
(Below is a list of Mynewt APIs called by the above top-level functions. You may skip this section if you don’t wish to create your own Mynewt application.)
main.c › Poll Temperature Sensor, Transmit Sensor Data
main()
is the overall program that starts ESP8266 WiFi networking and starts the polling of Blue Pill’s
internal temperature sensor. It calls the following functions…
1️⃣ sysinit() to initialise the drivers
and libraries. This includes the temp_stm32 driver for Blue
Pill’s Internal Temperature Sensor and the sensor_coap library
for transmitting Sensor CoAP messages.
Mynewt auto-generates sysinit() during the application build and includes all the
initialisation functions for drivers and libraries. Here is a sample sysinit().
The functions are called in sequence according to their Stage Numbers. Our custom drivers and
libraries are initialised last, from Stage 600 onwards.
2️⃣ start_network_task()
to run the Network Task in the background. The Network Task starts
ESP8266 WiFi networking and registers the ESP8266 driver as the Transport Layer for transmitting CoAP
messages.
3️⃣ start_sensor_listener()
to start polling the internal temperature sensor and to register the Listener Function that will
process the polled sensor data.
After that the main() function loops forever, receiving Mynewt events and
processing them with os_eventq_run().
This is the standard Event Queue loop that’s required for all Mynewt applications.
listen_sensor.c › Poll Internal Temperature Sensor
start_sensor_listener()
configures Mynewt to poll the internal temperature sensor every 10 seconds and to process the received
temperature data with our custom function. It calls the following functions, which are provided by
Mynewt’s Sensor Framework…
1️⃣ sensor_set_poll_rate_ms()
to poll the internal temperature sensor every 10 seconds
2️⃣ sensor_mgr_find_next_bydevname()
to fetch the internal temperature sensor temp_stm32_0
3️⃣ sensor_register_listener()
to register a Listener Function read_temperature()
that will be called with the polled temperature data every 10 seconds. read_temperature() will transmit the temperature to the CoAP server.
To learn more about Mynewt’s Sensor Framework, check out the previous tutorial.
send_coap.c › Start ESP8266, Transmit Sensor Data
start_network_task()
starts the task that connects the ESP8266 to the WiFi network. It calls os_task_init()
to start the Network Task in the background.
Mynewt is a preemptive multitasking operating system. That’s how we create tasks in Mynewt to run at different priorities. Here we created a background task to start up ESP8266 (which may take some time) so that the Main Task can proceed to run other functions.
When the Network Task starts it
runs network_task_func()...
network_task_func()
is the function in the Network Task that connects the ESP8266 module to the WiFi network and registers
the ESP8266 module as the Transport Layer for sending CoAP messages. It calls the following functions:
1️⃣ hmac_prng_generate()
to generate a random device ID, to assure privacy of the sensor data when viewed on a public website
2️⃣ os_dev_open()
to lock the ESP8266 device for exclusive use
3️⃣ esp8266_connect()
to connect the ESP8266 to the WiFi router
4️⃣ os_dev_close()
to unlock the ESP8266 device and allow other tasks to use it
5️⃣ esp8266_register_transport()
to register the ESP8266 device as the Transport Layer for transmitting CoAP messages
6️⃣ geolocate()
(if WIFI_GEOLOCATION is enabled) to compute latitude and
longitude based on WiFi Access Points scanned by ESP8266
7️⃣ os_msys_num_free()
to show number of free mbufs every 10 seconds. mbufs are RAM memory buffers used for composing and transmitting
CoAP messages. The number should remain constant after a while.
8️⃣ os_time_delay()
to sleep for 10 seconds before calling os_msys_num_free() again.
While sleeping, Mynewt will schedule other tasks to run.
Here we see how we open and lock Mynewt drivers for exclusive access, to prevent other tasks from accessing the same interface.
In a multitasking environment like Mynewt, it’s good to sleep occasionally (shown above) so that other tasks will have the chance to run.
Also in send_coap.c is send_sensor_data(),
the function that transmits the temperature sensor data to the CoAP server. We’ll examine this
function in a while.
Download Source Code
Let’s download the source code with Visual Studio Code…
1️⃣ Install Visual Studio Code if you haven’t. Launch Visual Studio Code.
2️⃣ Click View → Command Palette
3️⃣ Type git clone then press Enter
4️⃣ For Repository URL, enter
https://github.com/lupyuen/stm32bluepill-mynewt-sensor
5️⃣ When prompted to Select Repository Location…
For Windows:
Select your Local Disk C: drive
For macOS: Select your Home folder
(If you have previously
downloaded stm32bluepill-mynewt-sensor,
rename the old folder before downloading)
The Mynewt Sensor Application
source code will be downloaded to C:\stm32bluepill-mynewt-sensor
(Windows) or $HOME/stm32bluepill-mynewt-sensor
(macOS)
6️⃣ When prompted, click Open Repository and Open Workspace
If you have trouble with the steps, check the screenshots under “Install Visual Studio Code and the Mynewt Sensor Application”
Visual Studio Code with application source code
Configure WiFi Settings
In Visual Studio Code, open the
configuration file targets/bluepill_my_sensor/syscfg.yml.
Look for these lines:
    # Connect to the WiFi access point with this SSID
    WIFI_SSID:      '"my_ssid"'

    # Password for WiFi access point
    WIFI_PASSWORD:  '"my_password_is_secret"'
The ESP8266 module will use these
settings to connect to your WiFi network. Fill in the SSID and password for your WiFi network. The
SSID and password values should always begin with '"
and end with "'.
To enter the single-quote ' character, use ''…
    # This becomes: My Home's SSID
    WIFI_SSID:      '"My Home''s SSID"'
To enter the double-quote " character, use \"…
    # This becomes: My "SSID" goes here
    WIFI_SSID:      '"My \"SSID\" goes here"'
Build The Application
1️⃣ Install Mynewt as instructed in the last tutorial. Look for the sections “Install Apache Mynewt for Windows” or “Install Apache Mynewt for macOS”. For Ubuntu Linux, refer to these instructions.
2️⃣ Restart Visual Studio Code after installing Mynewt
3️⃣ Click Terminal → Run Task → [1] Build bluepill_boot
4️⃣ Click Terminal → Run Task → [2] Build bluepill_my_sensor
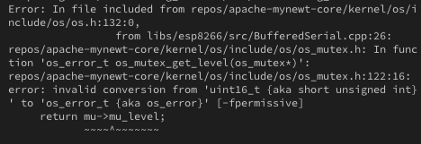
Build warnings caused by type conversion
You will encounter invalid conversion errors like this.
The workaround: Follow the instructions here to edit 3 files in the Mynewt source code. Then build again.
5️⃣ Click Terminal → Run Task → [3] Image bluepill_my_sensor
6️⃣ Connect your Blue Pill and ST-Link V2 to the USB port
7️⃣ Click Terminal → Run Task → [4] Load bluepill_boot
8️⃣ Click Terminal → Run Task → [5] Load bluepill_my_sensor
If you get stuck, refer to the sections “Build Mynewt Bootloader and Application”, “Create Application Image” and “Flash Bootloader and Application to Blue Pill”
The Install Apache Mynewt step installs a custom memory layout for Blue
Pill so that the bootloader and application both fit in 64 KB of ROM. More details here.
Run The Application
We’re now ready to run the application on Blue Pill to read the internal temperature sensor and send the data to the CoAP server…
1️⃣ Click Debug → Start Debugging
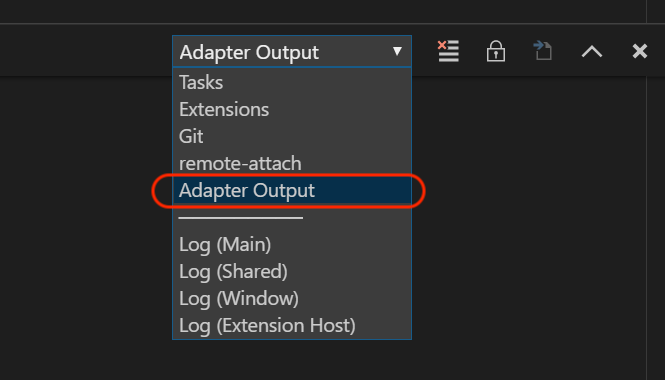
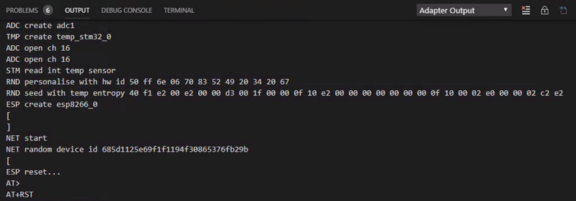
2️⃣ Click View → Output
Select Adapter Output to see the Blue Pill
log
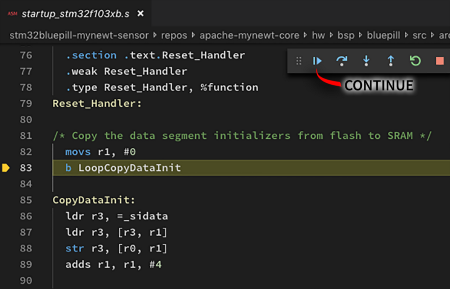
3️⃣ The debugger pauses at the
line with LoopCopyDataInit
Click Continue or press F5
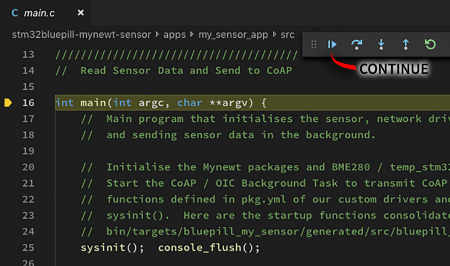
4️⃣ The debugger pauses next at
the main() function.
Click Continue or press F5
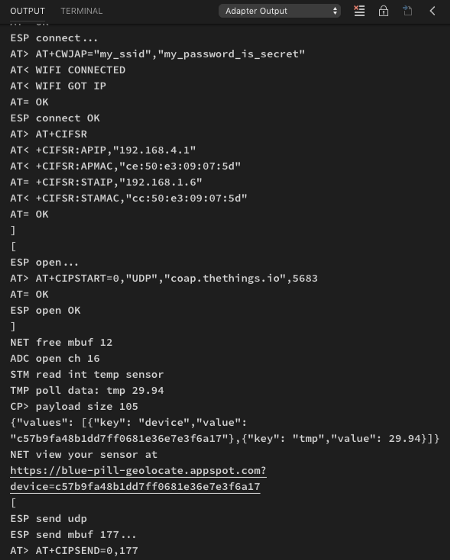
5️⃣ Your Blue Pill log should look like this:
https://gist.github.com/lupyuen/1006f1b2144b489c895f14a036dad8fb
To understand what’s really happening under the hood, let’s study the Blue Pill log.
We’ll start by looking at the commands sent to the ESP8266 module…
ESP8266 Commands
Chatting with ESP8266… “AT” and “OK”
Sending commands to ESP8266 is like chatting… We say something (the command), we wait for the response, and we parse the response for certain keywords (like “OK”) to decide how to proceed.
ESP8266 commands begin with AT and end with carriage return + line feed (\r\n). Like AT+RST which is
the Reset command. You may check the entire list of AT commands in the ESP8266 AT
Instruction Set reference. Also check out the examples in the ESP8266 AT Command
Examples doc.
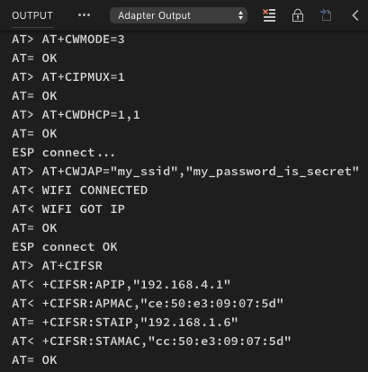
Let’s run through the ESP8266 commands in the sample log…
ESP8266 Reset
To understand the sample log, look out for these markers:
[ and ] mark the start and end
of each ESP8266 commandAT> flags the commands that we
sent to ESP8266AT< shows the responses from
ESP8266AT= means that we have matched a keyword in the
response
The first command is the Reset
command — we send AT+RST to the ESP8266 to restart the module
and clear any WiFi connections. Here’s the log for the Reset command…
AT> (newline) AT+RST means that we sent the command AT+RST to the ESP8266 module.
ESP8266 responded with an error
AT< ERROR caused by the newline that we sent. It’s OK to
ignore this error. (The newline was sent to terminate any prior commands)
To check that the command has
succeeded, the program waits for the keyword OK. AT= OK means that the program has matched the OK response from ESP8266. Most commands return OK upon completion, but the Reset command is more complicated…
After ESP8266 has returned the
OK response, it returns more text to show the progress of the
module restarting (including some garbled text). When the restart has completed, it returns a keyword
ready which is matched by the program: AT= ready. So now we know that the Reset command has completed and
we may send the next command.
Here’s the ESP8266::reset()
function in libs/esp8266/src/Controller.cpp
that sends the Reset command and matches the response keywords. send() is called to send a command to ESP8266. recv(keyword) will wait until the keyword is found in the response
from ESP8266. If the keyword is not found within a few seconds, it fails with a timeout error and the
program stops.
ESP8266 Echo
ESP8266 is usually very chatty…
when you send a command like AT+RST, it responds with the same
command AT+RST before responding OK. It’s like hearing an echo of yourself. To simplify the response
matching, we disable the echoing by sending the ATE0 command.
Here’s the log…
The function ESP8266::setEcho()
sends the ATE0 command and waits for the OK keyword.
The program sends three more commands:
AT+CWMODE=3 Set the ESP8266 into WiFi Client mode (instead of WiFi
Access Point mode). This means that our ESP8266 will connect to an existing WiFi Access Point (a WiFi
router) to access the internet.
AT+CIPMUX=1 Allow multiple TCP and UDP connections. In case we need
to connect to multiple servers
AT+CWDHCP=1 Enable DHCP so that the ESP8266 will request an IP
address from the WiFi network
ESP8266 Connect
After disabling the command echo, we connect the ESP8266 to our WiFi Access Point to get internet access…
AT+CWJAP=”ssid”,”password” connects the ESP8266 to the WiFi router
using the SSID and password. To change the WiFi settings, edit targets/bluepill_my_sensor/syscfg.yml
AT+CIFSR returns the WiFi connection details (IP and MAC addresses).
These commands are sent by ESP8266::connect()
and ESP8266::getIPAddress()
If the connection to the WiFi
Access Point fails, we’ll see a response mismatch message
because the program has waited a while for the OK response but
didn’t see any. If you see this message, check the WiFi settings in targets/bluepill_my_sensor/syscfg.yml
ESP8266 Orchestration
ESP8266::reset(),
setEcho()
and connect()
are the functions that send the Reset, Echo and Connect commands to ESP8266… but for transmitting
sensor data over WiFi, it’s tedious to code our application to call each of these low-level functions.
So we have a high-level function, esp8266_connect(),
that orchestrates (calls sequentially) the low-level functions to send the individual ESP8266
commands…
esp8266_connect()
is the function that we should call in our application to restart the ESP8266 module and connect it to
the WiFi router, like this.
ESP8266 Open
Before transmitting messages to
our server, we need to open the server connection by sending the command AT+CIPSTART=0,”UDP”,”coap.thethings.io”,5683
This opens a connection on socket
number 0 of the ESP8266 module.
The socket will be used to
transmit UDP packets to the server coap.thethings.io at port
5683 (the standard port for CoAP).
For this tutorial you may use my
paid-subscription account at thethings.io, since it’s too tedious to set up your own CoAP server. (I’m
not sponsored by thethings.io) If you wish to use another server, edit the CoAP settings at targets/bluepill_my_sensor/syscfg.yml
Back to the Open command AT+CIPSTART=0,... How did we know that socket 0 was available? We call the function esp8266_socket_open()
to allocate a socket. The function tracks which sockets are in use, assuming that we call esp8266_socket_close()
to deallocate the socket.
The Open command is sent by ESP8266::open().
We call it like this (look for esp8266_socket_open() and esp8266_socket_connect()).
ESP8266 Send
The final command for today: the Send command.
AT+CIPSEND=0,177 prepares the ESP8266 to transmit 177 bytes of data to socket number 0 (which we have specified earlier to AT+CIPSTART).
Following this command, the program sends 177 bytes of packet data to ESP8266. Be sure that we send exactly 177 bytes of data — if we don’t, the ESP8266 module will not respond to commands until we power it off and on again. (So if you think the ESP8266 is acting strange, just power-cycle it)
Since we have already opened
socket number 0 to the UDP server at thethings.io, this command
transmits the 177 bytes as a single UDP packet to thethings.io. Which is sufficient in this tutorial
for sending sensor data via the CoAP protocol (based on UDP).
The Send command is sent by ESP8266::send().
We call it like this (look for esp8266_socket_send_mbuf(), which transmits data stored as mbufs).
ESP8266 Reset, Echo, Connect, Open and Send commands are all that we need in this tutorial for sending sensor data to the CoAP server at thethings.io. CoAP is based on simple UDP networking, so it’s easy to implement on ESP8266 and constrained microcontrollers like Blue Pill (unlike MQTT based on TCP).
The ESP8266 driver is located at
libs/esp8266.
It’s based on the mbed community project esp8266-driver,
which I ported to Mynewt and added some performance enhancements meant for constrained platforms like
Blue Pill. Note that there’s a bug in the baselibc
implementation of vsscanf(). The corrected version is at apps/my_sensor_app/src/vsscanf.c
and it must be placed in the same folder as main.c.
💎 What’s in the 177 bytes of the UDP packet? Check the section “Advanced Topic: What’s Inside The CoAP Message?”
Read Temperature Sensor
In the previous tutorial we built a Mynewt application that read the BME280 Temperature Sensor. For this tutorial, I’ll save us the trouble of sourcing for an actual BME280… we’ll just use Blue Pill’s internal temperature sensor instead!
Blue Pill’s internal temperature
sensor may be accessed via the Analogue-To-Digital Converter
port ADC1, channel 16. Mynewt doesn’t have an ADC driver for Blue Pill, so I ported a similar driver for STM32F4 to
Blue Pill (STM32F1). The new driver is named adc_stm32f1
and it’s located at libs/adc_stm32f1.
Remember in the previous tutorial
we called sensor_register_listener() to register our custom
Listener Function named read_temperature()? Mynewt will call read_temperature() with the
temperature value after polling the
BME280 sensor every 10 seconds.
To make the Listener Function
work with the internal temperature sensor, we need to create a Mynewt
Sensor Device Driver. Which I have done: the driver is named temp_stm32
and it’s located at libs/temp_stm32.
Thanks to Mynewt’s Sensor Framework, the
same Listener Function read_temperature()
works for both BME280 and the internal temperature sensor! Notice that the function now calls send_sensor_data()
to transmit the temperature sensor value. Let’s dig deeper into send_sensor_data()…
Send Sensor Data
send_sensor_data(tmp)
transmits the temperature sensor value tmp to the CoAP server,
e.g. thethings.io. Mynewt has built-in support for CoAP — it’s part of the Open
Interconnect Consortium (OIC) Sensor Library. (More details on OIC here)
Mynewt’s OIC library doesn’t
fully implement the new OIC specification for
transmitting sensor data to a server. So I created a library sensor_coap
(located at libs/sensor_coap)
that fills in the missing features for composing and transmitting CoAP sensor data messages. Let’s
check out how send_sensor_data() calls the sensor_coap library…
1️⃣ send_sensor_data() calls init_sensor_post()
(from the sensor_coap library) to prepare a new CoAP sensor data
message
2️⃣ send_sensor_data() then calls some CP_…() macros (also from sensor_coap library) to compose the payload of the CoAP message that
will contain the sensor data…
CP_ROOT()
creates the top-level root for the CoAP payload
CP_ARRAY()
creates a child array in the payload, e.g. { “values”:[ ] }
CP_ITEM_STR()
and CP_ITEM_FLOAT()
add string and floating-point values (with string keys) to the child array, e.g.
{ “values”:[
     {“key”:”tmp”, “value”:28.7}
  ] }
3️⃣ Finally send_sensor_data() calls do_sensor_post()
to transmit the CoAP message to the server, with sensor data in the payload.
Let’s look at the encoding of the CoAP payload…
💎 We can use loops to encode complex payloads. See
apps/my_sensor_app/src/geolocate.c
The sensor_coap
library supports two formats for encoding the CoAP payload with the CP…() macros: JSON and CBOR, a binary,
compressed variant of JSON. CBOR encoding (but not JSON) is supported natively by Mynewt’s OIC library, so I
added the JSON encoding to the sensor_coap library (based on Mynewt’s low-level JSON
library).
With JSON encoding, send_sensor_data() creates a CoAP payload like this…
This CoAP JSON format works for
transmitting sensor data to
thethings.io. (CBOR is not supported by thethings.io today). If you didn’t change the CoAP
settings in syscfg.yml,
the application will send your sensor data to my paid account at thethings.io.
For the purpose of learning about transmitting sensor data over CoAP in this tutorial, I’ll allow you to send sensor data CoAP messages to my server.
I’ll explain in a while how you may view your sensor data through a special public website that I have created (connected to my account at thethings.io). To protect your privacy, the website requires the randomly-generated device ID that’s shown in the CoAP payload above.
💎 To select JSON or CBOR encoding, edit the settings in
targets/bluepill_my_sensor/syscfg.yml…
For JSON encoding (default):COAP_JSON_ENCODING: 1For CBOR encoding:COAP_CBOR_ENCODING: 1
Send CoAP Message
We saw earlier how send_sensor_data()
transmits a CoAP sensor data message by calling do_sensor_post()
defined in the sensor_coap
library. You will be delighted to learn this: do_sensor_post()
doesn’t actually send the CoAP message itself!
Instead, do_sensor_post() forwards the message (via an Event Queue) to the OIC Task running in the background, which will transmit the message. Why is
this a good thing? Because our sensor’s Listener Function read_temperature()
won’t be stuck waiting for the CoAP message to be transmitted!
The transmission will take place in the background, so the Listener Function may happily crunch through the next set of sensor data and prepare the new data for transmission. That’s the power of multitasking in Mynewt!
When you look back at the sample log, you’ll see these events that triggered the sending of the CoAP message…
1️⃣ ADC open ch 16: Mynewt Sensor
Framework prepares to read our internal temperature sensor temp_stm32,
since we have configured Mynewt to poll the sensor every 10 seconds. temp_stm32 calls the ADC driver adc_stm32f1
to open port ADC1 channel 16, where the sensor may be accessed.
2️⃣ STM read int temp sensor: temp_stm32 reads the internal temperature
sensor value through the open ADC1 port. temp_stm32
returns the temperature value 29.86 to the Sensor Framework.
3️⃣ TMP poll data tmp 29.86: The Sensor
Framework calls our Listener Function read_temperature()
with the temperature value 29.86. read_temperature() takes this value and calls the sensor_coap library to compose the CoAP message and transmit it.
4️⃣ CP> payload size 105: The sensor_coap library forwards the CoAP message to the
OIC Background Task for transmission
5️⃣ We see the JSON
payload that was composed by the sensor_coap
library
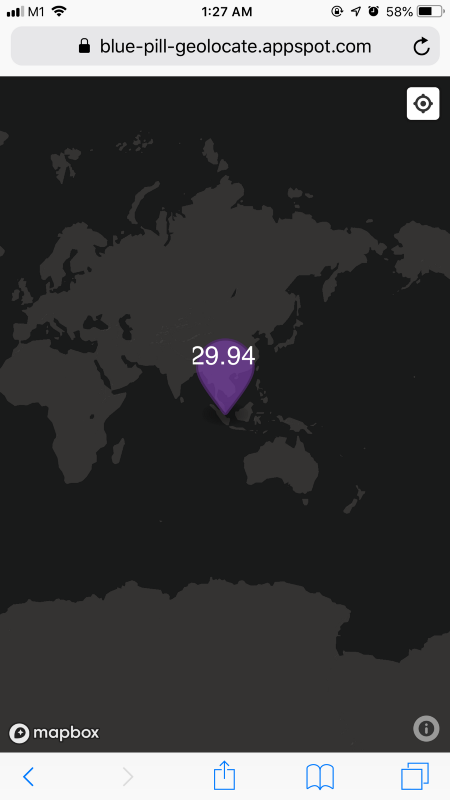
Real-time display of temperature sensor data, transmitted by Blue Pill
6️⃣ When you run the application,
you will see the blue-pill-geolocate.appspot.com URL for viewing the sensor data, secured with the randomly-generated device
ID.
Ctrl-Click the URL to view the live sensor data transmitted by your Blue Pill.
The device ID changes when you restart the application, so always check the log for the updated URL.
The sensor data display is refreshed automatically every 10 seconds.
The OIC Background Task receives
the forwarded CoAP message and transmits it by calling the function oc_tx_ucast().
The function invokes the ESP8266 driver to send the message via UDP. ESP send udp marks the beginning of the ESP8266 Send command, which
we have covered earlier.
💎 To conserve RAM and avoid dynamic memory allocation (which can become unpredictable), the Mynewt OIC Library and our
sensor_coaplibrary both use network-optimised, preallocatedmbufbuffers in RAM while composing and transmitting messages.The ESP8266 driver supports transmitting
mbufmessages, so there’s no need to copy the data into into a flat array before transmission. Which saves RAM space and processing time.
What is WiFi Geolocation?
Scary but true… Our mobile phones are scanning all the WiFi Access Points in our homes and workplaces… And sending the data to Google and Apple!
That’s why it’s possible today to estimate your location (latitude and longitude) very accurately by transmitting to Google…
1️⃣ A list of WiFi Access Points visible at your location (just the unique MAC Addresses of the Access Points) and
2️⃣ WiFi signal strength of each Access Point at your location. Technically it’s called the Received Signal Strength Indication (RSSI)
We call this WiFi Geolocation — Google can compute your location when you give Google the above information about the WiFi Access Points at your location.
Google WiFi Geolocation API Input
Google offers a paid WiFi Geolocation API for computing your location.
After subscribing to the service, we transmit the MAC Addresses and Signal Strength of each WiFi Access Point to the API, as shown here.
Note that we don’t actually need to connect to any of these Access Points. They may be secured, but all we need are their MAC Addresses, which are publicly accessible.
Within a second the API returns a result like this…
{
    "location": {
        "lat": 1.273065699,
        "lng": 103.8096223
    },
    "accuracy": 40
}
which contains the computed
latitude 1.273065699 and longitude 103.8096223. The result also indicates that the actual location may
be up to 40 metres away from the computed location. (We show
this by drawing a circle with radius 40, centered at the computed location.)
Let’s ponder how WiFi Geolocation may be used…
Why is WiFi Geolocation useful?
1️⃣ WiFi Geolocation works indoors and outdoors. Often we connect a GPS Receiver to our microcontroller to get the GPS location. GPS relies on satellite signals from the sky so it doesn’t work indoors. And GPS performs poorly in cloudy weather, also when there are tall buildings nearby (the “Street Canyon” effect).
WiFi Geolocation works as long as there are known WiFi Access Points broadcasting at the location. Indoor, outdoor and maybe underground too.
2️⃣ WiFi Geolocation doesn’t require any additional hardware… If we already have a WiFi module like ESP8266. We’ll just call the ESP8266 Scan command to fetch the WiFi Access Points, and we’ll transmit the data to our server, which will call the Google WiFi Geolocation API. It’s remarkably similar to the way we process IoT sensor data!
Try WiFi Geolocation For Yourself
To show you how well WiFi Geolocation can compute your location, I have configured my paid account at thethings.io to call the paid Google WiFi Geolocation API when you send a list of WiFi Access Point MAC Addresses and Signal Strength over CoAP. (The exact same way we used earlier for sending sensor data.)
For the purpose of learning about WiFi Geolocation in this tutorial, I’ll allow you to send Geolocation CoAP messages to my server. I don’t store any WiFi or geolocation data on my server, the data is discarded as soon as the computation is complete.
Caution: The Access Point information is transmitted in cleartext over CoAP UDP, without any encryption. It’s theoretically possible for another party to intercept the transmitted information and compute your location.
If you fully
understand and accept the consequences: Proceed to enable WiFi Geolocation in your application:
Edit targets/bluepill_my_sensor/syscfg.yml
and uncomment this line (by removing the leading #):
WIFI_GEOLOCATION: 1 # Uncommented to enable WiFi Geolocation
Rebuild the application and run
it. View the log. The overall logic for geolocation is driven by the geolocate() function that’s called by the
Network Task at startup.
A new ESP8266 command appears in
the log: AT+CWLAP. This is the command for ESP8266 to scan for nearby WiFi Access
Points.
The program picks the first 3 Access Points returned by the command and composes a CoAP message containing…
1️⃣ The random device ID: device
2️⃣ The 3 MAC Addresses: ssid0, ssid1 and ssid2
3️⃣ The 3 values for Signal
Strength: rssi0, rssi1 and
rssi2
Then it transmits the CoAP message to the CoAP server for my thethings.io account.
When you run the application, you
will see a blue-pill-geolocate.appspot.com URL for viewing your
computed geolocation that’s secured with the randomly-generated device ID.
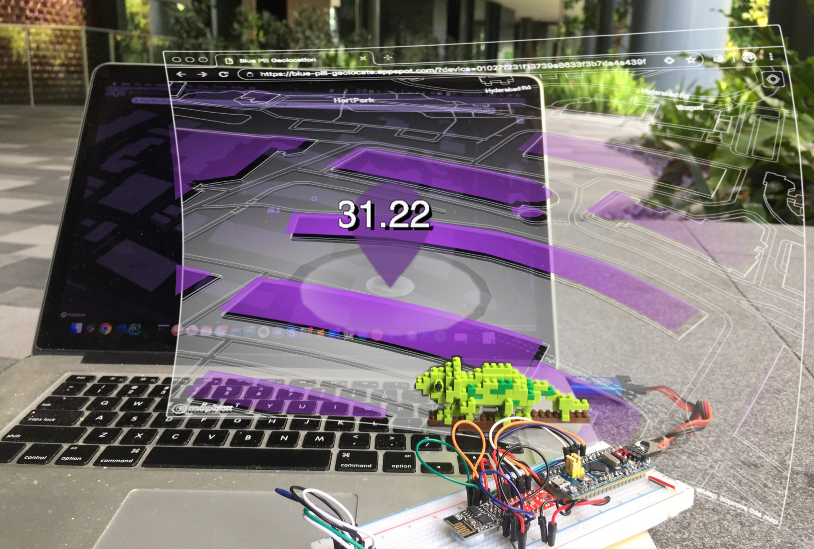
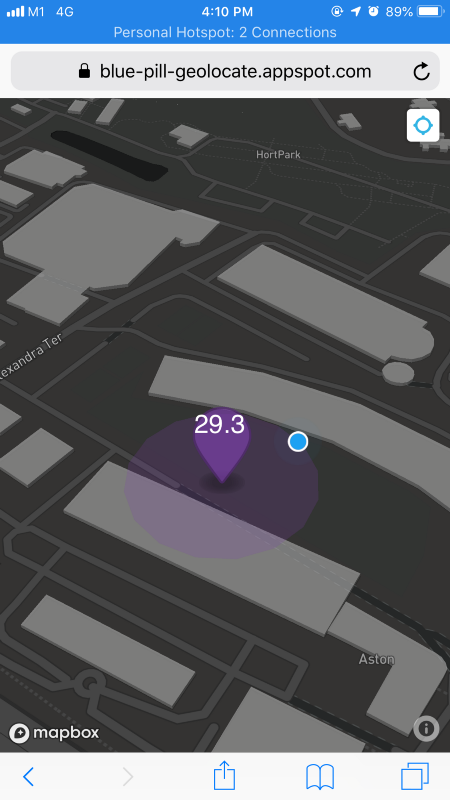
Ctrl-Click the URL to see your computed geolocation in the web browser (purple marker).
On the map there is a blue circle at top right. Click the blue circle to see your actual location (blue dot), as determined by your mobile device. Your actual location will not be transmitted to the server.
The device ID changes when you restart the application, so always check the log for the updated URL.
💎 How did I configure my account at thethings.io to call the Google WiFi Geolocation API? Check the section “Advanced Topic: WiFi Geolocation with thethings.io and Google App Engine”
Privacy Concerns
You can see for yourself — by sending only 3 WiFi Access Points to the Google Geolocation API, it’s possible to compute your location with high accuracy, perhaps within 10 metres of error.
The ESP8266 has everything we need to scan the WiFi access points and to transmit the WiFi data… Yet we see ESP8266 appearing in some smart home gadgets. Could these gadgets be transmitting your location without your consent?
What’s Next?
Reflecting on my experience with Mynewt… It’s amazing that we were able to accomplish so much in this tutorial with so little application code, thanks to the excellent frameworks in Mynewt. Most of the code went into the drivers and libraries. Please make full use of my open-source drivers and libraries to build your IoT gadget in record time!
Apache Mynewt is an incredible achievement for open-source IoT embedded platforms. But it’s not obvious to most people why certain Mynewt features (like the Sensor Framework) were designed that way. So I have lined up a series of Mynewt tutorials to show you the fun and exciting problems that Mynewt was designed to solve…
1️⃣ How I configured thethings.io to receive sensor data over CoAP and visualise the data with dashboards…
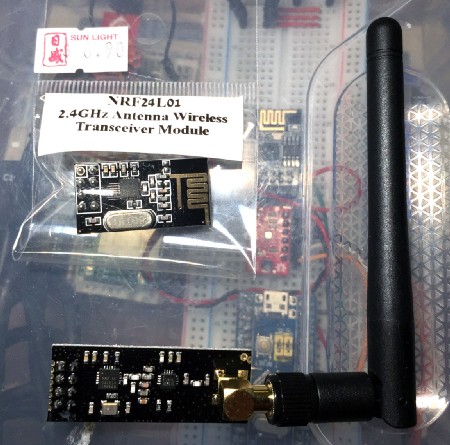
Nordic Semiconductor nRF24L01. Porting soon to Mynewt!
2️⃣ How I built the Mynewt drivers for ESP8266 and Blue Pill’s internal temperature sensor. Building drivers for Mynewt isn’t hard, we just follow the conventions.
3️⃣ I’ll be creating a Mynewt driver to support Nordic Semiconductor nRF24L01, a low-cost long-range wireless module operating on 2.4 GHz.
Why? To prove that it’s feasible to create a Network -Agnostic IoT Application with Mynewt. Need to send sensor data thru ESP8266 WiFi, nRF24L01, Zigbee, NB-IoT, LoRa or Sigfox or …? They are all supported by the same IoT Application!
(Hint: Remember that we created a CoAP Transport Layer for ESP8266 WiFi in this tutorial? We can do the same for any network interface!)
4️⃣ Lastly I’ll be writing about this exciting new evolution of the STM32 Blue Pill. (Check out this update)
STM32 Blue Pill’s unnamed beefy twin brother. Testing soon! https://detail.tmall.com/item.htm?id=568676838958
[UPDATE] I have ported the code in this article to Rust for a safer, smarter coding experience…
We have a new tutorial on connecting Blue Pill to NB-IoT…
💎 The following Advanced Topic sections are for advanced developers. If you’re new to embedded programming, you may stop here.
💎 Advanced Topic: Improve the Accuracy of WiFi Geolocation
(Skip this section if you’re happy with the accuracy of the WiFi Geolocation)
Since we are sending only 3 WiFi Access Points to the Google WiFi Geolocation API, we ought to pick the Access Points that really matter. Here are some tips to improve the accuracy…
1️⃣ The program calls a Filter Function filter_func()
to determine whether it should accept or reject an Access Point that has just been detected. filter_func() implements 2 types of checks…
2️⃣ Reject an Access Point whose MAC Address matches a pattern. If we’re connecting the ESP8266 to a mobile hotspot, we should blacklist the hotspot from being selected as one of the 3 Access Points. Because mobile hotspots don’t have fixed locations and they are not useful for computing geolocation.
The matching of MAC Addresses is
done by mac_matches_pattern().
The function matches each Access
Point’s MAC Address against a blacklist of patterns defined in the array skip_ssid.
In this example, any MAC
Addresses matching the patterns fc:39:98:*:*:* or 00:87:01:*:*:* will be excluded, since such MAC Addresses belong to
Apple or Samsung mobile devices.
If you have a MAC Address that
should be excluded, add to skip_ssid before LAST_MAC_PATTERN.
3️⃣ Reject similar MAC Addresses. If two Access Points
have MAC Addresses that differ in only 1 byte, e.g. 01:02:03:04:05:06 and 01:02:03:04:05:ab, then both Access
Points most likely belong to the same WiFi Router with multiple network interfaces (like 2.4 GHz vs 5
GHz interfaces). When we select two MAC Addresses from the same WiFi Router for computing geolocation,
we are actually submitting redundant data that produces a geolocation that is less precise.
The function similar_mac()
rejects any Access Point whose MAC Address is similar (they differ in only 1 byte) to any MAC Address
that has already been selected.
💎 Advanced Topic: WiFi Geolocation with thethings.io and Google App Engine
If you’re building an IoT System to process and visualise sensor data, thethings.io has everything you need. To protect your IoT data, only users of thethings.io will be able to view the dashboards.
For this tutorial I decided to make the data available for viewing by the public (as long as you have a valid device ID). So I added one component to extend thethings.io: A web application hosted on Google Cloud App Engine that’s publicly accessible. Here’s how thethings.io and the web application work together to execute geolocation requests and display sensor data…
thethings.io
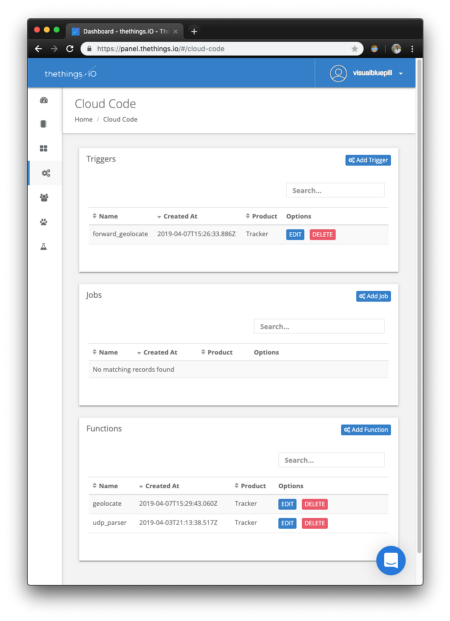
Cloud Code Trigger “forward_geolocate" and Cloud Code Function "geolocate" installed in my thethings.io account
In my account at thethings.io, I
created a Cloud Code Trigger forward_geolocate and a Cloud Code
Function geolocate. The two components work together to execute
geolocation requests and forward sensor data to the web application…
1️⃣ forward_geolocate
is a Cloud Code Trigger that’s called upon receiving sensor data through any channel (including the
CoAP server that we’re using in this tutorial). As we have seen earlier, our device transmits the
temperature data in this JSON format…
[ {"key": "device", "value": "01027f231f13739e8633f3b7da4e439f" },
  {"key": "tmp",    "value": 28.95} ]
forward_geolocate transforms the JSON into…
{ "device": "01027f231f13739e8633f3b7da4e439f", "tmp": 28.95 }
It pushes the transformed JSON to
our web application at the URL /push (described below). This
allows the sensor data to be viewed through the web server.
If the sensor data contains ssid and rssi values, forward_geolocate doesn’t push the data to the web application.
Instead, it forwards the data to the Cloud Code Function geolocate.
2️⃣ geolocate
is a Cloud Code Function called by forward_geolocate to perform
geolocation. The input contains 3 ssid and 3 rssi values, representing the 3 WiFi Access Points scanned by the
ESP8266.
geolocate calls the Google WiFi Geolocation API, passing the ssid and rssi values. The
Geolocation API returns the computed latitude, longitude and accuracy. This information is passed by
geolocate back to forward_geolocate
3️⃣ When forward_geolocate receives the computed latitude, longitude and
accuracy, it composes a JSON like this…
{ "device": "01027f231f13739e8633f3b7da4e439f",
  "latitude": 1.274, "longitude": 103.81, "accuracy": 40.1 }
And pushes the JSON to our web
application at the URL /push (described below). This allows the
computed geolocation to be viewed through the web server.
More on the features that I have implemented in thethings.io…
Web Application
The web application was built with Go, hosted on Google Cloud App Engine Standard Environment. The web application receives sensor and geolocation data from thethings.io and renders the data. The data is visible only to users with a valid device ID.
1️⃣ main.go
is the server-side Go program that implements two functions at these URLs…
/push: Receives a JSON document POSTed by forward_geolocate
that contains one or more sensor values for a device:
{ "device": "01027f231f13739e8633f3b7da4e439f", "tmp": 28.95 }{ "device": "01027f231f13739e8633f3b7da4e439f",
  "latitude": 1.274, "longitude": 103.81, "accuracy": 40.1 }
The program merges the sensor values into the Device State and remembers the updated Device State in RAM:
{ "device": "01027f231f13739e8633f3b7da4e439f",
  "tmp": 28.95,
  "latitude": 1.274, "longitude": 103.81, "accuracy": 40.1 }
The Device States in memory are lost when the server is restarted automatically during an idle period with no requests.
/pull: Return the JSON Device State
for a device ID. Called by index.html. The Device State contains
all sensor values for the device received so far:
{ "device": "01027f231f13739e8633f3b7da4e439f",
  "tmp": 28.95,
  "latitude": 1.274, "longitude": 103.81, "accuracy": 40.1 }
2️⃣ index.html
is a static HTML page with client-side JavaScript that renders the map using the Mapbox GL JavaScript API.
The JavaScript polls the /pull URL every 10 seconds via the
fetch API. When it detects any
changes to the sensor data (including location), it updates the map.
Check out the Go source code for the web application here…
💎 Advanced Topic: What’s Inside The CoAP Message?
(Skip this section if you’re not interested in decoding CoAP messages)
Earlier we saw the ESP8266 Send command transmit this mysterious UDP packet containing 177 bytes to our server…
That’s a CoAP message, based on UDP. The message data is displayed in two sections separated by a newline…
58 02 00 01 00 00 16 4a 27 2a e2 39 b2 76 32 06 74 68 69 6e 67 73 0d 1e 49 56 52 69 42 43 63 52 36 48 50 70 5f 43 63 5a 49 46 66 4f 5a 46 78 7a 5f 69 7a 6e 69 35 78 63 5f 4b 4f 2d 6b 67 53 41 32 59 38 11 32 51 32 ff7b 22 76 61 6c 75 65 73 22 3a 20 5b 7b 22 6b 65 79 22 3a 20 22 64 65 76 69 63 65 22 2c 22 76 61 6c 75 65 22 3a 20 22 36 63 30 31 33 30 37 63 30 63 32 34 62 39 37 31 66 30 34 62 32 34 39 62 37 31 36 34 36 36 30 30 22 7d 2c 7b 22 6b 65 79 22 3a 20 22 74 6d 70 22 2c 22 76 61 6c 75 65 22 3a 20 32 39 2e 38 36 7d 5d 7d
The top part contains the CoAP message header (which always ends with ff) while the bottom part contains the CoAP
payload (notice that it’s all ASCII!) To decode the entire
message, we’ll use open-source Wireshark (available for
Windows, macOS and Linux).
1️⃣ Copy both parts of the
message and paste into a new text file, say coap.txt. We may use
Visual Studio Code to create the file…
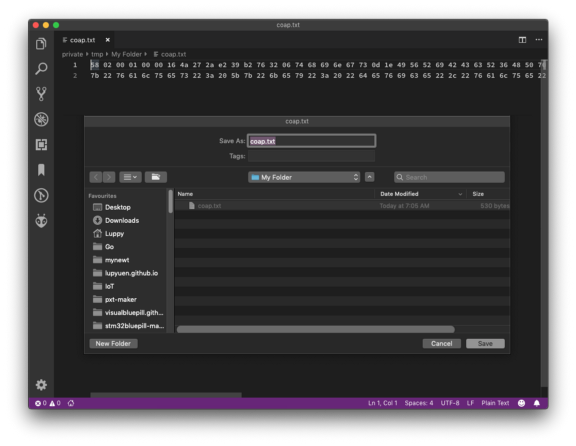
Creating the CoAP message file with Visual Studio Code
2️⃣ Install and launch Wireshark.
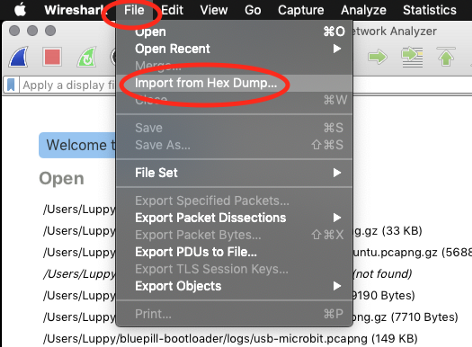
3️⃣ Click File → Import From Hex Dump
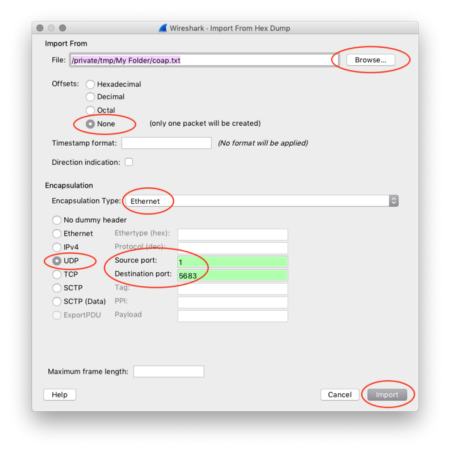
4️⃣ Click Browse to select the text file that
we have created, e.g. coap.txt
For Offsets, select None
For Encapsulation Type,
select
Ethernet
Click UDP
Set Source Port to 1
Set Destination Port to 5683
(the CoAP port number, so
that Wireshark will recognise this as a CoAP message)
Click Import

5️⃣ Wireshark decodes and displays the CoAP Header (which includes the URI) and the CoAP Payload
The CoAP Payload contains exactly the same sensor data JSON that we have composed earlier, as shown in the log!
Here’s the log…
That’s how we may decode and troubleshoot CoAP messages generated by the application. Wireshark also works for CoAP Payloads encoded in CBOR.
💎 Advanced Topic: Application ROM Usage
Here’s the detailed ROM memory usage of the application in this tutorial (total 44 KB ROM). It was created using the memory map spreadsheet that I described in an earlier article. The full spreadsheet is available here.
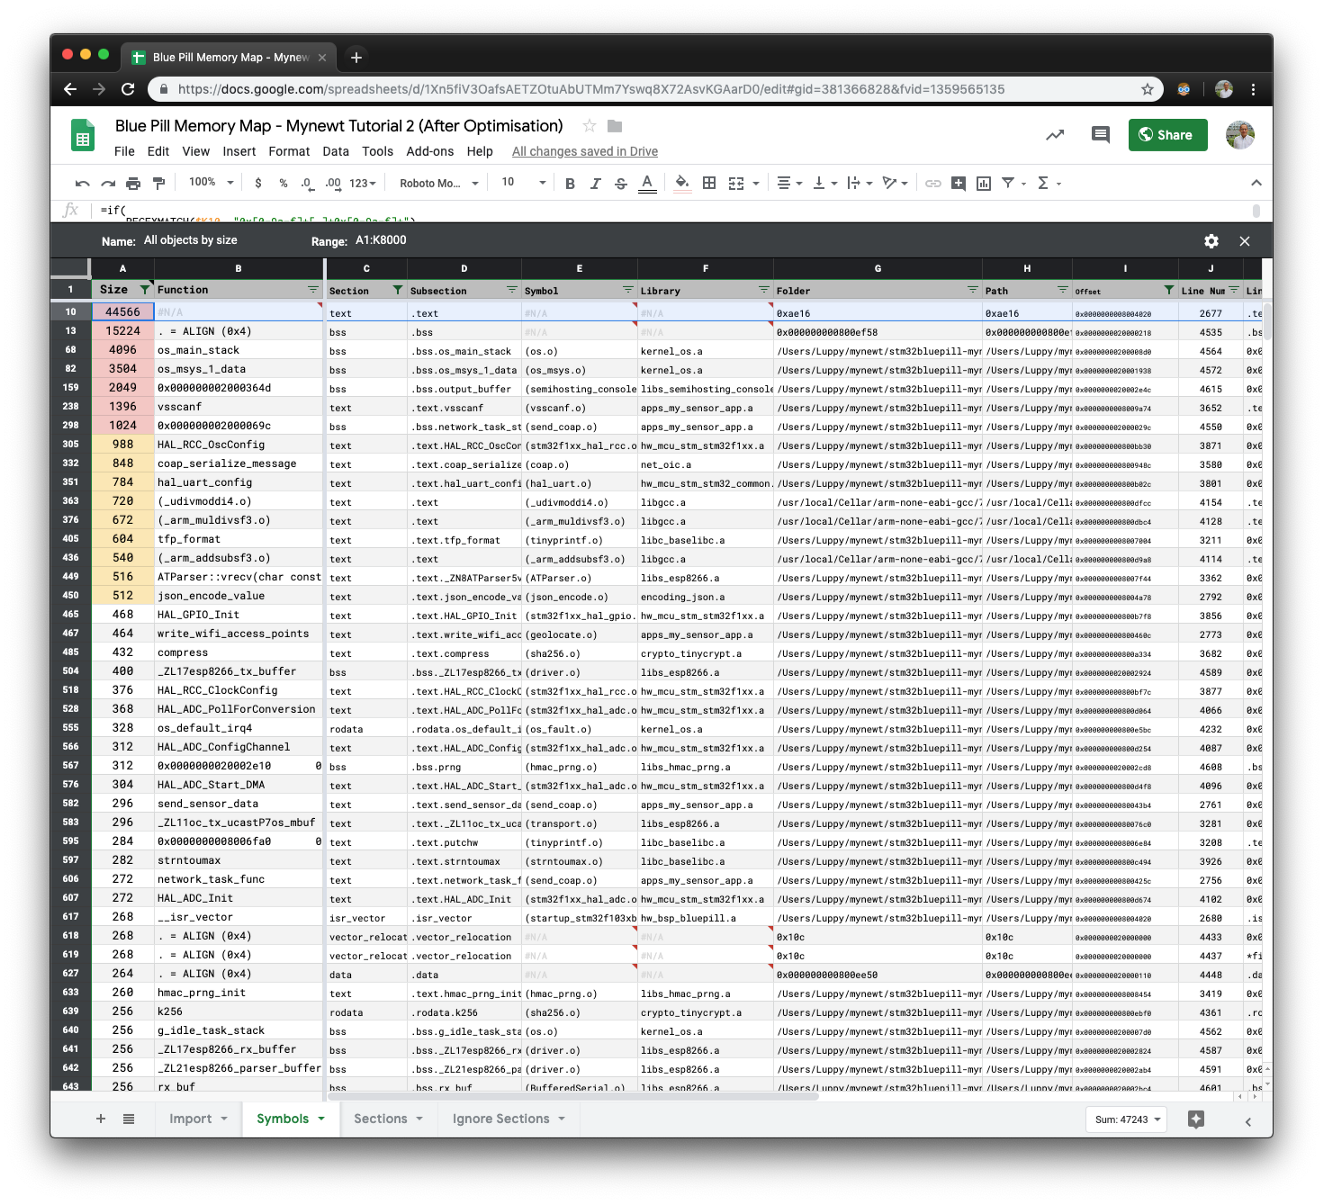
ROM usage of the application. From https://docs.google.com/spreadsheets/d/1Xn5fiV3OafsAETZOtuAbUTMm7Yswq8X72AsvKGAarD0/edit#gid=381366828&fvid=1359565135
💎 Advanced Topic: How Random Is The Device ID?
The device ID was generated with the open-source TinyCrypt library’s HMAC PRNG (pseudorandom number generator).
Our hmac_prng library simply calls
TinyCrypt, passing an entropy seed to initialise the generator.
The 32-bit entropy seed is computed by aggregating 64 temperature samples from Blue Pill’s internal temperature sensor.
32-bit entropy seed for HMAC PRNG created with Blue Pill’s internal temperature sensor