Build and Flash Rust+Mynewt Firmware for PineTime Smart Watch
All you need is a Raspberry Pi and a Windows or macOS computer!
UPDATE: This code in this article has been archived in the pre-lvgl branch of pinetime-rust-mynewt. The pinetime-rust-mynewt firmware has been revamped to support Rust Watch Faces on LVGL. Check out the updates
Welcome to the World of Modern IoT Gadgets! If you’re used to old-school IoT gadgets like Arduino Uno that are underpowered and have no networking and display… PineTime Smart Watch will surprise you! (Check out the Pine64 Store)
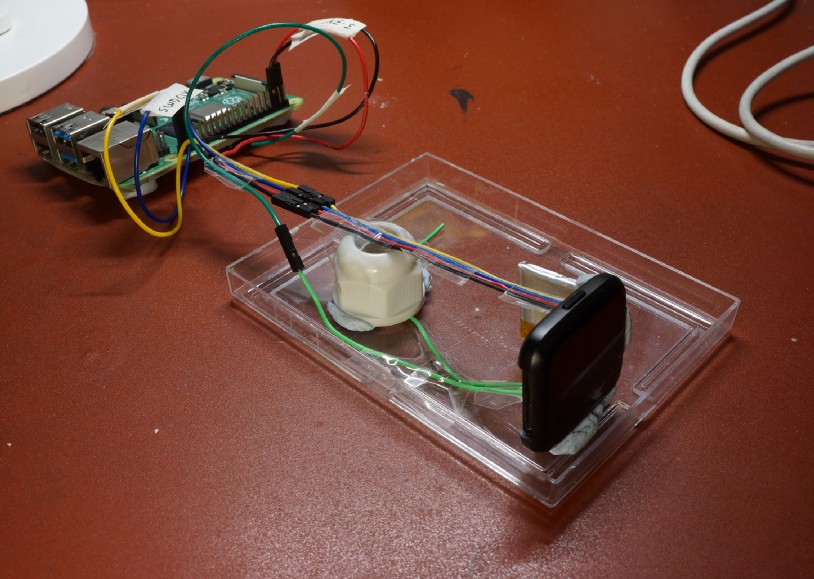
Raspberry Pi connected to PineTime
PineTime is powered by a Nordic nRF52 Microcontroller with an Arm Cortex-M4F CPU… The same microcontroller found in a high-end gaming mouse!
With built-in colour touchscreen and Bluetooth networking, embedded programming on PineTime becomes really fun and exciting.
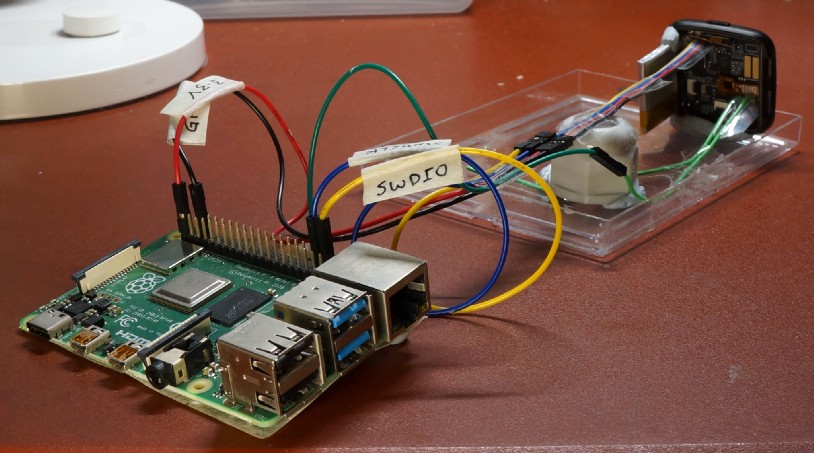
Raspberry Pi used for flashing the PineTime firmware
PineTime is a prime example of a real-world, off-the-shelf gadget that’s powerful and yet affordable, because it’s manufactured in huge quantities. But they can be intimidating to newbies who have not programmed such commercial devices.
Today I’ll show you that programming a PineTime is not that hard… All you need is a Raspberry Pi, some wires and a little creativity!
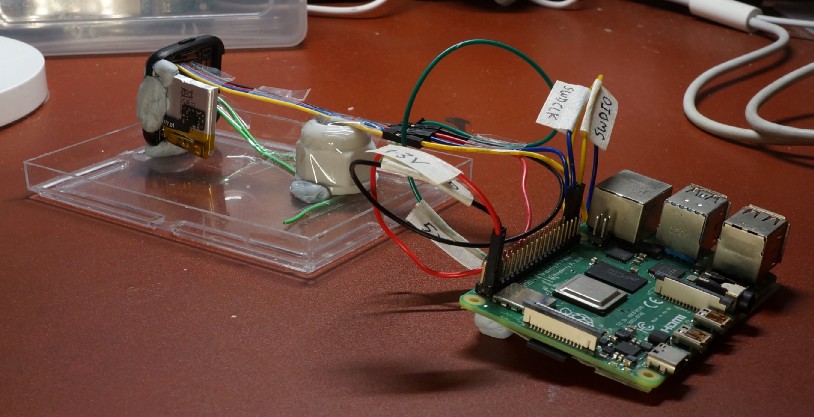
Another view of the improvised Raspberry Pi connection to PineTime
Connect PineTime to Raspberry Pi
Note: This section is obsolete. Please refer to the updated instructions here: https://github.com/lupyuen/visual-embedded-rust/blob/master/README.md
1️⃣ Carefully pry open the PineTime casing. Use tweezers to pivot the shiny battery gently to the side. Be careful not to break the red and black wires that connect the battery to the watch!
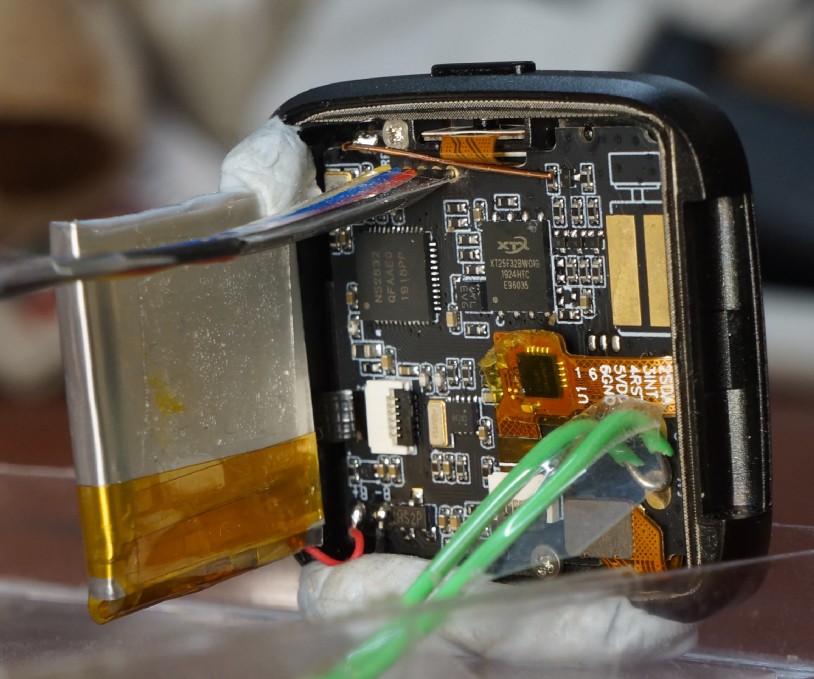
Be careful not to break the red and black wires (lower left) that connect the battery to the watch
2️⃣ Just above
the battery we see 4 shiny rings. This is the Serial Wire
Debug (SWD) Port for PineTime. We’ll use this port to
flash our firmware to PineTime. The 4 pins (from left to right) are SWDIO (Data I/O), SWDCLK
(Clock), 3.3V, GND.
🛈 What is “flash memory” / “flashing” / “firmware”? Read this
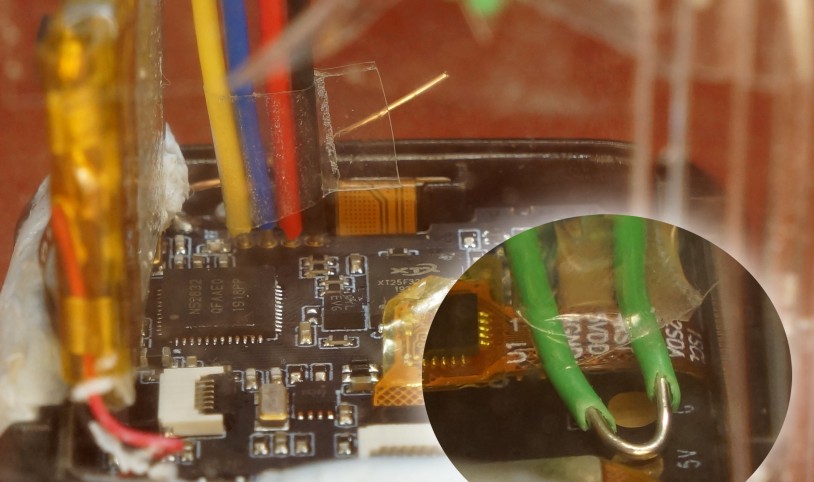
SWD Port at top left: SWDIO, SWDCLK, 3.3V and GND. 5V battery charging pad at lower right. Bent antenna wire is at top centre.
The exposed copper wire at the top centre of the photo is the Bluetooth antenna. Bend it upwards so that it doesn’t come into contact with anything.

Bending the Bluetooth Antenna so that it doesn’t touch anything
3️⃣ At lower
right we see a pad marked 5V. We’ll connect this pad to
Raspberry Pi to charge the battery. If charging of the battery is not needed during development, we
may leave5V disconnected.
4️⃣ Connect the SWD Port and the 5V Pad (optional) to the Raspberry Pi with Solid-Core Wire (22 AWG) and Female-To-Female Jumper Cables…
Some have reported that the SIM Ejector Tool from our phones will also fit perfectly into PineTime’s SWD holes. (Or file the pin down until it fits)
5️⃣ We may use Raspberry Pi Zero, 1, 2, 3 or 4 . The pins on Raspberry Pi to be connected are…
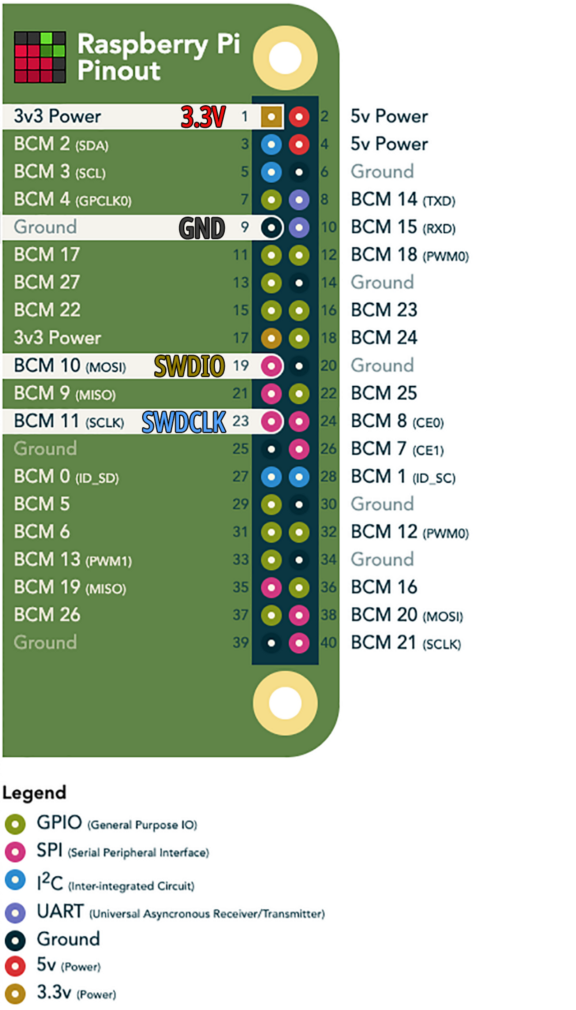
Connecting Raspberry Pi’s SPI port to PineTime. Based on https://pinout.xyz/
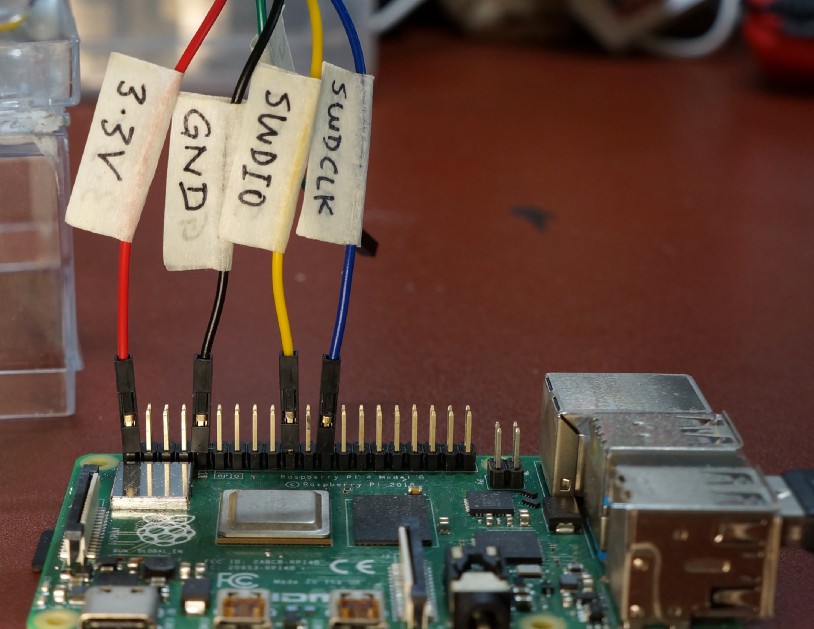
Raspberry Pi’s SPI port connected to PineTime. 5V may be disconnected if battery charging is not needed.
6️⃣ The PineTime touchscreen needs to be accessible during development, so I mounted PineTime on a $2 clear box cover from Daiso with Blu Tack and sticky tape.
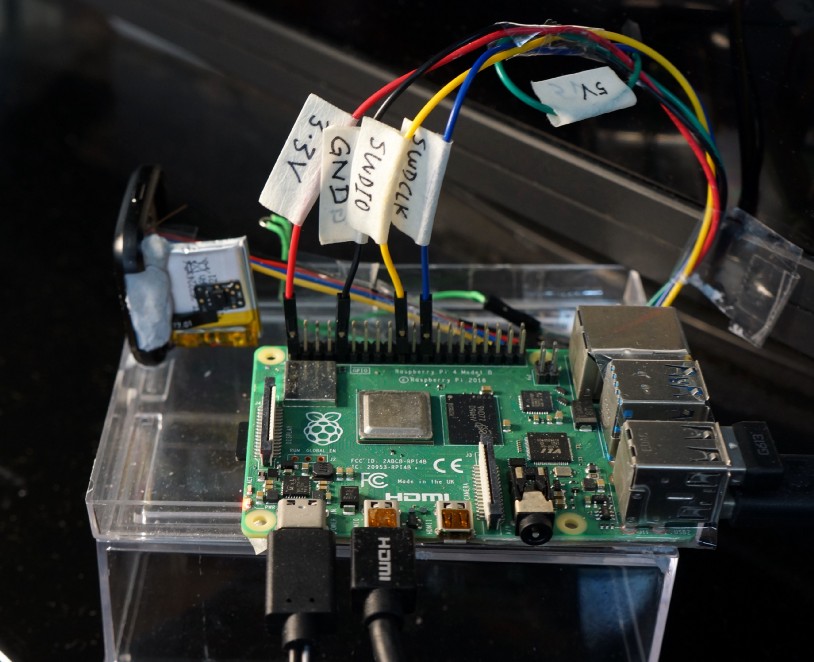
PineTime and Raspberry Pi mounted on a clear box cover
Be Creative! And send me photos of your PineTime setup…
UPDATE: Check this Reddit Thread for a super-cool Raspberry Pi Zero setup!

Here’s a tip: Colour the Raspberry Pi pins with a marker (one side only) so that we remember which pin to use
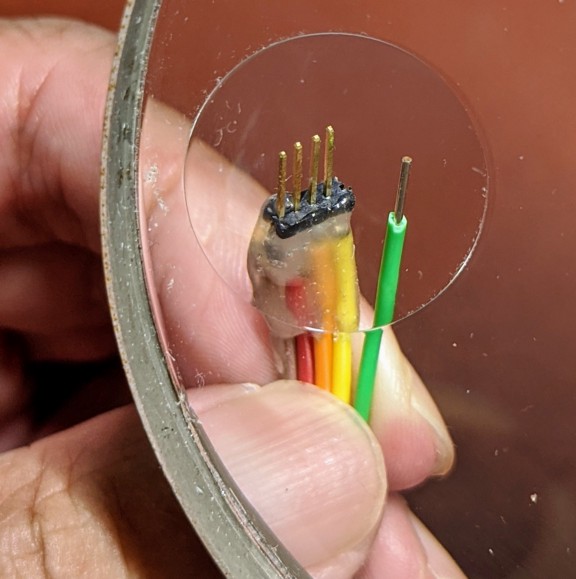
Why didn’t I use the SWD cable that was shipped with PineTime? Because the wires were too thin and may lose contact with the SWD connector. Compare that with the Solid Core 22 AWG wire (green), which fits nicely. Also note that the SWD cable is shipped with random colours.
Remove PineTime Flash Protection
Note: This section is obsolete. Please refer to the updated instructions here: https://github.com/lupyuen/visual-embedded-rust/blob/master/README.md
PineTime is shipped with preloaded demo firmware. We need to erase the demo firmware and unprotect PineTime’s flash memory so that we may flash our own firmware.
🛈 What is “flash protection”? Read this
1️⃣ Power on the Raspberry Pi. Open a command prompt and enter the following…
sudo raspi-config
Select Interfacing Options → SPI → Yes
Select Finish
At the command prompt, enter the following…
2️⃣ At the
Welcome to Rust! prompt, press Enter to select the default
option:1) Proceed with installation (default)
If you see this error…
Cloning into 'openocd-spi/jimtcl'...
fatal: unable to access 'http://repo.or.cz/r/jimtcl.git/': Recv failure: Connection reset by peer
fatal: clone of 'http://repo.or.cz/r/jimtcl.git' into submodule path '/private/tmp/aa/openocd-spi/jimtcl' failed
It means that
the sub-repository for one of the dependencies jimtcl is
temporarily down. You may download the pre-built openocd-spi
binaries from this link. Then copy the
executable openocd-spi/src/openocd to pinetime-rust-mynewt/openocd/bin/openocd
3️⃣ When the installation has completed, enter the following at the command prompt…
4️⃣ We should
see Shut Down And Power Off Your Raspberry Pi…
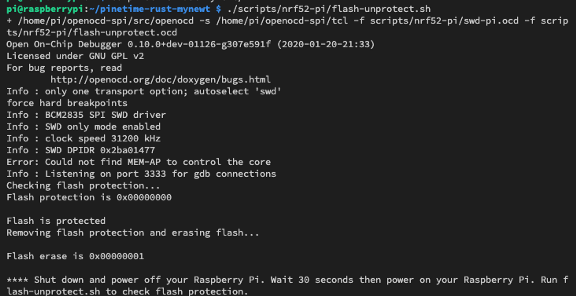
If you see
Clock Speed and nothing else after that…
Info : BCM2835 SPI SWD driver
Info : SWD only mode enabled
Info : clock speed 31200 kHz
Then the
connection to the SWD Port is probably loose, check the pins. Also enter sudo raspi-config and confirm that the SPI port has been enabled.
If you see this instead…
openocd/bin/openocd: cannot execute binary file: Exec format error
Then install-pi.sh probably didn’t run correctly. To fix this, copy the
openocd executable like this…
cp $HOME/openocd-spi/src/openocd $HOME/pinetime-rust-mynewt/openocd/bin/openocd
5️⃣ Shut down and power off your Raspberry Pi. Wait 30 seconds for the red and green LEDs on your Pi to turn off. Power on your Pi. Enter the same commands at a command prompt…
6️⃣ We should
see Flash Is Already Unprotected…
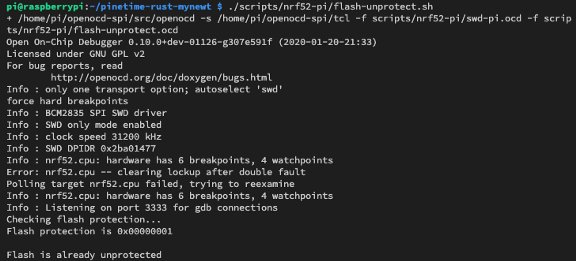
PineTime’s demo firmware has been erased and the flash protection has been removed.
🛈 What is OpenOCD? Why Raspberry Pi and not ROCK64 or Nvidia Jetson Nano? Read this
Flash Bootloader and Application to PineTime
We’re now ready to flash our own firmware to PineTime! We’ll be flashing the PineTime firmware that’s based on open-source Apache Mynewt embedded operating system. Mynewt OS contains two components that we shall flash to PineTime…
Mynewt Bootloader: This is the C code that’s run whenever we power on PineTime. The Bootloader executes the Mynewt Application upon startup.
Mynewt Application: Contains a Rust application that controls the PineTime functions, and low-level system functions written in C.
The Bootloader and Application firmware image files may be found at these locations…
From https://github.com/lupyuen/pinetime-rust-mynewt/blob/master/hw/bsp/nrf52/bsp.yml
🛈 What is a Bootloader? Read this
1️⃣ To flash Mynewt Bootloader to PineTime, enter the following at the command prompt…
Commands to flash Mynewt Bootloader to PineTime
2️⃣ We should
see Done…
Log of Mynewt Bootloader flashing. From https://github.com/lupyuen/pinetime-rust-mynewt/blob/master/logs/load-bootloader-pi.log
3️⃣ To flash Mynewt Application to PineTime, enter the following at the command prompt…
Commands to flash Mynewt Application to PineTime
4️⃣ We should
see Done! Press Ctrl-C To Exit…
Log of Mynewt Application flashing. From https://github.com/lupyuen/pinetime-rust-mynewt/blob/master/logs/load-application-pi.log
5️⃣ The new PineTime firmware runs after the flashing has been completed. Here are the debugging messages produced by our Rust application…
Log of Mynewt Application executing. From https://github.com/lupyuen/pinetime-rust-mynewt/blob/master/logs/load-application-pi.log
6️⃣ And we should see on the PineTime screen…
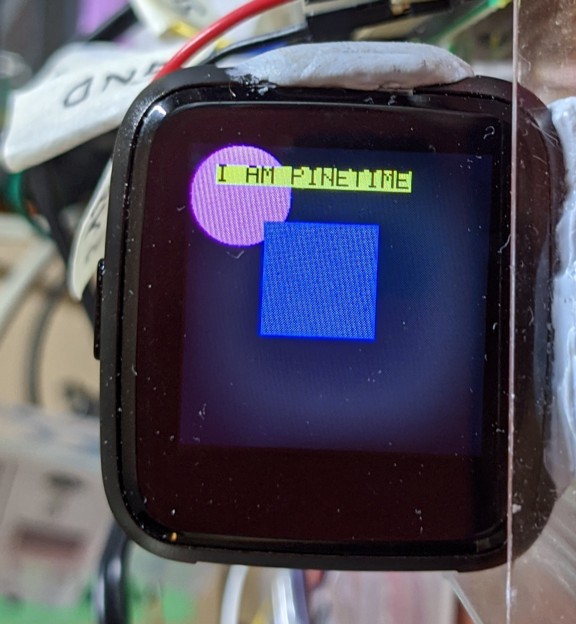
Our Rust Application rendering graphics and text to the PineTime display
7️⃣ Press Ctrl-C to stop the display of debugging messages.
We have flashed
a simple Rust application located at pinetime-rust-mynewt/rust/app/src/display.rs
that renders some graphics and text to the PineTime display…
Our Rust application that renders graphics and text. From https://github.com/lupyuen/pinetime-rust-mynewt/blob/master/rust/app/src/display.rs
Here’s a good introduction to Rust programming and here’s a good overview of Rust
The Rust
application references the Rust library (crate) named [embedded_graphics]. That’s
where Rectangle,
Circle,
fonts,
… are defined.
How do we modify this Rust application and rebuild the firmware? We have 3 options:
[Option 1] Build the firmware on a Windows computer, and copy to Pi for flashing
[Option 2] Build the firmware on a macOS computer, and copy to Pi for flashing
[Option 3] Build the firmware on a (powerful) Raspberry Pi (or PineBook Pro) and flash directly
[Option 1] Install PineTime Build Tools on Windows
(If you’re building firmware on macOS, skip to the next section. If you’re building firmware on Raspberry Pi, skip to the section “[Option 3] Install Build Tools on Raspberry Pi”)
To build your own firmware on a Windows computer, follow these instructions to install the build tools for Rust and Mynewt OS on Windows…
1️⃣ Download
the pinetime-rust-mynewt.7z file attached below…github.com/lupyuen/pinetime-rust-mynewt/releases/tag/v2.0.4
Expand the
.7z file with 7zip…www.7-zip.org/download.html
2️⃣ Click here
to install Build Tools For Visual Studio 2019:visualstudio.microsoft.com/downloads/#build-tools-for-visual-studio-2019
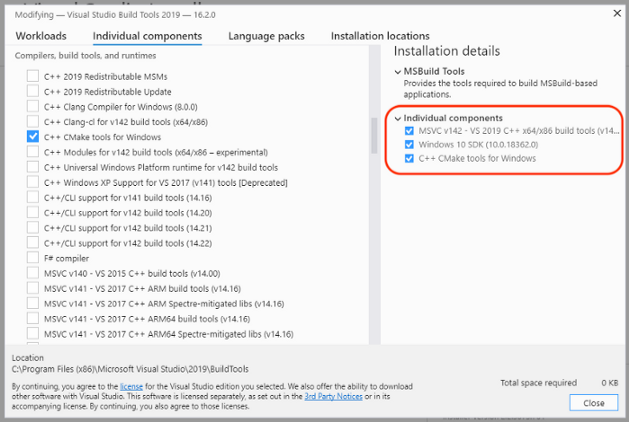
Build Tools For Visual Studio 2019
Click the Individual Components tab
Select the following components:
Windows 10 SDK (10.0.18362.0)C++ CMake Tools for Windows- (This
should be automatically selected)
MSVC v142 — VS 2019 C++ x64/x86 Build Tools
3️⃣ Install
rustup according to the instructions here:rustup.rs
Click the link
provided to download rustup‑init.exe
Launch the
downloaded file rustup‑init.exe
If you see the
message “Windows Defender SmartScreen prevented an unrecognised app from starting”…
Click More Info
Click Run Anyway
At the Welcome to Rust! prompt, press Enter to select the default
option:1) Proceed with installation (default)
4️⃣ Open the Command Prompt and enter…
# Install Rust build tools for Arm Cortex
rustup default nightly
rustup update
rustup target add thumbv7em-none-eabihf
5️⃣ Install GNU Arm Embedded Toolchain for
Windows from Arm Developer Website…gcc-arm-none-eabi-8-2019-q3-update-win32-sha1.exe
Select this
option at the last install step:"Add path to environment variable"
6️⃣ Install
VSCode…code.visualstudio.com
🛈 What is VSCode? Is it related to Visual Studio? How is Microsoft involved? Read this
[Option 2] Install PineTime Build Tools on macOS
(If you’re building firmware on Windows, skip to the section “Build PineTime Firmware”)
To build your own firmware on a macOS computer, follow these instructions to install the build tools for Rust and Mynewt OS on macOS…
1️⃣ Download
the pinetime-rust-mynewt.7z file attached below…github.com/lupyuen/pinetime-rust-mynewt/releases/tag/v2.0.5
Expand the
.7z file with Keka…www.keka.io/en/
2️⃣ Install
rustup according to the instructions here:rustup.rs
At the Welcome to Rust! prompt, press Enter to select the default
option:1) Proceed with installation (default)
3️⃣ Open the Command Prompt and enter…
# Install Rust build tools for Arm Cortex
source $HOME/.cargo/env
rustup default nightly
rustup update
rustup target add thumbv7em-none-eabihf# Install Go and newt (build tool for Mynewt OS)
cd pinetime-rust-mynewt
scripts/install-mac.sh
In case of problems, compare with this installation log
5️⃣ Install GNU Arm Embedded Toolchain for
macOS from Arm Developer Website…gcc-arm-none-eabi-8-2019-q3-update-mac.tar.bz2
Expand the
.tar.bz2 compressed file with Keka.
Add the
uncompressed bin folder to your PATH environment variable in your ~/.profile and ~/.bashrc
files, like this:
export PATH=”/Users/MYUSERNAME/gcc-arm-none-eabi-8–2019-q3-update/bin:$PATH”
6️⃣ Install
VSCode…code.visualstudio.com
🛈 What is VSCode? Is it related to Visual Studio? How is Microsoft involved? Read this
[Option 3] Install PineTime Build Tools on Raspberry Pi
(If you’re building firmware on Windows or macOS, skip this section)
The PineTime
Build Tools are already installed on our Raspberry Pi when we executed install-pi.sh earlier.
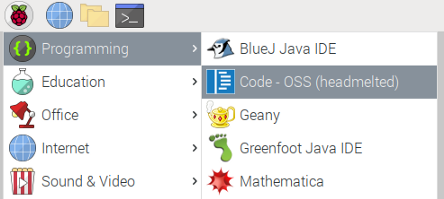
Launching VSCode on Raspberry Pi
Launch VSCode by clicking the Raspberry Pi Menu (top left corner) → Programming → Code OSS Headmelted
🛈 What is VSCode? Is it related to Visual Studio? How is Microsoft involved? Read this
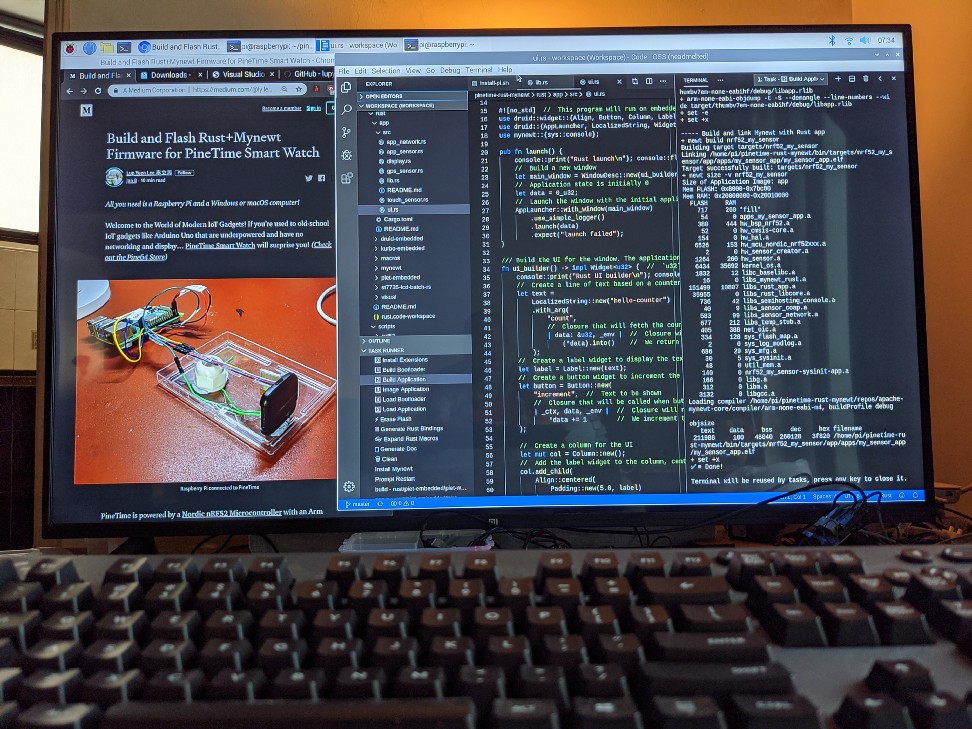
Building PineTime Firmware on Raspberry Pi 4 with VSCode. Displayed on Xiaomi 65-inch 4K TV.
If you’re building firmware on PineBook Pro…
To install the build tools on PineBook Pro, check these instructions
Build PineTime Firmware on Windows, macOS and Raspberry Pi
We’re all set to build our own PineTime Firmware with VSCode!
1️⃣ Launch
VSCode. Click File → Open Folder
Select the downloaded
folder pinetime-rust-mynewt
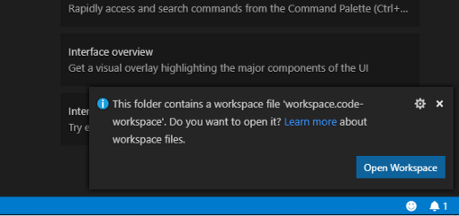
When prompted
to open the workspace, click Open Workspace

When prompted
to install Extension Recommendations, click Install All
2️⃣ Edit the
Rust demo application located at pinetime-rust-mynewt/rust/app/src/display.rs
Change I AM PINETIME to your own message.
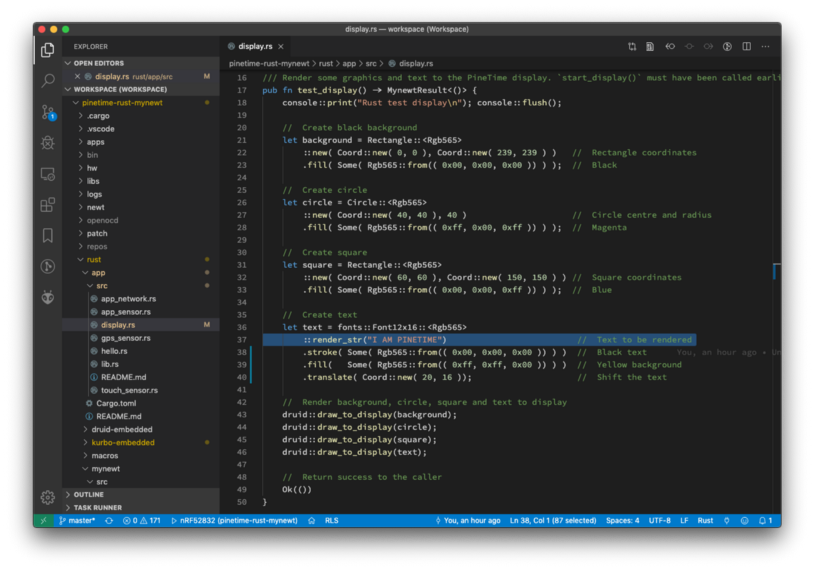
Editing the Rust demo application with VSCode
3️⃣ Click Terminal → Run Task → [2] Build Application
This builds the Mynewt Application, which includes our Rust application.
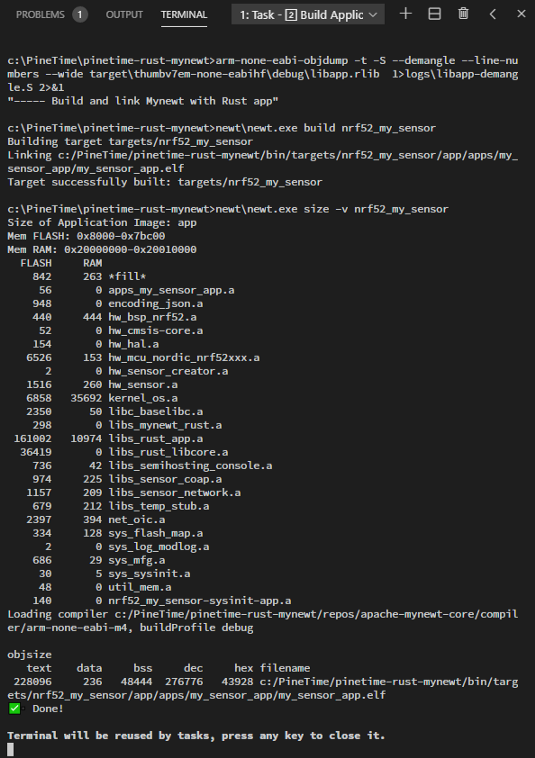
Build Mynewt Application Log
If you see the
message Undefined reference to main, rebuild the application by
clicking Terminal → Run Task → [2] Build Application
In case of problems, compare with this build log
4️⃣ Click Terminal → Run Task → [3] Image Application
This creates
the Firmware Image File for our Mynewt Application. The file is located at pinetime-rust-mynewt/bin/targets/nrf52_my_sensor/app/apps/my_sensor_app/my_sensor_app.img
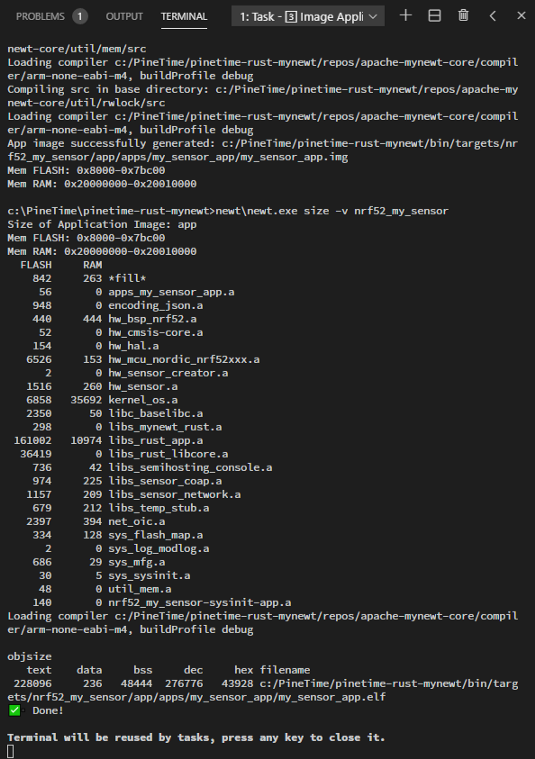
Image Mynewt Application Log
In case of problems, compare with this image log
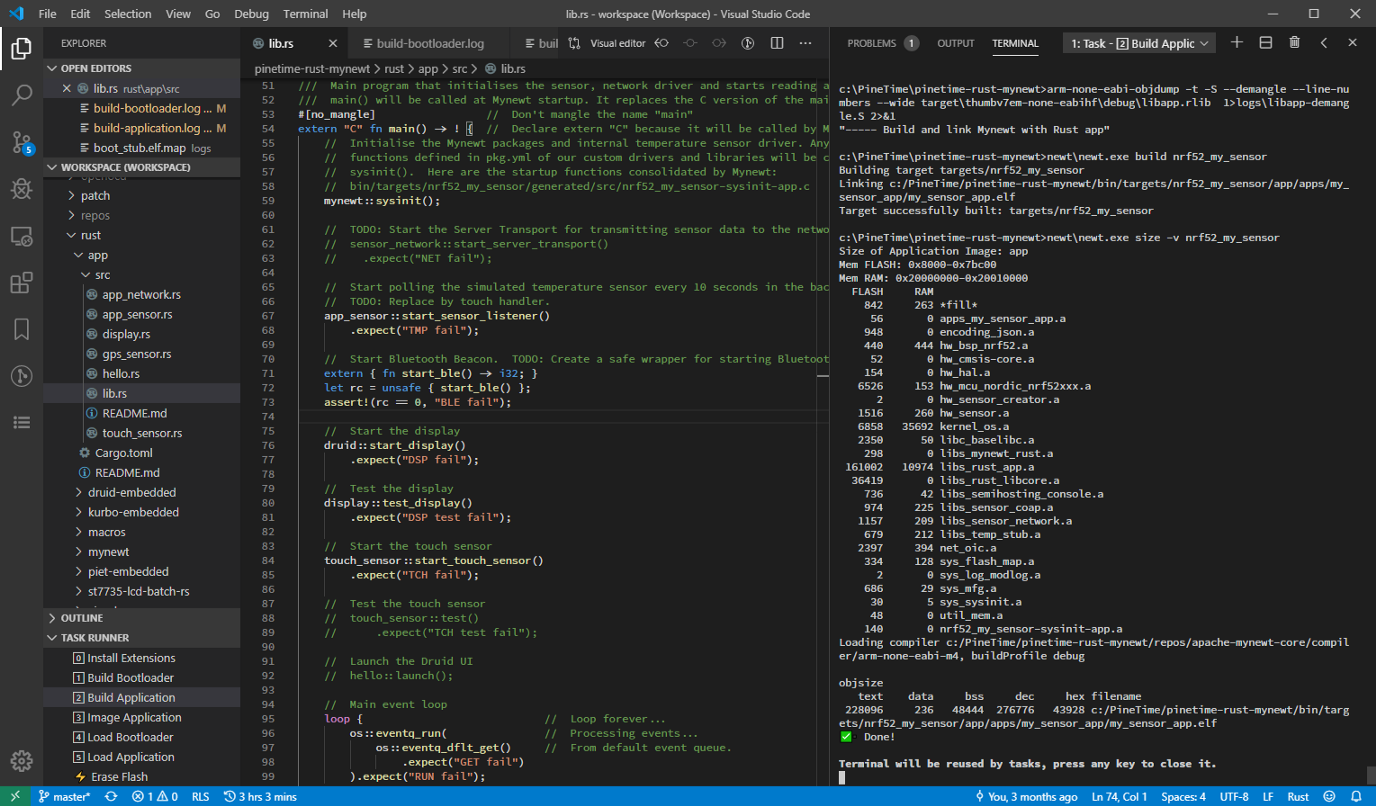
Building PineTime Firmware on Windows with VSCode
Flash New PineTime Firmware
Finally let’s flash our new firmware to PineTime!
1️⃣ If you used a Windows or macOS computer to build the firmware…
Copy the
application firmware image my_sensor_app.img from pinetime-rust-mynewt/bin/targets/nrf52_my_sensor/app/apps/my_sensor_appon
your Windows/macOS computer to the same folder on your Raspberry Pi.
I used Cyberduck to copy the file to Raspberry Pi. This step is not needed if you used a Pi to build the firmware.
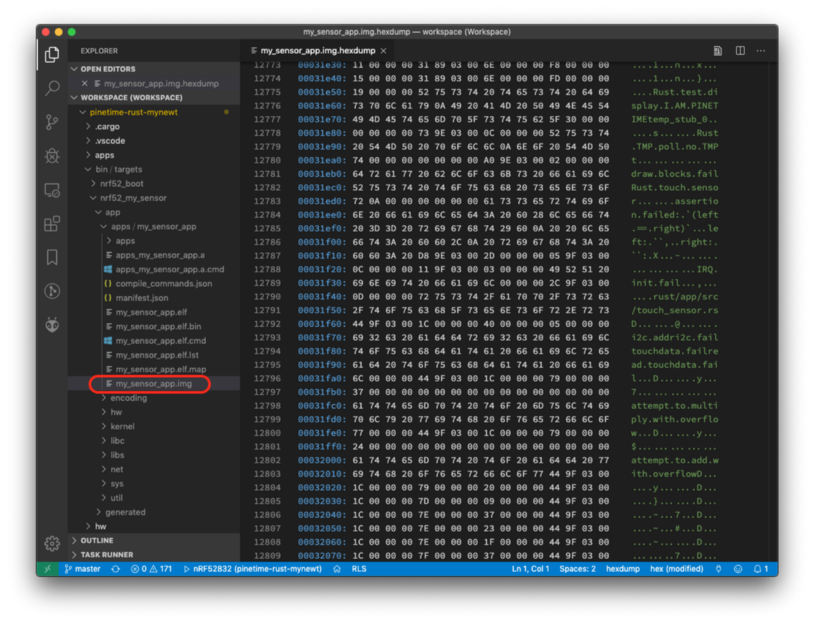
Location of the Mynewt Application Firmware
Image my_sensor_app.img
2️⃣ On our Raspberry Pi, enter the following at the command prompt…
Commands to flash Mynewt Application to PineTime
3️⃣ We should see…
Log of Mynewt Application flashing. From https://github.com/lupyuen/pinetime-rust-mynewt/blob/master/logs/load-application-pi.log
4️⃣ Our
modified firmware is now running on PineTime! Press Ctrl-C to
exit.
Explore the Rust code here to understand how the features were implemented in PineTime
If you prefer to build PineTime firmware and create the firmware image via the command line, here are the commands…
For Windows…
Build firmware and create firmware image on Windows
For macOS and Raspberry Pi…
Build firmware and create firmware image on macOS and Raspberry Pi
If you see the
error message Undefined reference to main, run build-app.cmd or build-app.sh
again and it should be fixed.
Debug PineTime Firmware with Raspberry Pi
With only a Raspberry Pi, we may debug the firmware on PineTime: Step into the program line by line, set a breakpoint to pause execution, inspect variables at runtime, …
Check the article “Debug Rust+Mynewt Firmware for PineTime on Raspberry Pi” for details
Debugging PineTime Firmware with Raspberry Pi
💎 Advanced Topic: Build druid UI Firmware for PineTime
Our demo application can render graphics but it’s not interactive like a real watch app… Watch apps should respond to our touch! Like this… 抖音视频
This Rust demo application that responds to touch was programmed with the druid UI framework like this…
druid UI application. From https://github.com/lupyuen/pinetime-rust-mynewt/blob/master/rust/app/src/ui.rs
There’s a lot happening in this short piece of code… Check this article for the details.
To build this
druid UI app instead of the previous graphics display app, open VSCode on your Windows or macOS
computer. Edit the Rust application configuration file pinetime-rust-mynewt/rust/app/Cargo.toml
Edit the file
such that display_app is commented out, and ui_app is uncommented…
From https://github.com/lupyuen/pinetime-rust-mynewt/blob/master/rust/app/Cargo.toml
Repeat the instructions above to build the PineTime firmware on your computer, then flash the firmware from Raspberry Pi to PineTime. And now you’ll have an interactive watch app on your PineTime!
If you wish to flash the druid UI firmware without rebuilding…
Download to
your Raspberry Pi the pinetime-rust-mynewt.7z file attached
below…github.com/lupyuen/pinetime-rust-mynewt/releases/tag/v1.0.1
Then flash the
application firmware image my_sensor_app.img located at
pinetime-rust-mynewt/bin/targets/nrf52_my_sensor/app/apps/my_sensor_app
💎 In the video above, some touches don’t seem to update the counter. If you have any ideas why, lemme know! Here’s the touchscreen driver in Rust. This article explains how it works.
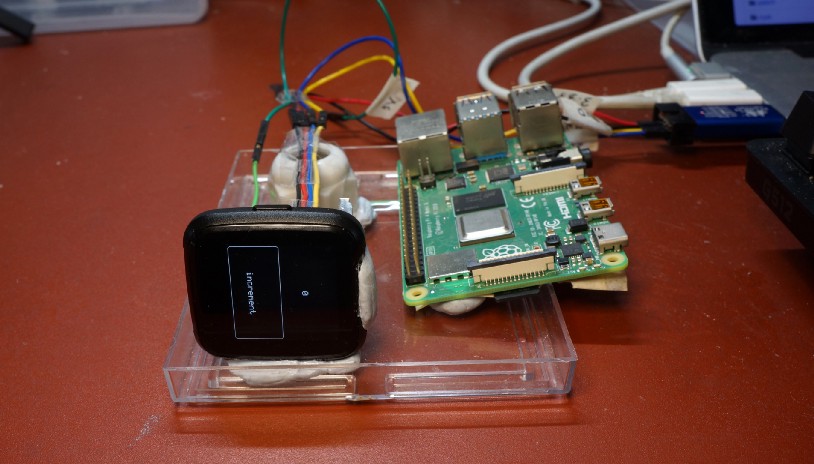
Rust druid app with touchable button running on PineTime
Here’s a video of PineTime connected to a Raspberry Pi 4 that’s building the druid app with VSCode… 抖音视频
Building druid app for PineTime with VSCode on RaspberryPi 4. Uses the “Task Runner” extension: https://marketplace.visualstudio.com/items?itemName=SanaAjani.taskrunnercode&ssr=false
💎 Advanced Topic: Flash and Debug PineTime with ST-Link
If we’re doing serious development with PineTime, I recommend getting an ST-Link v2 USB dongle ($2) that connects PineTime directly to our Windows, macOS or Linux computer.
ST-Link allows us to flash PineTime directly from our computer, and it even supports firmware debugging (setting breakpoints, checking values of variables at runtime, …)
Here’s how we connect PineTime to ST-Link…
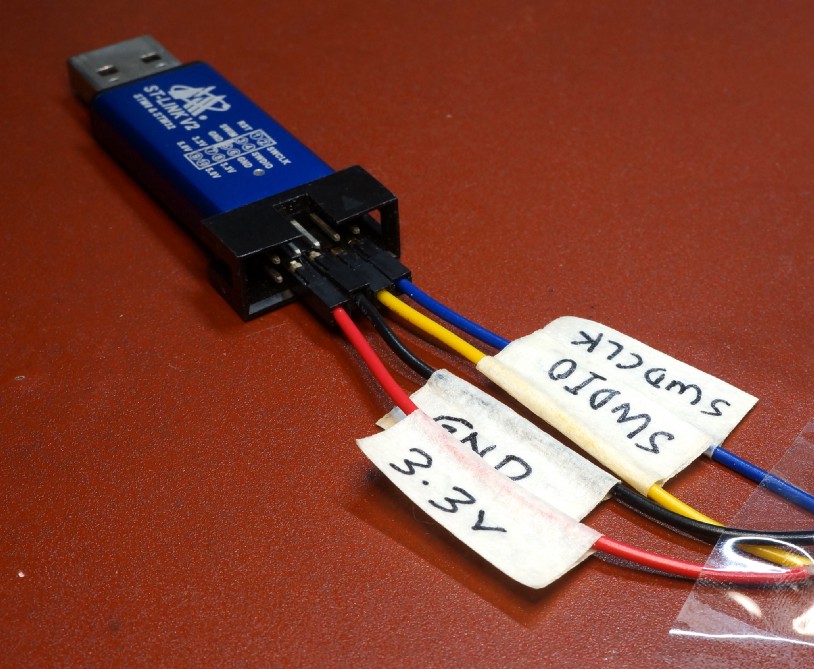
PineTime connected to ST-Link
Connecting PineTime to ST-Link
Instructions for flashing and debugging may be found in the article “Install Apache Mynewt and Embedded Rust for nRF52 and Visual Studio Code on Windows and macOS” under the sections “Flash The Firmware” and “Run The Program”.
Also check this article that explains the VSCode Debugger configuration files: “Debug RIOT-OS on PineTime with VSCode”
What’s Next?
Find out how to debug PineTime firmware with a Raspberry Pi…
We have been using a modified version of OpenOCD that’s faster and more reliable as explained here…
Our PineTime firmware bundles the Watch App together with the operating system (Mynewt OS). If PineTime were a real consumer gadget like an Android phone, we would expect the Watch App to be installed separately from the operating system.
I’m working on a solution for this.
Stay Tuned!
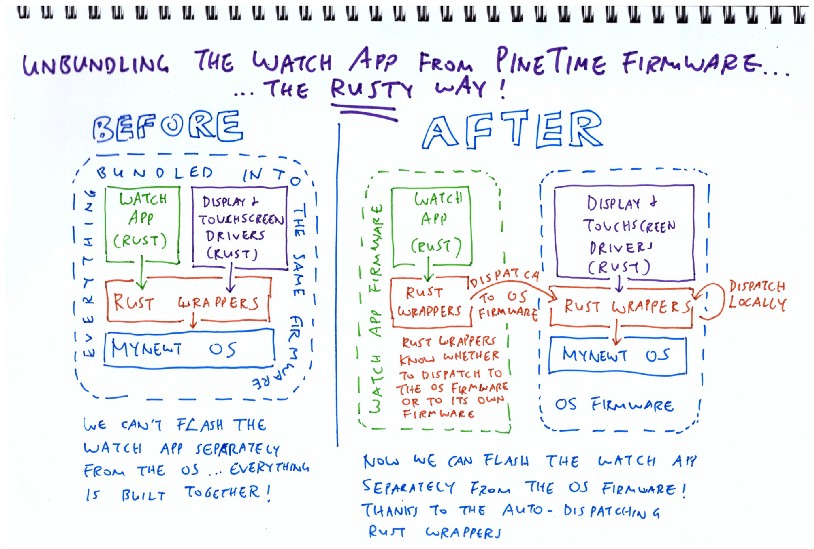
Proposed plan to unbundle Watch Apps from PineTime firmware
References
Chat with the PineTime Community and me (lupyuen#4063) on Discord!
To understand the PineTime code, check out the other articles in the PineTime series…
(Check the “References” section at the end of the first article for more useful links)
The structure of the Rust and Mynewt code on PineTime is similar to this…
The complete source code is here…
The rust folder in the above repository contains link to the following
Rust repositories…