Get Started with NB-IoT and Quectel modules
The year is 2029. Humans are populating the Moon, starting at Moon Base One. Two Moon Base Operators are about to commit a grave mistake in the crop garden of beautiful red tomatoes…

Tomato Crop on Moon Base One
Operator 1: Are we all set to power on 1,000 new temperature sensors today?
Operator 2: All set! We already have 1,000 existing temperature sensors. Doubling the sensors should be a piece of cake!
Operator 1: OK powering on 1,000 new sensors… Wait we got an error… CONNECTION REFUSED… MQTT SERVER TOO BUSY
Operator 2: That’s odd… These sensors are just connecting to the MQTT server over the 8G mobile network, sending a short sensor data message periodically while keeping the connection alive. What could have gone wrong?
Operator 1: WHAT??? Why didn’t we use 4G LTE with NB-IoT? It’s connectionless and can handle more sensors!
Operator 2: But the message delivery is not guaranteed with NB-IoT! Then again, maybe we don’t really need to receive every single sensor message…
Operator 1: ALL our temperature sensors are DISCONNECTED! Fans are speeding up and blowing HOT AIR at our crops! Our fresh tomatoes are getting AIR FRIED!!! NOOOOOOO…
Let’s face it — NB-IoT is hard! But we may not realise that NB-IoT (or Narrowband Internet of Things) is hard because it requires a mindset change…
When phones were created, they were meant to connect people to other people so that we could talk. Today our 4G LTE networks still carry over the same Connection-Oriented concepts but introduces a new twist: A new Connectionless method called NB-IoT…
NB-IoT focuses specifically on indoor coverage, low cost, long battery life, and high connection density. NB-IoT uses a subset of the LTE standard, but limits the bandwidth to a single narrow-band of 200kHz.
In this article we shall learn…
1️⃣ How NB-IoT networks operate the Connectionless way with UDP and CoAP protocols
2️⃣ How to use a Quectel evaluation board to send a CoAP message to the CoAP server hosted at thethings.io
3️⃣ How to visualise the sensor data transmitted to thethings.io
Many thanks to StarHub for providing the Quectel evaluation board and the NB-IoT SIM for the purpose of IoT Education! This generous gesture by StarHub will surely benefit many IoT makers around the world.

Are You Connected? Or Connectionless?
How do we achieve “low cost, long battery life, and high connection density” with NB-IoT? Next time you attend a party, try this…
Mingle around as many people as you can. Listen to what EVERYONE has to say.
When a conversation gets boring, just move away without saying anything.
Don’t feel obligated to continue any conversation. It’s your right to listen as much or as little as you want. You’re NOT committed to stay CONNECTED to any person at the party.
Yes your friends will find you strangely anti-social. You will miss out on some great stories from your friends, but then again, they are probably repeating the same old stories.
BUT you will learn lots more, from more people. And feel less drained.
That’s the better way… the CONNECTIONLESS way!
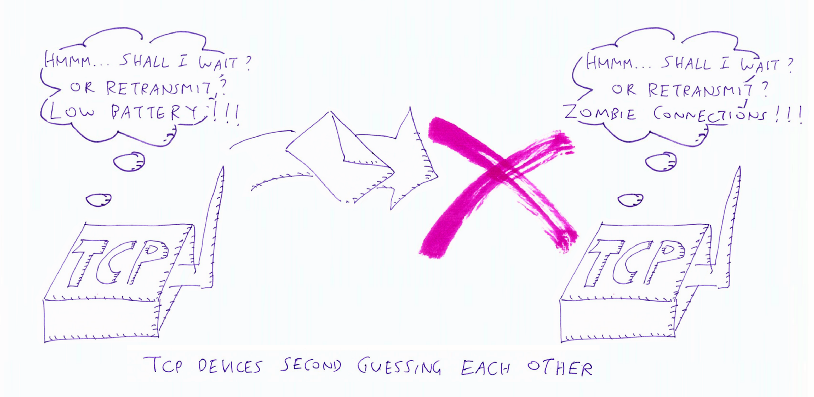
We have been using TCP (Transmission Control Protocol) since the beginning of the internet to connect our gadgets (HTTP and MQTT are two popular protocols based on TCP). However TCP is Connection-Oriented — when two devices are connected via TCP, they need to stay connected… or they will be penalised.
If any packets are dropped (due to poor network coverage or congestion) or delayed, both devices will need to resynchronise their TCP windows by retransmitting their packets. Which may lead to severe problems like the MQTT Server congestion on Moon Base One!
The Connectionless Way: Change TCP to UDP
In a Connectionless Network there’s no commitment to stay connected to any device: Just transmit or receive a message. And move on. (Like our Connectionless Party!)
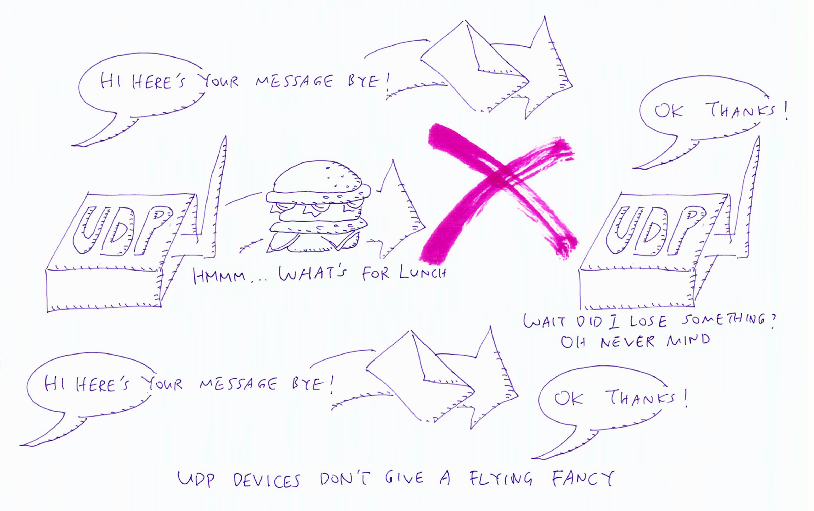
Instead of establishing a TCP connection, we transmit a UDP (User Datagram Protocol) packet without waiting for the acknowledgement. But because they are Connectionless, UDP packets do not enjoy guaranteed delivery.
Most UDP packets are delivered properly, but if any packets are dropped (due to poor network coverage or congestion), UDP devices don’t attempt to resynchronise and retransmit the lost packets.
Isn’t it a serious problem when packets disappear in our IoT network? Well, do we really need to receive every single sensor reading? Instead of suffering a server failure or network congestion like Moon Base One, could we compromise by dropping a couple of sensor messages? That’s how we achieve High Connection Density in NB-IoT!
When we go Connectionless, our gadgets become a lot simpler to build… no messy sliding window protocols and waiting forever! Thus our NB-IoT gadgets are Low Cost, and enjoy Long Battery Life!
💎 Many other things are switching to the simpler Connectionless way… 1️⃣ HTTP version 3 will switch from TCP to a UDP protocol named QUIC. Because it just works better on lossy mobile networks. 2️⃣ YouTube and many video streaming services are already running on RTSP based on UDP. It allows video quality to be negotiated in real time based on network conditions. 3️⃣ Most massively multiplayer games already use UDP to achieve lower latency.

Hello CoAP!
In the Connection-Oriented Universe, we have the MQTT protocol for transmitting TCP sensor messages to the IoT Server. What’s the equivalent for the Connectionless Universe that will allow us to transmit UDP sensor messages?
Answer: Constrained Application Protocol, or CoAP
Why “Constrained”? Because CoAP was designed for low-power microcontrollers that don’t have easy access to power (like the crop sensors on Moon Base One). And CoAP requires little bandwidth… 120 bytes is all we need to send a sensor message to a CoAP server (like thethings.io)… Perfect for NB-IoT!
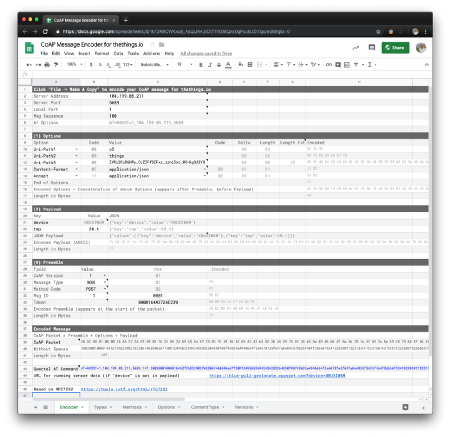
Google Sheet for encoding CoAP messages. From https://docs.google.com/spreadsheets/d/1k72R9CWKxu8_AsQURA3iOtTTlE08Qks0gFcuBJZtTqo/edit?usp=sharing
I have prepared a Google Sheet that shows how a CoAP message is encoded for sending sensor data. Let’s look at the three parts of a CoAP message…
0️⃣ CoAP Preamble
1️⃣ CoAP Options
2️⃣ CoAP Payload

[0] CoAP Preamble
The Preamble appears at the start of every CoAP message. The important parts are…
▶️ Message
Type: NON is the recommended Message Type. NON messages don’t require any acknowledgement from the CoAP Server.
So it’s highly efficient for transmitting sensor data and keeps the device firmware simple. If
acknowledgement is desired (think very carefully!), select CON
as the Message Type.
▶️ Method
Code: POSTwill transmit sensor data to thethings.io.
GET will fetch the last transmitted sensor value. Yes, CoAP
follows the same conventions as HTTP and REST.

[1] CoAP Options
After the Preamble, the Options section appears next. The Options will remind you of HTTP Headers…
▶️ URI Path: This is similar to the URL for HTTP requests. For thethings.io, each Thing is identified by a URI like…
v2/things/IVRiBCcR6HPp_CcZIFfOZFxz_izni5xc_KO-kgSA2Y8
The last gibberish part (IVRi…) is the Thing Token in thethings.io. More about that later.
▶️ Content Format: Here we tell the CoAP Server that our sensor data (the payload) is in JSON format
▶️ Accept: Here we tell the CoAP Server that the response from the server should also be in JSON format (if we’re expecting a response)
Note that Content Format and
Accept fields each require only 1 byte 32 to specify the value
application/json. Constrained and highly-efficient indeed!

[2] CoAP Payload
Finally we have the Payload,
which contains the sensor data. Here we use a JSON document to encode the sensor values device=4BUXIW6W, …
tmp=28.1
thethings.io requires the device
to transmit sensor values in the above format: an array of values, with key and value in each entry.
thethings.io will look up the
Thing that we have specified in the URI Options (IVRi…) and set
the temperature tmp to 28.1. What’s device? We’ll
find out in a while.
How do we know
where the Options end and where the Payload starts? Easy — just look for the End Of Options Marker FF. The CoAP format is so simple that
it doesn’t need any fields to indicate the sizes of the Options and the Payload!

Encoded CoAP message. From https://docs.google.com/spreadsheets/d/1k72R9CWKxu8_AsQURA3iOtTTlE08Qks0gFcuBJZtTqo/edit?usp=sharing
In under 150 bytes we have created a UDP message that our device may transmit over NB-IoT to update the sensor data for our Thing at thethings.io. We’ll learn next how to send this packet with a simple AT command.
For more details on CoAP, check the CoAP specifications (RFC7252)
Connect the Quectel Evaluation Board

Insert the NB-IoT SIM
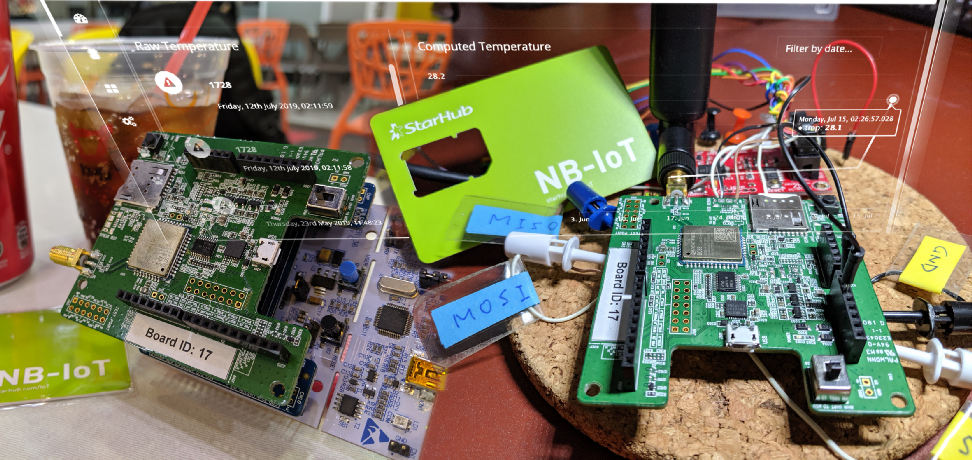
For this tutorial, StarHub has kindly provided me a Quectel BC68-TE-B Evaluation Board (which contains the Quectel BC68 module). The board is pin-compatible with Arduino Uno.
Quectel makes NB-IoT modules for various regions worldwide so your Quectel board may be slightly different, but the instructions below should be similar.
Remember: Always connect the antenna before powering up the board!
Insert the NB-IoT SIM into the slot provided (at lower right). We’ll use a USB-To-UART Adapter to connect our computer to the Quectel board.
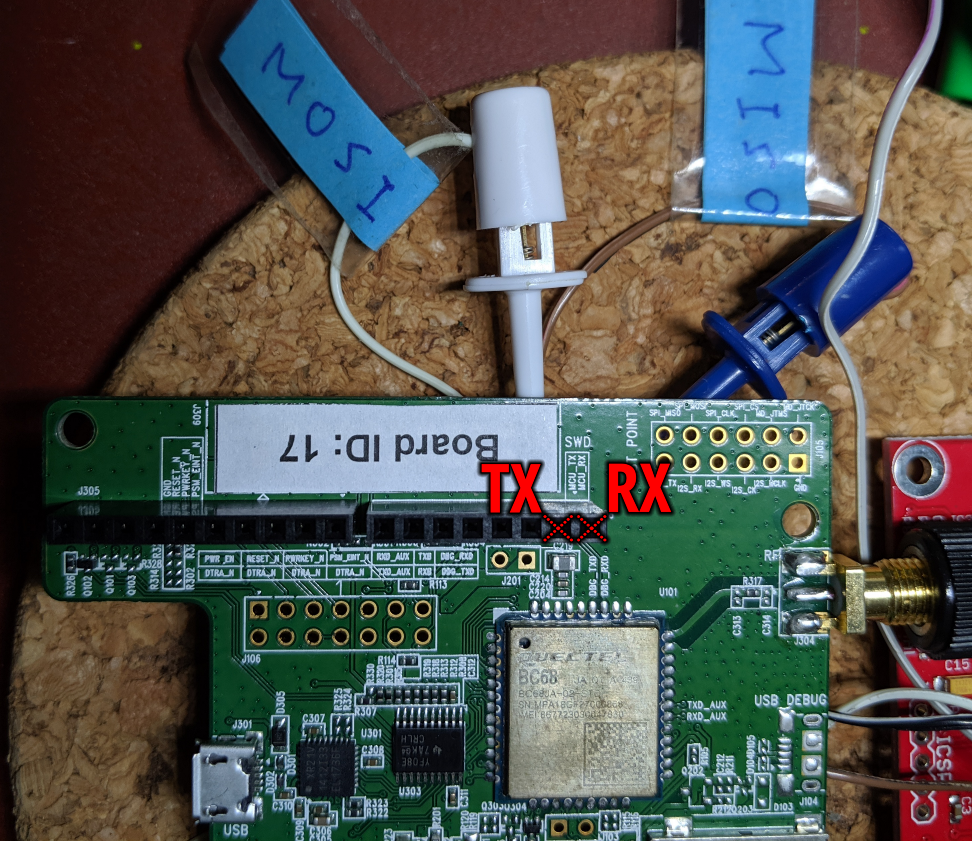
Top row of pins: TX, RX
Top Row
1️⃣ TX: Connect to the Transmit Pin of your computer’s UART Port. (MOSI means Master Out, Slave In)
2️⃣ RX: Connect to the Receive Pin of your computer’s UART Port. (MISO means Master In, Slave Out)

Bottom row of pins: 5V and GND (two of them). The SIM slot is at the right.
Bottom Row
1️⃣ 5V: Connect to the 5V power supply of your computer’s UART Port
2️⃣ GND: Connect both pins together with a jumper cable. Connect one of the GND pins to the GND pin of your computer’s UART Port
3️⃣ Main UART To MCU: Push switch J302 to the left position so that the Quectel module connected to the TX/RX pins instead of the USB port. The USB port did not respond when I connected it to my MacBook Pro, so I decided to use the TX/RX pins instead.
If you have a Bus Pirate, connect the pins as shown in the above photos.
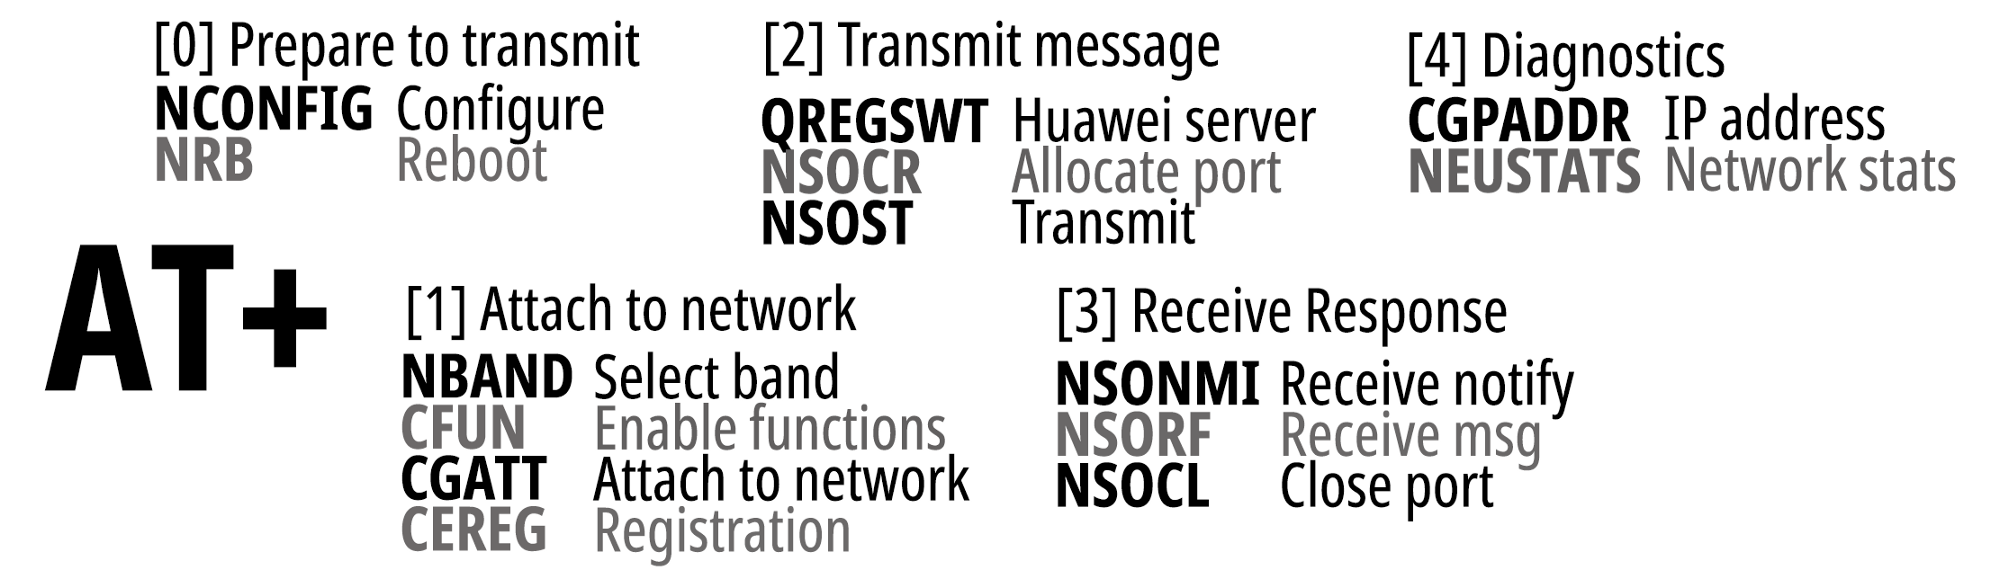
AT Commands used for transmitting CoAP messages
Transmit CoAP message to thethings.io
On your computer, open a terminal
emulator (like putty).
Connect to the UART port at 9600 bps, 8 data bits, No parity bit, 1 stop
bit.
When entering the AT commands
below, make sure that your terminal emulator sends CR (Ctrl-M or 0x0d) and LF (Ctrl-J or 0x0a)
at the end of the line.
[0] Prepare to transmit
First we reboot the Quectel module to start from a fresh, clean state…
[1] Attach to network
After rebooting, we specify the network settings and attach to the NB-IoT network…
[2] Transmit message
We are now ready to transmit. For the specific AT command for transmitting our message, look in the CoAP Message Encoder Google Sheet.
[3] Receive response
The CoAP Server at thethings.io returns a response to our message…
We may use Wireshark to decode the above server response (which is another CoAP message)…
58 41 00 01 00 00 16 4A 27 2A E2 39 C1
32 FF 7B 22 73 74 61 74 75 73 22 3A 22
63 72 65 61 74 65 64 22 7D
See the section “Advanced Topic: What’s Inside The CoAP Message?” in “Connect STM32 Blue Pill to ESP8266 with Apache Mynewt”. Insert a space between each byte before decoding with Wireshark. The decoded response from thethings.io should read…
{"status":"created"}
Which means that the Thing State has been successfully updated in thethings.io.
[4] Diagnostics
Here are some AT commands useful for troubleshooting…
Has thethings.io received our sensor data?
How do we check if the sensor
data tmp=28.1 was actually received by thethings.io? Easy peasy
— just open the CoAP Message Encoder Google
Sheet and click the URL there…

URL in the CoAP Message Encoder Google Sheet: https://docs.google.com/spreadsheets/d/1k72R9CWKxu8_AsQURA3iOtTTlE08Qks0gFcuBJZtTqo/edit?usp=sharing
The temperature data tmp appears in a web page like this (it refreshes every 10 seconds)…
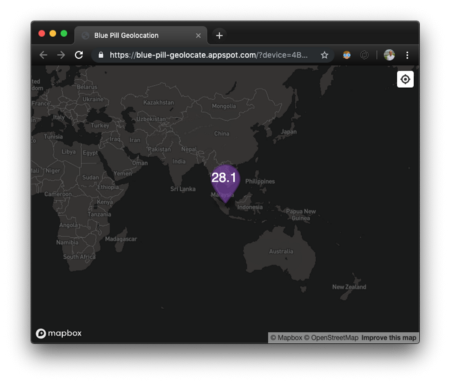
Display of temperature sensor data at my Google Cloud AppEngine website
Whoa how did the sensor data get posted on a public website that’s outside thethings.io?
That’s my demo server hosted at Google Cloud running AppEngine Go. Lemme explain what just happened…
1️⃣ When we pasted the AT command from the Google Sheet, it transmits the sensor data to thethings.io using this Thing Token…

Thing Token for thethings.io
2️⃣ This Thing Token refers to a specific Thing in my thethings.io account. What sensor data are we sending to the Thing?

Sensor data transmitted to thethings.io
3️⃣ We are sending the
temperature data plus a device field. device is a random ID generated by the Google Sheet. When my CoAP
Server at thethings.io receives the device and tmp fields, it pushes the two values to my Google Cloud server. (Yes
it’s possible with thethings.io Cloud Code!)
4️⃣ Then when you click the URL in the Google Sheet…
https://blue-pill-geolocate.appspot.com/?device=4BUXIW6W
The device ID appears inside the URL, so my Google Cloud server renders
the value of tmp associated with the device. That’s the power of end-to-end IoT Integration with Quectel
modules, NB-IoT, thethings.io and Google Cloud!
For the purpose of NB-IoT Education I’ll allow you to send CoAP messages to my (personal, paid, non-sponsored) account at thethings.io… because there’s no better way to learn CoAP!
What about displaying your own
sensor data, say a different value for tmp? Just make a copy of
the Google Sheet. This allocates a new device ID automatically.
You may then send your sensor data to that device ID and watch
the updates in my Google Cloud server. Here are the steps…
Transmit and visualise your own sensor data
Follow these steps to transmit
and visualise your own values for tmp…
1️⃣ Open the CoAP Message Encoder Google Sheet
2️⃣ Click File → Make A Copy
3️⃣ This creates a copy of the
Google Sheet with a new random device ID and new URL
4️⃣ Change the value of tmp
5️⃣ Use the updated AT command to send the sensor data
6️⃣ Click the URL to view the updated sensor data.
The web page refreshes every 10
seconds, so you may send another AT command to update the tmp
value and the web page will show the new value in 10 seconds
💎 If you wish to create your own free account for thethings.io, check the steps in the section “Configuring the CoAP Server at thethings.io” in this article. Copy your Thing Token to the
Uri-Path3field. This updates the AT command in the Google Sheet.Open the Developer’s Console in thethings.io. Updates to the Thing State triggered by CoAP messages will be shown here.
You will not longer be able to view the sensor data on my Google Cloud server, but you may follow the instructions in the above article to view your sensor data in thethings.io dashboards. The integration with Google Cloud is explained in the same article.

thethings.io Dashboard with Raw Temperature “t” and Computed Temperature “tmp”
What’s Next?
In this article we covered the basics of Quectel modules. We have transmitted CoAP messages over NB-IoT to thethings.io for capturing and visualising sensor data.
In the next article we’ll learn to automate this — by using a real microcontroller (STM32 Blue Pill) with a real temperature sensor, connected to the Quectel module. And we’ll look at the open-source libraries for encoding CoAP messages. The next article is here…
The Rust version of that article is here…
The code in the article is based on an earlier article…
I’m also exploring Visual Embedded Rust Programming for NB-IoT. So that you can drag-and-drop sensors and network modules to create an NB-IoT microcontroller program really easily…
As I’m writing this, my new Quectel breakout boards and dev kits are flying over from Taobao.com to Singapore. Stay tuned!
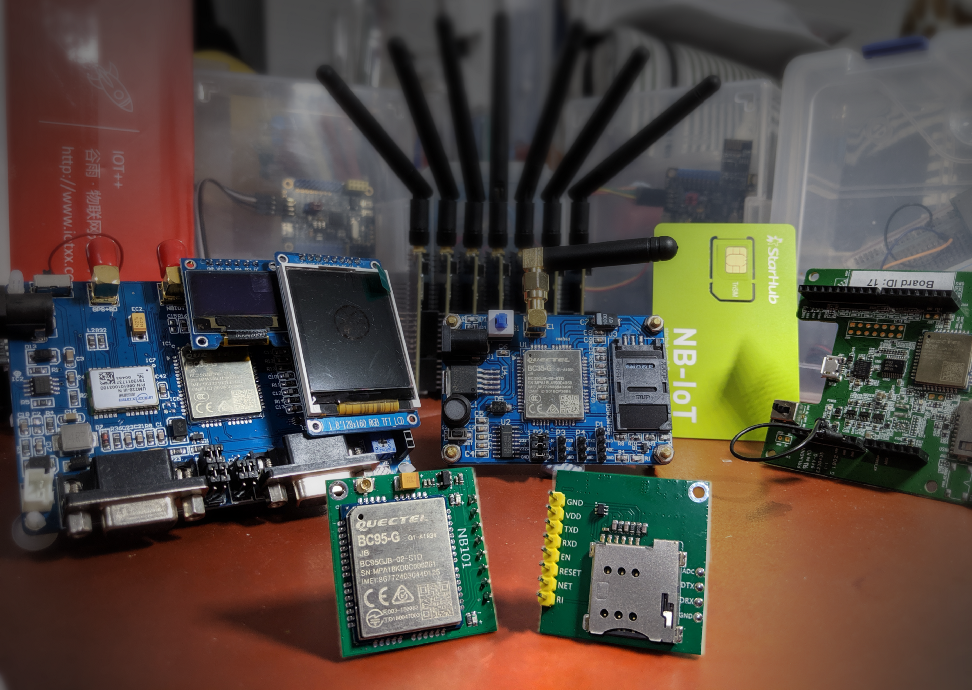
New Quectel breakout boards and dev kits that I’ll be featuring in the next article

Visual NB-IoT programming in progress
References
The following Quectel documents
were very useful for understanding the AT commands. Download them from (free registration required)
https://www.quectel.com/support/downloadb/TechnicalDocuments.htm
- Quectel BC68-TE-B User Guide V1.1: Details of the Quectel BC68 Evaluation Board
- Quectel BC68 Hardware Design V1.3: Details of the BC68 pins
- Quectel BC95 & BC95-G & BC68 Application Design Guide V1.1: Designing applications for BC68
- Quectel BC95-G & BC68 AT Commands Manual V1.4: AT commands
- Quectel BC95-G & BC68 CoAP Application Note V1.0: AT commands for CoAP. Unfortunately I was not able to use the AT commands here to transmit the payload correctly (the transmitted payload was always empty). So I decided to encode the CoAP messages myself.
Other documents available from the Quectel website…
- Quectel BC95 & BC95-G & BC68 RAI Application Note V1.0
- Quectel BC95 & BC95-G & BC68 Low Power Design Guide V1.1
- Quectel BC68 & M66 Compatible Design V1.0
- Quectel BC95-G & BC68 UEMonitor User Guide V1.0
- Quectel BC95-G & BC68 Firmware Upgrade User Guide V1.1
Benchmarks of CoAP vs MQTT performance…
Impact of CoAP and MQTT on NB-IoT System Performance
If you’re in Singapore…
- IMDA Spectrum
Management Handbook
Includes Spectrum Assignment for Cellular Systems, e.g. Band 8 - IMDA
Telecommunications Standards Advisory Committee (TSAC) — Technical Specification — Internet of
Things
Includes operating frequencies for each NB-IoT operator