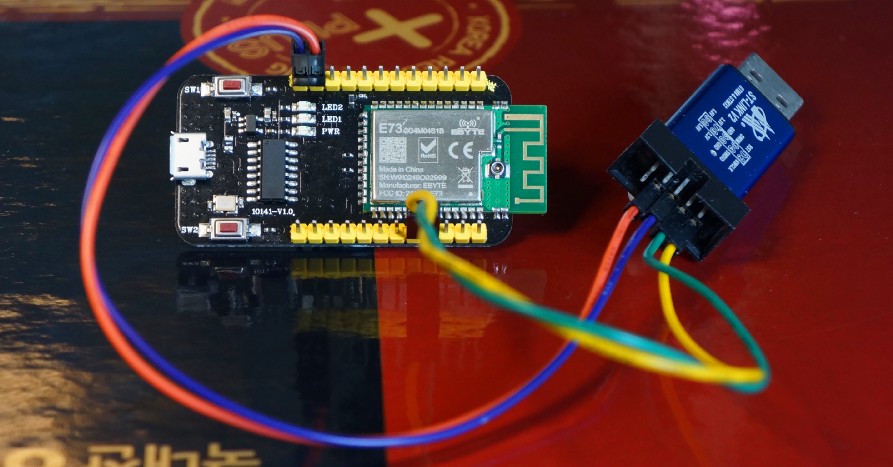
EBYTE E73-TBB Development Board with onboard Nordic nRF52832 Microcontroller, connected to ST-Link USB Programmer. Shot with Sony NEX-7.
Coding nRF52 with Rust and Apache Mynewt on Visual Studio Code
The nRF52 Microcontroller by Nordic Semiconductor is an awesome gadget with powerful Bluetooth Low Energy networking capability. It’s affordable too… For under $8, I can buy an EBYTE E73-TBB Development Board with onboard nRF52 (photo above). And it works like a supercharged BBC micro:bit (based on the older nRF51) in a smaller, cheaper form factor!
Powered by an Arm Cortex-M4 CPU (hardware floating-point) with 64 KB of RAM and 512 KB of Flash ROM, the nRF52 has plenty of capacity to run modern embedded platforms… Like Apache Mynewt realtime OS and Embedded Rust!
But what tools would we use to code the nRF52? Will we get locked in with proprietary IDEs and programming dongles?
Great News: The nRF52 works with popular open-source tools on Windows and macOS like Visual Studio Code, OpenOCD, Rust and ST-Link… I’ll show you how, right now! (ST-Link is not really open-source but it’s only $2!)
Even if you’re new to nRF52, Bluetooth, Mynewt, Visual Studio Code, … You’re welcome to skim! We’ll cover a broad range of topics. including…
1️⃣ Bluetooth Low Energy and the iBeacon protocol
2️⃣ Build your own iBeacon with nRF52 and Apache NimBLE
3️⃣ Embedded Rust programming on nRF52
4️⃣ Programming IoT Sensors with Mynewt and Rust
5️⃣ Why Rust not C?
6️⃣ Code, flash and debug the nRF52 with Visual Studio Code and OpenOCD
7️⃣ Remove Flash Protection from your nRF52 with a Raspberry Pi
8️⃣ Plus upcoming topics: Bluetooth Mesh and PineTime Smart Watch!
There’s something
for everyone in this article! The source code for this article may be found in the nrf52 branch of this repository…
What’s an iBeacon?
There was a time… (When people still shopped at physical retail stores…) You could walk into your favourite store and your phone would “Ding!” with a notification specially customised for you… “Save up to 40% on Baby and Kids Products!”
What is this magic that senses your mere presence… And summons a unique offer… Just for you?
That magic is called iBeacon. It’s a wireless protocol released by Apple in 2013 for detecting Bluetooth Low Energy devices nearby (within a few metres). iBeacon Transmitters are dumb devices planted in the store that broadcast an iBeacon ID that’s specific to the store.
Your phone needs to have an app installed that indicates which iBeacon ID it’s seeking. When your phone detects a nearby iBeacon Transmitter with a matching iBeacon ID, it wakes up the app so that the app can send you a custom notification.

In reality it’s hard to detect Bluetooth 4 iBeacons reliably because of conflicts with WiFi, which also operates in the crowded 2.4 GHz airwaves (see https://www.hindawi.com/journals/misy/2016/8367638/).
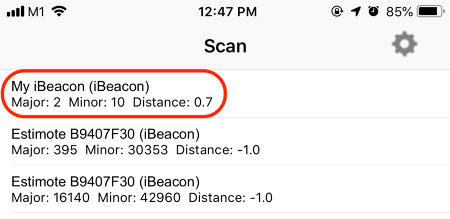
Our nRF52 detected as an iBeacon (“My iBeacon”) in the “Locate Beacon” app: https://apps.apple.com/us/app/locate-beacon/id738709014
In this tutorial we’ll program our nRF52 to be an iBeacon Transmitter, because…
- iBeacon is the simplest Bluetooth LE protocol to implement (and troubleshoot)
- It’s easy to use our phones to verify that our nRF52 is indeed working correctly as a Bluetooth LE transmitter
- Nostalgia… iBeacon actually served a purpose in the real world! (But if you decide to implement iBeacons today, beware of the iBeacon security implications, especially iBeacon spoofing)
nRF52 is Radio-Capable
nRF52 is similar to other microcontrollers (like the STM32 F103 found in Blue Pill)… Except that the nRF52 has 2.4 GHz Radio capabilities not found in most other microcontrollers.
2.4 GHz is used for WiFi… Does this mean that the nRF52 can talk WiFi?
Not quite… WiFi protocols are highly complex, beyond what the nRF52 can handle. Specialised microcontrollers like ESP8266 are better at handling WiFi.
But nRF52 is perfect for Bluetooth Low Energy (LE) protocols, including iBeacon. Note that Bluetooth LE is not compatible with the older standard Bluetooth. So we can’t operate our nRF52 like a classic Bluetooth tethered network device.
nRF52 doesn’t come with hardcoded firmware that enables the Bluetooth LE functions… We need to load our own Bluetooth LE firmware. Let’s discuss two options: Nordic SoftDevice and Apache NimBLE.
Nordic SoftDevice
Most nRF52 developers would probably use Nordic SoftDevice. This is the standard firmware provided by Nordic Semiconductor that implements the Bluetooth LE functions.
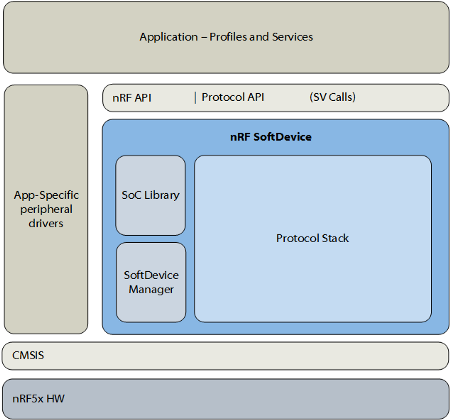
Nordic SoftDevice Architecture. From https://infocenter.nordicsemi.com/topic/struct_nrf52/struct/nrf52_softdevices.html
The firmware runs as a base system layer underneath our application code and RTOS.
SoftDevice reserves some hardware resources for itself, like the radio transceiver, some timers and some ROM+RAM.
The remaining resources would be available for our application, which would call the SoftDevice API to perform Bluetooth LE functions and receive notifications.
What if we wish to experiment with the Bluetooth LE implementation… Trace it to see how it works, tweak it to improve it, or even roll out a new Bluetooth LE protocol?
SoftDevice is clearly not meant for experimentation… Apache NimBLE is perfect for that!
Apache NimBLE
Apache NimBLE is an open-source Bluetooth LE stack that completely replaces SoftDevice on nRF51 and nRF52 chipsets. It’s designed to run with the Apache Mynewt embedded OS, so NimBLE feels like a typical Mynewt task.
Apache NimBLE is the Bluetooth LE implementation that we’re adopting for this tutorial.
In this tutorial we’ll often refer to NimBLE as Mynewt… Because NimBLE is so seamlessly integrated with Mynewt. Just note that Mynewt and NimBLE actually belong to two different code repositories…
Why Visual Studio Code with ST-Link (instead of nRFgo Studio with J-LINK)
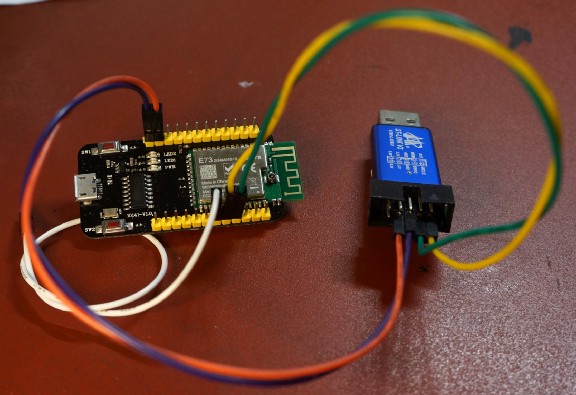
nRF52 Development Board connected to ST-Link USB Programmer
If you’re already familiar with nRF52 development tools like nRFgo Studio and J-LINK… This tutorial will open your eyes!
My previous tutorials have been based on open-source tools and affordable, accessible hardware. For this tutorial we’ll be reusing Visual Studio Code and ST-Link (with OpenOCD).
Yes, the open-source tools we use for coding STM32 may also be used for nRF52!
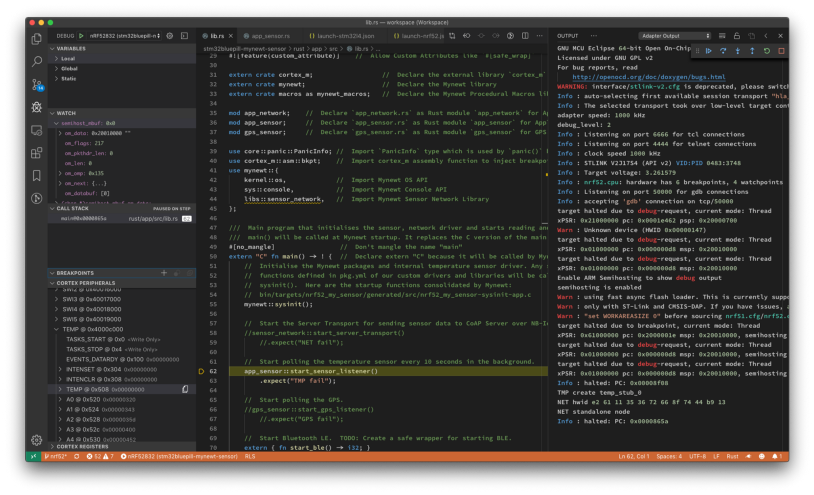
Debugging Embedded Rust on nRF52 with Visual Studio Code and ST-Link
The generic ST-Link V2 USB Adapter costs under $2 (search AliExpress for st-link v2) and works perfectly fine for flashing and debugging the
nRF52… Except for removing nRF52 flash protection.
How is ST-Link different from J-LINK, since both are used for flashing and debugging Arm microcontrollers?
ST-Link and J-LINK are both Arm SWD (Serial Wire Debug) Programmers. ST-Link is known as a High-Level Adapter… ST-Link doesn’t implement all SWD functions, just the minimal set of high-level functions needed for flashing and debugging. Thus ST-Link can’t be used for removing the nRF52 flash protection.
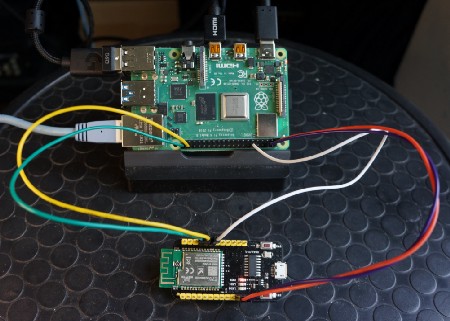
Removing nRF52 flash ROM protection with Raspberry Pi
If your nRF52 flash ROM is protected (and ST-Link refuses to flash your device), you may use a Raspberry Pi to remove the protection.
This only needs to be done once (and ST-Link will work fine after that).
Check the instructions in the section “Advanced Topic: Remove nRF52 Flash Protection” at the end of this article.
Welcome nRF52 (and nRF51)! Come join STM32 in the Open Source Party… Rust included!
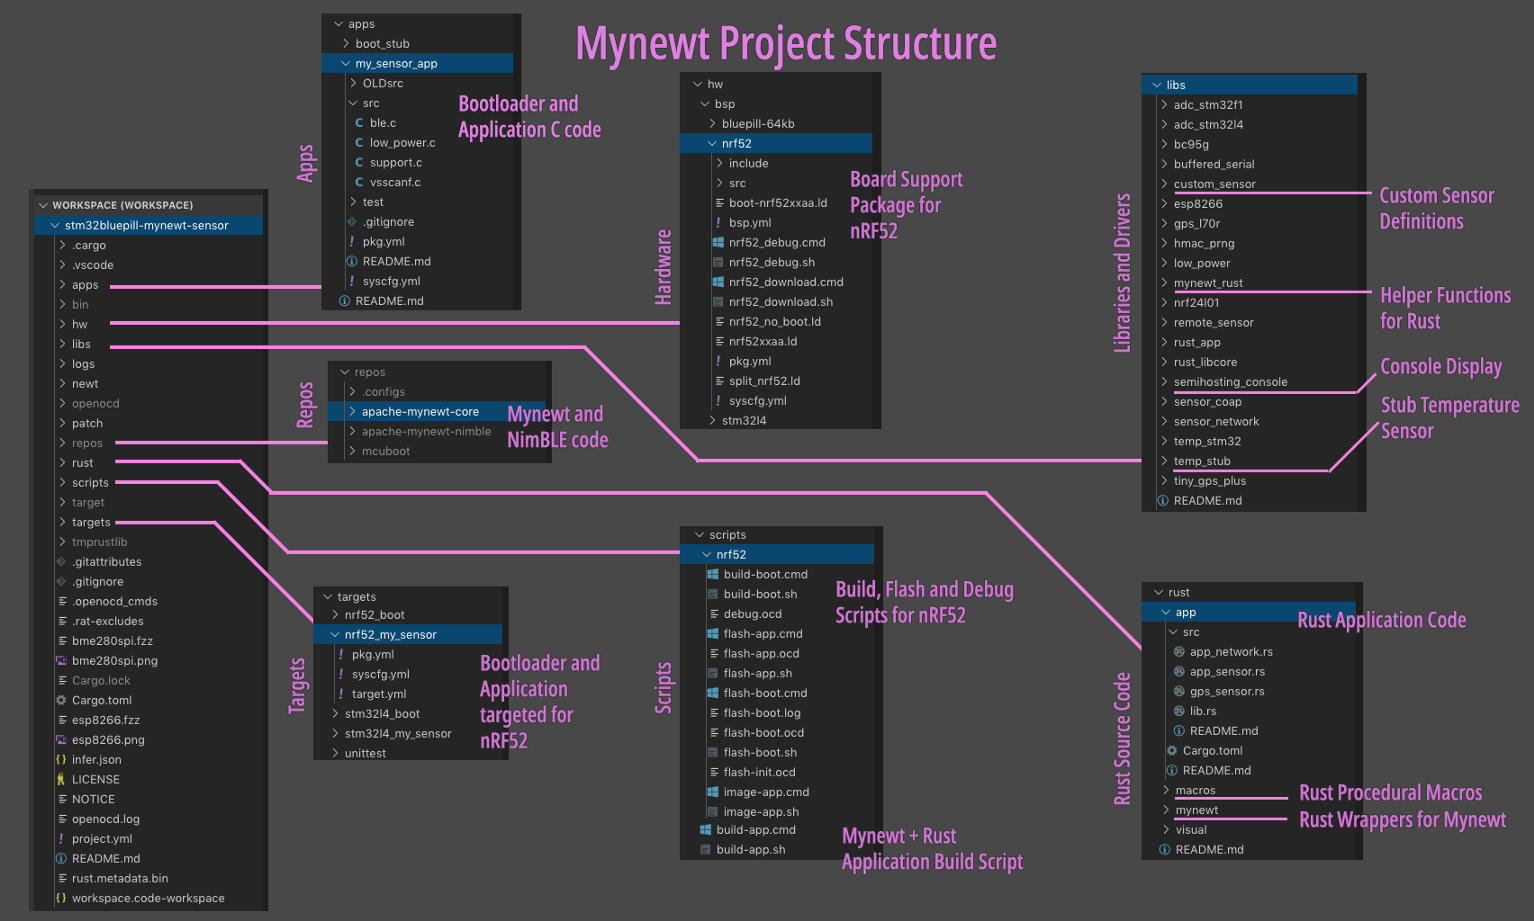
Mynewt Project Structure based on https://github.com/lupyuen/stm32bluepill-mynewt-sensor/tree/nrf52
Mynewt Project Structure
Mynewt is a lightweight embedded operating system that pulls in only the modules that it needs to create the firmware image. Here are the files in our Mynewt project… (Check this article if you wish to download the source code and browse with Visual Studio Code)
1️⃣ apps:
C Source Code for Bootloader and Application
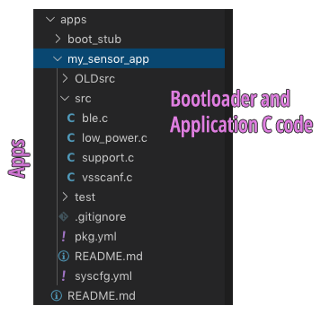
This is where we put our Bootloader and Application source code in C. The Mynewt build script will compile the code here into the Bootloader and Application Firmware Images.
apps/boot_stub/src:
C source code for our Bootloader. We’re using a simple Stub Bootloader: Upon startup it doesn’t do
anything, it just jumps to the Application.
apps/my_sensor_app/src:
C source code for our Application. The iBeacon code is located in ble.c.
We’ll cover this in a while.
2️⃣ rust:
Rust Source Code
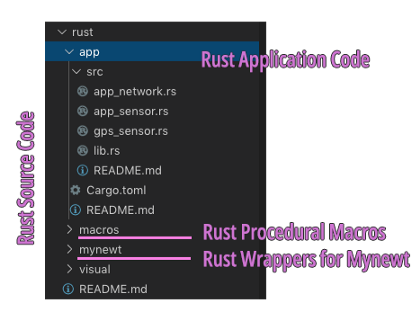
All Rust code is placed in this folder. Mynewt doesn’t support Rust officially (yet), so I created a custom Application Build Script for Mynewt that injects Rust Application code into the Mynewt Application Build. (We’ll soon discover that the Rust code was injected in a sneaky way…)
This means that we can write our
main() function in Rust and call other Rust modules and crates.
Since Rust supports the calling of C functions, we may call the Mynewt API from Rust as well. (Though
calling the Mynewt API through a proper Rust Wrapper is preferred… More about this later)
Here’s the Rust code in our Mynewt Project…
rust/app/src:
Rust source code for our Application. The main() function is
defined in lib.rs,
it’s called when our device starts up. We’ll cover this in a while.
rust/mynewt/src:
Rust Wrappers for Mynewt API. It’s possible to call the Mynewt API via extern declarations in Rust, but that wouldn’t be efficient.
(Imagine converting Rust strings to null-terminated C strings for every extern call.) Also we wouldn’t be able to exploit the power of Rust
Macros, Iterators, Error Handling, …
Thus I have created Rust Wrappers that allow Rust applications to call the Mynewt API in a safe and simple way. We’ll see examples of this in a while.
rust/macros/src:
Rust Macros for generating Rust Wrappers. Most of the Rust Wrappers were automatically generated with
the bindgen tool and Rust Procedural Macros. These macros are
invoked only during Rust compilation, not at runtime.
3️⃣ libs:
Custom Mynewt Libraries used by our Application
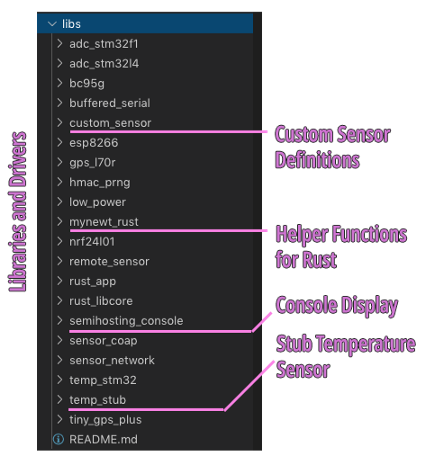
These are C libraries that I have
created to make Mynewt more friendly for embedded developers. semihosting_console allows debugging messages to be displayed in the
Visual Studio Code Debugger (without using a serial port). temp_stub is a Mynewt Driver that simulates a Temperature Sensor,
used in our Rust application.
rust_app is a Stub Library for injecting the compiled Rust
Application code. Our build script will bundle the compiled Rust Application code (including external
crates) into rust_app, which gets linked into the Application
Firmware. (Remember our main() function in Rust? It gets bundled
into rust_app)
Similarly, rust_libcore is a Stub Library for injecting the Rust Core Library
into the Application Firmware. The Rust Core Library is part of the Rust Compiler and it’s needed for
core functions (like manipulating strings). Note that we’re not using the full Rust Standard Library,
which contains lots of code that’s irrelevant for embedded platforms.
4️⃣ hw/bsp:
Board Support Packages for Mynewt
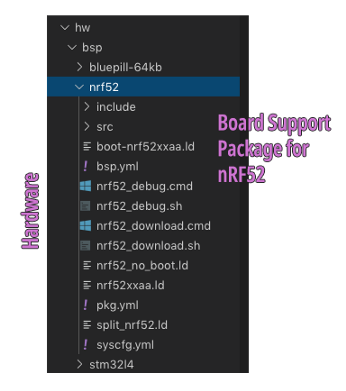
A Board Support Package contains information, scripts and drivers necessary to build Mynewt for our microcontroller (nRF52832) and the associated peripherals on our microcontroller board: flash memory, LEDs, UART ports, …
hw/bsp/nrf52:
Board Support Package for our nRF52 microcontroller board. This is a clone of the official ada_feather_nrf52
Board Support Package, with the LED and Button settings
customised for the EBYTE E73-TBB Development Board. (You should update these settings to suit your
nRF52 development board.)
5️⃣ targets:
Bootloader and Application Targets for Mynewt
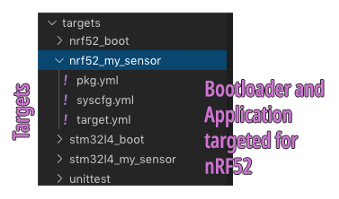
Mynewt Applications are designed
to be portable across microcontrollers… An application like my_sensor_app may be recompiled to run on STM32 Blue Pill F103,
STM32 F476, or even BBC micro:bit (based on Nordic nRF51).
How do we compile an application
like my_sensor_app for our nRF52832 development board? We tell
Mynewt to create a “Target” for the application, i.e. an instance of my_sensor_app that’s targeted for our Board Support Package hw/bsp/nrf52
The targets
folder contains Bootloaders and Applications that have been targeted for specific Board Support
Packages…
targets/nrf52_boot:
This is the boot_stub Bootloader targeted for nRF52
targets/nrf52_my_sensor:
This is the my_sensor_app Application targeted for nRF52. The
Application Settings are configured at targets/nrf52_my_sensor/syscfg.yml
Application Settings. From https://github.com/lupyuen/stm32bluepill-mynewt-sensor/blob/nrf52/targets/nrf52_my_sensor/syscfg.yml
6️⃣ scripts:
Build, Flash and Debug Scripts
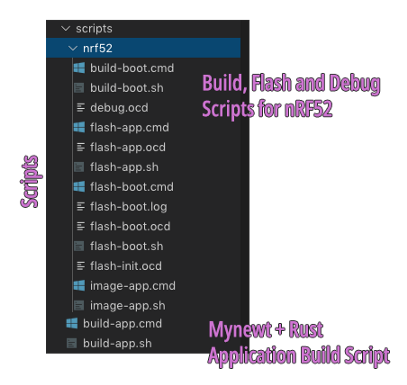
scripts/build-app.cmd, .sh:
This shell script builds the Rust Application by
calling cargo build and bundles the compiled Rust code
(with external crates) into the rust_app library.
Then it builds the Application
Firmware by running newt build nrf52_my_sensor, injecting
rust_app (Rust Application) and rust_libcore (Rust Core Library) into the
Application Firmware.
The Rust build is targeted for
thumbv7em-none-eabihf
(Arm Cortex M4 with Hardware Floating-Point), which is the designation for the Arm processor in the
nRF52832 microcontroller.
scripts/nrf52:
Contains the build, flash and debug scripts specific to nRF52. The Flash Bootloader, Flash Application and Debug Scripts include OpenOCD
scripts (*.ocd) that connect to the nRF52 via ST-Link.
Here’s the OpenOCD command used in the Flash Application Script that connects to nRF52 via ST-Link to flash the Application Firmware…
openocd/bin/openocd \
    -f scripts/nrf52/flash-init.ocd \
    -f interface/stlink.cfg \
    -c "transport select hla_swd" \
    -f target/nrf52.cfg \
    -f scripts/nrf52/flash-app.ocd
The OpenOCD script scripts/nrf52/flash-app.ocd
specifies the firmware image file to be flashed (my_sensor_app.img) and the ROM address (0x0000 4000)…
# From https://devzone.nordicsemi.com/f/nordic-q-a/42824/flashing-nrf5832-using-only-st-link-v2-and-openocd
gdb_flash_program enable
gdb_breakpoint_override hard# Connect to the device.
init# Enable ARM semihosting to show debug console output.
arm semihosting enableecho "Stopping..."
reset haltecho "Flashing Application..."
program bin/targets/nrf52_my_sensor/app/apps/my_sensor_app/my_sensor_app.img verify 0x00004000# Restart the device.
reset halt
exit
Note that…
Bootloader Code
is located at ROM Address 0x0000 0000
Application Code is
located at ROM Address 0x0000 4000
7️⃣ repos: Apache Mynewt and NimBLE Source
Code
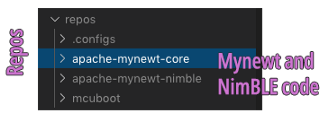
This folder contains the official Mynewt and NimBLE source code in C. We shouldn’t change anything here.
8️⃣ bin: Compiled Bootloader and Application
Code
The build scripts produce Bootloader and Application Firmware Images in this folder. These firmware images are used by the Flash Bootloader and Flash Application Scripts to flash the Bootloader and Application to the nRF52.
The Application Firmware is also
flashed to the nRF52 when we click Start Debugging.
9️⃣ .vscode:
Visual Studio Code Settings
tasks.json
defines the Build and Flash Bootloader / Application Tasks in Visual Studio Code. These tasks invoke
the scripts in the scripts
folder
launch-nrf52.json
contains the nRF52 debugger settings for the Cortex-Debug Extension that
we’re using to debug our application. When we run the Build Application script, the
script copies launch-nrf52.json
to launch.json, which is loaded by the Cortex-Debug debugger.
Create an iBeacon with NimBLE
Let’s look at the application
code that calls the NimBLE API to create an iBeacon Transmitter: apps/my_sensor_app/src/ble.c.
Why did we code this in C and not Rust? We’ll discuss this in a while.
start_ble() is called by the Rust main() function to start the iBeacon broadcasts in our application.
In Bluetooth LE applications, it’s mandatory to wait for the Host (i.e. Arm Processor) and Controller (i.e. Radio Transceiver) to sync up before performing any Bluetooth LE functions.
Here we set up the ble_hs_cfg.sync_cb callback defined in NimBLE, so that NimBLE will
call our function ble_app_on_sync() as soon as the Host and
Controller are in sync. (Which happens very quickly upon startup… Just set a breakpoint in ble_app_on_sync() and watch!)
When the Host and Controller are
in sync, ble_app_on_sync() calls two functions to set up the
iBeacon Transmitter…
ble_app_set_addr(): Generate a Non-Resolvable Private Addressble_app_advertise(): Advertise indefinitely as an iBeacon
What’s a Non-Resolvable Private Address? Just like any networking protocol, in Bluetooth LE we need to identify ourselves with a network address. Since we’re creating an iBeacon Transmitter with no receive capability, it’s OK to use a temporary random address, i.e. Non-Resolvable Private Address.
Here’s how we call the NimBLE API
ble_hs_id_gen_rnd() to generate that random 6-byte
Non-Resolvable Private Address.
Once we have obtained the random
address, we tell NimBLE to use it by calling ble_hs_id_set_rnd(). If you’re curious to see the random address,
just set a Debugger Breakpoint by clicking the gutter to add a red dot like this…
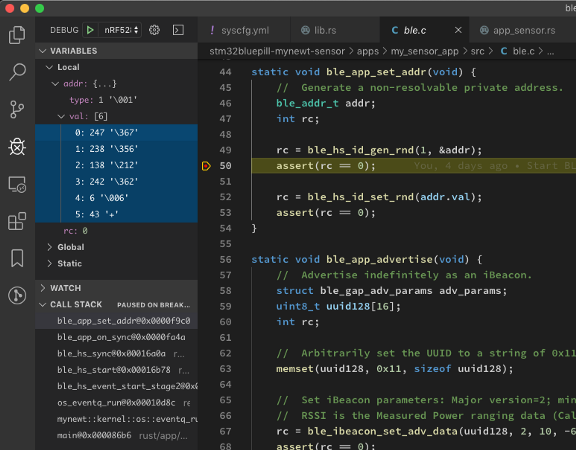
Setting a breakpoint to observe the randomly-generated 6-byte Non-Resolvable Private Address
Now let’s find out what our nRF52 shall be broadcasting…
Set iBeacon Parameters
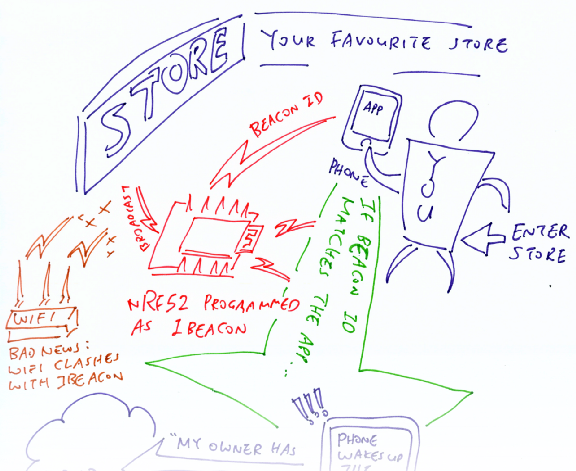
iBeacon ID links the iBeacon Transmitter to the Mobile App
Remember our iBeacon sketch? Every iBeacon Transmitter needs to broadcast the following…
- iBeacon ID: Our iBeacon Transmitter shall broadcast this 16-byte iBeacon
ID, which looks like
11111111–1111–1111–1111–111111111111(in hexadecimal). Upon sensing the iBeacon ID in the airwaves, the phone OS (iOS or Android) will wake up our Mobile App that’s linked to this iBeacon ID. - Major ID: A 16-bit number to differentiate iBeacon Transmitters
- Minor ID: Another 16-bit number to differentiate iBeacon Transmitters
How are Major and Minor IDs used? Let’s say we operate a chain of stores. All stores in the chain would use the same Mobile App, so all iBeacon Transmitters in the stores should broadcast the same iBeacon ID.
How would we identify which store the customer has stepped into? Easy… Just assign a unique Major ID for each store! The app would be able to sense the Major ID from the iBeacon broadcasts and figure out which store you’re at.
Could we identify which part of the store the customer is at? Sure! Just assign a unique Minor ID for each iBeacon Transmitter in the store. Here’s how we broadcast the iBeacon ID, Major ID and Minor ID in NimBLE…
In our code we used an arbitrary
iBeacon ID uuid128 that’s defined as 11111111–1111–1111–1111–111111111111 (in hexadecimal). We pass the
iBeacon ID to ble_ibeacon_set_adv_data(), together with Major ID
2 and Minor ID 10. When we
call ble_gap_adv_start(), our nRF52 starts advertising itself as
an iBeacon.
There’s one more parameter that
we passed to ble_ibeacon_set_adv_data()… Measured Power, which
is the RSSI value at 1 meter: -60. This value is broadcast by
the iBeacon, together with the other IDs.
Since we are diving deep into wireless transmission, let’s study the meaning of RSSI, known to most of us as Signal Strength…
How Near Is Our iBeacon?
Received Signal Strength
Indication (RSSI) is a common metric for measuring the Signal Strength of wireless networks like
WiFi, NB-IoT and Bluetooth LE. RSSI values are usually negative, and higher values denote stronger
signals (RSSI -50 is stronger than RSSI -60).
Why do iBeacons broadcast their RSSI values? So that we may estimate how near they are!
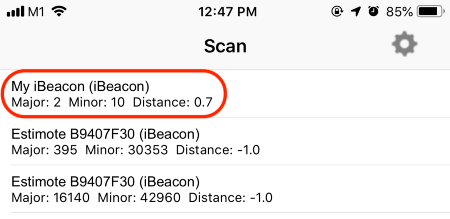
Estimated Proximity for our nRF52 iBeacon in the Locate Beacon app: 0.7 metres
Recall that we set our iBeacon
Transmitter’s Measured Power as -60. According to the definition
of Measured Power, if we placed our mobile phone 1 metre away from our iBeacon Transmitter, the phone
would record the RSSI as -60.
Thus if the RSSI recorded by the
phone was -50 or higher, the iBeacon Transmitter would probably
be close to the phone (within 1 metre). This gives us a simple way to estimate the distance between
the iBeacon Transmitter and our mobile phone.
In the real world, the estimated proximity of iBeacons is not really accurate. Bluetooth LE signals often clash with WiFi in the crowded 2.4 GHz airwaves, so the RSSI values may fluctuate wildly. And when Bluetooth LE signals pass through objects (like human bodies) the RSSI values will drop.
It’s hard to do accurate distance ranging for any kind of wireless signal (WiFi and NB-IoT included). But it’s good to understand what RSSI means, and how wireless signals degrade when transmitting over long distances, passing through obstacles.
For more details on implementing
iBeacon Transmitters with NimBLE, check out the complete tutorial at https://mynewt.apache.org/latest/tutorials/ble/ibeacon.html
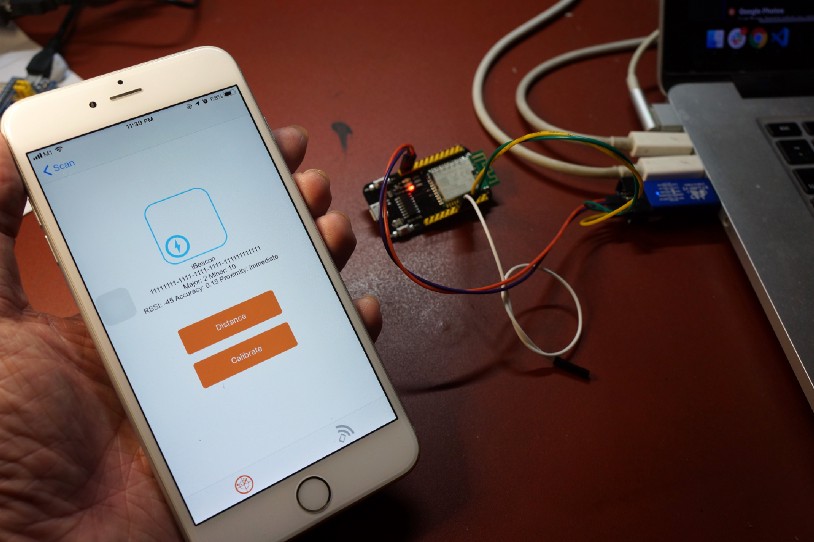
Testing our nRF52 iBeacon with the “Locate Beacon” mobile app
Test Our iBeacon
Let’s use a real Mobile App to verify that our nRF52 is indeed broadcasting as an iBeacon.
Follow the instructions in this article to flash and debug your nRF52 with an ST-Link V2 adapter.
Start a debug session for nRF52
in Visual Studio Code. Whenever the program pauses at a breakpoint (this will happen twice), click
Continue or press F5. Keep
the nRF52 powered on.
Install the “Locate Beacon” app on your iPhone…
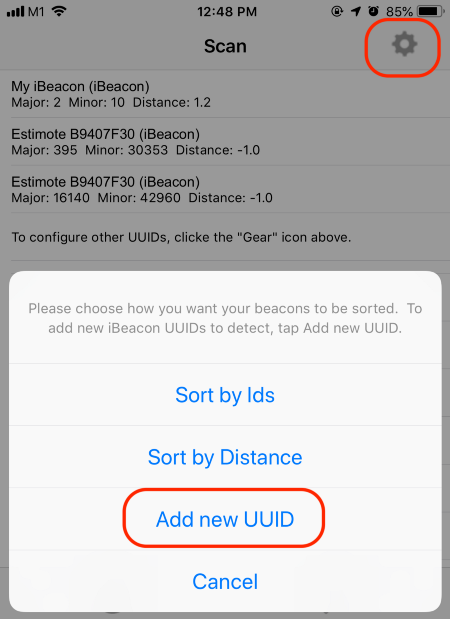
1️⃣ Launch the “Locate Beacon” app on your iPhone.
Tap the Gear icon at top right
Tap Add New UUID

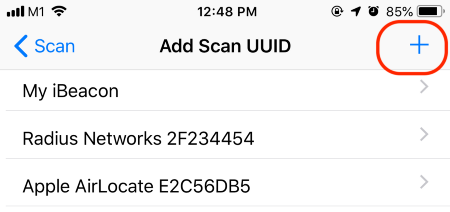
2️⃣ Tap the + button at top right


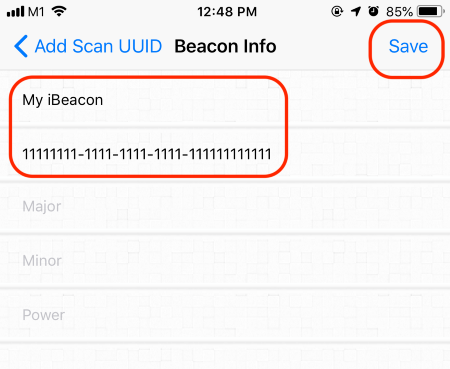
3️⃣ Enter My iBeacon as the name
For the UUID, enter11111111–1111–1111–1111–111111111111
Leave the Major, Minor and Power fields empty
Tap Save

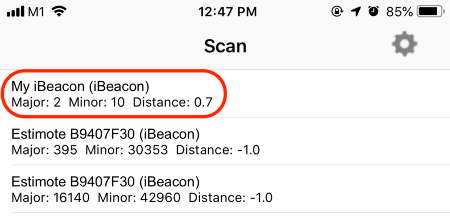
4️⃣ Our nRF52 should appear in
the list of detected iBeacons as My iBeacon
Tap My iBeacon

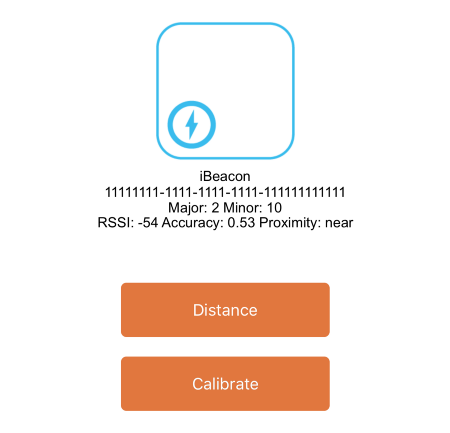
5️⃣ Details of our iBeacon appear, including the RSSI and estimated proximity.
How did I figure
out that my nRF52’s Measured Power was -60? By trial and
error!
I placed my phone 1 metre away from the nRF52, then adjusted the Measured Power value until the estimated distance in the Locate Beacon app showed 1 metre.
Poll A Sensor With Rust
Now let’s talk about Embedded
Rust! As we have discovered, our Mynewt Project allows us to embed Rust modules and crates into our
Application Firmware (via sneaky substitution of the rust_app
and rust_libcore libraries). The main() function is defined in Rust, in fact.
But we haven’t seen Rust in action while creating our iBeacon. How can we be sure that Rust is indeed running properly on our nRF52?
We’ll prove that by polling a Simulated Mynewt Sensor with Rust! Here how we do that…
Very first thing in any Mynewt Application: Call sysinit(). From https://github.com/lupyuen/stm32bluepill-mynewt-sensor/blob/nrf52/rust/app/src/lib.rs
Our main() function is defined in the Rust module rust/app/src/lib.rs.
The first thing that happens in main(): Call sysinit() to initialise the Mynewt libraries and drivers. (Mynewt
programs in C also call sysinit() at startup)
On the nRF52, sysinit() initialises the 2.4 GHz Radio Transceiver and the Stub
Temperature Sensor. We’ll talk about this simulated temperature sensor in a while.
Start polling the simulated temperature sensor. From https://github.com/lupyuen/stm32bluepill-mynewt-sensor/blob/nrf52/rust/app/src/lib.rs
Remember we said that Mynewt programs are designed to be portable across microcontrollers? The Rust-Mynewt application we’re studying now actually runs fine on STM32 F103 (Blue Pill) and L476 microcontrollers… But they run a little differently.
On STM32 microcontrollers, our Rust application polls the onboard temperature sensor every 10 seconds and transmits the temperature data to a server (via an NB-IoT module connected to the microcontroller).
On the nRF52 we won’t be transmitting the sensor data to a server, so the code to start the Server Transport has been commented out (for now).
Next, we call start_sensor_listener() (defined in our application module app_sensor.rs)
to begin polling the simulated temperature sensor every 10 seconds.
Start broadcasting as iBeacon. From https://github.com/lupyuen/stm32bluepill-mynewt-sensor/blob/nrf52/rust/app/src/lib.rs
Remember our C function start_ble() that initiates the iBeacon broadcasting? This is how we
call start_ble() from main(). It needs to be tagged as unsafe because to the Rust Compiler, all C functions are risky and
could potentially cause problems (memory corruption, crashing, …) The unsafe tag will be removed once we create a safe and proper Rust
Wrapper for NimBLE.
Mynewt Event Loop. From https://github.com/lupyuen/stm32bluepill-mynewt-sensor/blob/nrf52/rust/app/src/lib.rs
At the end of the main() function we have a standard Mynewt Event Loop to handle
Mynewt system events. (Mynewt programs in C also have this Mynewt Event Loop). Without this Event
Loop, the NimBLE functions will never get any processing done.
Mynewt Sensor Framework, Enhanced With Rust
Let’s look at start_sensor_listener(), defined in our application module app_sensor.rs...
Define the name of the Stub Temperature Sensor and the polling interval. From https://github.com/lupyuen/stm32bluepill-mynewt-sensor/blob/nrf52/rust/app/src/app_sensor.rs
At the top of app_sensor.rs
we define some constants for polling the sensor.
SENSOR_DEVICE is defined as temp_stub_0, which refers to the Stub
Temperature Sensor. The Stub Temperature Sensor works like a regular Mynewt Temperature
Sensor… Except that it always returns a hardcoded raw temperature value 1757. Useful for testing sensor applications without connecting a
real temperature sensor. (On STM32 this program polls the actual onboard temperature sensor)
SENSOR_POLL_TIME is set to 10,000 milliseconds, or 10 seconds. We’ll
be asking Mynewt to poll our simulated temperature sensor every 10 seconds.
What’s Strn? This is a custom string type that I have defined to make
passing of strings safer and more efficient. Mynewt APIs require all strings to be null-terminated;
Rust strings don’t need the terminating null.
If we pass strings back and forth
between Rust and the Mynewt APIs, we could end up creating many clones of the same string, with and
without terminating nulls. Or worse… Mynewt could crash because some Rust code has incorrectly passed
in a string that’s not null-terminated. So I have wrapped the Mynewt APIs to accept the safer,
efficient Strn type that’s always null-terminated.
Fetch the Stub Temperature Sensor by name. From https://github.com/lupyuen/stm32bluepill-mynewt-sensor/blob/nrf52/rust/app/src/app_sensor.rs
Here’s the first clue that Mynewt
has an awesome Sensor Framework… Mynewt keeps track of all installed
sensors by name. sensor_mgr::find_bydevname() is the Mynewt API
that returns a list of sensors (i.e. a Sensor Iterator) that match a name (temp_stub_0).
Set the polling interval for the Stub Temperature Sensor. From https://github.com/lupyuen/stm32bluepill-mynewt-sensor/blob/nrf52/rust/app/src/app_sensor.rs
Mynewt recognises every sensor and the type of data that the sensor produces. So let’s ask Mynewt to poll the sensor on our behalf!
By calling sensor::set_poll_rate_ms() we’re kindly asking Mynewt to poll our
simulated temperature sensor every 10 seconds. Truly awesome!
Create a Sensor Listener. From https://github.com/lupyuen/stm32bluepill-mynewt-sensor/blob/nrf52/rust/app/src/app_sensor.rs
Now we fill in the nitty-gritty
polling details… What shall we do with the temperature sensor data after Mynewt has
obtained it? Here we ask Mynewt to call our Rust function aggregate_sensor_data() with the sensor data.
aggregate_sensor_data() is known as a Sensor Listener Function… It’s
a function that listens for updated sensor data and acts on the data.
Register the Sensor Listener with Mynewt Sensor Framework. From https://github.com/lupyuen/stm32bluepill-mynewt-sensor/blob/nrf52/rust/app/src/app_sensor.rs
To activate the Sensor Listener
Function, we call the Mynewt API sensor::register_listener().
Mynewt will begin polling the simulated temperature sensor every 10 seconds and call aggregate_sensor_data() with the polled temperature data.
Polling a sensor in Mynewt is really so easy… in C and in Rust! That’s possible only because Mynewt has a well-designed Sensor Framework.
Handle Sensor Data With Rust
Remember that we don’t transmit sensor data to a server in the nRF52 version of the Rust application (unlike the STM32 version). But we’ll take a peek to understand how our sensor data could have been easily packaged and delivered to an IoT server.
Earlier we asked Mynewt to call
aggregate_sensor_data() whenever it has polled our simulated
temperature sensor. Let’s see what happens inside aggregate_sensor_data()…
Aggregate temperature data with GPS data. From https://github.com/lupyuen/stm32bluepill-mynewt-sensor/blob/nrf52/rust/app/src/app_network.rs
On the STM32 L476 microcontroller our Rust application not only handles temperature sensor data… It handles GPS latitude / longitude coordinates as well! The application polls the GPS module for the current geolocation (just like any Mynewt sensor) and attaches the geolocation to the temperature data before transmitting to the server.
On nRF52 we’ll settle for less…
aggregate_sensor_data() will simply transmit the temperature
data without attaching any GPS coordinates. It calls send_sensor_data() to transmit the temperature data…
Send sensor data to CoAP server. From https://github.com/lupyuen/stm32bluepill-mynewt-sensor/blob/nrf52/rust/app/src/app_network.rs
This sounds incredulous… But
send_sensor_data() was designed to transmit any
sensor data in any format that will be understood by our server!
For example, the code here works perfectly for transmitting temperature data to the server at thethings.io. This server accepts CoAP Messages with a JSON Payload that contains the geolocated sensor data.
Yet strangely, send_sensor_data() doesn’t contain any code that’s specific to
thethings.io… The sensor data appears to transform itself magically for
thethings.io. How is this possible? We’ll learn in a while…
Compose an outgoing CoAP message. From https://github.com/lupyuen/stm32bluepill-mynewt-sensor/blob/nrf52/rust/app/src/app_network.rs
This is the end of the road for nRF52… We haven’t started a Network Transport (like NB-IoT) that will deliver the sensor data to a server, so nRF52 silently drops the sensor data here.
For STM32, the Rusty trail continues…
Compose and transmit the JSON Payload containing the temperature and GPS data. From https://github.com/lupyuen/stm32bluepill-mynewt-sensor/blob/nrf52/rust/app/src/app_network.rs
Believe it (or not)… That’s all the code we need to transform our geolocated sensor data into this complicated nested CoAP + JSON format mandated by thethings.io…
{ "values": [
   { "key"  : "t",
     "value": 1757,
     "geo"  : { "lat": 1.2701, "long": 103.8078 }},   { "key"  : "device",
     "value": "l476,bf39a9607e1187f6f3d80d6dd43" }
]}
The secret of the
sensor data transformation? It’s in the coap!() macro!
Rust
Declarative Macros are incredibly powerful… A Rust macro can transform a simple JSON object
into a complicated nested CoAP + JSON monster. The coap!() macro
hides the details of the data transformation. That’s why we can transmit any sensor
data in any format that will be understood by the server… Just let the
coap!() macro handle it!
Thanks to Mynewt, the transmission of sensor data is highly efficient. The CoAP Message is transmitted (over NB-IoT) by a background task in Mynewt. So our application may continue processing sensor data without waiting for the transmission to complete.
Mynewt and Rust are perfectly paired for building safe and efficient embedded systems!
Watch Rust Run On nRF52
Ready to watch Rust run on nRF52? All you need is an nRF52 development board and an ST-Link V2 adapter.
Follow the instructions in this article to flash and debug your nRF52.
The Output Log in Visual Studio Code should look like this…
Output Log from https://github.com/lupyuen/stm32bluepill-mynewt-sensor/blob/nrf52/logs/standalone-node.log
Here’s a video demo of the Application Build and Debug on nRF52…
Video demo of the Application Build and Debug on nRF52
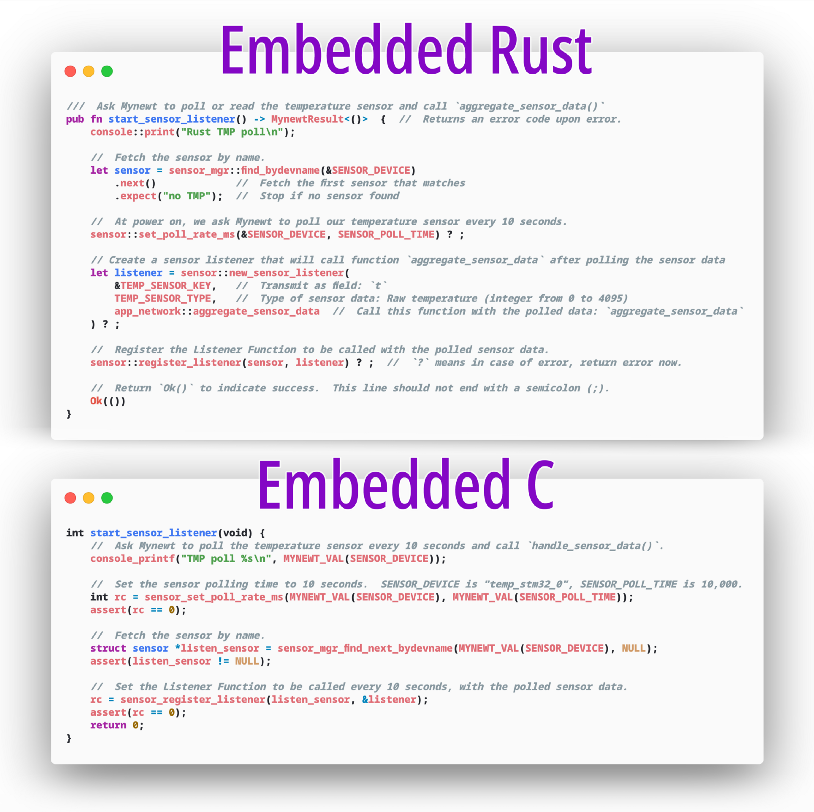
Polling sensors in Mynewt: Rust vs C
Why Embedded Rust Instead of Embedded C?
Take a look at the above Rust code that’s running on our nRF52 for polling the simulated temperature sensor. Compare that with the equivalent C code.
Why is Rust better than C?
Yes the Rust code looks more verbose than C… But that’s a good thing! C programming is so terse that it makes C difficult to learn. Experienced C programmers (like me) are indeed a dying breed.
Rust uses sensible keywords (like
fn to denote functions, let for declaring variables), making it easier to learn. Note also
that the Rust code doesn’t use any pointers. If you look at the C code, it’s really easy to misuse
pointers like listen_sensor and listener… causing more problems and frustration to learners.
Error handling in Rust is done
elegantly… We use the ? operator to catch errors and exit early.
Compare that with the unsightly assert() in C. What if we forget
to check the return code in C? Strange bugs ensue.
Why not code EVERYTHING in Rust… Including Mynewt OS and NimBLE?
There’s an amazing community hard at work creating Rust on Bare Metal. But it will take a while to get it running and tested with real-world applications on nRF52, nRF51, STM32 F103, STM32 F476, RISC-V, …
I’m solving this problem with a different approach by applying Lean Principles…
You, the reader, the learner, are my Customer. You wish to build a safe and efficient Embedded Application (hopefully in Rust). What Rust APIs shall I provide you?
I could build a Rust OS from scratch based on Bare Metal Rust, and offer you a Native Rust API. But that’s not very Lean.
Or I could take an embedded OS that’s already available, say Mynewt or Zephyr or FreeRTOS. Wrap it up with a clean Rust API, and give that Wrapped Rust API to you instead. You wouldn’t know the difference between the Native and Wrapped Rust APIs! (Unless I told you)
The Wrapped Rust API won’t be perfect, because as you create new gadgets with the API, you may find the API cumbersome or hard to use. So I’ll take this opportunity to evolve the API iteratively, till we get the Perfect Embedded Rust API. (That’s how I evolved the Mynewt Sensor Framework with Rust Iterators)
Now we’re ready to revamp the OS with Rust and restructure it to implement the Perfect Embedded Rust API in the safest and most efficient way possible.
This, I think, is the right approach for solving the Embedded Rust problem. And it needs to happen soon (based on Mynewt or Zephyr or FreeRTOS or …) so that we may quickly move embedded coders away from unsafe C and onto Rust.
Rust Wrappers for NimBLE
Where are the Rust Wrappers for the NimBLE API? Since the Mynewt Sensor Framework already has Rust Wrappers, it shouldn’t be too difficult to create Rust Wrappers for NimBLE right?
That’s work in progress. With the Mynewt Sensor Framework I understand clearly how the API is used to read and poll sensors under various situations. The Rust Wrappers for the Mynewt Sensor Framework were designed for these use cases. With the NimBLE API… The use cases are still fuzzy to me.
Some NimBLE applications appear
to have lots of repetitive code, like this Bluetooth Mesh
application. They could be greatly simplified with Rust Macros. Just like the coap!() Rust Macro we used for composing CoAP messages.
If you would like to help out with the design of the Rust Wrappers for NimBLE, drop me a note!
What’s Next?
Coding the nRF52 was an incredible experience… I’m finishing this tutorial only two weeks after touching nRF52 for the very first time!
I got big plans for nRF52 in upcoming tutorials…
1️⃣ Bluetooth Mesh: What if we had a mesh network of nRF52 nodes that can relay IoT sensor data to nearby nodes? One of these nodes could be a WiFi gateway (based on ESP8266) that forwards the sensor data to an IoT server like thethings.io.
This will be an interesting application of Bluetooth Mesh, which is already supported in NimBLE. Here is the article…
2️⃣ PineTime Smart Watch: PineTime is an upcoming smart watch that’s powered by nRF52. What if we could run Rust and Mynewt OS on this watch… And allow watch apps to be built easily with Visual Rust?
What if the watches could form a mesh and relay each wearer’s vital signs (from the heart rate sensor)? And alert you if any of your loved ones are uncontactable through the mesh network? No more missing kids / grandparents / friends / hikers / swimmers / pets / …
“Herding” sounds like a good name for such Wearable Mesh apps. I have received the PineTime developer kit… Here’s my review!
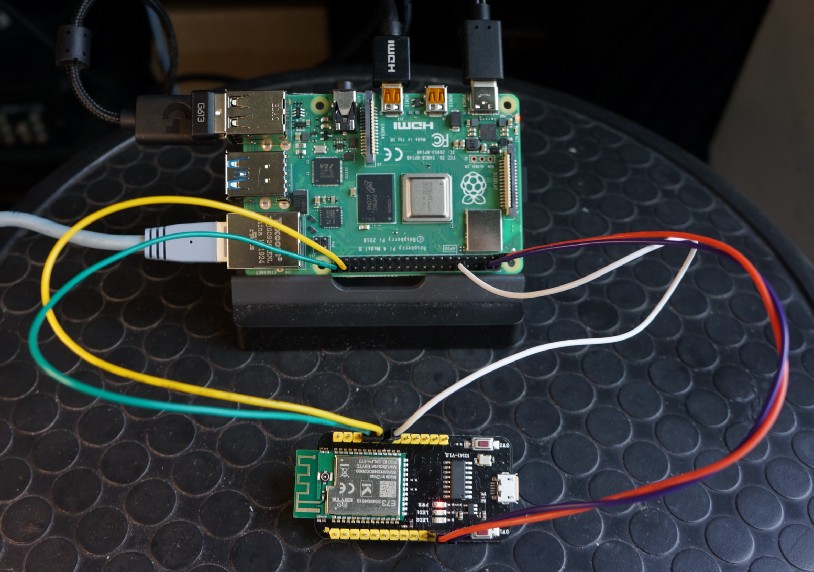
nRF52 connected to Raspberry Pi 4
Advanced Topic: Remove nRF52 Flash Protection With Raspberry Pi
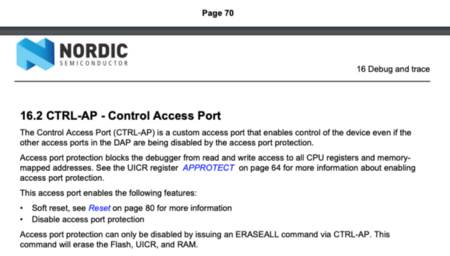
From “nRF52832 — Product Specification” https://infocenter.nordicsemi.com/pdf/nRF52832_PS_v1.0.pdf
Do you have problems flashing or debugging your nRF52? Here’s how you can fix it…
nRF52 has an Access Port Protection feature that locks the nRF52 flash ROM from any modification and prevents debugging. Access Port Protection is enabled in production devices, so that people can’t snoop into an nRF52 gadget and tamper with the ROM.
Some nRF52 development boards (including my EBYTE E73-TBB) are shipped with Access Port Protection enabled. Most developers use a J-LINK USB Programmer to remove the Access Port Protection, but I’ll show you how to use a Raspberry Pi (1, 2, 3 or 4) instead…
Connect your nRF52 board to a Raspberry Pi 1 / 2 / 3 / 4 (powered off) as follows (refer to the photo above)…
Connecting nRF52 to Raspberry Pi. From https://github.com/lupyuen/stm32bluepill-mynewt-sensor/blob/nrf52/scripts/nrf52/swd-pi.ocd
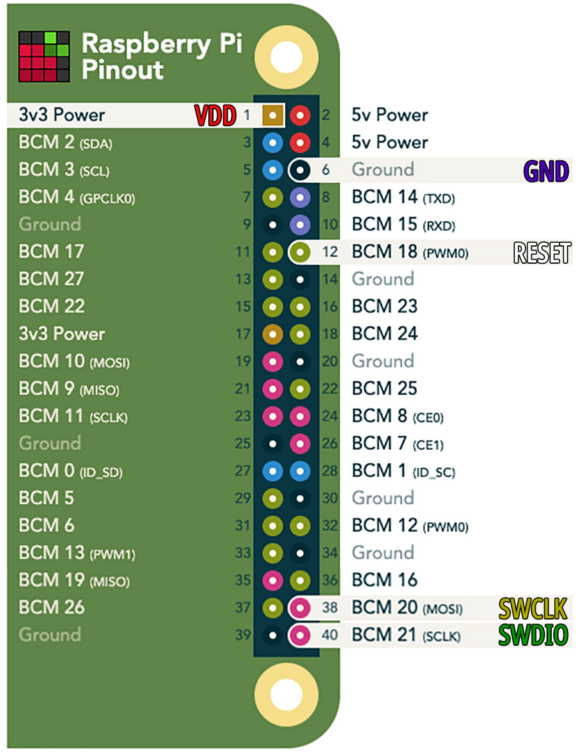
Connecting nRF52 to Raspberry Pi. Based on https://pinout.xyz/
Power on the Raspberry Pi. Open a common prompt on the Raspberry Pi. Enter into the command prompt…
# Build OpenOCD with CMSIS-DAP and GPIO supportsudo apt install wget git autoconf libtool make pkg-config libusb-1.0-0 libusb-1.0-0-dev libhidapi-dev libftdi-dev telnetgit clone https://github.com/ntfreak/openocdcd openocd./bootstrap./configure --enable-sysfsgpio --enable-bcm2835gpio --enable-cmsis-dapmakecd ..# Download the OpenOCD script
wget https://raw.githubusercontent.com/lupyuen/stm32bluepill-mynewt-sensor/nrf52/scripts/nrf52/swd-pi.ocd
Edit the downloaded swd-pi.ocd
Comment out the lines (insert
# prefix) for bcm2835gpio_peripheral_base and bcm2835gpio_speed_coeffs under Pi 4
Uncomment the lines (remove # prefix) for bcm2835gpio_peripheral_base and bcm2835gpio_speed_coeffs for your model of Raspberry Pi: Pi 1 / 2 / 3 / 4
OpenOCD script. From https://github.com/lupyuen/stm32bluepill-mynewt-sensor/blob/nrf52/scripts/nrf52/swd-pi.ocd
Enter into the command prompt…
# Start OpenOCD
sudo /home/pi/openocd/src/openocd \
   -s /home/pi/openocd/tcl \
   -d4 \
   -f swd-pi.ocd
We should see the following log…
OpenOCD Log from https://github.com/lupyuen/stm32bluepill-mynewt-sensor/blob/nrf52/scripts/nrf52/swd-pi.log
While OpenOCD is running, open a second command prompt and enter…
telnet localhost 4444
nrf52.dap apreg 1 0x0c
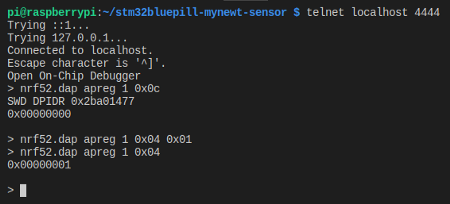
Checking the APPROTECTSTATUS status register for Access Port Protection
This queries the APPROTECTSTATUS status register for Access Port Protection.
It should show 0, which means protection is enabled.
We’ll now set the ERASEALL register to 1 to
erase the flash ROM and remove Access Port Protection.
Enter the following commands into
the telnet prompt.
nrf52.dap apreg 1 0x04 0x01
nrf52.dap apreg 1 0x04
This should show 1, which means that the nRF52 is ready to be erased.
Shut down and power off the Raspberry Pi and nRF52 board.
Power on the Raspberry Pi and nRF52 board. This performs the flash ROM erase.
Start OpenOCD by entering into a command prompt…
sudo /home/pi/openocd/src/openocd \
   -s /home/pi/openocd/tcl \
   -d4 \
   -f swd-pi.ocd
While OpenOCD is running, open another command prompt and enter…
telnet localhost 4444
targets
halt
nrf52.dap apreg 1 0x0c
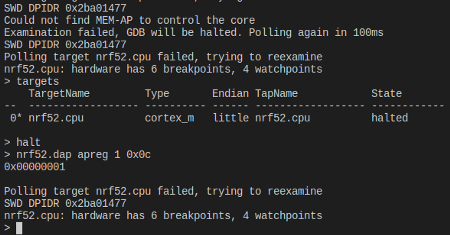
Checking APPROTECTSTATUS status register for Access Port Protection.
This queries the APPROTECTSTATUS status register for access port protection.
It should now show 1, which means protection has been disabled.
We may now disconnect the nRF52 from the Raspberry Pi and use ST-Link to flash and debug our nRF52!
References
My code was tested on the EBYTE E73-TBB Development Board. The board is based on the EBYTE E73–2G4M04S1B module, which embeds the nRF52832 microcontroller.