
STM32 Blue Pill — Dissecting the WebUSB Bootloader for MakeCode
Could STM32 Blue Pill overtake Arduino as the preferred platform for creating IoT prototypes?
1️⃣ Blue Pill is packed with features, yet costs under US$ 2
2️⃣ Cheaper Blue Pill clones are now emerging. No signs of Blue Pill fatigue.
3️⃣ Microcontrollers are joining mesh networks to become smarter collectives. Cheap microcontrollers like Blue Pill are needed.
4️⃣ The closest competitor, ESP8266 / ESP32, is still slowly growing its software base from scratch (though the embedded WiFi is a huge advantage)
5️⃣ Blue Pill developers have plenty of open-source Arm and STM32 code to guide them
So what’s holding back Blue Pill? Blue Pill is way more advanced than the ancient Arduino Uno, yet we are still using the same primitive coding tools… a text editor and a C compiler.
There must be a modern, easier way to write Blue Pill programs. Maybe we should sacrifice a bit of Blue Pill’s processing power to make it faster and friendlier to code and test. And this leads to MakeCode, the popular web-based tool for programming and flashing microcontrollers…
Creating a MakeCode visual program and flashing to Blue Pill
MakeCode is an open-source visual programming tool that’s easy to learn and use — makers around the world are already using MakeCode today with the BBC micro:bit. It generates Static TypeScript, a variant of JavaScript that’s optimised for newer powerful microcontrollers like Blue Pill. MakeCode could be the missing element that will make Blue Pill wildly successful for IoT.
Will MakeCode run on Blue Pill? There’s no official port of MakeCode for Blue Pill, but we’re nearly there. I have ported the most complicated part of MakeCode to Blue Pill: the MakeCode Bootloader. If the MakeCode Bootloader runs on Blue Pill, the rest is a piece of cake!
In this article we’ll take our surgical scalpels, dissect and explore the innards of the MakeCode Bootloader that I have ported to Blue Pill. We’ll learn…
- What’s a Bootloader and why we need a Custom Bootloader
- CODAL runtime library used by MakeCode to execute Blue Pill-specific functions
- How the Bootloader uses Blue Pill memory optimally
- HF2 Protocol used by MakeCode and the Bootloader to flash the Blue Pill
- Linker Script used to create the Bootloader memory layout
What’s a visual program? Check this video to see how MakeCode may be used to write a visual program that blinks the Blue Pill LED.
What’s A Bootloader?
Well it boots and it loads… Duh.
Boot: The Bootloader is a small program that’s pre-installed in the ROM of the microcontroller. It’s the first program that runs when we power on the device. Normally the Bootloader will jump to the custom program that we have flashed into the ROM (assuming it has been flashed). So most of the time we won’t notice that the Bootloader is actually started before our custom program.
Load: The Bootloader enables us to load (or flash) our custom program into ROM. On the Arduino Uno, the Bootloader receives our custom program file via the USB Serial Port and flashes the custom program into ROM. For Blue Pill, the factory-installed Bootloader works the same way except that it uses the UART pins instead of the USB port. See AN3155: USART protocol used in the STM32 bootloader and AN2606: STM32 microcontroller system memory boot mode.
Remember that we set the BOOT0 jumper to 0 while
flashing Blue Pill via ST Link? This disables the factory-installed Bootloader so we don’t actually
flash the custom program via the UART pins. ST Link uses the SWD port on the Blue Pill to flash our
custom program into the ROM.
Why Build A Custom Bootloader?
Flashing the Blue Pill via the bare UART pins or the SWD port (via ST Link) is cumbersome. What if we could simply click a button in a web page, and transmit our custom program directly into the Blue Pill ROM? And how would we connect the Blue Pill to our computer? Just use the USB port that’s already provided on Blue Pill! Flashing the Blue Pill would become so easy — just like in the demo above!
But there’s a catch (or two)…
1️⃣ The Blue Pill’s USB port doesn’t have any built-in functionality. (Surprised? Many of my students assumed that the Blue Pill USB port actually did something.) We need to write the Blue Pill code to perform the flashing over USB. And the code will go into a Custom Bootloader that we’ll install ourselves into our new Blue Pills. Once installed, we shouldn’t need to re-flash the Custom Bootloader (although there’s actually an easy way to do this… in our next article!)
2️⃣ Web Browsers won’t allow us to access all types of USB devices (e.g. Blue Pill) directly through a web page, for safety reasons. The Chrome browser provides the WebUSB JavaScript API for safely accessing some USB devices, including Blue Pill. With the right code in the web page and the right code in the Custom Bootloader, we’ll see in a while that it’s indeed possible to flash the Blue Pill via a web page, as we have seen in the demo above.
So this article is all about the internals of the Custom Bootloader for Blue Pill that supports flashing over WebUSB. Details on implementing WebUSB on Blue Pill may be found in my earlier article.
CODAL Runtime for Embedded Devices
The CODAL runtime library created by Lancaster University provides a friendly and flexible C++ API for programming embedded devices. MakeCode compiles our visual programs into Static TypeScript code that calls the CODAL library to access the device and peripheral functions like the onboard LED and ports for UART, I2C, SPI, …
Here’s a sample CODAL program that blinks the LED…
void Blink_main(STM32BluePill& device) {
 int state = 0;
 while(1) {
   device.io.led.setDigitalValue(state);
   device.sleep(1000);
   state = !state;
 }
}
Comparing this with the same Arduino program that blinks
the LED, it doesn’t look that different. But note that the onboard LED is neatly encapsulated as
device.io.led. device is an STM32BluePill
object that’s defined as…
class STM32BluePill : public CodalComponent {
public:
  Timer              timer;
  MessageBus         messageBus;
  STM32BluePillIO    io;
  I2C                i2c1;
  SPI                spi1;
  SPI                spi2;
  Serial             usart2;
Wow we have just dissected the
Blue Pill to reveal its innards: the system timer, I2C port, SPI port, USART port, … Each of these are
CODAL objects that expose methods for accessing the device and port-specific functions. The led object we saw earlier is just another CODAL object defined in
STM32BluePillIO.
CODAL gives us a clean way to
write embedded programs in C++ that will work with many types of modern microcontrollers, without
resorting to Arduino’s preprocessor symbols like in digitalWrite(LED_BUILTIN, HIGH).
CODAL is officially supported for Arm microcontrollers that use Arm’s Mbed device library (including the BBC micro:bit). However Mbed is not optimised for Blue Pill so I have ported CODAL to Blue Pill using the optimised open-source libopencm3 library instead…
From here onwards, we’ll use the term “CODAL” to refer to the Blue Pill version of CODAL. We’ll now look at the challenges in squeezing CODAL to run on Blue Pill, coexisting with the Bootloader.
Memory Layout for Bootloader
In my
article on memory optimisation, we learnt that the Blue Pill has 64 KB of
ROM, from address 0x0800 0000 to 0x0801 0000. Assuming that we can use all 64 KB of ROM, our MakeCode
Application (the one we created through drag-and-drop) will fill up the available ROM like this…

Memory Layout for MakeCode Application
MakeCode compiles our visual program into Arm Cortex machine code (not into intermediate bytecode), so the compiled MakeCode App appears to Blue Pill like any other C function. The compiled MakeCode App calls the CODAL library to execute Blue Pill device functions. To do its job, CODAL needs to call some friends…
- libopencm3: The open-source library for Blue Pill device functions
- nano-float: Math library optimised for Blue Pill. Includes Qfplib. I wrote about nano-float in this article and the Unit Testing too.
- newlib: Standard C library optimised for Blue Pill
- logger: Library for logging errors and diagnostic messages
- bluepill: Common functions for Real-Time Clock and System Timers
- hal: Hardware Adaptation Layer, called by CODAL
What’s missing from the picture? The Bootloader of course! Without the Bootloader, we won’t be able to flash the MakeCode App to Blue Pill via the web browser. Let’s add the Bootloader…

Memory Layout after adding Bootloader
Now we have a problem… 1️⃣ CODAL calls the libopencm3 library to access the Blue Pill device functions 2️⃣ Bootloader needs the libopencm3 library to write to flash memory and to access the USB port. So we have TWO copies of the libopencm3 code in ROM.
We don’t have enough ROM space for two copies of libopencm3, so let’s use only one copy of libopencm3, shared by the Application (CODAL + MakeCode App) and the Bootloader…

Memory Layout optimised for Application + Bootloader
For clarity, we segregate the
Bootloader and the Application into two Memory Regions: bootrom (for Bootloader) and rom (for Application). Recall that
the Application (rom) will be updated more often than the
Bootloader (bootrom).
This Bootloader design is rarely used in real life because it needs the Bootloader and the Application to be carefully matched by code version. Otherwise the Application might call a shared function (in libopencm3, for example) using an older address that’s no longer valid in the current Bootloader.
How do we tell the Blue Pill compiler and linker to use this memory layout? We define the memory layout in the Linker Script. The details may be found in the “For Advanced Programmers: Linker Script for Bootloader” section below.
WebUSB Flashing with the HF2 Protocol
The WebUSB Bootloader that I have implemented for Blue Pill (adapted from various sources) is a hefty embedded program taking 29 KB of ROM space. Why is it so huge? Because it supports…
1️⃣ WebUSB and WinUSB protocols. Allows the MakeCode website to access the Blue Pill via USB through the Chrome web browser, without installing any drivers. I wrote about WebUSB and WinUSB in this article.
2️⃣ USB Serial Port (USB CDC) for debug logging
3️⃣ HF2 Protocol for flashing Blue Pill via WebUSB
4️⃣ And remember that the Bootloader includes libopencm3 and other common functions used by the MakeCode Application, due to the way we partitioned the ROM space into Bootloader and Application regions.
How do we tell Blue Pill that we want to flash a new Application into ROM? Do we press a button on Blue Pill to enter Bootloader Mode, like on some MakeCode devices?
Not so! The demo above shows that
the flashing of Blue Pill is fully automated and triggered by the web browser, when we click the Download button in the MakeCode web page. How does this work?
While the Application runs on Blue Pill (we call this the Application Mode), the Bootloader is called periodically to check for USB requests. When the Bootloader receives a request for flashing, it restarts the Blue Pill into Bootloader Mode to perform the flashing. The Application doesn’t run until the flashing has been completed.
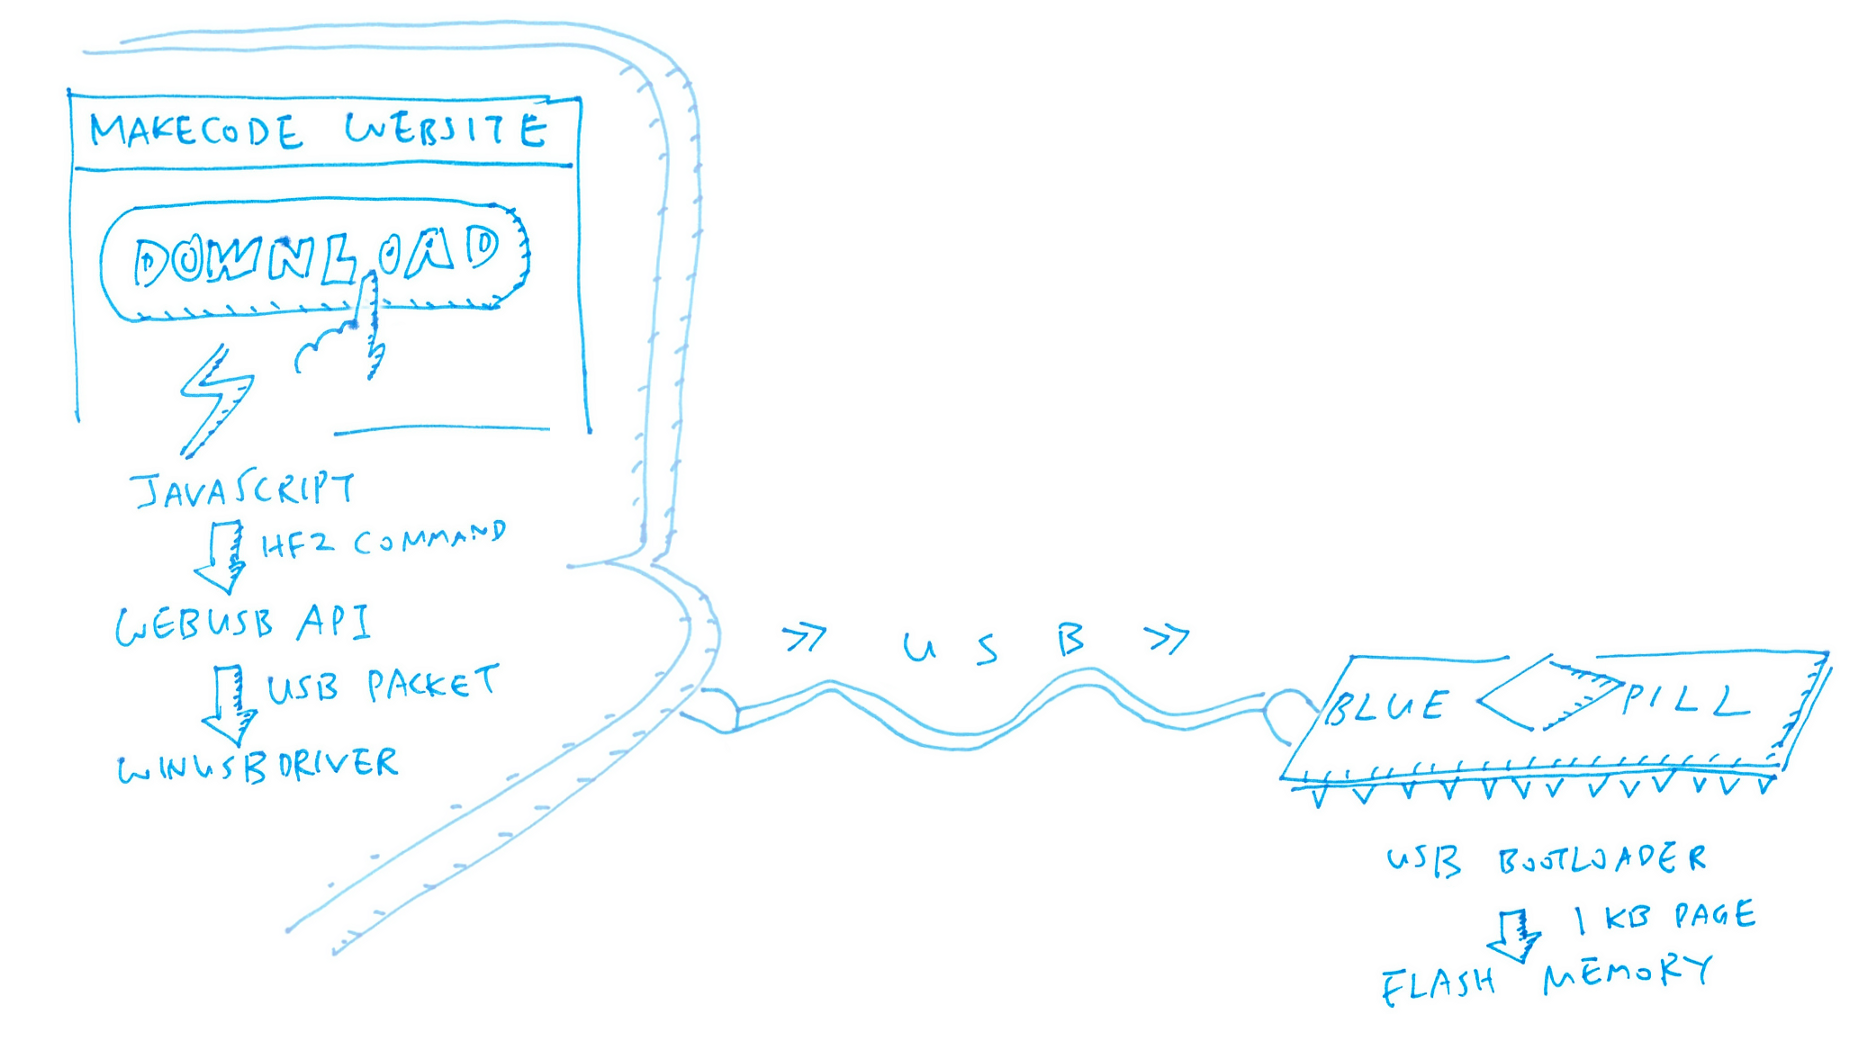
The flashing magic is made possible by the HF2 Protocol implemented in the MakeCode website and in the Bootloader code. The MakeCode website transmits HF2 command packets via in-browser JavaScript, via the WebUSB JavaScript API, via the WinUSB driver (on Windows), finally to the USB port of the Blue Pill.
The Blue Pill Bootloader receives the HF2 command packets and executes them, switching between Application and Bootloader Modes when necessary.
Here’s the overall flow of the HF2 flashing process as implemented in our Blue Pill WebUSB Bootloader…
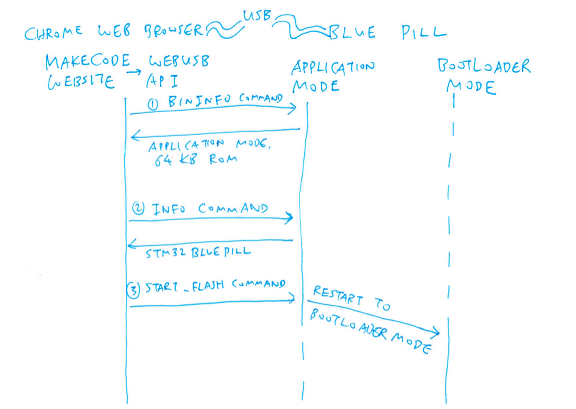
1️⃣ MakeCode website first sends
the BININFO command. Blue Pill returns the current mode
(Application or Bootloader Mode), and the flash memory size (64 KB).
2️⃣ MakeCode then sends the INFO command. Blue Pill returns the identity of the device e.g.
STM32BLUEPILL.
3️⃣ MakeCode sends START_FLASH. Blue Pill restarts in Bootloader Mode to begin
flashing.

4️⃣ For each 1 KB page of data to
be flashed, MakeCode sends the WRITE_FLASH_PAGE command and the
data to be flashed. Blue Pill compares the received data with the current ROM data. If the data is
different, it writes the received data to ROM. This is only applicable for the Application ROM, not
the Bootloader ROM.
5️⃣ MakeCode sends RESET_INTO_APP. Blue Pill restarts in Application Mode and runs the
flashed Application.
What if the Bootloader needs to be upgraded? The same flow works for upgrading the Bootloader as well. In the next article I’ll explain how the Baseloader upgrades the Bootloader code.
What’s Next?
The WebUSB Bootloader for MakeCode on Blue Pill is incredibly complex — it required four articles (plus this article) to explain the topics that we have covered today…
1️⃣ We implemented the WebUSB and WinUSB interfaces on Blue Pill…
2️⃣ We applied memory optimisation tools and techniques to squeeze the Bootloader into Blue Pill…
3️⃣ We created nano-float, an optimised version of the standard math library…
4️⃣ And we verified the accuracy of the nano-float library through Unit Testing…
5️⃣ We have one upcoming article that explains how the Baseloader upgrades the Bootloader.
It’s been a long journey — join me if you’re keen to complete the Blue Pill port of MakeCode! So that we’ll finally have the perfect platform to build and test IoT prototypes.
There are too many topics to cover, so I kept a log of all things that I have tried (even the failed ones)…
Why not port MicroPython to Blue Pill? I tried but failed miserably. MicroPython was designed for dynamic memory allocation, which works poorly on Blue Pill’s constrained RAM. Unlike MakeCode, which implements Static TypeScript without dynamic memory.
Look forward to having you onboard the Blue Pill MakeCode journey! :-)
For Advanced Programmers: Linker Script for Bootloader
If you’re interested in writing a Linker Script to customise the memory layout in your embedded program, read on…
_bootrom_size = 29K
...
MEMORY /* Define memory regions. */
{
  /* Available ROM is 64K (0x10000).
     Reserve lower part for Bootloader,
     upper part for Application. */bootrom (rx)  : ORIGIN = 0x08000000,
                 LENGTH = _bootrom_sizerom     (rx)  : ORIGIN = 0x08000000 + _bootrom_size,
                 LENGTH = 64K - _bootrom_size
The above Linker Script tells the GNU
Linker to create two memory regions: bootrom (29 KB) and rom (64–29=35 KB). How do we instruct the linker to allocate various
libraries to bootrom and rom?

Memory Layout with two memory regions
From my
article on memory optimisation, you’ll recall that the rom
memory region contains a Text Section (for program code) and a Data Section (for initial values of non-zero variables). Here’s how we tell
the linker which libraries to allocate into the Text Section of bootrom…
SECTIONS
{
 .boot_text : { /* Bootloader ROM */
  ...
  *liblibopencm3.a: (.text*) /* libopencm3       */
  *libnano-float.a: (.text*) /* Math Library     */
  *libnewlib.a:     (.text*) /* C Library        */
  *liblogger.a:     (.text*) /* Logger           */
  *libbluepill.a:   (.text*) /* Device Functions */
  *libbootloader.a: (.text*) /* Bootloader       */
  ...
} >bootrom
The * wildcard matches any number of characters. When used like this…
*liblibopencm3.a: (.text*)
…the linker takes all object
files (*.o) from the library liblibopencm3.a, extracts all the Text Sections, and writes them
into the bootrom memory region.
All other libraries and object
files that don’t match the above patterns will be allocated in the rom memory region, according to this rule…
.text : {          /* Application ROM        */
  ...
  * (.text*) /* Other Application Code */
  ...
} >rom
What about the Blue Pill RAM? We
allocate the available RAM into three memory regions: bootram
(for the Bootloader), ram (for the Application) and bootbuf. bootbuf contains the
RAM buffers used for flashing the ROM in Bootloader Mode. Since bootbuf is not used in Application Mode, we convert bootbuf into an extended memory space for
the stack and the heap while running the Application.
The Linker Script for RAM layout looks like this…
_bootrom_size = 29K;    /* Size of Bootloader ROM
                           (code + constant data) */_bootram_size =  4K;    /* Size of Bootloader RAM */_bootbuf_size = /* Size of the Bootloader buffers...         */
 1090 +         /* flashBuf from stm32/bootloader/ghostfat.c */
 1024 +         /* hf2_buffer from stm32/bootloader/hf2.c    */
    2;          /* Align to 4 bytes */
...
MEMORY /* Define memory regions. */
{
  /* Available RAM is 20K (0x5000).
     Reserve lower part for Bootloader,
     middle part for Application,
     upper part for Bootloader flash buffers
     (not used in Application Mode). */  bootram (rwx) : ORIGIN = 0x20000000,
                  LENGTH = _bootram_size  ram     (rwx) : ORIGIN = 0x20000000 + _bootram_size,
                  LENGTH = 20K - _bootram_size - _bootbuf_size  bootbuf (rwx) : ORIGIN = 0x20005000 - _bootbuf_size,
                  LENGTH = _bootbuf_size