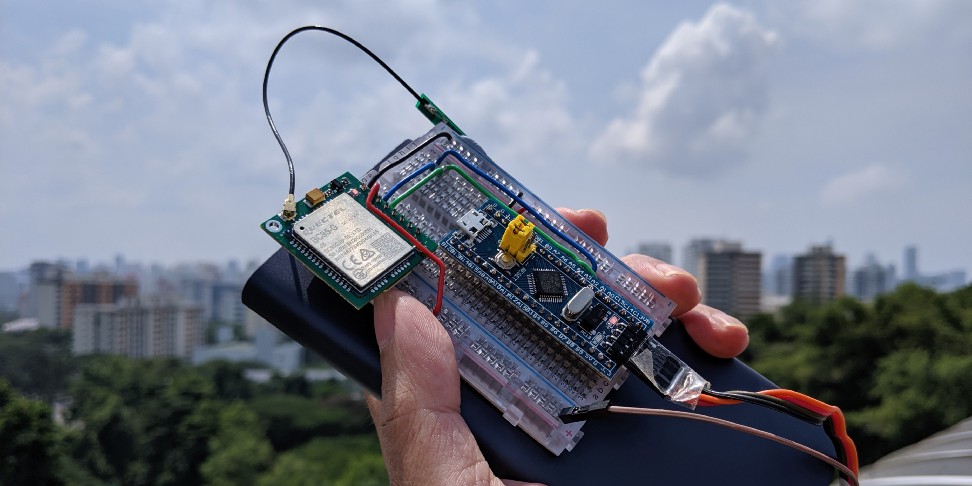
STM32 Blue Pill with Quectel BC95-G NB-IoT module running Apache Mynewt at Henderson Waves
Install Apache Mynewt for STM32 Blue Pill on Windows
Follow these instructions to install Mynewt build and application files on Windows for the article...
1️⃣ Download the .7z file attached
below…https://github.com/lupyuen/stm32bluepill-mynewt-sensor/releases/tag/v5.0.0
Expand the .7z file with 7zip…https://www.7-zip.org/download.html
2️⃣ Install Arm Cross-Compiler and Linker for Windows from Arm Developer
Website… https://developer.arm.com/-/media/Files/downloads/gnu-rm/8-2019q3/RC1.1/gcc-arm-none-eabi-8-2019-q3-update-win32-sha1.exe?revision=fcadabed-d946-49dc-8f78-0732d2f43773?product=GNU%20Arm%20Embedded%20Toolchain,32-bit,,Windows,8-2019-q3-update
Select this option at the last install step:"Add path to environment variable"
3️⃣ Download the ST-Link USB driver from ST-Link Driver Website (email
registration required)…https://www.st.com/en/development-tools/stsw-link009.html
Click Get Software
Unzip the
downloaded file. Double-click the driver installer:dpinst_amd64.exe
4️⃣ Install Windows Studio Code:https://code.visualstudio.com/
Launch Visual Studio Code
Install the extension “Cortex-Debug”…https://marketplace.visualstudio.com/items?itemName=marus25.cortex-debug
5️⃣ Click File → Open Folder
Select the
downloaded folder stm32bluepill-mynewt-sensor
When
prompted to open the workspace, click Open Workspace
Open the following file and configure the program settings:targets/bluepill_my_sensor/syscfg.yml
Change the NB-IoT band setting NBIOT_BAND.
Check with your NB-IoT operator for the band to use. The other settings are
documented below.
6️⃣ Connect Blue Pill to ST-Link. Connect ST-Link to your computer’s USB port.
Click Terminal → Run Task → [1] Build bluepill_boot
This
builds the Mynewt Bootloader. In case of problems, compare with this build log.
Click Terminal → Run Task → [2] Build bluepill_my_sensor
This
builds the Mynewt Application. Compare with this build log.
Click Terminal → Run Task → [3] Image bluepill_my_sensor
This
creates the Blue Pill flash image. Compare with this image log.
Click Terminal → Run Task → [4] Load bluepill_boot
This
flashes the Mynewt Bootloader to Blue Pill. Compare with this flash log.
Click Terminal → Run Task → [5] Load bluepill_my_sensor
This
flashes the Mynewt Application to Blue Pill. Compare with this flash log.
If any source files or configuration files are changed, rebuild by clicking
Terminal → Run Task → [2] Build bluepill_my_sensor
Program Settings
The program settings may be found in the filetargets/bluepill_my_sensor/syscfg.yml
Program Settings. From https://github.com/lupyuen/stm32bluepill-mynewt-sensor/blob/nbiot/targets/bluepill_my_sensor/syscfg.yml
COAP_HOST, COAP_PORT: The program will
send CoAP messages to this IP address and port number, which defaults to the
CoAP server at thethings.io.
Keep the default settings if you wish to view your sensor data at blue-pill-geolocate.appspot.com.
Change the setting to use your own CoAP server instead of thethings.io
COAP_URI: The CoAP message will be
delivered to this URI at the CoAP server (which defaults to thethings.io).
Keep the default settings if you wish to view your sensor data at blue-pill-geolocate.appspot.com.
For thethings.io, the last part IVRi… is
the Thing Token. If you wish to send sensor data to your own Thing at
thethings.io, replace the last part of the URI with your Thing Token.
For the purpose of NB-IoT Education, I’ll allow you to transmit sensor data to
the Thing Token IVRi… from my personal,
paid thethings.io account. Which will forward the sensor data to blue-pill-geolocate.appspot.com for viewing.
NBIOT_BAND: The program connects to this
NB-IoT Frequency Band. The
Frequency Band depends on your country and your NB-IoT network operator. Check
with your NB-IoT network operator for the Frequency Band to use.
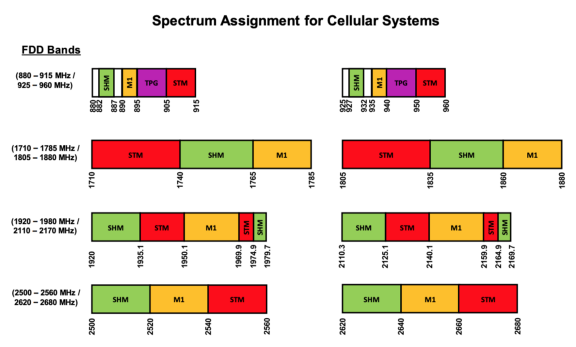
NB-IoT Frequency Bands for Singapore. From https://www.imda.gov.sg/-/media/imda/files/regulation-licensing-and-consultations/frameworks-and-policies/spectrum-management-and-coordination/spectrummgmthb.pdf
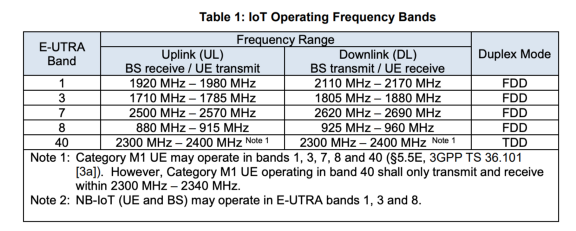
NB-IoT Frequency Bands for Singapore. From https://www.imda.gov.sg/-/media/imda/files/regulation-licensing-and-consultations/ict-standards/telecommunication-standards/radio-comms/imda-ts-iot.pdf