📝 4 Sep 2021
What is Rhai?
Rhai is a Rust-like Scripting Language, implemented in Rust.
Can we use Rhai for coding microcontrollers the REPL way?
Like on the BL602 / BL604 RISC-V + WiFi + Bluetooth LE SoC?
Sadly the Rhai Scripting Engine might be too heavy for most microcontrollers (like BL602 and BL604).
uLisp runs OK on microcontrollers. Why don’t we auto-convert Rhai Scripts to uLisp?
Transpile Rhai to uLisp… What an intriguing idea! Which we shall explore in this article.
Let’s make Rhai Scripting more fun for learners…
Can we drag-and-drop Rhai Scripts (the Scratch way) and run them on BL602?
Yep it sounds feasible, let’s explore that too.
One more thing… Can we run Rhai Scripts in a Web Browser? Like on a Simulated BL602?
Yes we can… Because we’ve implemented a BL602 Simulator in WebAssembly!
So today we shall explore…
Running Rhai Scripts on BL602
(The REPL way)
By Auto-Converting Rhai Scripts to uLisp
(Because Rhai can’t run directly on BL602 yet)
With Drag-and-Drop Rhai Scripting
(The Scratch way)
That also runs Rhai Scripts in a Web Browser
(With BL602 simulated in WebAssembly)
Why are we doing ALL this? (Waving hands)
What challenges are BL602 (and BL604) Firmware Developers facing?
Most developers code BL602 (and BL604) Firmware in C with the BL602 IoT SDK…
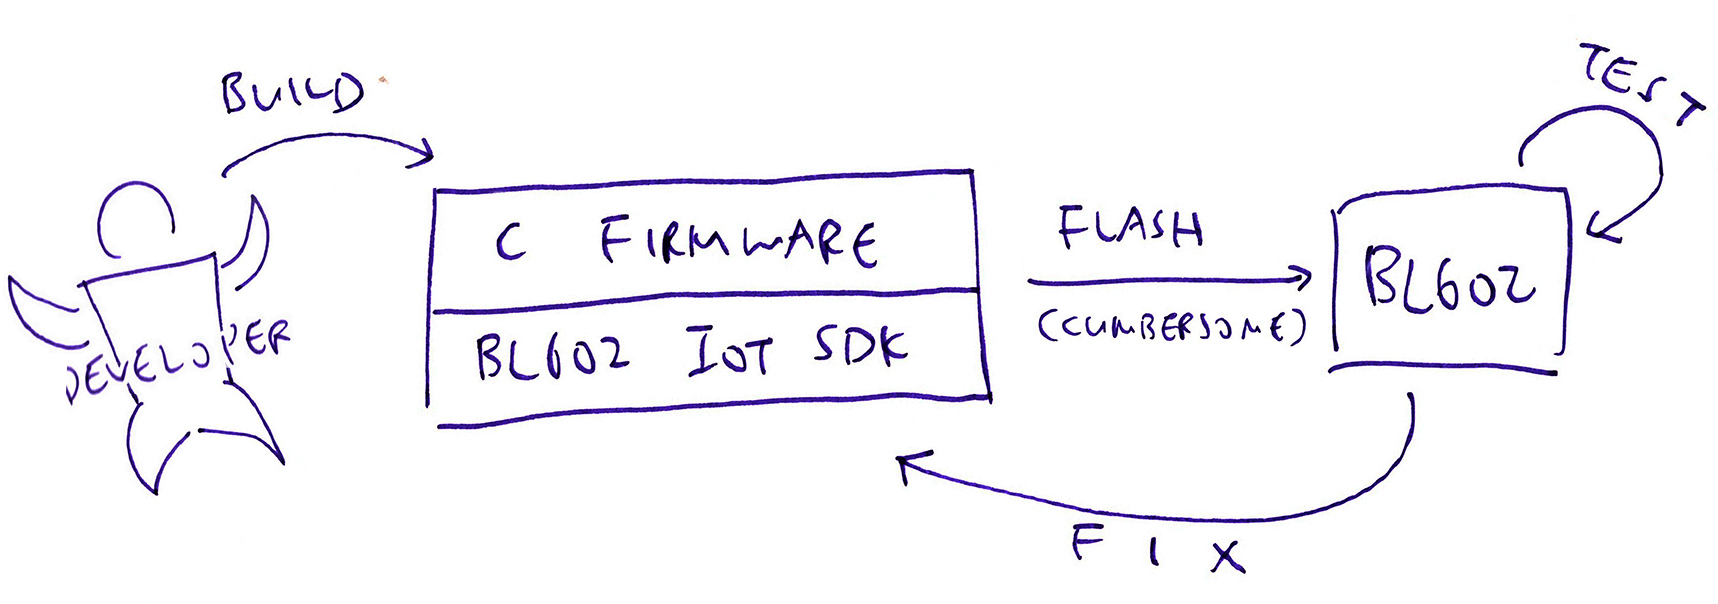
I introduced Rust as an option for coding BL602 Firmware, by creating a Rust Wrapper for BL602 IoT SDK…
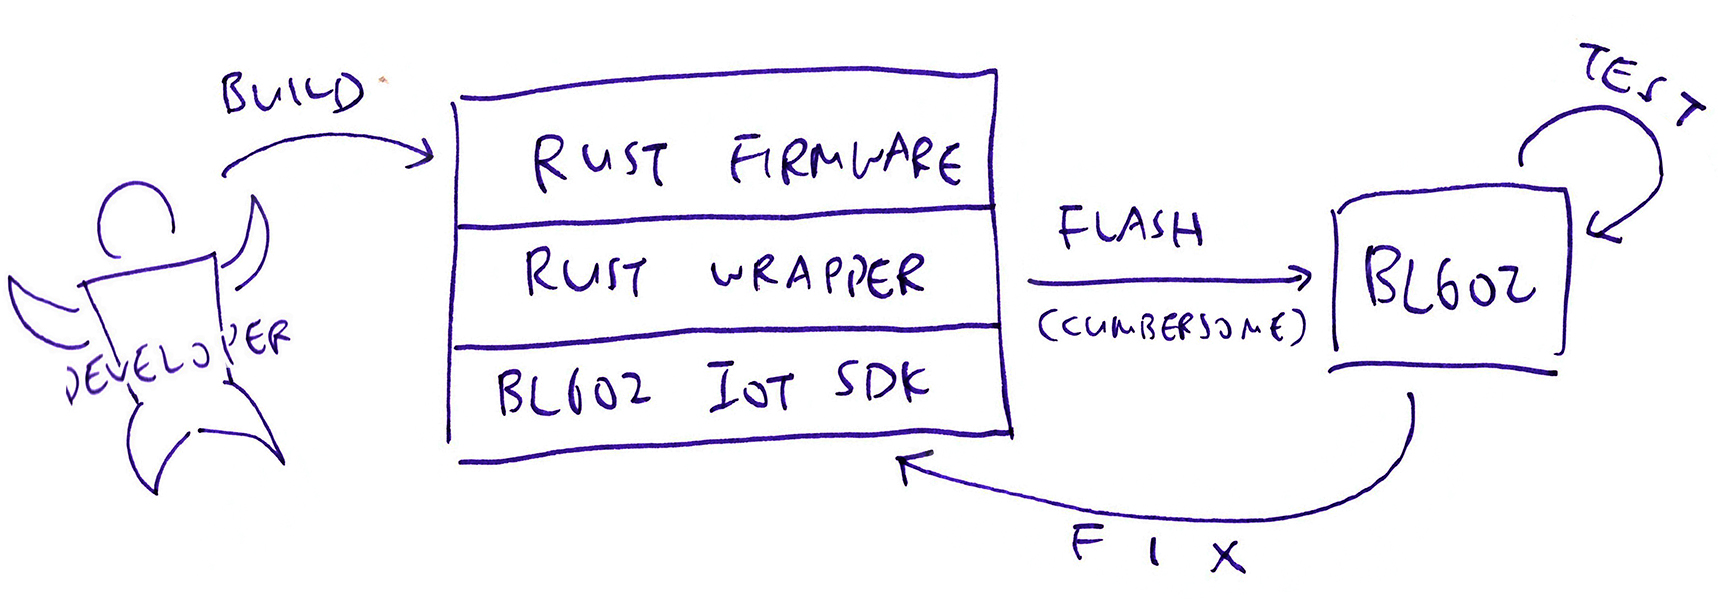
But flashing the C (or Rust) Firmware to BL602 over USB UART (and flipping a jumper) feels cumbersome.
(Especially when we keep fixing the code and reflashing to BL602)
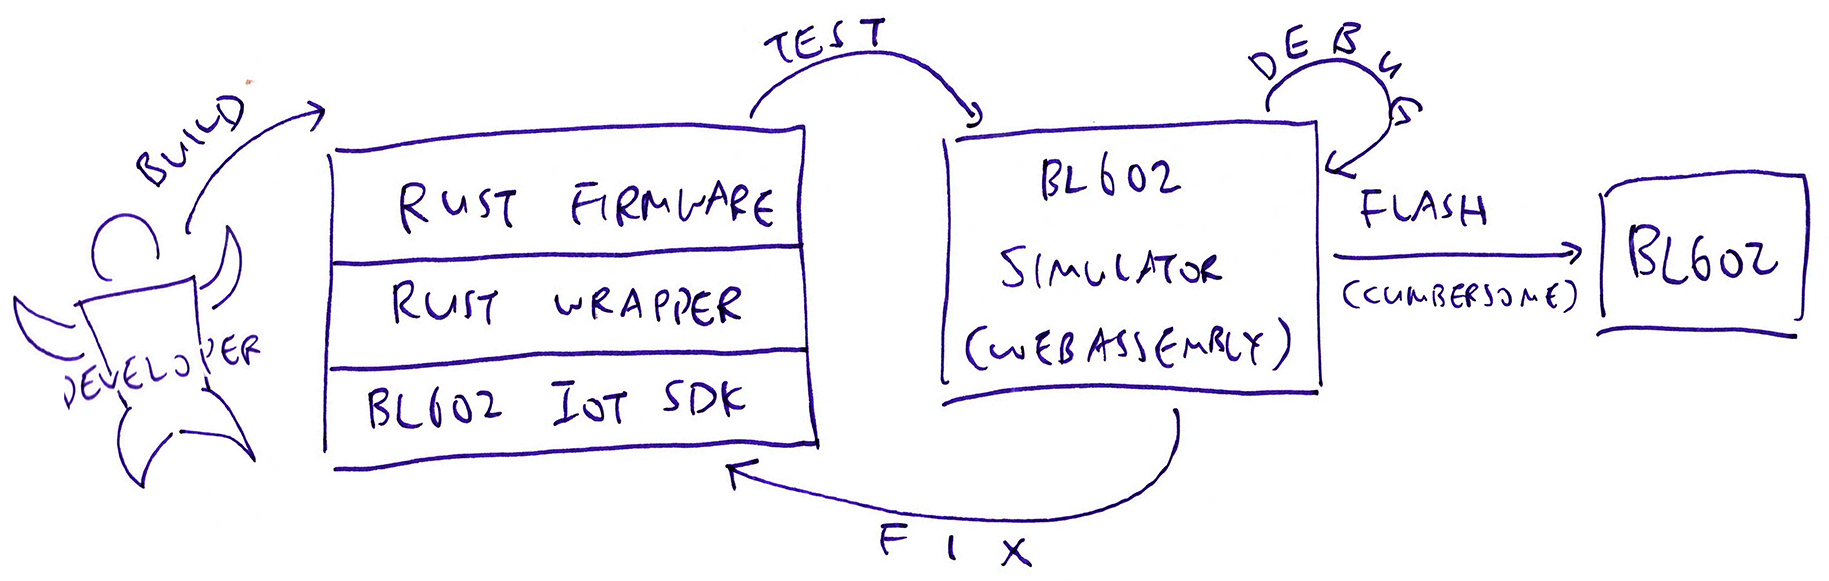
Thus we created the WebAssembly Simulator for BL602 that runs BL602 Rust Firmware in a Web Browser, for quicker testing, debugging and fixing…
But what about the learners?
Scripted REPL platforms for microcontrollers like uLisp and MicroPython are popular with learners.
Since we have a WebAssembly Simulator for BL602, we can run REPL Scripts too… With Rhai, the Drag-and-Drop Way!

And to run Rhai Scripts on actual BL602 Hardware, we need to convert Rhai Scripts to uLisp…
(Because Rhai Scripting Engine seems to be too heavy for BL602)
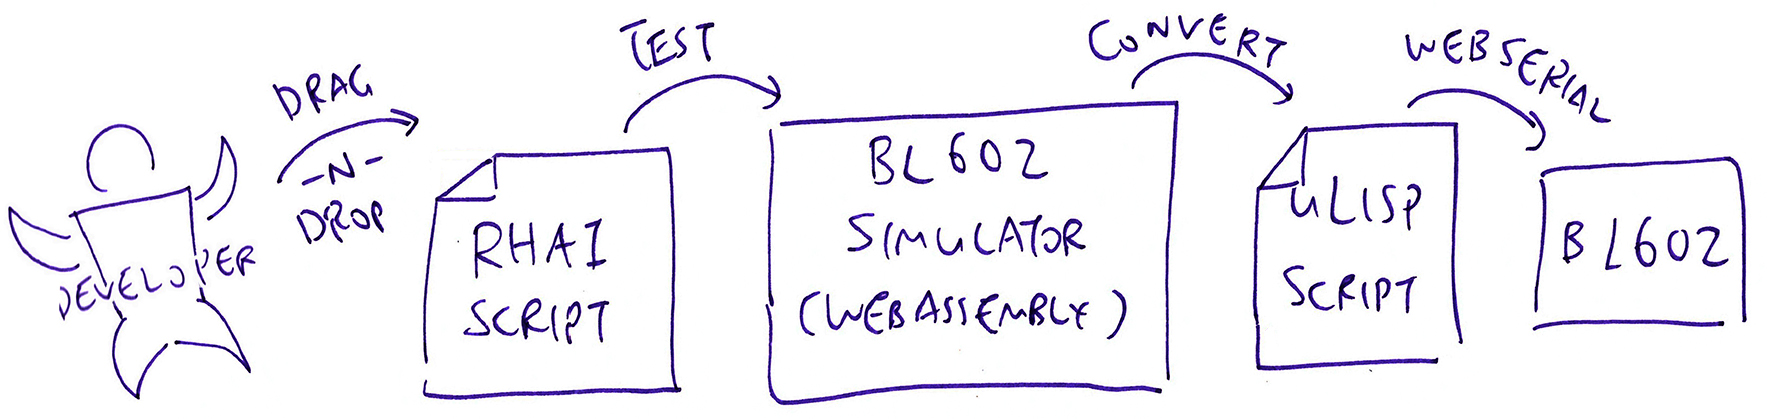
Which is perfectly OK, because we can do the conversion in WebAssembly!
(And transmit the converted uLisp code to BL602 via the Web Serial API)
In this article we’ll learn how this grand scheme is implemented with these 3 repos…
bl602-simulator (transcode branch): WebAssembly Simulator for BL602 and BL604
(Includes Rhai Scripting Engine and Rhai-To-uLisp Transcoder)
blockly-bl602: Blockly Drag-and-Drop Scripting for BL602 and BL604
(Works like Scratch)
ulisp-bl602 (sdk branch): uLisp for BL602 and BL604
(Integrated with BL602 / BL604 IoT SDK)
Let’s look at the Rhai Scripts that will…
Run OK on our BL602 Simulator and
Convert correctly to uLisp for execution on BL602
This Rhai Script evaluates to the value 42…
//  Rhai Variables and Expression
let a = 40;
let b = 2;
a + b loop, break, print and if (simple conditionals) shall be supported…
//  Rhai Loop and Conditional
loop {
  let a = 1;
  print(a);
  if a == 1 { break; }
}
See the next section for another loop that we shall support: for i in range(0, 10)
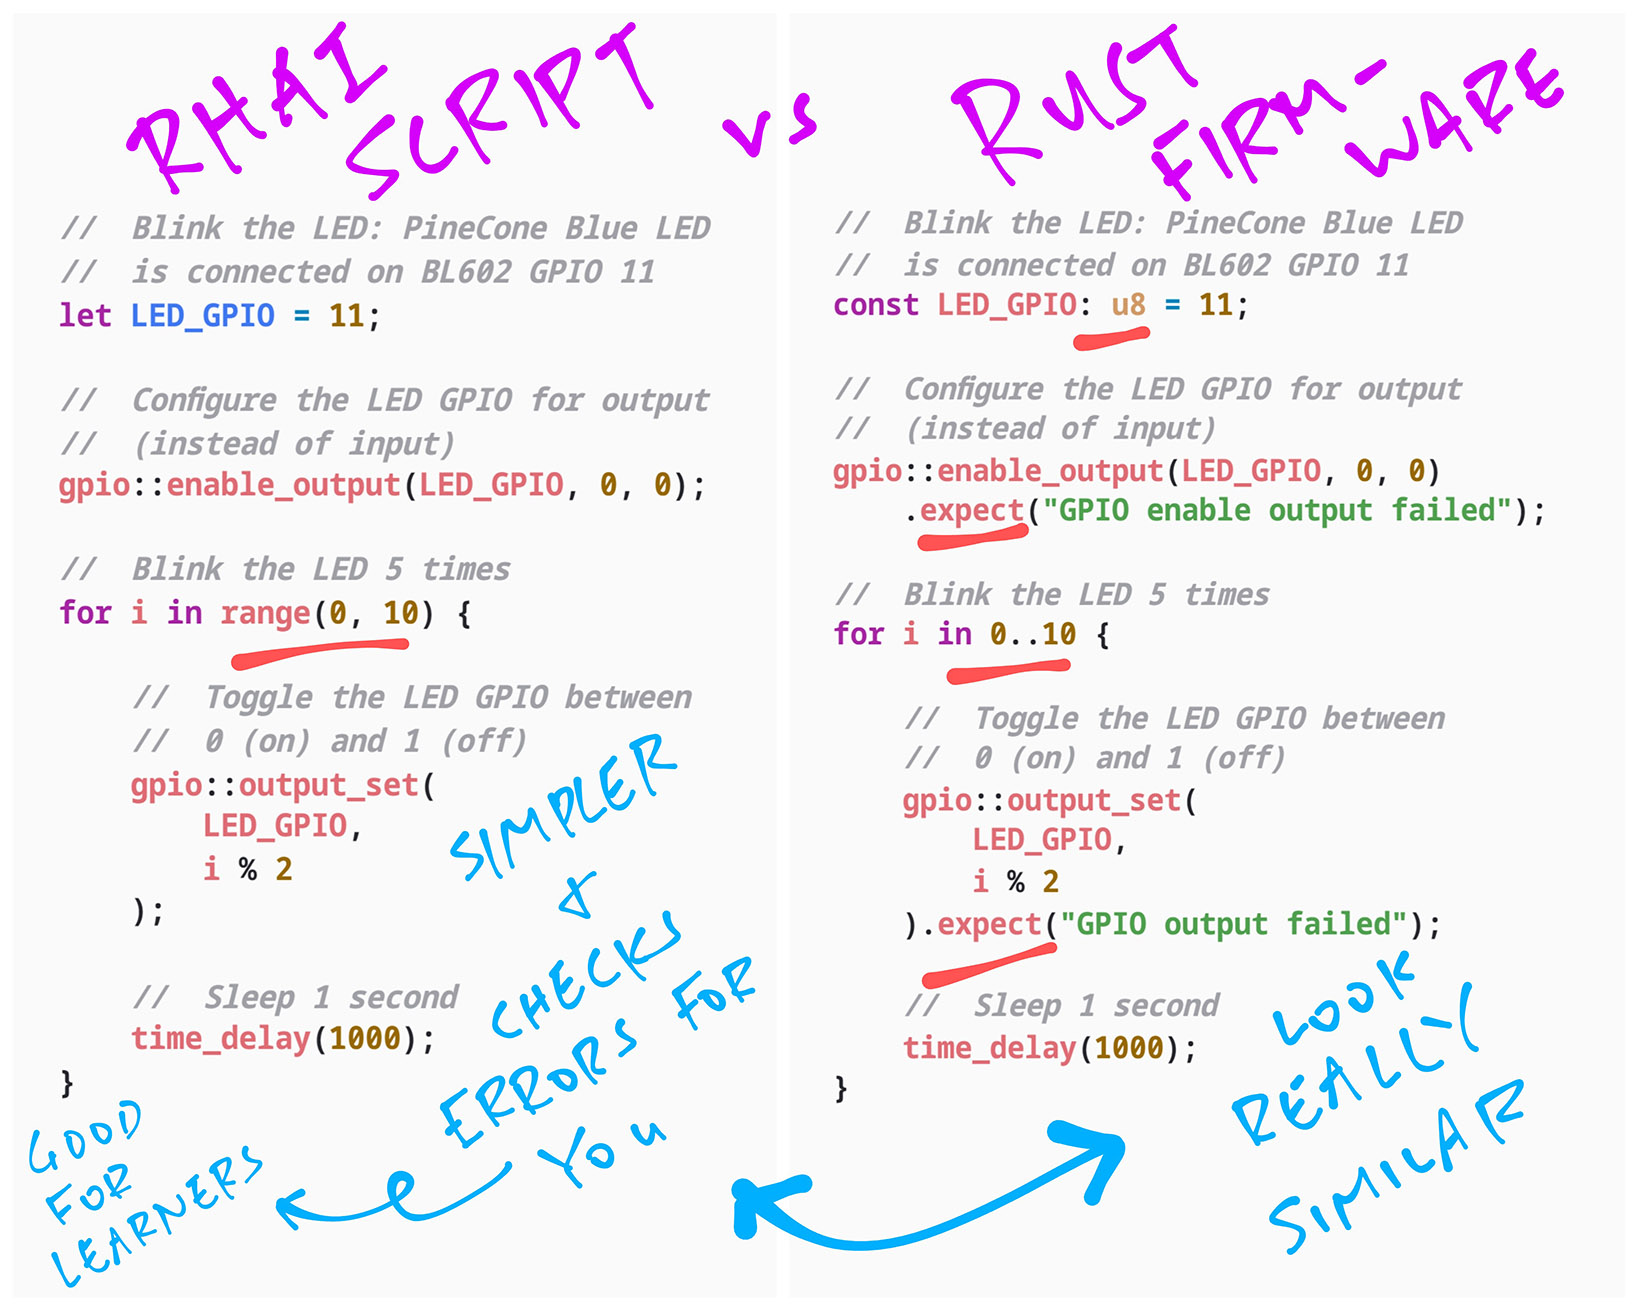
This Rhai Script blinks the LED on BL602…
//  Rhai Blinky: Blink the LED connected on BL602 GPIO 11
let LED_GPIO = 11;

//  Configure the LED GPIO for output (instead of input)
gpio::enable_output(LED_GPIO, 0, 0);

//  Blink the LED 5 times
for i in range(0, 10) {

  //  Toggle the LED GPIO between 0 (on) and 1 (off)
  gpio::output_set(
    LED_GPIO,
    i % 2
  );

  //  Sleep 1 second
  time_delay(1000);
}
time_delay is a Rust Function that we shall import into the Rhai Scripting Engine.
gpio is a Rust Module that we shall import into Rhai.
The gpio module has two functions: enable_output and output_set.
We begin by adding the Rhai Scripting Engine to our WebAssembly Simulator: bl602-script/lib.rs
/// This function will be called by
/// WebAssembly to run a script
#[no_mangle]  //  Don't mangle the function name
extern "C"    //  Declare `extern "C"` because it will be called by Emscripten
fn rust_script( ... ) {

  //  Init the Rhai script engine
  let mut engine = Engine::new();

  //  Rhai Script to be evaluated
  let script = r#"
    //  Evaluate an expression
    let a = 40;
    let b = 2;
    a + b
  "#;

  //  Evaluate the Rhai Script
  let result = engine.eval::<i32>(script)
    .unwrap() as isize;

  //  Display the result
  println!("{}", result);
}
This code initialises the Rhai engine and evaluates a Rhai Script that returns an integer result…
42(More about Rhai Scripting Engine)
To register a Rust Function that will be called by the Rhai Script, we do this: bl602-script/lib.rs
//  Init the Rhai script engine
let mut engine = Engine::new();

//  Register our functions with Rhai
engine.register_fn("time_delay", time_delay);

//  Rhai Script to be evaluated
let script = r#"
  //  Sleep 1 second
  time_delay(1000);

  //  Return 0
  0
"#;

//  Evaluate the Rhai Script (returns 0)
let result = engine.eval::<i32>(script)
  .unwrap() as isize;
time_delay is defined like so: bl602-script/lib.rs
/// Rhai Shim for Time Delay
/// TODO: Modified parameter from u32 to i32
pub fn time_delay(
    ticks: i32  //  Number of ticks to sleep
) {
  extern "C" {  //  Import C Function
    /// Sleep for the specified number of system ticks (from NimBLE Porting Layer)
    fn ble_npl_time_delay(ticks: u32);
  }

  //  Call the C function
  unsafe {  //  Flag this code as unsafe because we're calling a C function
    ble_npl_time_delay(ticks as u32);
  }
}
time_delay is a Rust Shim Function that calls out to the C function ble_npl_time_delay which we have defined in our WebAssembly Simulator.
Why not register ble_npl_time_delay with Rhai and rename it as time_delay?
Because ble_npl_time_delay is “extern C” and it accepts a parameter of type u32, but our Rhai engine is configured for only_i32.
(More about calling Rust Functions from Rhai)
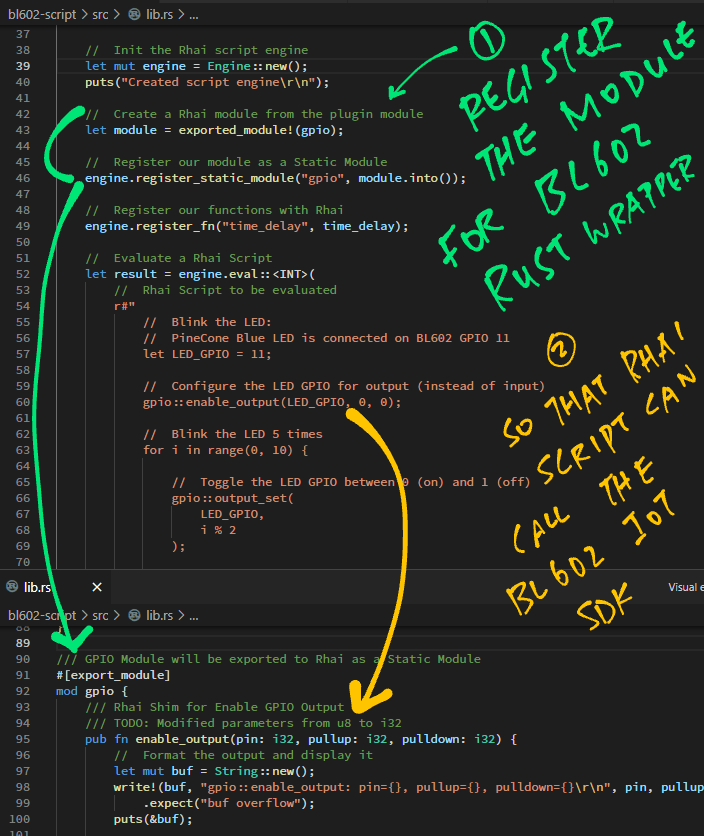
Now we register the gpio module with Rhai: bl602-script/lib.rs
//  Init the Rhai script engine
let mut engine = Engine::new();

//  Create a Rhai module from the plugin module
let module = exported_module!(gpio);

//  Register our module as a Static Module
engine.register_static_module("gpio", module.into());
gpio is a Rust Module that exports the functions enable_output and output_set, which may be called like so…
//  Rhai Script to be evaluated
let script = r#"
  //  Blink the LED connected on BL602 GPIO 11
  let LED_GPIO = 11;

  //  Configure the LED GPIO for output (instead of input)
  gpio::enable_output(LED_GPIO, 0, 0);

  //  Blink the LED 5 times
  for i in range(0, 10) {

    //  Toggle the LED GPIO between 0 (on) and 1 (off)
    gpio::output_set(
      LED_GPIO,
      i % 2
    );

    //  Sleep 1 second
    time_delay(1000);
  }

  //  Return 0
  0
"#;

//  Evaluate the Rhai Script (returns 0)
let result = engine.eval::<i32>(script)
  .unwrap() as isize;
Below is the definition of the gpio module: bl602-script/lib.rs
/// GPIO Module will be exported to Rhai as a Static Module
#[export_module]
mod gpio {
  /// Rhai Shim for Enable GPIO Output
  /// TODO: Modified parameters from u8 to i32
  pub fn enable_output(pin: i32, pullup: i32, pulldown: i32) {
    extern "C" {
      pub fn bl_gpio_enable_output(pin: u8, pullup: u8, pulldown: u8) -> i32;
    }
    unsafe {
      let _res = bl_gpio_enable_output(pin as u8, pullup as u8, pulldown as u8);
      //  TODO: Throw exception if result is non-zero
    }
  }

  /// Rhai Shim for Set GPIO Output
  /// TODO: Modified parameters from u8 to i32
  pub fn output_set(pin: i32, value: i32) {
    extern "C" {
      pub fn bl_gpio_output_set(pin: u8, value: u8) -> i32;
    }
    unsafe {
      let _res = bl_gpio_output_set(pin as u8, value as u8);
      //  TODO: Throw exception if result is non-zero
    }
  }
}
So gpio module is also a Rust Shim?
Yep. Maybe someday we’ll use a Rust Procedural Macro to generate the shims, similar to this…
(More about enable_output and output_set)
(More about calling Rust Modules from Rhai)
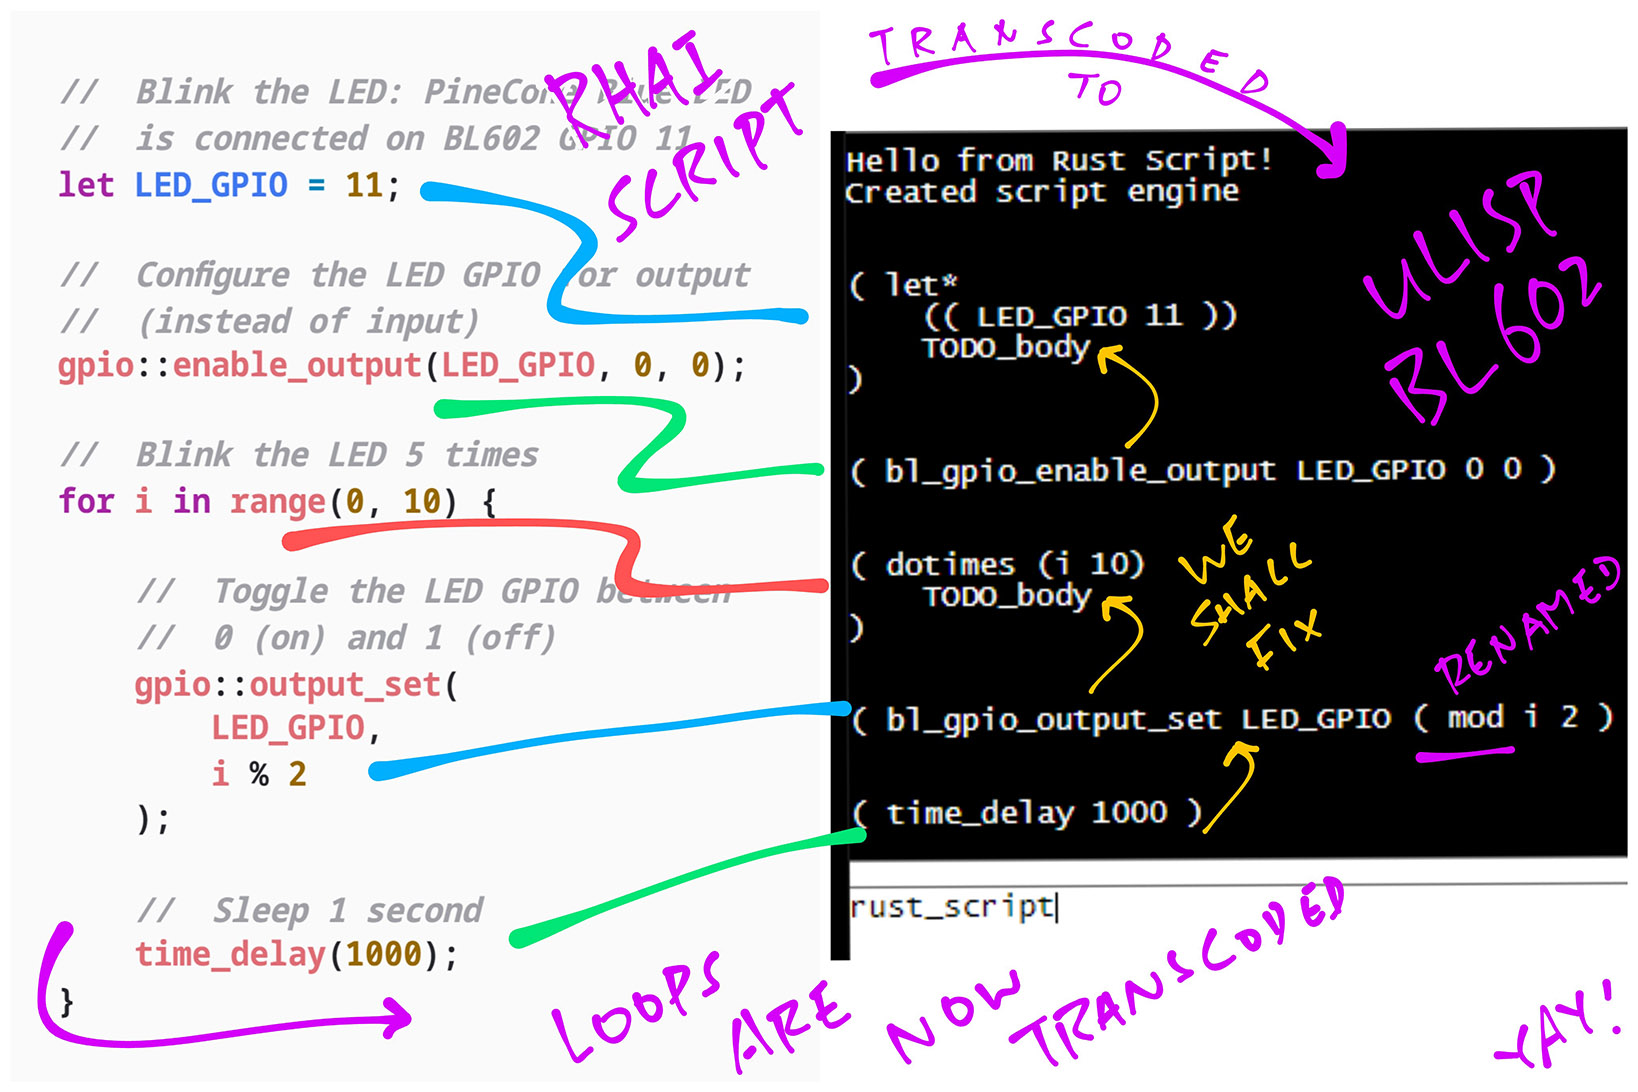
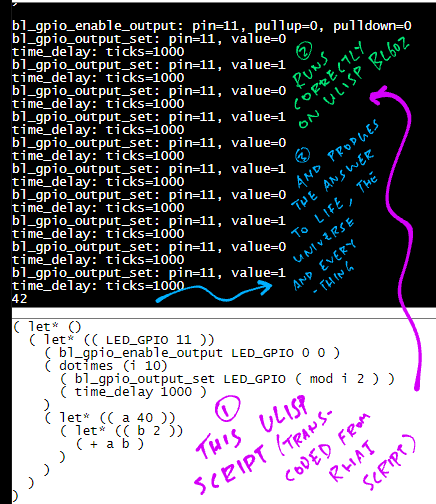
Yep the Rhai Blinky Script runs OK in the BL602 WebAssembly Simulator, blinking the simulated LED.
Now let’s auto-convert the Rhai Script to uLisp, and run it on a real BL602 board (and blink a real LED)!
We do the same as earlier…
Initialise the Rhai script engine
Register gpio module with Rhai
Register time_delay function with Rhai
From bl602-script/lib.rs …
// Init the Rhai script engine
let mut engine = Engine::new();
// Omitted: Create a Rhai module from the plugin module
// Omitted: Register `gpio` module as a Static Module
// Omitted: Register `time_delay` function with Rhai
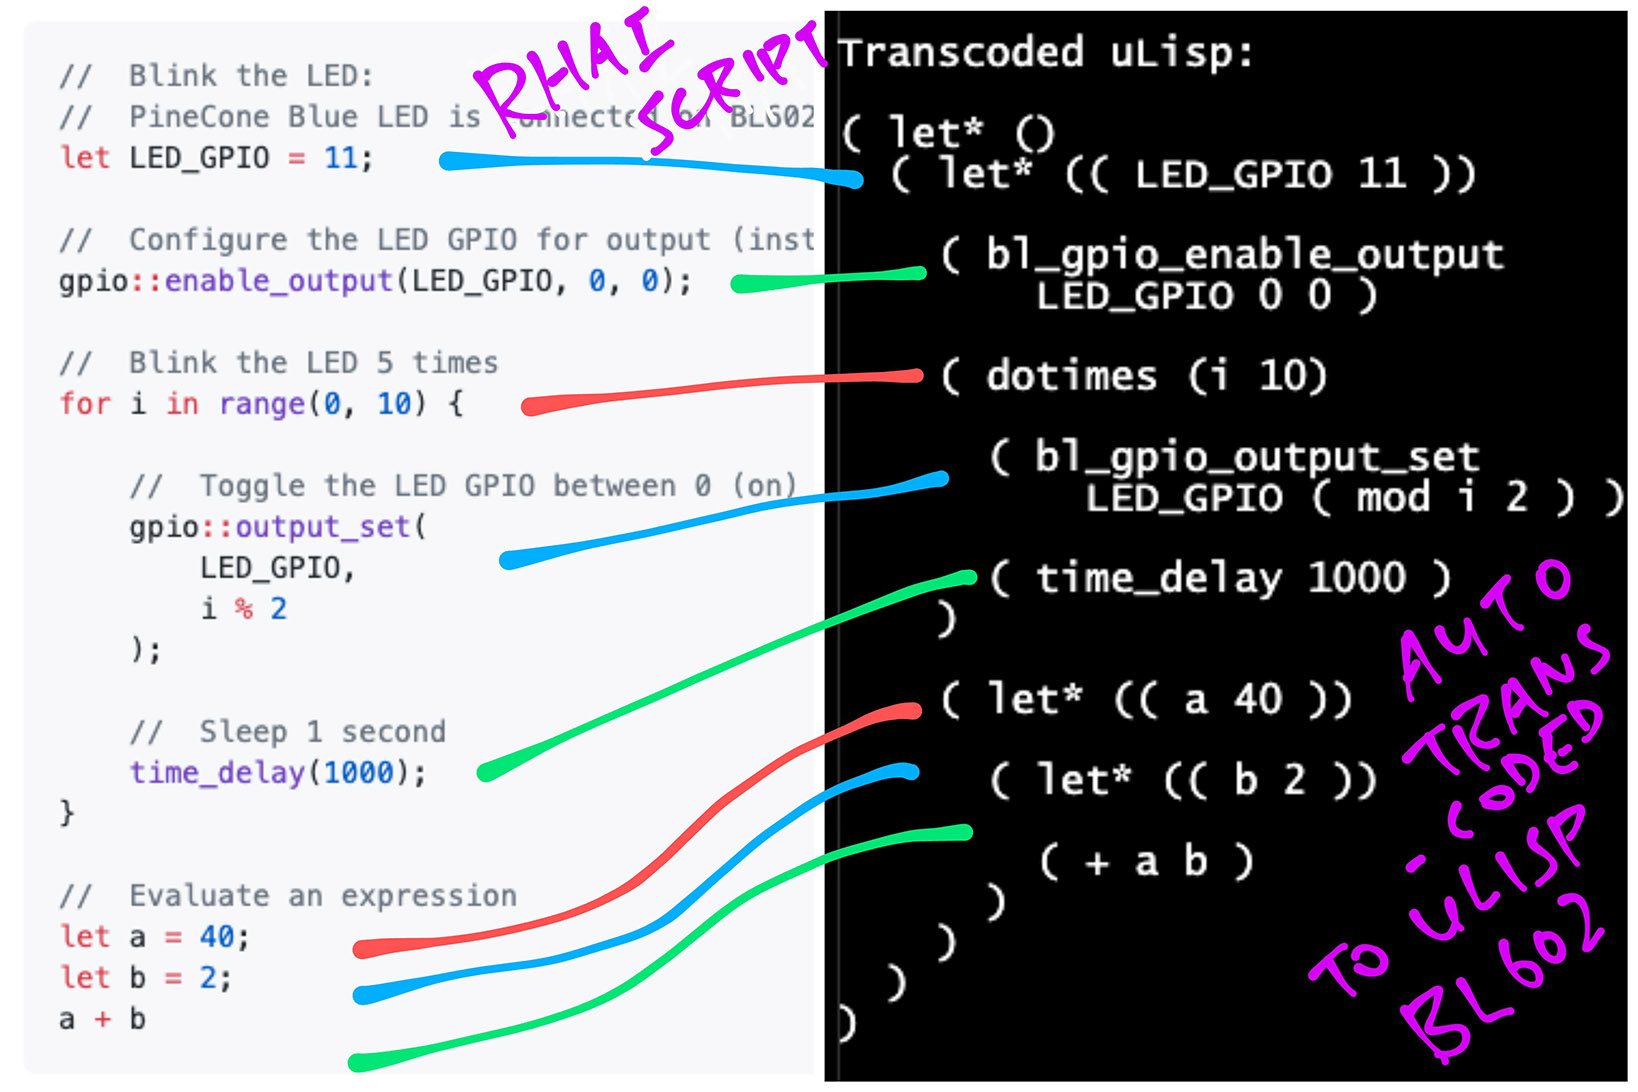
...Below is the kitchen-sink Rhai Script that will be converted to uLisp…
//  Rhai Script to be parsed
let script = r#"
  //  Rhai Loop and Conditional
  loop {
    let a = 1;
    print(a);
    if a == 1 { break; }
  }

  //  Rhai Blinky: Blink the LED connected on BL602 GPIO 11
  let LED_GPIO = 11;

  //  Configure the LED GPIO for output (instead of input)
  gpio::enable_output(LED_GPIO, 0, 0);

  //  Blink the LED 5 times
  for i in range(0, 10) {

    //  Toggle the LED GPIO between 0 (on) and 1 (off)
    gpio::output_set(
      LED_GPIO,
      i % 2
    );

    //  Sleep 1 second
    time_delay(1000);
  }

  //  Rhai Variables and Expression
  let a = 40;
  let b = 2;
  a + b
"#;
Now comes the interesting part: Rhai lets us compile our script into an Abstract Syntax Tree…
//  Compile the Rhai Script into
//  an Abstract Syntax Tree
let ast = engine.compile(script)
  .unwrap();
(More about the Abstract Syntax Tree in a while)
We may walk the Abstract Syntax Tree and convert each node to uLisp…
//  Transcode the Rhai Abstract
//  Syntax Tree to uLisp
transcode::transcode(&ast);
(More about transcode later)
FYI: This is how we evaluate the compiled Rhai Script…
//  Evaluate the compiled Rhai Script (returns 42)
let result: i32 = engine.eval_ast(&ast)
  .unwrap();
Let’s learn about the Abstract Syntax Tree…
What is an Abstract Syntax Tree?
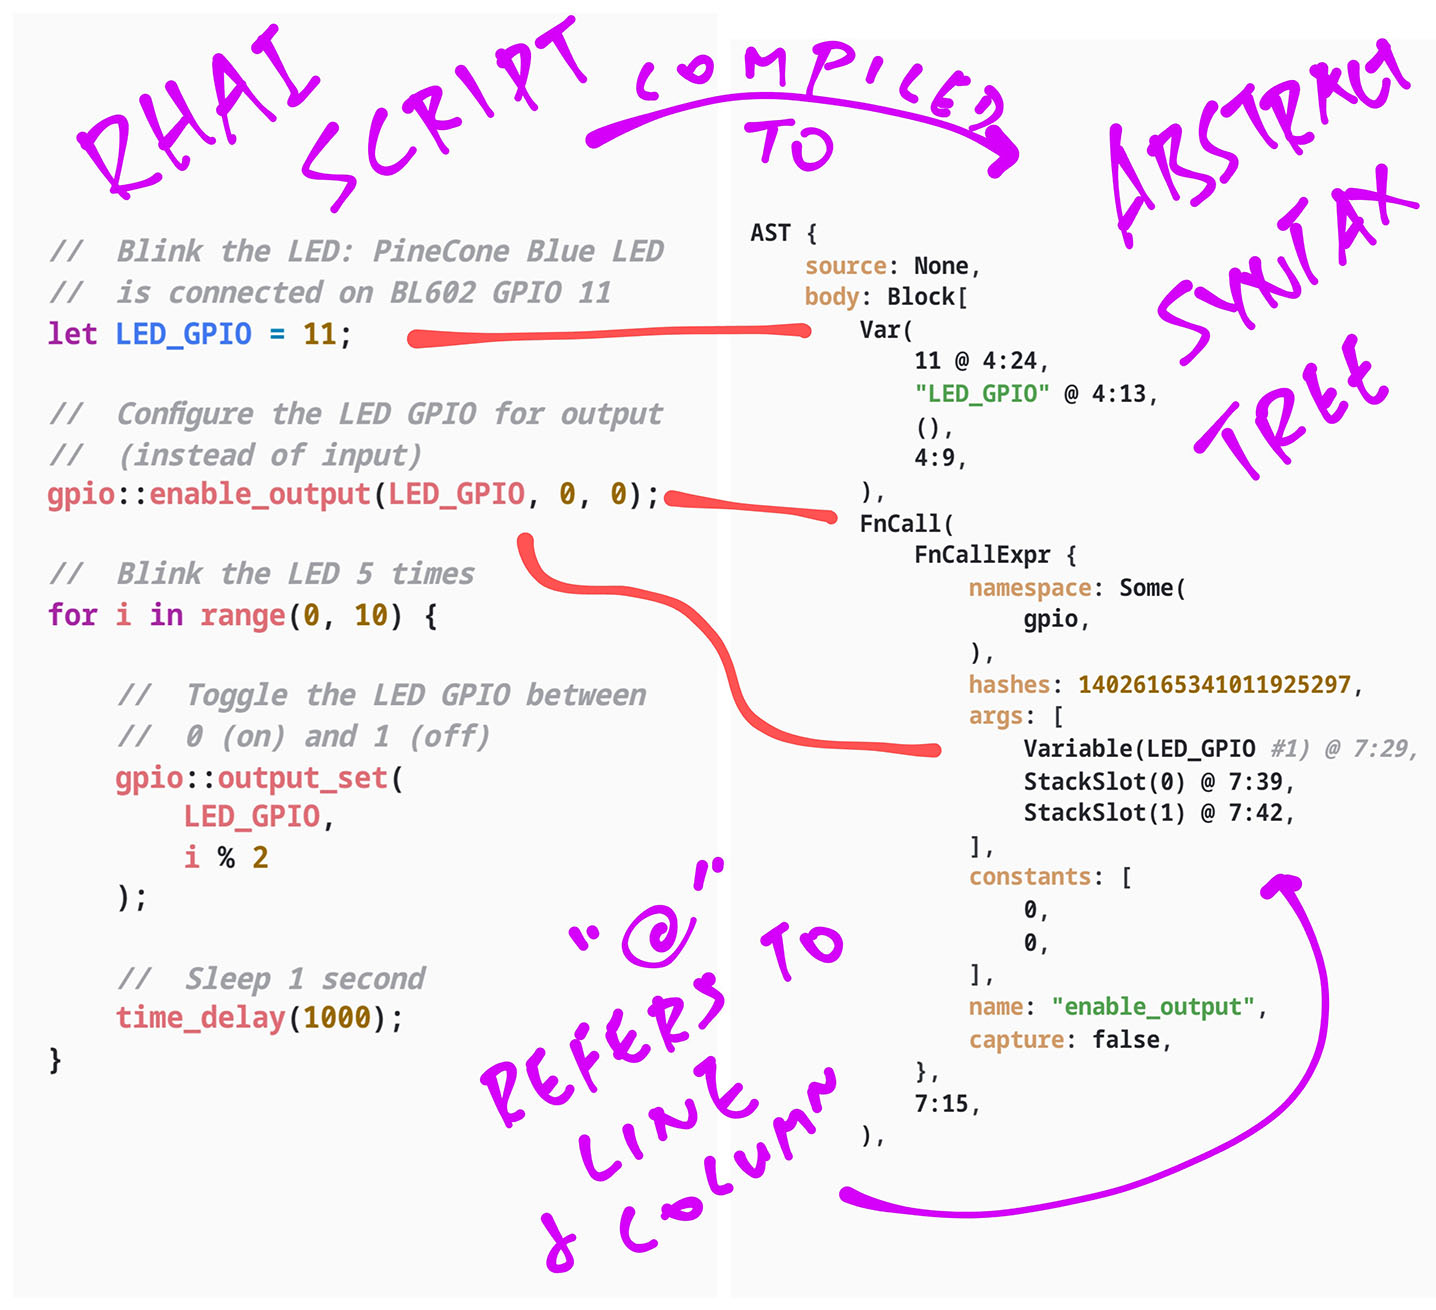
The Rhai Scripting Engine parses our Rhai Script and produces a tree of syntax elements… That’s the Abstract Syntax Tree.
This Rhai Script…
let LED_GPIO = 11;
gpio::enable_output(LED_GPIO, 0, 0);
Generates this Abstract Syntax Tree: bl602-script/lib.rs
Var(
  11 @ 11:24,
  "LED_GPIO" @ 11:13,
  (),
  11:9,
),
FnCall(
  FnCallExpr {
    namespace: Some(
      gpio,
    ),
    hashes: 12987214658708294900,
    args: [
      Variable(LED_GPIO #1) @ 14:29,
      StackSlot(0) @ 14:39,
      StackSlot(1) @ 14:42,
    ],
    constants: [
      0,
      0,
    ],
    name: "enable_output",
    capture: false,
  },
  14:15,
)(StackSlot refers to the values in the constants array)
Let’s match the two…
Yep Abstract Syntax Trees can get deeply nested, like this for loop…
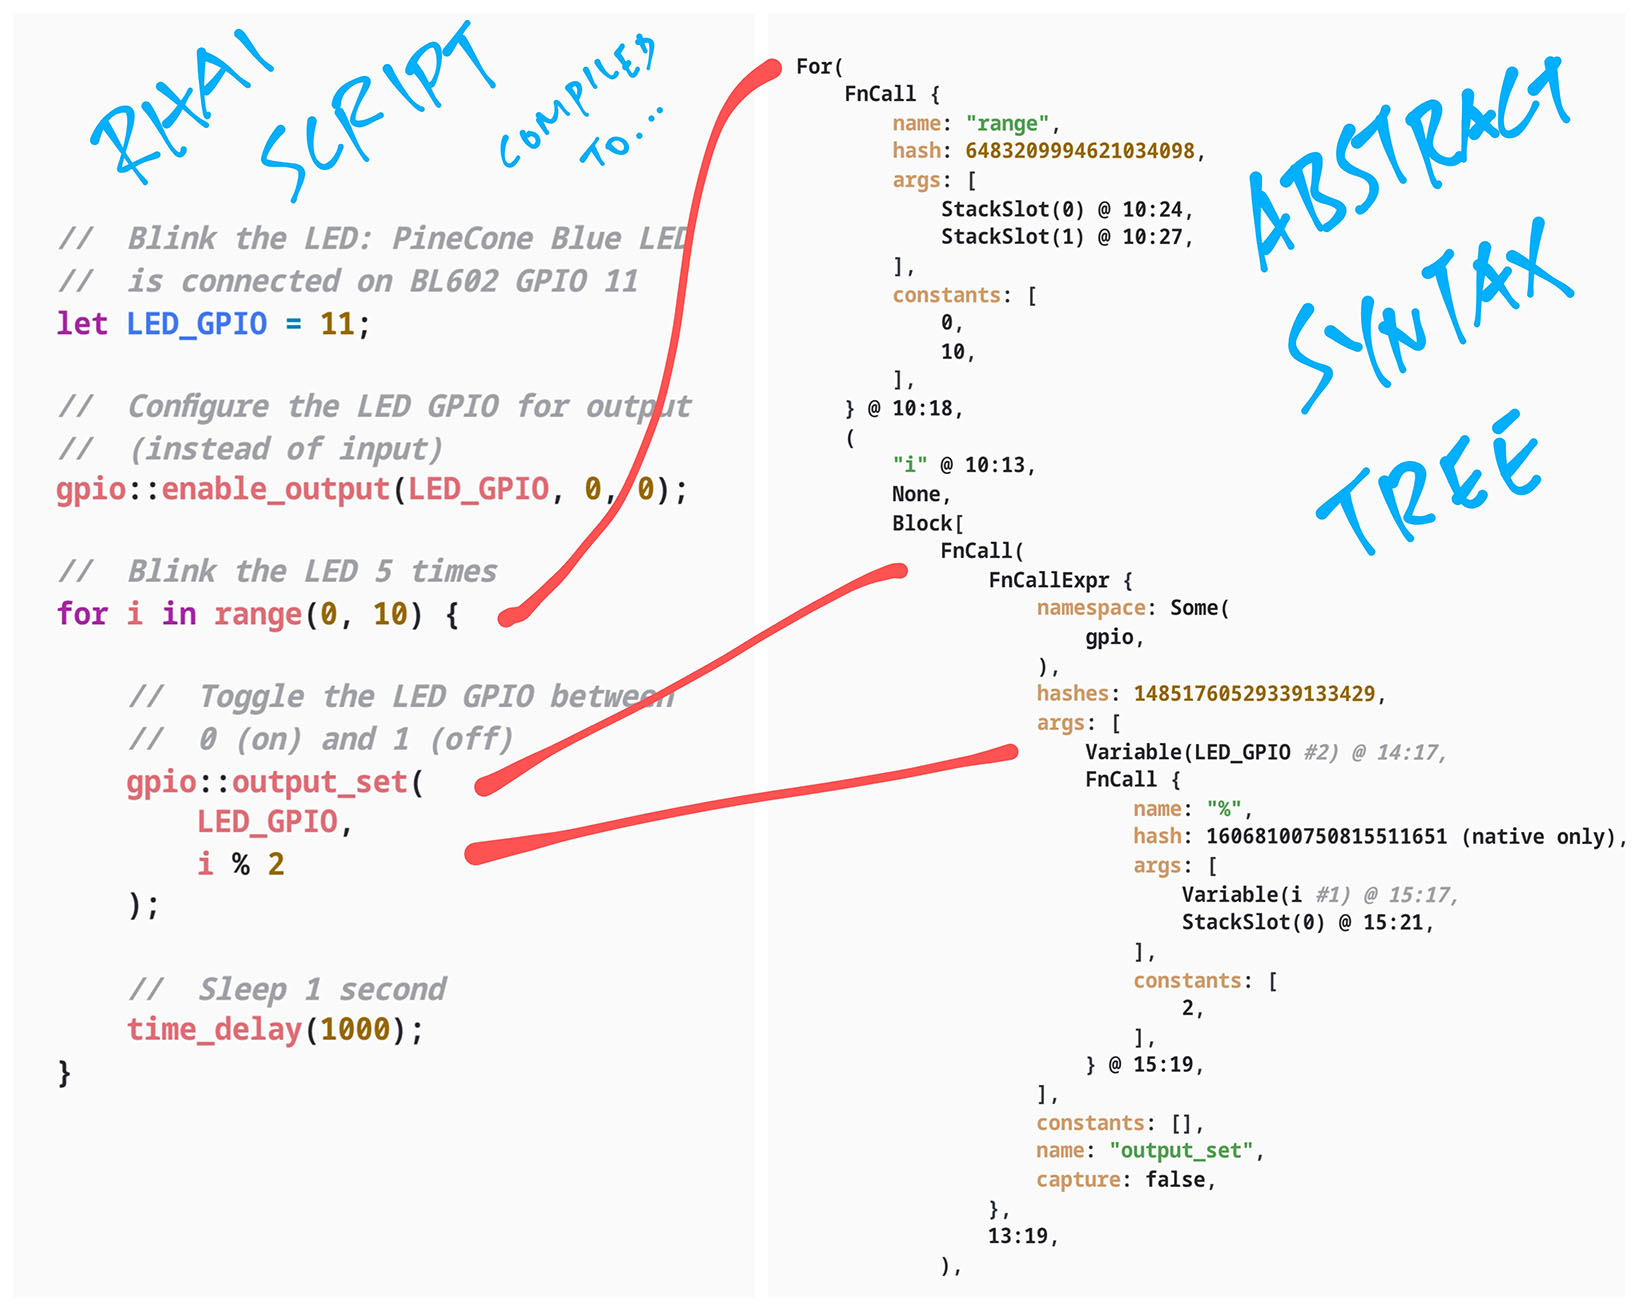
(See the complete Abstract Syntax Tree)
But Abstract Syntax Trees are actually perfect for converting Rhai to uLisp.
Lisp is a recursive language and the Lisp parentheses match the nodes in the Abstract Syntax Tree quite closely.
Let’s talk about the Rhai to uLisp conversion…
(More about Rhai Abstract Syntax Tree)
(Since we’re converting Rhai Code to uLisp Code, let’s call it “transcoding” instead of “transpiling”)
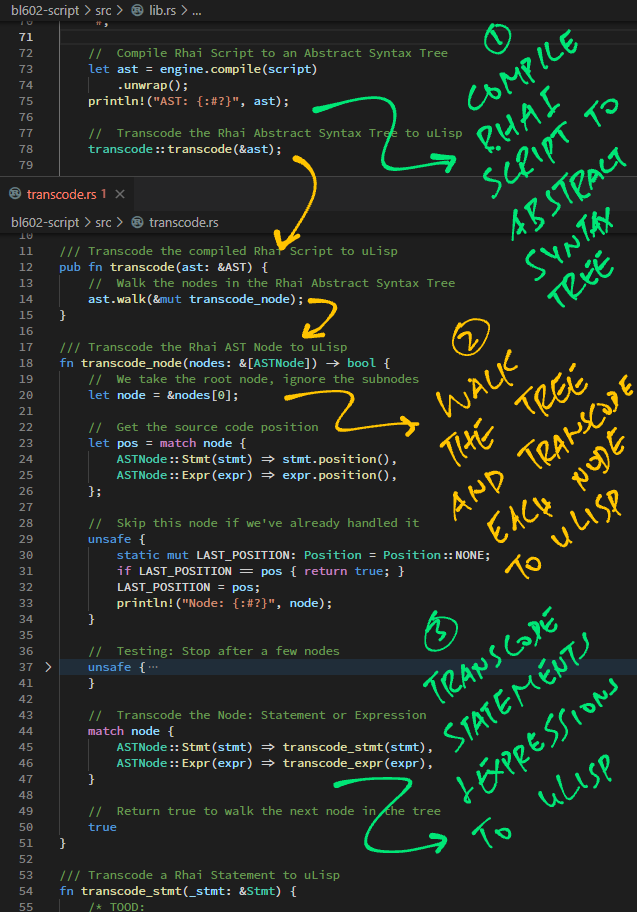
To transcode the compiled Rhai Code to uLisp, we walk the Abstract Syntax Tree and transcode each node to uLisp: bl602-script/transcode.rs
/// Transcode the compiled Rhai Script
/// (Abstract Syntax Tree) to uLisp
pub fn transcode(ast: &AST) -> String {
  //  Start the first uLisp Scope
  let scope_index = scope::begin_scope("let* ()");

  //  Walk the nodes in the Rhai Abstract Syntax Tree
  ast.walk(&mut transcode_node);

  //  End the first uLisp Scope and get the uLisp S-Expression for the scope
  let output = scope::end_scope(scope_index);

  //  Return the transcoded uLisp S-Expression
  output
}
(More about scope in a while)
ast.walk calls transcode_node to transcode each node in the Abstract Syntax Tree: transcode.rs
/// Transcode the Rhai AST Node to uLisp
fn transcode_node(nodes: &[ASTNode]) -> bool {
  //  We take the root node, ignore the subnodes
  let node = &nodes[0];

  //  Get the source code position
  let pos = match node {
    ASTNode::Stmt(stmt) => stmt.position(),
    ASTNode::Expr(expr) => expr.position(),
  };

  //  Skip this node if we've already handled it
  unsafe {
    static mut LAST_POSITION: Position = Position::NONE;
    if LAST_POSITION == pos { return true; }
    LAST_POSITION = pos;
  }

  //  Transcode the Node: Statement or Expression
  let output = match node {
    ASTNode::Stmt(stmt) => transcode_stmt(stmt),
    ASTNode::Expr(expr) => transcode_expr(expr),
  };

  //  Add the transcoded uLisp S-Expression to the current scope
  scope::add_to_scope(&output);

  //  Return true to walk the next node in the tree
  true
}
Each node is either a Rhai Statement or Expression. We call…
transcode_stmt to transcode a Rhai Statement
transcode_expr to transcode a Rhai Expression
Let’s look into each of these functions…
We start with the let Statement that declares a variable…
let LED_GPIO = 11This will be transcoded to uLisp like so…
( let*
  (( LED_GPIO 11 ))
  ...
)
Watch how we transcode the let Statement: transcode.rs
/// Transcode a Rhai Statement to uLisp
fn transcode_stmt(stmt: &Stmt) -> String {
  match stmt {
    //  Let or Const Statement: `let LED_GPIO = 11`
    Stmt::Var(expr, ident, _, _) => {
      //  Begin a new uLisp Scope
      scope::begin_scope(
        format!(
          "let* (( {} {} ))",    //  `let* (( LED_GPIO 11 ))`
          ident.name,            //  `LED_GPIO`
          transcode_expr(expr),  //  `11`
        ).as_str()
      );

      //  Scope will end when the parent scope ends
      "".to_string()
    }
Why do we need uLisp Scopes?
Hint: The transcoded uLisp will look like this…
( let*
  (( LED_GPIO 11 ))
  ...
)
Where “...” refers to the uLisp Scope of the statements that will be transcoded after the let statement.
(More about uLisp Scopes in a while)
Next: for Statements like this…
for i in range(0, 10) { ... }Shall be transcoded to uLisp like so…
( dotimes (i 10)
  ...
)
This is how we transcode the for Statement: transcode.rs
  match stmt {
    ...
    //  For Statement: `for i in range(0, 10) { ... }`
    Stmt::For(expr, id_counter, _) => {
      //  TODO: Support `for` counter
      let id    = &id_counter.0;  //  `i`
      let stmts = &id_counter.2;  //  `{ ... }`

      //  Get the `for` range, e.g. `[0, 10]`
      let range = get_range(expr);  //  `[0, 10]`
      let lower_limit = range[0];   //  `0`
      let upper_limit = range[1];   //  `10`
      assert!(lower_limit == 0);    //  TODO: Allow Lower Limit to be non-zero

      //  Begin a new uLisp Scope
      let scope_index = scope::begin_scope(
        format!(
          "dotimes ({} {})",  //  `dotimes (i 10)`
          id.name,            //  `i`
          upper_limit,        //  `10`
        ).as_str()
      );

      //  Transcode the Statement Block: `{ ... }`
      transcode_block(stmts);

      //  End the uLisp Scope and add the transcoded uLisp S-Expression to the parent scope
      scope::end_scope(scope_index)
    }
transcode_block transcodes the block of statements in the body of a for loop.
(Coming up in the next section)
get_range is defined here: transcode.rs
Function Calls are transcoded as a special kind of Expression: transcode.rs
  match stmt {
    ...
    //  Function Call: `gpio::enable_output(LED_GPIO, 0, 0)`
    Stmt::FnCall(expr, _) => format!(
      "{}",
      transcode_fncall(expr)
    ),
(We’ll meet transcode_fncall in a while)
Check out the source code to see how we transcode these statements…
Our transcoder calls transcode_block to transcode a block of statements (for, loop, if, …)
From transcode.rs …
/// Transcode the Statement Block and
/// the transcoded uLisp S-Expression
/// into the current scope
fn transcode_block(stmts: &StmtBlock) {
  //  Iterate through each Statement in the block...
  stmts.clone().statements_mut().iter().for_each(|stmt| {
    //  Transcode each Statement
    let output = transcode_stmt(stmt);

    //  Add the transcoded uLisp S-Expression to the current scope
    scope::add_to_scope(&output);
  });
}
This code transcodes every statement in the block.
transcode_expr transcodes an Expression from Rhai to uLisp: transcode.rs
/// Transcode a Rhai Expression to uLisp
fn transcode_expr(expr: &Expr) -> String {
  match expr {
    //  Integers become themselves, e.g. `1`
    Expr::IntegerConstant(i, _) => format!("{}", i),

    //  Variables become their names, e.g. `a`
    Expr::Variable(_, _, var) => format!("{}", var.2),

    //  Function Call: `gpio::enable_output(LED_GPIO, 0, 0)`
    Expr::FnCall(expr, _) => transcode_fncall(expr),

    _ => panic!("Unknown expr: {:#?}", expr)
  }
}
Which means that…
1 is transcoded as 1
a is transcoded as a
Now for Function Calls: We shall transcode…
gpio::enable_output(LED_GPIO, 0, 0)To…
( bl_gpio_enable_output LED_GPIO 0 0 )Here’s how: transcode.rs
/// Transcode a Rhai Function Call to uLisp:
/// `gpio::enable_output(LED_GPIO, 0, 0)`
fn transcode_fncall(expr: &FnCallExpr) -> String {
  //  Compose namespace e.g. `bl_gpio_` or ``
  let namespace = match &expr.namespace {
    Some(ns) => format!("bl_{:#?}_", ns),  //  TODO
    None => "".to_string()
  };
transcode_fncall begins by converting the Rhai Namespace (like “gpio::”) to its uLisp equivalent (like “bl_gpio_”)
Next it composes the list of arguments for the function call…
  //  Compose arguments e.g. `LED_GPIO 0 0 `
  let args = expr.args.iter().map(|arg| {
    //  Transcode each argument
    let val = match arg {
      //  Transcode a StackSlot by looking up the constants
      Expr::Stack(i, _) => format!("{}", expr.constants[*i]),

      //  Transcode other expressions
      _ => transcode_expr(&arg)
    };
    val + " "
  });
And concatenates everything into a uLisp Function Call…
  //  Transcode to uLisp Function Call:
  //  `( bl_gpio_enable_output LED_GPIO 0 0 )`
  format!(
    "( {}{} {})",
    namespace,                             //  `bl_gpio_` or ``
    rename_function(&expr.name.as_str()),  //  `enable_output`, `+` or `mod`
    args.collect::<String>()               //  `LED_GPIO 0 0 `
  )
}
What’s rename_function?
Rhai Operators are parsed as Function Calls…
“a % b” is represented in the Abstract Syntax Tree as “% (a, b)”
We call rename_function to convert the Rhai Operator to its uLisp equivalent: transcode.rs
/// Rename a Rhai Function or Operator Name to uLisp:
/// `%` becomes `mod`, `==` becomes `eq`
fn rename_function(name: &str) -> String {
  match name {
    "%"  => "mod",  //  `%` becomes `mod`
    "==" => "eq",   //  `==` becomes `eq`
    _    => name    //  Else pass through
  }.to_string()
}
This means that “a % b” in Rhai is rewritten as “( mod a b )” in uLisp.
(More about Rhai Function Calls)
Why do we need uLisp Scopes when transcoding Rhai to uLisp?
Watch what happens when we transcode Rhai to uLisp without using scopes…
We see that the transcoded uLisp code ought to be nested inside each other.
To fix this we introduce uLisp Scopes: bl602-script/scope.rs
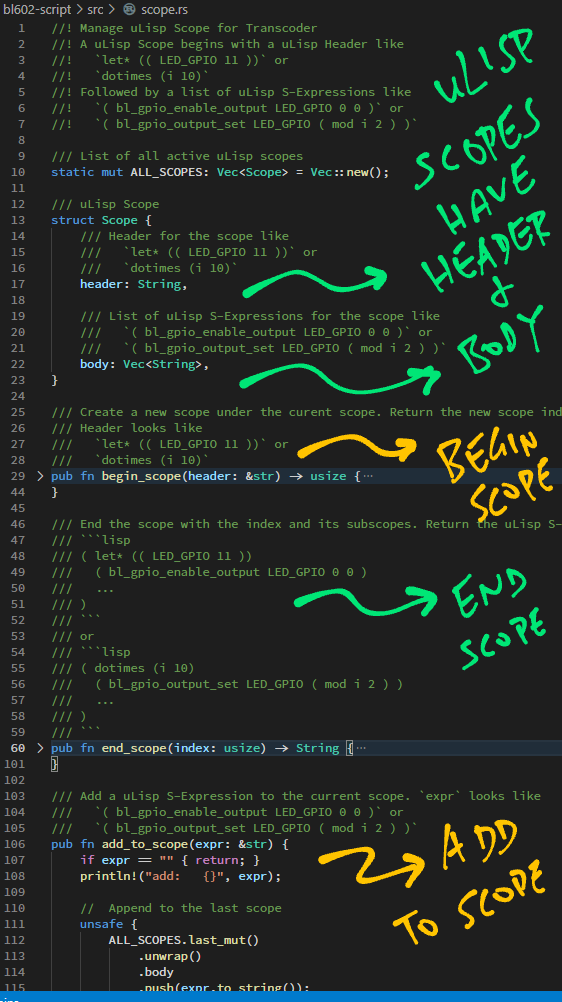
With uLisp Scopes, our transcoded uLisp code becomes correctly nested…
Remember our kitchen-sink Rhai Script from earlier?
Below is the uLisp Code generated by our Rhai Transcoder: bl602-script/lib.rs
( let* ()
  ( loop
    ( let* (( a 1 ))
      ( print a )
      ( if ( eq a 1 )
        ( return )
      )
    )
  )
  ( let* (( LED_GPIO 11 ))
    ( bl_gpio_enable_output LED_GPIO 0 0 )
    ( dotimes (i 10)
      ( bl_gpio_output_set LED_GPIO ( mod i 2 ) )
      ( time_delay 1000 )
    )
    ( let* (( a 40 ))
      ( let* (( b 2 ))
        ( + a b )
      )
    )
  )
)
Yep it looks like proper uLisp!
Just that we need to define these BL602 Functions in uLisp…
bl_gpio_enable_output: Configure a GPIO Pin for output
bl_gpio_output_set: Set the output value of a GPIO Pin
time_delay: Delay for a specified number of milliseconds
Fortunately uLisp lets us extend its interpreter by adding the above functions in C.
(Details in the Appendix)
And the output from our Rhai Transcoder runs OK on uLisp!
We wrap up today’s show-and-tell… With some Drag-and-Drop Rhai Scripting in your Web Browser!
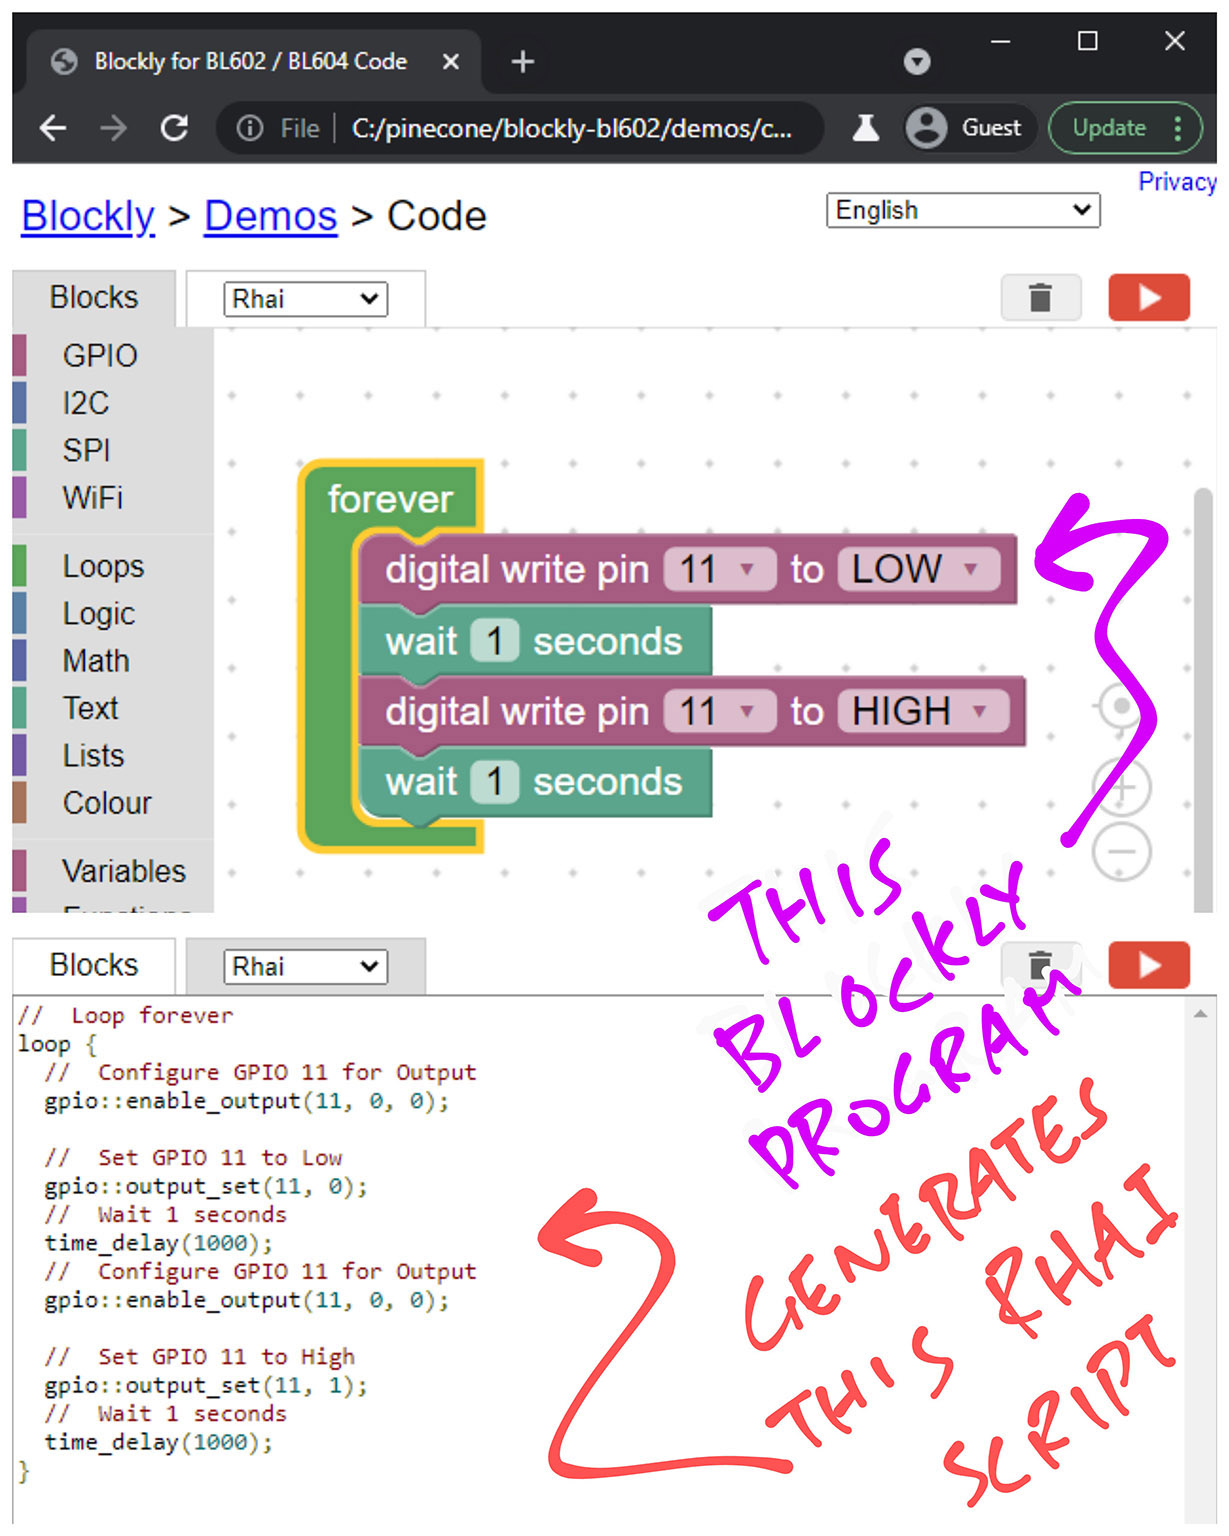
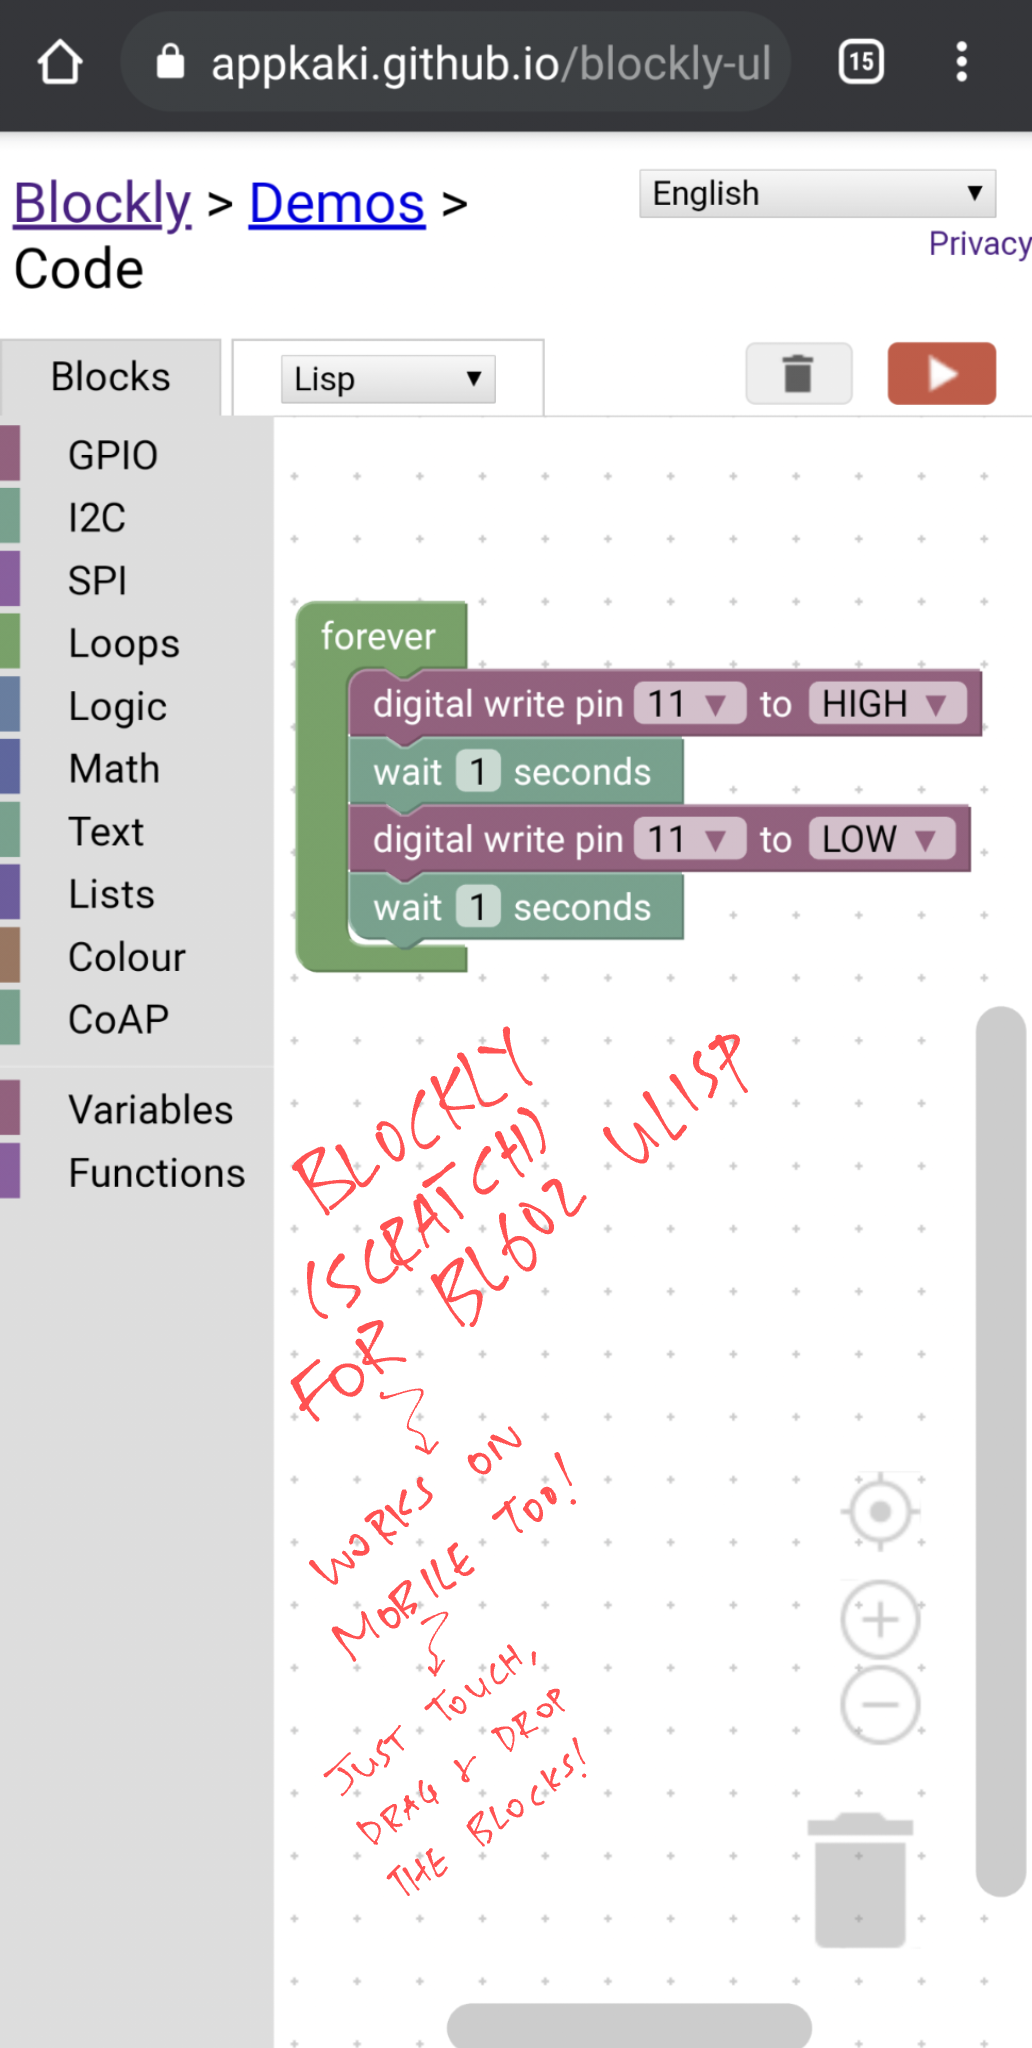
Click this link to run the customised Blockly Web Editor…
This link points to plain HTML and JavaScript, no server-side code.
Drag and drop the blocks to create a program that blinks the LED…
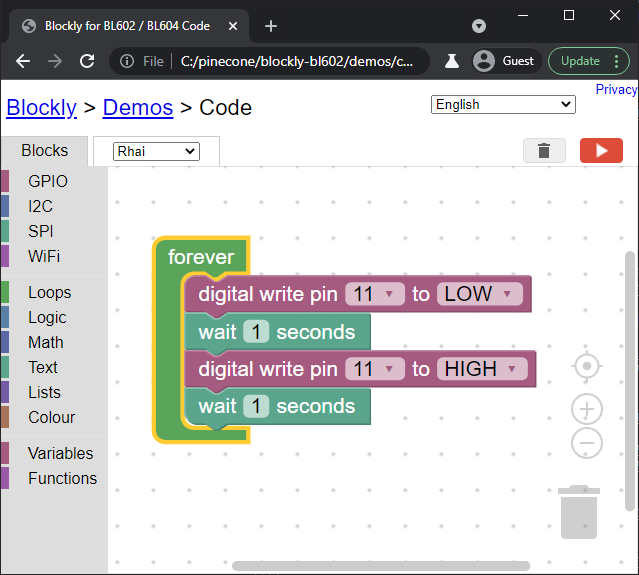
forever comes from Loops in the left bar
digital write comes from GPIO in the left bar
wait comes from Loops in the left bar
Update the block settings for the digital write and wait blocks
(See pic above)
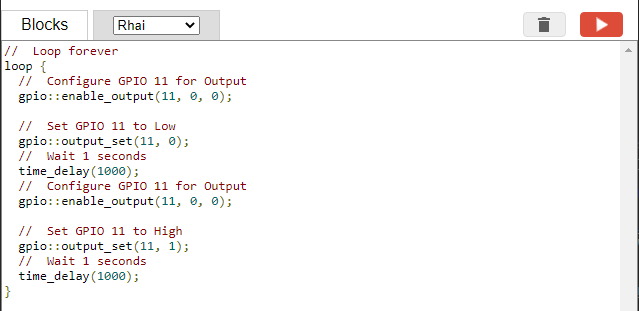
Click the Rhai tab at the top.
We should see this Rhai Script generated by Blockly…
//  Loop forever
loop {
    //  Configure GPIO 11 for Output
    gpio::enable_output(11, 0, 0);

    //  Set GPIO 11 to Low
    gpio::output_set(11, 0);

    //  Wait 1 second
    time_delay(1000);

    //  Configure GPIO 11 for Output
    gpio::enable_output(11, 0, 0);

    //  Set GPIO 11 to High
    gpio::output_set(11, 1);

    //  Wait 1 second
    time_delay(1000);
}
(Yeah the Rhai code generator needs improving)
How did we do this?
We customised Blockly for Rhai and BL602 by…
Adding Custom Blocks like forever, digital write and wait
Creating a Code Generator that generates Rhai code
Eventually we shall…
Run the generated Rhai code in the Web Browser with our BL602 WebAssembly Simulator
Transcode Rhai to uLisp by calling our Rhai-To-uLisp Transcoder in WebAssembly
Transfer the uLisp code to BL602 and run it via the Web Serial API
(More details in the Appendix)
Today we have explored the Bestest Outcome for learners to code and test Rhai Scripts on BL602 and BL604…
Soon we shall test all this on PineDio Stack BL604 with LoRa SX1262… As we explore whether it’s feasible to teach Rhai (and Rust) as a Safer Way to create firmware for BL602 and BL604.
Many Thanks to my GitHub Sponsors for supporting my work! This article wouldn’t have been possible without your support.
Got a question, comment or suggestion? Create an Issue or submit a Pull Request here…
This article is the expanded version of this Twitter Thread
In our Rhai Script, why did we write…
let LED_GPIO = 11;Instead of this?
const LED_GPIO = 11;Because I’m targeting Rhai Scripting for learners who are new to coding microcontrollers.
I’m pondering whether we should teach them let vs const. Or maybe start with let and teach const later?
schungx has an excellent suggestion about creating a minimal Rhai Scripting Language for learners…
For a minimal language you might also want to disable keywords like continue, break, switch, while, do etc. and especially eval if you don’t intend your users to touch them yet… since they would also need to be transcoded into uLisp
What happens when we run the Rhai Scripting Engine on BL602 (configured for the smallest feature set)?
It seems to crash with a Stack Overflow. (See this)
We’ll try LTO Optimisation to reduce the size of the Rust binaries.
It’s possible that the default FreeRTOS configuration on BL602 severely limits the usable Stack Space. (Sadly I’m no expert in FreeRTOS though)
There’s a minor quirk when building Rhai with AST support on WebAssembly (since we’re running our Rhai Transcoder on WebAssembly)…
unresolved import `ast::FloatWrapper`
--> rhai-1.0.2/src/lib.rs:230:44
To run the transcoded uLisp, we need to define these BL602 Functions in uLisp…
bl_gpio_enable_output: Configure a GPIO Pin for output
bl_gpio_output_set: Set the output value of a GPIO Pin
time_delay: Delay for a specified number of milliseconds
This is how we extend the uLisp Interpreter by adding the above functions in C…
First we define the uLisp Shim Function in C: ulisp.c
//  Expose the C function `bl_gpio_enable_output` to uLisp:
//  `int bl_gpio_enable_output(uint8_t pin, uint8_t pullup, uint8_t pulldown)`
object *fn_bl_gpio_enable_output(object *args, object *env) {
  //  Fetch the `pin` parameter from uLisp
  assert(args != NULL);
  int pin = checkinteger(BL_GPIO_ENABLE_OUTPUT, car(args));
  args = cdr(args);

  //  Fetch the `pullup` parameter from uLisp
  assert(args != NULL);
  int pullup = checkinteger(BL_GPIO_ENABLE_OUTPUT, car(args));
  args = cdr(args);

  //  Fetch the `pulldown` parameter from uLisp
  assert(args != NULL);
  int pulldown = checkinteger(BL_GPIO_ENABLE_OUTPUT, car(args));
  args = cdr(args);

  //  No more parameters
  assert(args == NULL);
  printf("bl_gpio_enable_output: pin=%d, pullup=%d, pulldown=%d\r\n", pin, pullup, pulldown);

  //  Call the C function `bl_gpio_enable_output`
  int result = bl_gpio_enable_output(pin, pullup, pulldown);

  //  Return the result to uLisp
  //  TODO: Throw an exception if the result is non-zero
  return number(result);
}
Next we extend the Function Enum: ulisp.c
enum function {
  ...
  //  Begin User Functions
  BL_GPIO_ENABLE_OUTPUT,
  BL_GPIO_OUTPUT_SET,
  TIME_DELAY,
  //  End User Functions
Then we define the uLisp Function Name: ulisp.c
// Insert your own function names here
const char str_bl_gpio_enable_output[] PROGMEM = "bl_gpio_enable_output";
const char str_bl_gpio_output_set[]    PROGMEM = "bl_gpio_output_set";
const char str_time_delay[]            PROGMEM = "time_delay";
Finally we add the uLisp Shim Function to the Symbol Lookup Table: ulisp.c
// Built-in symbol lookup table
const tbl_entry_t lookup_table[] PROGMEM = {
  ...
  // Insert your own table entries here
  { str_bl_gpio_enable_output, fn_bl_gpio_enable_output, 0x33 },
  { str_bl_gpio_output_set,    fn_bl_gpio_output_set,    0x22 },
  { str_time_delay,            fn_time_delay,            0x11 },
What is 0x33?
0x33 means that our uLisp Function accepts
Minimum of 3 parameters, and
Maximum of 3 parameters
How did we customise Blockly for Rhai and BL602?
We added Custom Blocks like forever, digital write and wait
We created a Code Generator that generates Rhai code.
Eventually we shall..
Run the generated Rhai code in the Web Browser with our BL602 WebAssembly Simulator
Transcode Rhai to uLisp in Blockly by calling our Rhai-to-uLisp Transcoder
Transfer the uLisp code to BL602 and run it via the Web Serial API
Which Blockly source files were modified?
We modified these Blockly source files to load the Custom Blocks and generate Rhai code…
This is the HTML source file for the Blockly Web Editor. (See pic above)
This is the main JavaScript source file for the Blockly Web Editor.
How did we create the Custom Blocks?
We used the Block Exporter from Blockly to create the Custom Blocks…
With Block Explorer and the Custom Blocks XML file, we generated this JavaScript file containing our Custom Blocks…
Block Exporter and Custom Blocks are explained here…
Can we do this through a Desktop App? (Instead of Web Browser)
Possibly, if we wrap the Web Browser Interface into a Desktop App with Tauri.
Does Blockly work on Mobile Web Browsers?
Yes but the Web Serial API won’t work for transferring the generated uLisp code to BL602. (Because we can’t connect BL602 as a USB Serial device)
In future we could use the Web Bluetooth API instead to transfer the uLisp code to BL602. (Since BL602 supports Bluetooth LE)
This is how it looks on a Mobile Web Browser (from our earlier Blockly uLisp project)…
What were we thinking when we designed the Custom Blocks: forever, on_start, digital write, wait, …
The custom blocks were inspired by MakeCode for BBC micro:bit…
How did we generate Rhai code in Blockly?
We created Code Generators for Rhai. Our Code Generators are JavaScript Functions that emit Rhai code for each type of Block…
We started by copying the Code Generators from Dart to Rhai into this Blockly folder…
Then we added this Code Generator Interface for Rhai…
Which Blocks are supported by the Rhai Code Generator?
The Rhai Code Generator is incomplete.
The only Blocks supported are…
forever (See this)
wait (See this)
digital write (See this)
How do we define a Rhai Code Generator?
We define the forever Code Generator like so: rhai_functions.js
//  Emit Rhai code for the "forever" block.
//  Inspired by MakeCode "forever" and Arduino "loop".
Blockly.Rhai['forever'] = function(block) {
  var statements_stmts = Blockly.Rhai.statementToCode(block, 'STMTS');
  var code = statements_stmts;
  code = [
    `//  Loop forever`,
    `loop {`,
    code + `}`,
  ].join('\n');
  return code;
};
This JavaScript function emits a Rhai loop that wraps the code inside the forever block like so…
//  Loop forever
loop {
    ...Code inside the loop block...
}
And below is the digital write Code Generator: rhai_functions.js
//  Emit Rhai code for the "digtial write" block.
Blockly.Rhai['digital_write_pin'] = function(block) {
  var dropdown_pin = block.getFieldValue('PIN');
  var dropdown_value = block.getFieldValue('VALUE');
  //  TODO: Call gpio::enable_output only once
  var code = [
    `//  Configure GPIO ${dropdown_pin} for Output`,
    `gpio::enable_output(${dropdown_pin}, 0, 0);`,
    ``,
    `//  Set GPIO ${dropdown_pin} to ${dropdown_value == 0 ? 'Low' : 'High' }`,
    `gpio::output_set(${dropdown_pin}, ${dropdown_value});`,
    ``
  ].join('\n');
  return code;
};
This JavaScript function emits Rhai code that sets the GPIO Pin mode and output value like so…
//  Configure GPIO 11 for Output
gpio::enable_output(11, 0, 0);

//  Set GPIO 11 to High
gpio::output_set(11, 1);
What about the missing Rhai Code Generators?
If the Community could help to fill in the missing Rhai Code Generators… That would be incredibly awesome! 🙏 👍 😀