
📝 28 Nov 2022
This article explains how I prepared my Pull Requests for submission to Apache NuttX RTOS. So if we’re contributing code to NuttX, just follow these steps and things will (probably) go Hunky Dory!
(Like the fish)
Before we begin, please swim over to the official Development Workflow for NuttX…
Ready? Let’s dive in! (Like the fish)
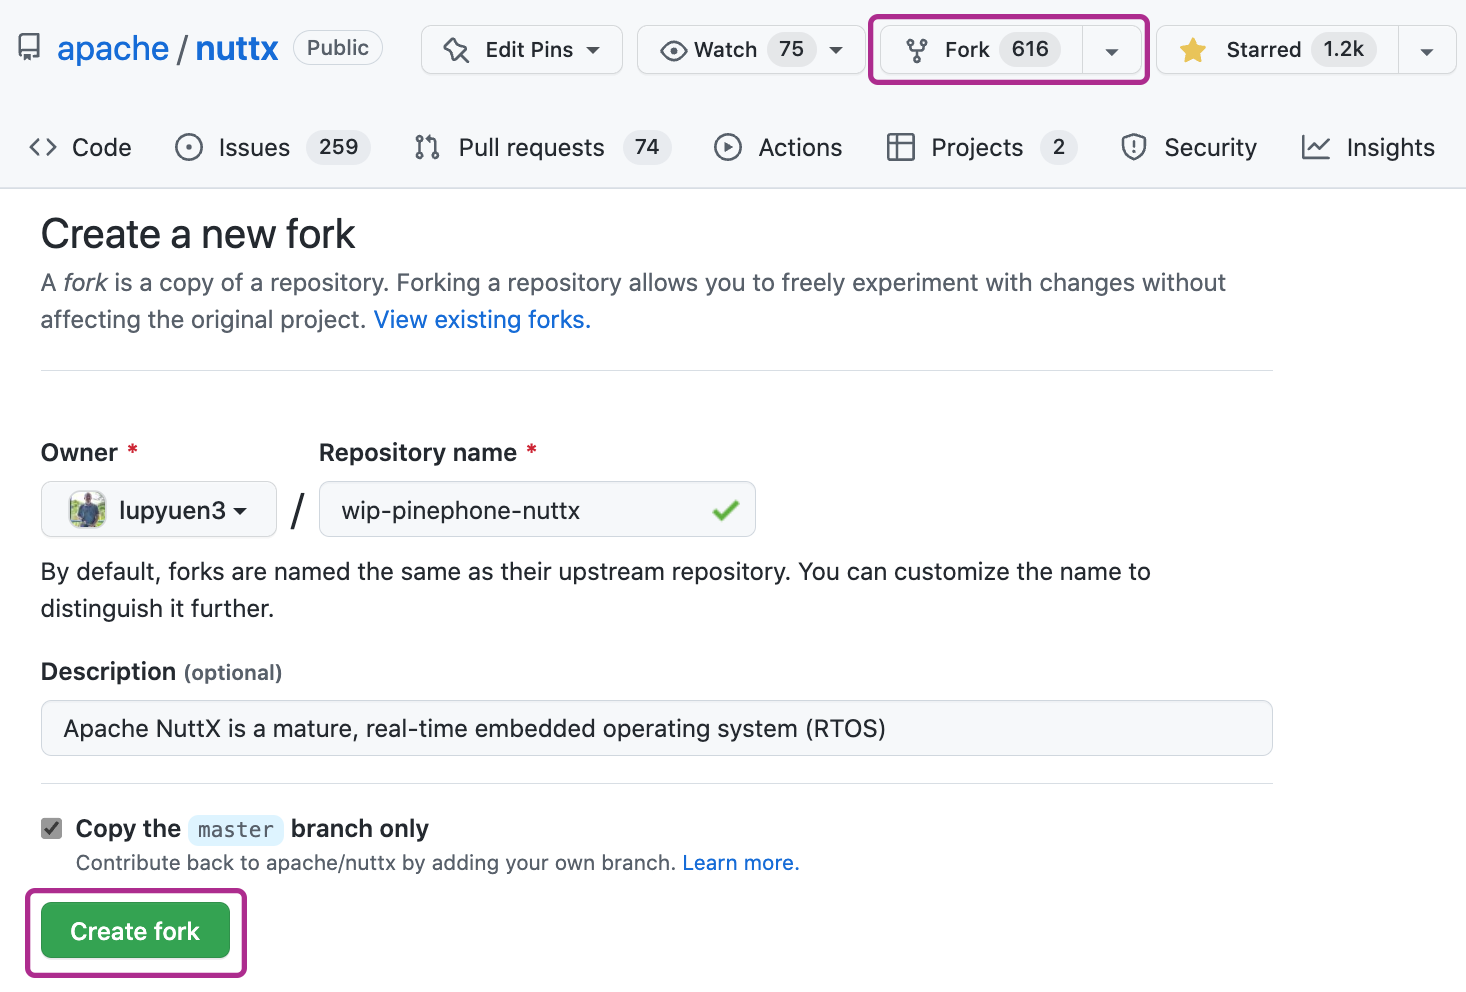
We begin by creating our forks for the nuttx and apps repositories…
Browse to NuttX Repository…
Click “Fork” to create our fork. (Pic above)
Click “Actions” and enable workflows…

(This will check that our code compiles OK at every commit)
Do the same for the NuttX Apps Repository…
Click “Fork” to create our fork.
Click “Actions” and enable workflows.
As a principle, let’s keep our master branch always in sync with the NuttX Mainline master branch.
(This seems cleaner for syncing upstream updates into our repo)
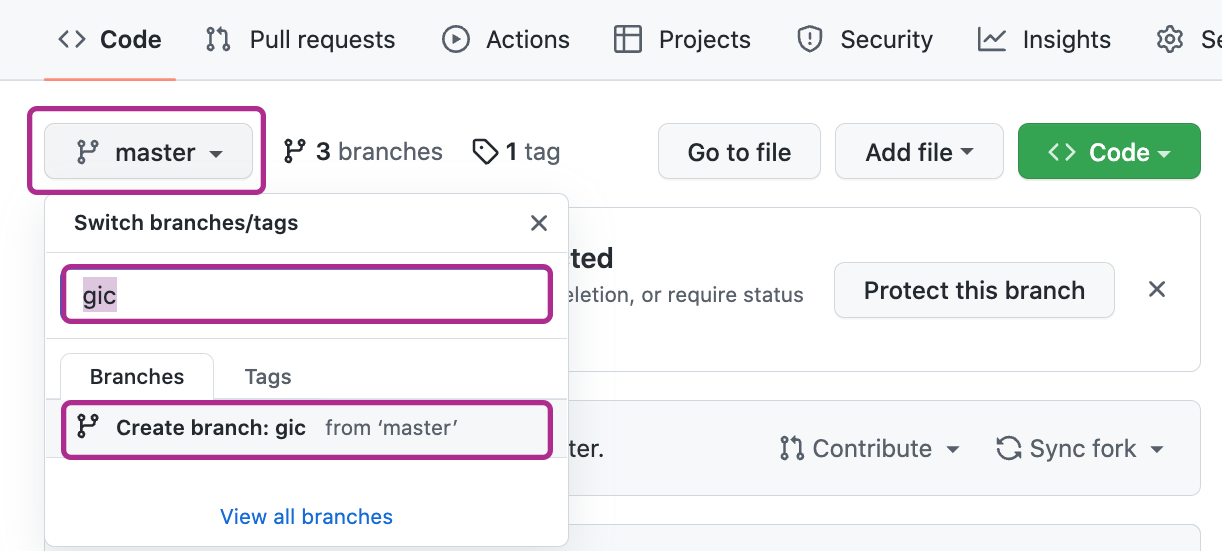
Let’s create a branch to make our changes…
In our NuttX Repository, click master.
Enter the name of our new branch.
Click “Create Branch”
Do the same for our NuttX Apps Repository
(Because we should sync nuttx and apps too)
Download the new branches of our nuttx and apps repositories…
## Download the "gic" branch of "lupyuen2/wip-nuttx"
## TODO: Change the branch name and repo URLs
mkdir nuttx
cd nuttx
git clone \
  --branch gic \
  https://github.com/lupyuen2/wip-nuttx \
  nuttx
git clone \
  --branch gic \
  https://github.com/lupyuen2/wip-nuttx-apps \
appsWe’re ready to code!
Consider breaking our Pull Request into Smaller Pull Requests.
This Pull Request implements One Single Feature (Generic Interrupt Controller)…
“arch/arm64: Add support for Generic Interrupt Controller Version 2”
That’s called by another Pull Request…
“arch/arm64: Add support for PINE64 PinePhone”
Adding a NuttX Arch (SoC) and Board might need 3 Pull Requests (or more)…
Modify the code in nuttx and apps to implement our awesome new feature.
Build and test the modified code.
Capture the Output Log and save it as a GitHub Gist…
“NuttX QEMU Log for Generic Interrupt Controller”
We’ll add this to our Pull Request. Test Logs are super helpful for NuttX Maintainers!
(Because we can’t tell which way the train went… Unless we have the Test Logs!)
Commit the modified code to our repositories.
Sometimes the GitHub Actions Workflow will fail with a strange error (like below). Just re-run the failed jobs. (Like this)
Error response from daemon:
login attempt to https://ghcr.io/v2/
failed with status: 503 Service Unavailable"Will our modified code break other parts of NuttX?
That’s why it’s good to run a Regression Test (if feasible) to be sure that other parts of NuttX aren’t affected by our modified code.
For our Pull Request…
We tested with QEMU Emulator our new implementation of Generic Interrupt Controller v2…
tools/configure.sh qemu-armv8a:nsh_gicv2 ; make ; qemu-system-aarch64 ...And for Regression Testing we tested the existing implementation of Generic Interrupt Controller v3…
tools/configure.sh qemu-armv8a:nsh ; make ; qemu-system-aarch64 ...Remember to capture the Output Log, we’ll add it to our Pull Request.
(Yeah it will be hard to run a Regression Test if it requires hardware that we don’t have)
Please update the Documentation. The Documentation might be in a Text File…
Or in the Official NuttX Docs…
To update the Official NuttX Docs, follow the instructions here…
For macOS: We may need to use “brew install pipenv” instead of “pip install pipenv”. And we may need “pip install setuptools” to fix “No module named pkg_resources”…
## Build NuttX Docs on macOS
cd nuttx/Documentation
brew install pipenv
pipenv install
pipenv shell
pip install setuptools
rm -r _build
make html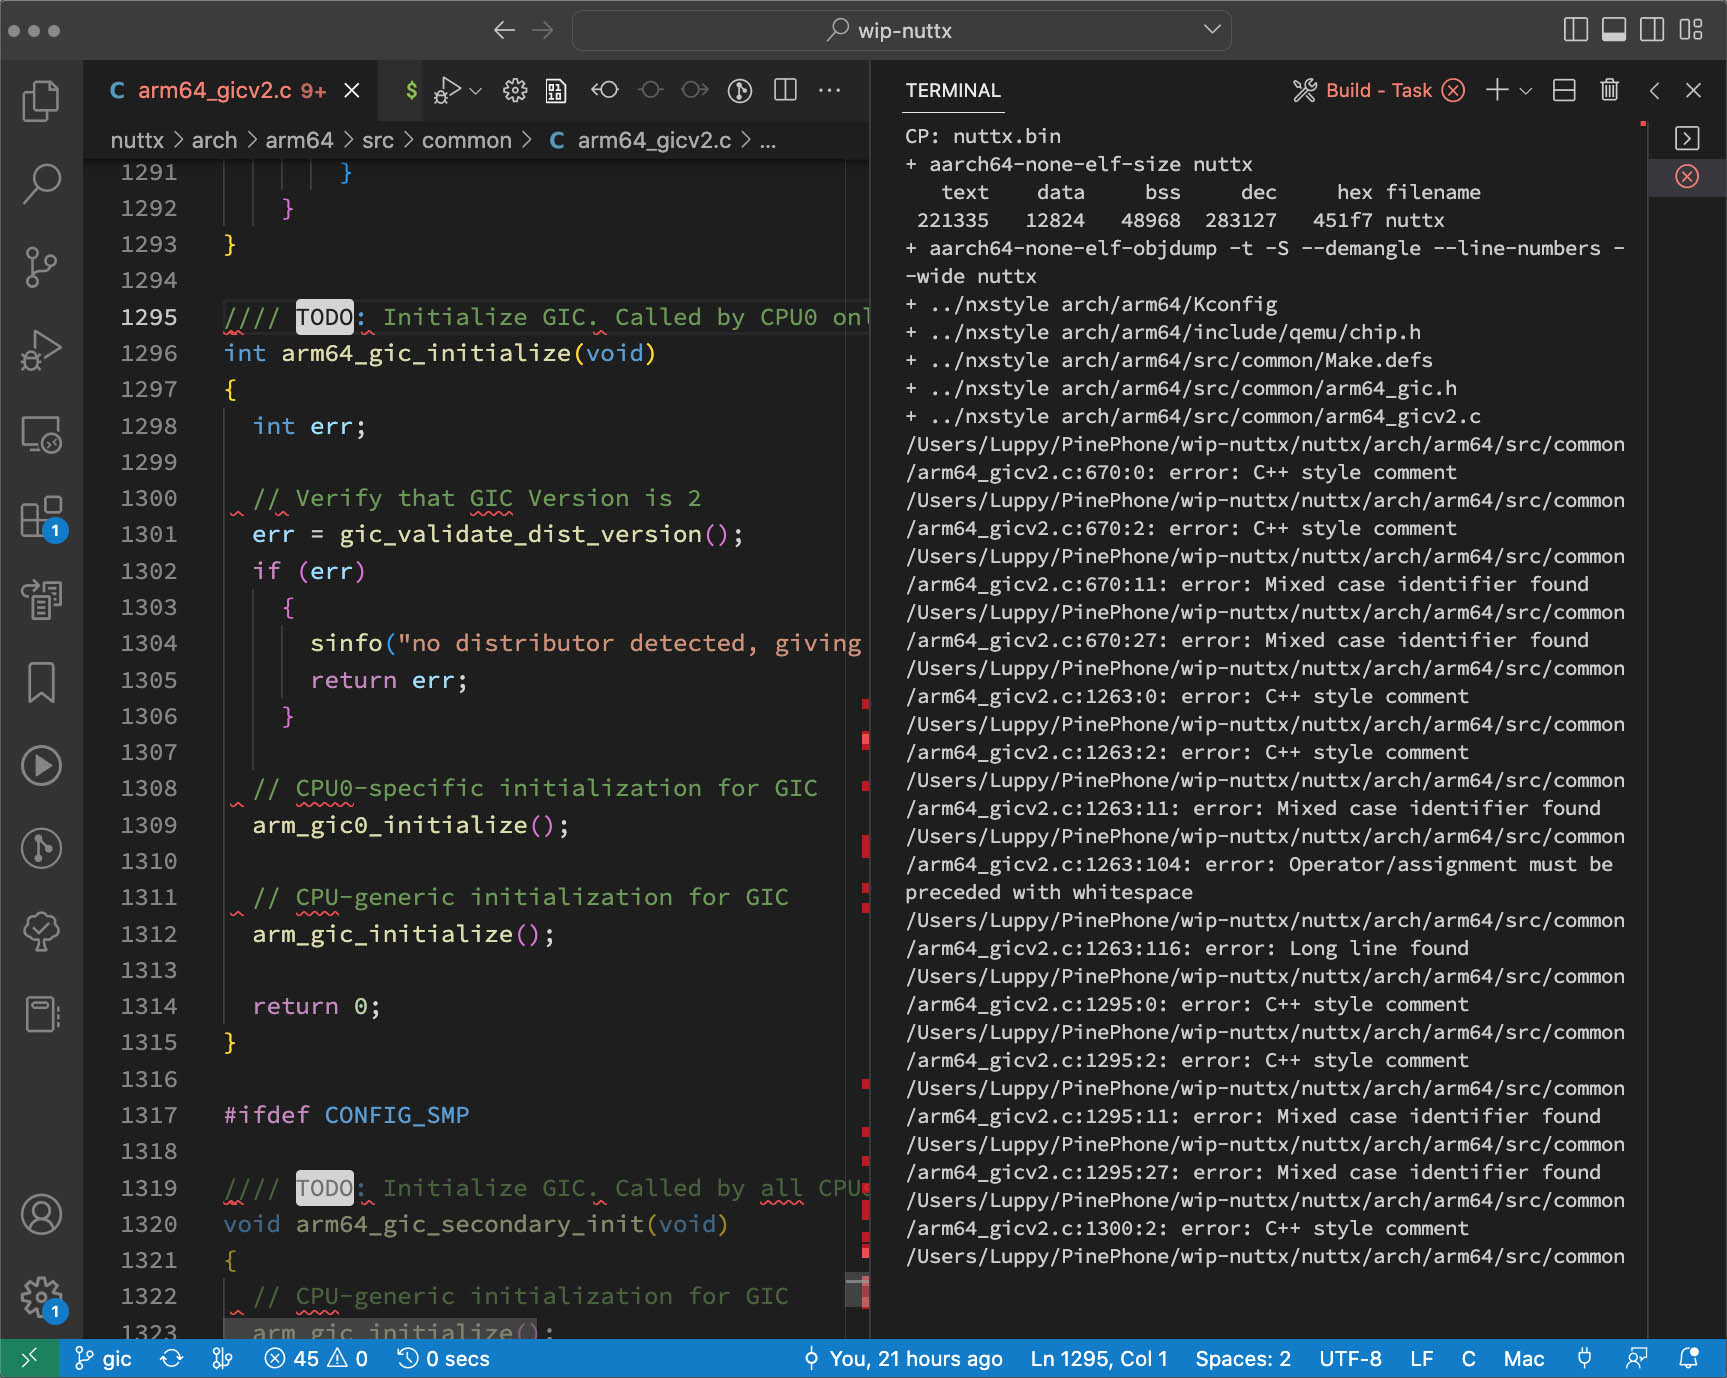
Our NuttX Code will follow this Coding Standard…
NuttX provides a tool nxstyle that will check the Coding Style of our source files…
## Compile nxstyle
## TODO: Change "$HOME/nuttx" to our NuttX Project Folder
gcc -o $HOME/nxstyle $HOME/nuttx/nuttx/tools/nxstyle.c

## Check coding style for our modified source files
## TODO: Change the file paths
$HOME/nxstyle $HOME/nuttx/nuttx/arch/arm64/Kconfig
$HOME/nxstyle $HOME/nuttx/nuttx/arch/arm64/src/common/Make.defs
$HOME/nxstyle $HOME/nuttx/nuttx/arch/arm64/src/common/arm64_gic.h
$HOME/nxstyle $HOME/nuttx/nuttx/arch/arm64/src/common/arm64_gicv2.c(How I run nxstyle in my Build Script)
Will nxstyle check Kconfig and Makefiles?
Not yet, but maybe someday? That’s why we passed all the modified files to nxstyle for checking.
How do we fix our code?
The pic above shows the output from nxstyle. We’ll see messages like…
- C++ style comment
- Long line found
- Mixed case identifier found
- Operator/assignment must be followed/preceded with whitespace
- Upper case hex constant found
- #include outside of 'Included Files' section
We modify our code so that this…
// Initialize GIC. Called by CPU0 only.
int arm64_gic_initialize(void) {
  // Verify that GIC Version is 2
  int err = gic_validate_dist_version();
  if (err) { sinfo("no distributor detected, giving up ret=%d\n", err); return err; }

  // CPU0-specific initialization for GIC
  arm_gic0_initialize();

  // CPU-generic initialization for GIC
  arm_gic_initialize();
  return 0;
}Becomes this…
/****************************************************************************
 * Name: arm64_gic_initialize
 *
 * Description:
 *   Initialize GIC. Called by CPU0 only.
 *
 * Input Parameters
 *   None
 *
 * Returned Value:
 *   Zero (OK) on success; a negated errno value is returned on any failure.
 *
 ****************************************************************************/

int arm64_gic_initialize(void)
{
  int err;

  /* Verify that GIC Version is 2 */

  err = gic_validate_dist_version();
  if (err)
    {
      sinfo("no distributor detected, giving up ret=%d\n", err);
      return err;
    }

  /* CPU0-specific initialization for GIC */

  arm_gic0_initialize();

  /* CPU-generic initialization for GIC */

  arm_gic_initialize();

  return 0;
}If we see this…
/* */ not balancedCheck that our stars “*” are aligned (heh)…
/******************************
 * Name: missing_asterisk_below
 *
 *****************************/
After fixing, test our code one last time.
Our Pull Request will have…
Title: NuttX Subsystem and One-Line Summary
Summary: What’s the purpose of the Pull Request? What files are changed?
Impact: Which parts of NuttX are affected by the Pull Request? Which parts won’t be affected?
Testing: Provide evidence that our Pull Request does what it’s supposed to do.
(And that it won’t do what it’s not supposed to do)
To write the above items, let’s walk through these Pull Requests…
Inside our Title is the NuttX Subsystem and One-Line Summary…
“arch/arm64: Add support for Generic Interrupt Controller Version 2”
Let’s write this into a Markdown File for easier copying…
We’ll add the following sections to the Markdown File…
In the Summary we write the purpose of the Pull Request…
“This PR adds support for GIC Version 2, which is needed by Pine64 PinePhone.”
And we list the files that we changed…
“
arch/arm64/Kconfig: Under “ARM64 Options”, we added an integer option ARM_GIC_VERSION (“GIC version”) that selects the GIC Version. Valid values are 2, 3 and 4, default is 3.“
If it’s a long list, we might break into subsections like this…
For Code Provenance it’s good to state how we created the code…
“This 64-bit implementation of GIC v2 is mostly identical to the existing GIC v2 for 32-bit Armv7-A (
arm_gicv2.c,gic.h), with minor modifications to support 64-bit Registers (Interrupt Context).”
(Adding GPL Code? Please check with the NuttX Maintainers)
Under “Impact”, we write which parts of NuttX are affected by the Pull Request.
(And which parts won’t be affected)
“With this PR, NuttX now supports GIC v2 on Arm64.
There is no impact on the existing implementation of GIC v3, as tested below.“
Under “Testing”, we provide evidence that our Pull Request does what it’s supposed to do. We fill in the…
Commands used for testing
Output Logs captured from our testing
Like this…
“We tested with QEMU our implementation of GIC v2:
tools/configure.sh qemu-armv8a:nsh_gicv2 ; make ; qemu-system-aarch64 ...
The log shows that GIC v2 has correctly handled interrupts“
If we have done a Regression Test, provide the details too…
“For Regression Testing: We tested the existing implementation of GIC v3…”
tools/configure.sh qemu-armv8a:nsh ; make ; qemu-system-aarch64 ...
Test Logs are super helpful for NuttX Maintainers!
(Because we can’t tell which way the train went… By staring at the track!)
Now we tidy up our commits…
(Note: Some kinds of Pull Requests won’t need to Squash Commits)
What’s this “squashing”?
“Squashing” means we’re combining Multiple Commits into One Single Commit.
Our Commit History can get awfully messy during development…
- Initial Commit
- Fixing Build
- Build OK!
- Oops fixing bug
- Tested OK yay!So we always Squash the Commits into One Single Commit (to help future maintainers)…
- arch/arm64: Add support for Generic Interrupt Controller Version 2How do we squash the commits?
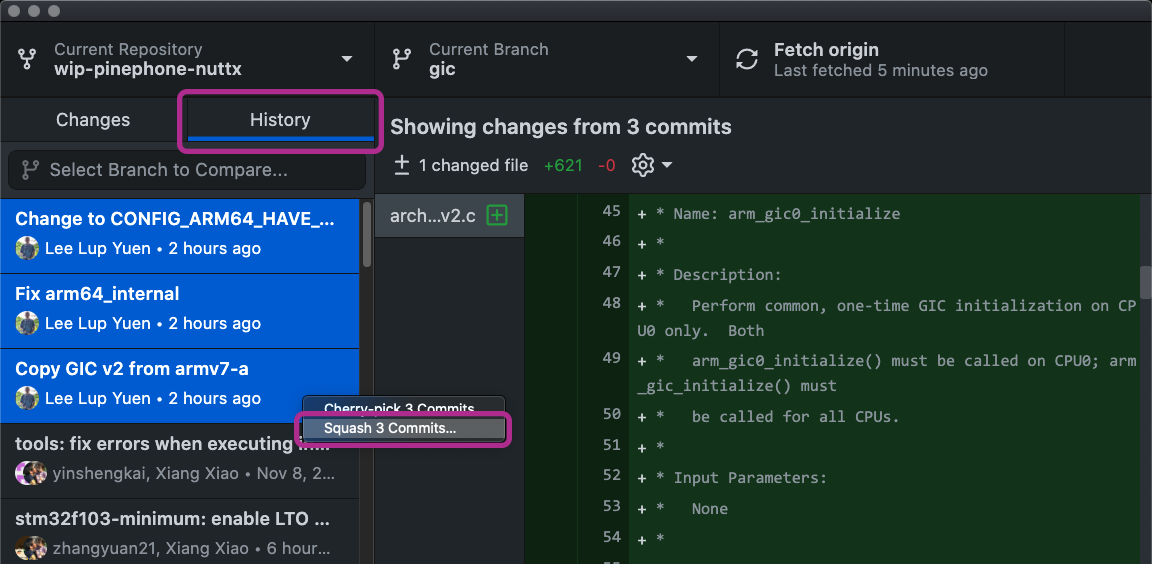
We’ll use GitHub Desktop (because I’m terrible with the Git Command Line)…
Install GitHub Desktop and launch it
Click “File → Add Local Repository”
Select our downloaded nuttx folder.
Click “Add Repository”
Click the “History” tab to reveal the Commit History
Select the Commits to be Squashed.
Right-click the Commits.
Select “Squash Commits”
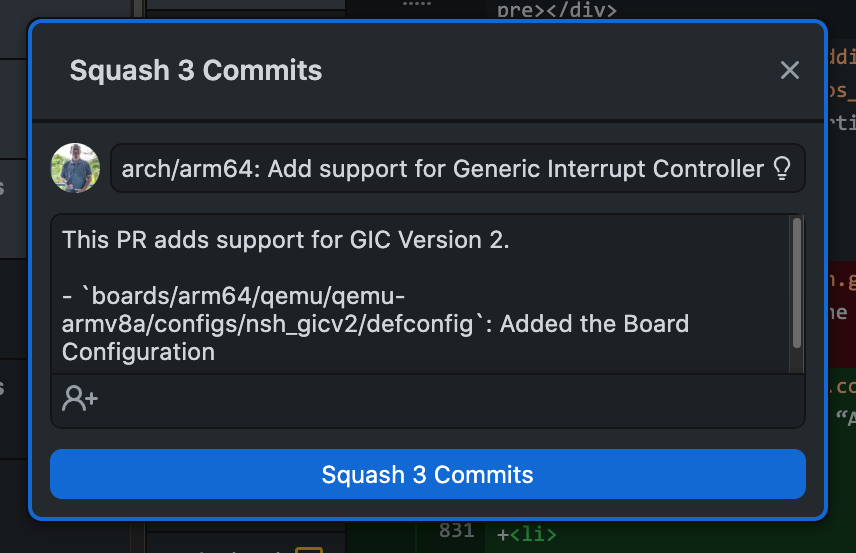
Copy the Title of our Pull Request and paste into the Title Box…
arch/arm64: Add support for Generic Interrupt Controller Version 2In the Description Box, erase the old Commit Messages.
Copy the Summary of our Pull Request and paste into the Description Box…
This PR adds support for GIC Version 2.
- `boards/arm64/qemu/qemu-armv8a/configs/nsh_gicv2/defconfig`: Added the Board Configuration
Click “Squash Commits”
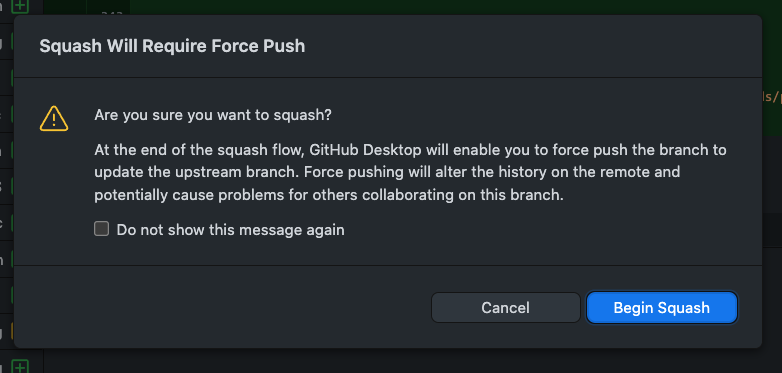
Click “Begin Squash”
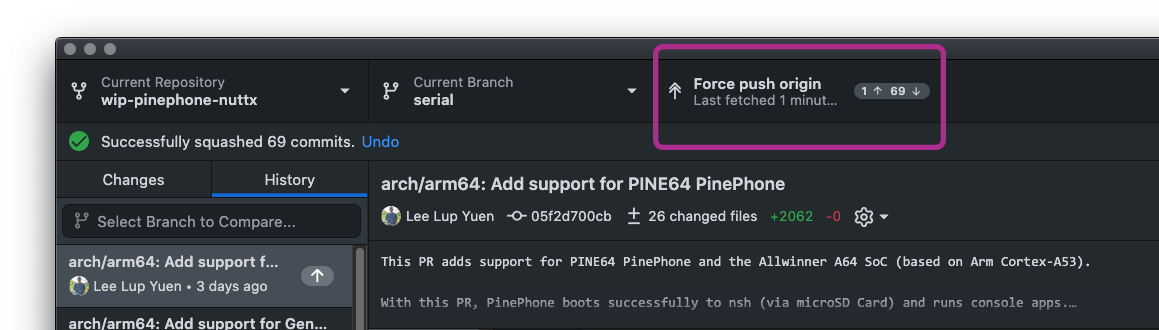
Click “Force Push Origin”
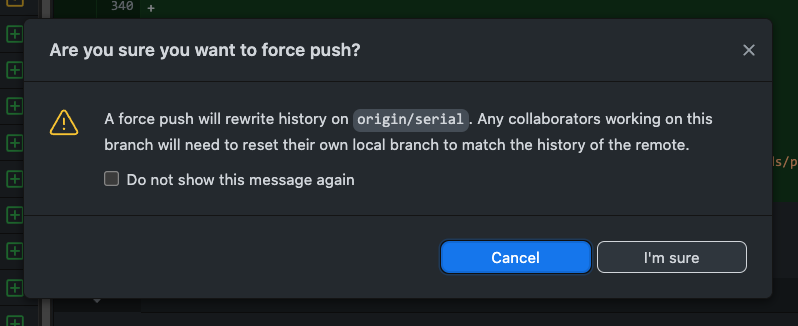
Click “I’m Sure”
And we’re ready to merge upstream! (Like the salmon)
What if we prefer the Git Command Line?
Here are the steps to Squash Commits with the Git Command Line…
Breathe. Take a break.
We’re about to make NuttX History… Our changes will be recorded for posterity!
Take a long walk and ponder…
Who might benefit from our Pull Request
How we might best help them
(I walked 29 km for 5.5 hours while meditating on my Pull Request)
If we get an inspiration or epiphany, touch up the Pull Request.
(And resquash the commits)
What’s your epiphany?
Through my Pull Requests, I hope to turn NuttX into a valuable tool for teaching the internals of Smartphone Operating Systems.
That’s my motivation for porting NuttX to PINE64 PinePhone.
But for now… Let’s finish our Pull Request!
Finally it’s time to submit our Pull Request!
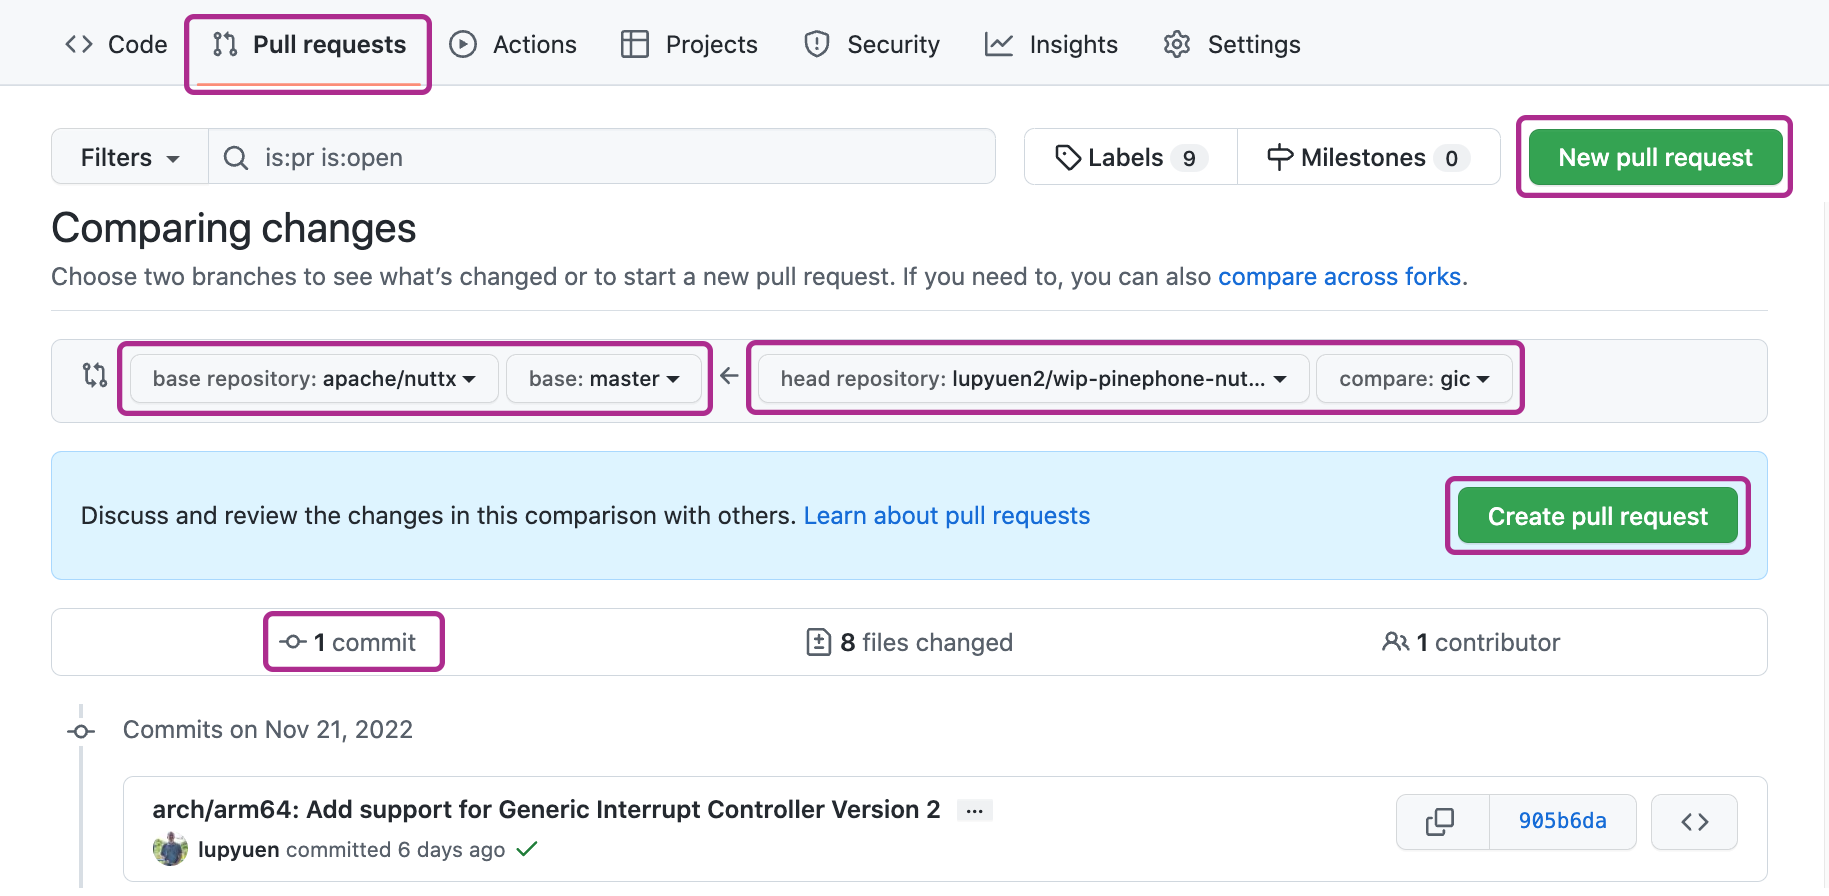
Create the Pull Request (pic above)
Verify that it has only One Single Commit (pic above)
Copy these into the Pull Request…
Submit the Pull Request
Wait for the Automated Checks to be completed (might take an hour)…

Fix any errors in the Automated Checks
Wait for the NuttX Team to review and comment on our Pull Request.
This might take a while (due to the time zones)… Grab a coffee and standby for fixes!
(I bake sourdough while waiting)
If all goes Hunky Dory, our Pull Request will be approved and merged! 🎉
For PR Reviewers: Do NOT flag a PR or a Comment with the Thumbs-Down Emoji. This is considered offensive in some cultures.
Instead, mark the PR as “Request For Changes”. And state precisely the changes needed for the PR.
For GitHub Actions: Don’t use the pull_request_target trigger, it’s disallowed by the ASF GitHub Actions Security Policy
Whenever we modify the GitHub CI Workflow, remember to run the Zizmor Security Scanner. Ignore the messages for workflow_run trigger, because Zizmor can’t analyse the code inside the trigger.
brew install zizmor
git clone YOUR_NUTTX_REPO
zizmor nuttx

## Ignore the message:
## "workflow_run is almost always used insecurely"
Sometimes we need to Rebase To The Latest Master due to updates in the GitHub Actions Workflow (Continuous Integration Script). Here’s how…
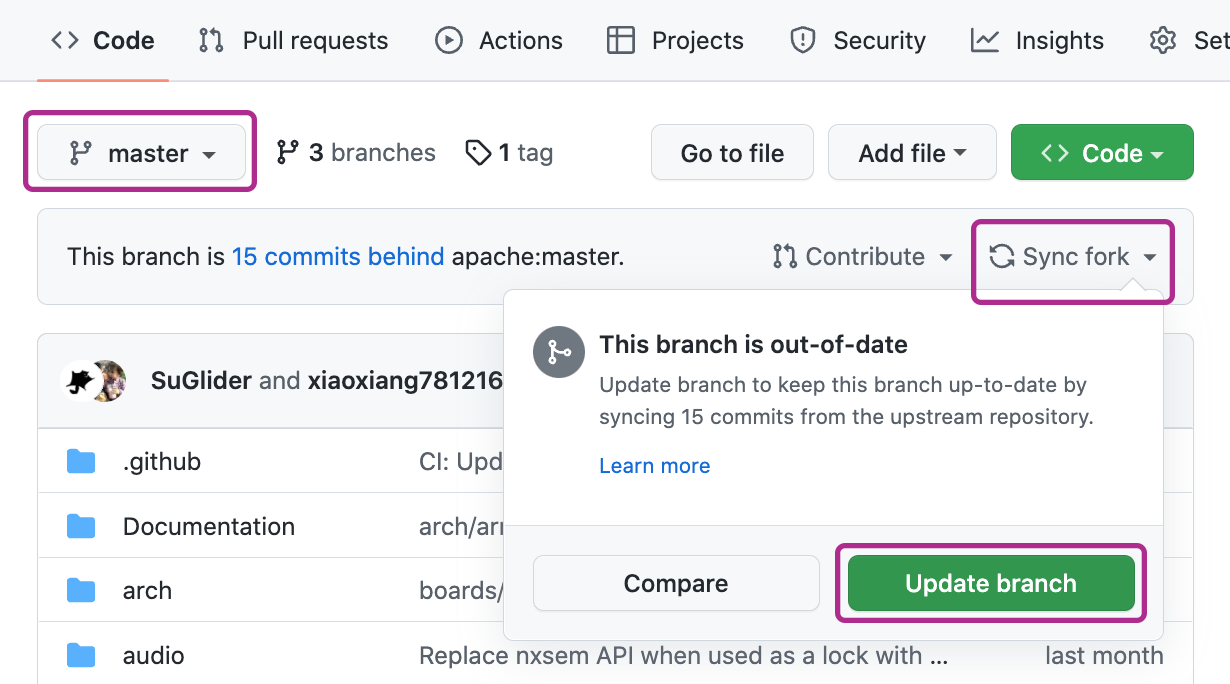
Browse to the master branch of our nuttx repository.
Click “Sync Fork → Update Branch”
(Pic below)
Launch GitHub Desktop
Click “File → Add Local Repository”
Select our downloaded nuttx folder.
Click “Add Repository”
Check that the Current Branch is our Working Branch for the Pull Request.
(Like gic branch)
Click “Fetch Origin”
Click “Branch → Rebase Current Branch”
Select the master branch
Click “Rebase” and “Begin Rebase”
Click “Force Push Origin” and “I’m Sure”
Is it really OK to Rebase To The Latest Master?
Normally when the GitHub Actions build fails (not due to our code), I take a peek at other recent Pull Requests.
If they didn’t fail the build, then it’s probably OK to Rebase with Master to force the Rebuild.
After our Pull Request has been merged into NuttX Mainline, pull the updates into our repositories…
Browse to the master branch of our nuttx repository.
Click “Sync Fork → Update Branch”
(Pic above)
Do the same for the master branch of our apps repository.
Click “Sync Fork → Update Branch”
Test the code from the master branch of our nuttx and apps repositories.
When we’re ready to add our next awesome feature…
Pull the updates from NuttX Mainline into our nuttx repository…
Select the master branch.
Click “Sync Fork → Update Branch”
(Pic above)
Do the same for our apps repository.
In our nuttx repository, click master.
Enter the name of our new branch.
Click “Create Branch”
Do the same for our apps repository.
Modify the code in the new branch of our nuttx and apps repositories.
Build, test and submit our new Pull Request.
And that’s the Complete Lifecycle of a Pull Request for Apache NuttX RTOS!
One last thing: Please help to validate that the NuttX Release works OK! We really appreciate your help with this… 🙏
Will NuttX accept Pull Requests generated with LLMs and AI Tools?
Check out the ASF Generative Tooling Guidance.
Why was my Pull Request rejected?
Some PRs are rejected because they’re not consistent with the community guidelines. Refer to the following docs for guidance…
I hope this article will be helpful for folks contributing code to NuttX for the very first time.
In the next article we’ll explain this complex Pull Request that adds a new SoC and new Board to NuttX. Stay Tuned!
Many Thanks to my GitHub Sponsors for supporting my work! This article wouldn’t have been possible without your support.
Got a question, comment or suggestion? Create an Issue or submit a Pull Request here…
Here’s an excellent guide for the Git Command Line…
Converting our code to the “NuttX C Coding Standard”…
Can we automate this with a VSCode Extension?
Maybe like the Linux checkpatch Extension, but it will actually auto-reformat our lines?
QEMU Emulator is incredibly helpful for Regression Testing…
Can we extend it to emulate PinePhone? Maybe just the UART Hardware? Check out the articles…
“(Possibly) Emulate PinePhone with Unicorn Emulator”
“(Clickable) Call Graph for Apache NuttX Real-Time Operating System”
Why did our NuttX Pull Request fail with this CMake Error?
Cmake in present: rv-virt/smp
riscv-none-elf-gcc CMakeFiles/nuttx.dir/empty.c.obj -o nuttx ...
riscv_createstack.c: undefined reference to board_autoled_on
collect2: error: ld returned 1 exit status
ninja: build stopped: subcommand failed.That’s because the NuttX Automated Check (Continuous Integration with GitHub Actions) runs CMake on some NuttX Configurations!
(Instead of the usual GNU Make)
What’s this CMake?
CMake is the Alternative Build System for NuttX. We build NuttX with CMake like this…
## For macOS: Install Build Tools
brew install pipenv cmake ninja

## For Ubuntu: Install Build Tools
sudo apt install pipenv cmake ninja-build

## Configure NuttX for QEMU RISC-V SMP `rv-virt:smp`
cd nuttx
pipenv install
pipenv shell
pip install kconfiglib
cmake \
  -B build \
  -DBOARD_CONFIG=rv-virt:smp \
  -GNinja

## Build NuttX for QEMU RISC-V SMP
## with CMake and Ninja
cmake --build build

## Note: No more `tools/configure.sh` and `make`!
But why did CMake fail?
Probably because the CMake Makefiles are out of sync with the GNU Make Makefiles.
Suppose we have a GNU Make Makefile: rv-virt/src/Makefile
## Always compile `qemu_rv_appinit.c`
CSRCS = qemu_rv_appinit.c

## If `CONFIG_ARCH_LEDS` is Enabled:
## Compile `qemu_rv_autoleds.c`
ifeq ($(CONFIG_ARCH_LEDS),y)
  CSRCS += qemu_rv_autoleds.c
endif

## If `CONFIG_USERLED` is Enabled:
## Compile `qemu_rv_userleds.c`
ifeq ($(CONFIG_USERLED),y)
  CSRCS += qemu_rv_userleds.c
endif
Note that it checks the Kconfig Options CONFIG_ARCH_LEDS and CONFIG_USERLED. And optionally compiles qemu_rv_autoleds.c and qemu_rv_userleds.c.
We need to Sync the Build Rules into the CMake Makefile like so: rv-virt/src/CMakeLists.txt
## Always compile `qemu_rv_appinit.c`
set(SRCS qemu_rv_appinit.c)

## If `CONFIG_ARCH_LEDS` is Enabled:
## Compile `qemu_rv_autoleds.c`
if(CONFIG_ARCH_LEDS)
  list(APPEND SRCS qemu_rv_autoleds.c)
endif()

## If `CONFIG_USERLED` is Enabled:
## Compile `qemu_rv_userleds.c`
if(CONFIG_USERLED)
  list(APPEND SRCS qemu_rv_userleds.c)
endif()
This will ensure that the Build Rules are consistent across the GNU Make Makefiles and CMake Makefiles. (Like this)
Why did our NuttX Pull Request fail with this defconfig error?
Normalize rv-virt/leds64
Saving the new configuration file
HEAD detached at pull/12762/merge
Changes not staged for commit:
  (use "git add <file>..." to update what will be committed)
  (use "git restore <file>..." to discard changes in working directory)
  modified:   boards/risc-v/qemu-rv/rv-virt/configs/leds64/defconfig
no changes added to commit (use "git add" and/or "git commit -a")This means that the NuttX Configuration File for rv-virt:leds64 has a problem, like a Missing Newline.
To fix it, run tools/refresh.sh: nuttx/pull/12762
## Normalize the `defconfig` for `rv-virt:leds64`
$ cd nuttx
$ make distclean
$ tools/refresh.sh --silent rv-virt:leds64
  Normalize rv-virt:leds64
  < CONFIG_USERLED_LOWER=y
  \ No newline at end of file
  ---
  > CONFIG_USERLED_LOWER=y
  Saving the new configuration file

## Remember to commit the updated `defconfig`!
$ git status
  modified: boards/risc-v/qemu-rv/rv-virt/configs/leds64/defconfig
refresh.sh will also fix Kconfig Options that are misplaced…
## `CONFIG_USERLED_LOWER` is misplaced in `rv-virt:leds64`
## Remember to commit the updated `defconfig`!
$ make distclean
$ tools/refresh.sh --silent rv-virt:leds64
  Normalize rv-virt:leds64
  74d73
  < CONFIG_USERLED_LOWER=y
  75a75
  > CONFIG_USERLED_LOWER=y
  Saving the new configuration file
What else will cause defconfig errors?
When we modify the Kconfig Configuration Files, remember to update the defconfig Configuration Files! (Like this)
If we forget to update defconfig…
Configuration/Tool: pinephone/sensor
Building NuttX...
Normalize pinephone/sensor
71d70
< CONFIG_UART1_SERIAL_CONSOLE=y
Saving the new configuration file
HEAD detached at pull/9243/merge
Changes not staged for commit:
(use "git add <file>..." to update what will be committed)
(use "git restore <file>..." to discard changes in working directory)
modified: boards/arm64/a64/pinephone/configs/sensor/defconfigHow to create a new defconfig?
To Create or Update a defconfig, do this…
## TODO: Change this to your
## `boards/<archname>/<chipname>/<boardname>/config/<configname>`
cd nuttx
mkdir -p boards/risc-v/bl808/ox64/configs/nsh

## Create or Update the NuttX Config
make menuconfig \
  && make savedefconfig \
  && grep -v CONFIG_HOST defconfig \
  >boards/risc-v/bl808/ox64/configs/nsh/defconfig
Some Default Settings in .config are missing from defconfig. Can we copy them ourselves to defconfig?
Sorry it won’t work. Suppose we copy these Default UART3 Settings from .config to defconfig (to hard-code the UART3 Baud Rate)…
CONFIG_UART3_BAUD=115200
CONFIG_UART3_BITS=8
CONFIG_UART3_PARITY=0
CONFIG_UART3_2STOP=0
The Auto-Build will fail with the error below. Thus we can’t copy any Default Settings in .config to defconfig.
Configuration/Tool: pinephone/modem
Building NuttX...
Normalize pinephone/modem
69,72d68
< CONFIG_UART3_BAUD=115200
< CONFIG_UART3_BITS=8
< CONFIG_UART3_PARITY=0
< CONFIG_UART3_2STOP=0
Saving the new configuration file
HEAD detached at pull/9304/merge
Changes not staged for commit:
(use "git add <file>..." to update what will be committed)
(use "git restore <file>..." to discard changes in working directory)
modified: boards/arm64/a64/pinephone/configs/modem/defconfigWhat if the auto-build fails with “Untracked etctmp”?
HEAD detached at pull/11379/merge
Untracked files: (use "git add <file>..." to include in what will be committed)
boards/risc-v/k230/canmv230/src/etctmp.c
boards/risc-v/k230/canmv230/src/etctmp/Check that we’ve added “etctmp” to the Board-Specific Git Ignore: boards/risc-v/jh7110/star64/src/.gitignore
etctmp
etctmp.c
(NuttX CI validates the Config Files by calling cibuild.sh)
Don’t leave any extra files lying around after the NuttX Build! Or we’ll see this error…
HEAD detached at pull/15188/merge
Ignored files:
  (use "git add -f <file>..." to include in what will be committed)
config.txtFor each Official Release of NuttX, how do we check if it runs OK on all devices? Like PinePhone, ESP32, BL602, …
NuttX needs to be tested on every device, and we need your help! 🙏
Before every Official Release of NuttX, a Validation Request will be broadcast on the NuttX Developers Mailing List…
Follow the instructions here to validate that the NuttX Release builds correctly and runs OK on your device…
(See below for the updates)
Here’s the script I run to validate NuttX on PinePhone…
And here’s the output of the validation script…
Boot NuttX on our device, run “uname -a” and “free”…
NuttShell (NSH) NuttX-12.1.0
nsh> uname -a
NuttX 12.1.0 d40f4032fc Apr 12 2023 07:11:20 arm64 pinephone
nsh> free
      total     used   free      largest   nused nfree
Umem: 133414240 550768 132863472 132863376 56    2
The NuttX Hash (like “d40f4032fc” above) should match the Validation Request.
Copy the above into a Validation Response email…
And send back to the Mailing List. (Assuming all is hunky dory)
Since there are so many NuttX devices, we really appreciate your help with the NuttX Validation! 🙏
What are the updates to the NuttX Validation Instructions?
The NuttX Validation Instructions should be updated…
To verify the NuttX Signature, we need to import the NuttX Keys…
wget https://dist.apache.org/repos/dist/dev/nuttx/KEYS
gpg --import KEYS
We also need to trust the NuttX Keys…
gpg --edit-key 9208D2E4B800D66F749AD4E94137A71698C5E4DB(That’s the RSA Key Fingerprint from “gpg –verify”)
Then enter “trust” and “5”
The file “DISCLAIMER-WIP” no longer exists in the nuttx and apps folders
Why are we doing this? Suppose we need to tweak the NuttX CI Docker Image (for Continuous Integration), like to install a Rust Target for a RISC-V Build…
## Install the Rust Target for QEMU RISC-V 64-bit
rustup target add riscv64gc-unknown-none-elfWe need to test our Modified CI Docker Image. But if we’re on Arm64 macOS: Sorry we can’t download the CI Docker Image, we need to build ourselves! (Skip to the next section if we’re on x64 Linux)
Here’s how we created our CI Docker Image and Custom Dockerfile: tools/ci/docker/linux/Dockerfile
Install Rancher Desktop. In Rancher Desktop, click “Settings”…
Then we build the Docker Image…
$ cd nuttx/tools/ci/docker/linux
$ docker build -t nuttx:v1 .If we see…
76.31 error: Cannot download gmp-6.1.0.tar.bz2 from ftp://gcc.gnu.org/pub/gcc/infrastructure/Then GNU Server might be busy. Try again later and it works!
But i386 packages are missing (because we’re hosting Docker on Arm64 macOS)…
 > [stage-12  5/50] RUN apt-get update -qq && DEBIAN_FRONTEND="noninteractive" TZ=Etc/UTC apt-get install -y -qq --no-install-recommends   -o APT::Immediate-Configure=0   avr-libc   ccache   clang   clang-tidy   g++-12-multilib   gcc-avr   gcc-12-multilib   genromfs   gettext   git   lib32z1-dev   libasound2-dev libasound2-dev:i386   libc6-dev-i386   libcurl4-openssl-dev   libmp3lame-dev:i386   libmad0-dev:i386   libncurses5-dev   libpulse-dev libpulse-dev:i386   libpython2.7   libtinfo5   libusb-1.0-0-dev libusb-1.0-0-dev:i386   libv4l-dev libv4l-dev:i386   libx11-dev libx11-dev:i386   libxext-dev libxext-dev:i386   linux-headers-generic   linux-libc-dev:i386   ninja-build   npm   qemu-system-arm   qemu-system-misc   python3   python3-pip   python-is-python3   u-boot-tools   unzip   wget   xxd   file   tclsh   && rm -rf /var/lib/apt/lists/*:
15.03 E: Failed to fetch http://ports.ubuntu.com/ubuntu-ports/dists/jammy/universe/binary-i386/Packages  404  Not Found [IP: 185.125.190.39 80]
15.03 E: Failed to fetch http://ports.ubuntu.com/ubuntu-ports/dists/jammy-updates/multiverse/binary-i386/Packages  404  Not Found [IP: 185.125.190.39 80]
15.03 E: Failed to fetch http://ports.ubuntu.com/ubuntu-ports/dists/jammy-backports/universe/binary-i386/Packages  404  Not Found [IP: 185.125.190.39 80]
15.03 E: Failed to fetch http://ports.ubuntu.com/ubuntu-ports/dists/jammy-security/main/binary-i386/Packages  404  Not Found [IP: 185.125.190.39 80]
15.03 E: Some index files failed to download. They have been ignored, or old ones used instead.
We don’t need the i386 packages. So we comment out everything in Dockerfile except NuttX Build Tools, RISC-V Toolchain and Rust Toolchain:
Make sure RISC-V Toolchain is for Arm64 (not x64)…
# Download the latest RISCV GCC toolchain prebuilt by xPack
RUN mkdir riscv-none-elf-gcc && \
  curl -s -L "https://github.com/xpack-dev-tools/riscv-none-elf-gcc-xpack/releases/download/v13.2.0-2/xpack-riscv-none-elf-gcc-13.2.0-2-linux-arm64.tar.gz" \
  | tar -C riscv-none-elf-gcc --strip-components 1 -xz
If RISC-V Toolchain fails: Try again…
 => ERROR [nuttx-toolchain-riscv 1/1] RUN mkdir riscv-none-elf-gcc &&    195.2s
------
 > [nuttx-toolchain-riscv 1/1] RUN mkdir riscv-none-elf-gcc &&   curl -s -L "https://github.com/xpack-dev-tools/riscv-none-elf-gcc-xpack/releases/download/v13.2.0-2/xpack-riscv-none-elf-gcc-13.2.0-2-linux-arm64.tar.gz"   | tar -C riscv-none-elf-gcc --strip-components 1 -xz:
195.2
195.2 gzip: stdin: unexpected end of file
195.2 tar: Unexpected EOF in archive
195.2 tar: Unexpected EOF in archive
195.2 tar: Error is not recoverable: exiting now
------
zap seems to fail for Arm64. So we comment out zap in Dockerfile…
39.86 npm ERR! code 1
39.86 npm ERR! path /tools/zap/node_modules/canvas
39.86 npm ERR! command failed
39.86 npm ERR! command sh -c node-pre-gyp install --fallback-to-build --update-binary
39.86 npm ERR! Failed to execute '/usr/bin/node /usr/share/nodejs/node-gyp/bin/node-gyp.js configure --fallback-to-build --update-binary --module=/tools/zap/node_modules/canvas/build/Release/canvas.node --module_name=canvas --module_path=/tools/zap/node_modules/canvas/build/Release --napi_version=8 --node_abi_napi=napi --napi_build_version=0 --node_napi_label=node-v72' (1)
39.86 npm ERR! node-pre-gyp info it worked if it ends with ok
39.86 npm ERR! node-pre-gyp info using node-pre-gyp@1.0.10
39.86 npm ERR! node-pre-gyp info using node@12.22.9 | linux | arm64
39.86 npm ERR! node-pre-gyp http GET https://github.com/Automattic/node-canvas/releases/download/v2.11.2/canvas-v2.11.2-node-v72-linux-glibc-arm64.tar.gz
39.86 npm ERR! node-pre-gyp ERR! install response status 404 Not Found on https://github.com/Automattic/node-canvas/releases/download/v2.11.2/canvas-v2.11.2-node-v72-linux-glibc-arm64.tar.gz
39.86 npm ERR! node-pre-gyp WARN Pre-built binaries not installable for canvas@2.11.2 and node@12.22.9 (node-v72 ABI, glibc) (falling back to source compile with node-gyp)
And we’re done!
 => [stage-4 27/33] COPY --from=nuttx-tools /tools/bloaty/ bloaty/         1.8s
 => [stage-4 28/33] COPY --from=nuttx-tools /tools/kconfig-frontends/ kco  0.0s
 => [stage-4 29/33] COPY --from=nuttx-tools /tools/rust/ /tools/rust/      3.0s
 => [stage-4 30/33] COPY --from=nuttx-toolchain-riscv /tools/riscv-none-e  5.1s
 => [stage-4 31/33] RUN mkdir -p /tools/gn                                 0.2s
 => [stage-4 32/33] COPY --from=nuttx-tools /tools/gn/gn/out/gn /tools/gn  0.0s
 => [stage-4 33/33] RUN mkdir -p /tools/ccache/bin &&   ln -sf `which cca  0.3s
 => exporting to image                                                    15.0s
 => => exporting layers                                                   15.0s
 => => writing image sha256:27da351829f15ecf1dd333cc43b864045d462a595f512  0.0s
 => => naming to docker.io/library/nuttx:v1                                0.0s
After the above fixes, here’s our Custom Dockerfile for NuttX CI + RISC-V + Rust (that works on Arm64 macOS)…
We check the Docker Image and RISC-V Toolchain…
$ docker images
REPOSITORY  TAG   IMAGE ID       CREATED              SIZE
nuttx       v1    27da351829f1   About a minute ago   7.09GB

$ docker run -it nuttx:v1 /bin/bash

root@?:/tools# uname -a
Linux 6d5db4f6b835 6.6.14-0-virt #1-Alpine SMP Fri, 26 Jan 2024 11:08:07 +0000 aarch64 aarch64 aarch64 GNU/Linux

root@?:/tools# riscv-none-elf-gcc -v
gcc version 13.2.0 (xPack GNU RISC-V Embedded GCC aarch64)

root@?:/tools# rustc --version
rustc 1.80.0 (051478957 2024-07-21)

root@?:/tools# rustup --version
rustup 1.27.1 (54dd3d00f 2024-04-24)

root@?:/tools# rustup toolchain list
stable-aarch64-unknown-linux-gnu (default)

root@?:/tools# rustup target list
aarch64-unknown-linux-gnu (installed)
riscv64gc-unknown-none-elf (installed)
thumbv6m-none-eabi (installed)
thumbv7m-none-eabi (installed)

root@?:/tools# exit
Looks hunky dory! We download the NuttX Source Files and start the build…
$ docker run -it nuttx:v1 /bin/bash
# pip install ntfc
# mkdir /root/nuttx-ntfc
# mkdir /root/nuttx-ntfc/external
# cd /root/nuttx-ntfc/external
# git clone -b release-0.0.1 https://github.com/apache/nuttx-ntfc-testing
# mv nuttx-ntfc-testing nuttx-testing
# export NTFCDIR=/root/nuttx-ntfc
# cd
# pwd
/root
# git clone https://github.com/apache/nuttx
# git clone https://github.com/apache/nuttx-apps apps
# cd nuttx/tools/ci
# ./cibuild.sh -c -A -N -R testlist/risc-v-02.dat
Why risc-v-02.dat? That’s because we’re running the “Linux (risc-v-02)” build. Which will build the Second Batch of RISC-V Targets, including rv-virt:* (QEMU RISC-V).
(Why cibuild.sh? See the next section)
We will see…
+ /root/nuttx/tools/testbuild.sh -A -N -R -j 2 -e '-Wno-cpp -Werror' testlist/risc-v-02.dat
====================================================================================
Configuration/Tool: hifive1-revb/nsh
2024-08-06 16:06:08
------------------------------------------------------------------------------------
  Cleaning...
  Configuring...
  Building NuttX...
Exactly like NuttX CI in GitHub Actions!
Finally we see our Rust Build completing successfully in our Docker Container yay!
Configuration/Tool: rv-virt/leds64_rust
  Cleaning...
  Configuring...
  Building NuttX...
riscv-none-elf-ld: warning: /root/nuttx/nuttx has a LOAD segment with RWX permissions
Normalize rv-virt/leds64_rustAnd that’s how we test a NuttX CI Docker Image on Arm64 macOS.
What happens if the CI Build fails?
Suppose we forget to add the Rust Target into the Docker Image. We’ll see an error like this…
Configuration/Tool: rv-virt/leds64_rust
  Cleaning...
  Configuring...
  Building NuttX...
error[E0463]: can't find crate for `core`
  |
  = note: the `riscv64gc-unknown-none-elf` target may not be installed
  = help: consider downloading the target with `rustup target add riscv64gc-unknown-none-elf`

error: aborting due to 1 previous error

For more information about this error, try `rustc --explain E0463`.
make[2]: *** [/root/apps/Application.mk:293: leds_rust_main.rs.root.apps.examples.leds_rust.o] Error 1
make[2]: Target 'all' not remade because of errors.
make[1]: *** [Makefile:51: /root/apps/examples/leds_rust_all] Error 2
make[1]: Target 'all' not remade because of errors.
make: *** [tools/LibTargets.mk:232: /root/apps/libapps.a] Error 2
make: Target 'all' not remade because of errors.
/root/nuttx/tools/testbuild.sh: line 378: /root/nuttx/../nuttx/nuttx.manifest: No such file or directory
Normalize rv-virt/leds64_rustWhat about testing a Single Config?
Just do it the normal NuttX way…
$ docker run -it nuttx:v1 /bin/bash
# pip install ntfc
# mkdir /root/nuttx-ntfc
# mkdir /root/nuttx-ntfc/external
# cd /root/nuttx-ntfc/external
# git clone -b release-0.0.1 https://github.com/apache/nuttx-ntfc-testing
# mv nuttx-ntfc-testing nuttx-testing
# export NTFCDIR=/root/nuttx-ntfc
# cd
# git clone https://github.com/apache/nuttx
# git clone https://github.com/apache/nuttx-apps apps
# cd nuttx
# tools/configure.sh rv-virt:leds64_rust
# make
(Based on “Create a Docker Image for NuttX”)
If we’re on x64 Linux: We can Build the Docker Image for NuttX CI, without any changes to the Dockerfile…
$ sudo apt install podman-docker
$ cd nuttx/tools/ci/docker/linux
$ docker build -t nuttx:v1 .
(Takes a few hours to complete. Unless we trim down the Dockerfile, as explained in the previous section)
Or we can Download the Docker Image for NuttX CI and tweak it (for testing). This works only if we’re on x64 Linux…
$ sudo apt install podman-docker
$ docker pull \
    ghcr.io/apache/nuttx/apache-nuttx-ci-linux:latest
$ docker images
REPOSITORY                                  TAG         IMAGE ID      CREATED         SIZE
ghcr.io/apache/nuttx/apache-nuttx-ci-linux  latest      60a6cdc2c7cc  5 hours ago     15.9 GB
If we see “No matching manifest for linux/arm64/v8”: Nope sorry we’re not on x64 Linux, we can’t download and run the Docker Image!
After building or downloading the Docker Image: Run these steps (from previous section) to start the Docker Container, download the NuttX Source Files and start the build…
## If we built the Docker Image ourselves:
$ docker run -it nuttx:v1 /bin/bash

## If we downloaded the Docker Image:
$ docker run -it ghcr.io/apache/nuttx/apache-nuttx-ci-linux:latest /bin/bash

## Inside Docker Container:
## Download the NuttX Source Files and start the build
$ pip install ntfc
$ mkdir /root/nuttx-ntfc
$ mkdir /root/nuttx-ntfc/external
$ cd /root/nuttx-ntfc/external
$ git clone -b release-0.0.1 https://github.com/apache/nuttx-ntfc-testing
$ mv nuttx-ntfc-testing nuttx-testing
$ export NTFCDIR=/root/nuttx-ntfc
$ cd
$ pwd
/root
$ git clone https://github.com/apache/nuttx
$ git clone https://github.com/apache/nuttx-apps apps
$ cd nuttx/tools/ci
$ ./cibuild.sh -c -A -N -R testlist/risc-v-02.dat
Or for a Single Config…
$ cd
$ git clone https://github.com/apache/nuttx
$ git clone https://github.com/apache/nuttx-apps apps
$ cd nuttx
$ tools/configure.sh rv-virt:leds64_rust
$ make
Why cibuild.sh? We got it from the NuttX CI Log…
(cibuild.sh is called by .github/workflows/build.yml)
(testbuild.sh is explained here)
## Run the CI Build for RISC-V Targets
./cibuild.sh -c -A -N -R \
  testlist/risc-v-02.dat

## Which calls Test Build for RISC-V Targets
/github/workspace/sources/nuttx/tools/testbuild.sh -A -N -R \
  -j 4 \
  -e '-Wno-cpp -Werror' \
  testlist/risc-v-02.dat

## Which runs inside the Docker Container for NuttX CI
/usr/bin/docker run \
  --name ghcrioapachenuttxapachenuttxcilinux_ba895b \
  --label bbeb86 \
  --workdir /github/workspace \
  --rm \
  -e "DOCKER_BUILDKIT" \
  -e "nuttx_sha" \
  -e "BLOBDIR" \
  -e "INPUT_RUN" \
  -e "HOME" \
  -e "GITHUB_JOB" \
  -e "GITHUB_REF" \
  -e "GITHUB_SHA" \
  -e "GITHUB_REPOSITORY" \
  -e "GITHUB_REPOSITORY_OWNER" \
  -e "GITHUB_REPOSITORY_OWNER_ID" \
  -e "GITHUB_RUN_ID" \
  -e "GITHUB_RUN_NUMBER" \
  -e "GITHUB_RETENTION_DAYS" \
  -e "GITHUB_RUN_ATTEMPT" \
  -e "GITHUB_REPOSITORY_ID" \
  -e "GITHUB_ACTOR_ID" \
  -e "GITHUB_ACTOR" \
  -e "GITHUB_TRIGGERING_ACTOR" \
  -e "GITHUB_WORKFLOW" \
  -e "GITHUB_HEAD_REF" \
  -e "GITHUB_BASE_REF" \
  -e "GITHUB_EVENT_NAME" \
  -e "GITHUB_SERVER_URL" \
  -e "GITHUB_API_URL" \
  -e "GITHUB_GRAPHQL_URL" \
  -e "GITHUB_REF_NAME" \
  -e "GITHUB_REF_PROTECTED" \
  -e "GITHUB_REF_TYPE" \
  -e "GITHUB_WORKFLOW_REF" \
  -e "GITHUB_WORKFLOW_SHA" \
  -e "GITHUB_WORKSPACE" \
  -e "GITHUB_ACTION" \
  -e "GITHUB_EVENT_PATH" \
  -e "GITHUB_ACTION_REPOSITORY" \
  -e "GITHUB_ACTION_REF" \
  -e "GITHUB_PATH" \
  -e "GITHUB_ENV" \
  -e "GITHUB_STEP_SUMMARY" \
  -e "GITHUB_STATE" \
  -e "GITHUB_OUTPUT" \
  -e "RUNNER_OS" \
  -e "RUNNER_ARCH" \
  -e "RUNNER_NAME" \
  -e "RUNNER_ENVIRONMENT" \
  -e "RUNNER_TOOL_CACHE" \
  -e "RUNNER_TEMP" \
  -e "RUNNER_WORKSPACE" \
  -e "ACTIONS_RUNTIME_URL" \
  -e "ACTIONS_RUNTIME_TOKEN" \
  -e "ACTIONS_CACHE_URL" \
  -e "ACTIONS_RESULTS_URL" \
  -e GITHUB_ACTIONS=true \
  -e CI=true \
  -v "/var/run/docker.sock":"/var/run/docker.sock" \
  -v "/home/runner/work/_temp/_github_home":"/github/home" \
  -v "/home/runner/work/_temp/_github_workflow":"/github/workflow" \
  -v "/home/runner/work/_temp/_runner_file_commands":"/github/file_commands" \
  -v "/home/runner/work/nuttx/nuttx":"/github/workspace" \
  ghcr.io/apache/nuttx/apache-nuttx-ci-linux  \
  "/bin/bash" \
  "-ce" \
  "echo \"::add-matcher::sources/nuttx/.github/gcc.json\"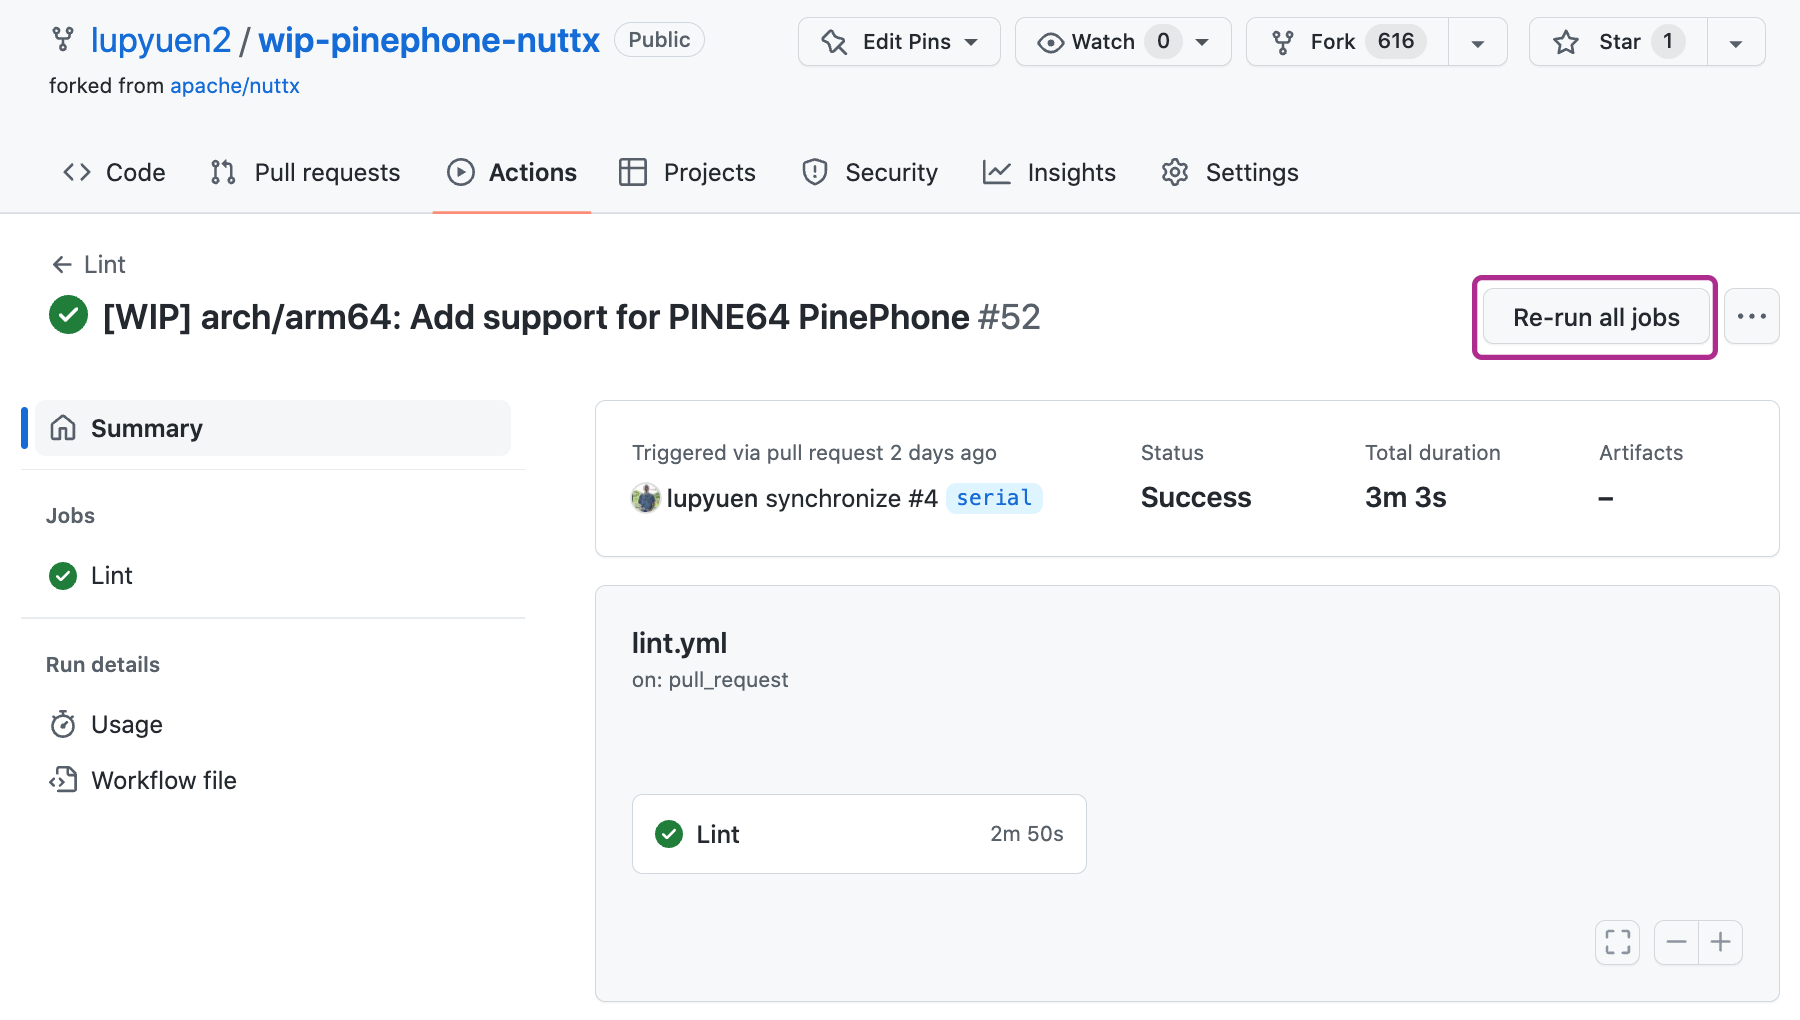