📝 18 Nov 2020
NOTE: THIS ARTICLE IS UNFINISHED
Q: We're in the middle of the pandemic... Is there something fun and useful that we can learn on our own?
A: Try learning Embedded Programming!
Q: I need to buy an Arduino or a Microcontroller Board? And have it shipped sloooowly to me at exorbitant prices?
A: Nope! Today we can build and test Embedded Programs in a Web Browser... Without any Embedded Hardware! Made possible with awesome WebAssembly tools.
Q: But a Web Browser Simulator doesn't behave like Real Hardware right?
A: We have a real PineTime Smart Watch that's connected to the web for everyone to test our Embedded Programs... Try it for yourself and compare!
Q: People say that Embedded Programming is hard... Needs strange languages like C
A: Not any more! Today we'll code with Rust, a friendly, modern language. (And less frustating for new coders)
Q: Great! But my computer is kinda old, slow and weak... Do I need a powerful Linux desktop?
A: Any Linux, macOS AND Windows computer works great for coding in Embedded Rust and WebAssembly... Even a Raspberry Pi!
If you prefer zero setup, we can build our Embedded Rust and WebAssembly programs in the Cloud! (Provided free of change by GitHub Actions and GitLab CI)
It feels strange... But building and testing Embedded Programs will work on a Mobile Web Browser!
Q: Fantastic! Can't wait to build my very first Blinking LED program!
A: Well it's 2020, and we have progressed waaaay beyond Blinking LEDs ;-)
Today we'll learn to build a Smart Watch Face in Rust. We'll be coding for a Smart Watch with Colour Touchscreen, Bluetooth Networking and Real Time Clock... Just like the expensive watches by A***e and S*****g!
As promised, our Watch Face will run in a Web Browser, so it will be easy to test and troubleshoot.
And when you're done... Please flash your Watch Face to our Remote PineTime over the web. Show the world your embedded creation... Running on a real watch!
Q: But what's the catch?
None really. Now's the perfect time to Learn and Experiment with Embedded Programming... At our own pace, with whatever materials we have.
Read on and join me for the learning adventure! :-)
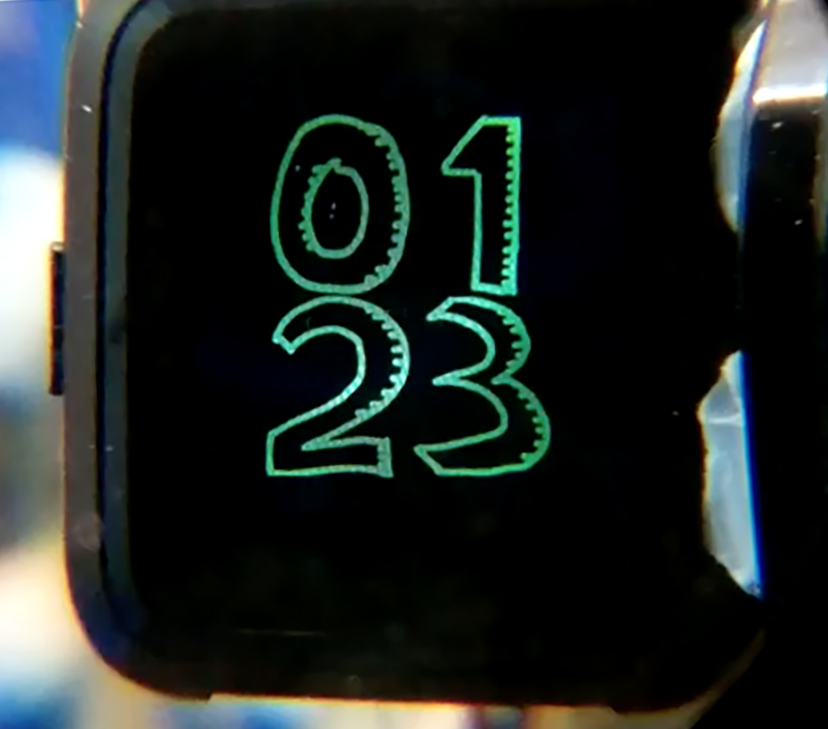
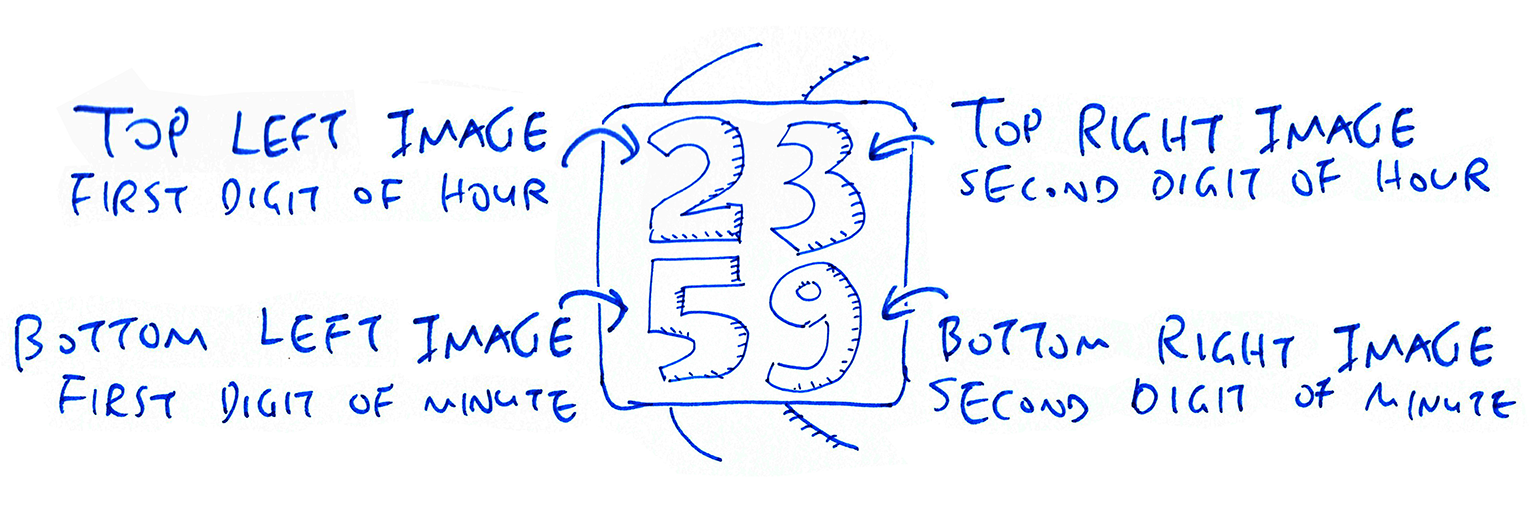
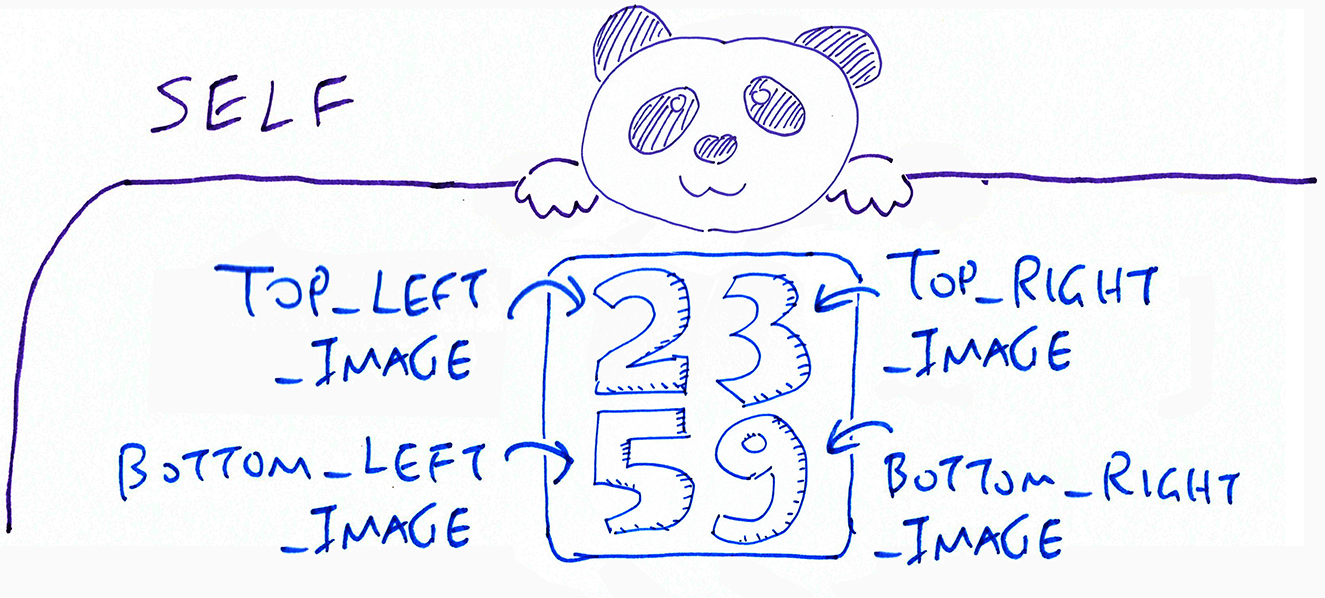
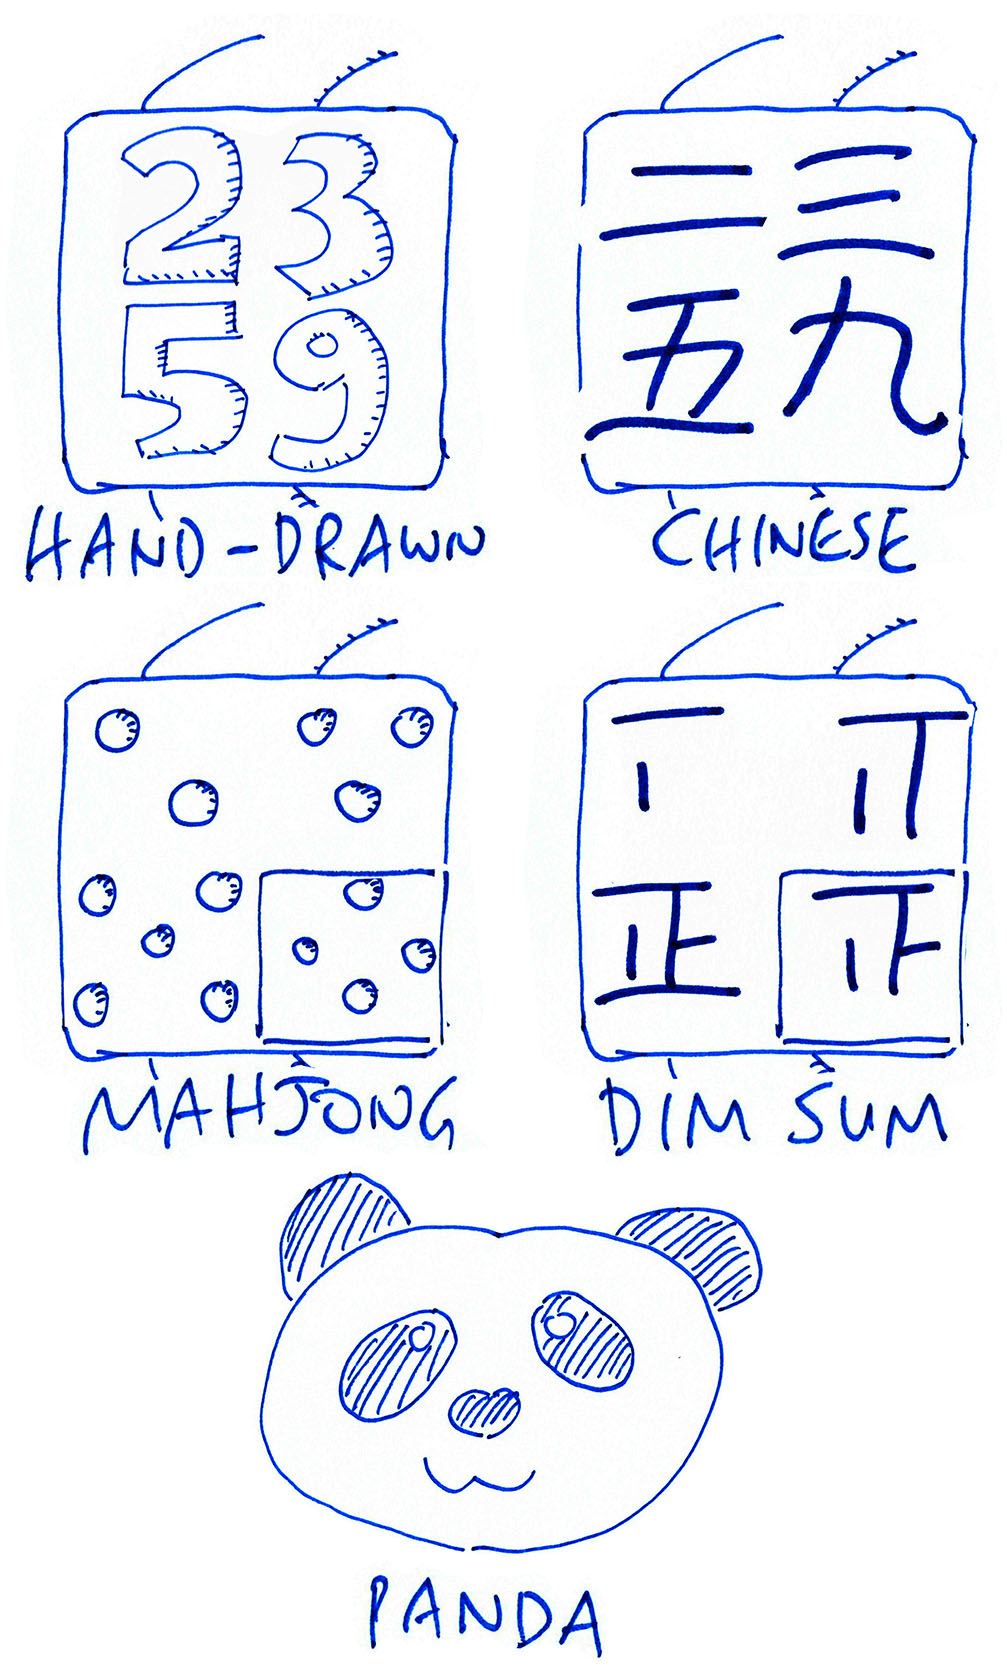
Let's make a Hand-Drawn Watch Face like the pic above. The Watch Face consists of 4 hand-drawn images that will be a-changin' with the times...
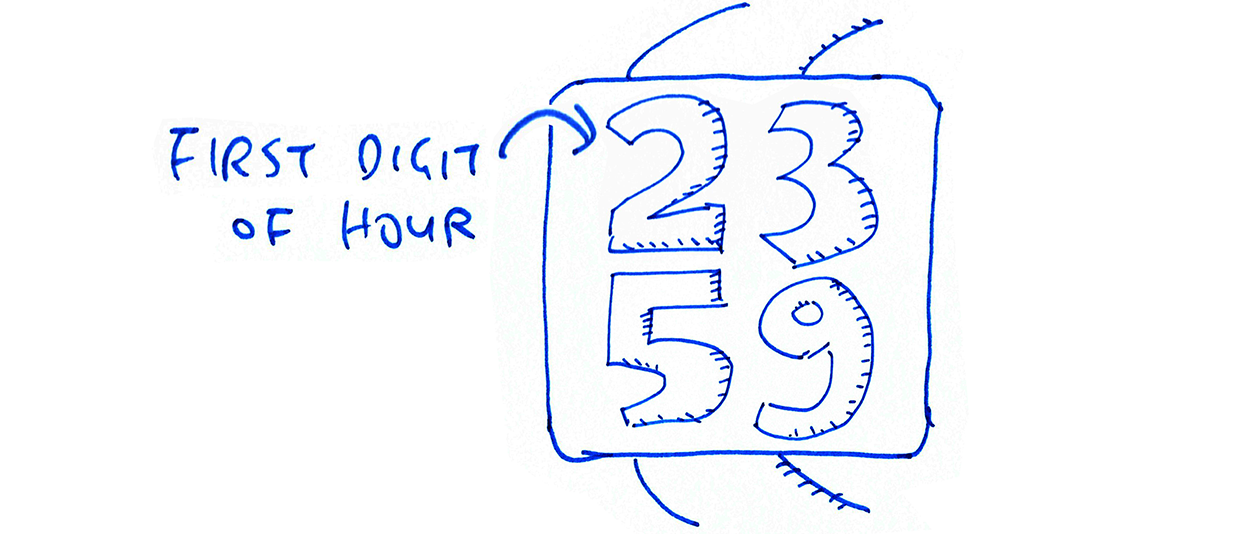
We start by zooming to the top left...
How shall we load the top left image... With the first digit of the hour?
In 3 steps...
We compute the first digit of the hour. So if the hour is 23, the first digit is 2.
We fetch the hand-drawn bitmap for the digit, i.e. 2
We load the bitmap into the top left image
Here's how we do it in Rust: src/lib.rs
//  Update the top left image with the first digit of the hour

//  Compute the first digit of the hour
let digit = state.time.hour / 10;

//  Fetch the bitmap for the digit as a constant pointer
let bitmap: *const img::lv_img_dsc_t =
    &self.bitmaps[digit as usize];

img::set_src(                //  Set the source...
    self.top_left_image,     //  Of the the top left image...
    bitmap as *const c_void  //  To the digit bitmap
) ? ;                        //  Quit in case of error
Yep it looks daunting... These are the 3 hardest lines of code in our Watch Face!
But let's step through each line bit by bit and uncover the mystique of Rust.
(I promise you... The rest of the code will be much simpler!)
Given an hour like 23, compute the first digit i.e. 2. How shall we do this in Rust?
Here's how: src/lib.rs
//  Compute the first digit of the hour
let digit = state.time.hour / 10;
We interpret state.time.hour like a nested fairy tale...
Once upon a time, there was an object named
state... That contained an object namedtime... That contained a field namedhour... The current hour of the day (from 0 to 23)
(We'll learn the backstory of state in a while... And objects in Rust are named Structs)
Here we divide the hour by 10 (and truncate the result) to get the first digit.
So if hour is 23, then digit gets set to 2.
The Type of digit is missing. Is Rust a Typeless Language like JavaScript and Python?
Rust is a Statically Typed Language like C... All Variables have known Types during compilation. The Rust Compiler infers the Types for us.
Sounds spooky, but the Rust Compiler goes all Sherlock Holmes on our code to deduce our Variable Types...
I see what you did there...
digitdoesn't have a known type! Hmmmhouris au8... 8-bit unsigned integer... After integer division we get anotheru8... So I deduce thatdigitis alsou8!
To see this Sherlock smartness in action, mouse over digit in VSCode...

We see that u8 pops up for digit... The Rust Compiler has inferred that digit is an 8-bit unsigned integer. (Like uint8_t in C)
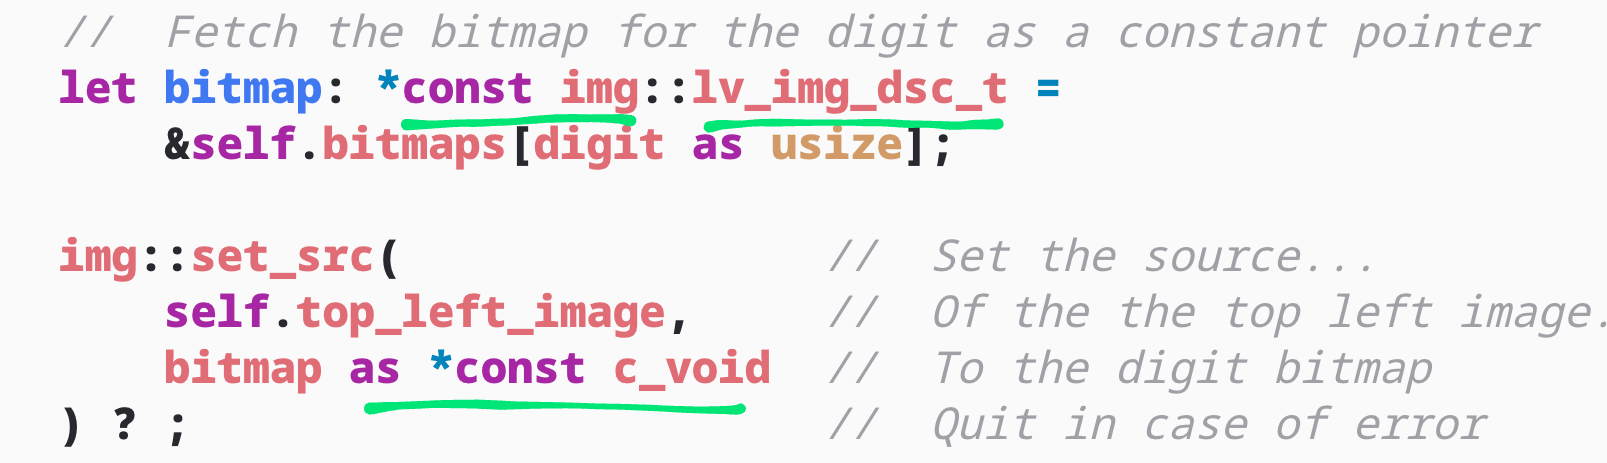
Now that we have the first digit of the hour, let's fetch the hand-drawn bitmap for the digit.
We have digit set to the first digit of the hour (0, 1 or 2). Here's how we fetch the bitmap for digit: src/lib.rs
//  Fetch the bitmap for the digit as a constant pointer
let bitmap: *const img::lv_img_dsc_t =
    &self.bitmaps[digit as usize];
This looks... Strange. Let's break it down...
What's self.bitmaps?
self.bitmaps is an Array of 10 hand-drawn bitmaps, indexed from 0 to 9...
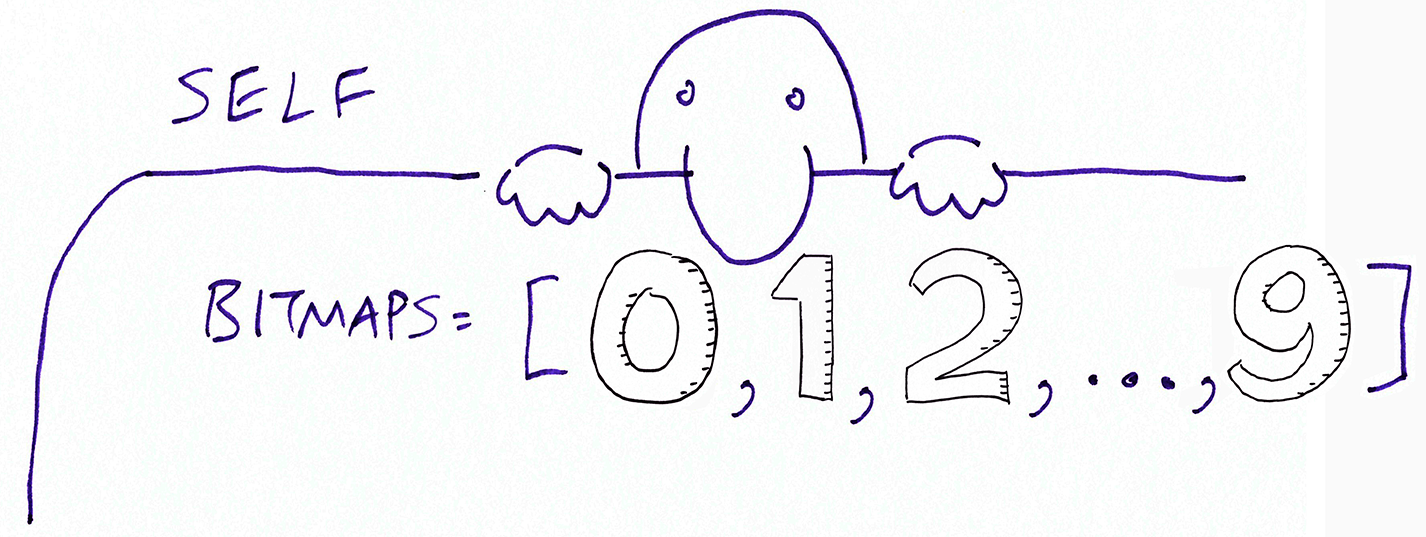
(We'll reveal our self later... Hint: We're inside an object!)
Thus to fetch the bitmap that corresponds to a digit, we do this...
let bitmap = self.bitmaps[digit];
What's usize?
Rust is extremely uptight about Types... Including the index for our Array self.bitmaps.
In Rust, Arrays are indexed by integers of the usize Type. (Somewhat like size_t in C)
Hence we need to convert (or cast) digit as usize like so...
let bitmap = self.bitmaps[digit as usize];
What's with the "&"?
We're not gonna pass around copies of the bitmap. (Because that would be awfully inefficient in a smart watch)
Instead we're passing a Reference to the bitmap. (Somewhat like a Pointer in C)
To get the Reference, we insert "&" like so...
let bitmap = &self.bitmaps[digit as usize];
What about *const img::lv_img_dsc_t?
Remember we set bitmap like so...
let bitmap: *const img::lv_img_dsc_t = ...
This means we're casting the bitmap Reference to a weird Type...
*const img::lv_img_dsc_t
This is a tough nugget to crack (unlike McNuggets)... But we'll learn its true meaning in a while.
(Hint: It's a Pointer (yep like C). And no we're not shopping for French luxury goods.)
Our story thus far: We have bitmap set to the hand-drawn digit (i.e. the first digit of the hour)...

Here's how we set the Top Left Image on our Watch Face to the bitmap: src/lib.rs
img::set_src(                //  Set the source...
    self.top_left_image,     //  Of the the top left image...
    bitmap as *const c_void  //  To the digit bitmap
) ? ;                        //  Quit in case of error
Let's savour this chunk by chunk (the old chunky way)...
What's self.top_left_image?
We have 4 images inside self...
So self.top_left_image refers to the Top Left Image on our Watch Face.
Why the studs in img::set_src?
Rust is fussy about keeping things neat, tidy and modular.
"img::" refers to the Module named img. When we write...
img::set_src( ... );
It means we're calling the function set_src defined in the Module img. (Similar to namespaces in C++)
Are we done yet?
Let's recap...
We have a function set_src (from Module img) that will set the bitmap for an image
We have the Top Left image: self.top_left_image
We have a Reference to the digit bitmap: bitmap
Thus to set the bitmap for the Top Left Image we may write...
img::set_src(             //  Set the source...
    self.top_left_image,  //  Of the the top left image...
    bitmap                //  To the digit bitmap
) ? ;                     //  What's this???
Why the questionable "?" at the end?
"?" is the Try Operator in Rust. It checks for errors.
If set_src returns an error, Rust stops executing the current function. And returns the error immediately to the caller.
(This is similar to try ... catch ... throw in JavaScript and Python)
Wait! We haven't covered these two sus chunks with *const...
//  Cast the bitmap as a constant pointer
let bitmap: *const img::lv_img_dsc_t = ... ;

//  Set the bitmap pointer as the image source
img::set_src( ... , bitmap as *const c_void ) ? ;
Yep they look highly sus... Is this really Embedded Rust?
Get ready for the shocking reveal...
Earlier we saw two highly sus chunks of code: src/lib.rs
What's *const?
*const is a Raw Pointer in Rust.
It works like a Pointer in C... It's an address that points to an object in memory.
We already have References in Rust (via the "&" operator). Why do we need Raw Pointers?
Time to fess up...
bitmap is a Raw Pointer to a C Object
set_src is a C Function
😮 But why??? Can't we do this in Rust instead of C?
That's the beauty... Rust and C are interoprapereraberble...
Ahem... Rust and C Functions can call each other!
Both Rust and C are low-level languages. It's perfectly OK to call C Functions from Rust (and the other way around).
That's why some folks are coding in Rust instead of C for creating Embedded Gadgets.
What C Functions are we calling?
We're calling C Functions from the open-source LVGL Graphics Library. It's great for creating Graphical User Interfaces on Embedded Devices with images, text labels, buttons, ...
The LVGL Library is used by many firmware developers to create Watch Faces for PineTime. We're calling the LVGL Library too... But from Rust.
Now our sus code...
//  Cast the bitmap as a constant pointer
let bitmap: *const img::lv_img_dsc_t = ... ;

//  Set the bitmap pointer as the image source
img::set_src( ... , bitmap as *const c_void ) ? ;
Makes more sense when we realise...
img::lv_img_dsc_t is a C Struct from the LVGL Library
img::set_src is a C Function from the LVGL Library
Today we won't talk much about casting C Pointers in Rust and passing them to C Functions. More details may be found in "The Rust Programming Languague" book...
Below is a handy map to keep us on track... It shows the code that we have explored thus far. The rest of the code awaits!

Remember our 3 toughest lines of Rust code... For updating the top left image on our Watch Face?
Let's zoom out and watch how we use them: src/lib.rs
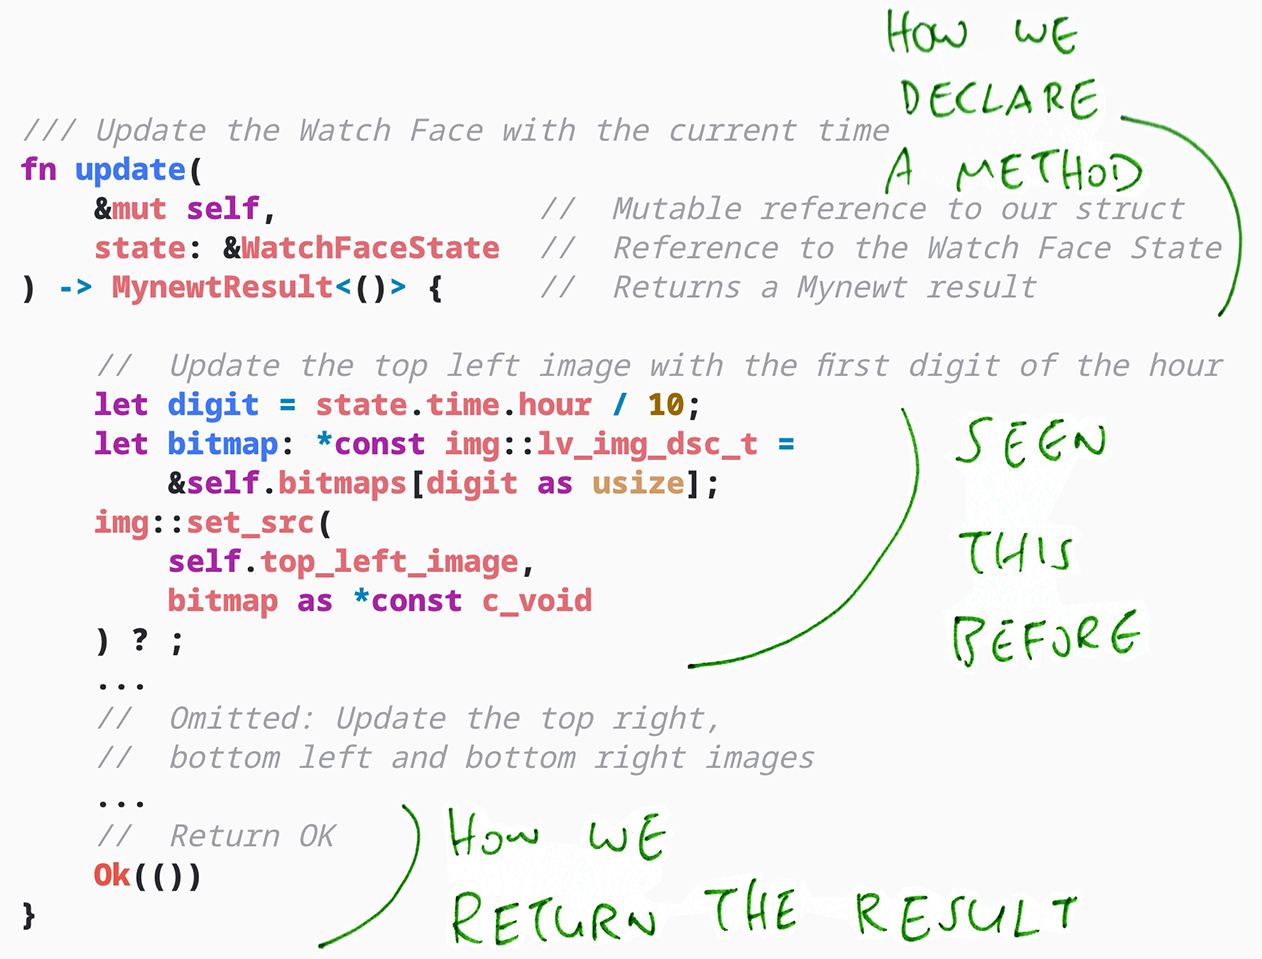
Now we zoom in to the top... Where we declare the update method: src/lib.rs

In Rust we declare a function (or a method) by writing...
fn ... -> ... {
(Similar to function in JavaScript and def in Python... But looks more mathematical)
What's update?
update is the method that's called to update the Watch Face every minute.
It accepts 2 parameters...
&mut self
This refers to our Watch Face object and the variables inside: bitmaps, top_left_label, ...
(Similar to self in Python or this in JavaScript and C++)
&mut means that the self object is passed as a Reference (instead of a copy), and that the self object is Mutable (can be modified).
state: &WatchFaceState
This says that state is a Reference to a WatchFaceState, an object that contains the values that will be rendered to our Watch Face.
Through this state, our caller passes the time of the day as hour (0 to 23) and minute (0 to 59).
We have seen state.hour earlier... We used it to render the hour of the day.
What's MynewtResult in the declaration above?
Remember the Try Operator "?" for checking errors returned by Rust Functions?
This works only for functions and methods that return the Result Type. Thus we follow the Rust error-checking convention and return a kind of Result named MynewtResult.
(Mynewt refers to the Apache Mynewt embedded operating system that we're running on PineTime)
Here's how we return the result in our update method: src/lib.rs
Ok( ... ) tells the caller that the result is OK, no errors.
We write Ok(()) when we have no result value to return.
(Think of () in Rust like void in C)
Note that we omit the trailing semicolon ";" when returning the result.
FYI: We return errors with Err( ... )
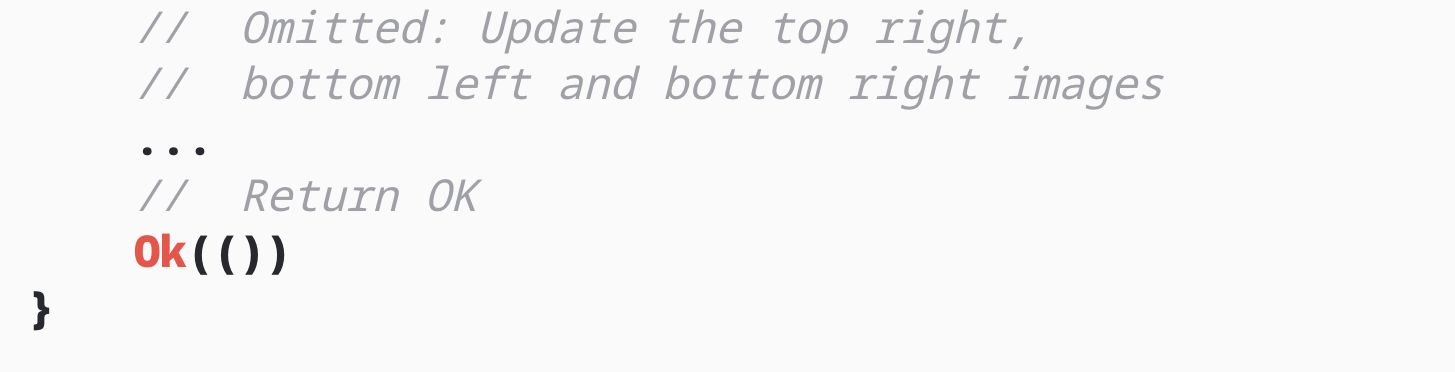
We've seen top_left_image... What about the other images: top_right_image, bottom_left_image and bottom_right_image?
The code to update the other 3 images looks similar. Check out the rest of the update method here: src/lib.rs

Congratulations! We're done with the update method... That's half of the Watch Face code!
Now we move on to the new method... For creating the Watch Face.
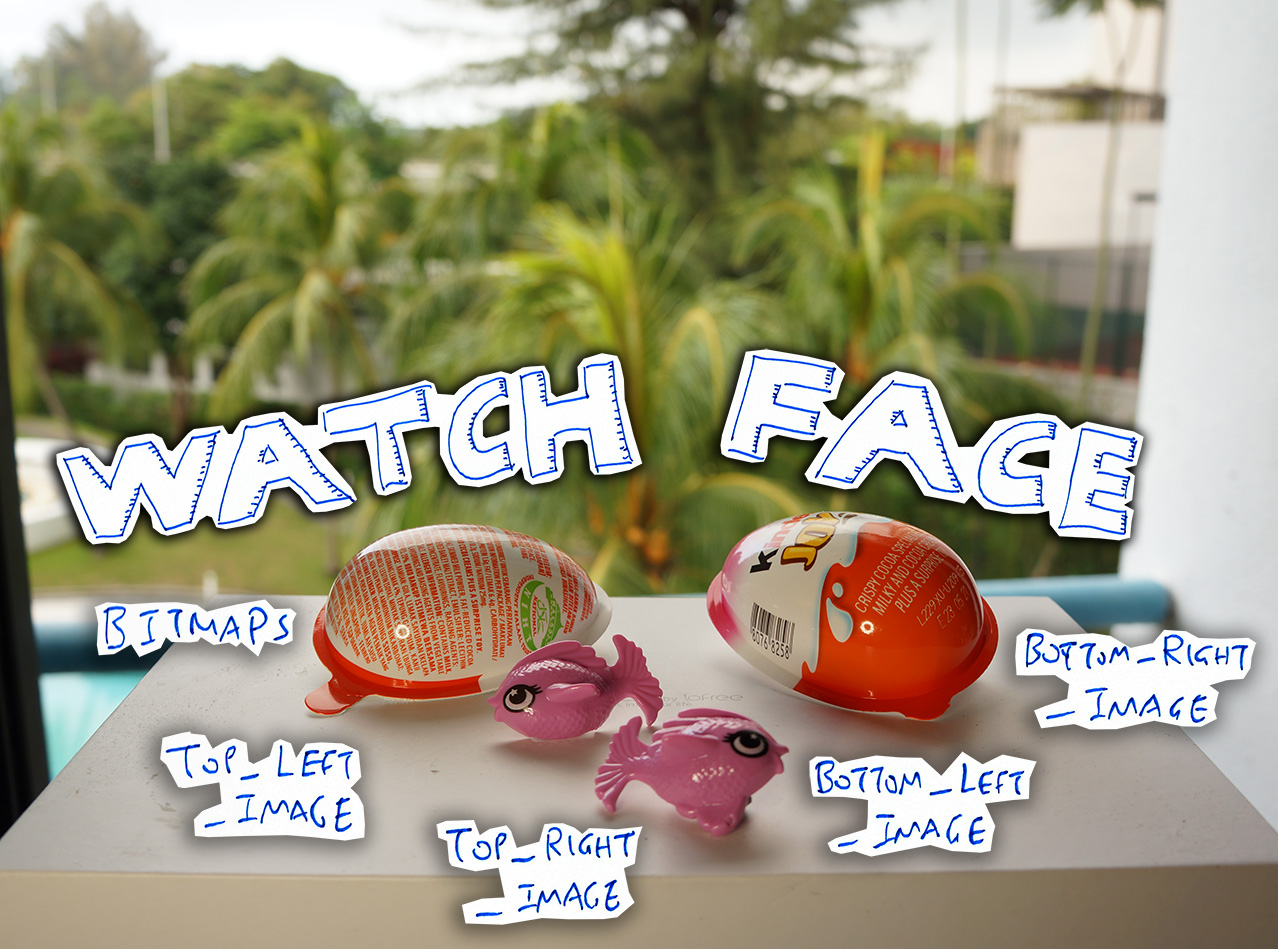
Our Watch Face has plenty of goodies inside (like a Kinder Egg)...
bitmaps: The hand-drawn bitmaps of the digits 0 to 9
top_left_image, top_right_image, bottom_left_image and bottom_right_image: The 4 images on our Watch Face
We have used them earlier but...
How are the bitmaps and images created?
Let's watch and learn...
We create the bitmap for the digit 0 as a Rust Struct like so: src/lib.rs
//  Create the bitmap struct for the digit 0
img::lv_img_dsc_t {
    //  Bitmap data, size and header
    data: include_bytes!("../bitmaps/0.bin") as *const u8,
    data_size,
    header
}
(Rust Structs are structured objects with fields inside... Just like Structs in C and Classes in Python)
What's img::lv_img_dsc_t?
We're reusing the C Struct lv_img_dsc_t from Module img of the LVGL Library. The lv_img_dsc_t Struct represents a bitmap in LVGL.
(Rust Structs and C Structs are generally interchangeable, with the right settings)
In Rust, we create instances of Structs by writing...
struct_type {
    field_name: field_value,
    ...
}
Let's look at the 3 fields inside our bitmap Struct...
data: The bitmap data
data_size: The size of the bitmap
header: The bitmap header (like the bitmap dimensions)
(How do we define a Struct and its fields? We'll find out later)
What's 0.bin? Why do we use it with include_bytes?
//  Load the bitmap file "0.bin" as the bitmap data field
data:
    include_bytes!("../bitmaps/0.bin")
        as *const u8
0.bin is the binary file that contains the hand-drawn bitmap for the digit 0. (Encoded in a special RGB565 format... Which we'll see later)
The file is located in the bitmaps source folder...

To embed the contents of 0.bin into our source file (at src/lib.rs), we call include_bytes.
Thus the field data will be compiled literally as...
//  include_bytes will be expanded like this...
data:
    &[ 0x00, 0x01, 0x02, ... ]  //  Reference to a byte array
        as *const u8            //  Cast to a C Pointer
(Yep it looks like #include from C... But works on binary files. Nifty!)
Why *const u8?
Our bitmap Struct will be passed to a C Function... So we need to convert Rust References to C Pointers.
We write as *const u8 to convert the binary contents of 0.bin from a Rust Reference to a C Pointer.
Why is there a "!" after include_bytes?
Because include_bytes is a Rust Macro (not a Rust Function). It's interpreted by the Rust Compiler while compiling our Rust code.
Rust makes it so breezy easy to embed binary files (like bitmaps) into our Watch Face... Thanks to include_bytes!
We've seen how the data field is loaded from the bitmap file 0.bin: src/lib.rs
//  Create the bitmap struct for the digit 0
img::lv_img_dsc_t {
    //  We have seen this...
    data: include_bytes!("../bitmaps/0.bin") as *const u8,
    //  Now let's do data_size and header
    data_size,
    header
}
We move on to the next field data_size, the number of bytes in the bitmap file.
data_size is computed like so: src/lib.rs
/// Width of each image and bitmap
const IMAGE_WIDTH: u32  = 80;

/// Height of each image and bitmap
const IMAGE_HEIGHT: u32 = 100;

/// 2 bytes per pixel, in RGB565 format
const BYTES_PER_PIXEL: u32 = 2;

//  Compute the image size
let data_size = IMAGE_WIDTH * IMAGE_HEIGHT * BYTES_PER_PIXEL;
(u32 means unsigned 32-bit integer)
Our bitmap 0.bin is 80 pixels wide and 100 pixels wide.
In RGB565 Encoding, each pixel is represented by 2 bytes of colour data.
So data_size works out to 80 * 100 * 2 or 16,000 bytes.
There's something odd about data_size... Shouldn't it be:
//  Create the bitmap struct for the digit 0
img::lv_img_dsc_t {
    //  Set the value of data_size
    data_size: data_size,
    ...
That's a handy short form in Rust... When creating Structs, we may omit the value if it has the same name as the field.
So the above code may be simplified as...
//  Create the bitmap struct for the digit 0
img::lv_img_dsc_t {
    //  Short form of `data_size: data_size`
    data_size,
    //  Short form of `header: header`
    header,
    ...
Let's talk about header, the header for our bitmap...
According to the definition of the lv_img_dsc_t Struct in LVGL, we need to provide a header field that describes...
Colour format of our bitmap (i.e. True Color)
Width of our bitmap (i.e. 80 pixels)
Height of our bitmap (i.e. 100 pixels)
We create the header like so: src/lib.rs
//  Compose the image header
let mut header = img::lv_img_header_t::default();
header.set_cf(img::LV_IMG_CF_TRUE_COLOR);  //  Color Format
header.set_w(IMAGE_WIDTH);                 //  Width
header.set_h(IMAGE_HEIGHT);                //  Height
We have seen this code for loading the bitmap for the digit 0...
//  Create the bitmap struct for the digit 0
img::lv_img_dsc_t {
    //  Load the bitmap bytes
    data: include_bytes!("../bitmaps/0.bin") as *const u8,
    //  Set the bitmap size
    data_size,
    //  Set the bitmap header
    header
}
Let's load all 10 bitmaps, for digits 0 to 9: src/lib.rs
//  Load the bitmaps
bitmaps: [
    img::lv_img_dsc_t { data: include_bytes!("../bitmaps/0.bin") as *const u8, header, data_size },
    img::lv_img_dsc_t { data: include_bytes!("../bitmaps/1.bin") as *const u8, header, data_size },
    img::lv_img_dsc_t { data: include_bytes!("../bitmaps/2.bin") as *const u8, header, data_size },
    //  Omitted: Bitmaps 3 to 8
    img::lv_img_dsc_t { data: include_bytes!("../bitmaps/9.bin") as *const u8, header, data_size },
]
bitmaps is the array of bitmaps that we have used earlier.
This code appears at the end of the new method for creating our Watch Face...

Let's study the rest of the code in the new method...
We create the top left image like so: src/lib.rs
top_left_image: {
    //  Create the top left image
    //  `?` will terminate the function in case of error
    let image = img::create(screen, ptr::null()) ? ;

    //  Set image position to top left
    obj::set_pos(image, 40, 20) ? ;

    //  Return the image as top_left_image
    image  //  Omit the semicolon
},
This form of Rust looks unusual, but think of it like this...
top_left_image: { ... ; image },
In Rust the curly brackets { ... } represent a block of code.
Every block of code in Rust evaluates to a value. Here the last line of code in the block, image, is returned as the value of the block. (Note that the semicolon ";" is omitted when we return values)
What's screen?
screen refers to the current active screen in LVGL.
screen is defined in src/lib.rs as...
//  Get the active screen
let screen = watchface::get_active_screen();
We create the top right, bottom left and bottom right images the same way: src/lib.rs
//  Create the top right image
top_right_image: {
    let image = img::create(screen, ptr::null()) ? ;
    obj::set_pos(image, 120, 20) ? ;  //  Set image position to top right
    image                             //  Return the image as top_right_image
},

//  Create the bottom left image
bottom_left_image: {
    let image = img::create(screen, ptr::null()) ? ;
    obj::set_pos(image, 40, 120) ? ;  //  Set image position to bottom left
    image                             //  Return the image as bottom_left_image
},

//  Create the bottom right image
bottom_right_image: {
    let image = img::create(screen, ptr::null()) ? ;
    obj::set_pos(image, 120, 120) ? ;  //  Set image position to bottom right
    image                              //  Return the image as bottom_right_image
},
And that's how we create images in the new Method.
The code is located in the middle of the new Method...

We have seen various parts of the new Method... Let's wrap them all up into a proper Method Defintion: src/lib.rs
/// Create the Watch Face
fn new() -> MynewtResult<Self> {
    //  Get the active screen
    let screen = watchface::get_active_screen();

    //  Seen earlier: Compose the image header
    let mut header = ... ;

    //  Seen earlier: Compute the image size
    let data_size = ... ;

    //  Create the widgets
    let watch_face = Self {

        //  Seen earlier: Create the top left image
        top_left_image: { ... },

        //  Seen earlier: Create the top right image
        top_right_image: { ... },

        //  Seen earlier: Create the bottom left image
        bottom_left_image: { ... },

        //  Seen earlier: Create the bottom right image
        bottom_right_image: { ... },

        //  Seen earlier: Load the bitmaps
        bitmaps: [ ... ],
    };
    //  Return the watch face
    Ok(watch_face)
}
The new Method returns MynewtResult<Self>...
/// Create the Watch Face
fn new() -> MynewtResult<Self> { ...
Which means that the method returns either a Watch Face (i.e. Self) or an error (i.e. Err)
Why does Self refer to the Watch Face?
We'll find out in a while.
TODO
/// Create the Watch Face
fn new() -> MynewtResult<Self> {
    ...
    //  Create the widgets
    let watch_face = Self {
        ...
    };
    //  Return the watch face
    Ok(watch_face)
}

TODO
TODO
TODO
Lemme know if you're keen to help! :-)
In the meantime, please go right ahead to create your own Watch Faces and publish them on crates.io... So that all PineTime Owners can share, learn and enjoy :-)
Got a question, comment or suggestion? Create an Issue or submit a Pull Request here...