
📝 16 Aug 2021
One year ago I pondered… Can we make Embedded Programming easier for Learners?
Maybe we need an easier way to build, test and debug our firmware…
Without using actual embedded hardware?
Today we shall explore whether it’s feasible to run Rust Firmware for BL602 RISC-V SoC in a Web Browser…
By simulating the BL602 SoC with WebAssembly!
Read on to find how we created this bare-bones BL602 Simulator in WebAssembly…
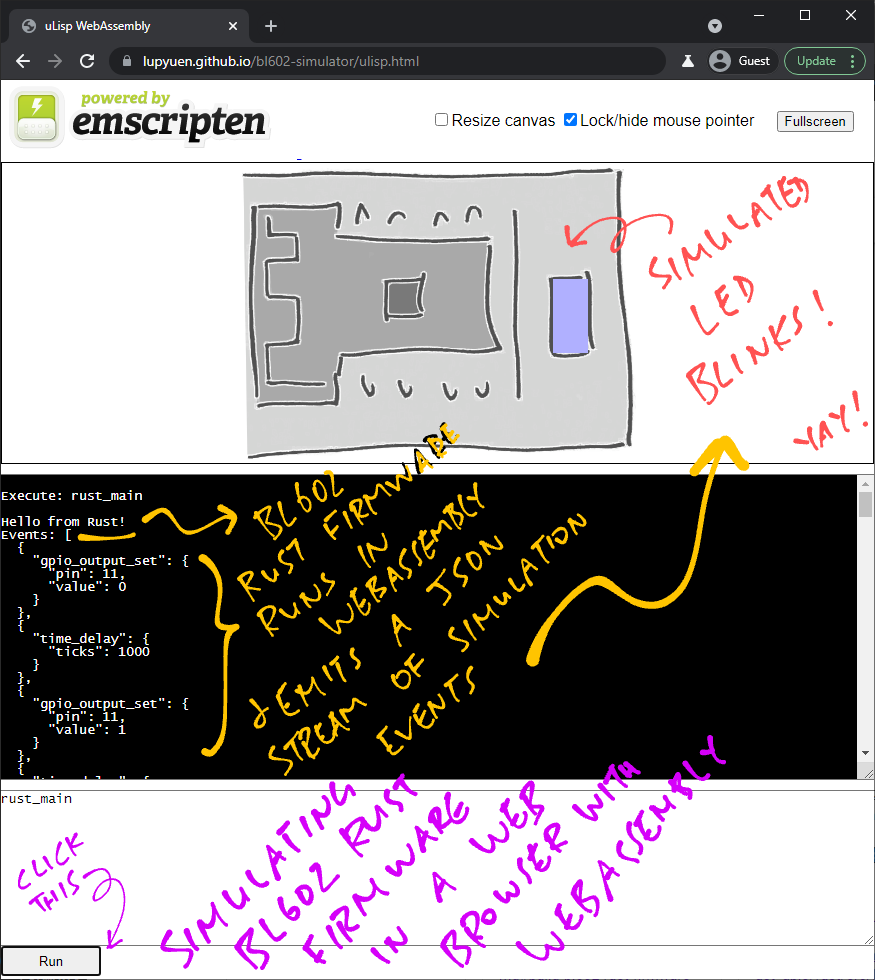
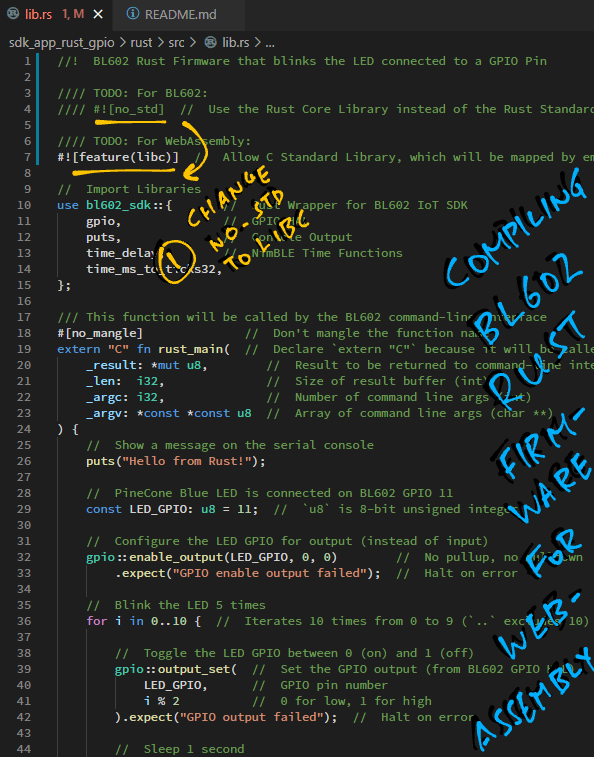
We start with this BL602 Rust Firmware sdk_app_rust_gpio that blinks the LED: sdk_app_rust_gpio/lib.rs
/// This function will be called by the BL602 command-line interface
#[no_mangle]              //  Don't mangle the function name
extern "C" fn rust_main(  //  Declare `extern "C"` because it will be called by BL602 firmware
  _result: *mut u8,        //  Result to be returned to command-line interface (char *)
  _len:  i32,              //  Size of result buffer (int)
  _argc: i32,              //  Number of command line args (int)
  _argv: *const *const u8  //  Array of command line args (char **)
) {
  //  Show a message on the serial console
  puts("Hello from Rust!");

  //  PineCone Blue LED is connected on BL602 GPIO 11
  const LED_GPIO: u8 = 11;  //  `u8` is 8-bit unsigned integer

  //  Configure the LED GPIO for output (instead of input)
  gpio::enable_output(LED_GPIO, 0, 0)      //  No pullup, no pulldown
    .expect("GPIO enable output failed");  //  Halt on error

  //  Blink the LED 5 times
  for i in 0..10 {  //  Iterates 10 times from 0 to 9 (`..` excludes 10)

    //  Toggle the LED GPIO between 0 (on) and 1 (off)
    gpio::output_set(  //  Set the GPIO output (from BL602 GPIO HAL)
      LED_GPIO,        //  GPIO pin number
      i % 2            //  0 for low, 1 for high
    ).expect("GPIO output failed");  //  Halt on error

    //  Sleep 1 second
    time_delay(                 //  Sleep by number of ticks (from NimBLE Porting Layer)
      time_ms_to_ticks32(1000)  //  Convert 1,000 milliseconds to ticks (from NimBLE Porting Layer)
    );
  }
  //  Return to the BL602 command-line interface
}
What are gpio::enable_output and gpio::output_set?
They are BL602 GPIO Functions defined in the Rust Wrapper for BL602 IoT SDK, as explained here…
time_delay and time_ms_to_ticks32 are also defined in the BL602 Rust Wrapper.
How do we build, flash and run this BL602 Rust Firmware?
To see the blinking BL602 LED, we…
Build this Rust Firmware
Link it with the BL602 IoT SDK
Flash the firmware to BL602
Connect to BL602 via the USB Serial Port and enter the command…
rust_main
Can we run this BL602 Rust Firmware in a Web Browser? Without any BL602 hardware?
Let’s find out!
First we compile this BL602 Rust Firmware to WebAssembly…
We’ve created a Makefile that builds the above BL602 Rust Firmware into WebAssembly.
Here’s how we use it…
## Configure emscripten. See https://emscripten.org/docs/getting_started/downloads.html
## For Windows: emsdk\emsdk_env.bat
. ~/emsdk/emsdk_env.sh

## Download source code
git clone --recursive https://github.com/lupyuen/bl602-simulator
cd bl602-simulator

## Compile the Rust Firmware, Rust Simulator Library and link with Emscripten
make

## Produces outputs in the `docs` folder: wasm.js, wasm.wasm
This produces the JavaScript and WebAssembly files wasm.js and wasm.wasm, which we’ll run in a Web Browser later.
What’s inside the Makefile?
Our Makefile does the following…
Compile the Rust Firmware into WebAssembly
(“cargo build” for target “wasm32-unknown-emscripten”)
Link the Rust Firmware with the Emscripten WebAssembly Runtime
(So that it runs in a Web Browser)
Let’s go into the details…
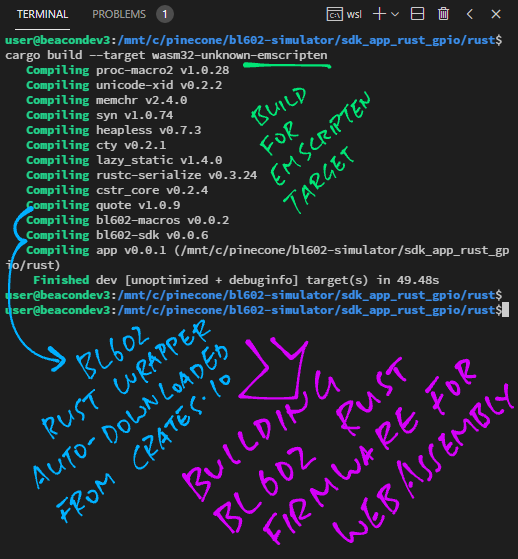
To compile our Rust Firmware into WebAssembly, our Makefile calls this command…
## Compile the Rust Firmware and Rust Simulator Library into WebAssembly
cargo build --target wasm32-unknown-emscripten
This compiles three Rust Projects…
Rust Firmware:
bl602-simulator/sdk_app_rust_gpio/rust
(The Rust Firmware we’ve seen earlier. Should be portable across BL602 and WebAssembly)
Rust Simulator Library:
bl602-simulator/bl602-simulator
(Simulates the BL602 IoT SDK. We’ll see this in a while)
Rust Scripting Library:
(More about this later)
“cargo build” downloads the BL602 Rust Wrapper automagically from crates.io …
...
Compiling bl602-macros v0.0.2
Compiling bl602-sdk v0.0.6
Compiling app v0.0.1 (bl602-simulator/sdk_app_rust_gpio/rust)
Compiling bl602-simulator v0.0.1 (bl602-simulator/bl602-simulator)
Finished dev [unoptimized + debuginfo] target(s) in 1m 43s
(Great that BL602 Rust Wrapper builds OK for WebAssembly! Yep our WSL machine is slow)
However our Rust Firmware needs a slight tweak at the top to build correctly under WebAssembly: sdk_app_rust_gpio/lib.rs
// TODO: For BL602:
// #![no_std]  //  Use the Rust Core Library instead of the Rust Standard Library, which is not compatible with embedded systems

// TODO: For WebAssembly:
#![feature(libc)]  //  Allow C Standard Library, which will be mapped by emscripten to JavaScript
We change no_std to feature(libc) for the build to succeed.
Probably because the Emscripten Runtime behaves more like the Standard C Runtime.
(Someday we might use build.rs to apply this mod automatically during compilation)
What are the outputs for “cargo build”?
“cargo build” produces two Static Libraries (Rust Firmware and Rust Simulator)…
target/wasm32-unknown-emscripten/debug/libapp.a
target/wasm32-unknown-emscripten/debug/libbl602_simulator.a
Which we shall link with Emscripten’s WebAssembly Runtime.
Why did “cargo build” emit Static Libraries? Instead of the default Rust Libraries?
Because we specified staticlib in Cargo.toml for the Rust Firmware and Rust Simulator…
## Build this module as a Static Library.
[lib]
name       = "app"          # Output will be named `libapp.a`
crate-type = ["staticlib"]  # And will be a Static Library
Rust Libraries won’t link with Emscripten’s WebAssembly Runtime.
That’s why we switched to Static Libraries.
We’re nearly ready to run our Rust Firmware in WebAssembly! We need a WebAssembly Runtime that will…
Let our Rust Firmware interact with HTML and JavaScript
(To render the Web Browser UI)
And print messages, errors and exceptions to the Web Browser
We’ll use the Emscripten WebAssembly Runtime.
Our Makefile links the Rust Firmware with Emscripten like so…
## Link the Rust Firmware and Rust Simulator Library with Emscripten
emcc -o wasm/wasm.html \
  target/wasm32-unknown-emscripten/debug/libapp.a \
  target/wasm32-unknown-emscripten/debug/libbl602_simulator.a \
  wasm/wasm.o \
  -g \
  -s WASM=1 \
  -s DISABLE_EXCEPTION_CATCHING=0 \
  -s "EXPORTED_FUNCTIONS=[ '_rust_main', '_clear_simulation_events', '_get_simulation_events' ]" \
  -s "EXTRA_EXPORTED_RUNTIME_METHODS=[ 'cwrap', 'allocate', 'intArrayFromString', 'UTF8ToString' ]"
What are the EXPORTED_FUNCTIONS?
These Rust Functions will be called from JavaScript…
_rust_main is the Rust Function that blinks the LED
(We’ve seen this earlier)
_clear_simulation_events and _get_simulation_events are functions from the Rust Simulator Library that will manage the JSON Stream of Simulation Events
(More about this later)
What are the EXTRA_EXPORTED_RUNTIME_METHODS?
These Emscripten Runtime Functions will be exported to JavaScript to allow strings to be passed between JavaScript and our Rust Firmware…
cwrap, allocate, intArrayFromString, UTF8ToStringWhat are the outputs emitted by Emscripten?
Emscripten produces these files after linking our Rust Firmware…
wasm.wasm: WebAssembly binary file
wasm.js: JavaScript that loads the WebAssembly binary file into the Web Browser
wasm.html: HTML page that loads the above JavaScript to execute the WebAssembly binary
Our Makefile copies the JavaScript and WebAssembly outputs to the docs folder…
## Copy the WebAssembly outputs to the docs folder for GitHub Pages
cp wasm/wasm.js   docs
cp wasm/wasm.wasm docs
So that we may test the WebAssembly outputs with a Local Web Server.
What about the HTML file wasm.html?
We’re using a customised version of wasm.html in the docs folder.
It renders a Simulated BL602 Board, as we shall soon see.
Why did we use the Emscripten WebAssembly Runtime? Instead of the Rust WebAssembly Runtime?
Because we copied the code from an earlier (non-Rust) WebAssembly project…
Our story so far…
We have compiled our Rust Firmware into WebAssembly
Our firmware runs in a Web Browser and it’s capable of interacting with HTML and JavaScript
(Thanks to Emscripten)
But our firmware won’t blink any LEDs
(Because the BL602 IoT SDK is missing from WebAssembly)
What if we simulate the LED with HTML and JavaScript?
Yep we could build a BL602 Simulator in HTML and JavaScript.
And we can make our Rust Firmware talk to the BL602 Simulator…
By emitting a JSON Stream of BL602 Simulation Events!
What’s a BL602 Simulation Event?
When our firmware needs to set the GPIO Output to High or Low (to flip an LED On/Off)…
//  Switch the LED On
gpio::output_set(  //  Set the GPIO output for...
  11,              //  GPIO pin number
  0                //  0 for On, 1 for Off
)...
It sends a Simulation Event to the BL602 Simulator (in JSON format)…
{ "gpio_output_set": {
  "pin":  11,
  "value": 0
} }
Which will be handled by the BL602 Simulator to flip the Simulated LED on or off.
Is our firmware directly controlling the BL602 Simulator?
Not quite. Our firmware is indirectly controlling the BL602 Simulator by sending Simulation Events.
(More about this Inversion of Control)
What about time delays?
Our firmware shall generate Simulation Events for time delays.
To handle such events, our BL602 Simulator pauses for the specified duration.
(It’s like playing a MIDI Stream)
Hence this firmware code…
//  Sleep 1,000 milliseconds (or 1 second)
time_delay(1000);
Shall generate this Time Delay Simulation Event…
{ "time_delay": { "ticks": 1000 } }
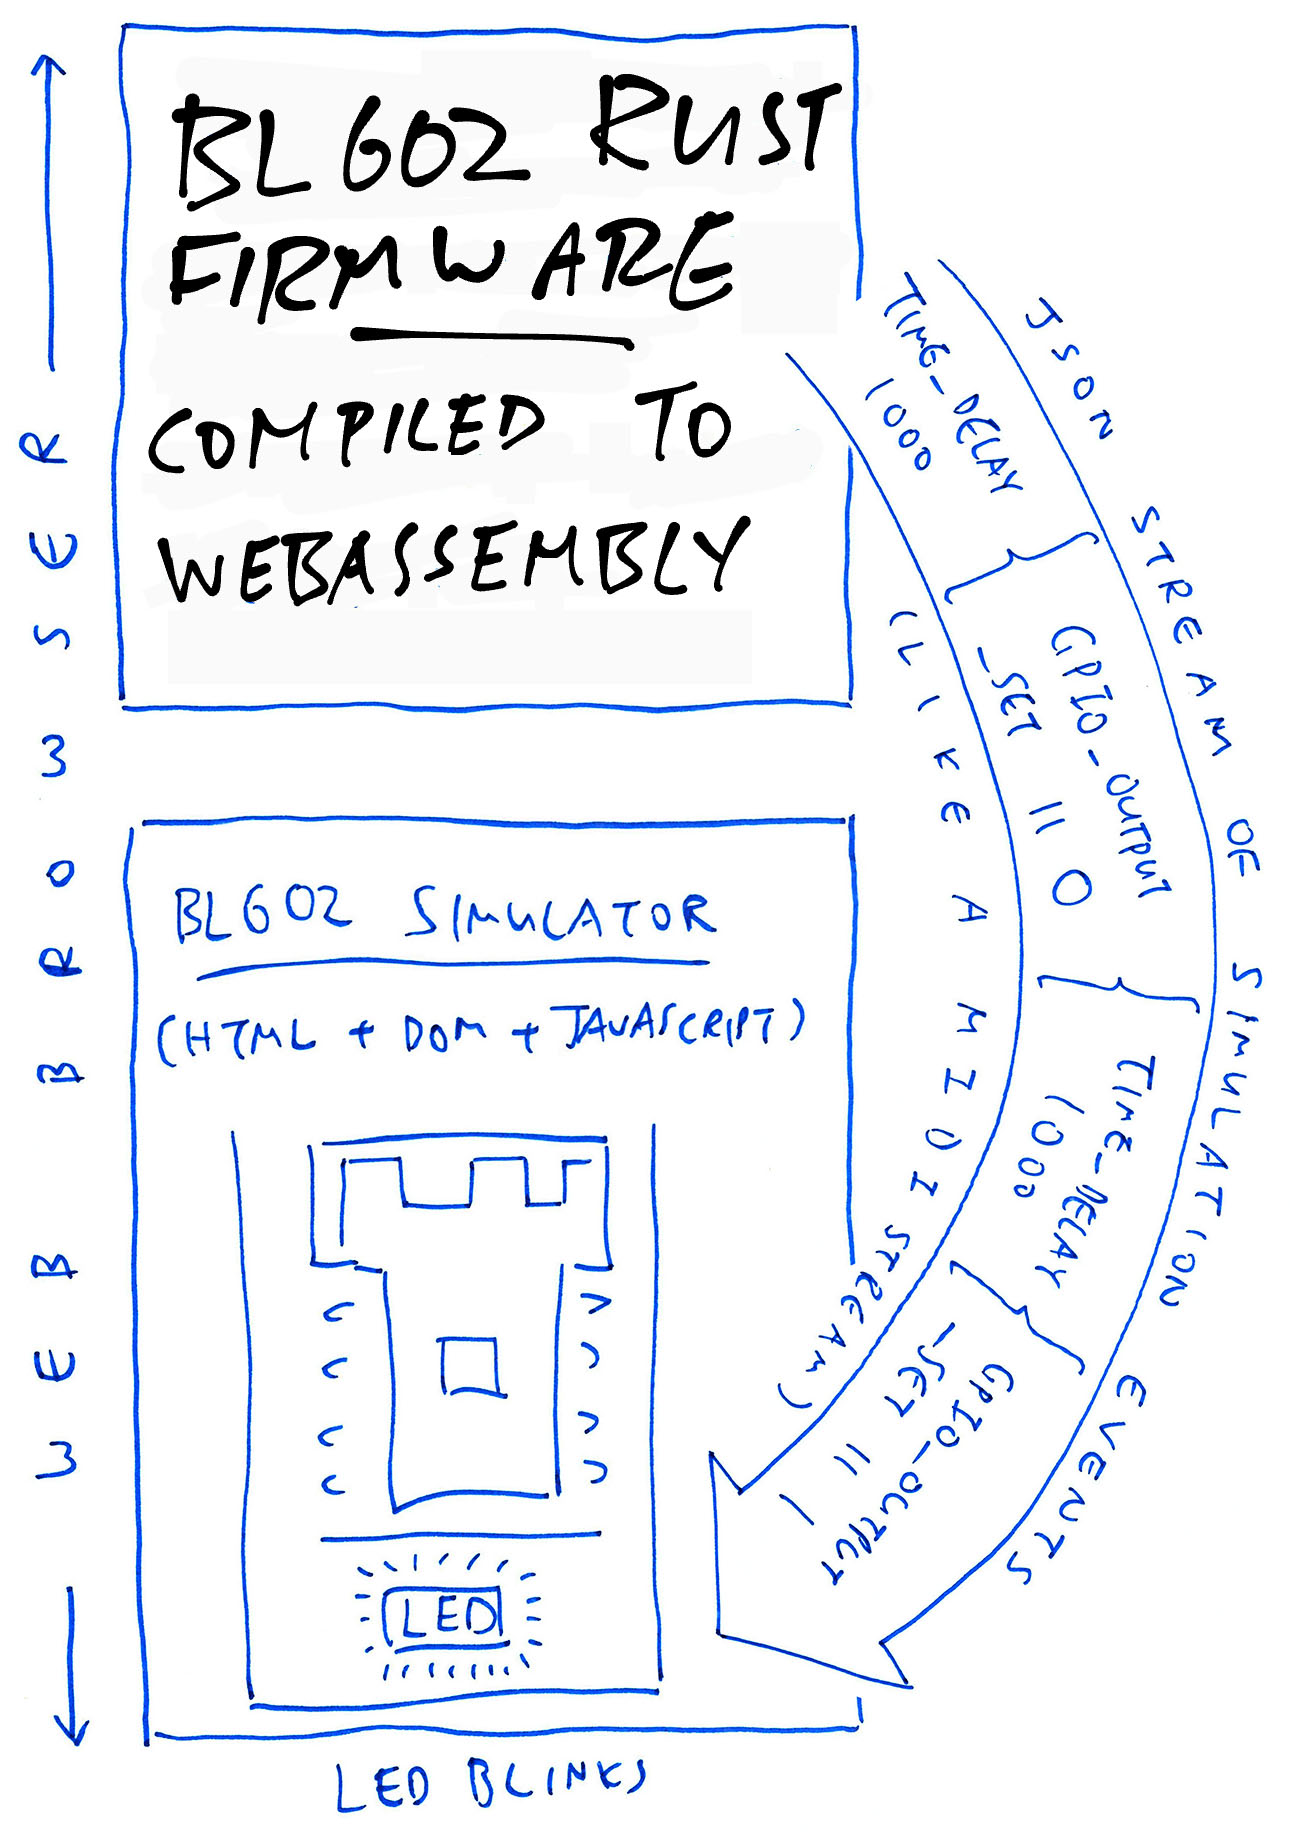
What’s inside the JSON Stream of Simulation Events?
To simulate our firmware on the BL602 Simulator, we shall transmit an array of Simulation Events (in JSON format) from our firmware to the BL602 Simulator.
Thus our Rust Blinky Firmware shall generate this JSON Stream of Simulation Events…
[ { "gpio_output_set": { "pin": 11, "value": 0 } },
  { "time_delay":      { "ticks": 1000 } },

  { "gpio_output_set": { "pin": 11, "value": 1 } },
  { "time_delay":      { "ticks": 1000 } },
  ...
]
That will simulate a blinking BL602 LED.
Let’s generate the Simulation Events now.
How shall we generate this JSON Simulation Event…
{ "gpio_output_set": {
  "pin":  11,
  "value": 0
} }
When we call this Rust Function?
// Switch the LED On
gpio::output_set( // Set the GPIO output for...
11, // GPIO pin number
0 // 0 for On, 1 for Off
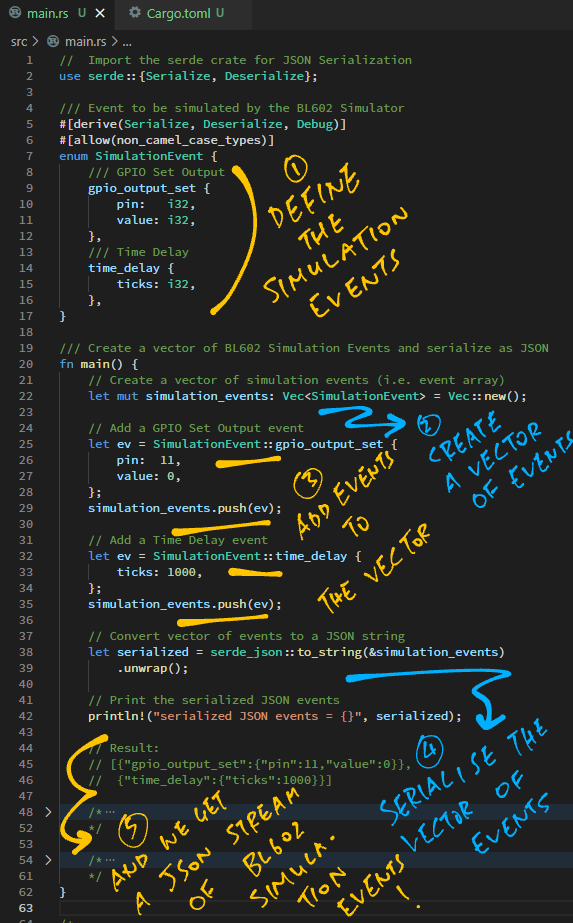
)...We start by defining the Enum Type for the Simulation Event: bl602-simulator/lib.rs
//  Import the serde crate for JSON Serialization
use serde::{Serialize, Deserialize};

/// Event to be simulated by the BL602 Simulator
#[derive(Serialize, Deserialize, Debug)]
enum SimulationEvent {
  /// GPIO Set Output:
  /// `{ "gpio_output_set": { "pin": 11, "value": 1 }`
  gpio_output_set {
    pin:   u8,
    value: u8,
  },
}
To represent a stream of events, we create a Vector of Simulation Events…
// Create a vector of simulation events (i.e. event array)
let mut simulation_events: Vec<SimulationEvent> = Vec::new();
Here’s how we create a Simulation Event for GPIO Set Output and add it to the stream…
// Create a GPIO Set Output event
let ev = SimulationEvent::gpio_output_set {
  pin:  11,
  value: 0,
};

// Add the event to the vector
simulation_events.push(ev);
Thanks to the Serde Crate, we may serialize the Vector of Simulation Events like so…
// Convert vector of events to a JSON string
let serialized = serde_json::to_string(&simulation_events)
  .unwrap();

// Print the serialized JSON events
println!("{}", serialized);
The result is a JSON Array of Simulation Events…
[{"gpio_output_set":{"pin":11,"value":0}}]
Exactly what we need!
What about the Time Delay Event?
{ "time_delay": { "ticks": 1000 } }
We add Time Delay to our Enum Type like so: bl602-simulator/lib.rs
/// Event to be simulated by the BL602 Simulator
enum SimulationEvent {
    /// Omitted: GPIO Set Output
    ...
    /// Time Delay:
    /// `{ "time_delay": { "ticks": 1000 } }`
    time_delay {
        ticks: u32,
    },
}
And we create the Time Delay Event like so…
// Create a Time Delay event
let ev = SimulationEvent::time_delay {
  ticks: 1000,
};

// Add the event to the vector
simulation_events.push(ev);
Serde Crate does the rest!
We’ve just figured out how to compose the JSON Stream of Simulation Events.
Now let’s do this inside the calls to BL602 IoT SDK…
//  Switch the LED On
gpio::output_set(  //  Set the GPIO output for...
  11,              //  GPIO pin number
  0                //  0 for On, 1 for Off
)...
Where is the Rust Wrapper Function gpio::output_set defined?
From the previous article we see that the Wrapper Function is generated by bindgen and safe_wrap: sdk-expanded.rs
/// BL602 Rust Wrapper Function that sets the GPIO output
pub fn output_set(pin: u8, value: u8) -> BlResult<()> {
  //  Import the C function from BL602 IoT SDK
  extern "C" {
    pub fn bl_gpio_output_set(pin: u8, value: u8) -> ::cty::c_int;
  }
  unsafe {
    //  Call the BL602 IoT SDK
    let res = bl_gpio_output_set(pin as u8, value as u8);
    //  Return the result
    match res { 0 => Ok(()), _ => Err(BlError::from(res)), }
  }
}This code calls bl_gpio_output_set, which is defined in the BL602 IoT SDK.
But bl_gpio_output_set won’t work on WebAssembly right?
Correcto! Because BL602 IoT SDK doesn’t exist on WebAssembly!
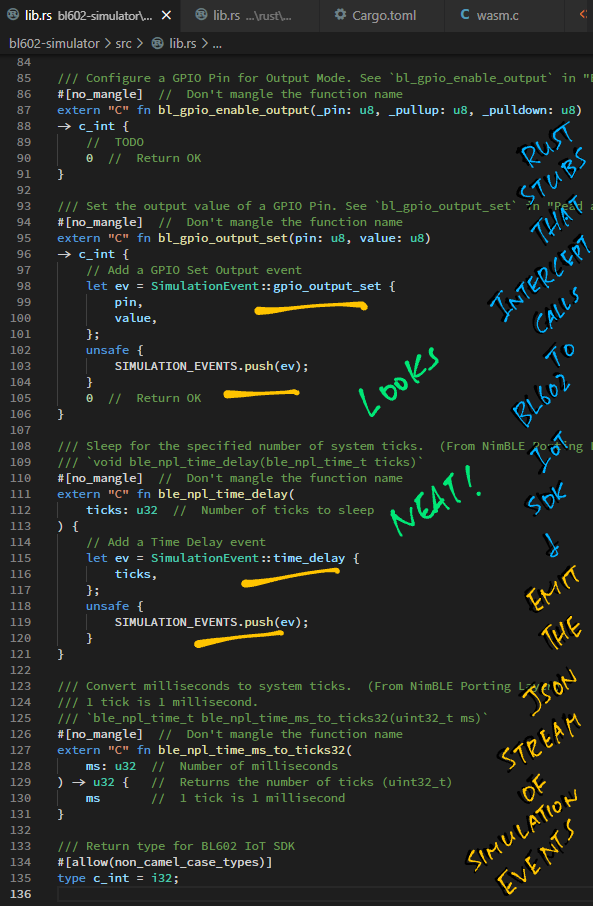
To fix this we introduce the Rust Simulator Library, which pretends to be the BL602 IoT SDK for WebAssembly.
Here’s how it works: bl602-simulator/lib.rs
/// Set the output value of a GPIO Pin. See `bl_gpio_output_set` in "Read and Write GPIO" <https://lupyuen.github.io/articles/led#read-and-write-gpio>
#[no_mangle]  //  Don't mangle the function name
extern "C" fn bl_gpio_output_set(pin: u8, value: u8) -> c_int {
  //  Omitted: If the GPIO Pin has not been configured for Output, halt
  ...
  //  Create a GPIO Set Output event
  let ev = SimulationEvent::gpio_output_set {
    pin,
    value,
  };
  //  Add the event to the JSON Stream of Simulation Events.
  //  Unsafe because `SIMULATION_EVENTS` is a Static Variable.
  unsafe {
    SIMULATION_EVENTS.push(ev);
  }
  //  Return OK
  0
}
See what we did there? To flip the LED on / off…
Our Rust Firmware calls gpio::output_set
gpio::output_set(11, 0)Which is a wrapper function that calls bl_gpio_output_set
fn output_set(pin: u8, value: u8) -> BlResult<()> {
  //  Call the BL602 IoT SDK
  bl_gpio_output_set(pin as u8, value as u8);
Which adds the Set GPIO Output event to the JSON Stream of Simulation Events
fn bl_gpio_output_set(pin: u8, value: u8) -> c_int {
  //  Create a GPIO Set Output event
  let ev = SimulationEvent::gpio_output_set { pin, value };
  //  Add the event to the JSON Stream of Simulation Events
  SIMULATION_EVENTS.push(ev);
And that’s how we intercept calls to BL602 IoT SDK… To emit a JSON Stream of Simulation Events!
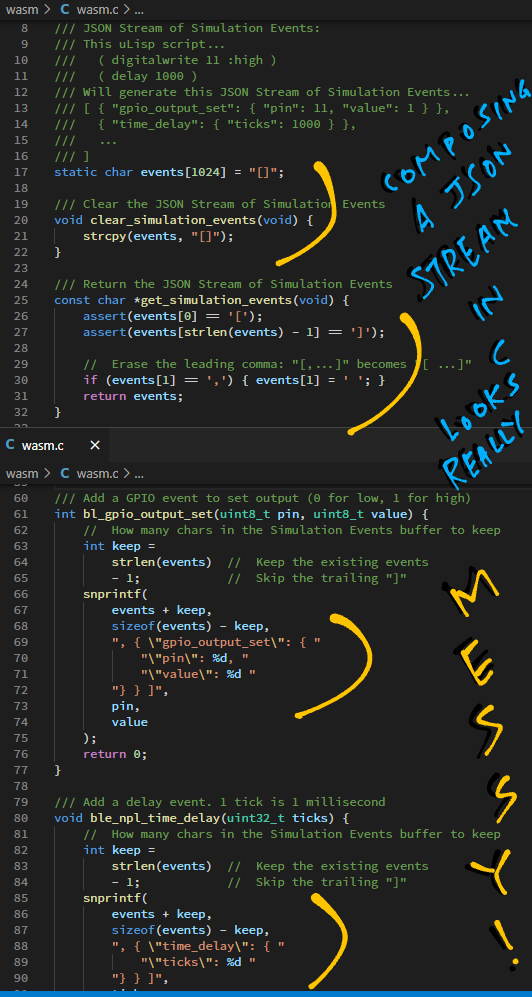
Could we have done this in C instead of Rust?
Yep but it’s gonna get messy when we compose JSON in C.
Here’s the original implementation in C before converting to Rust…
We’ve done the Top Half of this pic: Emitting a JSON Stream of BL602 Simulation Events…
Now we do the Bottom Half: Web Browser Interface in HTML and JavaScript!
First we save this sketchy pic of a PineCone BL602 Board as a PNG file: pinecone.png
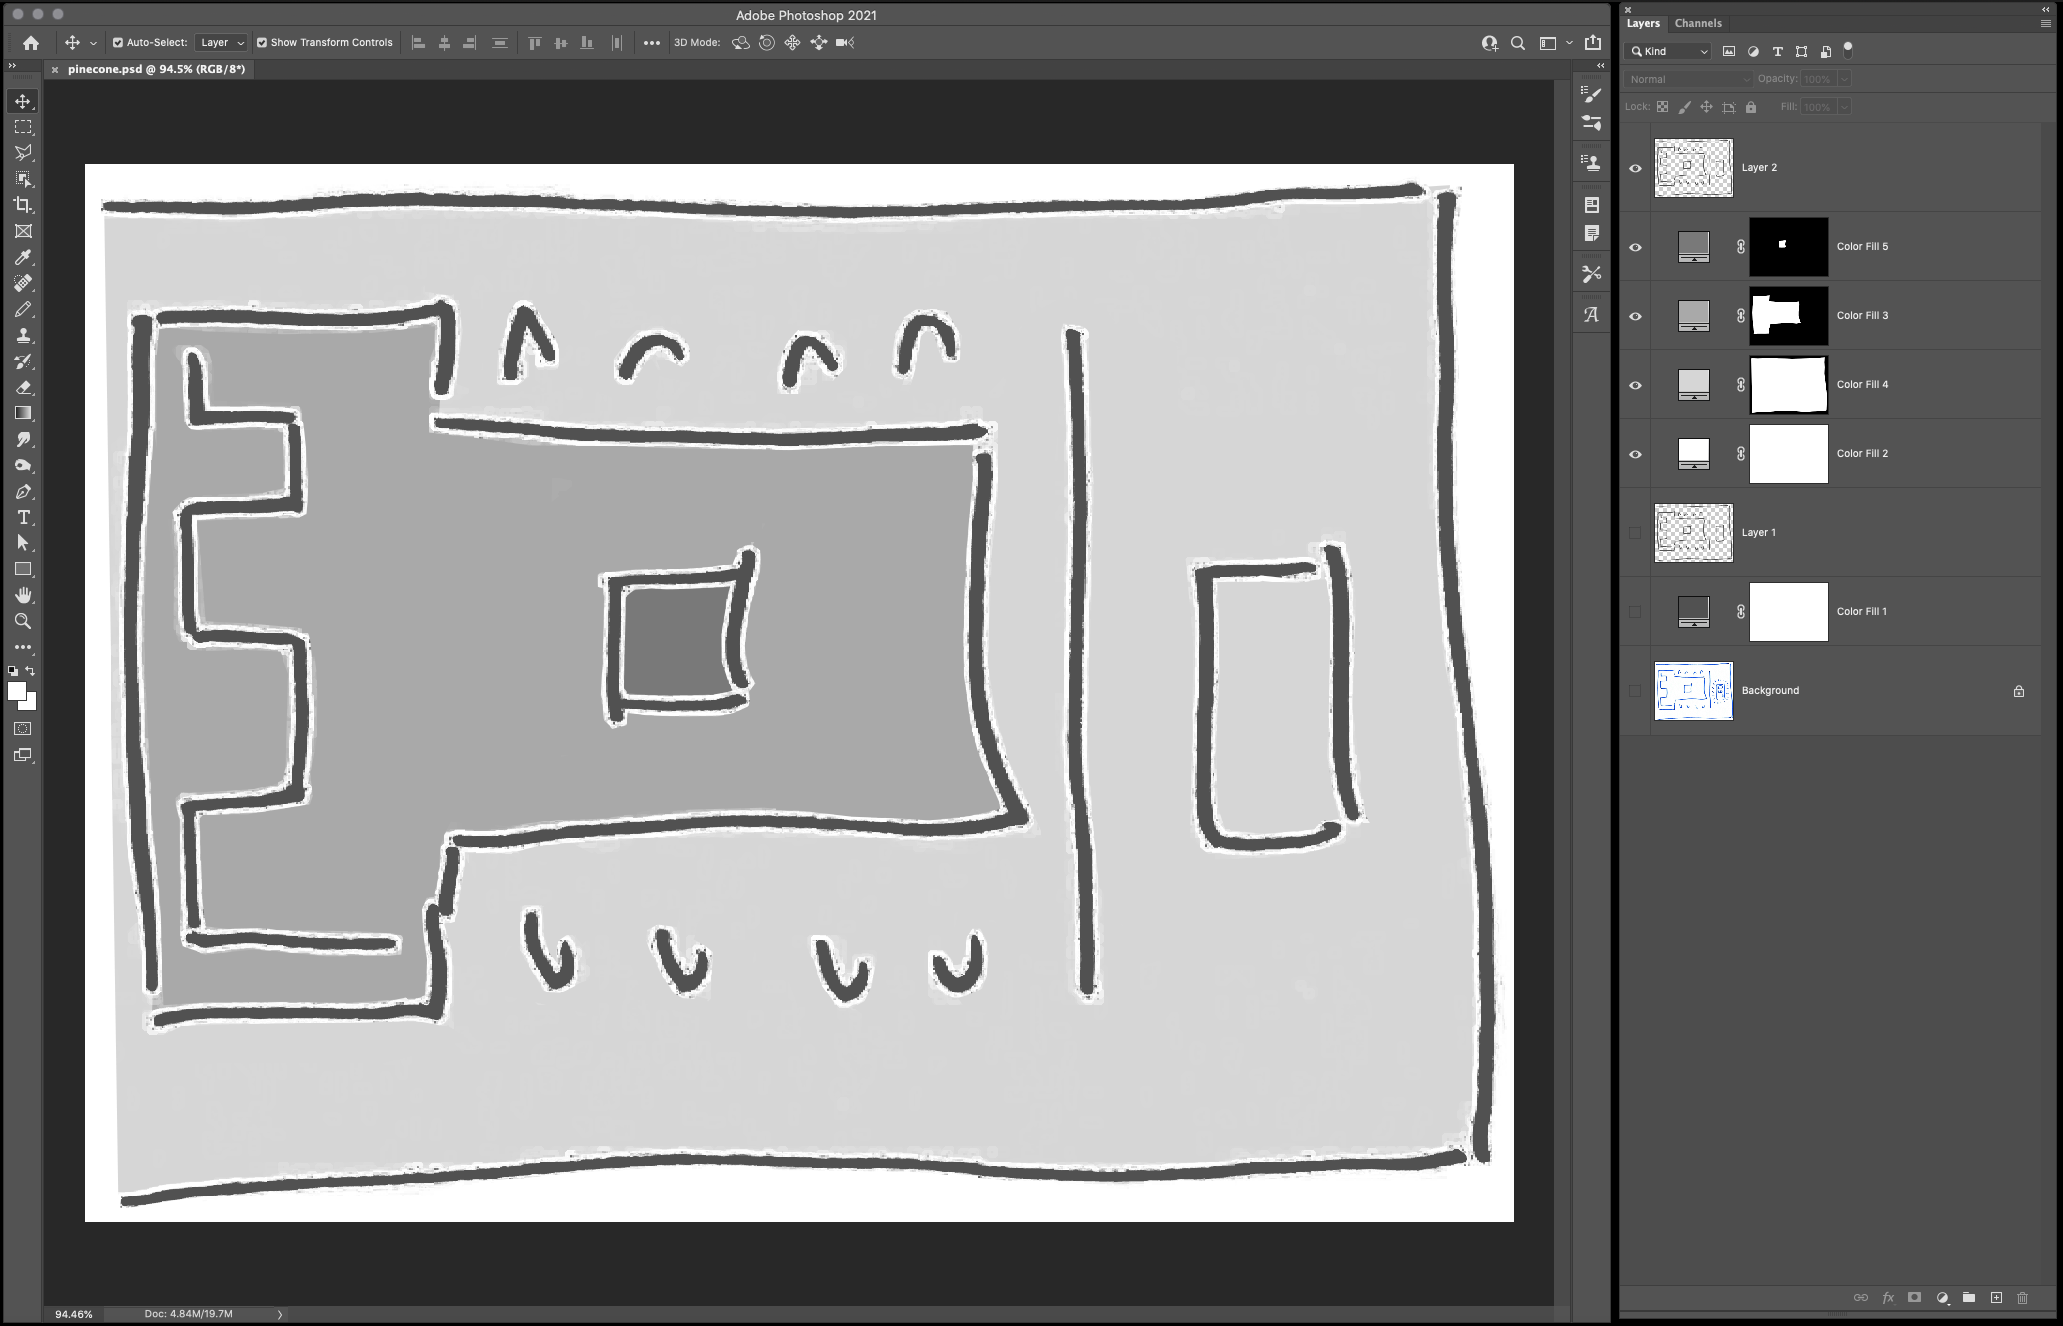
We load the PNG file in our web page: simulator.js
/// Wait for emscripten to be initialised
Module.onRuntimeInitialized = function() {
  // Load the simulator pic and render it
  const image = new Image();
  image.onload = renderSimulator;  //  Draw when image has loaded
  image.src = 'pinecone.png';      //  Image to be loaded
};
When the pic has been loaded, renderSimulator renders the pic: simulator.js
/// Render the simulator pic. Based on https://developer.mozilla.org/en-US/docs/Web/API/CanvasRenderingContext2D/drawImage
function renderSimulator() {
  //  Get the HTML canvas and context
  const canvas = document.getElementById('canvas');
  const ctx = canvas.getContext('2d');

  //  Resize the canvas
  canvas.width  = 400;
  canvas.height = 300;

  //  Draw the image to fill the canvas
  ctx.drawImage(this, 0, 0, canvas.width, canvas.height);
}
What’s the canvas?
Emscripten has helpfully generated a HTML Canvas in wasm.html …
<canvas id="canvas" class="emscripten" oncontextmenu="event.preventDefault()" tabindex=-1></canvas>
renderSimulator renders our BL602 pic to the HTML Canvas like so…
What about the LED?
To simulate the LED switching on (or off), let’s draw a blue rectangle (or grey rectangle) onto the HTML Canvas: simulator.js
//  Get the HTML Canvas Context
const ctx = document.getElementById('canvas').getContext('2d');

//  For LED On: Set the fill colour to Blue
ctx.fillStyle = '#B0B0FF';  //  Blue

//  For LED Off: Set the fill colour to Grey
//  ctx.fillStyle = '#CCCCCC';  //  Grey

//  Draw the LED colour
ctx.fillRect(315, 116, 35, 74);
Watch what happens when we click the “Run” Button in our BL602 Simulator: simulator.js
/// Run the command in the input box
function runScript() {
  //  Omitted: Read the command from input box and convert to a function (like `rust_main`)
  ...
  //  Clear the JSON Stream of Simulation Events in WebAssembly
  Module._clear_simulation_events();
We start by clearing the JSON Stream of Simulation Events.
(More about this in the Appendix)
Next we call the rust_main function from our Rust Firmware…
  //  Execute the WebAssembly Function defined in Rust.
  //  TODO: Pass the command-line args
  Module._rust_main();  //  Omitted: Checking whether `rust_main` exists
(Yep that’s a Quantum Leap from JavaScript to WebAssembly to Rust and back!)
Remember: Our Rust Firmware doesn’t run in Real Time.
Our Rust Firmware completes in an instant and emits a stream of events. (Including Time Delays)
We fetch the stream of events emitted by our Rust Firmware…
  //  Get the JSON string of Simulation Events from WebAssembly. Looks like...
  //  [ { "gpio_output_set": { "pin": 11, "value": 1 } },
  //    { "time_delay": { "ticks": 1000 } }, ... ]
  const json_ptr = Module._get_simulation_events();
(More about this in the Appendix)
And convert it from WebAssembly to JSON…
  //  Convert the JSON string from WebAssembly to JavaScript
  const json = Module.UTF8ToString(json_ptr);

  //  Parse the JSON Stream of Simulation Events
  simulation_events = JSON.parse(json);
Inside simulation_events we have a JSON Stream of Simulation Events, ready for processing!
Our JavaScript code has received the JSON Stream of Simulation Events from the Rust Firmware…
[
  { "gpio_output_set": { "pin": 11, "value": 1 } },
  { "time_delay": { "ticks": 1000 } },
  ...
]
Let’s process the events: simulator.js
/// Simulate the BL602 Simulation Events recorded in simulate_events, which contains...
///  [ { "gpio_output_set": { "pin": 11, "value": 1 } },
///    { "time_delay": { "ticks": 1000 } }, ... ]
function simulateEvents() {
  //  Take the first event and update the queue
  if (simulation_events.length == 0) { return; }
  const event = simulation_events.shift();
  //  event looks like:
  //  { "gpio_output_set": { "pin": 11, "value": 1 } }

  //  Get the event type and parameters
  const event_type = Object.keys(event)[0];
  const args = event[event_type];

  //  Timeout in milliseconds to the next event
  let timeout = 1;
Here we take the first event from the stream.
Then we handle the event: Set GPIO Output or Time Delay…
  //  Handle each event type
  switch (event_type) {

    //  Set GPIO output
    //  { "gpio_output_set": { "pin": 11, "value": 1 } }
    case "gpio_output_set": timeout += gpio_output_set(args.pin, args.value); break;

    //  Delay
    //  { "time_delay": { "ticks": 1000 } }
    case "time_delay": timeout += time_delay(args.ticks); break;

    //  Unknown event type
    default: throw new Error("Unknown event type: " + event_type);
  }
We use a timer to iterate through the events in the stream…
  //  Simulate the next event
  if (simulation_events.length > 0) {
    window.setTimeout("simulateEvents()", timeout);
  }
}
What happens inside gpio_output_set, the event handler for Set GPIO Output?
gpio_output_set renders the Simulated BL602 LED: simulator.js
/// Simulate setting GPIO pin output to value 0 (Low) or 1 (High):
/// { "gpio_output_set": { "pin": 11, "value": 1 } }
function gpio_output_set(pin, value) {
  //  Get the HTML Canvas Context
  const ctx = document.getElementById('canvas').getContext('2d');

  //  Set the simulated LED colour depending on value
  switch (value) {
    //  Set GPIO to Low (LED on)
    case 0: ctx.fillStyle = '#B0B0FF'; break;  //  Blue

    //  Set GPIO to High (LED off)
    case 1: ctx.fillStyle = '#CCCCCC'; break;  //  Grey

    //  Unknown value
    default: throw new Error("Unknown gpio_output_set value: " + args.value);
  }

  //  Draw the LED colour
  ctx.fillRect(315, 116, 35, 74);

  //  Simulate next event in 0 milliseconds
  return 0;
}
(Yep we’ve seen this code earlier)
That’s how we blink the Simulated LED through the stream of simulation events!
What about time_delay, the event handler for Time Delays?
time_delay is explained here: “Simulate Delays”
(Hint: It simulates Time Delays by calling the JavaScript Timer that we’ve seen earlier)
Try the BL602 Rust Firmware Simulator for yourself!
Click the Run Button and watch the LED blink!
To run the BL602 Simulator on our computer (Linux, macOS and Windows)…
Build the BL602 Rust Firmware and the BL602 Simulator
Start a Local Web Server, because WebAssembly won’t run from a filesystem
Browse to docs/wasm.html
Click Run
Is this easier than building and testing firmware on Real BL602 Hardware?
BL602 Simulator could potentially shorten the Code - Build - Flash - Test Cycle for Embedded Development…
Code the firmware in Rust
Build the firmware for WebAssembly
(With a single “make” command on Linux / macOS / Windows)
Test and Debug the firmware in the Simulator
(No BL602 hardware needed, just a Web Browser)
Repeat until the firmware is hunky dory
Flash the firmware to BL602
(Remember: Flashing BL602 via UART is kinda cumbersome)
But not all firmware can be simulated right?
True, there are limits to what we can simulate.
(Might be tricky to simulate Analog Inputs… Do we draw a graph?)
Even so, the simulator could be really helpful for learners who are building basic firmware.
(Maybe attract more Embedded Learners too!)
What about the Embedded Pros?
Someday BL602 Simulator might also be helpful for Embedded Pros who are building complex firmware…
Automated Testing of BL602 Firmware
Remember that our firmware emits a JSON Stream of Simulation Events?
This JSON Stream is perfect for checking whether our firmware is behaving as expected… Just “diff” the Expected and Actual JSON Streams!
Tracing Calls to BL602 IoT SDK for debugging
(Like an embedded “strace”)
Validating Calls to BL602 IoT SDK
(More about this in the next chapter)
Can we simulate C Firmware? (Instead of Rust Firmware)
We could probably simulate C Firmware if we…
Tweak the BL602 C Firmware to build with Emscripten
(By modding the C Header Files and Makefiles)
And link the compiled C Firmware with our Rust Simulator Library
Remember that the BL602 Shim Functions in our Rust Simulator Library are declared “extern C”?
#[no_mangle]  //  Don't mangle the function name
extern "C" fn bl_gpio_output_set(pin: u8, value: u8) -> c_int { ...
Yep this means they can be called from C Firmware!
And the BL602 Shim Functions will emit simulation events… Our C Firmware will work exactly like Rust Firmware!
What if the Embedded HAL (like BL602 IoT SDK) could tell us how to fix our code?
(Wouldn’t that be great, especially for learners?)
Yep we can help Embedded Learners when we catch BL602 SDK Calling Errors and explain the errors in a friendly way.
Watch what happens when set the output for a GPIO Pin without configuring the GPIO for Output…
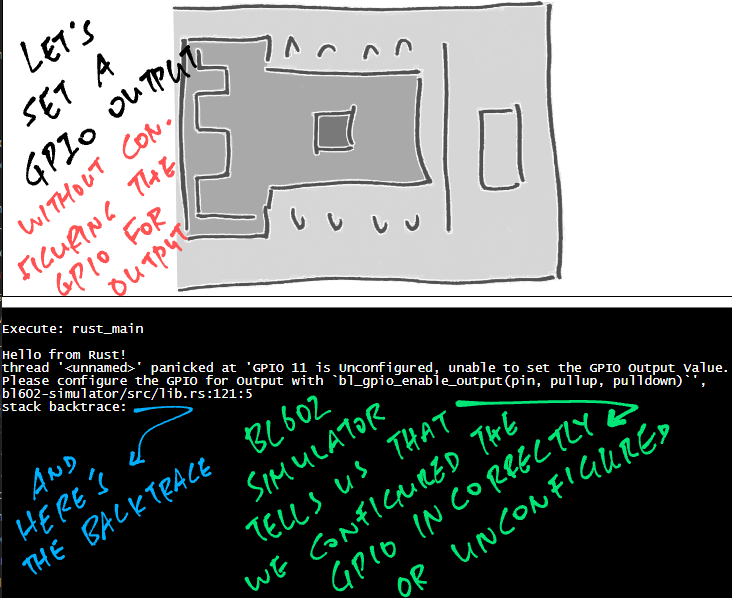
Our simulator halts with a friendly message… And explains how we can fix it!
How does our simulator validate calls to BL602 IoT SDK?
BL602 Simulator remembers the configuration of every GPIO Pin: bl602-simulator/lib.rs
/// Configuration for a BL602 GPIO Pin
#[derive(Clone, Copy, Debug, PartialEq)]
enum GpioConfig {
/// GPIO Pin is unconfigured
Unconfigured,
/// GPIO Pin is configured for Input
Input,
/// GPIO Pin is configured for Output
Output,
}
/// Configurations for all BL602 GPIO Pins
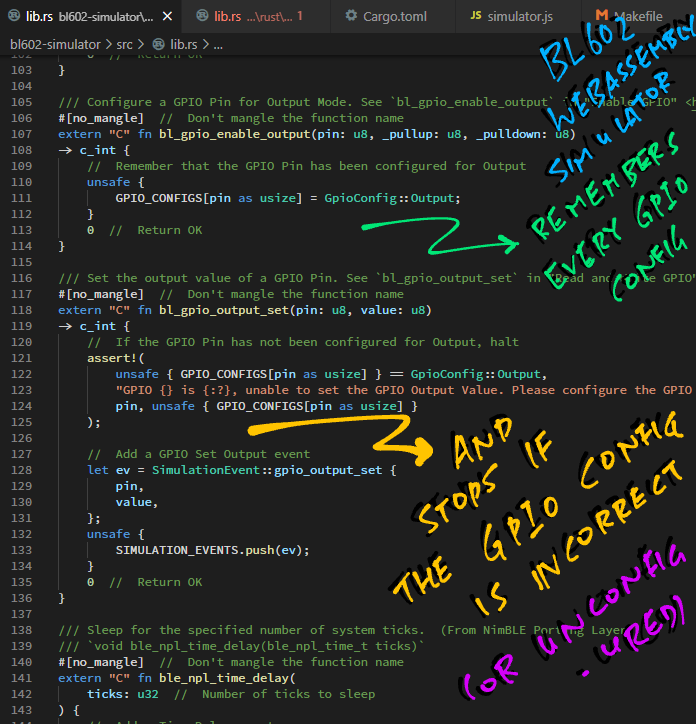
static mut GPIO_CONFIGS: [GpioConfig; 32] = [GpioConfig::Unconfigured; 32];We update the GPIO Configuration whenever the GPIO is configured for Input or Output: lib.rs
/// Configure a GPIO Pin for Output Mode. See `bl_gpio_enable_output` in "Enable GPIO" <https://lupyuen.github.io/articles/led#enable-gpio>
#[no_mangle]  //  Don't mangle the function name
extern "C" fn bl_gpio_enable_output(pin: u8, _pullup: u8, _pulldown: u8) -> c_int {
  //  Remember that the GPIO Pin has been configured for Output
  GPIO_CONFIGS[pin as usize] = GpioConfig::Output;
While setting the GPIO output value, we raise an error if the GPIO Configuration is incorrect: lib.rs
/// Set the output value of a GPIO Pin. See `bl_gpio_output_set` in "Read and Write GPIO" <https://lupyuen.github.io/articles/led#read-and-write-gpio>
#[no_mangle]  //  Don't mangle the function name
extern "C" fn bl_gpio_output_set(pin: u8, value: u8) -> c_int {
  //  If the GPIO Pin has not been configured for Output, halt
  assert!(
    GPIO_CONFIGS[pin as usize] == GpioConfig::Output,
    "GPIO {} is {:?}, unable to set the GPIO Output Value. Please configure the GPIO for Output with `gpio::enable_output(pin, pullup, pulldown)` or `bl_gpio_enable_output(pin, pullup, pulldown)`. See \"Enable GPIO\" <https://lupyuen.github.io/articles/led#enable-gpio>",
    pin, GPIO_CONFIGS[pin as usize]
  );
That’s how we make BL602 Simulator a little more helpful for Embedded Learners… By validating the calls to BL602 IoT SDK!
Simulating a plain BL602 board (like PineCone BL602) is pointless, innit?
Yep simulating a PineCone BL602 Board ain’t particularly exciting because it only has…
One RGB LED
One Jumper (GPIO 8)
And everything else needs to be wired to the GPIO Pins
(Which makes it harder to simulate actually)
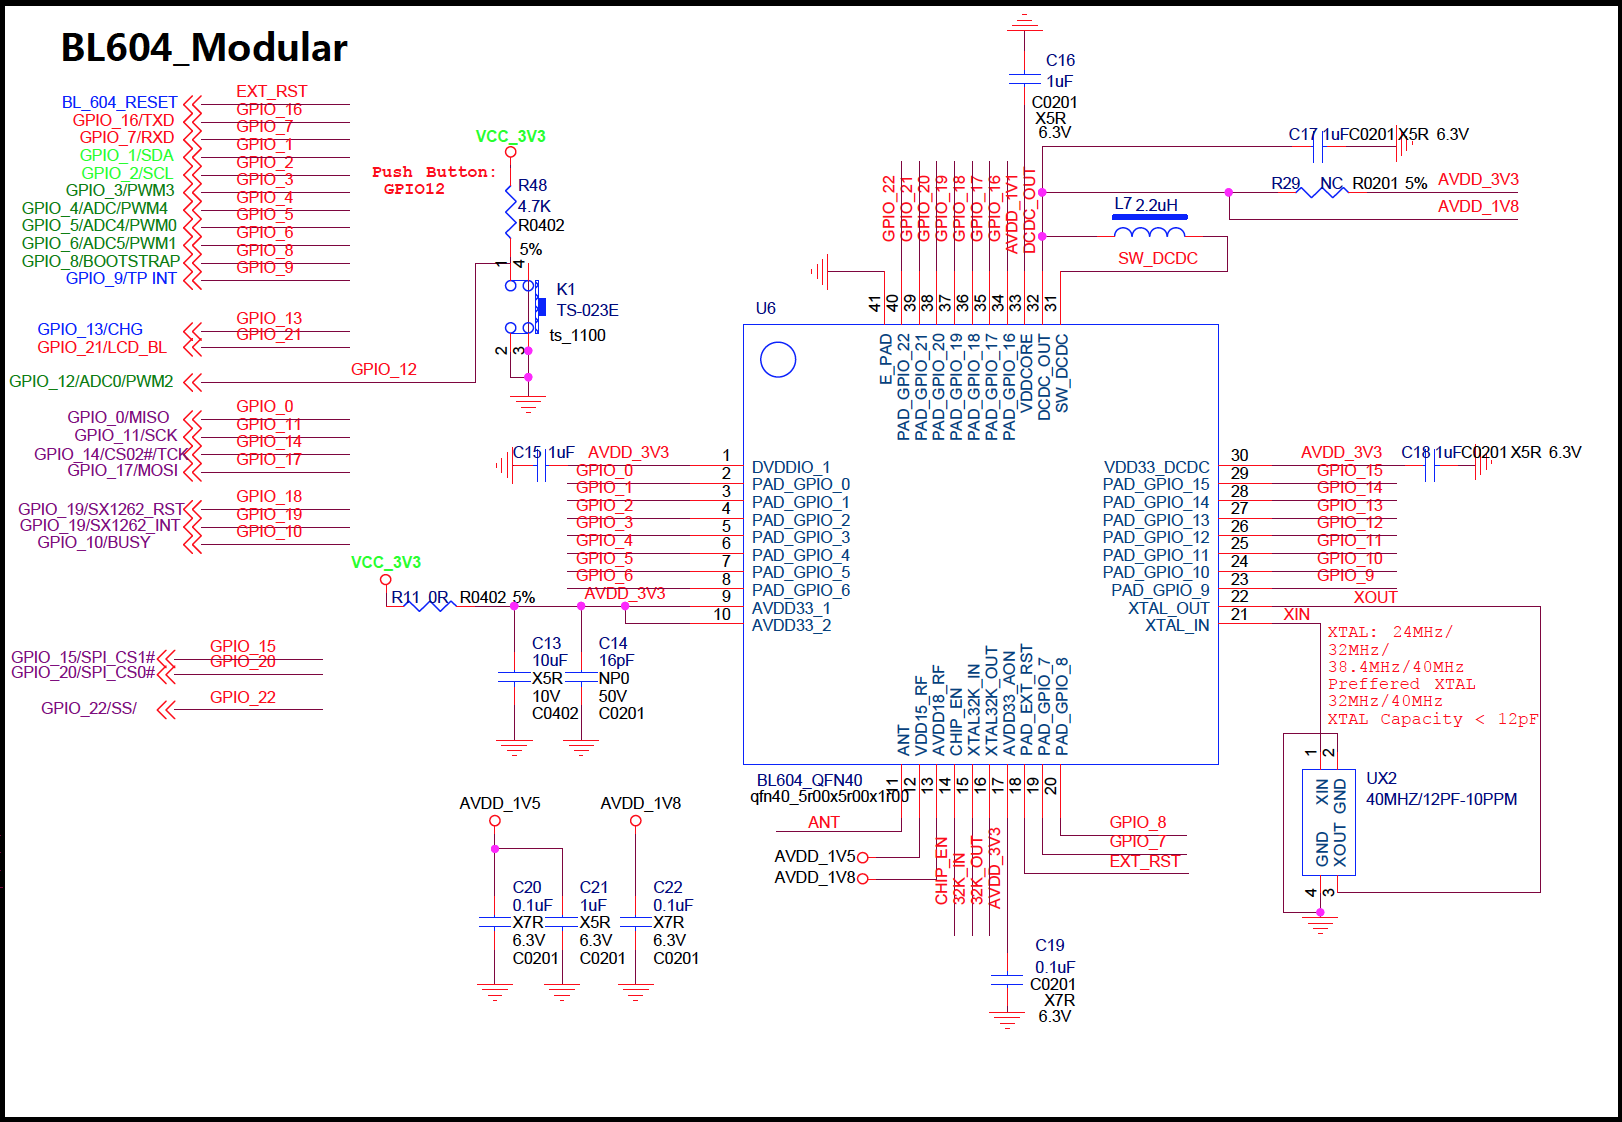
Compare this with the PineDio Stack BL604 which has…
SPI Display (with LVGL Graphics Library)
LoRa SX1262 Transceiver
Motion Sensor
Heart Rate Sensor
Battery Charging Chip
All this in a compact 3.5 cm² form factor!
It makes a lot more sense to simulate the PineDio Stack, because it’s a super interesting gadget for Embedded Learners.
Stay tuned for an updated simulator with support for LVGL, LoRa and LoRaWAN!
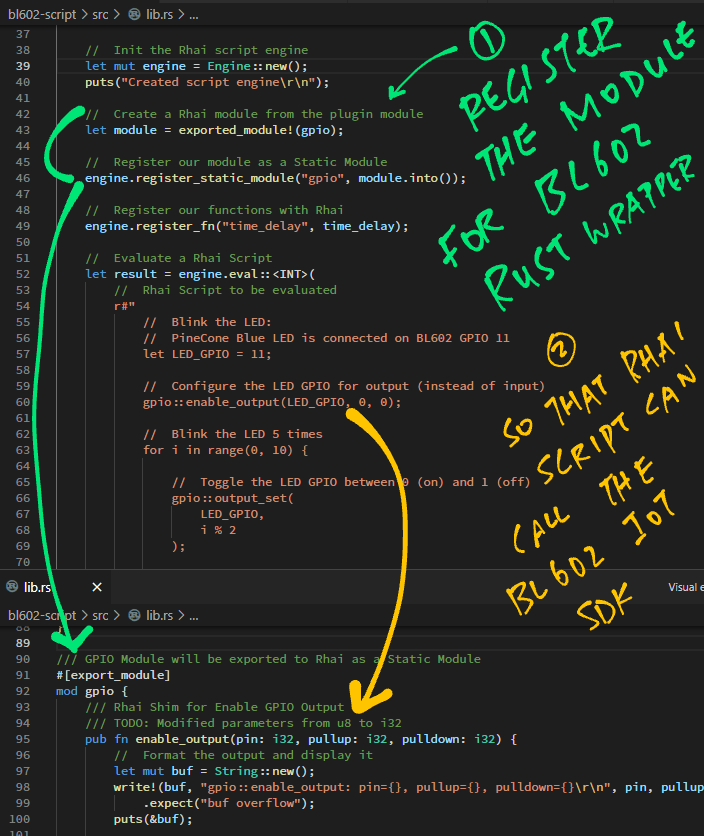
To make BL602 Simulator even more useful for Embedded Learners, we’re adding the Rhai Scripting Engine to the simulator…
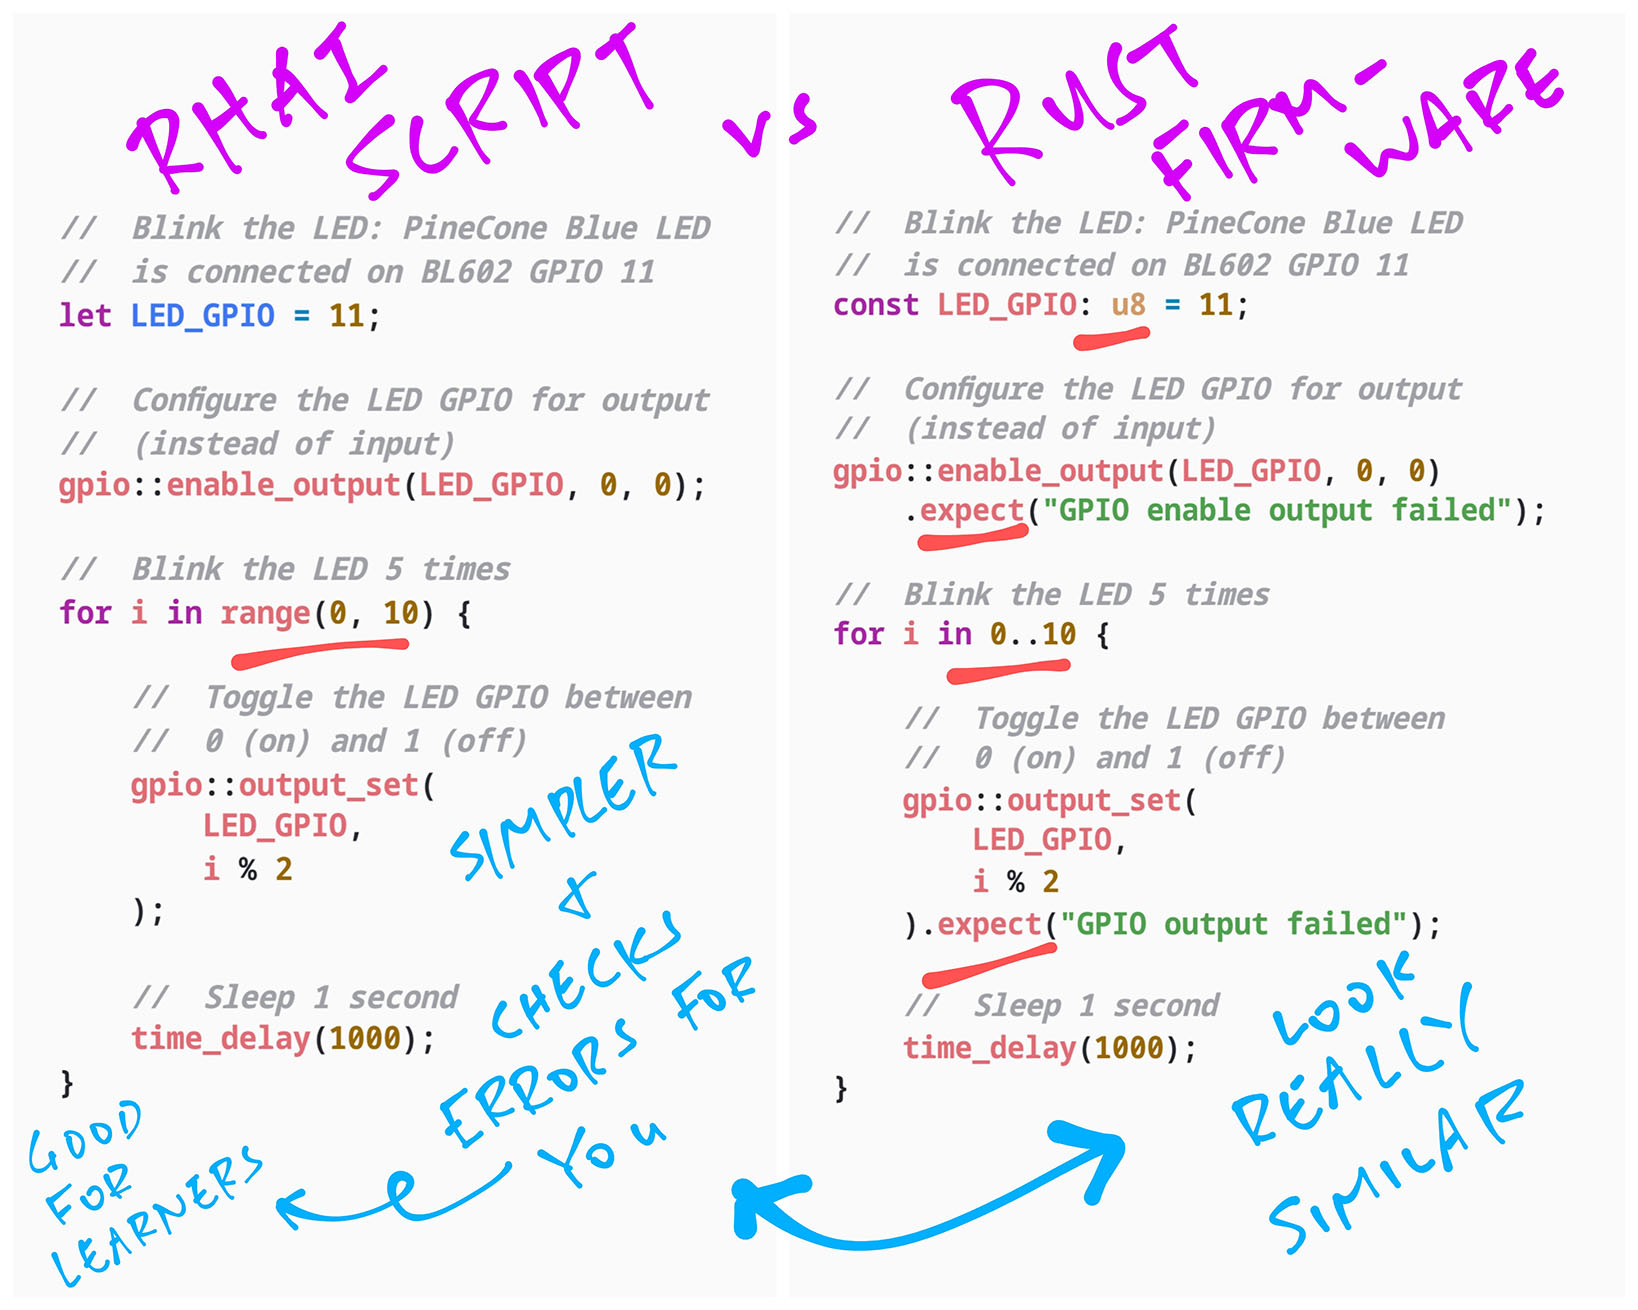
Thus we’ll allow BL602 Simulator to be used in two ways…
The Traditional Way:
Code the program in Rust. Compile to WebAssembly. Test with Simulator.
…OR…
The Scripted REPL Way:
Code the program in Rhai Script. (Which looks like Rust)
Type the Rhai Script directly into the Web Browser. (No compiler needed)
Test with Simulator.
Why would we need The Scripted REPL Way?
Because Scripted REPL platforms like uLisp and MicroPython are still popular with Embedded Learners.
For BL602, perhaps learners could start with (Rust-like) Rhai Script…
And upgrade to Rust (or C) when they’re ready.
Check out the new article…
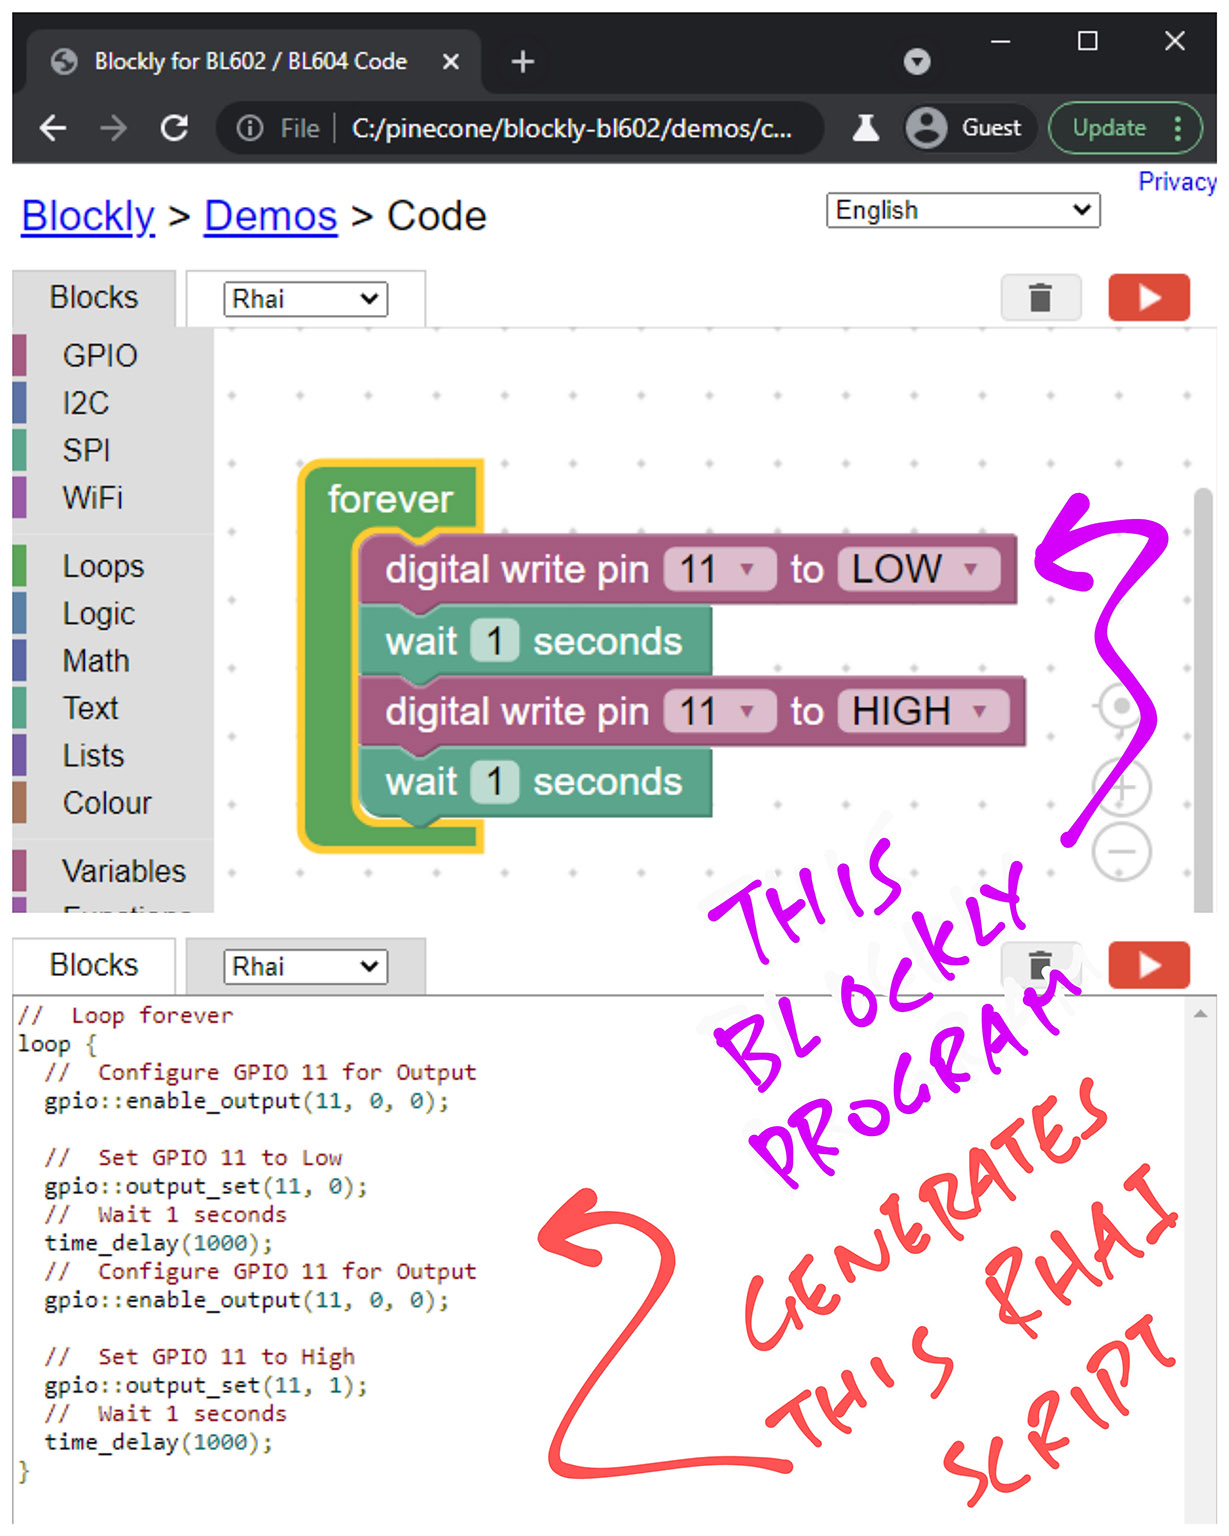
I sense another upcoming enhancement?
Yes! Since we’re adding a Scripting Engine to the simulator…
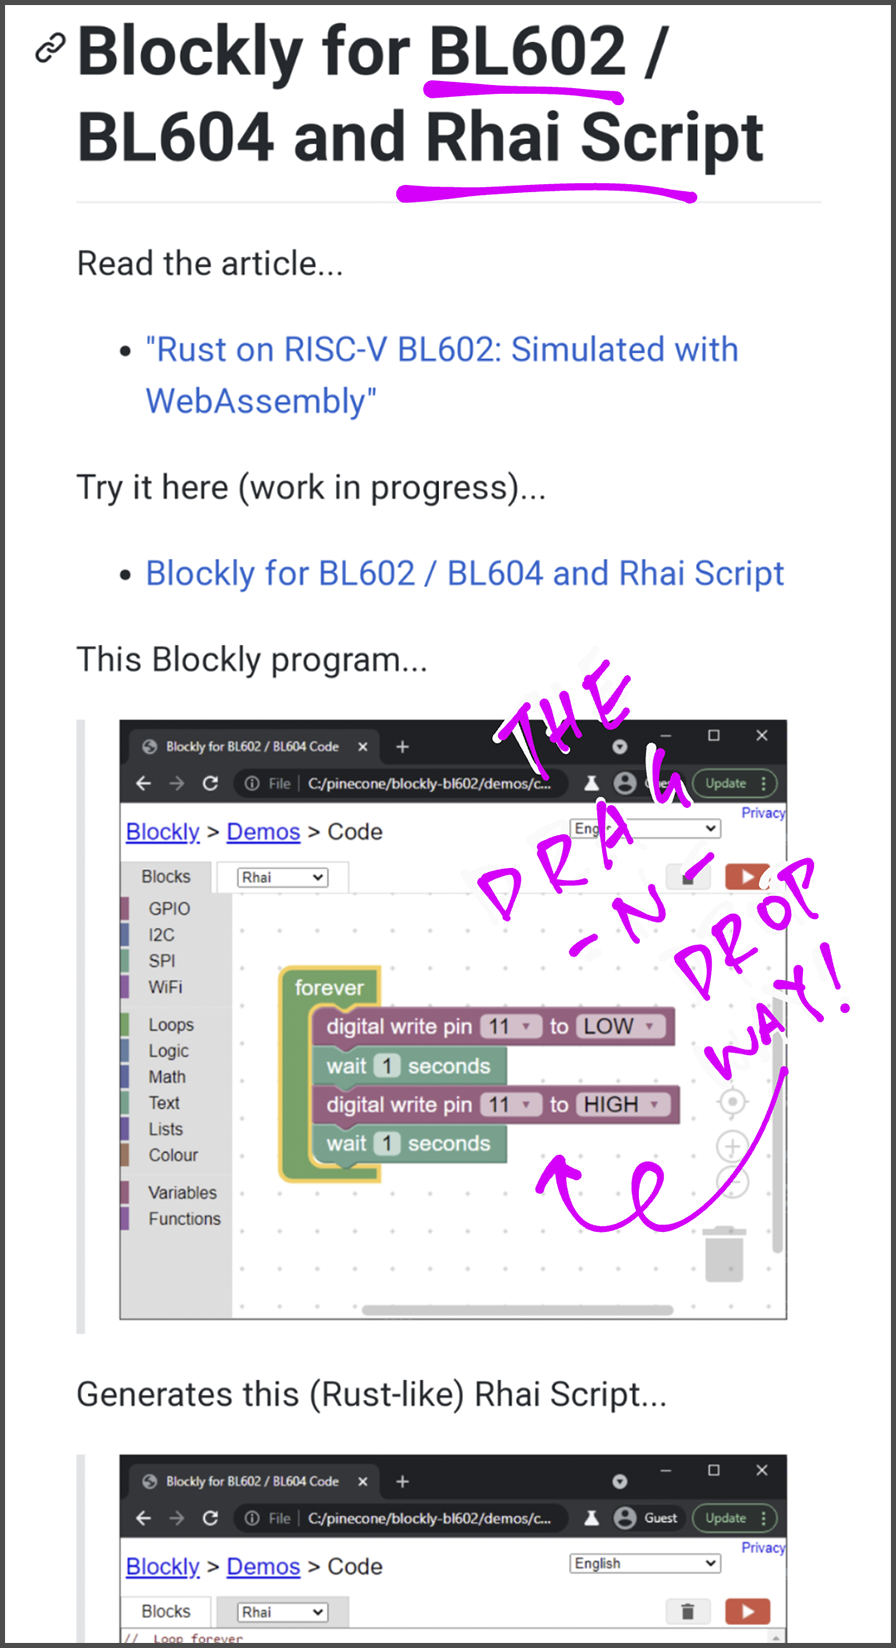
Why not make it super easy to create scripts: The Drag-and-Drop Way!
Can we do this through a Desktop App? (Instead of Web Browser)
Possibly, if we wrap the Web Browser Interface into a Desktop App with Tauri.
Rhai Scripts run OK on our simulator with WebAssembly. But will the scripts run on Real BL602 Hardware?
Sadly no. Rhai Scripting Engine is too heavy for BL602. (See this)
But we could auto-convert / transcode Rhai Script to uLisp, which runs fine on BL602.
(More about Rhai Transcoding in the Appendix)
Can we transmit uLisp to BL602 from the Web Browser?
Yes, we may automagically transmit the transcoded uLisp from Web Browser to BL602 with the Web Serial API.
Which means our learners will…
Use a Web Browser to drag and drop the blocks to create a visual program
Which will auto-generate the Rhai Script for the visual program
And the Rhai Script will be auto-transmitted to BL602 for execution
(After the Rhai Script has been transcoded to uLisp)
You sound pretty confident about Drag-and-Drop Scripting. Have we done this before?
Yep we’ve previously experimented with Blockly (Scratch), uLisp and Rust.
Now that we’re switching to Rhai Script, things might get simpler…
(In the last article above we did some complicated Type Inference in Rust. Thankfully that’s no longer necessary for Rhai Script)
We have a lot of work coming up!
Rhai Scripting Engine (See this)
Drag-and-Drop Scripting (with Blockly)
Transcoding Rhai Script to uLisp (See this)
Integrating uLisp with BL602 IoT SDK (See this)
(Follow the updates in this Twitter Thread)
And soon we shall test all this on PineDio Stack BL604 with LoRa SX1262… As we explore whether it’s feasible to teach Rust (or Rhai) as a Safer Way to create firmware for BL602 and BL604.
Many Thanks to my GitHub Sponsors for supporting my work! This article wouldn’t have been possible without your support.
Got a question, comment or suggestion? Create an Issue or submit a Pull Request here…
lupyuen.github.io/src/rustsim.md
This article is the expanded version of this Twitter Thread
Mbed OS has a simulator based on C++ and Emscripten. (See this)
We can run Rhai Scripts in our Web Browser thanks to WebAssembly…
How will we run Rhai Scripts on Real BL602 Hardware?
Sadly Rhai Scripting Engine is too heavy for BL602. (See this)
But we could auto-convert / transcode Rhai Script to uLisp, which runs fine on BL602.
We’ll do the transcoding in the Web Browser with WebAssembly, since it has a lot more RAM than BL602.
Why uLisp?
Because uLisp is a tiny Lisp Interpreter (coded in C) that runs well on BL602 with little RAM.
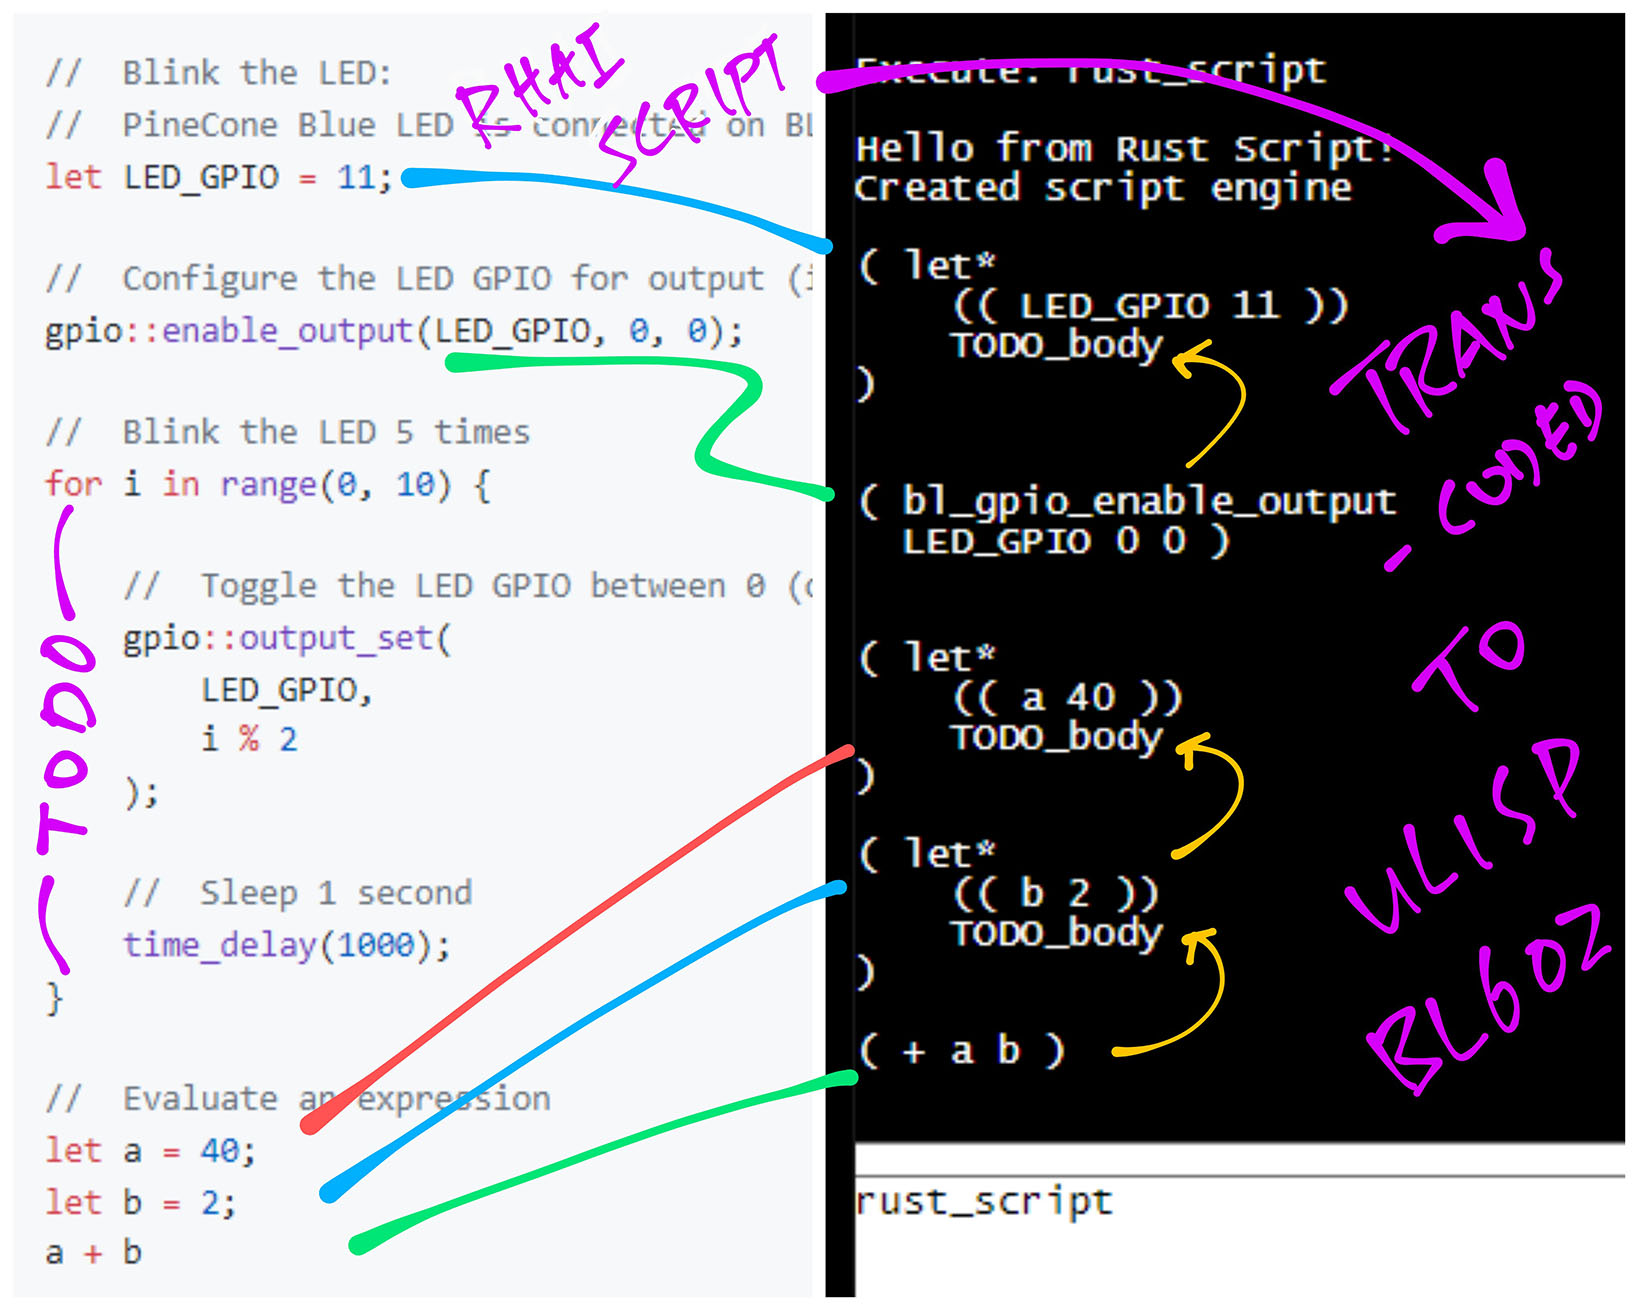
Transcoded uLisp will be in the S-Expression Format. (Which looks a little like WebAssembly)
Hence this Rust-like Rhai Script…
gpio::output_set(11, 0);Shall be transcoded to this uLisp S-Expression…
( bl_gpio_output_set 11 0 )
But will uLisp let us call C functions defined in BL602 IoT SDK?
Yep uLisp lets us expose a C function from BL602 IoT SDK like so: ulisp.c
//  Expose the C function `bl_gpio_output_set` to uLisp:
//  `int bl_gpio_output_set(uint8_t pin, uint8_t value)`
object *fn_bl_gpio_output_set(object *args, object *env) {
  //  Fetch the `pin` parameter from uLisp
  assert(args != NULL);
  int pin = checkinteger(BL_GPIO_OUTPUT_SET, car(args));
  args = cdr(args);

  //  Fetch the `value` parameter from uLisp
  assert(args != NULL);
  int value = checkinteger(BL_GPIO_OUTPUT_SET, car(args));
  args = cdr(args);

  //  No more parameters
  assert(args == NULL);

  //  Call the C function `bl_gpio_output_set`
  int result = bl_gpio_output_set(pin, value);

  //  Return the result to uLisp
  return number(result);
}
Which will be called from uLisp like so…
( bl_gpio_output_set 11 0 )
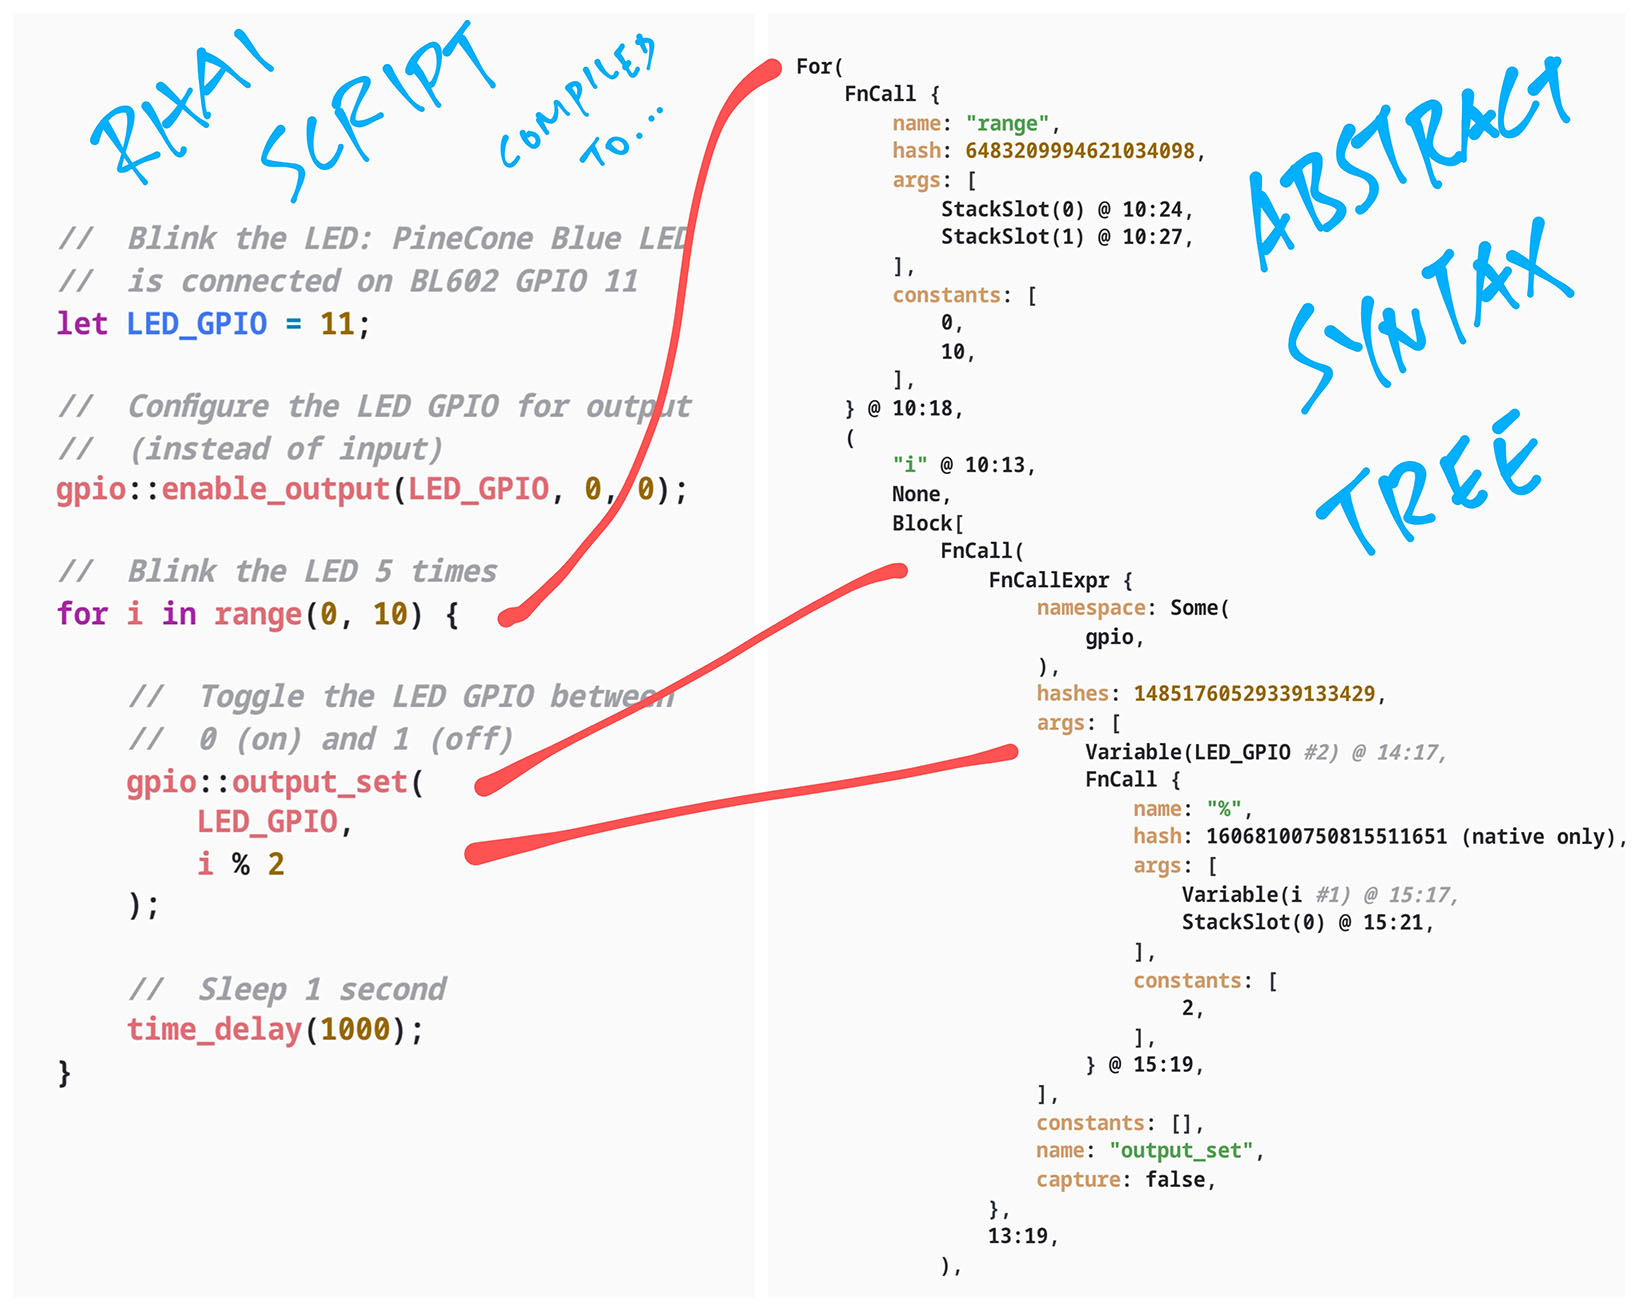
How shall we transcode Rhai Script to uLisp?
The Rhai Scripting Engine compiles Rhai Script into an Abstract Syntax Tree. (See this)
We shall traverse the nodes in the tree and emit uLisp S-Expressions.
Thus this Rhai Script…
gpio::output_set(11, 0);Shall emit this uLisp S-Expression…
( bl_gpio_output_set 11 0 )
The transcoding implementation will probably look similar to…
Why are we doing this in Rust?
Because thanks to bindgen, we have complete info on the BL602 IoT SDK interfaces (functions, parameters, return types).
Which lets us manipulate the BL602 SDK interfaces and do cool things like…
Generate the uLisp Shims for BL602 IoT SDK
Generate the Rhai Shims for BL602 IoT SDK
Transcode Rhai Calls (BL602 IoT SDK) into uLisp
Generate the Rust Wrapper for BL602 IoT SDK
How is the JSON Stream of Simulation Events accessed via the Rust Simulator Library?
Remember that we maintain a Vector of Simulation Events in Rust: bl602-simulator/lib.rs
/// Vector of Simulation Events (i.e. event array)
static mut SIMULATION_EVENTS: Vec<SimulationEvent> = Vec::new();
But we can’t expose this Rust Vector to WebAssembly and JavaScript.
Thus we define an Event Buffer that exposes the vector as a JSON String…
/// String Buffer that returns the JSON Stream of Simulation Events:
/// `[ { "gpio_output_set": { "pin": 11, "value": 1 } },
///   { "time_delay": { "ticks": 1000 } },
///   ...
/// ]`
static mut EVENT_BUFFER: [u8; 1024] = [0; 1024];
When our JavaScript code calls get_simulation_events to fetch the Simulation Events, we convert the Rust Vector to JSON and copy it into the Event Buffer: lib.rs
/// Return the JSON Stream of Simulation Events
#[no_mangle]  //  Don't mangle the function name
extern "C" fn get_simulation_events() -> *const u8 {
    //  Convert vector of events to a JSON string
    let mut serialized = unsafe {
        serde_json::to_string(&SIMULATION_EVENTS)
    }.unwrap();

    //  Terminate the JSON string with null, since we will be returning to C
    serialized.push('\0');

    //  Check that JSON string fits into the Event Buffer
    assert!(serialized.len() <= unsafe { EVENT_BUFFER.len() });

    //  Copy the JSON string to the Event Buffer
    unsafe {                            //  Unsafe because we are copying raw memory
        std::ptr::copy(                 //  Copy the memory...
            serialized.as_ptr(),        //  From Source (JSON String)
            EVENT_BUFFER.as_mut_ptr(),  //  To Destination (mutable pointer to Event Buffer)
            serialized.len()            //  Number of Items (each item is 1 byte)
        );
    }

    //  Return the Event Buffer
    unsafe {
        EVENT_BUFFER.as_ptr()
    }
}
Yep it’s possible that our serialized vector won’t fit into the Event Buffer.
To mitigate this, we ought to check the serialized vector size whenever we add an event…
/// Add an Simulation Event
fn add_event(ev: SimulationEvent) {
    //  Add the event to the vector
    SIMULATION_EVENTS.push(ev);

    //  Convert vector of events to a JSON string
    let mut serialized = unsafe {
        serde_json::to_string(&SIMULATION_EVENTS)
    }.unwrap();

    //  If the JSON string doesn't fit into the Event Buffer...
    if (serialized.len() + 1 > unsafe { EVENT_BUFFER.len() }) {
        //  Remove the event from the vector and stop the simulation
Here’s how we initialise the Vector of Simulation Events before use: lib.rs
/// Clear the JSON Stream of Simulation Events
#[no_mangle]  //  Don't mangle the function name
extern "C" fn clear_simulation_events() {
    //  Clear the vector of Simulation Events
    unsafe {
        SIMULATION_EVENTS.clear();
    }
    //  Show Rust Backtrace on error
    std::env::set_var("RUST_BACKTRACE", "full");
}