📝 18 Oct 2021
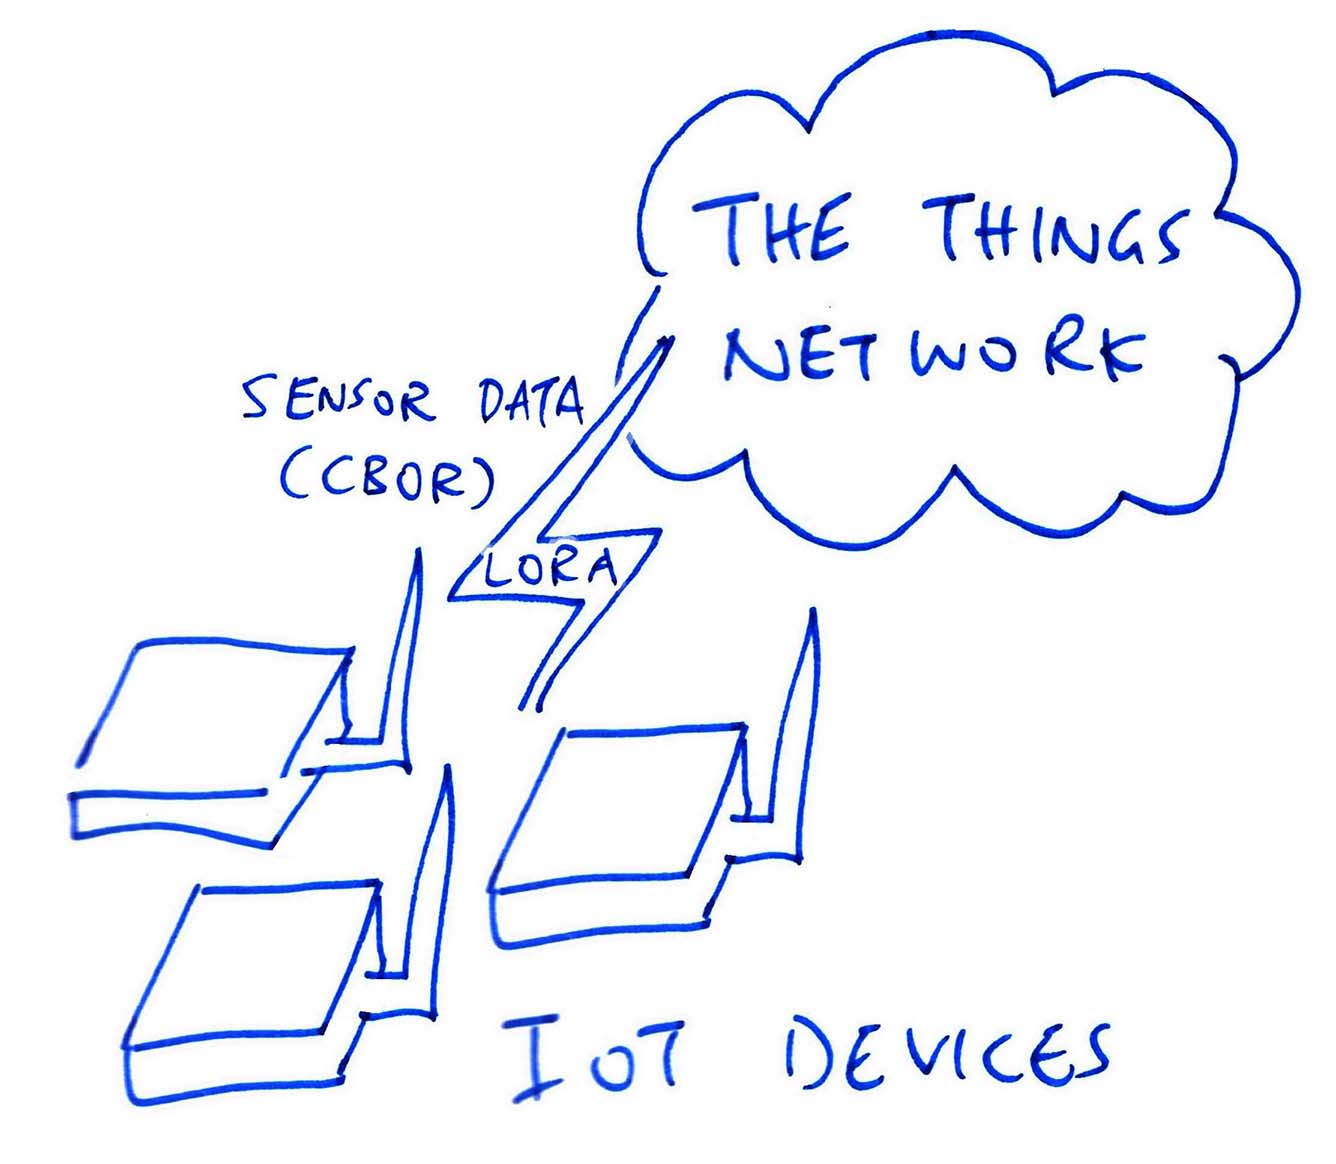
Suppose we have an IoT Sensor Device (like PineDio Stack BL604) connected to The Things Network (via LoRaWAN)…
And our device transmits Sensor Data to The Things Network in CBOR Format (because it requires fewer bytes than JSON)…
How shall we process the CBOR Sensor Data transmitted by our device?
We could let each Application fetch and decode the CBOR Sensor Data from The Things Network…
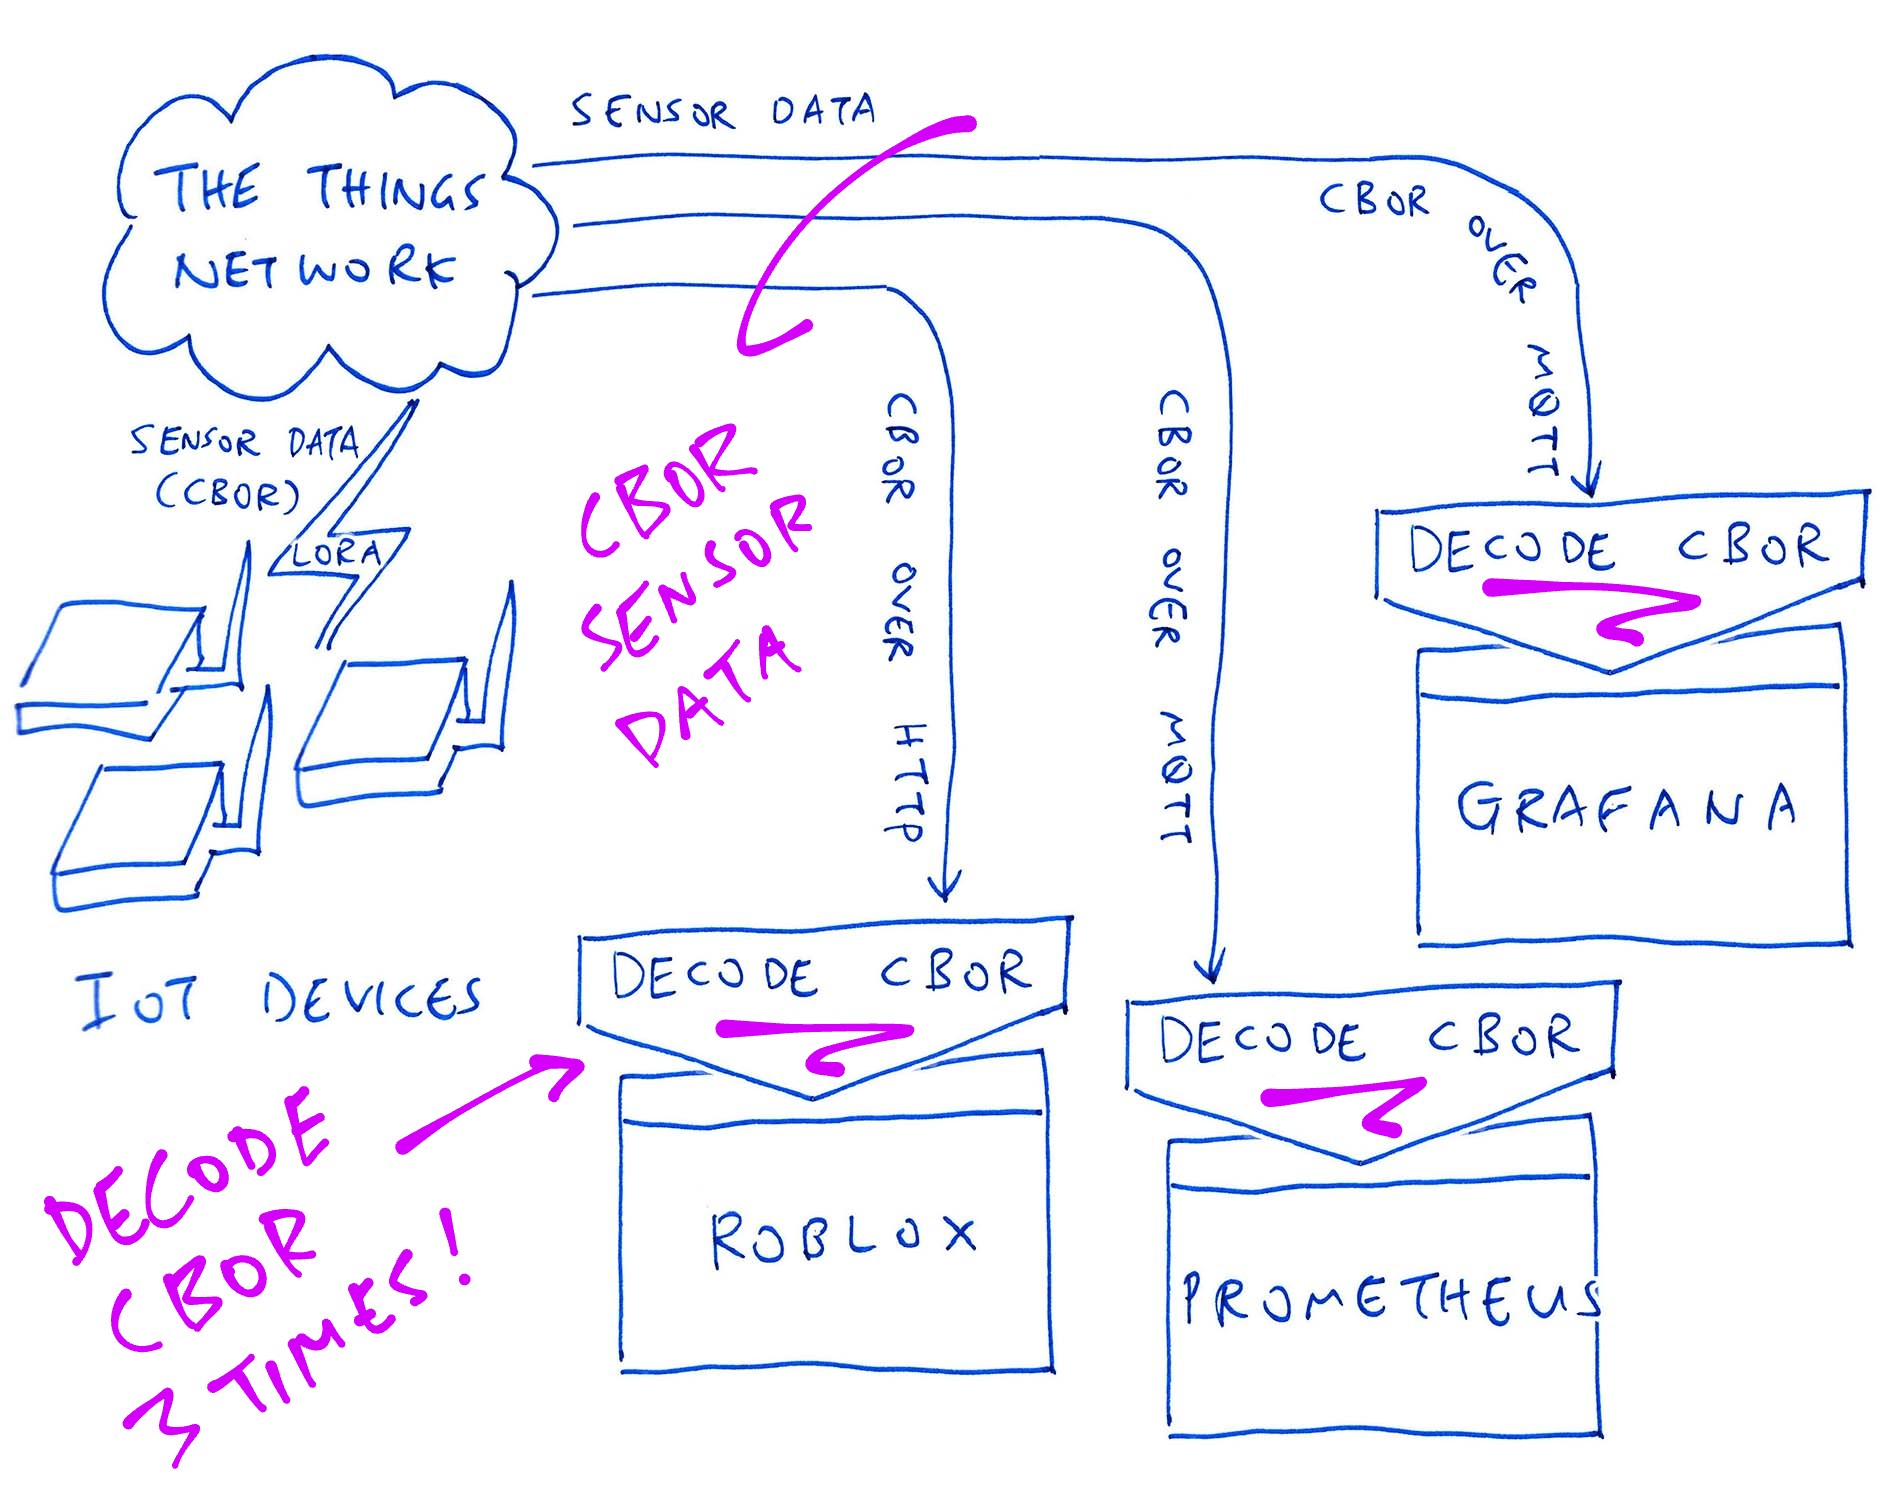
Each Application would decode CBOR into JSON before processing, like we’ve done for Grafana and Roblox…
(Assuming that JSON is supported natively by each Application)
Erm this solution doesn’t scale well if we have many Applications…
Exactly! For every Application that we add (like Prometheus), we would need to decode the CBOR Sensor Data into JSON again and again.
(And some Applications might need code changes to support CBOR)
What’s the right solution then?
The proper solution is to configure a Payload Formatter at The Things Network that will decode our CBOR Sensor Data into JSON once…
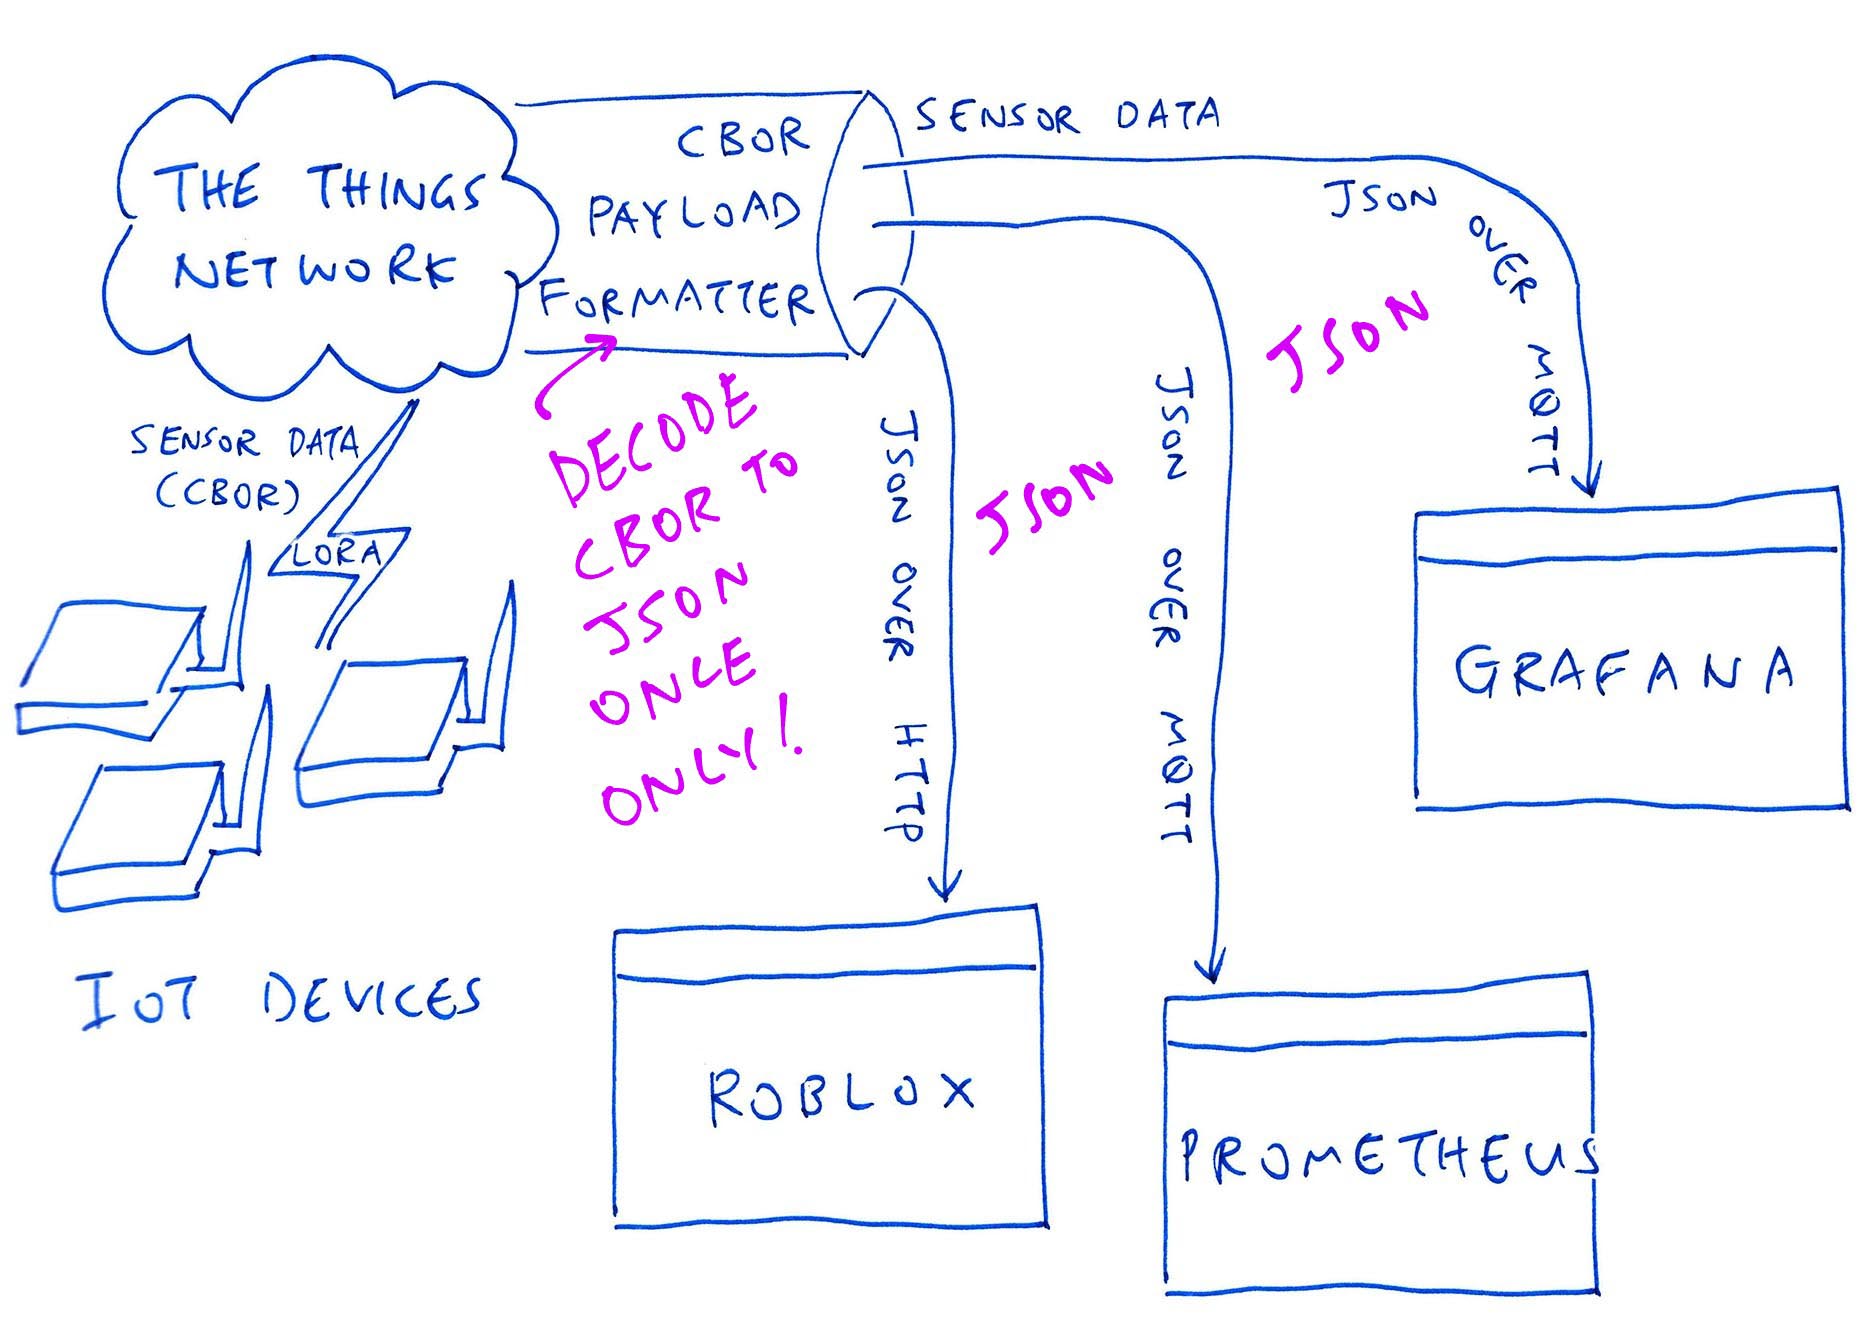
And distribute the Decoded Sensor Data (as JSON) to all Applications.
Read on to learn how we created a CBOR Payload Formatter for The Things Network.
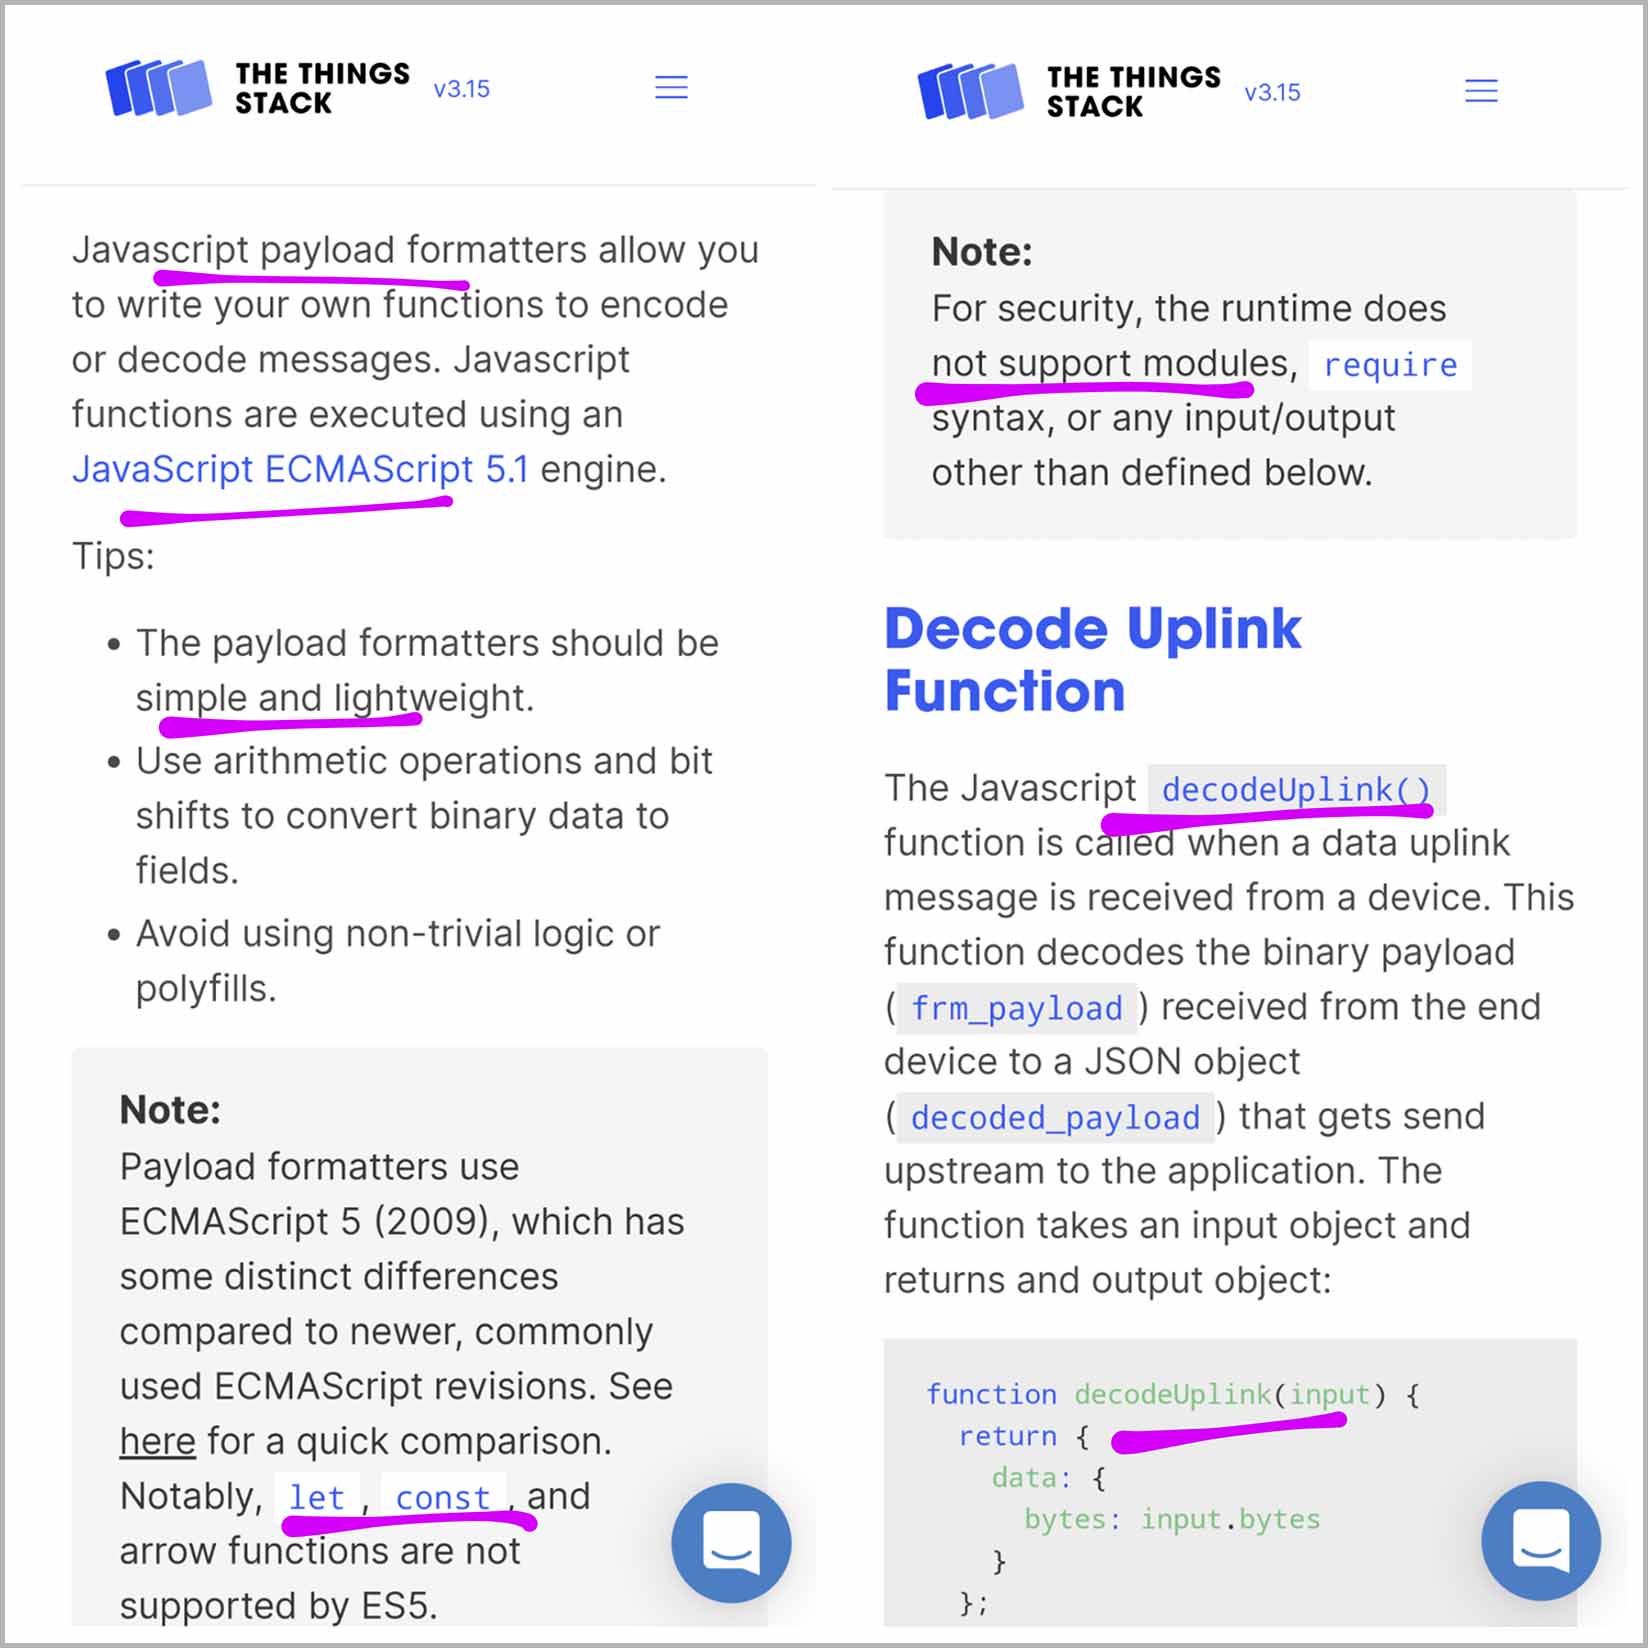
A Payload Formatter is JavaScript Code that runs on the servers at The Things Network to decode our LoRaWAN Message Payload. (Which contains our CBOR-Encoded Sensor Data)
Inside the Payload Formatter we need to provide a JavaScript Function named decodeUplink that will decode our LoRaWAN Message Payload…
//  Decode the Payload in the Uplink Message
function decodeUplink(input) {
  //  `input.fPort` contains the LoRaWAN Port Number (like 2)
  //  `input.bytes` contains the LoRaWAN Message Payload bytes like...
  //  [ 0xa2, 0x61, 0x74, 0x19, 0x12, 0x3d, 0x61, 0x6c, 0x19, 0x0f, 0xa0 ]

  //  TODO: Data and warnings to be returned to The Things Network
  var data     = { "t": 4669, "l": 4000 };
  var warnings = [];

  //  Return the decoded data and warnings
  return {
    data:     data,
    warnings: warnings
  };
}
In the above example we return the Decoded Data as…
{
  "t": 4669,
  "l": 4000
}
(Let’s pretend that’s the Sensor Data for our Temperature Sensor and Light Sensor)
Can we run any kind of JavaScript in a Payload Formatter?
Nope, here are the Rules for Squid Game (oops) Payload Formatter…
Only JavaScript (ECMAScript) 5.1 is supported
(a.k.a “Plain Old JavaScript”)
Which means we don’t allow let, const and Arrow Functions
(Like x => {...})
JavaScript Modules are not supported
(Like require and import)
Input / Output are not supported
(console.log will fail!)
(More about Payload Formatters)
(Helium has a similar Payload Decoder)
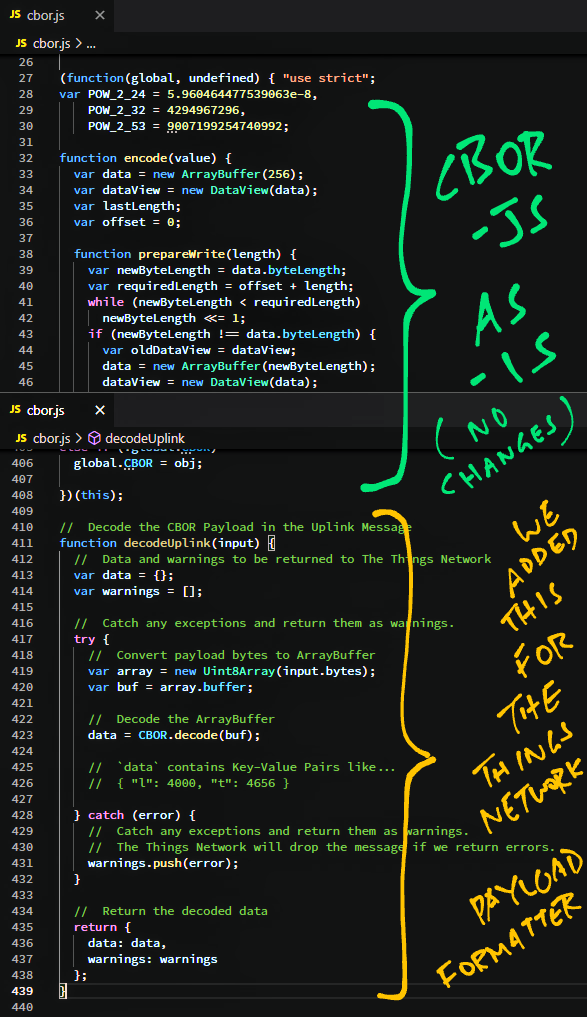
Let’s study the JavaScript for our CBOR Payload Formatter: cbor.js
//  The Things Network Payload Formatter for CBOR
//  Based on https://github.com/paroga/cbor-js/blob/master/cbor.js
(function(global, undefined) {
  function decode(...) { ... }
  ...
})(this);
The script begins by including the entire contents of this JavaScript Decoder for CBOR…
This defines the CBOR Decoder Function CBOR.decode, which we’ll call in a while.
(Yep, this decoder is all Plain Old JavaScript)
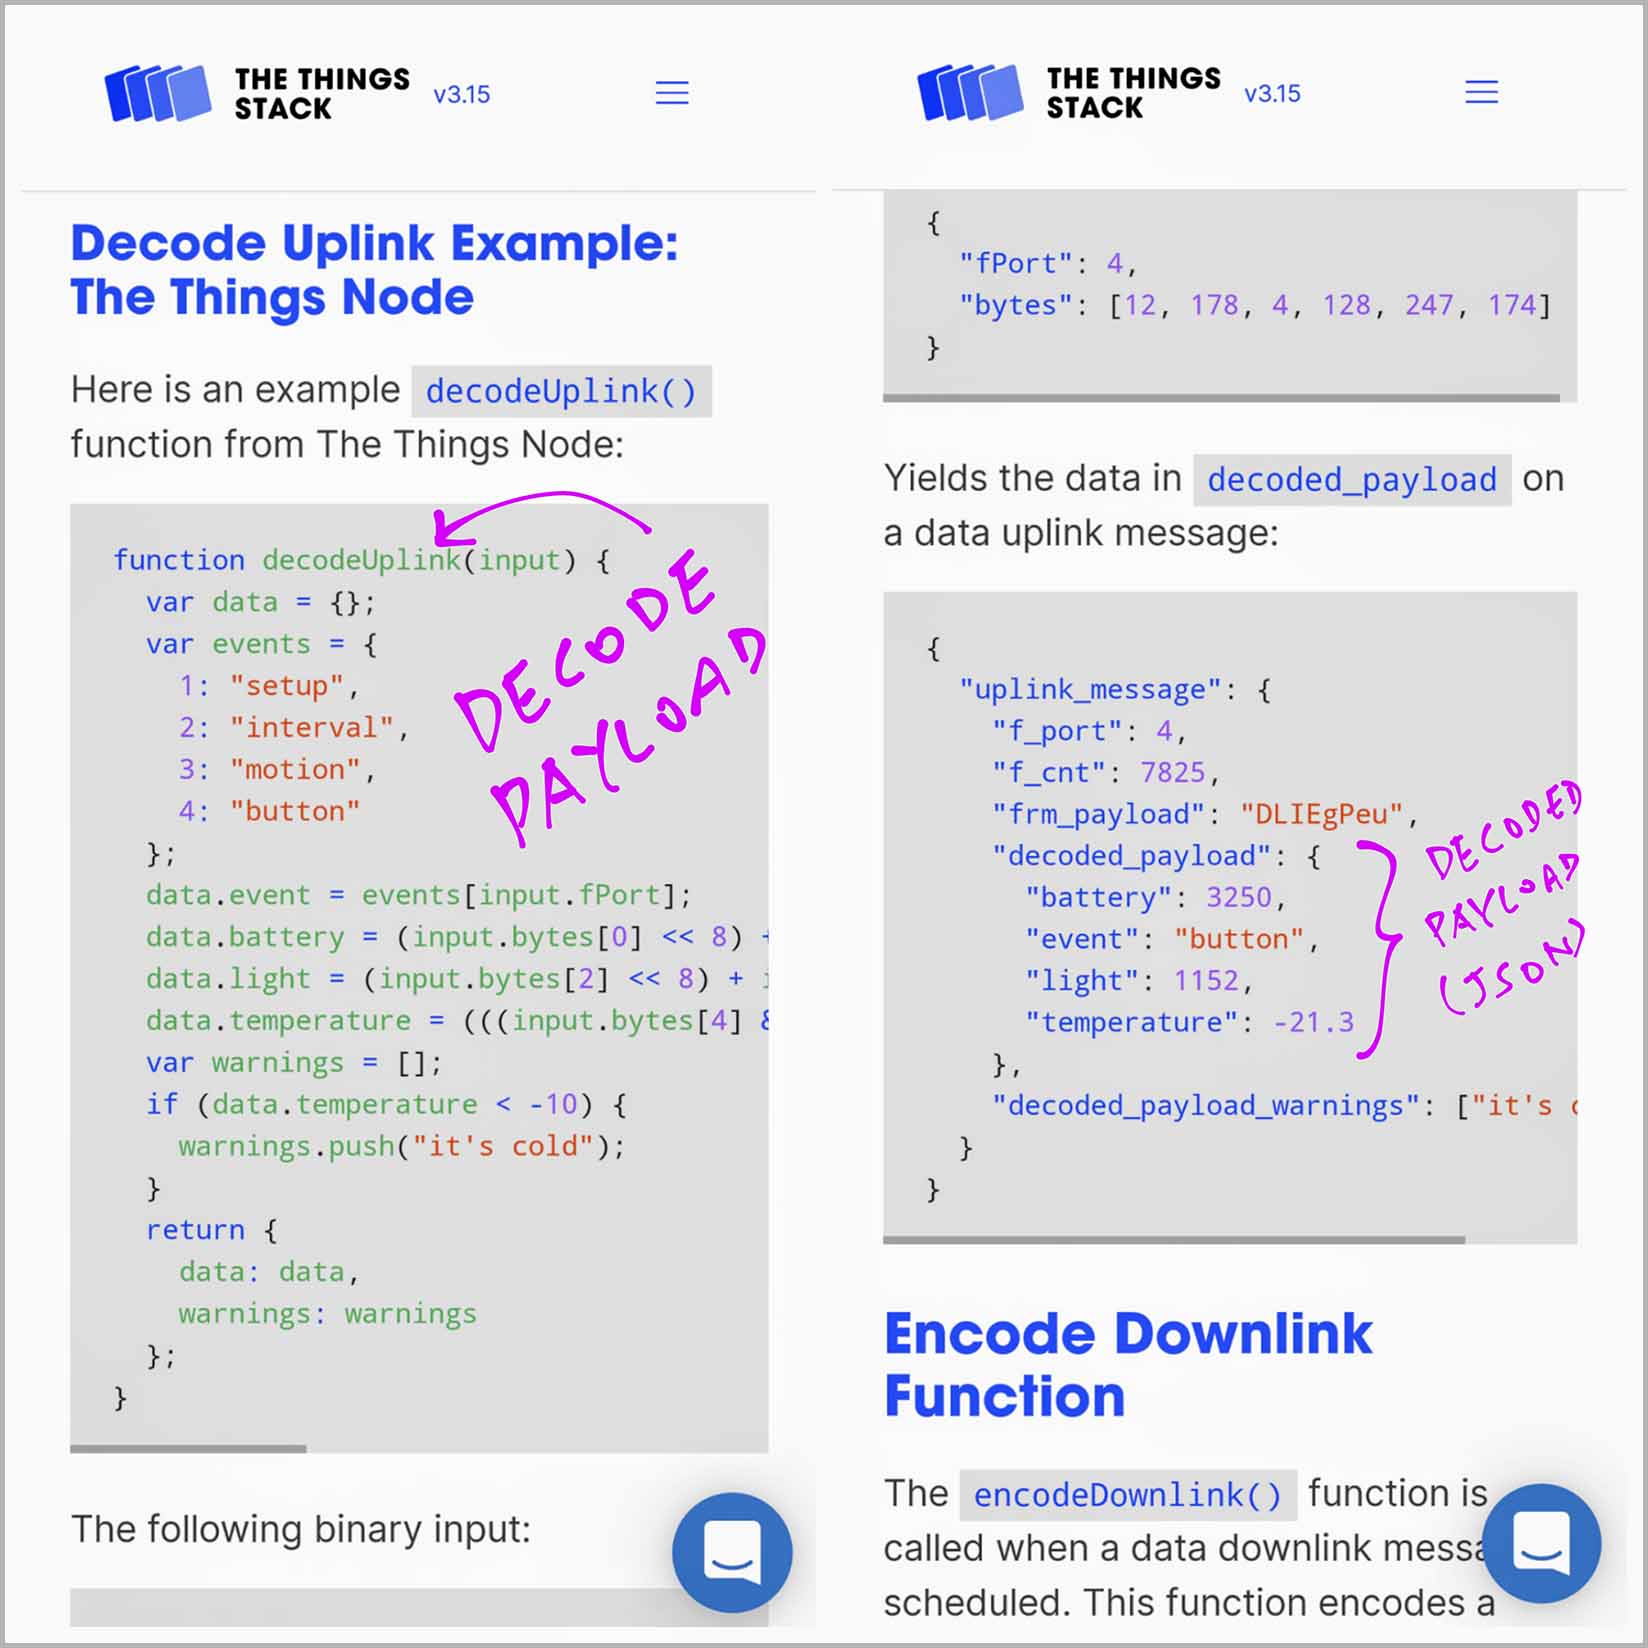
Next we define the decodeUplink function that will be called by The Things Network…
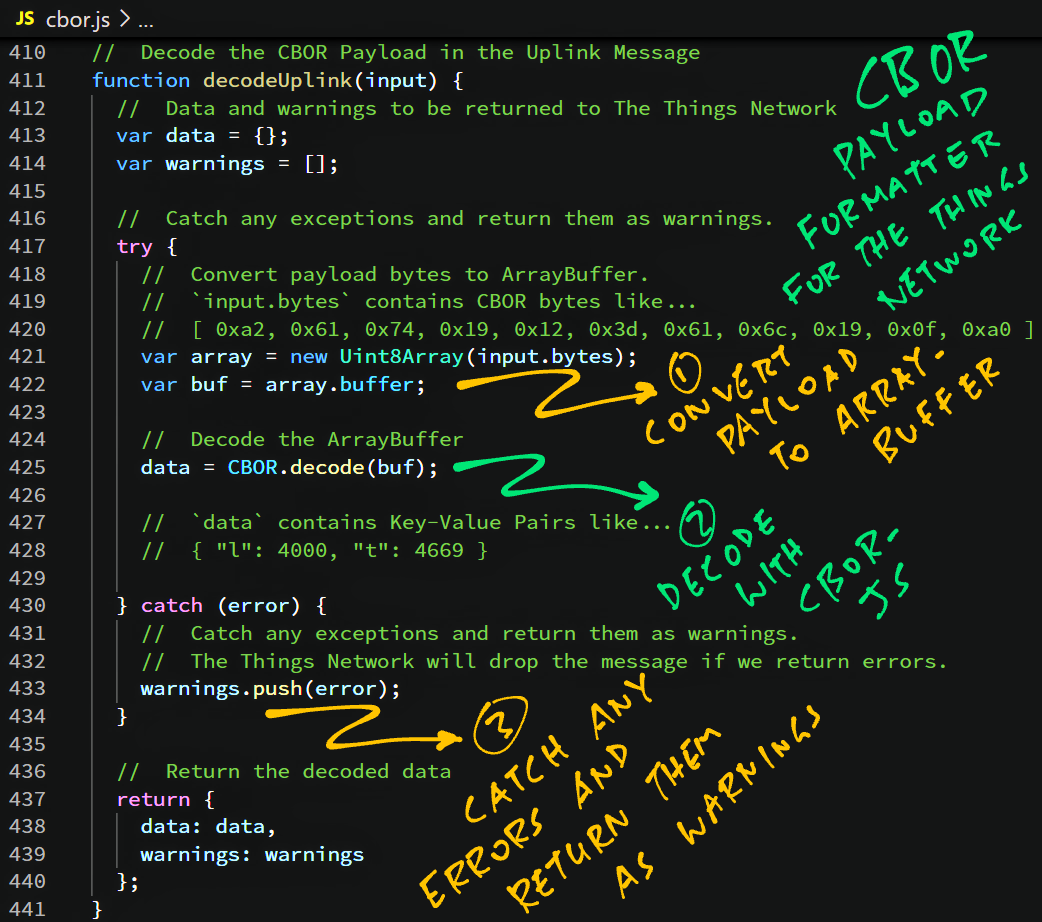
//  Decode the CBOR Payload in the Uplink Message
function decodeUplink(input) {
  //  Data and warnings to be returned to The Things Network
  var data     = {};
  var warnings = [];
Soon we shall compose the Decoded Data and Decoder Warnings that will be returned to The Things Network.
input.bytes contains a byte array of CBOR-Encoded Sensor Data…
[ 0xa2, 0x61, 0x74, 0x19, 0x12, 0x3d, 0x61, 0x6c, 0x19, 0x0f, 0xa0 ]
We convert it to an ArrayBuffer…
  //  Catch any exceptions and return them as warnings.
  try {
    //  Convert payload bytes to ArrayBuffer.
    //  `input.bytes` contains CBOR bytes like...
    //  [ 0xa2, 0x61, 0x74, 0x19, 0x12, 0x3d, 0x61, 0x6c, 0x19, 0x0f, 0xa0 ]
    var array = new Uint8Array(input.bytes);
    var buf   = array.buffer;
And we call our CBOR Decoder to decode the ArrayBuffer…
    //  Decode the ArrayBuffer
    data = CBOR.decode(buf);

    //  `data` contains Key-Value Pairs like...
    //  { "l": 4000, "t": 4669 }
In case of errors, we catch them and return as warnings…
  } catch (error) {
    //  Catch any exceptions and return them as warnings.
    //  The Things Network will drop the message if we return errors.
    warnings.push(error);
  }
Finally we return the Decoded Data and Decoder Warnings to The Things Network…
  //  Return the decoded data and decoder warnings
  return {
    data:     data,
    warnings: warnings
  };
}
The Decoded Data will look like this…
{
  "t": 4669,
  "l": 4000
}
And that’s how we decode CBOR Sensor Data in our Payload Formatter!
Now we configure The Things Network with our Payload Formatter…
Log on to The Things Network Console
Click Applications → (Your Application) → Payload Formatters → Uplink
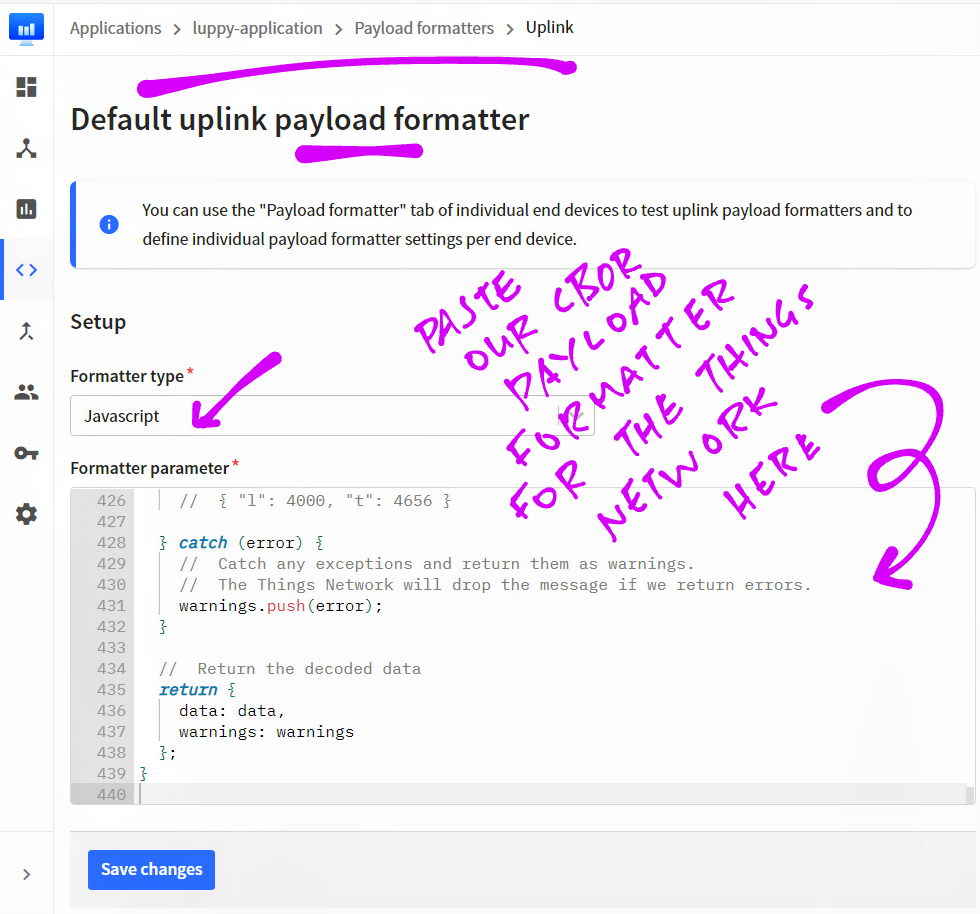
Set the Formatter Type to JavaScript
Copy and paste the contents of cbor.js into the Formatter Parameter box
Click Save Changes
Let’s test our CBOR Payload Formatter!
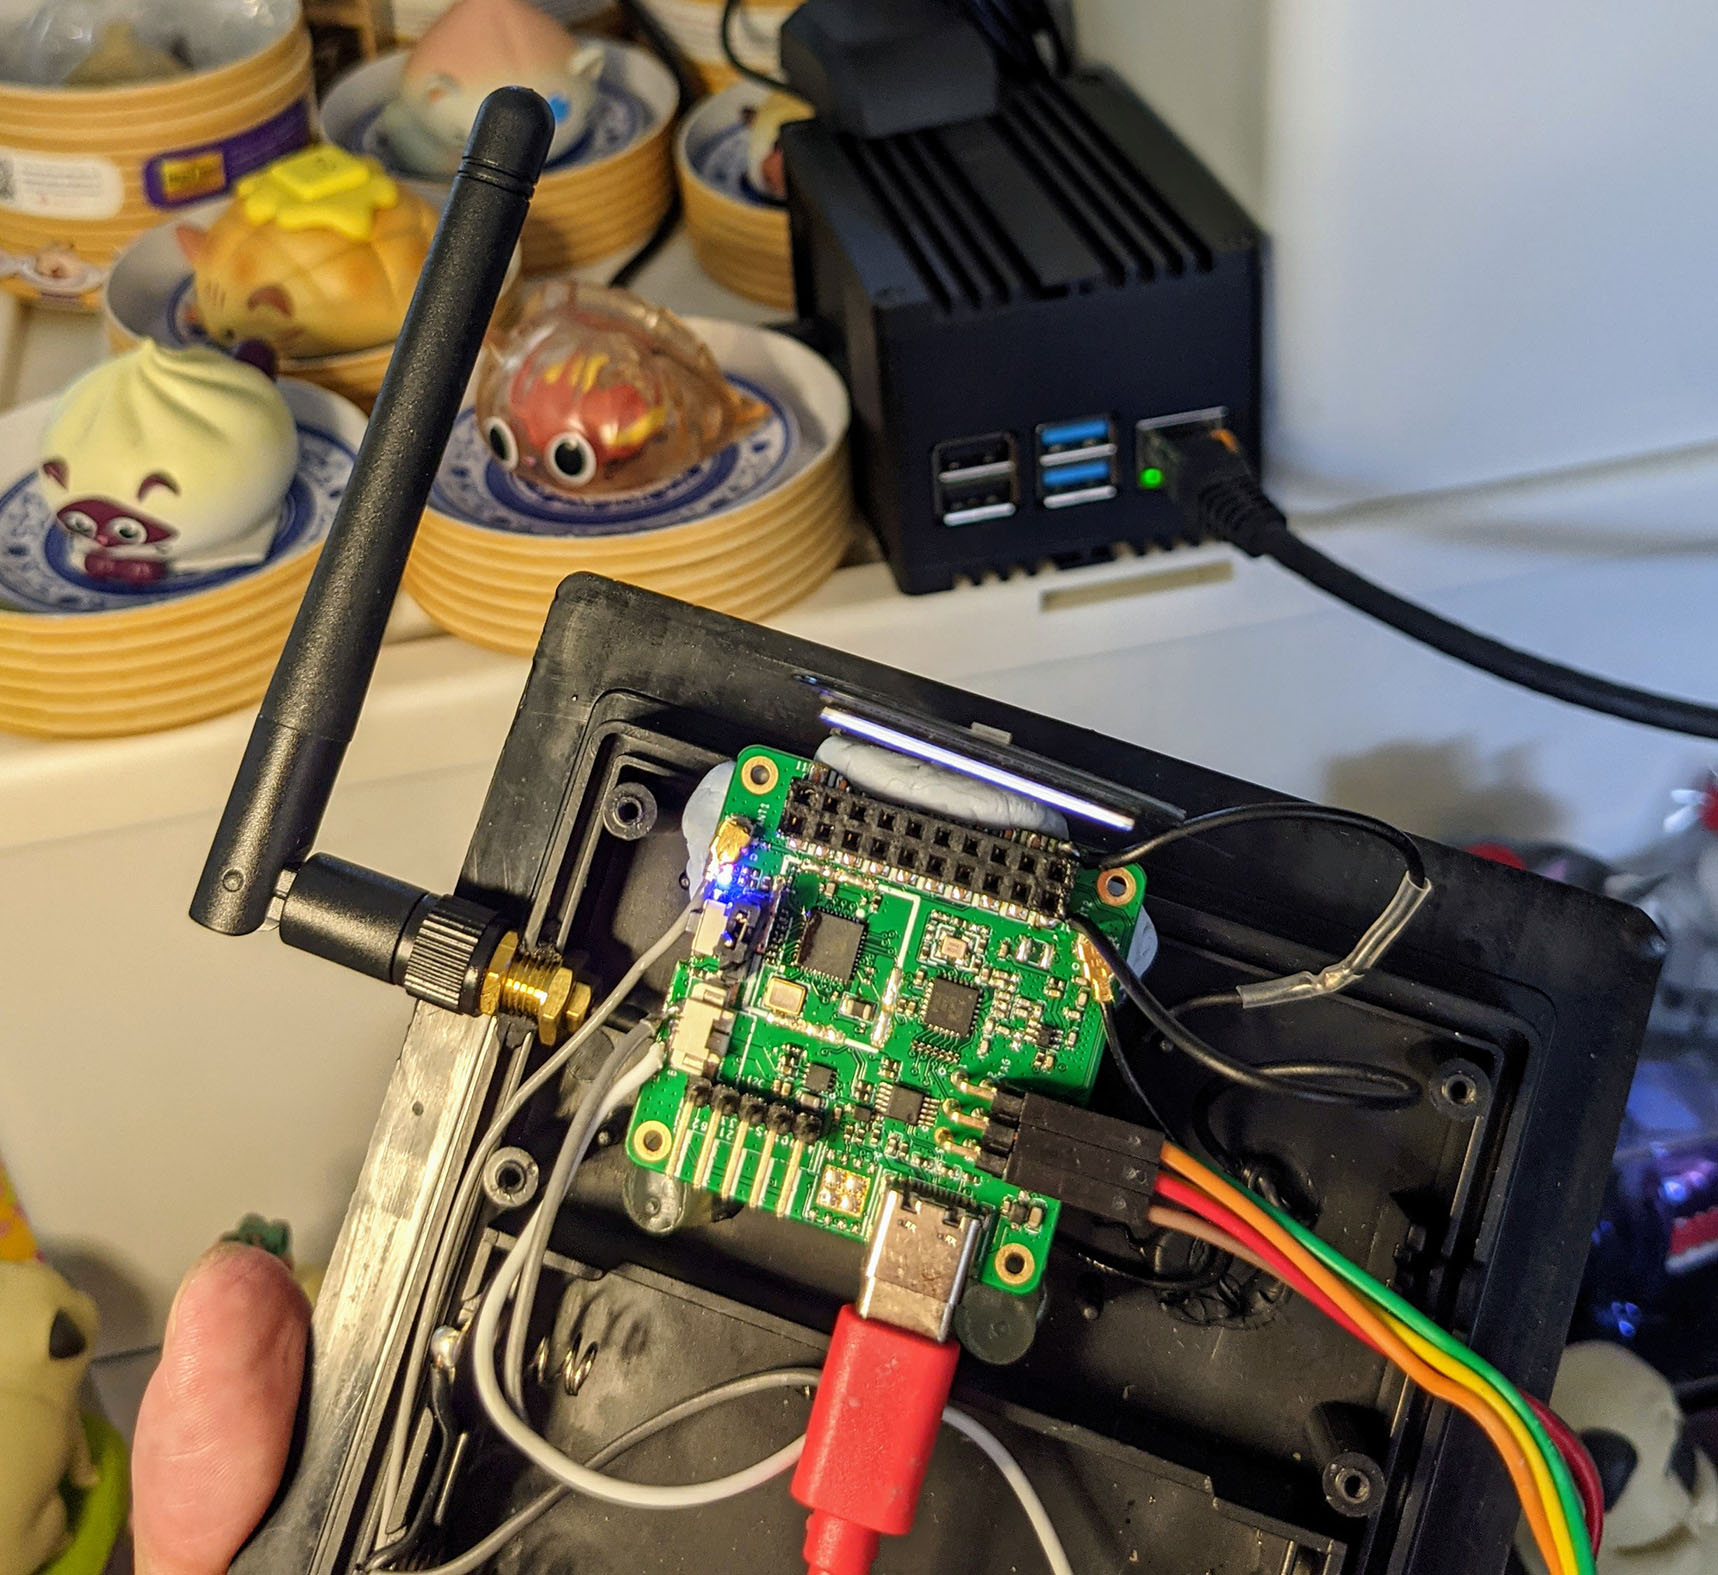
To test our CBOR Payload Formatter, we need a LoRaWAN Device that will transmit CBOR Payloads to The Things Network.
Today we shall use PineDio Stack BL604 (pic above)
Follow the instructions below to build, flash and run the LoRaWAN Firmware for PineDio Stack…
Enter the command to transmit Temperature Sensor Data to The Things Network, encoded with CBOR…
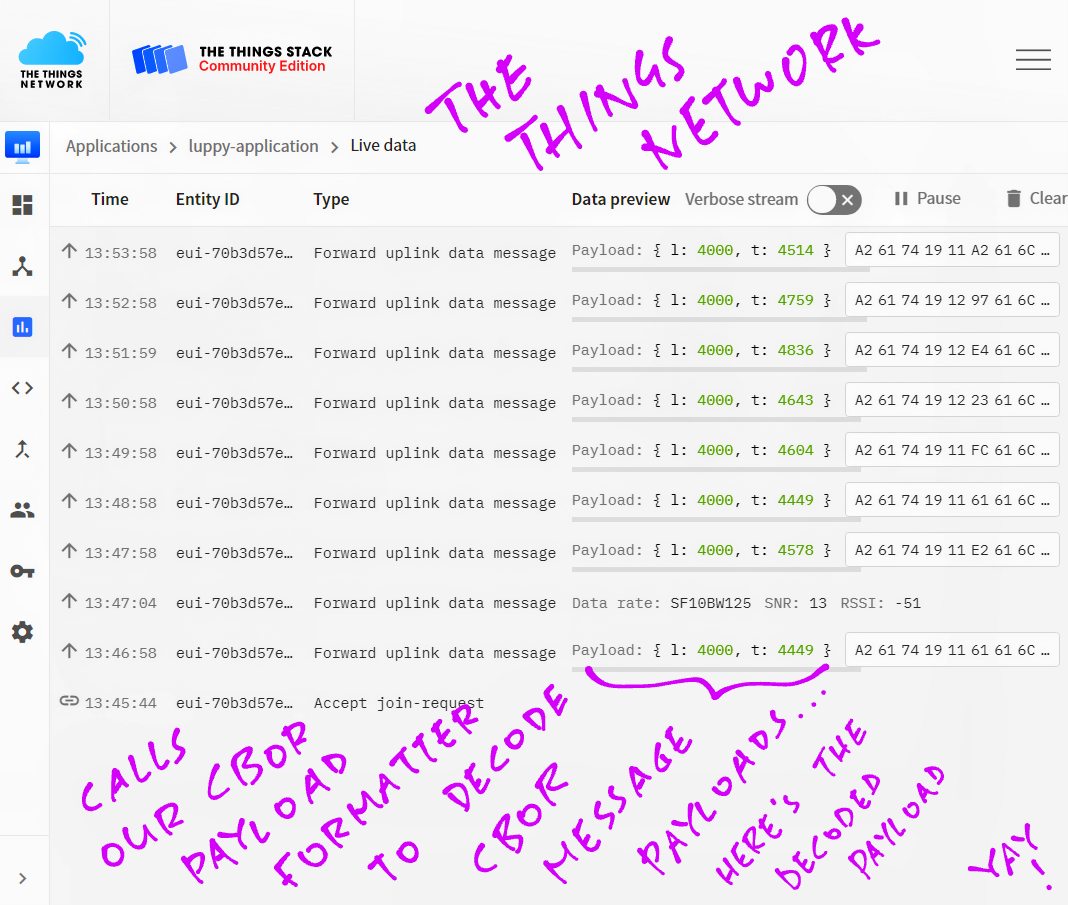
Log on to The Things Network Console
Click Applications → (Your Application) → Live Data
Our Decoded Sensor Data should appear in the Live Data Table…
{ "l": 4000, "t": 4669 }
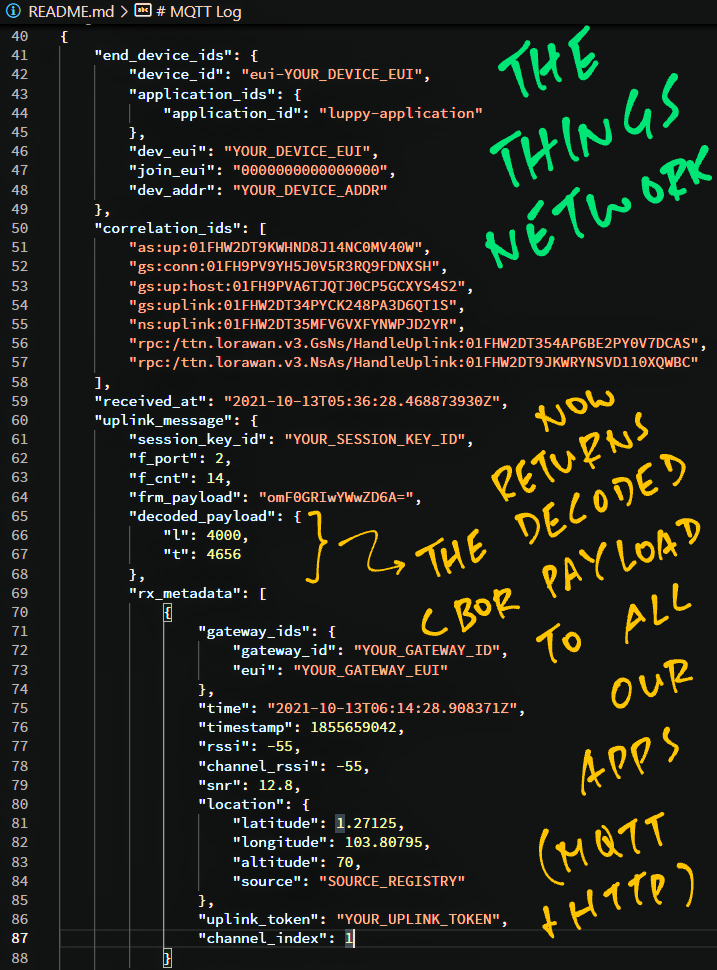
Click on a message in the Live Data Table.
We should see the decoded_payload field with our Decoded Sensor Data…
"decoded_payload": {
  "l": 4000,
  "t": 4656
}
(Our decoder warnings will also appear here)
decoded_payload will be visible to Applications that are connected to The Things Network via…
Storage API (over HTTPS)
Congratulations, we have successfully decoded our CBOR Message Payload in The Things Network… Ready to be consumed by multiple Applications!
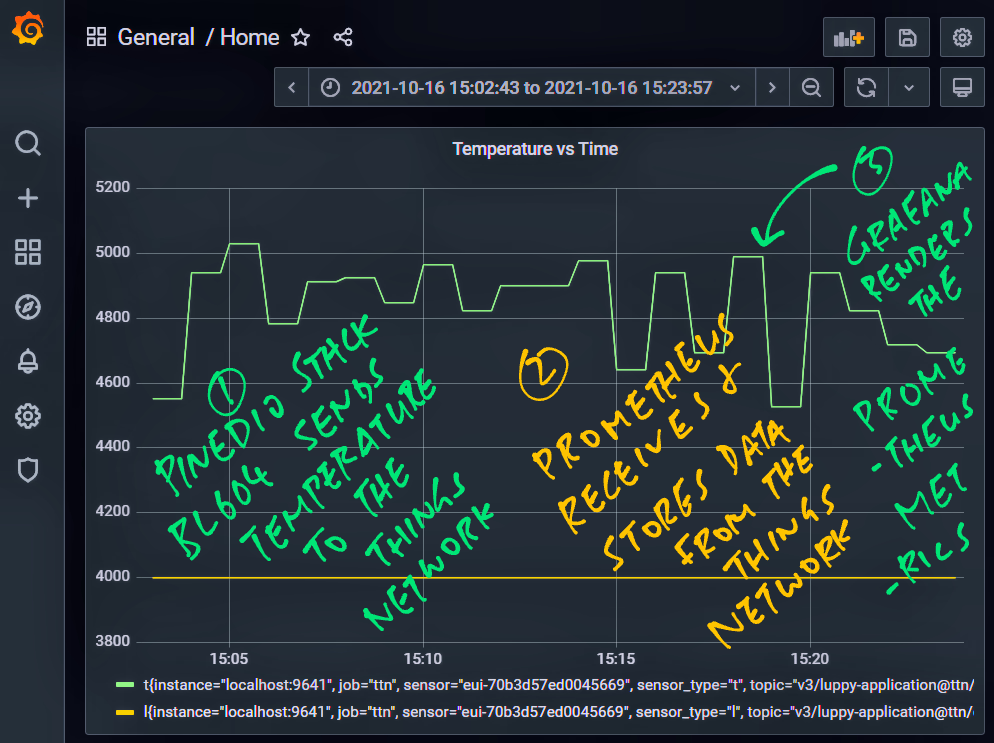
(Like Prometheus, the open source Time Series Database for IoT Sensor Data)
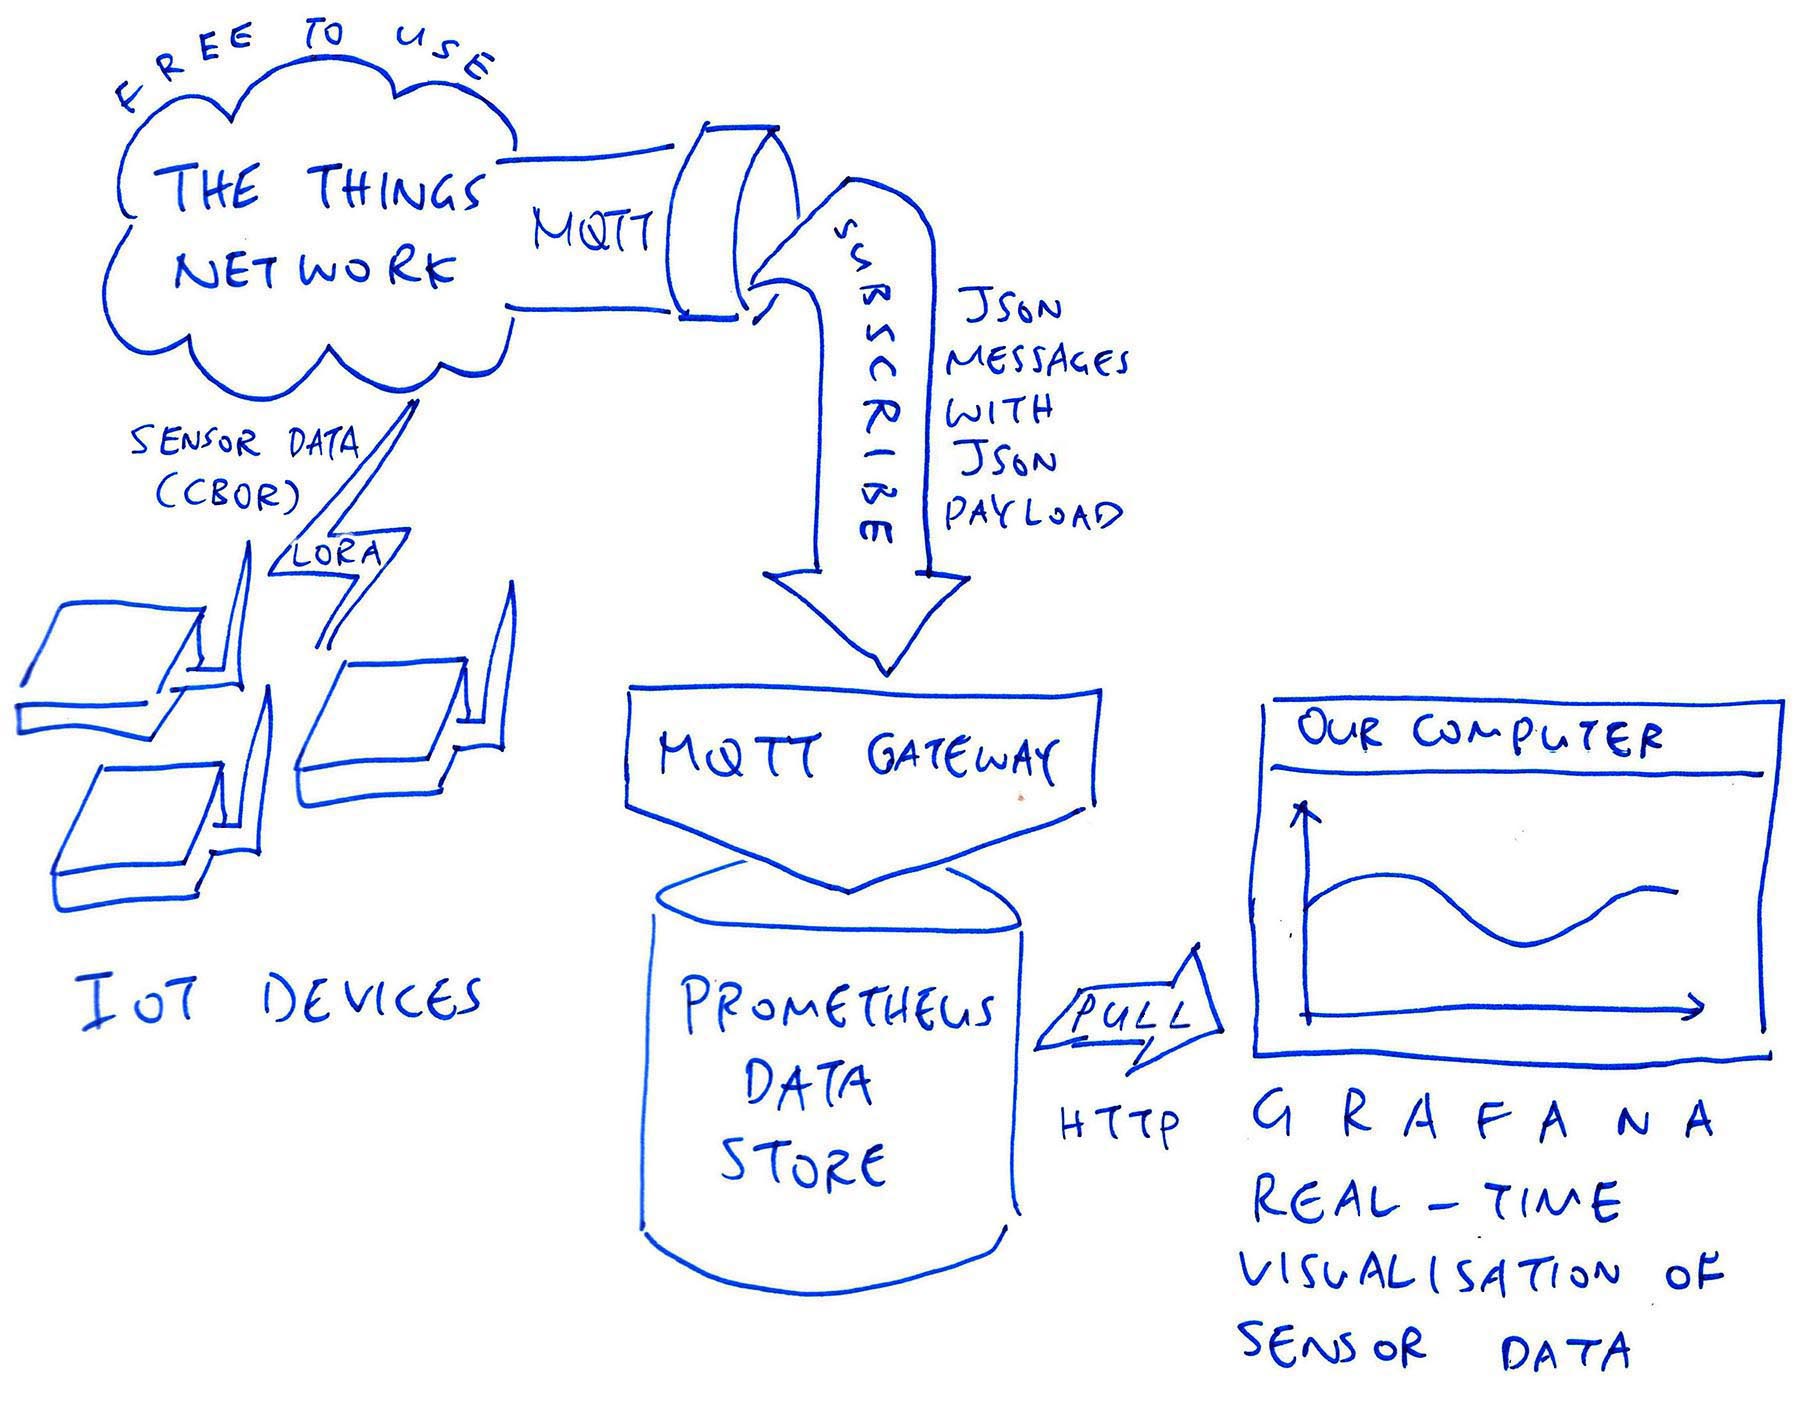
Now that we can decode CBOR Sensor Data in The Things Network, it becomes a lot easier to ingest the Sensor Data into Prometheus (the open source Time Series Database).
In the next article we shall build an IoT Monitoring System that stores the Sensor Data with Prometheus and visualises the data in a Grafana Dashboard…
Many Thanks to my GitHub Sponsors for supporting my work! This article wouldn’t have been possible without your support.
Got a question, comment or suggestion? Create an Issue or submit a Pull Request here…
lupyuen.github.io/src/payload.md
This article is the expanded version of this Twitter Thread
Be careful when decoding CBOR with our Payload Formatter!
Some Data Types in CBOR don’t exist in JSON, and might throw errors.
(See this mapping of CBOR to JSON types)
When we’re encoding Sensor Data with CBOR, use Data Types that are supported in JSON: Integers, Floats, Strings and Maps.
Here’s a tip for debugging Payload Formatters…
We can’t use console.log for logging Debug Messages, but we can return Debug Messages as Decoder Warnings…
//  Decode the payload in the Uplink Message
function decodeUplink(input) {
  //  Data and warnings to be returned to The Things Network
  var data     = {};
  var warnings = [];

  //  Omitted: Decode the payload
  ...

  //  For Debugging: Show the contents of
  //  `input.bytes` in the decoder warnings
  warnings.push(input.bytes);

  //  Return the decoded data and decoder warnings
  return {
    data:     data,
    warnings: warnings
  };
}
The Decoder Warnings (and our Debug Messages) will be shown when we click on a message in Applications → (Your Application) → Live Data.