📝 14 Jul 2021
The BL706 Audio Video Board by Bouffalo Lab has a delightful mix of features for Embedded Developers: Multimedia, Bluetooth LE / Zigbee Networking and USB Device Interface.
And it runs on 32-bit RISC-V!
Today we look inside the BL706 Audio Video Board and learn why it’s great for creating Multimedia, RF Networking and USB Firmware.
(The board is not available for purchase yet… But soon, according to Bouffalo Lab)
Many thanks to Bouffalo Lab for providing the BL706 Audio Video Board! (BTW I’m not paid to write this article)
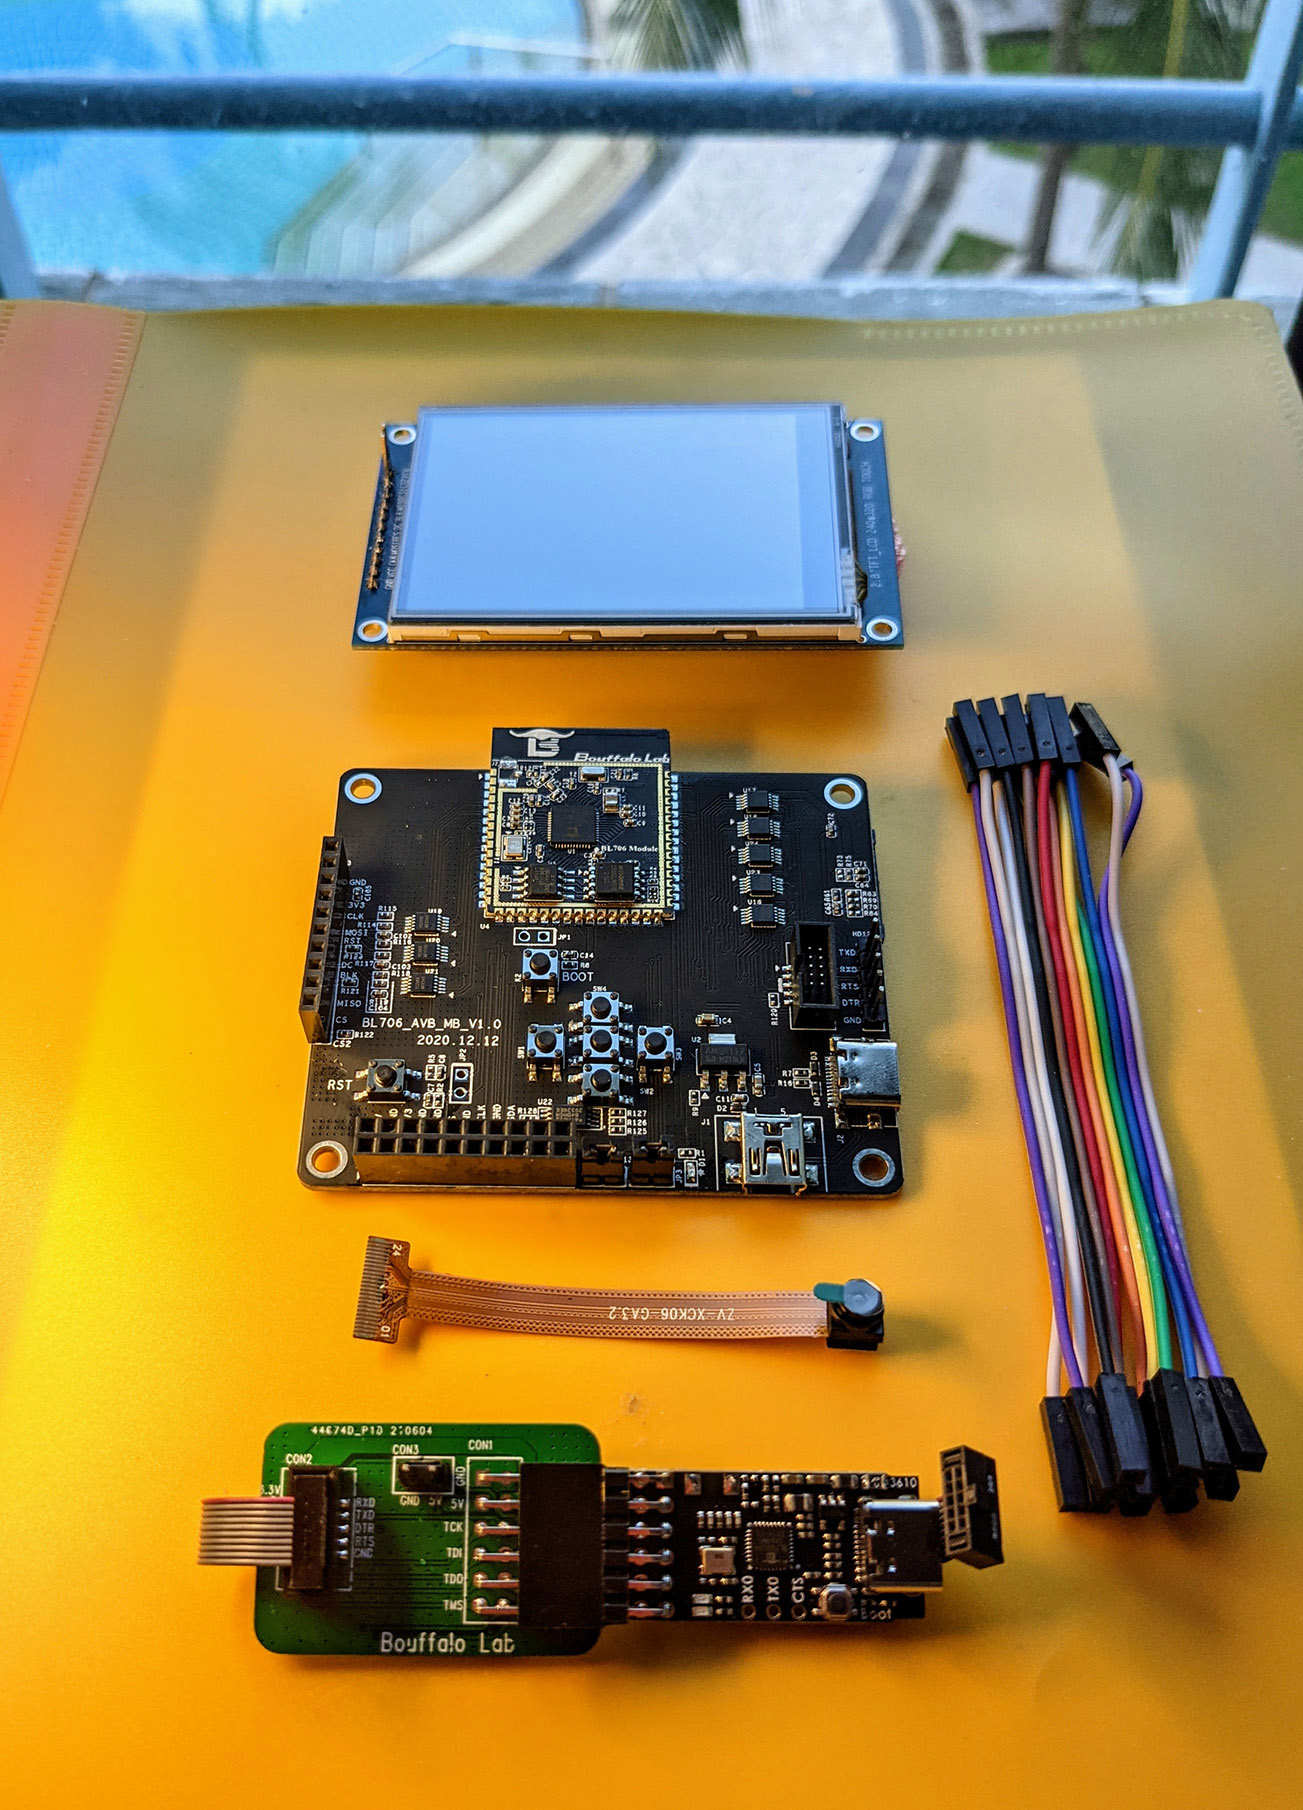
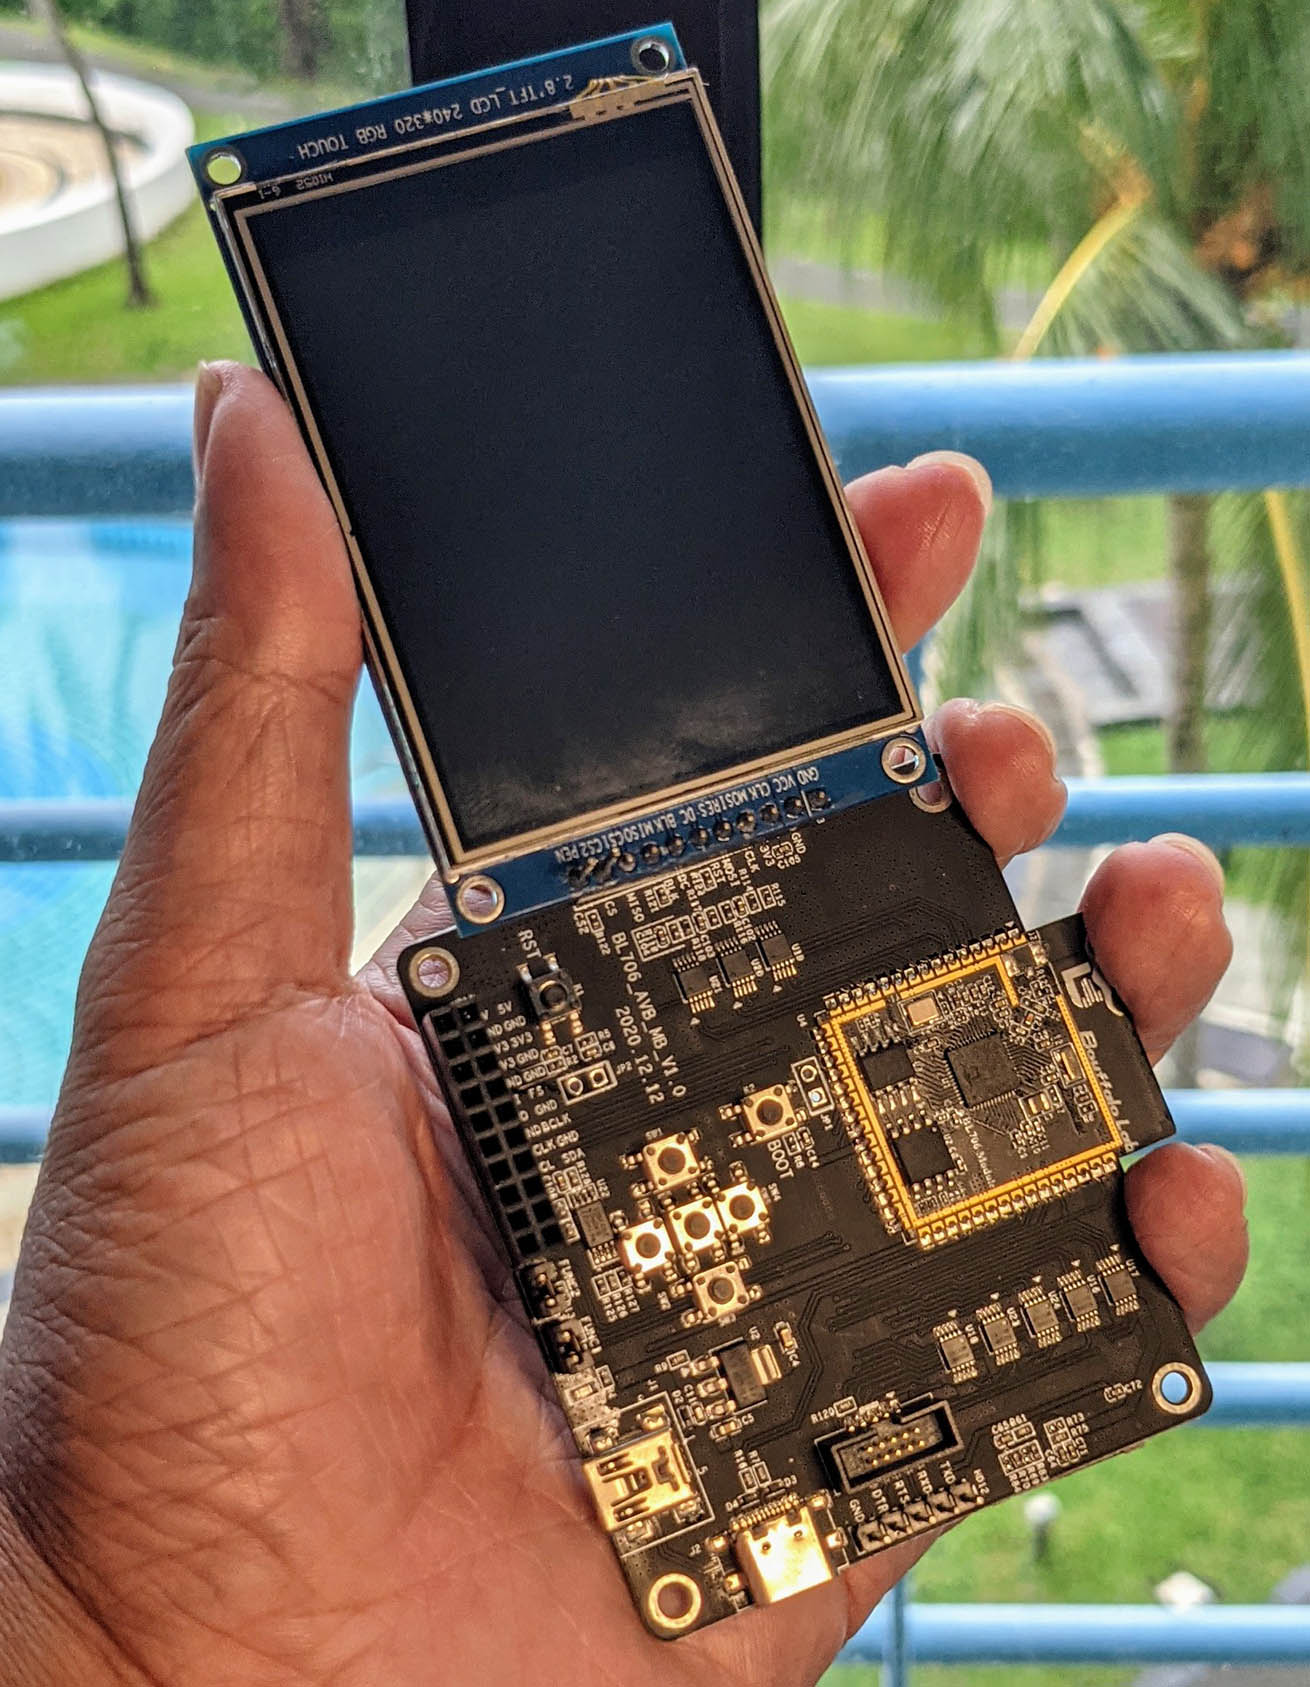
Dev Kit for Bouffalo Lab BL706 Audio Video Board
Top to bottom: ILI9341 SPI Display, BL706 AVB, Camera, JTAG Adapter
What is BL706?
BL706 is the new RISC-V + 2.4 GHz RF SoC by Bouffalo Lab…
32-bit RISC-V CPU with Hardware Floating-Point (RV32IMAFC)
CPU Frequency configurable from 1 MHz to 144 MHz
Based on SiFive E24 Core
132 KB RAM, 192 KB ROM
XIP QSPI Flash / pSRAM with hardware encryption support
2.4 GHz Radio Frequency Transceiver
Supports Bluetooth LE 5.0 and Zigbee 3.0
(Note that BL706 does NOT support WiFi)
Camera Interface
I2S Audio Interface
Ethernet RMII Interface
USB 2.0 Full-Speed Device Interface
Infrared Remote Control Interface
Passive Infrared Detection
Other Peripherals
UART x 2, SPI x 1, I2C x 1
PWM x 5, ADC 12-bit, DAC 10-bit
GPIO x 31
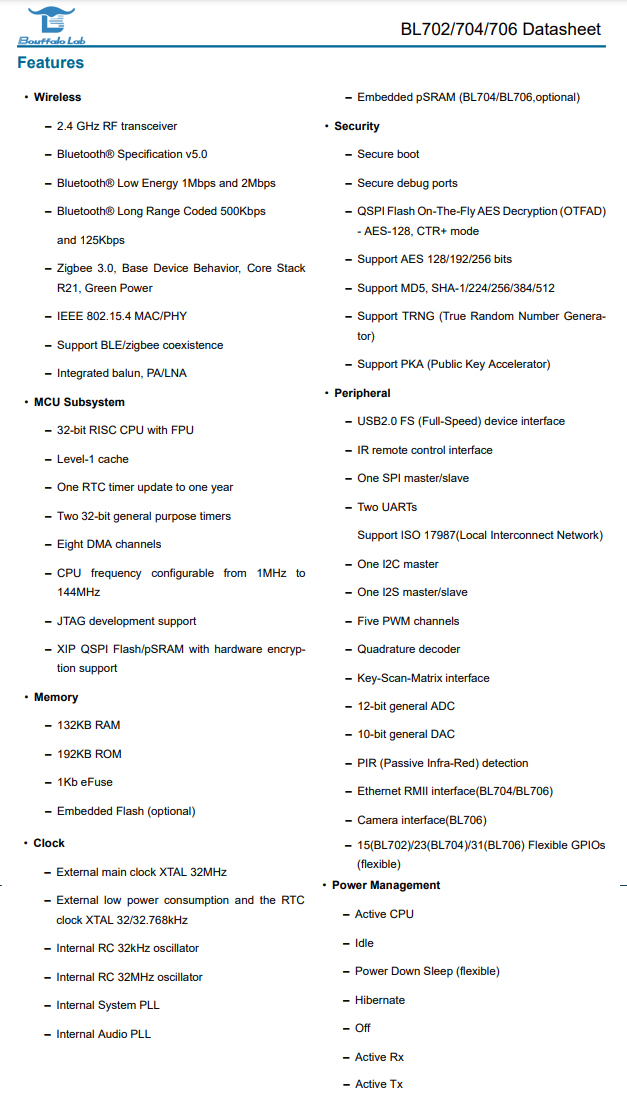
The BL706 docs are located here…
BL702 / BL704 / BL706 Datasheet
(Click on BL702_BL704_BL706_DS_EN)
BL702 / BL704 / BL706 Reference Manual
(Click on BL702_BL704_706_RM_EN)
BL702 and BL704 have fewer features than BL706…
GPIO: 15 on BL702, 23 on BL704 (31 on BL706)
Camera Interface: Only available on BL706
Ethernet Interface: Only available on BL704 and BL706
(How does BL706 compare with BL602? We’ll discuss in a while)
What is BL706 Audio Video Board?
Bouffalo Lab has created 2 Development Boards for BL706…
BL706 IoT Development Board
This is the Smaller Board, with GPIO Pins and USB Port exposed. (It looks like the BL602 Evaluation Board)
The BL706 IoT Dev Board is useful for running Bluetooth LE and Zigbee Firmware.
BL706 Audio Video Board (AVB)
This is the Bigger Board, with connectors for SPI Display, Camera and Audio Codec. Plus GPIO Pins and USB Port.
The BL706 AVB is great for Mulimedia Firmware. And it works with Bluetooth LE and Zigbee too.
(We’re using this today)
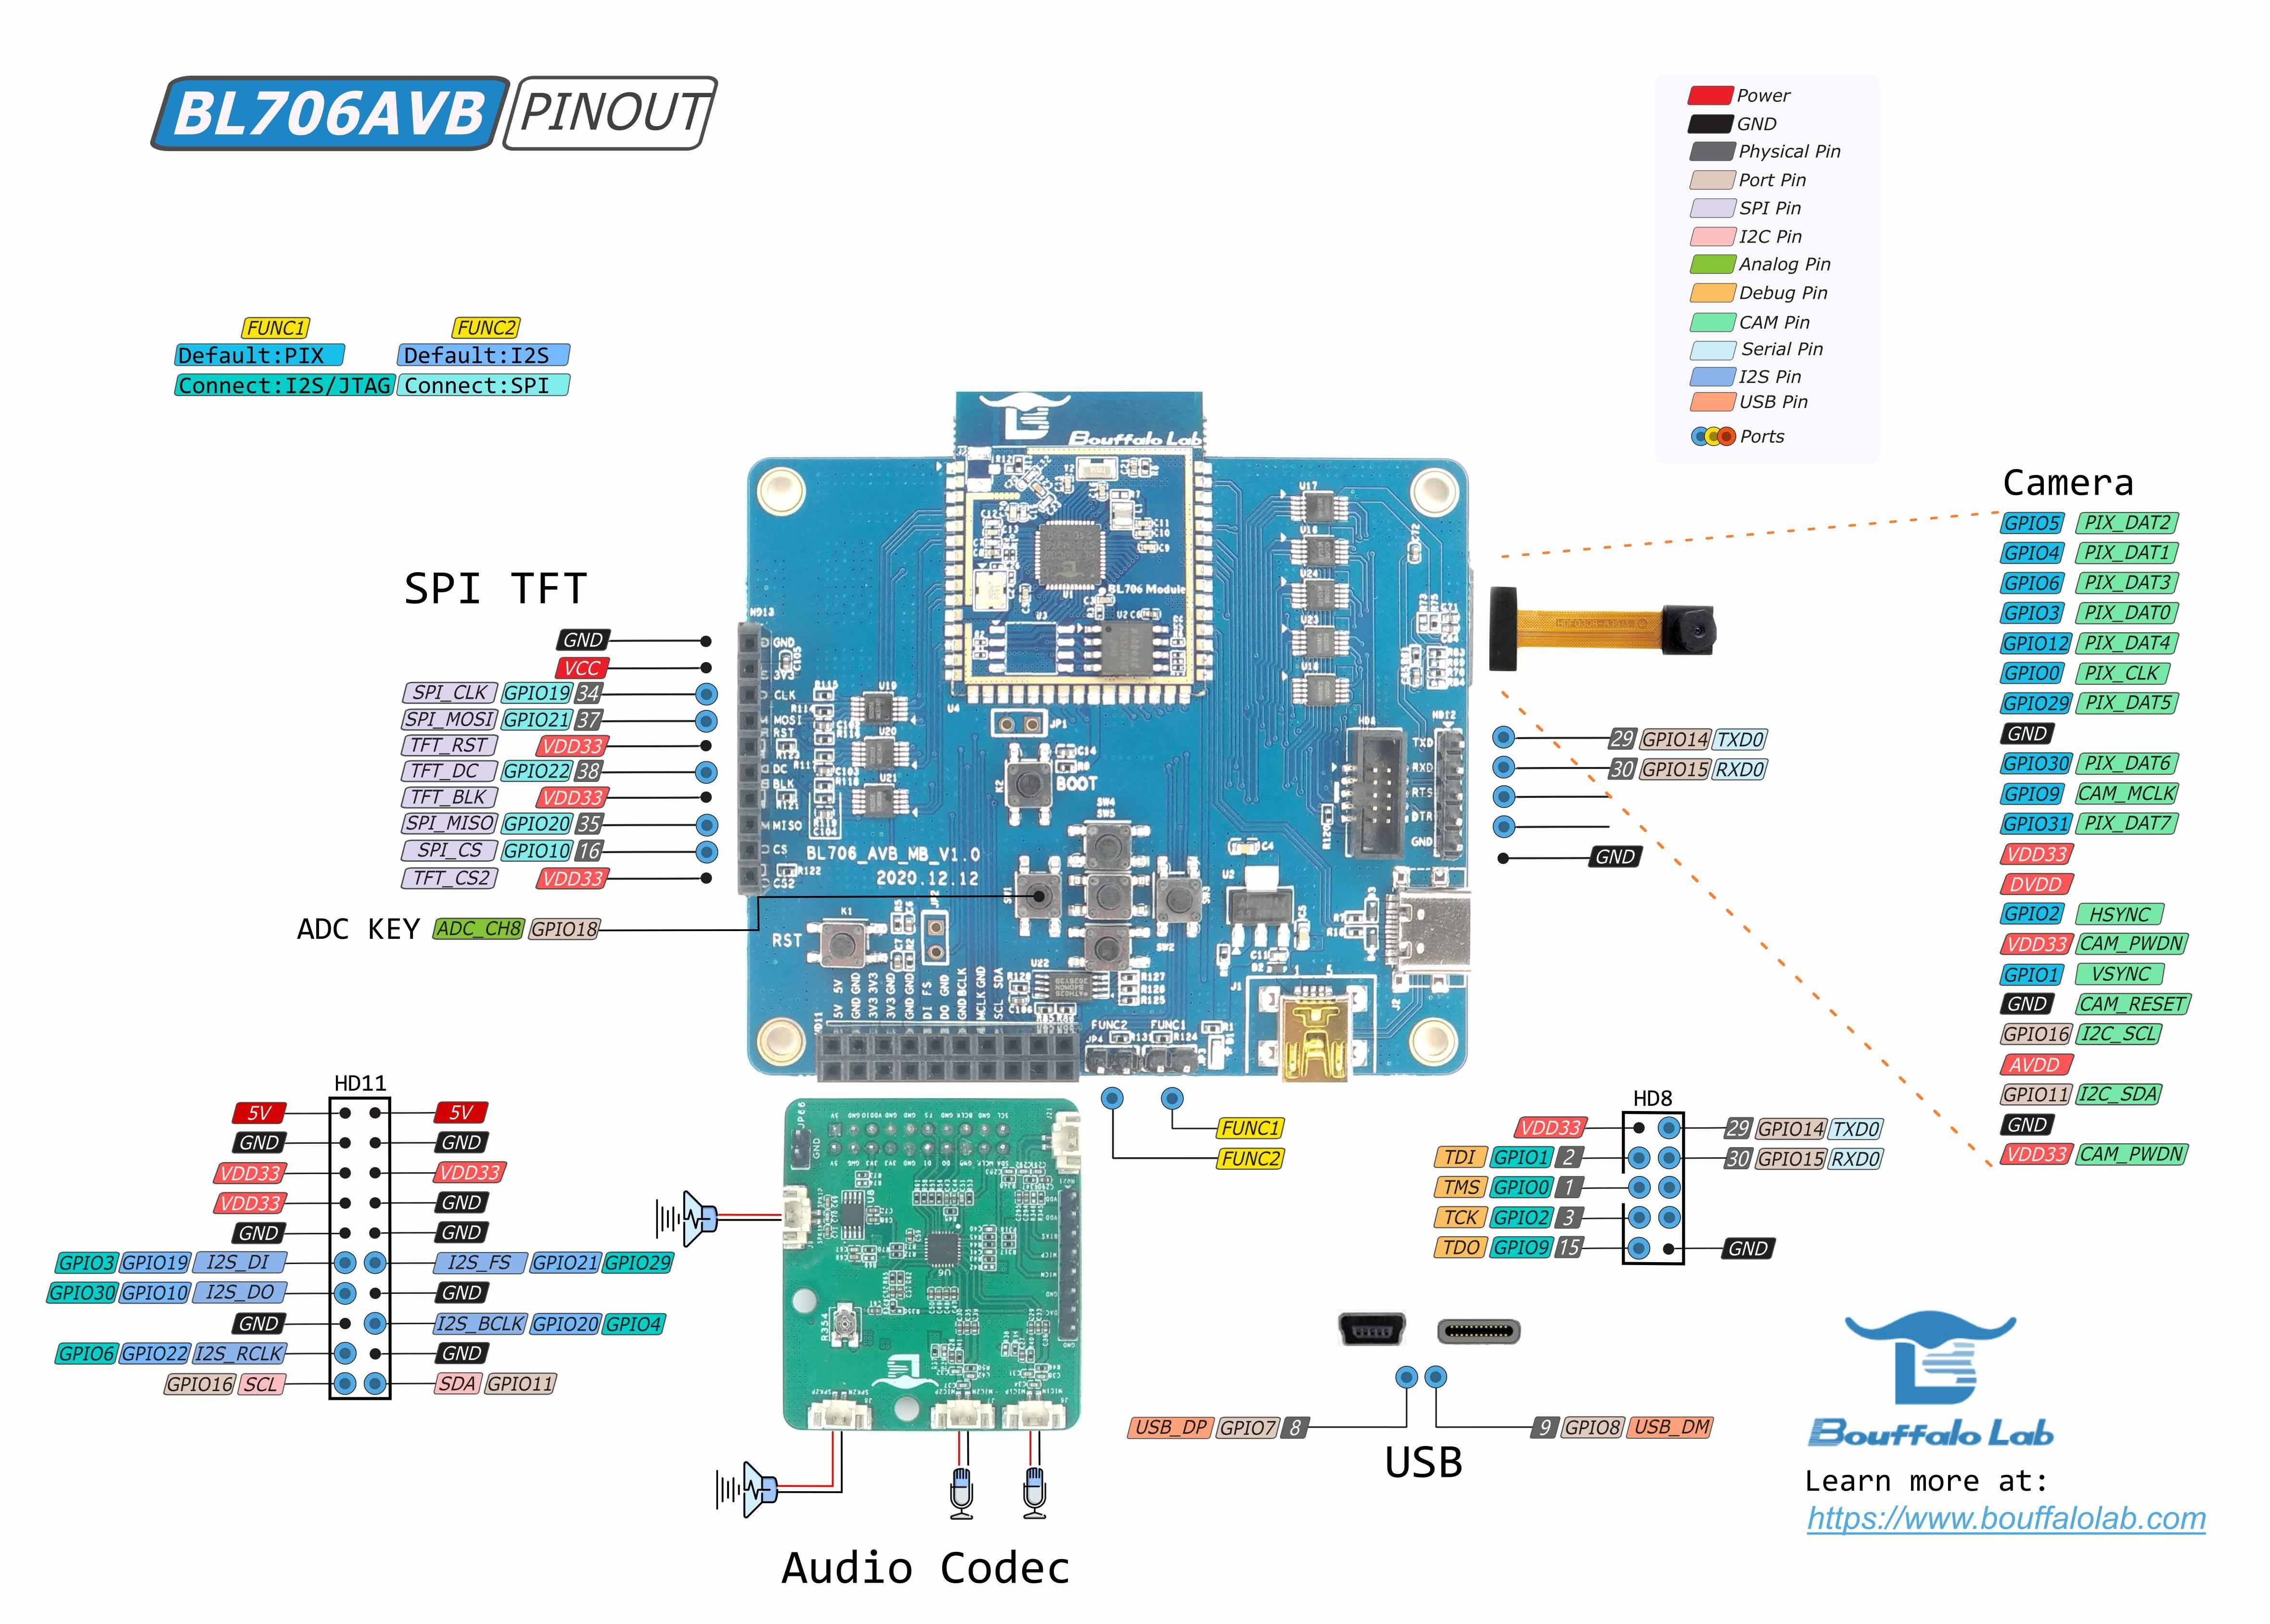
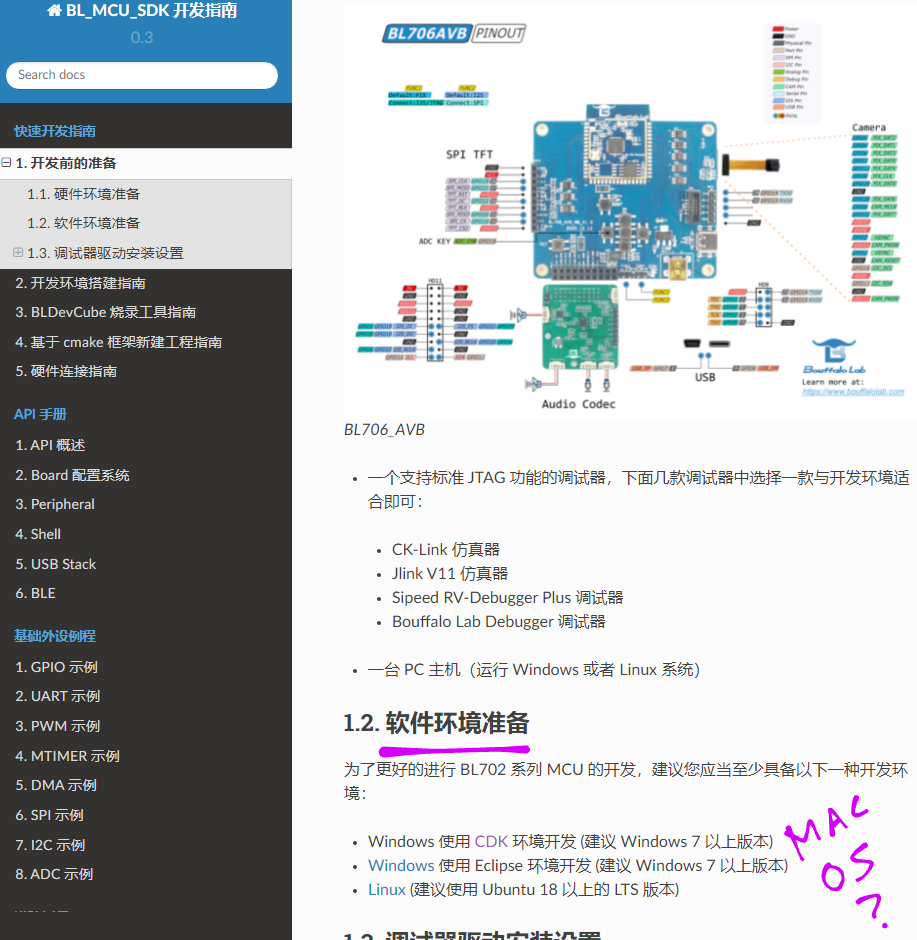
Here’s the Pinout for BL706 AVB…
Here’s the Front View of BL706 AVB…
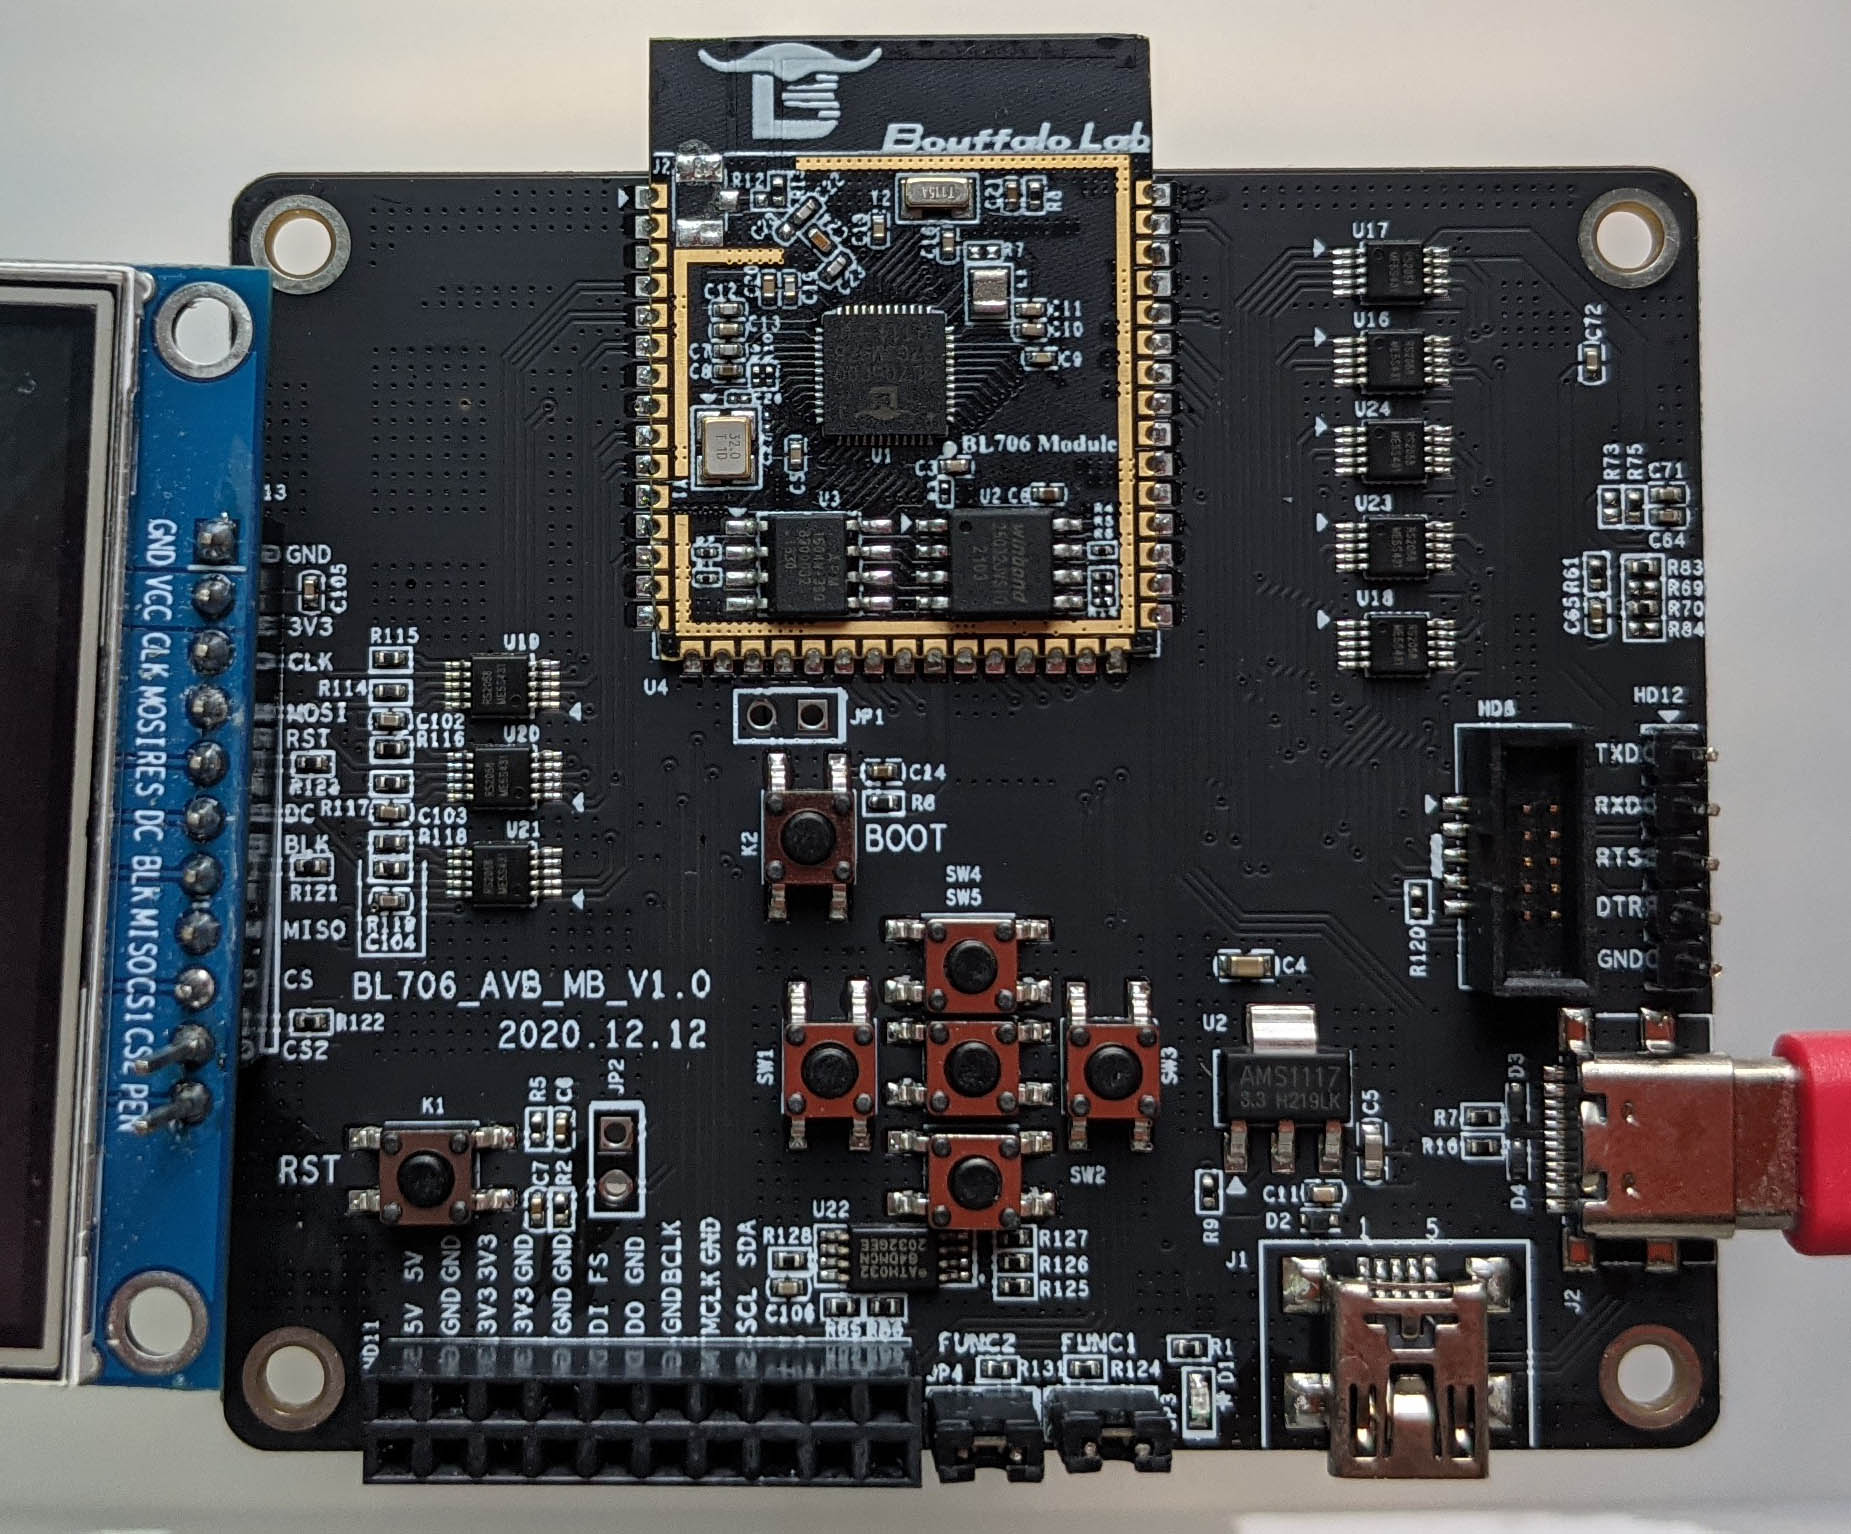
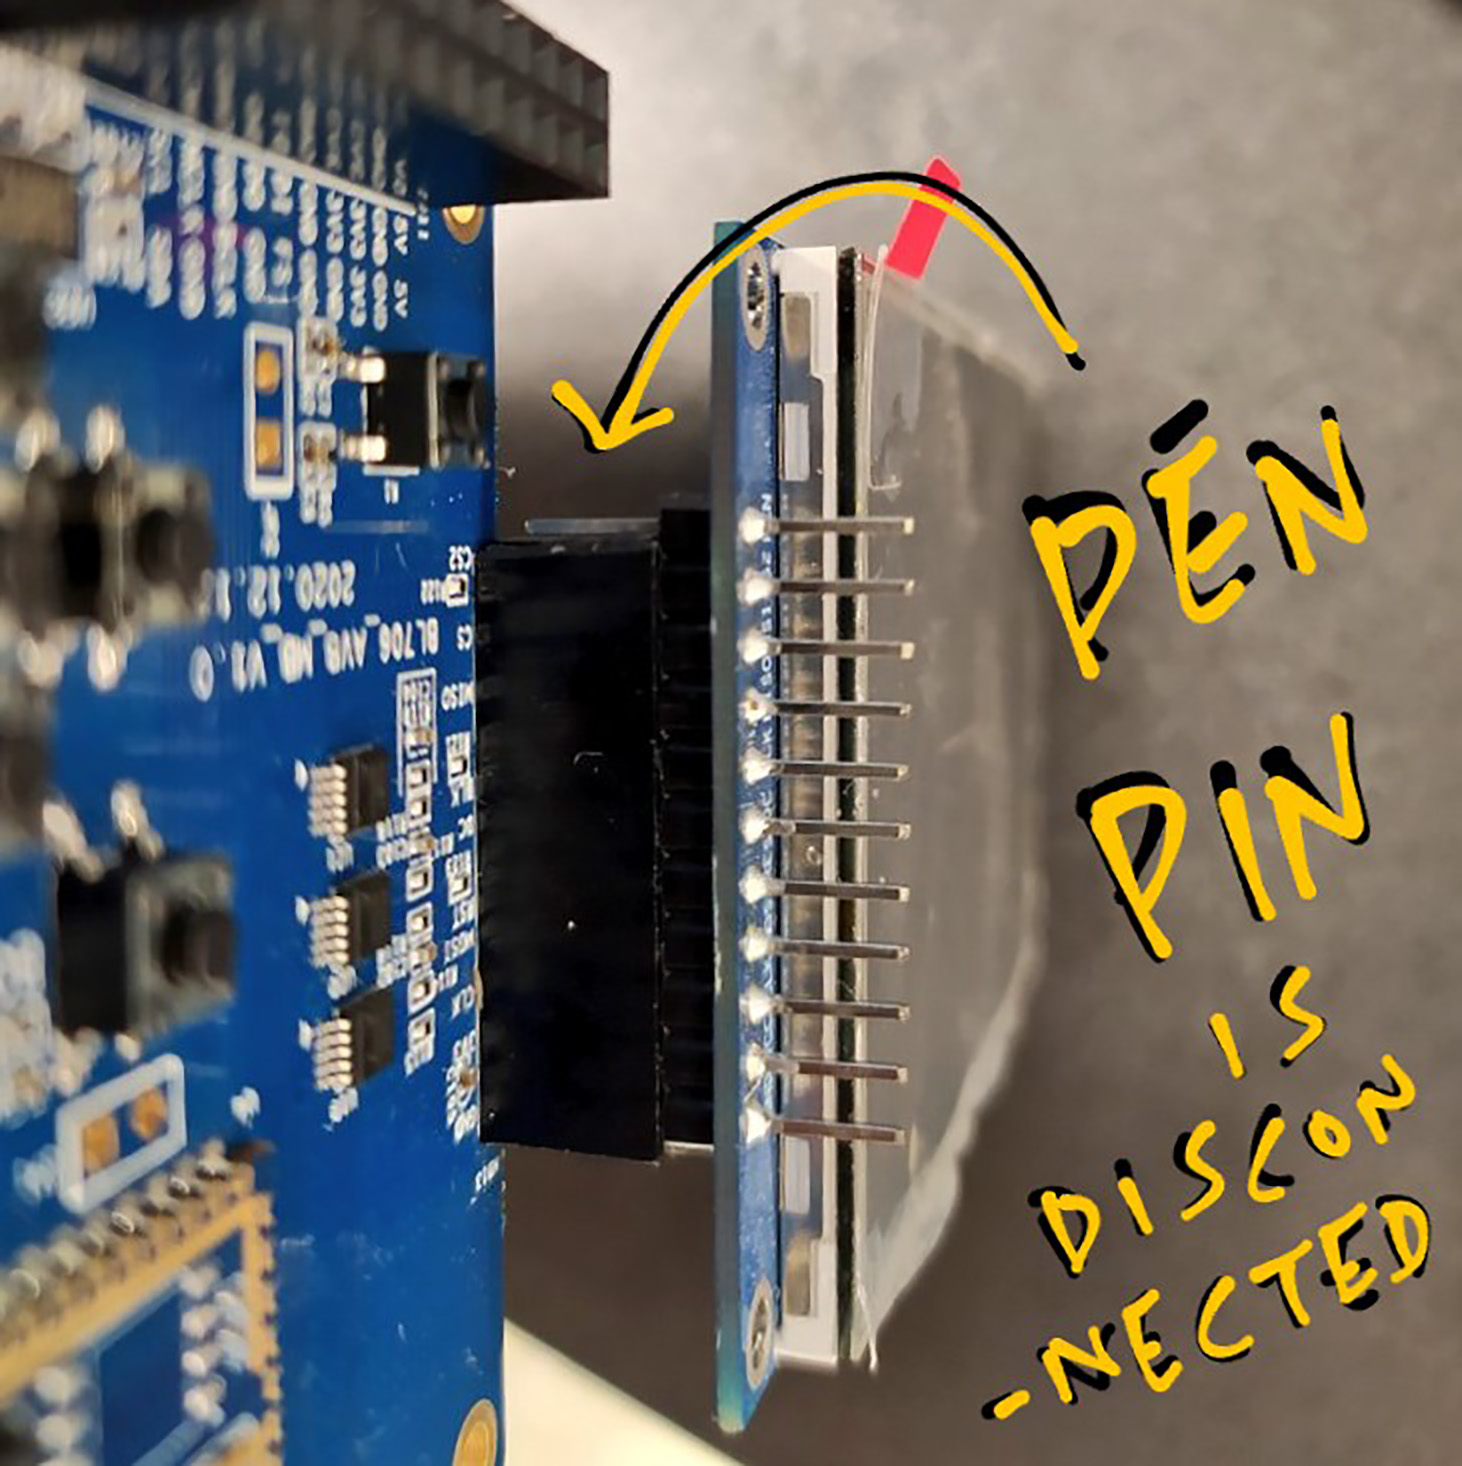
(ILI9341 SPI Display is connected at left. The PEN Pin must be disconnected)
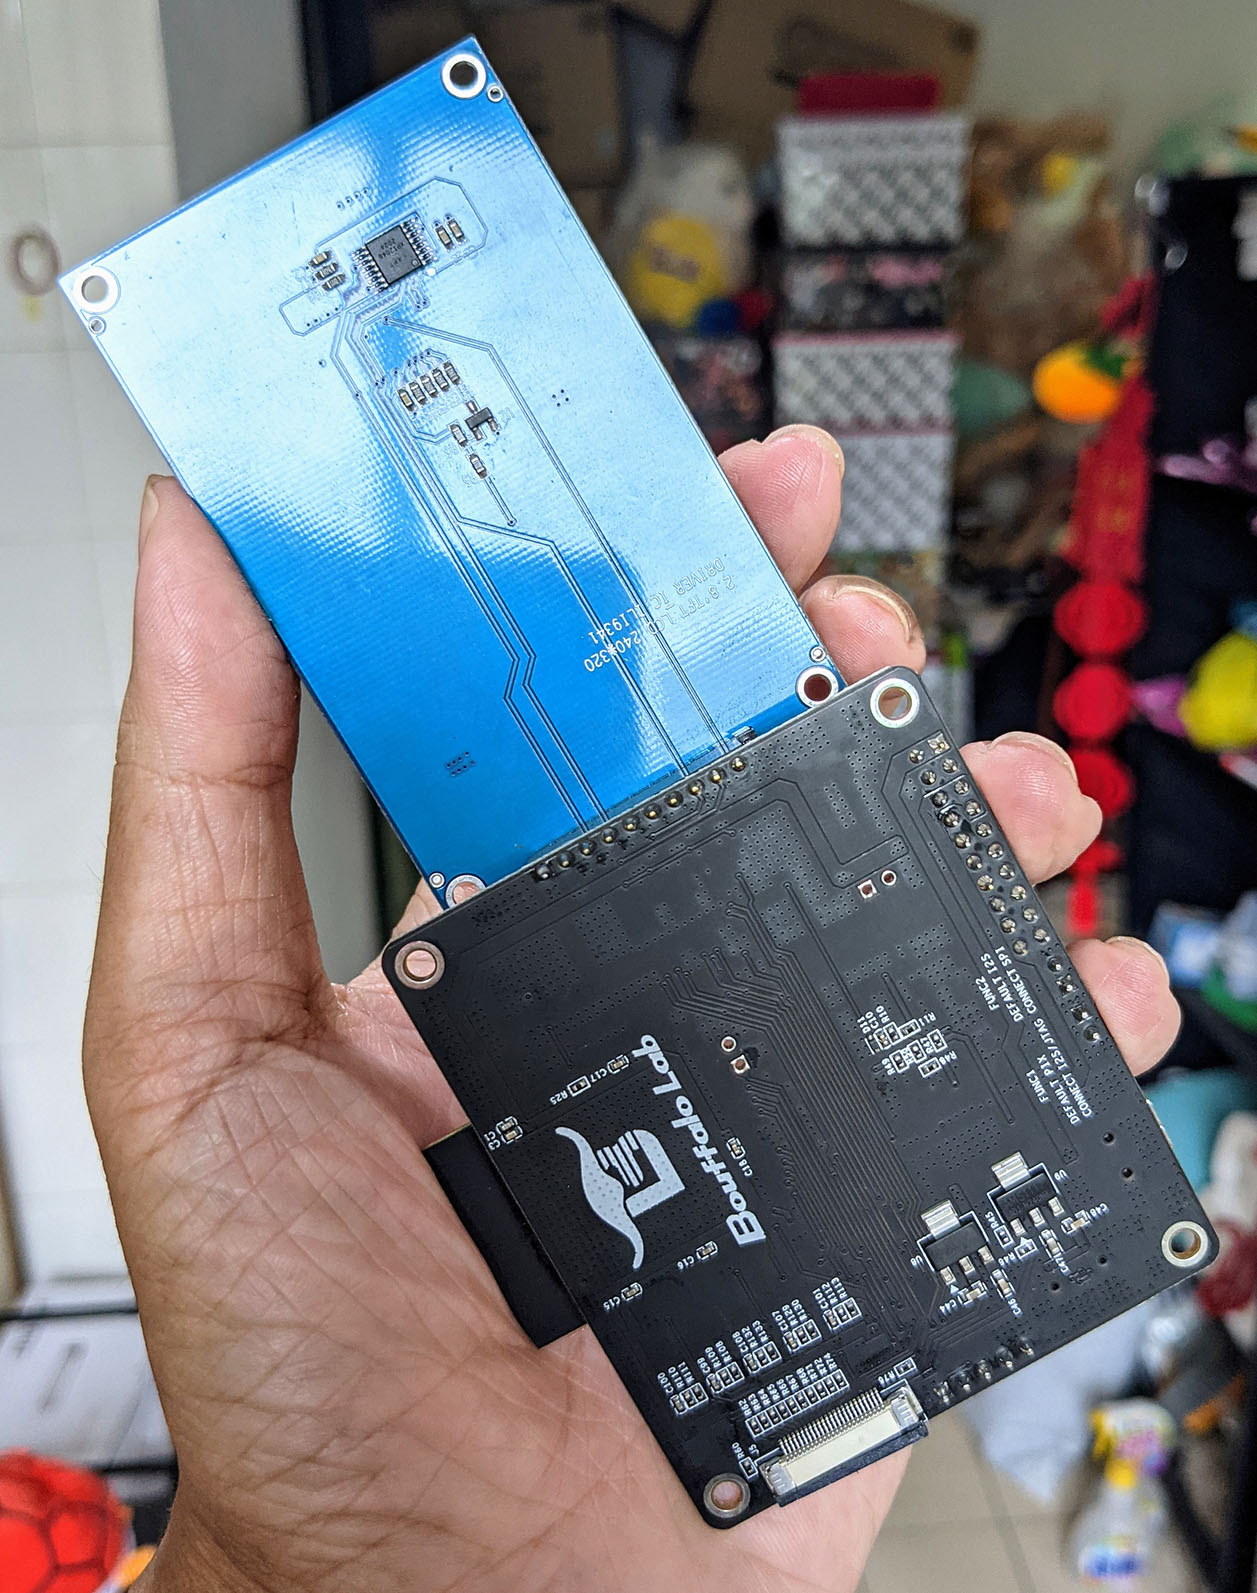
And here’s the Back View of BL706 AVB…
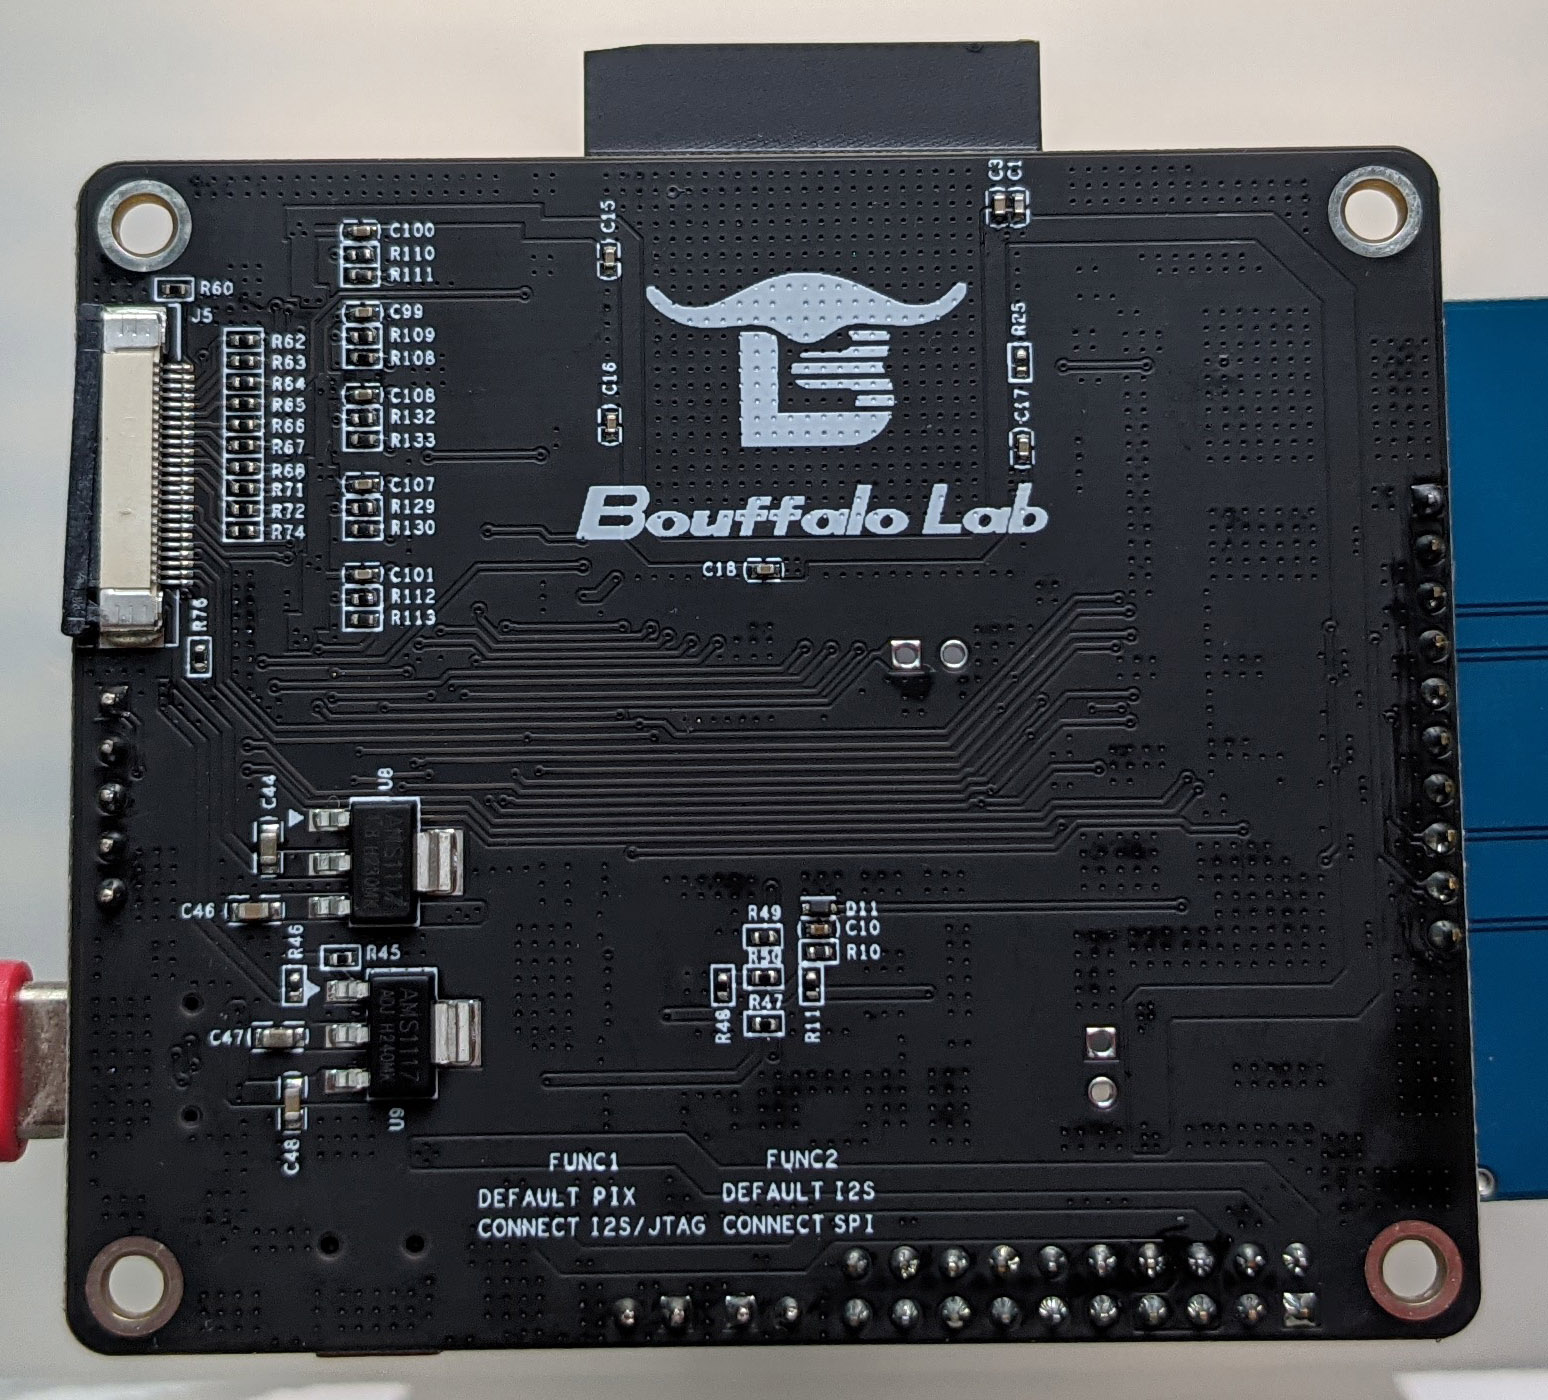
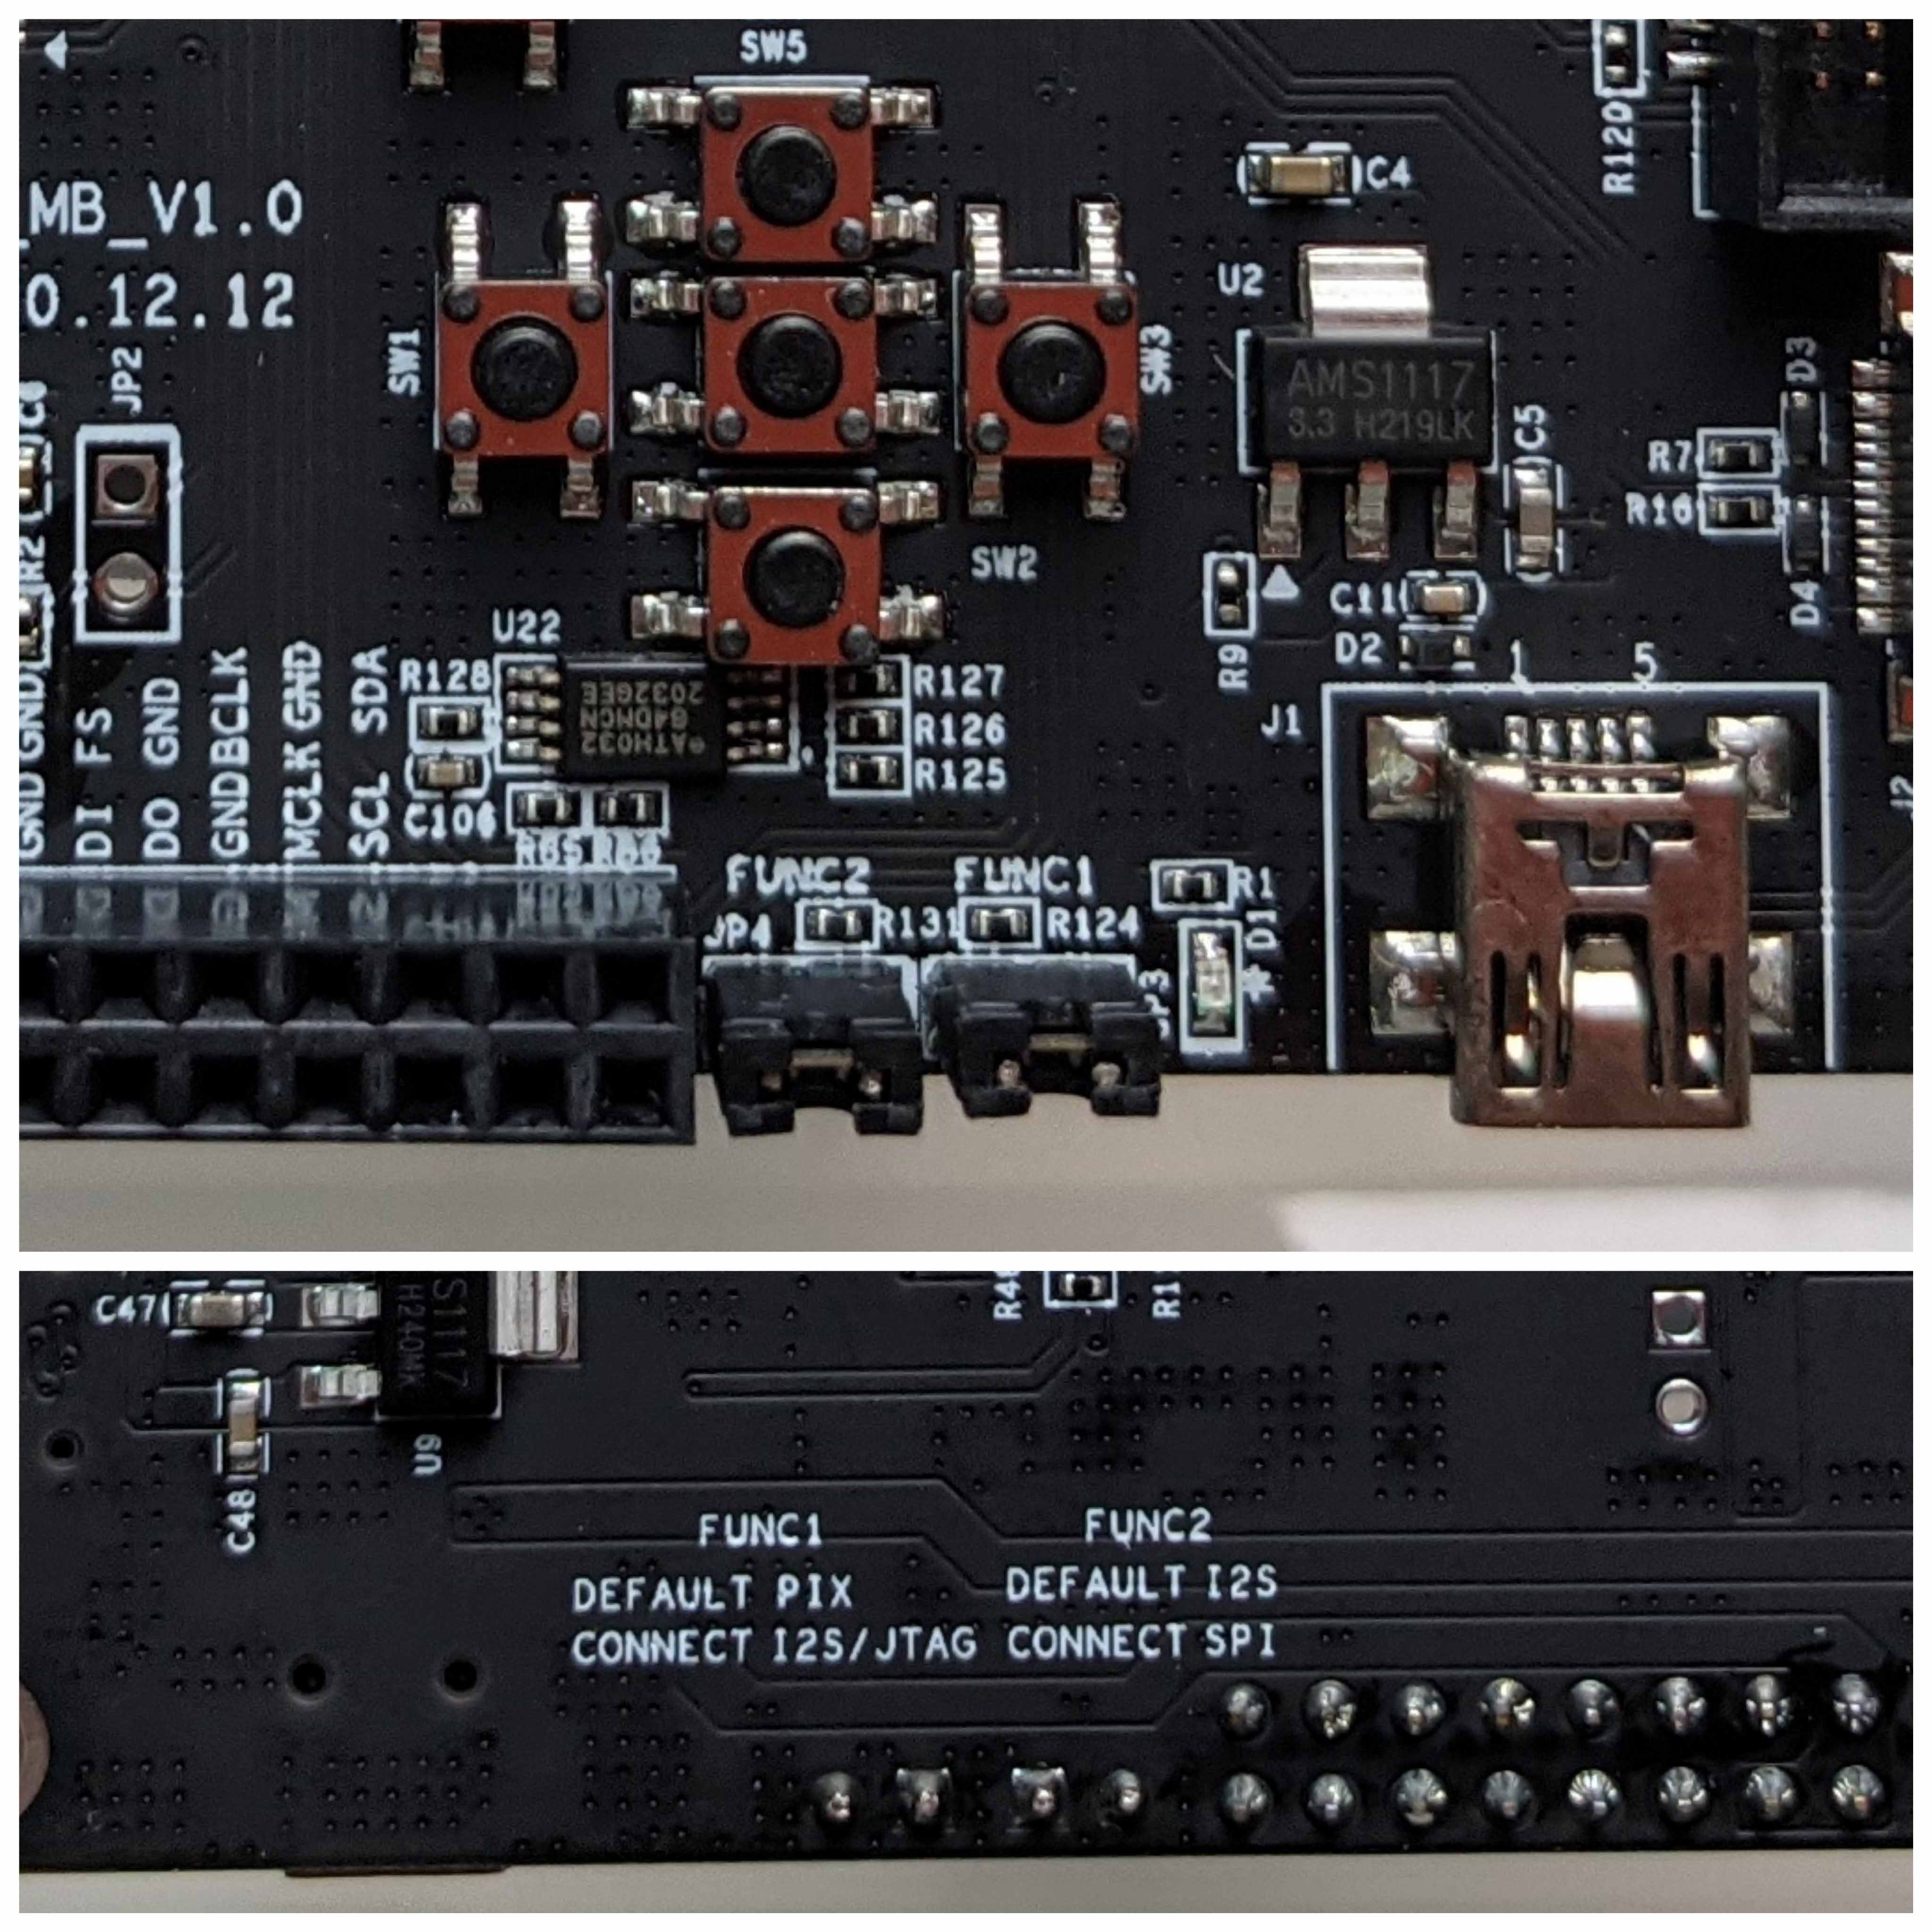
(The Camera Connector is at top left. FUNC1 and FUNC2 refer to the two jumpers at the bottom of the Front View)
What kinds of Multimedia Firmware can we create with BL706 AVB?
Plenty! Today we shall run the LVGL Graphics Demo Firmware and draw some cool animation on the ILI9341 Display.
With the onboard USB 2.0 Device Interface we can create lots of fun firmware…
CDC: USB Serial Port (Command-Line Interface)
MSC: USB Storage (BL706 becomes a USB Drive)
HID: USB Mouse and Keyboard
Video: USB Cam
Audio: USB Microphone
Check out the USB Demo Firmware
See also the TensorFlow Lite Firmware
UPDATE: BL706 is now supported by Bouffalo Lab IoT SDK (the same one for BL602)
To build firmware for BL706, we need the Bouffalo Lab MCU SDK…
(The version on Gitee is probably more recent than GitHub)
Today we shall build BL706 Firmware on Windows Subsystem for Linux (WSL) + Ubuntu.
The instructions are in Chinese (apologies)…
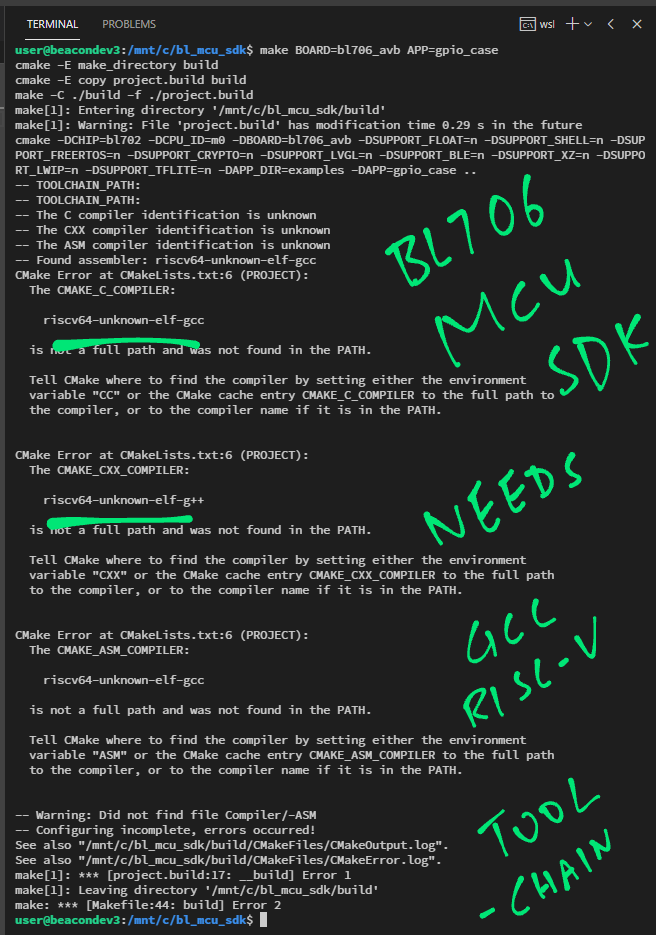
To install the SDK and RISC-V Toolchain on WSL (Ubuntu), we follow these steps in the above doc…
Section 2.3.2: Install RISC-V Toolchain
“wget” the toolchain from dev.bouffalolab.com
Do this at the WSL bash command prompt.
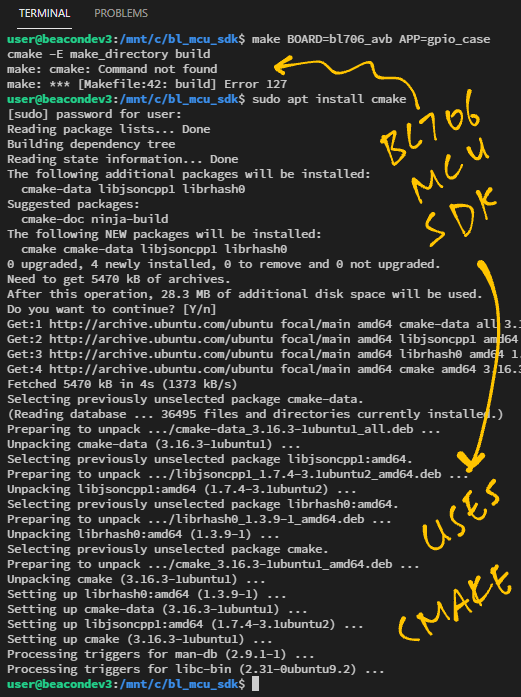
Section 2.3.3: Install cmake and make
I used “sudo apt install cmake” and it worked OK.
Also do this at the WSL bash command prompt.
Section 2.3.5: Download bl_mcu_sdk
“git clone --recursive” the BL MCU SDK link above.
Note: Do this at the Windows cmd command prompt, because we will be flashing the generated firmware under Windows.
The instructions will also work on Ubuntu x64. (But not Ubuntu Arm64)
If we prefer plain old Windows CMD (instead of WSL), follow these instructions to install Windows CDK or Windows Eclipse (apologies again)…
Windows Quick Start for CDK (Chinese)
Jianchi CDK is the IoT IDE by T-Head.
What about macOS?
Sadly BL MCU SDK doesn’t support macOS.
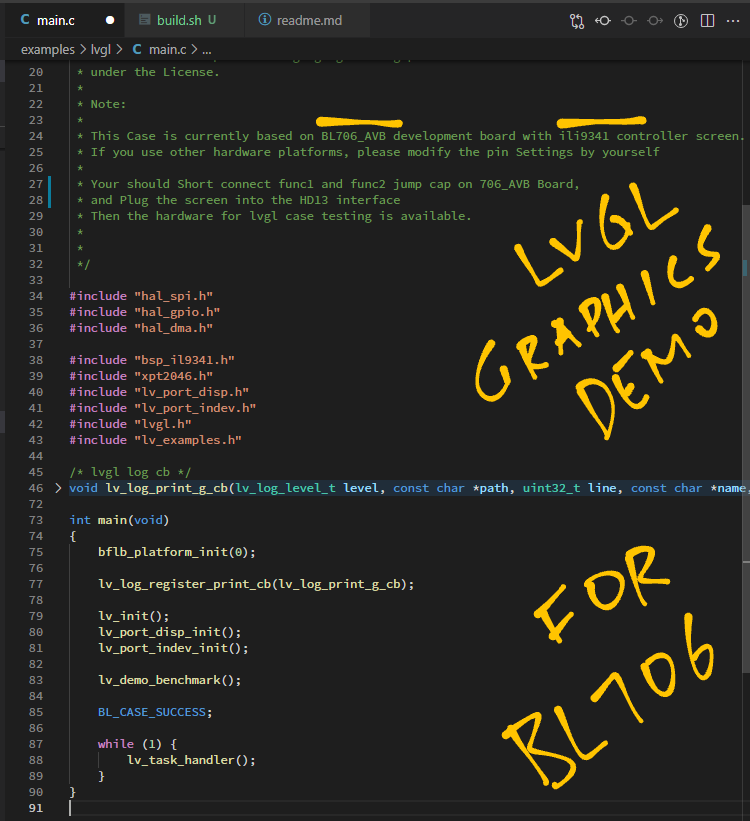
Let’s build some firmware for BL706!
The pic above shows the LVGL Graphics Demo Firmware that we shall build. The source code is at…
According to the instructions for the LVGL Demo Firmware, we build the firmware like so…
## In WSL bash: Go to the Windows directory for MCU SDK
cd /mnt/c/bl_mcu_sdk

## Build the LVGL Firmware
make APP=lvgl \
     BOARD=bl706_avb \
     SUPPORT_LVGL=y
(Note that we’ve downloaded the MCU SDK to C:\bl_mcu_sdk in Windows cmd, so the WSL path becomes /mnt/c/bl_mcu_sdk)
The firmware build begins…
make[1]: Entering directory '/mnt/c/bl_mcu_sdk/build'
cmake -DCHIP=bl702 -DCPU_ID=m0 -DBOARD=bl706_avb -DSUPPORT_FLOAT=n -DSUPPORT_SHELL=n -DSUPPORT_FREERTOS=n -DSSUPPORT_LVGL=y -DSUPPORT_BLE=n -DSUPPORT_XZ=n -DSUPPORT_LWIP=n -DSUPPORT_TFLITE=n -DAPP_DIR=examples -DAPP=lv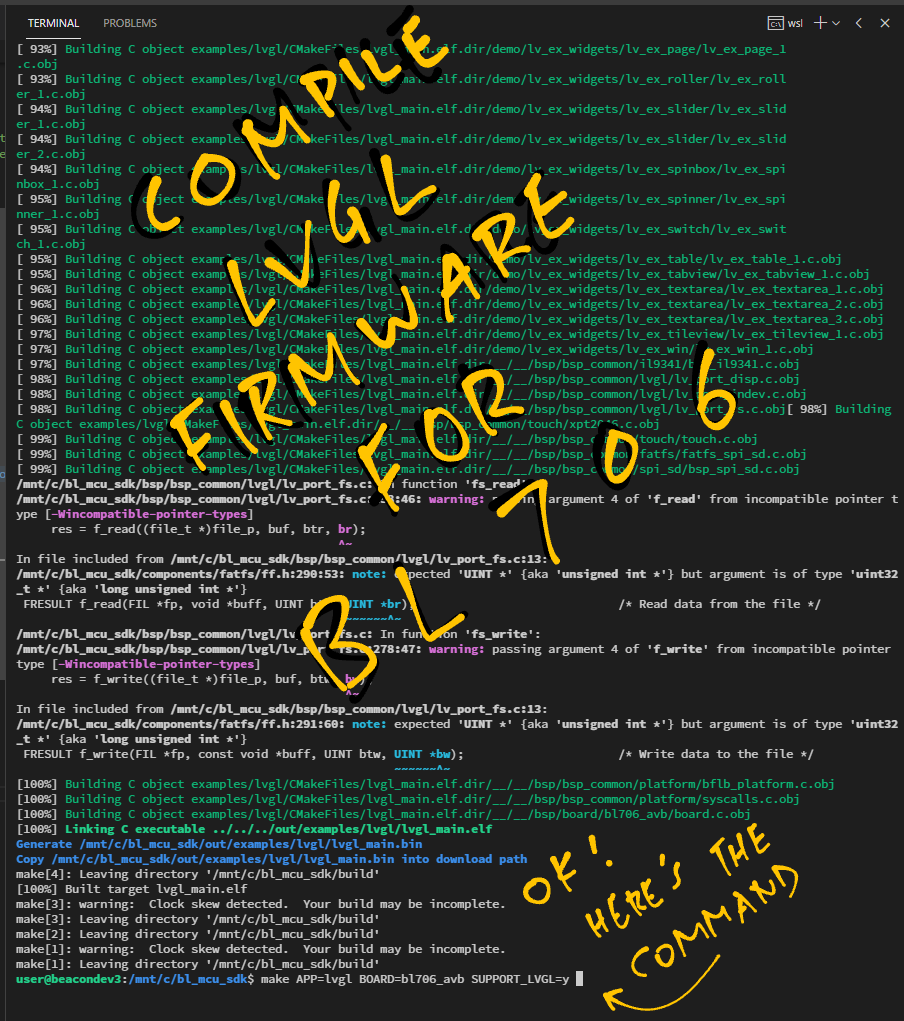
And succeeds with…
[100%] Linking C executable ../../../out/examples/lvgl/lvgl_main.elf
Generate /mnt/c/bl_mcu_sdk/out/examples/lvgl/lvgl_main.binThe build is done! This is the BL706 Firmware File that we shall flash to BL706 AVB…
C:\bl_mcu_sdk\out\examples\lvgl\lvgl_main.binWe’re ready to flash our LVGL Demo Firmware to BL706 AVB! We shall…
Enter Flashing Mode on BL706 AVB
Run Bouffalo Lab Dev Cube to flash our firmware to BL706 AVB
Connect BL706 AVB to our computer’s USB port.
To enter Flashing Mode on BL706 AVB, we do the “Two Finger Salute”…
Press and Hold BOOT
Press RST
Release RST
Release BOOT
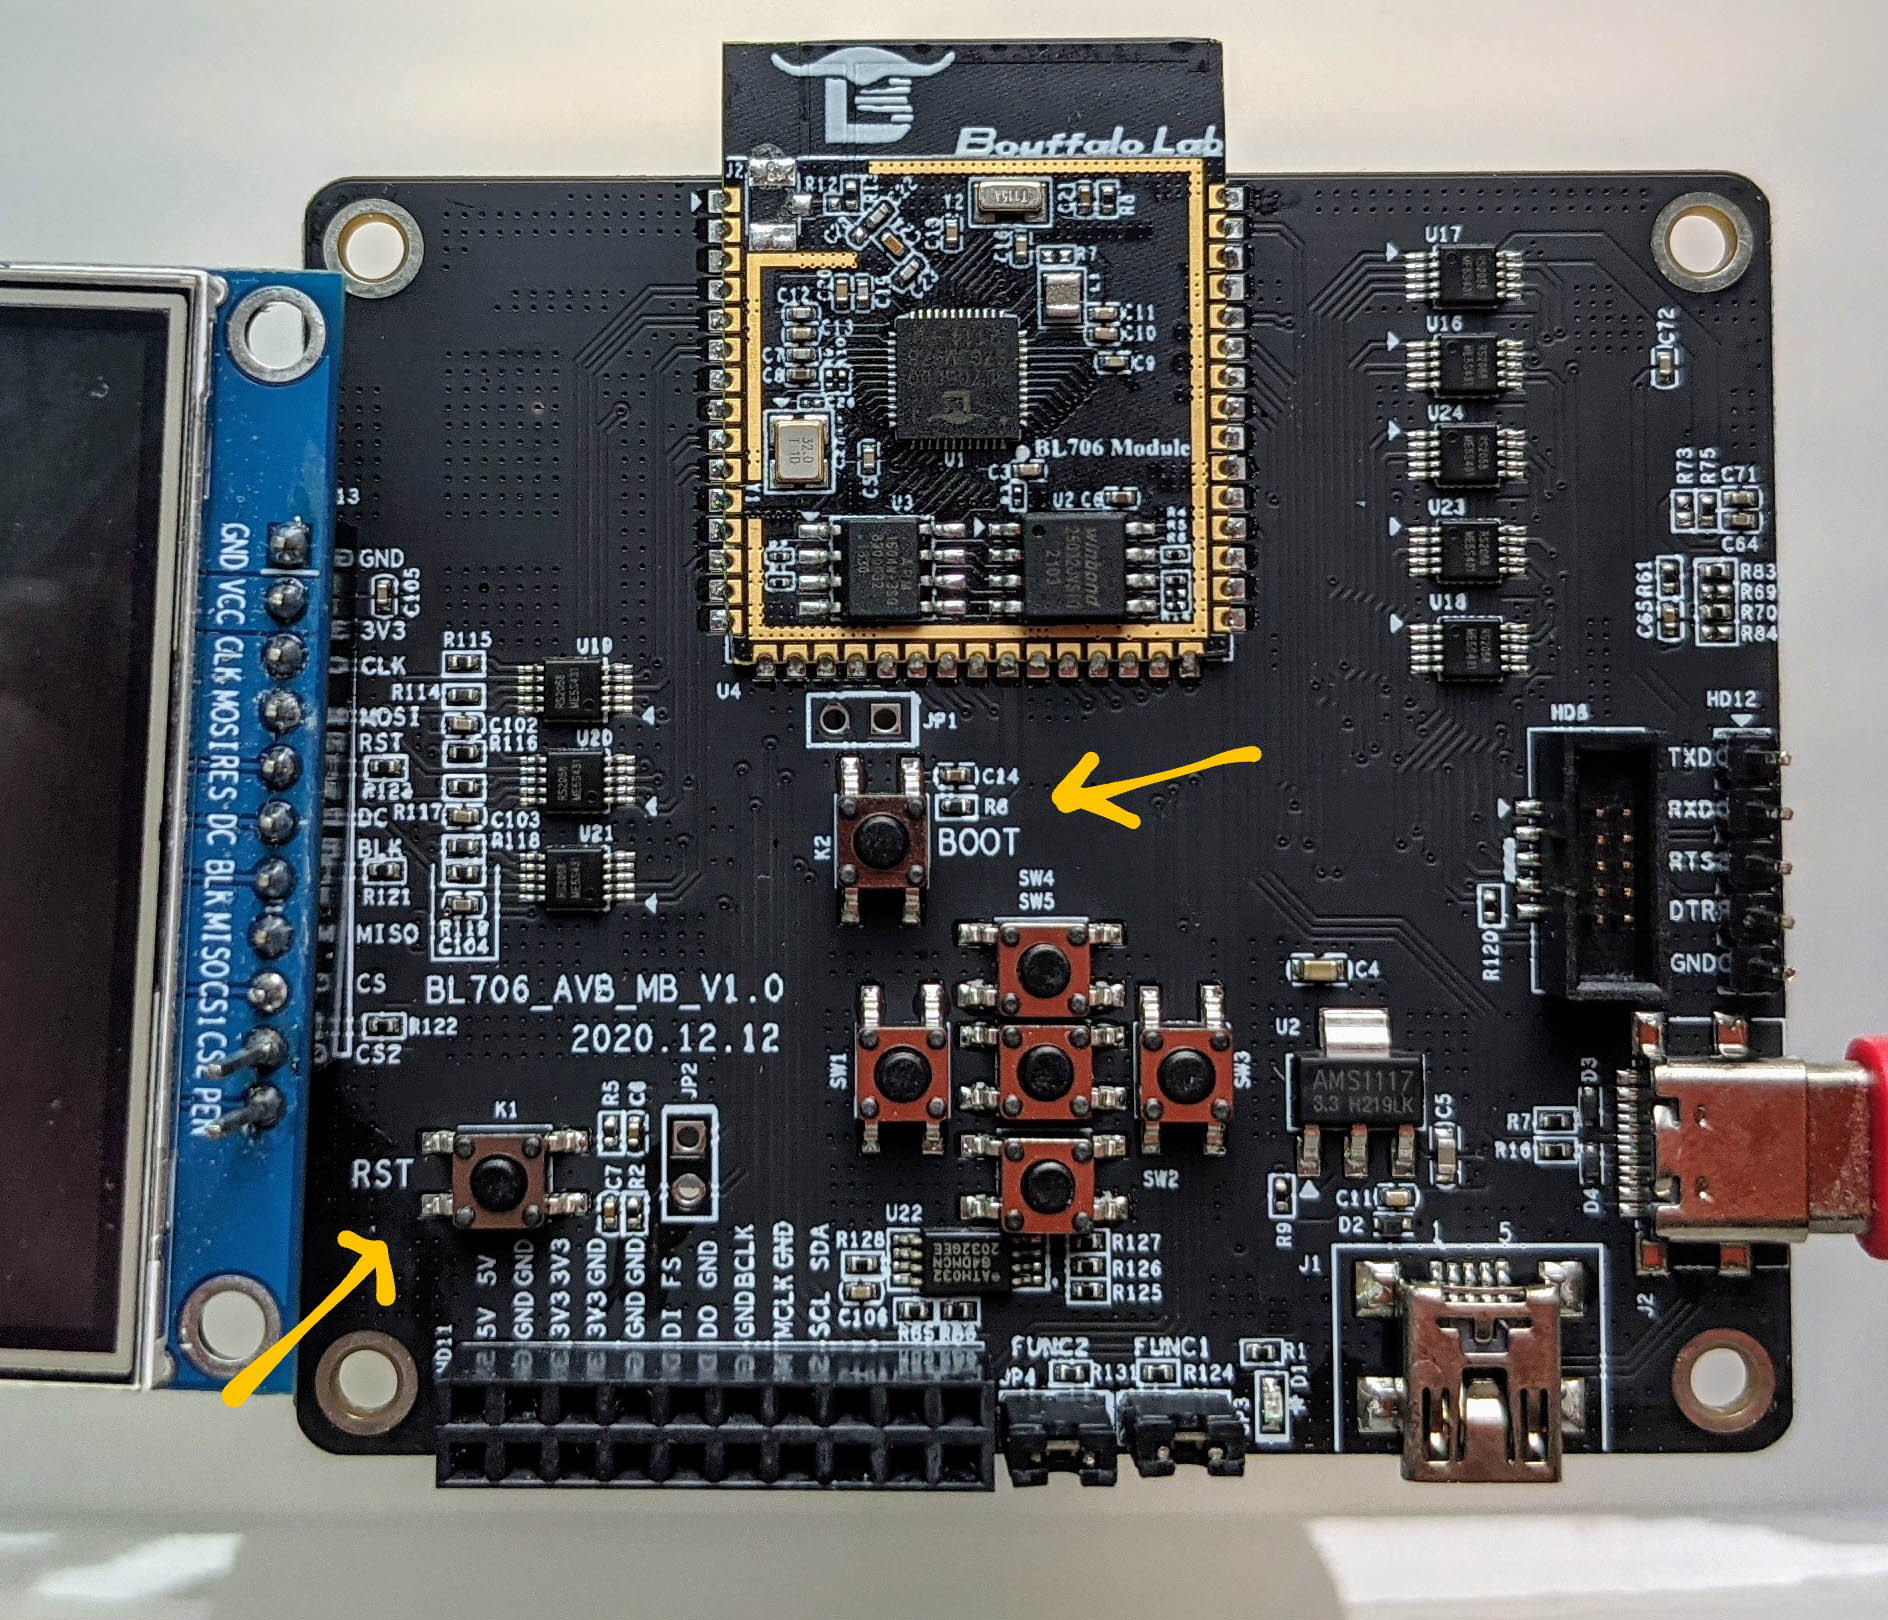
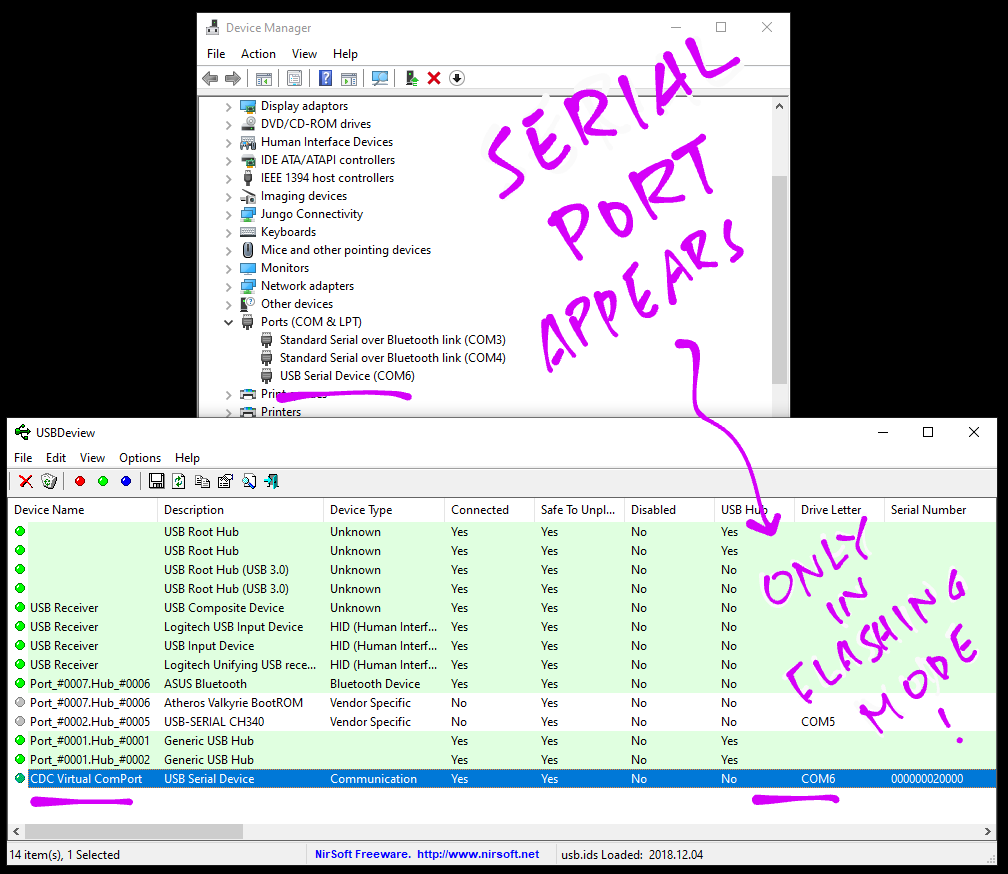
BL706 AVB needs to be in Flashing Mode so that it will appear on Windows as a USB Serial Device…
To flash our firmware on Windows, we download the Windows version of Bouffalo Lab Dev Cube software…
BL Dev Cube is available for Windows, macOS and Ubuntu x64.
(But the macOS version doesn’t seem to work. See this)
Start BL Dev Cube, select BL706 and click View → MCU.
(If we see the Windows Defender warning, click More Info → Run Anyway)
Enter these settings…
Interface: UART
COM Port: (Select the COM Port for BL706 AVB)
UART Speed: 2000000
Chip Erase: False
Xtal: 32M
Boot Source: Flash
Image Type: Single CPU
BootInfo Addr: 0x0
Image Addr: 0x2000
Image File:
C:\bl_mcu_sdk\out\examples\lvgl\lvgl_main.bin(Change this to the location of the BL706 Firmware File lvgl_main.bin)
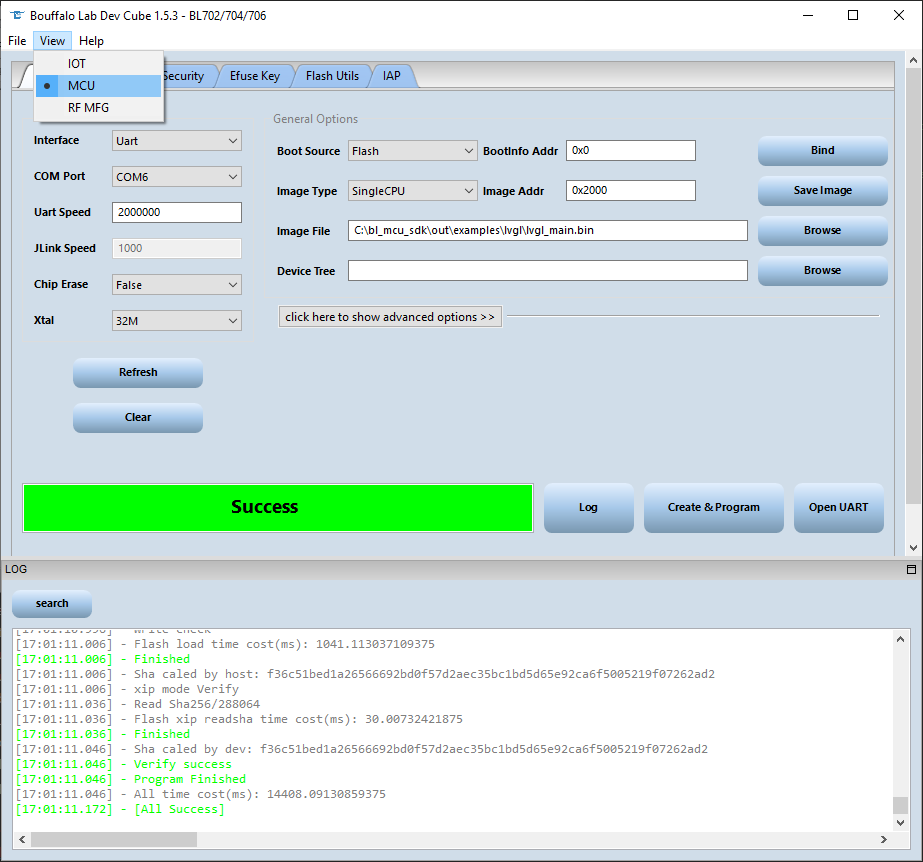
Click Create & Program
We should see…
{'xtal_type': 'XTAL_32M', 'pll_clk': '144M', 'encrypt_type': 'None', 'key_sel': '0', 'cache_way_disable': 'None', 'sign_type': 'None', 'crc_ignore': 'False', 'hash_ignore': 'False', 'encrypt_key': '', 'aes_iv': '', 'public_key_cfg': '', 'private_key_cfg': '', 'device_tree': '', 'page_type': 'mcu', 'flash_clk_type': '72M', 'boot_src': 'Flash', 'img_type': 'SingleCPU', 'img_addr': '0x2000', 'bootinfo_addr': '0x0', 'img_file': 'C:\\bl_mcu_sdk\\out\\examples\\lvgl\\lvgl_main.bin', 'dl_device': 'Uart', 'dl_comport': 'COM6', 'dl_comspeed': '2000000', 'dl_jlinkspeed': '1000', 'dl_chiperase': 'False', 'dl_xtal': '32M'}
...
========= programming chips\bl702\img_create_mcu\img.bin to 0x2000
...
Verify success
Program Finished
[All Success]Our firmware has been flashed to BL706 AVB!
To learn more about BL Dev Cube…
Is there another way to flash our firmware to BL706?
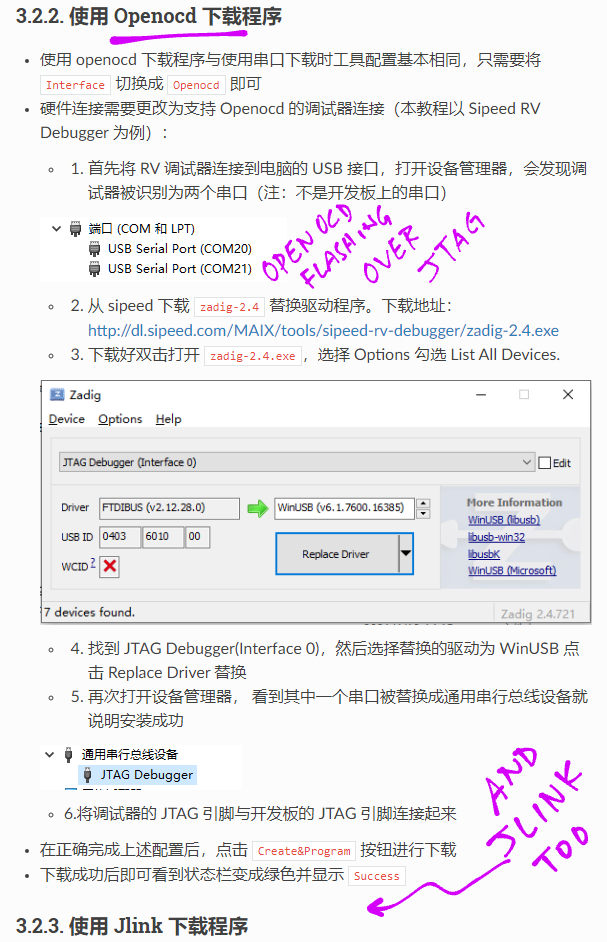
We may flash BL706 with BL Dev Cube, OpenOCD and a JTAG or J-Link Adapter.
The FUNC1 Jumper should be connected, to enable the JTAG Port.
Here are the instructions…
Is it possible to flash BL706 with OpenOCD and JTAG… Without BLDevCube?
Check out the findings here…
Watch what happens when we run our LVGL Firmware on BL706 AVB!
Connect the FUNC1 and FUNC2 Jumpers. (Because we’re using the SPI Port)
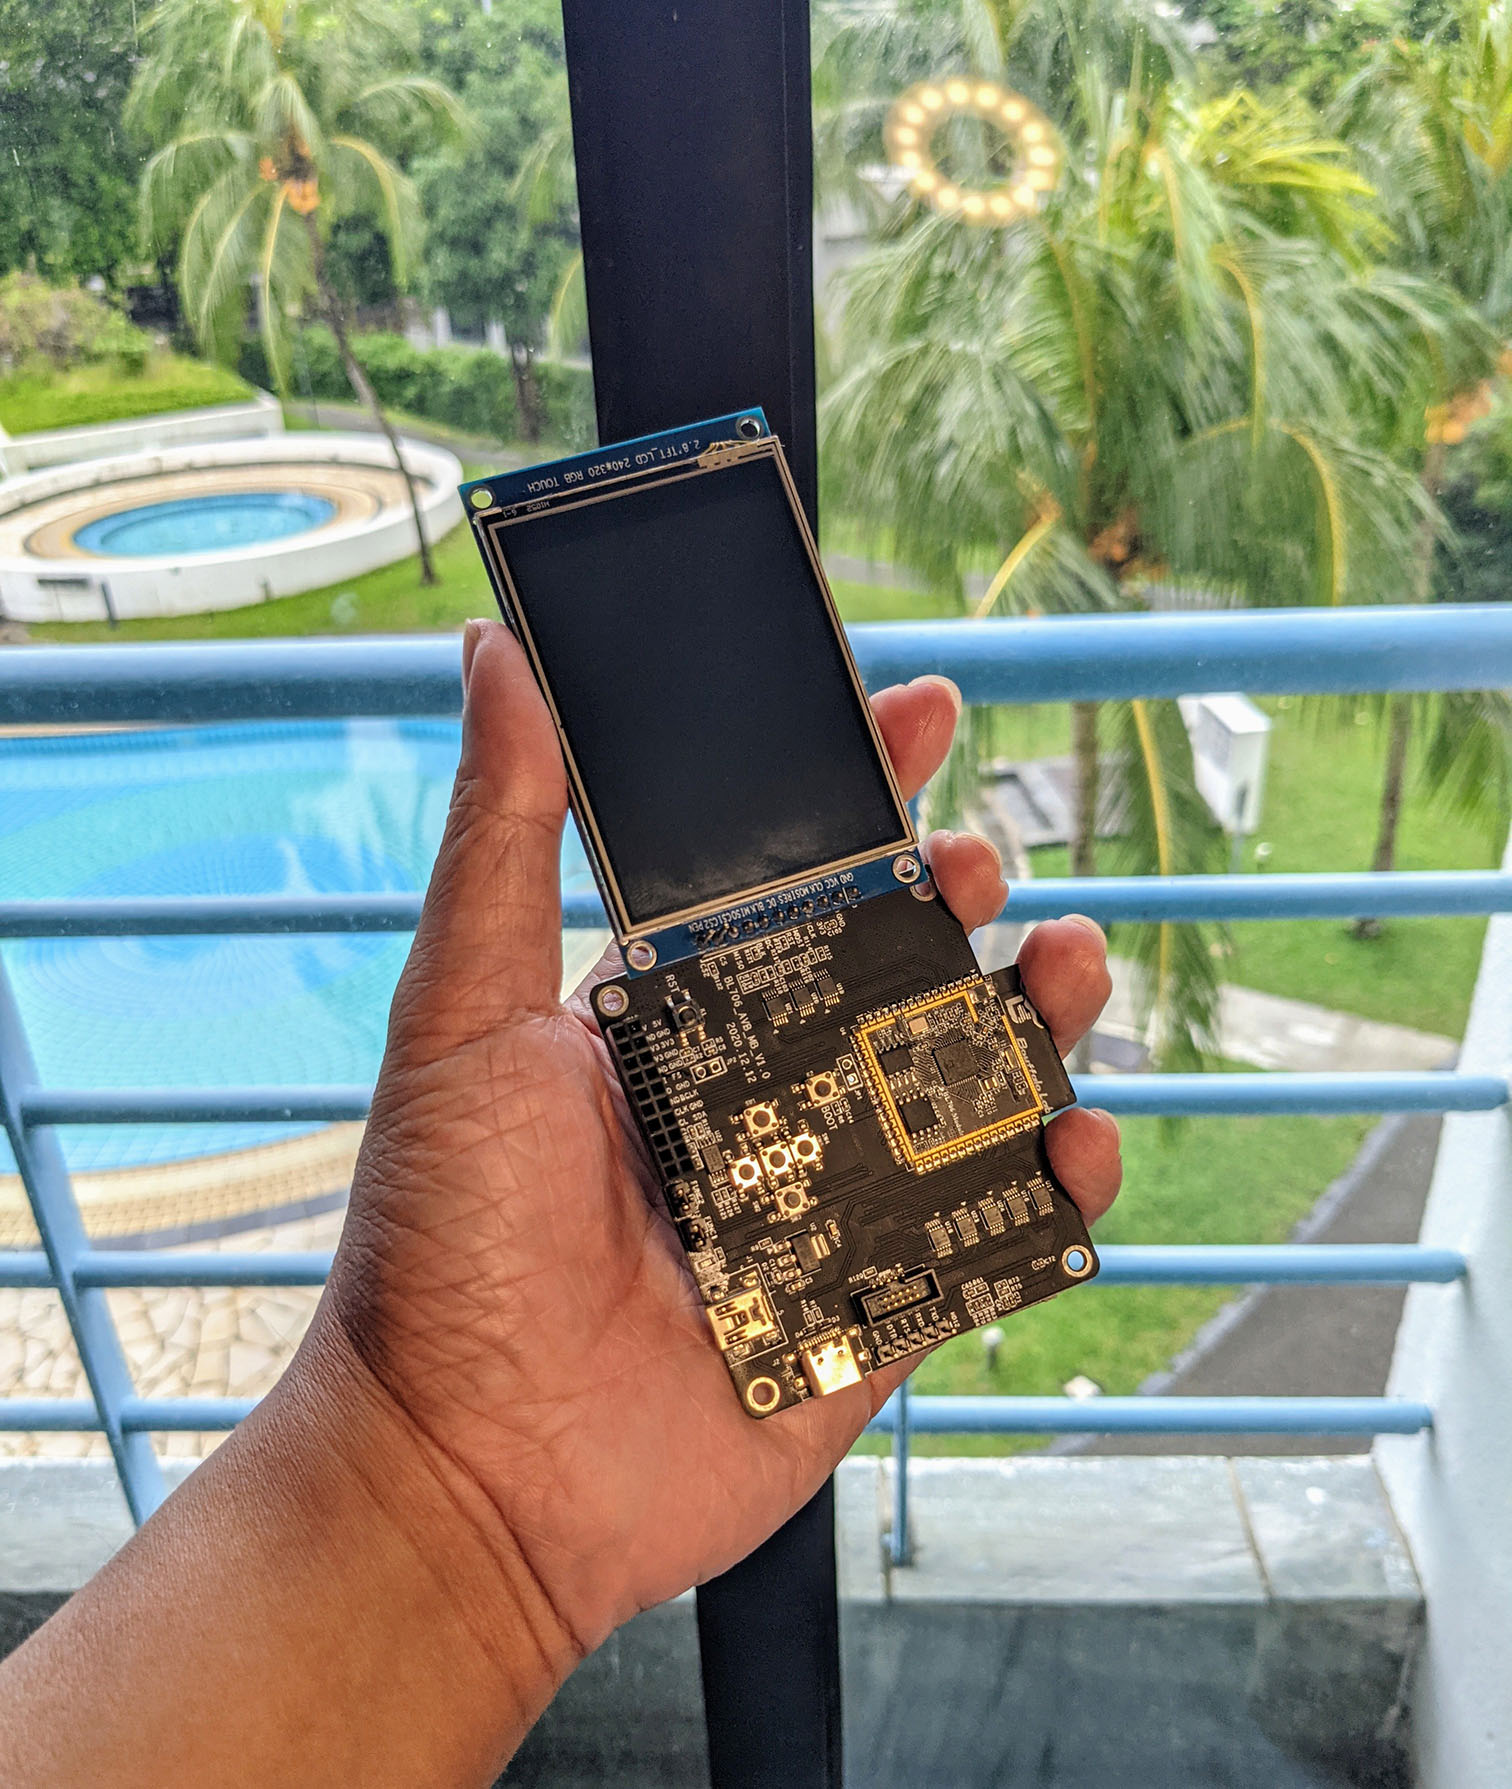
Attach the ILI9341 SPI Display to the left edge of the BL706 AVB…
(Yep it looks like a Game Boy!)
The PEN Pin (leftmost pin on the display) must be disconnected…
Here’s the back view…
Connect BL706 AVB to our computer’s USB port.
Press the RST Button.
The display comes to life with some cool animation!
BL706 AVB is actually running an LVGL Graphics Display Benchmark…
Here are the results…
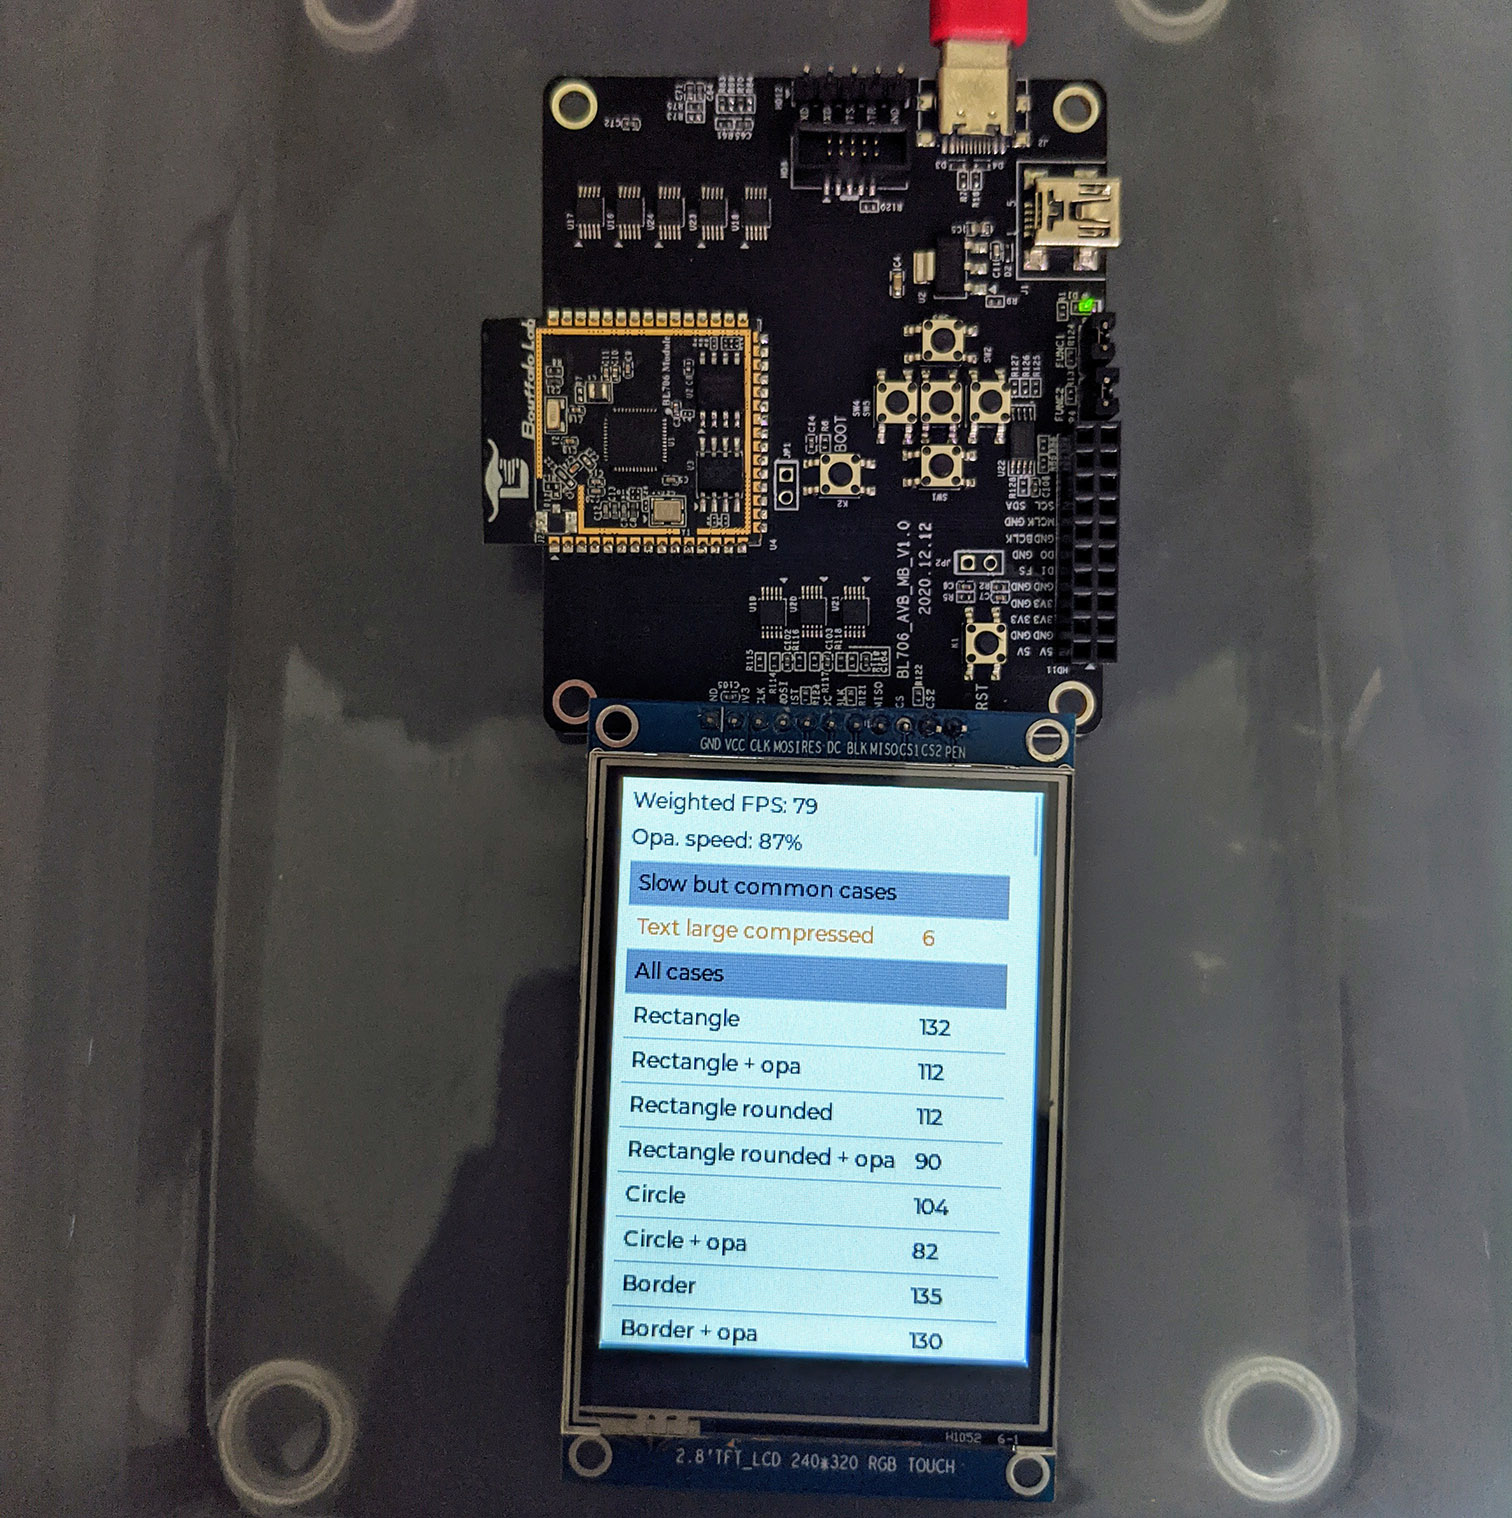
We have successfully built, flashed and executed the LVGL Demo Firmware on BL706 AVB!
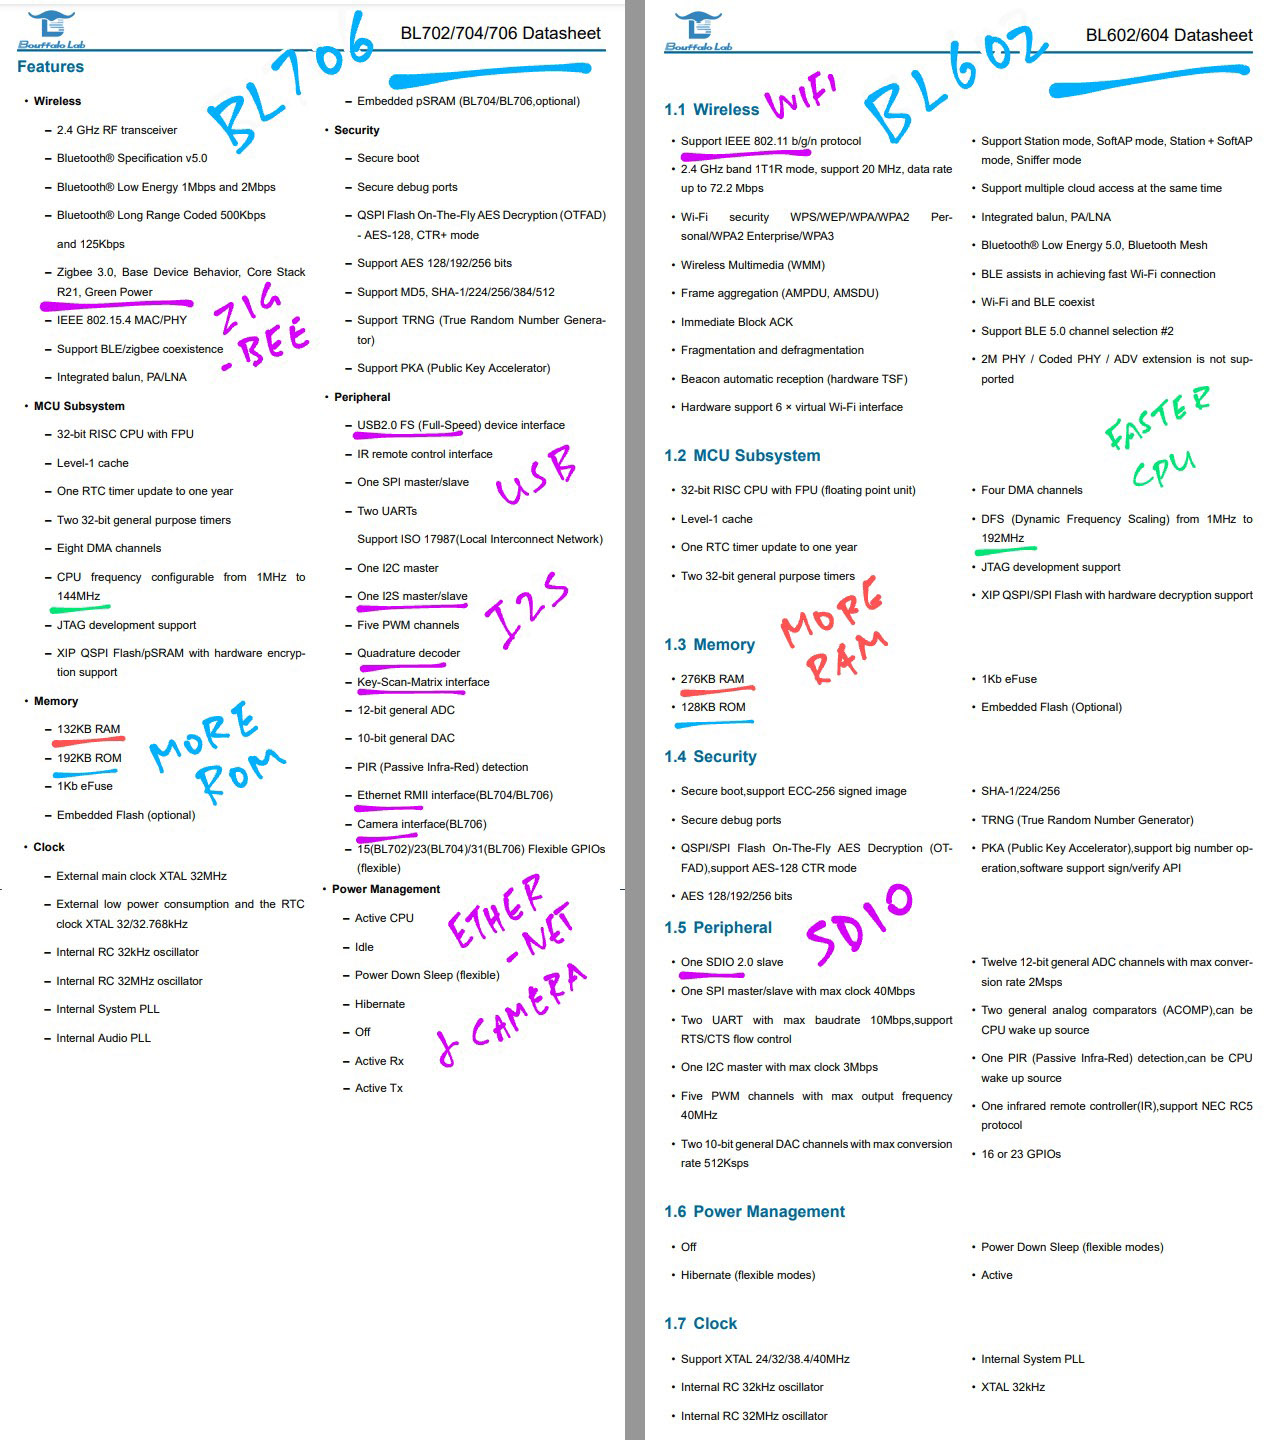
How does BL706 differ from BL602?
From the datasheets we can see…
BL706 has Zigbee, while BL602 has WiFi.
(Both have Bluetooth LE)
BL706 has interfaces for USB, I2S (Audio), Camera and Ethernet.
BL602 has an SDIO Interface (for SD Card).
BL706 has less RAM than BL602, but more ROM.
BL706’s CPU (144 MHz) also runs slower than BL602 (192 MHz).
UPDATE: BL706 is now supported by Bouffalo Lab IoT SDK (the same one for BL602)
The BL IoT SDK for BL602 was released months before the BL MCU SDK for BL706.
Bouffalo Lab explains how the MCU SDK differs from IoT SDK…
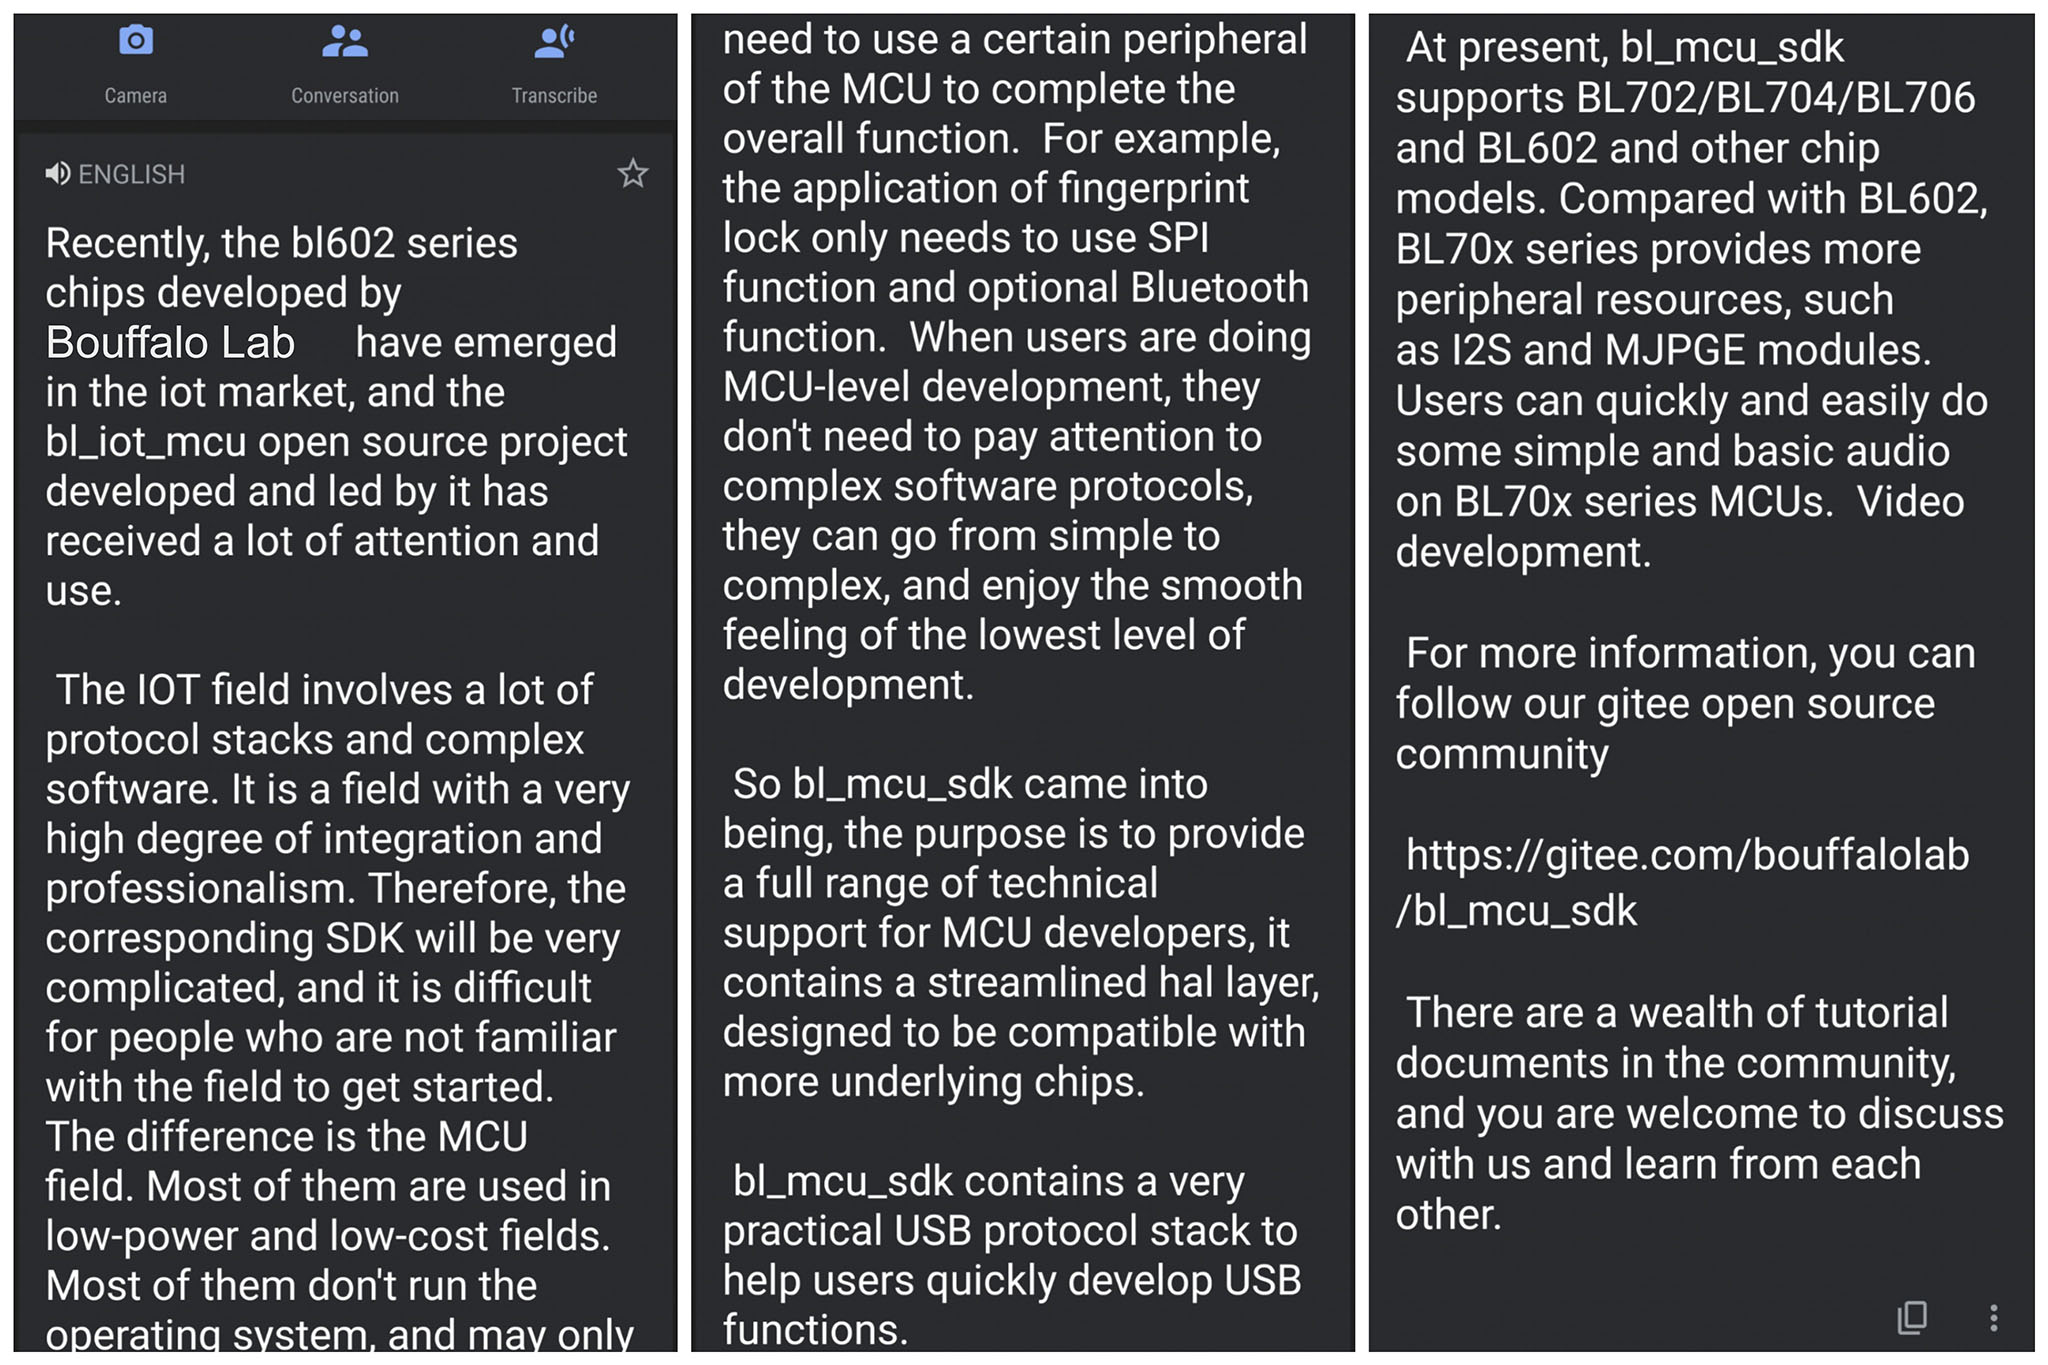
(Auto-translated from this post)
BL602 is not supported today on BL MCU SDK, but it will be supported in future according to Bouffalo Lab.
We spotted some differences between the SDKs…
Hardware Adaptation Layer has been revamped.
With BL602 IoT SDK we call this to set a GPIO Output…
bl_gpio_output_set(pin, value);Now with BL706 MCU SDK we do this…
gpio_write(pin, value);FreeRTOS is no longer included for firmware builds by default.
To include FreeRTOS, we specify SUPPORT_FREERTOS like so…
make APP=freertos_semaphore \
     BOARD=bl706_iot \
SUPPORT_FREERTOS=yAliOS Functions (aos_*) for Multitasking and Device Tree are no longer in BL706 MCU SDK.
Now we configure peripherals directly from our Firmware Code: GPIO, SPI, UART, …
OpenOCD, JTAG and J-Link are now supported for flashing BL706.
(But not BL602)
LVGL (Graphics) and TensorFlow Lite (Machine Learning) are now bundled with BL706 MCU SDK
BL706 requires cmake for building firmware.
(BL602 builds with make only)
GCC RISC-V Toolchain is no longer bundled with BL706 MCU SDK.
(Now we need to download the toolchain from dev.bouffalolab.com)
macOS is no longer supported for building firmware with BL706 MCU SDK.
(But BL Dev Cube is still available on macOS for flashing firmware)
I had lots of fun using the BL706 Audio Video Board.
It feels simpler than BL602… But yet it has so many cool new features: Camera, Audio, USB, Zigbee Networking, LVGL Graphics, TensorFlow Machine Learning, …
I look forward to seeing your Multimedia Creations on BL706!
Got a question, comment or suggestion? Create an Issue or submit a Pull Request here…
lupyuen.github.io/src/bl706.md
This article is the expanded version of this Twitter Thread
Got a question for Bouffalo Lab? Check out their Developer Forum…
Here are the steps for debugging BL702 / BL704 / BL706…
UPDATE: There is a new Combo BL706 + BL602 board. (See this)
UPDATE: BL706 is now supported by Bouffalo Lab IoT SDK (the same one for BL602)
BL706 Audio Video Board